A Step-by-Step Guide to Finding Your Apple ID From Your iPhone 14 Plus
A Step-by-Step Guide to Finding Your Apple ID On Your Apple iPhone 14 Plus
In the world of Apple devices and services, your Apple ID is your key to unlocking a world of possibilities. The digital fingerprint connects you to your Apple iPhone 14 Plus, iPad, Mac, and all the apps and services you love. But if you’re asking, “How do I find my Apple ID?” you’ve come to the right place.
This article will take you on a journey to discover your Apple ID. The mission? To provide you with a clear guide, ensuring that finding your Apple ID is as easy as pie. So, dive in and unravel the secrets of your Apple ID!

Part I. A Brief Introduction to Apple ID?
At the heart of your Apple experience is an Apple ID. But what exactly is it, and why is it so important?

What Is My Apple ID?
Think of your Apple ID as your unique passkey to the entire Apple ecosystem. It’s a combination of your email address and a secure password that you use to sign in to all things Apple. Whether it’s your cherished iPhone, trusty iPad, or reliable Mac, your Apple ID ties them all together, making your digital life seamless.
Why Is Your Apple ID Significant?
Your Apple ID plays a crucial role in your digital journey. Here are some key points to highlight its significance:
- **Access to Apple Services.**Your ID is your golden ticket to various Apple services like the App Store, iTunes, and iCloud. It’s how you download apps, purchase music, and store your cherished photos and files in the cloud.
- **Device Linkage.**Your Apple ID serves as the glue that binds your devices. It ensures that your Apple iPhone 14 Plus, iPad, and Mac are in sync. When you change something on one device, it reflects across all your Apple gadgets.
- **Security and Privacy.**Apple places a high premium on security and privacy. Your ID helps keep your data safe and confidential, whether it’s your messages, emails, or personal information.
- **Find My.**If you ever misplace your Apple iPhone 14 Plus or other Apple devices, your Apple ID is your lifeline to track and recover them using the “Find My” feature.
- **App Purchases.**Your Apple ID remembers all the apps you’ve purchased, making it easy to reinstall them on a new device without repurchasing.
In a nutshell, your Apple ID is the gateway to a world of digital convenience and security. It makes your life easier, keeps your data safe, and ensures your Apple devices work seamlessly together. Now that you understand the importance of your Apple ID let’s move on to the exciting part: finding it!
Part II. How Do I Find My Apple ID on iPhone/iPad/Mac/Windows?
Knowing your Apple ID is the key to unlocking your Apple world. You’ll need your Apple ID if you’re an iPhone aficionado, a Mac enthusiast, or a Windows user dipping into the Apple ecosystem. Let’s explore how to find Apple ID on various devices.
On iPhone or iPad
The following steps are for finding your Apple ID on an iPhone or an iPad:
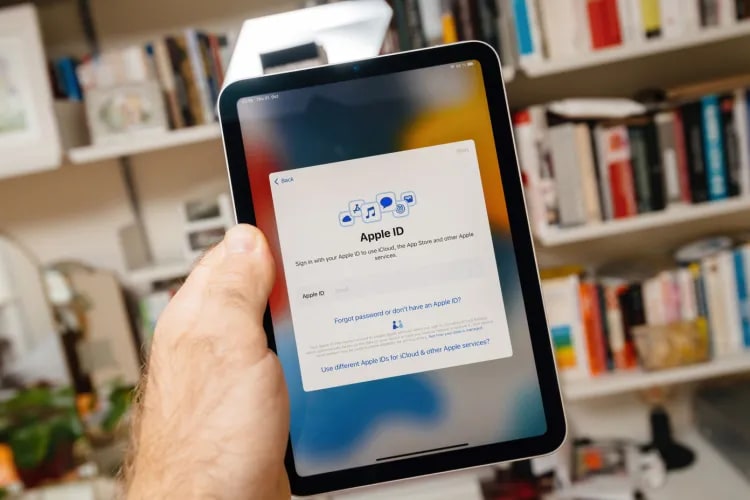
- Step 1: Begin by unlocking your Apple iPhone 14 Plus or iPad. Now, open the Settings app. It’s the one with the gearwheel icon – you can’t miss it!

- Step 2: Scroll down and tap “Sign in to your [Device].” If you’re already signed in, your name and Apple ID should be at the top.
- Step 3: There it is! Your Apple ID is displayed at the top of the screen, just beneath your name. Write it down or take a screenshot for safekeeping.

On Mac
Here’s how to locate your Apple ID on a Mac device:
- Step 1: If you’re on a Mac, click the “Apple logo” in the top-left corner of the screen. From the drop-down menu, select System Preferences.

- Step 3: In the System Preferences window, click on Apple ID.

- Step 4: Your Apple ID is now right in front of you, under your profile picture. Jot it down or take a screenshot – just in case.


On Windows PC
If you’ve lost your Apple ID and need to find it on your Windows device, follow these steps:
- Step 1: If you’re using a Windows PC, launch iCloud on your PC. Syncing your Apple device (such as an iPhone or iPad) to your computer is probably why you installed this.
Note: You can use iTunes instead of iCloud if you don’t have one on your Windows PC yet.

- Step 2: And that’s it! Your Apple ID should be there. Your Apple ID will be associated with your name as long as you are logged in.
Why It’s Important
Even on a Windows PC, your Apple ID is your gateway to Apple services, which means you can access your iCloud data and enjoy Apple Music and the iTunes Store.
Remember Knowing Your Apple ID Is Crucial
Your Apple ID is the key to a world of apps, services, and secure data. Knowing how to find it on your device is the first step in making the most of your Apple experience. So, take a moment to discover your Apple ID on your Apple iPhone 14 Plus, iPad, Mac, or Windows PC. It’s a small effort that brings you big benefits!
Part III. Want a Quicker Way To Unlock Your Apple Devices?
Have you ever found yourself locked out of your Apple device, desperately seeking a solution to regain access? If so, you’re not alone. For those times when you need a quick and reliable way to unlock your Apple device, Wondershare Dr.Fone - Screen Unlock is here to the rescue.
Introduction to Dr.Fone - Screen Unlock
So, what is Dr.Fone - Screen Unlock? It’s a nifty tool designed to simplify unlocking your Apple devices. Whether it’s a forgotten passcode, a locked screen, or an Apple ID issue, Dr.Fone - Screen Unlock is your go-to solution.

Key Features and Benefits
Let’s explore the key features and benefits of Dr.Fone - Screen Unlock:
- **Simplicity at Its Best.**One of the standout features of Dr.Fone - Screen Unlock is its simplicity. There is no need for technical expertise or hours of frustration. With a user-friendly interface, this tool makes the unlocking process a breeze, even for the less tech-savvy.
- Dr.Fone - Screen Unlock is designed to work swiftly, ensuring you regain access to your device in no time.
- It’s not limited to specific Apple devices – it supports various models, making it an all-in-one solution.
- **Data Protection.**The tool ensures your data remains intact during the unlocking process, so you don’t have to worry about losing precious information.
- Dr.Fone - Screen Unlock has a dedicated support team to assist you if you encounter any issues.
How To Use Dr.Fone - Screen Unlock
Unlocking your Apple device with Dr.Fone - Screen Unlock is as easy as 1-2-3. Here’s a step-by-step guide:
- Step 1: After Wondershare Dr.Fone has finished installing on your computer, go to Toolbox > Screen Unlock > iOS to open the relevant window.
- Step 2: Select the Unlock iOS Screen button repeatedly within the new window that has opened up so that you can proceed with unlocking the screen of your iOS device.

- Step 3: To begin unlocking the iOS device, tap Start on the following screen. Check to see if your gadget has adequate battery life.

- Step 4: The next step is to enter Recovery Mode on your iOS device. Put your iDevice into the appropriate mode by following the on-screen prompts. If you cannot get your iDevice to boot into Recovery Mode, you can attempt putting it into DFU mode by tapping the Try to enter DFU Mode button at the bottom.

- Step 5: The platform automatically recognizes the Device Model after users successfully enter Recovery Mode on their iDevice. Make any necessary adjustments to the model and pick the System Version. After that, tap the Start button to continue the screen unlocking process.

- Step 6: The next screen will show you where your device’s iOS firmware download stands. If you want to cancel the operation, just hit the Stop button. If the iOS firmware takes a long time to download on your platform, you can copy the download link by clicking the Copy option.

- Step 7: Once the iOS firmware has been downloaded and verified, it will be displayed on the following screen. Continue by clicking the Unlock Now button.

- Step 8: A dialog box asking for confirmation of the action will pop up on the screen. Enter the unlock code and select Unlock to continue.

- Step 9: On the following screen, you’ll see an iOS device’s unlocking status. Don’t forget to keep the Apple iPhone 14 Plus device plugged in, as doing otherwise will disrupt it.
- Step 10: To complete unlocking your iDevice, tap the Done button once you’re done. If you’re still stuck with a locked iOS device, tap the Try Again button to try again.

It’s important to note that Dr.Fone - Screen Unlock is a trusted solution that prioritizes data security and ease of use. So, if you ever find yourself locked out of your Apple device and need a quick and reliable way to unlock it, Dr.Fone - Screen Unlock should be your first choice.
Part IV. Additional Tips and Troubleshooting
While this guide has covered the basics of finding your Apple ID and using Dr.Fone - Screen Unlock, there are some common issues that Apple users might encounter. Here are some tips and troubleshooting solutions to help you navigate these problems:
Forgotten Apple ID Password
Issue: If you’ve forgotten your Apple ID password, don’t worry. You can reset it by following these steps:
- Visit the Forgot Apple ID or passwordlink on the Apple website.
- Enter your Apple ID and follow the prompts to reset your password.
Two-Factor Authentication Issues
Issue: Sometimes, two-factor authentication can cause access problems. Here’s what you can do:
- Ensure your trusted device is nearby when you sign in with your Apple ID.
- Verify that your device has an internet connection.
- Double-check your date and time settings.
Account Locked for Security Reasons
Issue: If your Apple ID is locked for security reasons, follow these steps:
- Visit iforgot.apple.com and unlock your account using your Apple ID and password.
- You may need to answer security questions or use two-factor authentication.
Problems With Apple ID Verification
Issue: If you’re having trouble with Apple ID verification, try these tips:
- Ensure you’re using the correct Apple ID and password.
- Check your email for a verification link.
- Follow the on-screen prompts for verification.
Unable To Sign Into iCloud
Issue: If you can’t sign in to iCloud, follow these steps:
- Make sure your device is running the latest software.
- Verify your network connection.
- Try signing in using a different device.
With these additional tips and troubleshooting solutions, you’ll be better prepared to handle any hiccups related to your Apple ID and password. We hope this information helps you make the most of your Apple experience!
Conclusion
In the vast Apple universe, your Apple ID is your golden ticket to an array of services and endless convenience. Remember, it’s not just a passcode; it’s your passport to an easier digital life. This “How to find Apple ID“ journey has been even smoother with Dr.Fone - Screen Unlock. This trusted tool simplifies the process, making it accessible to everyone.
So, explore Dr.Fone - Screen Unlock and make your Apple experience hassle-free. And don’t forget to safeguard your Apple ID like the treasure it is. Because with your Apple ID secure, you’re ready to unlock a world of endless possibilities!
How to Remove Apple ID from Apple iPhone 14 Plus without Password?
“Is it possible to remove the Apple ID of an old iPhone without entering the password? I have purchased an iPhone from someone and forgot to remove his Apple ID from the Apple iPhone 14 Plus device, and now I am unable to use it. Can I still go past the password? If yes, then what is the best method available?”
The security of the users and their data is among the primary priorities of Apple. Due to this, it is now more challenging than ever to access any Apple-built device without entering the required credentials.
However, there might come a scenario when the iPhone’s rightful owner wouldn’t use the Apple iPhone 14 Plus device. It generally happens when you are not the first owner of the said device, and the previous holder forgot to remove the security protocols such as their Apple ID.
Still, it is possible to remove the Apple ID from the Apple iPhone 14 Plus without the password. There’s no need to worry, though, as we have assembled a guide to get your Apple iPhone 14 Plus unlocked in no time. Three methods are offered here on how to remove Apple ID from the Apple iPhone 14 Plus without the password.

Part 1. Remove Apple ID from iPhone without Password using Dr.Fone
The first method here revolves around a popular software, Dr. Fone - Screen Unlock (iOS) . Wondershare is the brand behind Dr.fone, which has been in this industry for quite some time. The application offers a robust solution for unlocking your Apple iPhone 14 Plus. Here are some of the features you can expect from Dr.Fone.
- It can remove four different types of screen locks: fingerprints, PIN, pattern, and password.
- It offers compatibility with Android 10 and iOS 14, making sure you could remove the password or screen lock of even the latest devices.
- You can remove the passcode even if the screen is unusable.
- Dr.Fone works with a wide range of manufacturers: Xiaomi, Samsung, iPhone, and LG.
- It allows transferring data from one phone to another.
Dr.Fone is a powerful tool enabling you to remove Apple ID from the Apple iPhone 14 Plus without much of a hassle. Here’s the step by step guide on how the process works.
Step 1: Install Dr.Fone on your Computer
Install the software. Launch it and connect your Apple iPhone 14 Plus to the computer using a USB cable. Choose the “Screen Unlock” option from the menu.
The interface will present another set of options before you. You need to access the one at the end, which says, “Unlock Apple ID.” Choose the option and begin to remove Apple ID from the iPhone.

Step 2: Enter Screen Password
Dr.Fone will not be able to detect your device just yet. You need to tap the “Trust this Computer” option on your phone, and then Dr.Fone will begin to access your device. It would help if you kept in mind that proceeding with this process will wipe all your Apple iPhone 14 Plus data.

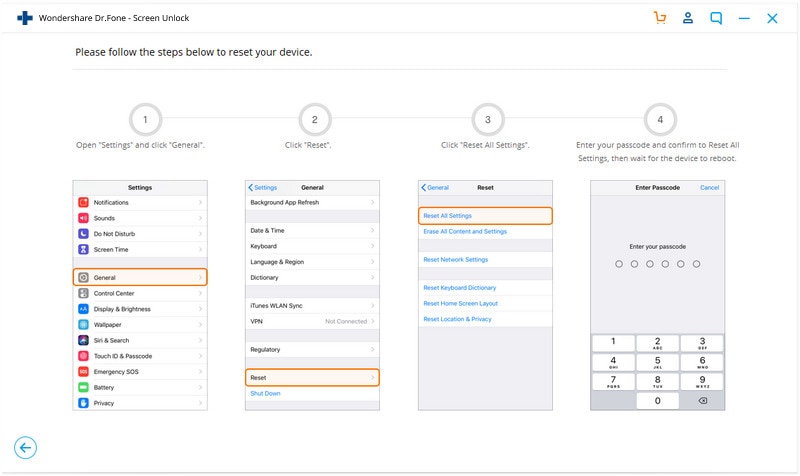
Step 3: Reset all your Apple iPhone 14 Plus Settings
Dr.Fone will present a set of instructions for you to follow. Stick to these steps and reset all your Apple iPhone 14 Plus settings. Once this is done, the Apple iPhone 14 Plus will reboot, and the process to unlock your Apple iPhone 14 Plus will begin.
Step 4: Unlock the iPhone
The unlocking process will begin once your Apple iPhone 14 Plus has finished resetting. Removing the Apple ID from your phone will only take a couple of seconds.
Once the process is finished, make sure the Apple ID is no longer there. Proceed to your settings and check if Dr.Fone has removed the Apple ID.

Part 2. Remove Apple ID from iPhone without Password with iCloud.com
It is better to possess more than one solution to a single issue, which could come in handy when the first one doesn’t work for you. To remove the Apple ID without the password would require you to use iCloud.
You would use the Find My Devices utility of the service to remove the ID. Here are the steps:
Step 1. Visit the iCloud website using your favorite browser. Once you are there, sign in through your Apple ID.
Step 2. Select the “Find iPhone” option to initiate removing the Apple ID from the Apple iPhone 14 Plus permanently.
Step 3. There will be an option in front of you with the title “My Devices” select it.
Step 4. You will be presented with four options, select “Remove from Account,” and the Apple ID of the previous owner will no longer plague the iPhone.
That’s it! Once you complete the steps mentioned above, the account will be removed from the iPhone, and you can sign in with your own Apple ID.

Part 3. Remove Apple ID by Restoring the Apple iPhone 14 Plus in iTunes
In the case that neither of the above methods works for you, you can try removing the Apple ID from the Apple iPhone 14 Plus without a password through Apple’s popular platform, iTunes. It is better to remember that this method will not work if the Apple iPhone 14 Plus has iCloud enabled.
The first step is to get your Apple iPhone 14 Plus into recovery mode. The process of entering recovery mode varies depending on which iPhone you have.
So here, we have listed the method for every Apple iPhone 14 Plus to provide convenience. Here’s how to enter recovery mode:
Step 1. Power off your device by pressing one of the volume buttons and the side button until you see the power off slider. Slide to power off your device.
Step 2. Get your USB cable and connect your phone to our computer while holding the side button. Leave the side button when you see the recovery-mode screen.
Step 3. Once you have gotten your Apple iPhone 14 Plus into recovery mode, you can begin to restore it using iTunes. If the Apple iPhone 14 Plus device stays like this for more than 15 minutes, then the Apple iPhone 14 Plus will reboot, and you will need to repeat the above steps till you get it back to recovery mode.
Step 4. Select the Restore or Update option on your Apple iPhone 14 Plus.
Step 5. Select Restore. iTunes will download the necessary software to reset your Apple iPhone 14 Plus.
Step 6. Please wait for your device to restore, and that’s it!
Conclusion
Now you know how to remove the Apple ID from your old or new iPhone without having to enter the password. Each method is reliable and works well if you follow the steps mentioned above, one by one. If you wish to pick a winner, then there is no better option than Dr.Fone. The platform keeps the phone and its content safe during the process. Additionally, there are a ton of other features that you can utilize at the same time.
How to Delete iCloud Account On Apple iPhone 14 Plus without Password?
If you own various Apple products, you must be familiar with the significance of iCloud service. iCloud is a cloud storage service that allows Apple users to sync their data and access it across different Apple devices, be it iPhone, iPad, or Macbook.
Now, there are several situations where a user might want to delete their iCloud account, especially when one has created too many iCloud accounts and don’t remember the passwords to all of them.
So, in this guide, we’re going to share some insight into how to delete iCloud account without password so that you can get rid of all the unnecessary accounts and use a single one across all your iDevices.
Part 1: How to delete iCloud account without password on iPhone?
If you have an iPhone at the moment, here are three different ways to delete an iCloud account using your phone itself.
1.1 Remove iCloud from settings on iPhone
Follow these instructions to delete the iCloud account from the “Settings” menu on your Apple iPhone 14 Plus.
Step 1: Open “Settings” and scroll down to click on “iCloud”.
Step 2: You’ll be asked to enter your password. Here enter any random number and click “Done”.
Step 3: iCloud will tell you the password is incorrect. Tap “Ok” and you’ll be prompted back to the iCloud screen.
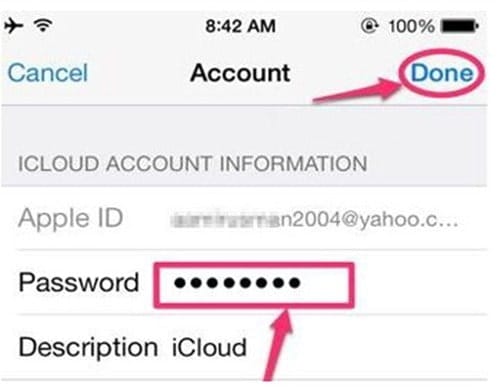
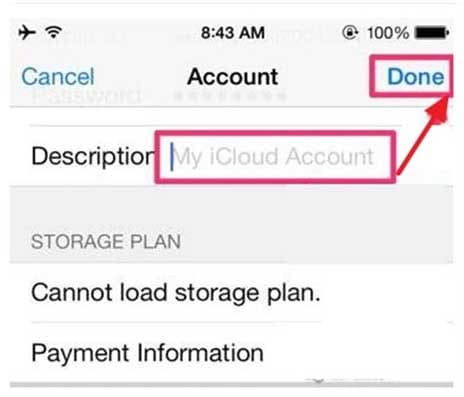
Step 4: Now, click on “Account” and erase everything from “Description”. Click “Done” and you’ll again go back to the iCloud screen. This will disable the “Find My iPhone” feature and you’ll be able to remove the iCloud account easily.
Step 5: Again, tap on iCloud and scroll down till the end. Tap “Delete Account” and again click “Delete” to confirm your action.

That’s how to delete iCloud account without password directly from “Settings” on your Apple iPhone 14 Plus.
1.2 Delete iCloud account via iTunes
Another convenient way to delete the iCloud account is to use iTunes on your Apple iPhone 14 Plus. Let’s walk you through the process of deleting an iCloud account using iTunes.
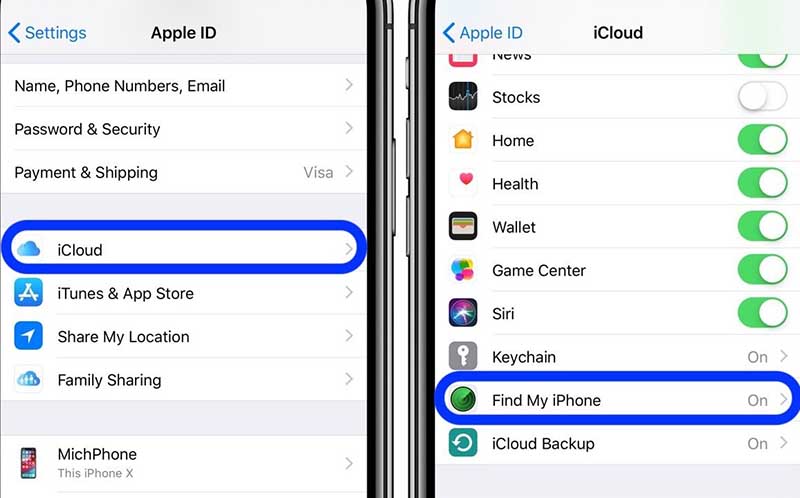
Step 1: First of all, make sure to disable the “Find My iPhone” feature. Navigate to “Settings” > “iCloud” > “Find My iPhone” and toggle the switch off to turn off the feature.
Step 2: Now, go back to the “Settings” window and click “iTunes & App Store”.

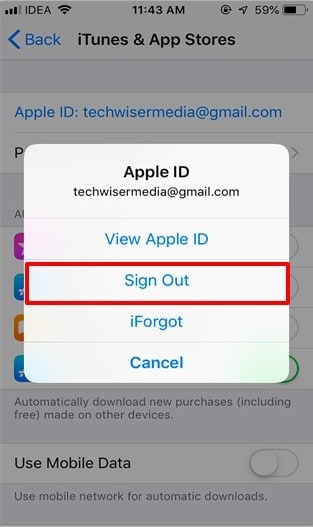
Step 3: Tap on your “Account” at the top. A pop-up will appear on your screen. Here, click “Sign Out” and the iCloud account will be removed from your iDevice.
1.3 Create a new password
If you have enabled two-way verification on your Apple iPhone 14 Plus, you can also delete the iCloud account by resetting the password. In this case, however, you’ll have to visit the Apple ID Account Page and use it to reset the password.
Here’s how to delete iCloud account without password by creating a new password.
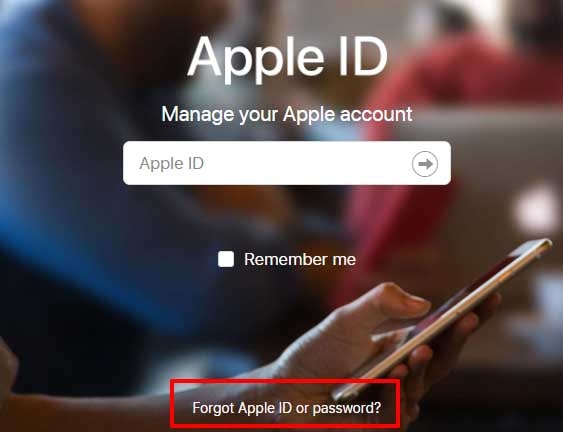
Step 1: Visit the Apple ID Account page and select “Forgot Apple ID or Password”.
Step 2: Now, enter your Apple ID and tap “Continue”. Select “I Need to Reset My Password” to initiate the password resetting process.
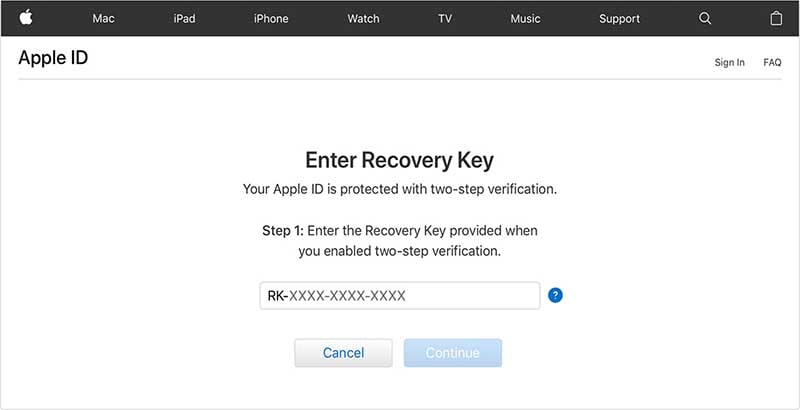
Step 3: You’ll be prompted to a new window where you’ll have to enter the “Recover Key”. This key is an exclusive that’s generated when a user enables two-way verification for their iCloud account.
Step 4: Enter the recovery key and tap “Continue”. Now, select a trusted device where you want to receive the verification code. Enter this verification code to continue with the process.
Step 5: In the next window, you can reset the password. Simply, add the new password and click the “Reset Password” button.
Once the password is changed, you can easily delete your iCloud account by going to “Settings” > “iCloud” > “Delete Account”. Enter the new password and your iCloud account will be deleted permanently.
In case you haven’t enabled two-way verification for your iCloud account, there’s still a way to reset the password. However, you must remember the security questions that you answered or the recovery e-mail you had added while setting up your iCloud account.
Step 1: Open the Apple ID Account page and tap “Forgot Apple ID or Password”. Enter your Apple ID and select “I need to reset my password”.
Step 2: You’ll be redirected to a new window displaying two different methods, i.e., “Answer Security Questions” an “Get an Email.” Choose a suitable method and follow the further steps to reset your password.

Part 2: How to delete iCloud account without password on computer using Dr.Fone - Screen Unlock (iOS)?
If you find all the above methods slightly challenging, we have a simpler solution for you. Wondershare Dr.Fone Screen Unlock (iOS) is an exclusive tool for iOS users that’ll help them remove screen locks and delete iCloud accounts from an iDevice, even if you don’t remember the password or even if the “Find My iPhone” feature is enabled.
Thanks to its user-friendly interface, it’ll become a hassle-free task to delete the iCloud account using Dr.Fone Screen Unlock. Since the software is available for Windows as well as Mac, one can easily use it to bypass Apple ID sign-in, irrespective of the OS one’s using on their PC.
So, let’s quickly discuss how to delete iCloud account without password using Dr.Fone Screen Unlock.
Note: Before moving further, make sure to back up the entire data as this will erase everything from your Apple iPhone 14 Plus.
Step 1: Launch Dr.Fone Screen Unlock
Install Dr.Fone Screen Unlock on your PC and double-tap its icon to launch the software. Now, connect your iDevice to the computer using a USB cable.
Step 2: Select Screen Unlock
Now, in the main interface of Dr. Fone Screen Unlock, select “Screen Unlock”.
Step 3: Choose the Option
In the next window, you’ll see three different options. Select “Remove Apple ID” as we want to delete the iCloud account.
Step 4: Trust the Apple iPhone 14 Plus device
Now, to successfully establish the connection between the two devices, enter the passcode on your iDevice and tap the “Trust” button to confirm the connection.
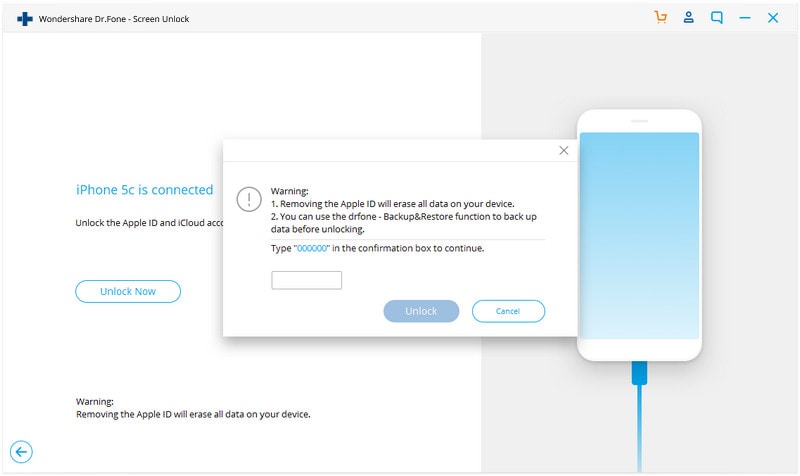
Step 5: Reset Your Apple iPhone 14 Plus
Once the two devices are successfully connected, tap “Unlock Now” on your computer screen. This will trigger a warning message. Click “Unlock” to continue with the process.
At this point, you’ll be asked to enter recovery mode. You can follow the on-screen instructions to successfully enter recovery mode.

Step 6: Unlock Apple ID
After entering the recovery mode, Dr.Fone will automatically initiate the unlocking process. Do not disconnect the iDevice from your computer as this can cause damage to the Apple iPhone 14 Plus device itself.

As soon as your Apple ID gets unlocked, a confirmation message will pop up on your screen. Simply reboot your smartphone and you’ll be able to sign in with a new Apple ID without any hassle.
It doesn’t matter if you’re using Windows or Mac, Dr.Fone – Screen Unlock for iOS will make it extremely easy to delete the iCloud account without the password. So, if you are looking for a reliable and convenient way to remove an iCloud account, make sure to use Dr.Fone – Screen Unlock.
Conclusion
That’s the entire guide on how to delete iCloud account without password. Even though iCloud is an exceptional feature, one is likely to forget the password to his iCloud account. If you’re stuck in a similar situation and want to create a new iCloud account, make sure to use the above tactics to delete the previous iCloud account, even if you don’t remember the password.
Also read:
- [Updated] Choosing Between Wirecast and OBS for Streaming
- [Updated] In 2024, SocialSnatcher Grab and Save Twitter Vids in a Flash
- Full Guide to Catch 100 IV Pokémon Using a Map On Poco X6 | Dr.fone
- How to Bypass FRP from Realme Narzo N55?
- How to Fix when Apple Account Locked On iPhone 11 Pro?
- How to Recover Deleted Photos from Android Gallery App on Samsung Galaxy M34 5G
- How to Remove an AirTag from Your Apple ID Account From iPhone 14 Pro?
- In 2024, Detailed Guide on Removing iPhone 11 Pro Activation Lock without Previous Owner?
- In 2024, Explore YouTube Rankings SEO Tools for Peak Performance
- In 2024, How To Fix Apple ID Verification Code Not Working From Apple iPhone 14 Pro
- In 2024, How to Reset Apple ID and Apple Password From iPhone 6
- In 2024, How To Unlink Your iPhone 8 Plus From Your Apple ID
- In 2024, Top 20 PUBG Moment Snapshots, Open Access
- Title: A Step-by-Step Guide to Finding Your Apple ID From Your iPhone 14 Plus
- Author: Alma
- Created at : 2024-10-23 08:29:51
- Updated at : 2024-10-26 08:40:56
- Link: https://apple-account.techidaily.com/a-step-by-step-guide-to-finding-your-apple-id-from-your-iphone-14-plus-by-drfone-ios/
- License: This work is licensed under CC BY-NC-SA 4.0.