
Apple ID is Greyed Out From iPhone 14 How to Bypass?
Apple ID is Greyed Out On Apple iPhone 14: How to Bypass?
An Apple ID functions as a vital passageway to a diverse array of Apple services. These encompass iCloud, the App Store, iTunes, and other offerings. It serves as a unified account that enables users to connect with different Apple products and services. Yet, even with its significance, Apple ID users can encounter various issues that may disrupt their experience.
One such problem is the daunting phenomenon of the Apple ID being greyed out. It also prevents users from accessing essential features and services. Thankfully, solutions to these issues do exist. Understanding the root cause and implementing the appropriate solution is crucial. This article aims to delve into one of the most effective methods to tackle the troubling problem of the Apple ID greyed-out issue.
Part 1: Why Did the Apple ID Greyed Out? Coming to the Reasons
Dealing with a greyed-out Apple ID can undoubtedly lead to a frustrating experience. It also hinders your access to essential Apple services. Before delving into the solutions, understanding why Apple ID is grayed out is essential. Several factors can contribute to the greying out of your Apple ID, and some of these are given below:
1. Apple ID Signed In on Another Device
One common reason for the Apple ID to appear greyed out is when it is actively signed in on another device. This often happens when users forget to log out of their account on a different Apple device. It leads to a conflict that prevents the smooth functioning of the Apple ID.
2. Incorrect Password Attempts
Multiple failed attempts at entering the Apple ID password can trigger security measures. It can temporarily disable the account, causing it to grey out. This security measure is created to safeguard the account against unauthorized entry. Nevertheless, it may limit access to the Apple ID in the event of multiple incorrect password entries.
3. Network Connection Issues
Fluctuating or unstable network connections can also contribute to the Apple ID greying out. When the Apple iPhone 14 device is unable to establish a stable connection with Apple’s servers, it may manifest as an unresponsive or greyed-out Apple ID. Thus restricting access to various Apple services and features.
4. Software Glitches or Bugs
Software inconsistencies within the Apple iPhone 14 device’s operating system can lead to temporary malfunctions. That results in the greying out of the Apple ID. Such glitches can arise due to software updates or incomplete installations. It can also happen due to conflicts between different applications.
5. Apple Server Maintenance or Outage
Periodic maintenance or unexpected server outages on Apple’s end can disrupt the functionality of the Apple ID. As a result, you experience temporary Apple ID grey-out issues. During such occurrences, users may experience difficulties accessing their Apple ID.
Part 2: Finding the Proper Solutions to Apple ID Greyed Out [Highly Effective]
Encountering a greyed-out Apple ID can be a daunting experience. However, there exist many resolutions to this issue that can be implemented. This article aims to guide you through several effective remedies that can help resolve the problem. By following the solution outlined below, you can fix the Apple ID greyed out on iPad:
Solution 1: Checking Screen Time Passcode Settings
In some instances, the greying out of the Apple ID can be attributed to specific settings, such as the Screen Time passcode. Checking and adjusting the Screen Time passcode settings can help ensure your Apple ID is not inadvertently restricted. Follow the steps below to check and manage your Screen Time passcode settings for fixing the Apple ID that is greyed out in the settings option:
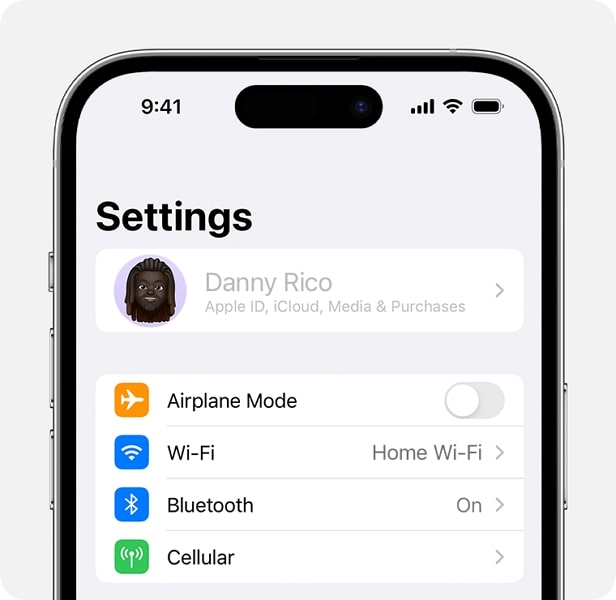
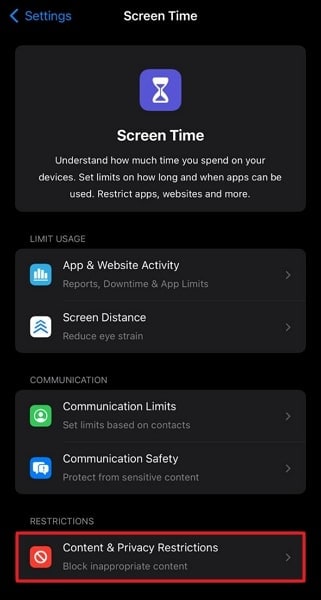
- Step 1: Access the Settings app on your Apple iPhone 14 and tap “Screen Time.” Here, select “Content & Privacy Restrictions” and move down to the “Allow Changes” section.
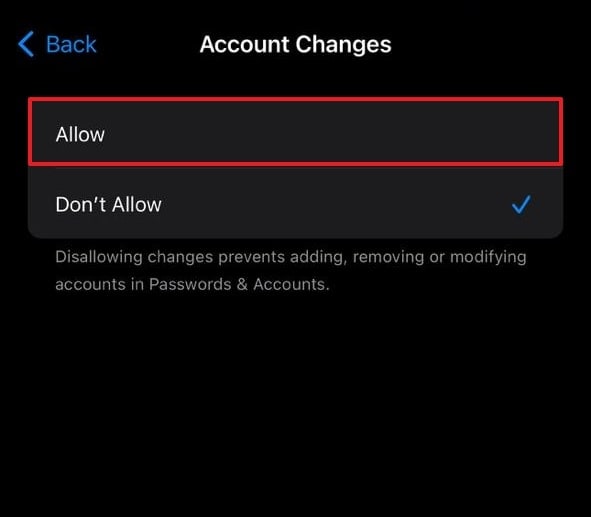
- Step 2: Now, navigate to “Account Changes” and ensure it is set to “Allow.” Afterward, check if the Apple ID is working normally again.
Solution 2: Checking Apple System Status Page
Checking the Apple System Status page can help determine if the problem lies at Apple’s end. The greying-out issue can be related to any ongoing server maintenance or outage. By staying informed about the status of Apple services, you can ensure that you can take the necessary steps. Follow these steps to check the Apple System Status page to check the Apple ID greyed-out status:
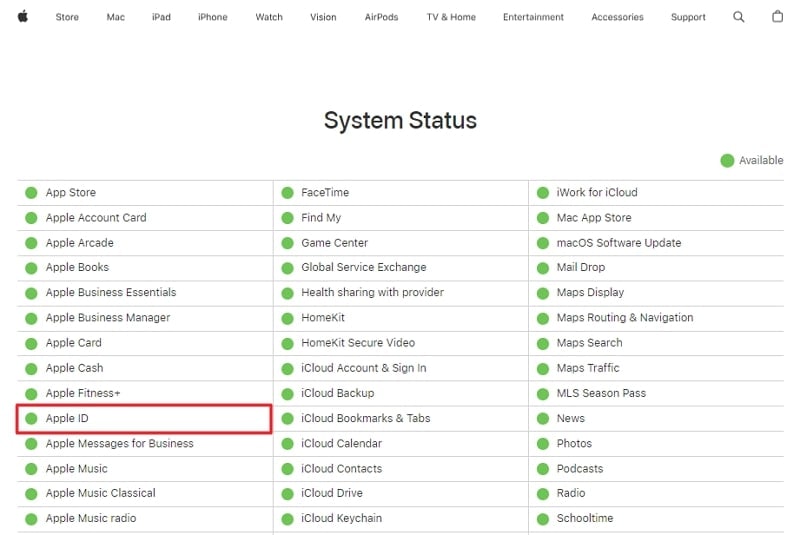
- Step 1: Start by accessing a web browser and opening the Apple System Status page. Here, look for the entry named “Apple ID.”
Step 2: When the indicator is green, there are no issues at the server’s end. Yet, if it turns orange or red, it signifies a server problem, and you’ll need to be patient until it’s resolved.
Solution 3: By Turning Off Screen Time
If the greying out issue persists and is related to Screen Time settings, disabling Screen Time can serve as a potential solution. By turning off Screen Time, you can potentially resolve any conflicts or restrictions that might be causing the greying out of your Apple ID.
This simple solution can help restore full access to your Apple ID and associated services. To disable Screen Time and fix Apple ID greyed out on iPad, follow these simplified step-by-step instructions:
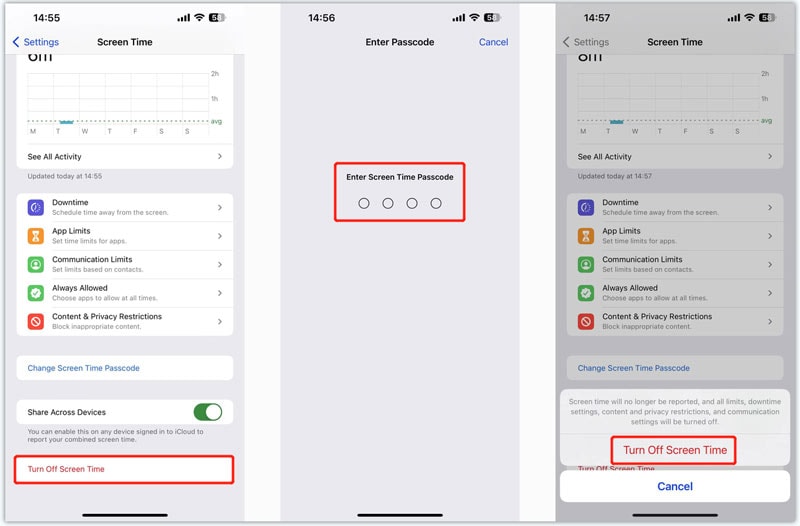
- Step 1: From the Settings of your Apple iPhone 14, access “Screen Time.” On the following screen, scroll to the last option, “Turn Off Screen Time.”
- Step 2: Now tap “Turn Off Screen Time” and provide the screen time passcode for confirmation. Finally, confirm the action by selecting “Turn Off Screen Time” in the pop-up confirmation message.
Solution 4: Restarting the iOS Device
Performing a simple restart on your iOS device can resolve various software-related glitches. It also includes glitches behind the greying out of the Apple ID. By restarting your iOS device, you can refresh the system’s processes. This simple yet effective solution can help restore normal functionality to your device. Follow these steps to restart your iOS device to fix the Apple ID grayed-out problem:
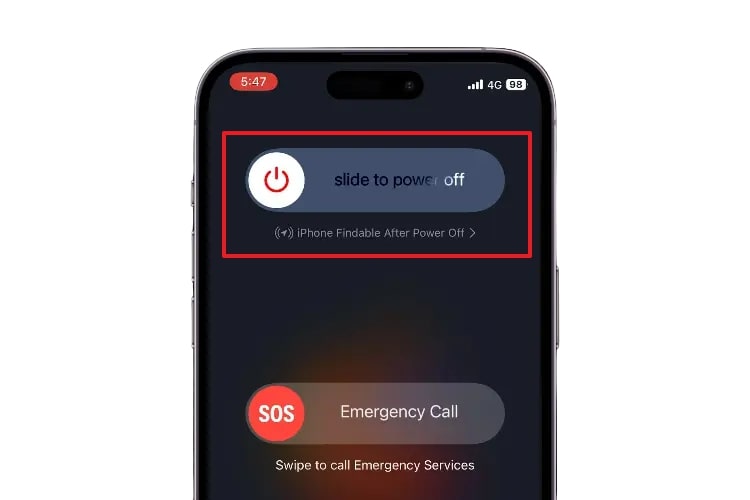
- Step 1: Press and hold the Power button and either the Volume Up or Volume Down button simultaneously. Keep holding these two iDevice buttons until the “Slide to Power Off” slider appears.
- Step 2: Drag the slider towards the right to power off your device. Allow a few moments to pass before using the “Side” button to switch on your Apple iPhone 14.
Solution 5: Checking Internet Connectivity Status on Device
Ensuring a consistent and reliable internet connection is crucial for the optimal performance of your Apple ID. If you’re utilizing Wi-Fi, be sure to connect to a dependable network to guarantee seamless functionality. When utilizing cellular data, verify your signal strength and confirm the availability of an active data plan. A stable internet connection is of utmost importance for the effective operation of your Apple ID.
Solution 6: Reset All Settings Within iOS Device
Resetting all settings on your iOS device can effectively resolve persistent software-related issues. This means if conflicts in settings where the root of Apple ID is grayed out, the problem would be resolved. Be aware that initiating this action will restore all settings to their original defaults while preserving your data. Follow the steps outlined below to reset all settings on your iOS device:
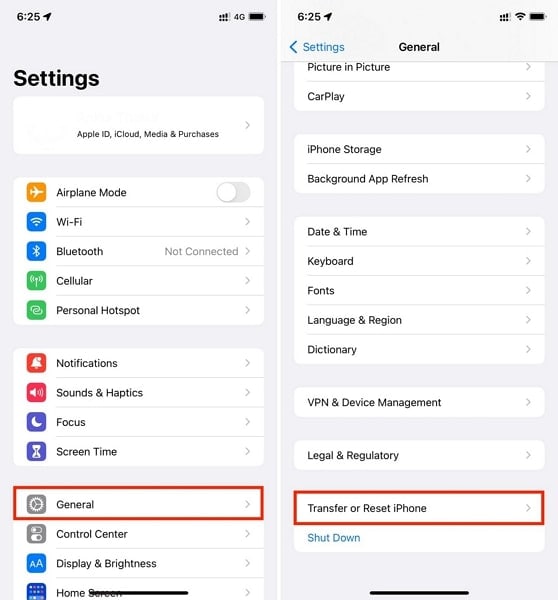
- Step 1: To start, you access the Settings app and navigate to the “General” settings tab. There, scroll to the bottom till the last option and tap on “Transfer or Reset iPhone.”
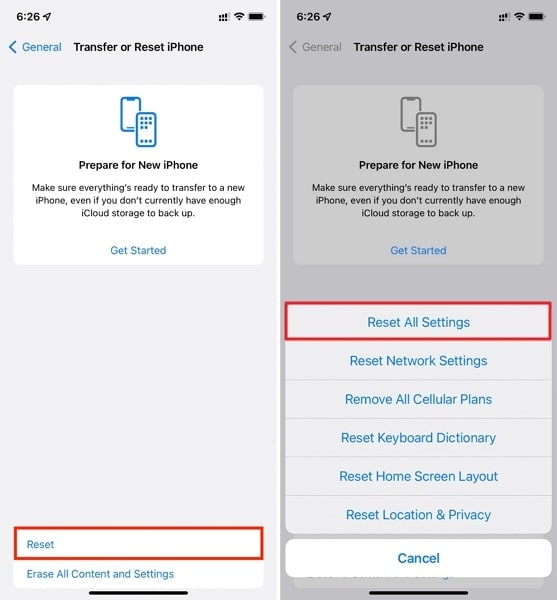
- Step 2: Navigate to the next screen and tap “Reset.” From there, choose the option for “Reset All Settings.” A prompt will appear, requesting your device passcode for verification. Once entered, proceed with the “Reset All Settings” to finalize the process.
Solution 7: Contact Apple Customer Support
If the previous solutions have not resolved the issue of your Apple ID greying out. It may be necessary to seek help from Apple’s customer support. Apple’s support team can provide personalized guidance and troubleshooting steps.
By contacting Apple’s customer support, you can receive expert help. The support team can offer tailored solutions and further guidance. This can help you regain access to your Apple ID and associated services.
Part 3: Advanced Solution: Try Wondershare Dr.Fone Screen Unlock if the Previous Solutions Are Ineffective
You have implemented all the methods mentioned above, and your Apple ID greyed-out issue is not resolved. It means you need a more efficient solution. Wondershare Dr.Fone is one of the most effective and solid solutions to fix the Apple ID greyed-out issue. Without resolving this problem, your Apple ID would be of no use; that is the main functional unit in your iOS devices.
Dr.Fone does this resolving procedure through its powerful Screen Time Passcode unlock feature. It is also a primary remedy to unlock the locked screen of your Apple devices. Moreover, this tool can bypass the iCloud activation lock and Apple ID without any password requirement. Through this Screen Unlock tool, you will be able to resolve your issue quickly and without any technical knowledge.
Key Features of Wondershare Dr.Fone
Dr.Fone - Screen Unlock (iOS)
Unlock iPhone/iPad Lock Screen Without Hassle.
- Simple, click-through, process.
- Unlock screen passwords from all iPhone and iPad.
- No tech knowledge required, everybody can handle it.
- Supports the latest iOS version fully!


4,395,217 people have downloaded it
- This enhanced and powerful iDevice toolkit can also help unlock Apple ID for iOS 17 devices.
- It can also bypass the MDM or remove the MDM profiles to allow you to use your Apple iPhone 14 normally.
- You can unlock your Apple iPhone 14 or iPad screen lock without a password if you can’t remember it.
Fix Apple ID Greyed Out Issues by Unlocking Forgotten Screen Time Passcode
Wondershare Dr.Fone is an easy-to-use software with a simple guide to fix your Apple device issues. Here is how to fix Apple ID greyed-out issues with Wondershare Dr.Fone - Screen Unlock (iOS):
- Step 1: Access the Screen Unlock Tool
You need to start the process by opening Wondershare Dr.Fone and moving towards the “Toolbox” section. At that location, select “Screen Unlock” from the options provided. Then, select the “iOS” option from the window to define the type of your device.

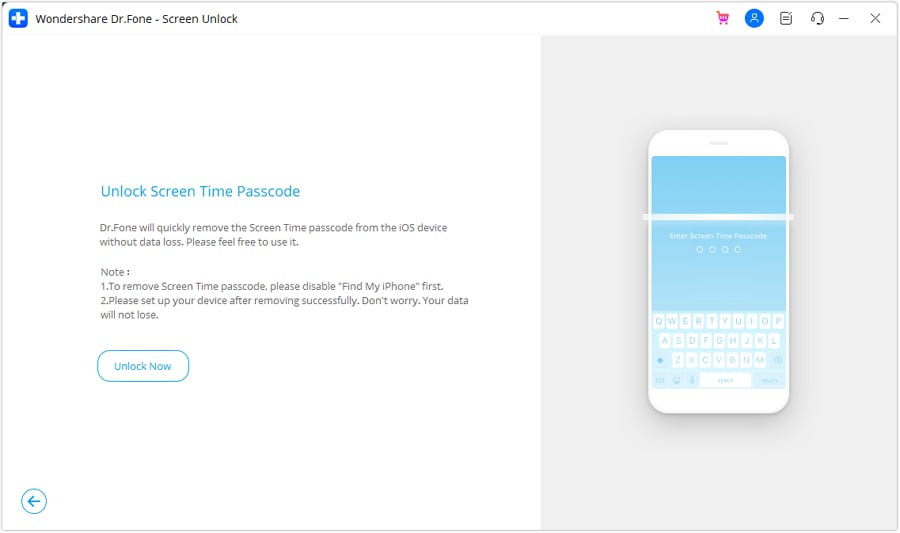
- Step 2: Start the Unlocking Process and Connect Your iDevice
You will find yourself in a list of options from where you need to continue with the “Unlock Screen Time Passcode” option. Next, connect your iOS device to the computer via a USB cable. Then, wait for Wondershare Dr.Fone to detect your Apple iPhone 14.

- Step 3: Unlock Your iDevice and Toggle off Find My Feature
After the connection, select the “Unlock Now” button to unlock your screen time passcode, and turn off the “Find My iPhone” feature by following the on-screen instructions. Completion of the screen time passcode unlocking process will start to display after clicking the “OK” button. Finally, after the completion message, hit “Done” to end the entire operation.
Final Words
Throughout this article, we have explored the perplexing issue of the Apple ID grayed out in settings. It can hinder the smooth functioning of your iOS device and access to various Apple services. By going through the root causes behind this problem, we have outlined several solutions. These can help users address the issue and regain access to their Apple ID.
We recommend that users diligently follow the steps provided in each solution. So that they can identify and rectify the specific cause of the problem. However, in cases where the issue persists, we highlighted the significance of using Wondershare Dr.Fone. It offers a specialized Screen Time Passcode Unlock feature. Moreover, this ensures the smooth operation of Apple ID and associated services.
How to Remove an AirTag from Your Apple ID Account On Apple iPhone 14?
Apple provides many exciting features in its products, including the AirTag feature on iPhone devices. However, after enabling the function, many iPhone users forget to remove it from the FindMy app ahead of time. Therefore, if you are selling or resetting the Apple iPhone 14 device, you need to remove AirTag from Apple ID to be usable later.
If someone removes the AirTag without resetting it while operating in the Bluetooth range, deleting AirTag ownership will require manually breaking the Apple iPhone 14 device apart and further configuration.
Remove this connection from the Apple ID account with simple steps first-hand to avoid that. Read on to know the steps involved in this process directly or with the best software alternative.

Part 1. What Exactly Does an AirTag Do?
Before discussing how to remove AirTag from Apple ID, you should know better about the function itself. The AirTag feature is available for iOS devices. Therefore, one can register the AirTag process with the Apple ID you are utilizing on your smartphone.
Apple users can attach the AirTag to different objects like backpacks or keychains. This makes it simple to find these objects later in case they get misplaced or lost through the Find My app on the iPhone.
Users can add their AirTag to one Apple ID account, so you cannot access this from the Find My app via other accounts. In case of loss, you must remove the AirTag from your device entirely.

Part 2. How to Remove an AirTag from Your Apple ID onApple iPhone 14 & iPad?
After adding the AirTag to any object, it instantly syncs with the Apple ID of the user. So, only the primary Apple ID user can use or monitor the AirTagged item. Other users can use it only after resetting the AirTag. So, learn how to remove AirTag from Apple ID via the Find My app on different iOS device types.
Version 1: Removing AirTag on iPhone
Step 1: Access the Apple iPhone 14 homepage and access the Find My app.
Step 2: From the bottom menu bar, tap on the Items option.
Step 3: The information about which AirTag is associated with your chosen item will appear in the next page list.

Step 4: Choose the selected items and swipe upwards on the screen. Then, find the Remove Item button and press it.

Step 5: Following this, select and press the Remove button. Repeat for confirmation.
Version 2: Removing AirTag on iPad
Step 1: Access the Find My app from the home screen on your iPad device.
Step 2: When the app opens, click on the Items icon at the bottom part of the screen.

Step 3: Choose the items you want to delete by tapping them.
Step 4: Swipe up and choose the “Remove Item” option.
Step 5: On the next confirmation prompt that comes up, click Remove.

Part 3. Bonus Tips: How to Unlock an Apple ID That’s Locked?
Typically, it is impossible to use a PC or Mac to access and remove AirTag from Apple ID. One has to use the Apple iPhone 14 or iPad device only. But what if the smartphone screen or Apple ID is locked?
You need to unlock the Apple iPhone 14 device using capable software like Dr.Fone - Screen Unlock (iOS) to remove the blockage. This software can remove many different Apple screen lock types, like Black Screen of Death, Face ID Lock, Screen Time Passcode, and more.
The process of bypassing Apple ID as a feature is available for iOS 14.0 or its previous conversions. It does not require extremely complex jailbreaking or configuration steps- all is complete in some clicks only.
Top Features:
- Users get at least ten retries for the password or lock removal attempt.
- Suitable for removing various screen locks, Apple ID locks, etc.
- Works to bypass Apple ID account locking without a password within seconds.
- It allows Apple ID lock removal even with the active Find My iPhone feature on the smartphone.
How to use it?
Step 1: Install the Dr.Fone app and launch it on the computer. Choose Screen Unlock.
Step 2: On the next page, tap the Remove Apple ID option. Then enter the necessary passcode to verify that you trust the PC. Then, do further scanning.

Step 3: Back up all devices before the procedure. Then, visit the Settings page > user profile > Password & Security. Then, toggle the Two Factor Authentication feature to the ON part. Then, press Unlock Now.

Step 4: Put the smartphone into recovery mode with on-screen instructions. Then, restart the phone. Complete the resetting steps and press the Restart button. It will unlock the Apple iPhone 14 device automatically.

Step 5: Verify on your device that the Apple ID is unlocked. Then, go to the Find My app and remove the AirTag feature as detailed previously.

Part 4. FAQs about AirTag
- How to Set Up and Add an AirTag on Your Apple iPhone 14?
Firstly, get your device ready to get set up. Remove the wrap around the AirTag and pull the tab out to start the battery. After it plays a tiny sound, hold the Apple iPhone 14 device near the iPhone/iPad and press Connect. Next, change the name of the AirTag on your list, give an emoji to it, and press Continue. Register it with the Apple ID in the next prompt and then choose Done.
- How to Rename AirTag and Change Its Emoji?
You can access the Items tab on the Find My application and choose the AirTagged item. Then, scroll downward and choose Rename item to change the name. Finally, create a customized name and add an emoji as well.
- How Far Can You Track an Apple AirTag?
With the Bluetooth connection switched on, one can track Apple AirTag for approximately 100 feet.
Conclusion
The added AirTag stays connected with one Apple ID account until you reset it. So, use the process mentioned to remove the AirTag via iPhone or iPad. If the iPad or iPhone you are using has locked the Apple ID, you can use another software Dr.Fone - Screen Unlock (iOS) , to access it without data loss securely. Then, follow the steps mentioned to reset the AirTag here.
How to Erase an Apple iPhone 14 without Apple ID?
Our generation is all about high-performance gadgets and, a phone is one of the most important of it all. But with the concept of a smartphone, things have changed. iPhone/iPad has emerged as an important fashion quotient for a long now.
We often end up buying second-hand iPhones/iPads or sell our old version of the phones/pads to an unknown person and buy a new version of other brands, like Samsung S22. At times, be it after-sale/purchase or old iPhone, or if you may have yourself forgotten the password to your Apple ID, we often come across a big challenge, and that is how to erase an iPhone without an Apple ID password. Well, if that’s the case with you, then you’ve reached the right place. We’re about to discuss the most effective ways to erase an iPhone without an Apple ID password. Let’s discover them.
Part 1. How to erase an iPhone without Apple ID and iTunes
When it comes to taking care of all your Apple iPhone 14 recovery solutions, Dr. Fone has effectively managed to make a mark in the field. Especially when it comes to erasing an iPhone without an Apple ID password, the Dr.Fone – Screen Unlock (iOS) can help you get it done without a hitch. Not only can you erase an iPhone without an Apple ID password, but you can also get the Apple ID/iCloud lock removed too with much ease. With over 5 million-plus users, the tool is the most recommended in the market, serving every customer to their content.
Key Features:
The key features of Dr.Fone – Screen Unlock (iOS) are –
- It can unlock an iPhone/iPad by erasing an iPhone without an Apple ID password.
- Even when your screen is damaged and you cannot enter a passcode, Dr. Fone – Screen Unlock (iOS) can effortlessly get it done.
- If the passcode is wrongly set by your kids or an unknown, this software can help unlock the same.
- Works efficiently with almost all iOS devices and supports even the latest iOS version 14.
Step by Step Tutorial:
Let’s get to understand how to erase an iPhone without an Apple ID password:
Step 1: Connecting the iPhone/iPad
The first thing to do is download and install the Dr.Fone – Screen Unlock (iOS) software on your computer/laptop. Before you move on to any other step, connect your affected iPhone/iPad to your computer or laptop with the help of a USB.
Step 2: Select the correct Mode.
After the installation is done completely, launch the tool and select the “Screen Unlock” option on the software’s home interface. A new screen interface will appear, you will have three different options. You need to select the “Unlock iOS Screen” option and, this will start the entire process of unlocking.
Step 3: Boot your device into Recovery/DFU Mode
You now have to boot your Apple iPhone 14 or iPad device into Recovery mode or DFU mode so that the software can recognize your device for further process. For your convenience, Dr. Fone Screen Unlock (iOS) has a built-in instruction facility that helps you to follow the steps.

Step 4: Confirm the information and download firmware
After a successful reboot into Recovery mode, the tool will automatically detect your device’s information and the most compatible iOS firmware. To start the process of downloading the firmware, you need to hit on “Start” button.

Step 5: Erase an iPhone without an Apple ID password.
Once the download is complete, you can get started with erasing an iPhone without an Apple ID password. Hit the “Unlock Now” button, and voila! In no time, you’ve successfully erased an iPhone without an Apple ID password.

Part 2. Erase an iPhone without Apple ID via iTunes
Sometimes your phone might ask for an Apple ID and password to confirm your authority. In such cases, you may get stuck as either you have forgotten the password to it, or you don’t remember the Apple ID in the first place. For that matter, where it needs immediate help, we have listed down a set of steps that can help you erase an iPhone without Apple ID via iTunes –
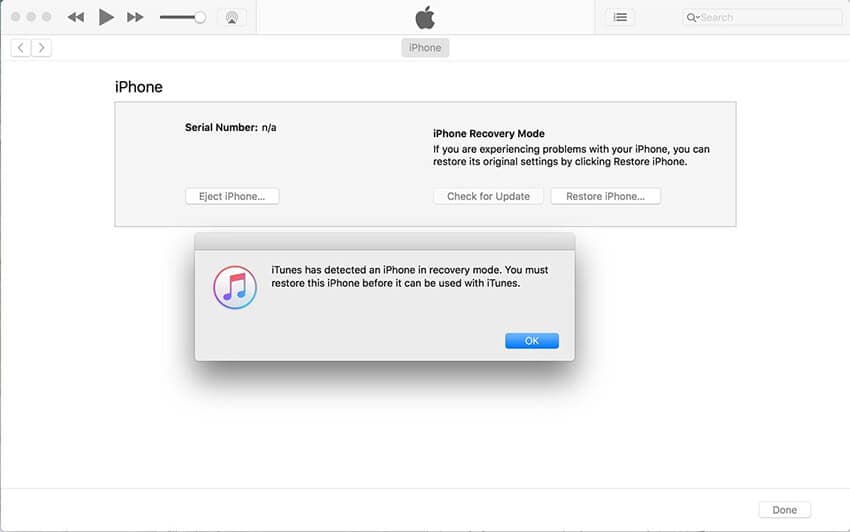
Step 1: Connect your Apple iPhone 14 to the computer with the help of a USB and then open your iTunes.
Step 2: The best way to start the process is to move your phone to recovery mode. For this, you need to:
In iPhone 8 or later: Tap the Volume Up, then quickly tap Volume Down and hold down the Power key afterward.

In the case of iPhone 7/7Plus: Press the “Sleep/Power” and “Volume Down” keys together.
Hold down the keys until you see the message on your iTunes screen about “your iPhone has been detected in recovery mode.”
Step 3: Once done, click on “Ok” and choose the “Restore iPhone” option. Confirm your actions, and you’re done.
Part 3. How to erase an iPhone without Apple ID via Settings
Erasing an iPhone without Apple ID becomes necessary when we happen to use a second-hand phone or when we share a phone with someone. It is indeed a hard task to overcome these issues as we constantly strive to change our phone or replace it with a second-hand one. We have jotted a few steps that can help you erase an iPhone without Apple ID via settings for your ease.
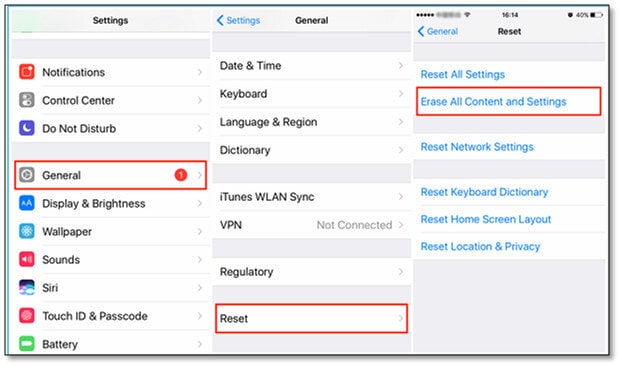
Step 1: On your Apple iPhone 14, press the “Settings” icon on your App drawer.
Step 2: Under the Settings, scroll down and click on the “General” option.
Step 3: Now, you need to scroll all the way down to the “Reset” button and click on it. Then, look for “Erase All Content and Settings” and tap on the same.
Step 4: Enter your passcode to confirm. This action will pop up a screen where you need to select Erase iPhone again, and boom, you are done now.
Part 4. Tip you may need to erase Apple ID
Now, just in case you wish to delete your Apple ID completely, you need to perform a simple practice of removing any devices associated with your Apple ID.
Step 1: One can simply visit appleid.apple.com and log in with the Apple ID credentials already allotted to the user.
Note: You might get a prompt of a two-factor authentication code while being on this page.
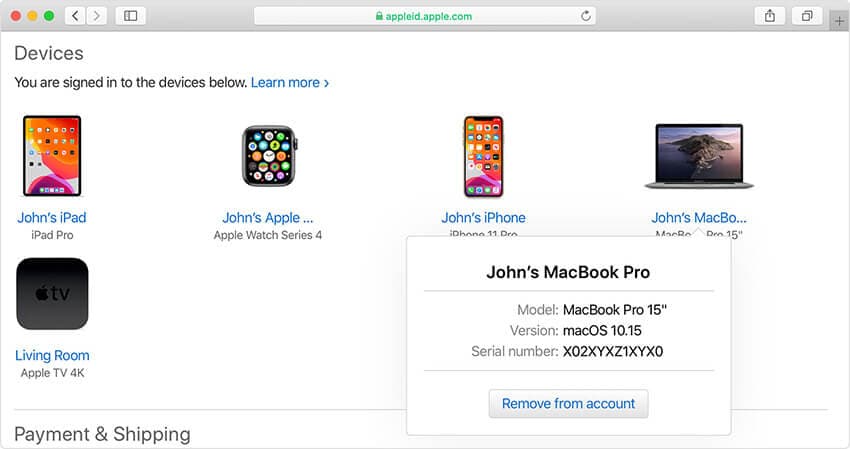
Step 2: Once you scroll down the line, choose, and click on the “Device” option.
Step 3: Choose the desired device and click on the “Remove from account” option followed by a “Remove this – Device Name” to confirm the action. Perform this step for all other devices.
How to erase an Apple ID via Apple’s Data and Privacy website
Now let’s get started with erasing an Apple ID via Apple’s Data and Privacy website are simple and, we have mentioned a simple way to take care of the same:
Step 1: Once you’re done removing the Apple iPhone 14 devices linked to your Apple ID, visit privacy.apple.com and log in with the same Apple ID and password credentials.
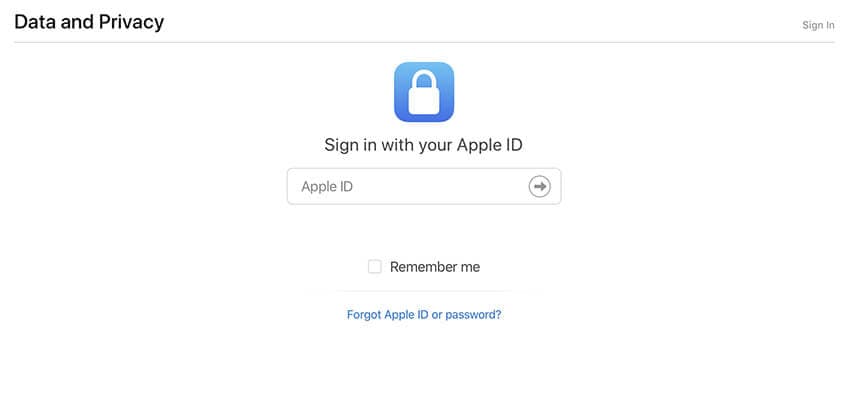
Step 2: Once you authenticate, click on the prompt indicating the option to “Continue.”
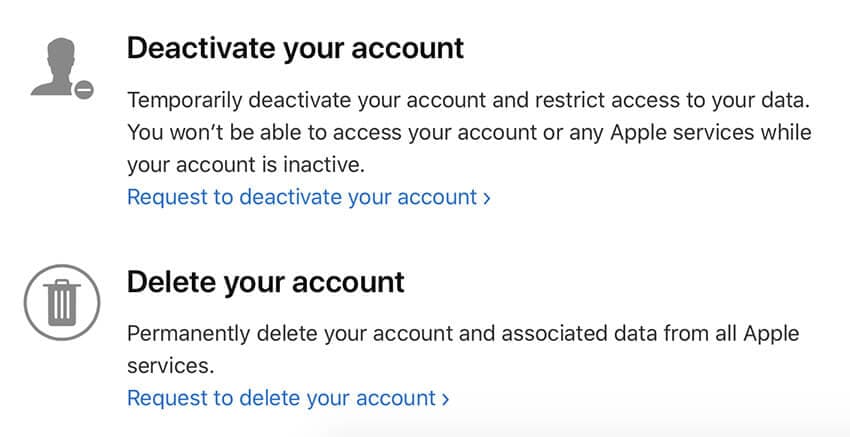
Step 3: Once you click on the “Get started” prompt on the screen, you will get a tab to “Delete your account.” This will prompt you with an Apple message indicating the information regarding the deletion process time.
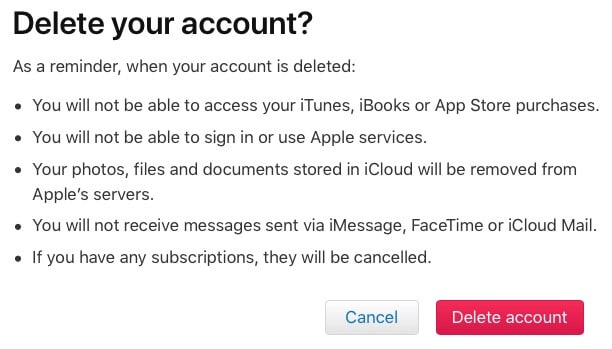
Step 4: Before everything, make sure you back up your data and follow the instructions steps prompted by Apple’s website. This will lead you to choose a reason for deletion from the click-down option and click “Continue.”
Message – You will get the details of the entire process for a quick review before you can submit for the final deletion of the policies
Step 5: Click on “Delete terms and conditions” by checking the read and agreed on the box. Make sure to provide a good call-back number to finalize the process.
Step 6: This submission will give you your access code which you can later use for clarification and, now you can click on the “Delete Account” option
Conclusion
Coming towards the end of the topic, we now are fully sure that you fully understand how to erase an iPhone without an Apple ID. Just in case you have any doubts, please feel free to comment below. And do remember to share this with your friends and family if you find it useful.
Also read:
- [New] 2024 Approved Tailor-Made Twitter Video Coverage
- 2024 Approved Magix's ACID Pro Reviewed Comparing Similar Software
- Apple ID Locked for Security Reasons From iPhone 12 mini? Find the Best Solution Here
- Best Android Data Recovery - undelete lost call logs from Vivo V27 Pro
- FRP Hijacker by Hagard Download and Bypass your OnePlus Nord 3 5G FRP Locks
- Hookup HP Envy 5530 Driver with Windows 10
- How To Create an Apple Developer Account From iPhone 14 Pro
- How to Delete iCloud Account From Apple iPhone 12 without Password?
- How To Delete iCloud Account Remove Your Apple ID Permanently On Apple iPhone 11 Pro
- How To Fix Apple ID Verification Code Not Working From Apple iPhone 13 Pro
- In 2024, Expert Tips for Efficiently Logging GooGle Online Gatherings
- In 2024, How to Change Credit Card on Your Apple iPhone 8 Plus Apple ID and Apple Pay
- In 2024, How to get the dragon scale and evolution-enabled pokemon On Honor 70 Lite 5G? | Dr.fone
- In 2024, JoyMakerBox Sign Up, Share Smiles, Create
- In 2024, Top IMEI Unlokers for Your Realme GT Neo 5 SE Phone
- In 2024, Top-Notch Solutions for Disabled Apple ID On iPhone 13 mini Making It Possible
- Optimize Your Gaming Experience on Windows 11 - SteelSeries Engine Software Now Available for Download!
- Tips and Tricks for Apple ID Locked Issue On iPhone 11 Pro
- Why Apple Account Disabled From your Apple iPhone 14 Plus? How to Fix
- Title: Apple ID is Greyed Out From iPhone 14 How to Bypass?
- Author: Alma
- Created at : 2024-10-18 18:04:18
- Updated at : 2024-10-20 16:13:23
- Link: https://apple-account.techidaily.com/apple-id-is-greyed-out-from-iphone-14-how-to-bypass-by-drfone-ios/
- License: This work is licensed under CC BY-NC-SA 4.0.