
Detailed Guide on Removing Apple iPhone 14 Plus Activation Lock without Previous Owner?
Detailed Guide on Removing Apple iPhone 14 Plus Activation Lock without Previous Owner?
Today, many individuals will purchase a utilized iPad or a recycled iOS phone instead of a fresh, box new one. However, they are often disturbed by the Activation Lock screen showing up on the screen once they buy them. This case will probably happen because the iPad is associated with the past user’s iCloud account and will be an iPad locked to the owner.
It becomes a difficult issue as removing a connected iCloud account without the past user is almost difficult. However, sit back and relax. We’ve discovered a few potential ways. This guide will show you the iPad locked to owner bypass. Furthermore, you can use our expert tool, i.e., Dr.Fone-Screen Unlock, to bypass the lock.
After reading this guide, you will understand how to erase the Activation Lock without a past user. How about we get everything started?
Method 1. Dr.Fone - Screen Unlock
Rather than making our readers wait about how to remove Activation Lock without Apple ID or past user, we suggest you with Wondershare Dr.Fone-Screen Unlock.
It is an expert iCloud activation lock bypass program that can remove the activation lock on your iPad. It is the best possible solution when you fail to remember your Mac ID or password. Download the application on your Windows or Macintosh and follow the steps to remove the activation lock without a previous user.
Steps to Follow:
Step 1. Install and launch the Dr.Fone program and choose the Screen Unlock tool.
Step 2. Pick the “iCloud Activation Lock Removal” option.

Step 3. Now you can start to bypass the lock.

Step 4. Begin to remove and wait briefly. The phone will be in a typical state with practically no lock after removing the activation lock.
Step 5. The program will remove the activation lock like a flash. Your iPad will begin with no activation lock. You can access and utilize the iPad now. However, you must know that you can’t call or use cellular data and iCloud of your new Apple ID after bypassing the lock.

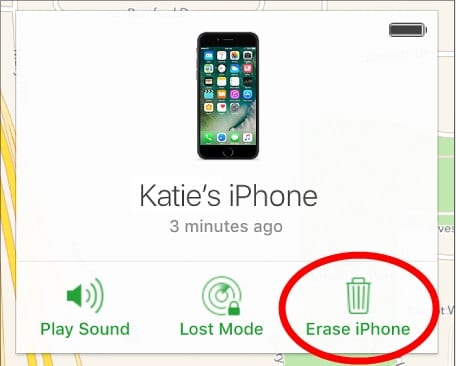
Method 2. Remove it from iCloud
If you cannot reach the past user but rather you are still in contact with them, they can unlock your iPad. Here are the step-by-step guidelines on eliminating the iPad activation lock through the iCloud web:
- Open the iCloud site in a browser.
- Sign in to the current iCloud account being used with the locked iPhone.
- When you sign in, click on the choice that says Find iPhone.
- Presently, you can remotely perform activities on your phone.
- Click on the drop-down named All Gadgets and pick your iPad.
- Click on Erase iPhone.
Method 3. Use DNS bypass
Bypassing DNS Server is one more way for you if you’re searching for simple methods for eliminating Activation Lock without the past user. Note that this DNS strategy can bypass the iCloud lock for a brief time. Here’s how:
Step 1. Open your iPad and explore the “Choose a Wi-Fi Network” page.
Step 2. Presently, press the Home button and select Wi-Fi settings. Presently, tap the “I” symbol right behind your Wi-Fi network. It will show the properties of the Wi-Fi.
Step 3. Select “Configure DNS” and set it as indicated by your region:
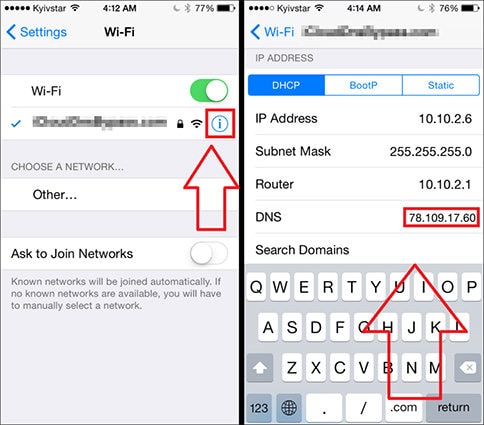

- USA: 104.154.51.7
- South America: 35.199.88.219
- Europe: 104.155.28.90
- Asia: 104.155.220.58
- Australia and Oceania: 35.189.47.23
- Other Continents: 78.100.17.60
Step 4. From that point forward, return to the Wi-Fi page.
Step 5. Presently, click over and again on “Next” and “Back” and hold on until the iPad connects with your area’s iCloud DNS bypass server.
Method 4. Local Apple Support
Following the techniques above, you can try reaching Apple’s local service when you can’t remove the Activation Lock. However, you need to provide the following things:
- iPad serial number
- Buying receipt
When they confirm you own the iOS iPad legitimately, they will help you further by unlocking your iPad.
Part 2: How to Reset iPad without Passcode?
1. Reset iPad by Computer
- Connect your iPad to a computer. Press and hold the Power button + Home button (if your iPad has a Home button). Otherwise, press and hold the Power button + either Volume button (if your iPad doesn’t have a Home button) until you see the Recovery Mode screen.
- On your Macintosh, find the connected iPad.
- Tap Restore and trust that the process will end.
- Set up your iPad and restore the factory default settings without a password.
2. Reset it by Find My
- Go to iCloud.com, and sign in with your Apple ID and password.
- Click on the Find [device] symbol in the menu.
- Select your iPad from the list of all the connected devices.
- Select Erase iPad.
- Follow the prompts for iPad locked to owner reset.
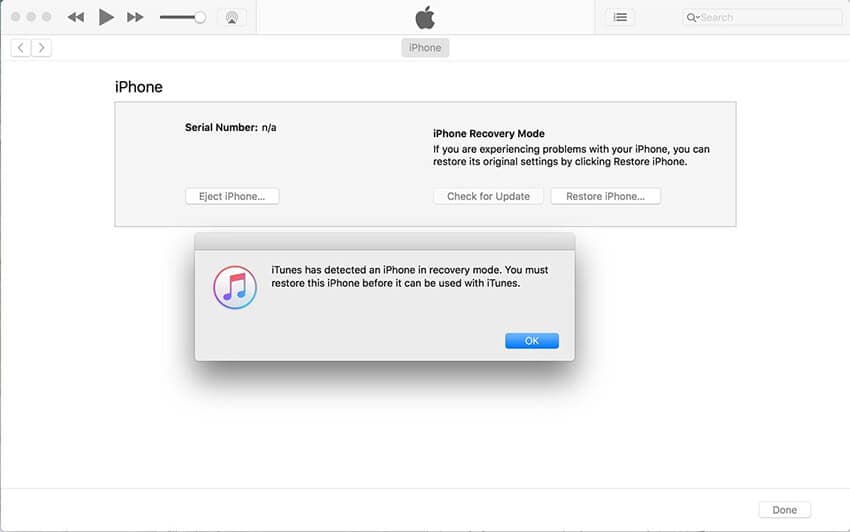
3. Reset with iTunes
- Open the iTunes application or website.
- Connect your iPad to your PC with a connector. Enter your password whenever required.
- Click on the iPad symbol in the upper-left corner.
- Select Summary in the left section.
- Click Restore iPad and then click the Restore button to confirm and reset the iPad locked to the owner.
Conclusion
This iPad locked to owner bypass guide explains how to remove the activation lock. We have mentioned a list of helpful methods to remove the lock from your device. However, if you are still looking for a quick and efficient answer, we suggest you install Dr.Fone - Screen Unlock (iOS) . Dr.Fone is a safe and effective tool for all your unlocking needs.
How to Erase an Apple iPhone 14 Plus without Apple ID?
Our generation is all about high-performance gadgets and, a phone is one of the most important of it all. But with the concept of a smartphone, things have changed. iPhone/iPad has emerged as an important fashion quotient for a long now.
We often end up buying second-hand iPhones/iPads or sell our old version of the phones/pads to an unknown person and buy a new version of other brands, like Samsung S22. At times, be it after-sale/purchase or old iPhone, or if you may have yourself forgotten the password to your Apple ID, we often come across a big challenge, and that is how to erase an iPhone without an Apple ID password. Well, if that’s the case with you, then you’ve reached the right place. We’re about to discuss the most effective ways to erase an iPhone without an Apple ID password. Let’s discover them.
Part 1. How to erase an iPhone without Apple ID and iTunes
When it comes to taking care of all your Apple iPhone 14 Plus recovery solutions, Dr. Fone has effectively managed to make a mark in the field. Especially when it comes to erasing an iPhone without an Apple ID password, the Dr.Fone – Screen Unlock (iOS) can help you get it done without a hitch. Not only can you erase an iPhone without an Apple ID password, but you can also get the Apple ID/iCloud lock removed too with much ease. With over 5 million-plus users, the tool is the most recommended in the market, serving every customer to their content.
Key Features:
The key features of Dr.Fone – Screen Unlock (iOS) are –
- It can unlock an iPhone/iPad by erasing an iPhone without an Apple ID password.
- Even when your screen is damaged and you cannot enter a passcode, Dr. Fone – Screen Unlock (iOS) can effortlessly get it done.
- If the passcode is wrongly set by your kids or an unknown, this software can help unlock the same.
- Works efficiently with almost all iOS devices and supports even the latest iOS version 14.
Step by Step Tutorial:
Let’s get to understand how to erase an iPhone without an Apple ID password:
Step 1: Connecting the iPhone/iPad
The first thing to do is download and install the Dr.Fone – Screen Unlock (iOS) software on your computer/laptop. Before you move on to any other step, connect your affected iPhone/iPad to your computer or laptop with the help of a USB.

Step 2: Select the correct Mode.
After the installation is done completely, launch the tool and select the “Screen Unlock” option on the software’s home interface. A new screen interface will appear, you will have three different options. You need to select the “Unlock iOS Screen” option and, this will start the entire process of unlocking.

Step 3: Boot your device into Recovery/DFU Mode
You now have to boot your Apple iPhone 14 Plus or iPad device into Recovery mode or DFU mode so that the software can recognize your device for further process. For your convenience, Dr. Fone Screen Unlock (iOS) has a built-in instruction facility that helps you to follow the steps.

Step 4: Confirm the information and download firmware
After a successful reboot into Recovery mode, the tool will automatically detect your device’s information and the most compatible iOS firmware. To start the process of downloading the firmware, you need to hit on “Start” button.

Step 5: Erase an iPhone without an Apple ID password.
Once the download is complete, you can get started with erasing an iPhone without an Apple ID password. Hit the “Unlock Now” button, and voila! In no time, you’ve successfully erased an iPhone without an Apple ID password.

Part 2. Erase an iPhone without Apple ID via iTunes
Sometimes your phone might ask for an Apple ID and password to confirm your authority. In such cases, you may get stuck as either you have forgotten the password to it, or you don’t remember the Apple ID in the first place. For that matter, where it needs immediate help, we have listed down a set of steps that can help you erase an iPhone without Apple ID via iTunes –
Step 1: Connect your Apple iPhone 14 Plus to the computer with the help of a USB and then open your iTunes.
Step 2: The best way to start the process is to move your phone to recovery mode. For this, you need to:
In iPhone 8 or later: Tap the Volume Up, then quickly tap Volume Down and hold down the Power key afterward.

In the case of iPhone 7/7Plus: Press the “Sleep/Power” and “Volume Down” keys together.
Hold down the keys until you see the message on your iTunes screen about “your iPhone has been detected in recovery mode.”
Step 3: Once done, click on “Ok” and choose the “Restore iPhone” option. Confirm your actions, and you’re done.
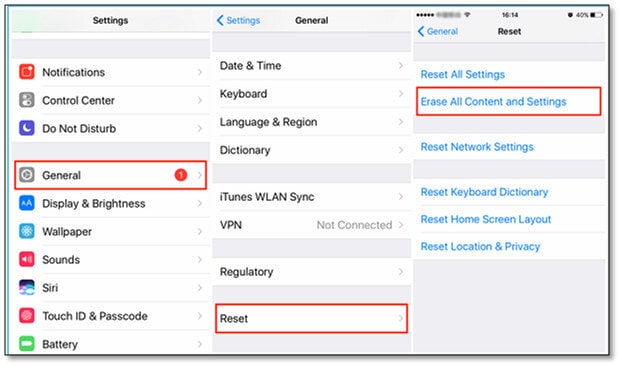
Part 3. How to erase an iPhone without Apple ID via Settings
Erasing an iPhone without Apple ID becomes necessary when we happen to use a second-hand phone or when we share a phone with someone. It is indeed a hard task to overcome these issues as we constantly strive to change our phone or replace it with a second-hand one. We have jotted a few steps that can help you erase an iPhone without Apple ID via settings for your ease.
Step 1: On your Apple iPhone 14 Plus, press the “Settings” icon on your App drawer.
Step 2: Under the Settings, scroll down and click on the “General” option.
Step 3: Now, you need to scroll all the way down to the “Reset” button and click on it. Then, look for “Erase All Content and Settings” and tap on the same.
Step 4: Enter your passcode to confirm. This action will pop up a screen where you need to select Erase iPhone again, and boom, you are done now.
Part 4. Tip you may need to erase Apple ID
Now, just in case you wish to delete your Apple ID completely, you need to perform a simple practice of removing any devices associated with your Apple ID.
Step 1: One can simply visit appleid.apple.com and log in with the Apple ID credentials already allotted to the user.
Note: You might get a prompt of a two-factor authentication code while being on this page.
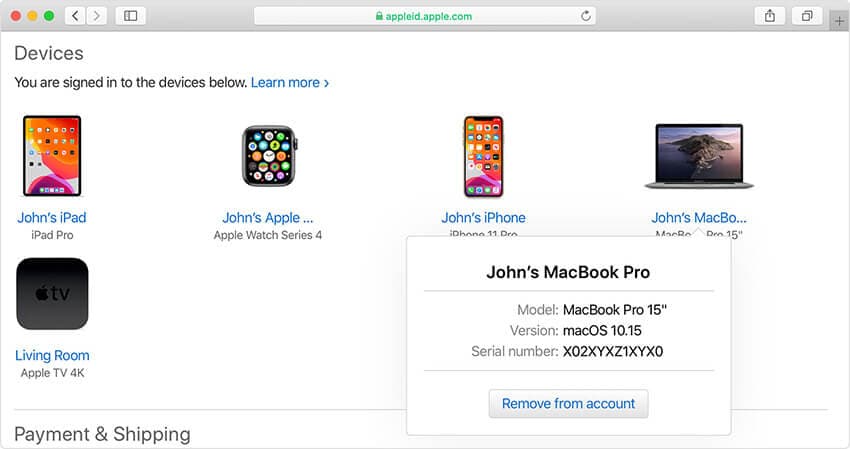
Step 2: Once you scroll down the line, choose, and click on the “Device” option.
Step 3: Choose the desired device and click on the “Remove from account” option followed by a “Remove this – Device Name” to confirm the action. Perform this step for all other devices.
How to erase an Apple ID via Apple’s Data and Privacy website
Now let’s get started with erasing an Apple ID via Apple’s Data and Privacy website are simple and, we have mentioned a simple way to take care of the same:
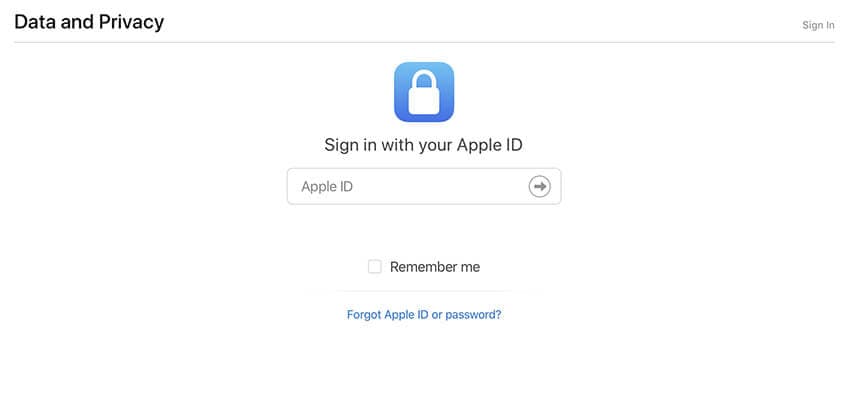
Step 1: Once you’re done removing the Apple iPhone 14 Plus devices linked to your Apple ID, visit privacy.apple.com and log in with the same Apple ID and password credentials.
Step 2: Once you authenticate, click on the prompt indicating the option to “Continue.”
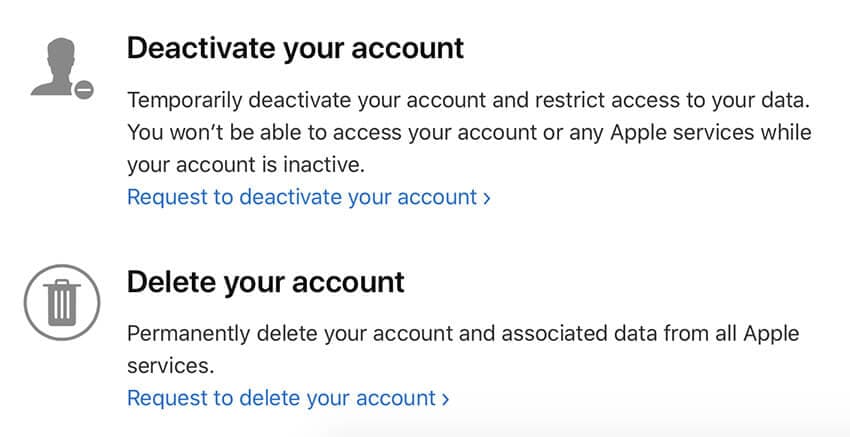
Step 3: Once you click on the “Get started” prompt on the screen, you will get a tab to “Delete your account.” This will prompt you with an Apple message indicating the information regarding the deletion process time.
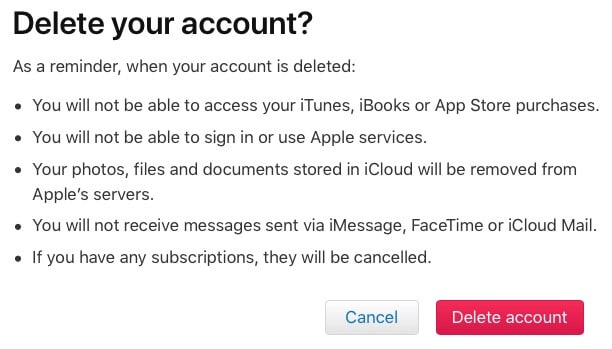
Step 4: Before everything, make sure you back up your data and follow the instructions steps prompted by Apple’s website. This will lead you to choose a reason for deletion from the click-down option and click “Continue.”
Message – You will get the details of the entire process for a quick review before you can submit for the final deletion of the policies
Step 5: Click on “Delete terms and conditions” by checking the read and agreed on the box. Make sure to provide a good call-back number to finalize the process.
Step 6: This submission will give you your access code which you can later use for clarification and, now you can click on the “Delete Account” option
Conclusion
Coming towards the end of the topic, we now are fully sure that you fully understand how to erase an iPhone without an Apple ID. Just in case you have any doubts, please feel free to comment below. And do remember to share this with your friends and family if you find it useful.
3 Ways of How to Get Someone’s Apple ID Off Apple iPhone 14 Plus without Password
iPhone has its unique system of iCloud and Apple ID that allows high privacy and security for users. It is responsible for keeping an updated version of all the applications that are present within the iPhone. You might have encountered a second-hand iPhone once in your life, which has a pre-stored Apple ID belonging to another user. You might be left with more problems while using your Apple iPhone 14 Plus under complicated circumstances where users do not have the username or password to the Apple ID that is related to the previous user.
Out of these problems, users aren’t able to update or download applications that have been acquired or purchased with their own Apple ID. All the photos taken would be backed up in the iCloud connected to the certain Apple ID. Have you ever wondered if there are convenient and straightforward solutions for countering this issue? There are several ways to get rid of someone else’s Apple ID without any credentials. This article will describe the methods of how to get someone’s Apple ID off the Apple iPhone 14 Plus without a password or any other credential.
Part 1: How to get someone else’s Apple ID off iPhone without a password using Dr. Fone – Screen Unlock (iOS)
There are many prompt notifications you would receive when trying to log into the Apple ID. In many cases, we might see that the users either would have forgotten their Apple ID passwords or couldn’t find the password of someone else’s Apple ID. But here’s the kicker, with Dr.Fone - Screen Unlock (iOS) your ID can be unlocked by keenly following a few steps as described below:
![]()
Dr.Fone - Screen Unlock (iOS)
Log out iPhone’s Apple ID without Password
- Prevent your phone from being tracked or remotely blocked.
- Free download checker to see if the iCloud Activation Lock is still on.
- Bypass iCloud activation lock without Apple ID or password.
4,008,669 people have downloaded it
Step 1. Connect your Apple Device (iPhone or iPad) to the desktop with the help of a USB cable. After downloading and installing Dr.fone, you need to select the “Screen Unlock” section on its home interface.
Step 2. A new screen appears after selecting the tool. Apple ID can be unlocked by selecting the third and last option of “Remove Apple ID.”
Step 3. Unlock the phone’s lock screen for trusting on the computer to further scan the data on the phone.

Step 4. By following the on-screen guidance provided by Dr.fone, users need to enter the recovery mode. After successfully rebooting their iPhone, the process of unlocking the Apple ID automatically initiates.

Step 5. The tool automatically starts the process of unlocking the Apple ID and finishes in a few seconds.

Step 6. Another screen comes on the front after the completion of the task, which tells the users to check whether their Apple ID has been unlocked or not.

Part 2: How to get rid of someone’s Apple ID off iPhone with the previous owner’s help?
Signing out of the Apple ID on your Apple iPhone 14 Plus is very easy if you are in contact with the previous owner. There are a few methods that are available for understanding how to remove the Apple ID from the Apple iPhone 14 Plus with their help.
1st Method
- The associated person needs to sign themselves into icloud.com and the Apple iPhone 14 Plus from their account. After signing in, they can easily access the Apple iPhone 14 Plus by hitting “Find iPhone.”
- After successfully finding the iPhone, they need to click “All Devices,” followed by the Apple iPhone 14 Plus from which the account is to be removed and select “Erase iPhone.”
2nd Method
There is another alternative method available to check if the previous owner has considerable trust in you. They would have to share their Apple ID credentials, which then can be easily removed by following the steps while using the same iPhone.
3rd Method
- In cases where the previous account is not activated, users can apply this method for iPhone models later than iPhone 6S.
- Connect with the desktop and open iTunes on it. Initiate a force restart by holding down the sleep button and volume down button for 10 seconds.
- Release the Sleep button and keep a hold of the volume down button for another 10 seconds.
- The screen on the Apple iPhone 14 Plus should be black. Following this, a message would appear on the desktop screen showing an iPhone in recovery mode.
- By clicking “Ok,” the restoration of the Apple iPhone 14 Plus shall start.
Part 3: How to get rid of someone’s Apple ID off iPhone on the App Store?
There might be a case where your subordinates or relative might have downloaded an app on your Apple iPhone 14 Plus from the App Store by using their IDs and would have forgotten to sign themselves out of it. For understanding the method on how to sign out of the Apple ID without passwords and credentials, users need to follow a few simple steps.
Conclusion
Having another Apple ID logged in doesn’t mean that everything is long lost. Several ways and scenarios help users to counter this problem easily. It’s easy to bypass Apple ID without a password remotely if you have the right tool. In that case, Dr.Fone - Screen Unlock (iOS) can definitely be your right choice. This article is a complete guide on how to combat the issue of having someone else’s Apple ID logged in to your Apple iPhone 14 Plus.
Also read:
- [New] In 2024, Navigating Virtual Spaces Easily With This List of Free Online Tools
- [New] Innovative Approaches 5 Techniques for Recording Sounds on Windows 11 for 2024
- Conquer Unwanted Silent Call Intrusions: A Simple Guide for iPhone Owners
- How to Fix when Apple Account Locked From Apple iPhone 15 Pro Max?
- How to Fix when Apple Account Locked On iPhone 6s Plus?
- In 2024, Bloodthirsty Horror Your Ultimate 8 Zombie Game Compilation
- In 2024, Forgot Your Apple ID Password and Email From Apple iPhone SE (2022)? Heres the Best Fixes
- In 2024, How To Remove Phone Number From Your Apple ID from Your iPhone 11?
- In 2024, Turning Off Two Factor Authentication From iPhone 6 Plus? 5 Tips You Must Know
- Is pgsharp legal when you are playing pokemon On Oppo Reno 11 Pro 5G? | Dr.fone
- Navigating the Best HDR Cameras
- Overcoming Unable to Link Error: Guide for Nvidia Experience on Windows 11
- Snap Shooting Techniques for Zoom Calls
- Step-by-Step Guide to Solve Microsoft Edge Crashing Problems on Your Windows 10 Device
- Turning Off Two Factor Authentication On Apple iPhone SE (2020)? 5 Tips You Must Know
- Your Account Has Been Disabled in the App Store and iTunes From iPhone 11 Pro Max?
- Title: Detailed Guide on Removing Apple iPhone 14 Plus Activation Lock without Previous Owner?
- Author: Alma
- Created at : 2024-10-19 04:30:03
- Updated at : 2024-10-26 04:50:44
- Link: https://apple-account.techidaily.com/detailed-guide-on-removing-apple-iphone-14-plus-activation-lock-without-previous-owner-by-drfone-ios/
- License: This work is licensed under CC BY-NC-SA 4.0.