
Everything To Know About Apple ID Password Requirements For Apple iPhone 14 Plus
Everything To Know About Apple ID Password Requirements For Apple iPhone 14 Plus
In the digital realm, your Apple ID is the guardian of your haven. Understanding the importance of a potent shield, this article delves into the essential realm of Apple ID password requirements.
A strong password is the key to safeguarding your digital kingdom. Dive in and unravel the significance of robust Apple ID passwords. Learn everything about the Apple ID password criteria and rules to secure your device. Fortify your Apple ID with simple yet effective measures because your device deserves the best defense!

Part I. Apple ID Password Requirements: What You Need To Know
Your Apple ID is the gatekeeper to a world of digital wonders, and a sturdy password is your first line of defense. Let’s unravel the secrets of crafting unbreakable Apple ID passwords with requirements examples that keep your account secure and your mind at ease.
- Length and Complexity
When it comes to passwords, size matters! Apple recommends a minimum of eight characters, but why stop there? Aim for a longer passphrase to add an extra layer of security. Mix it up with a blend of uppercase and lowercase letters, numbers, and sprinkle in some special characters for good measure.
- Variety is Key
To truly fortify your Apple ID, embrace diversity in your password creation. Incorporate a variety of characters, avoiding predictable sequences or easily guessable choices. This diversity acts as a shield against unauthorized access, making your password a robust fortress.
- Avoid Common Pitfalls
Beware of the password pitfalls! Apple urges users to steer clear of common patterns and dictionary words. Craft a password that is uniquely yours, steering away from easily guessable choices. You create a password that stands tall against potential threats by dodging the usual suspects.

Apple ID Password Criteria
Below are the Apple ID password rules for constructing a fortress-like password:
- Your password must not be your Apple ID or a minor variation.
- Avoid using the same password across multiple accounts.
- Regularly update your password for an added layer of security.
- Enabling two-factor authentication is your ally in the quest for an impenetrable Apple ID.
Understanding and implementing these guidelines isn’t just a security measure; it’s a digital necessity. In the next part of this series, you’ll explore practical tips for crafting a strong Apple ID password effortlessly. Stay tuned and continue your journey to fortify your digital world!
Part II. Best Practices for Creating a Strong Apple ID Password
Now that you’ve understood the Apple account password requirements, let’s embark on crafting a password that not only meets the criteria but also stands as a beacon of impenetrable security. Here are some simple yet effective best practices to guide you:

- Create Uniquely Memorable Passwords
Crafting a strong yet memorable password might seem challenging, but fear not! Blend words, add some numbers or special characters, and create a combination that is uniquely yours. This way, you ensure a password that’s strong and easy for you to recall.
- Embrace Password Managers
Why juggle multiple passwords in your mind when technology can lend a hand? Password managers are your digital sidekick, securely storing and organizing your passwords. They generate complex passwords for you, taking the hassle out of password creation and ensuring each account gets its unique shield.
- Regular Updates and Two-factor Authentication
Keep your digital fortress up to date by regularly refreshing your password. Set a reminder to change it periodically, adding an extra layer of security. And don’t forget the superhero of digital protection – two-factor authentication. Enabling this feature ensures that even if your password is known, an additional step is needed for access, making your Apple ID virtually impervious to unauthorized entry.
By incorporating these Apple account password requirements, you’re not just following rules but fortifying your Apple ID against potential threats. In the next part, you’ll see a couple of examples of strong Apple ID passwords. It will provide you with practical insights to elevate your digital security game.
Part III. Example of Strong Apple ID Passwords
Now that you know the groundwork for crafting a robust Apple ID password, let’s bring those concepts to life with practical examples. Remember, the key is to strike a balance between uniqueness and complexity. Here are a few examples to inspire your digital shield:

- Code 1: Sunrise$Pineapple42
Uniqueness: The combination of “Sunrise” and “Pineapple” adds a personal touch.
Complexity: Adding “$” and “42” meets Apple’s special character and number requirements.
- Code 2: Dance!Rainbow@73
Uniqueness: The pairing of “Dance” and “Rainbow” creates a memorable combination.
Complexity: Including “!” and “@73” adds the essential complexity.
- Code3: Adventure$4EverYolo
Uniqueness: Merging “Adventure” and “4EverYolo” gives a distinct touch.
Complexity: The presence of “$” and numbers meets the criteria for complexity.
These examples showcase the creativity and strength you can infuse into your Apple ID password with criteria. Remember, the goal is to make it yours, ensuring it’s easy to remember while providing a robust defense against unauthorized access. In the final segment, you’ll be introduced to a tool that extends this security mindset beyond Apple devices. Stay tuned for the exciting conclusion of this journey to fortify your digital presence!
Bonus: A Professional Solution for Bypassing Apple ID
As you navigate the digital security landscape, it’s crucial to extend your focus beyond Apple devices and explore solutions catering to the broader spectrum. Imagine this scenario: you’ve diligently followed the guidelines for creating a robust Apple ID password, but what if you find yourself locked out of your Android device due to a forgotten password? Fear not; here’s a reliable solution: Wondershare Dr.Fone - Screen Unlock (iOS).
Dr.Fone - Screen Unlock (iOS) isn’t just a tool confined to Apple’s realm; it’s your trusted ally in managing and securing Android devices’ passwords. If you ever find yourself unable to access your Android device, this professional solution steps in to efficiently unlock it, ensuring you regain control effortlessly.

Key Features and Benefits
Dr.Fone - Screen Unlock (iOS) is a user-friendly and efficient tool that goes beyond simple unlocking. Check out its key features and benefits below:
- **Effortless Unlocking.**Fone makes unlocking your iOS device a breeze. Regain access to your Apple iPhone 14 Plus or iPad without any hassle, even if you forget your password.
- **Versatile Password Management.**Beyond unlocking, Dr.Fone manages various password types (PIN, pattern, password). Ensure your preferred method of device security is both convenient and secure.
- **Wide Device Compatibility.**Compatible with various iOS devices like iPhones and iPads. No matter which Apple device you have, Dr.Fone is ready to assist in unlocking and securing it.
- User-friendly Interface. Intuitive and easy-to-use interface. No technical expertise is required; effortlessly navigate and use the tool to unlock your device.
- **Secure Data Protection.**Protecting your data during the unlocking process. Your private information remains secure while regaining access to your device.
- **No Data Loss.**Unlock your device without losing any data. Regain access without sacrificing your photos, messages, or other important information.
- **Time-efficient Solution.**Fone swiftly unlocks your device. Regain access to your iOS device quickly, minimizing downtime.
- **Reliable Support.**Accessible customer support. Assistance is available if you encounter any issues or have questions during the unlocking process.
Step-by-Step Guide
The easy-to-follow steps provided below will make the unlocking process stress-free and straightforward.
- Step 1: Launch the iOS tool in a new window after downloading and installing Wondershare Dr.Fone on your PC. You may do this by navigating to Toolbox > Screen Unlock > iOS.
- Step 2: To unlock the iOS device screen, click the Unlock iOS Screen button in the popup that appears.

- Step 3: Click Start on the following screen to begin unlocking the iOS device. It is imperative that you check the battery life of your gadget before you proceed so the operation won’t get interrupted.
- Step 4: After that, you should switch your Apple iPhone 14 Plus into Recovery mode. Just follow the on-screen prompts to switch your iOS device into the appropriate mode for your specific model. To get the instructions for entering DFU mode on the iDevice, click the Try DFU Mode button on the bottom if Recovery mode does not solve the problem.

- Step 5: The platform automatically detects the Device Model and shows it in the corresponding section after the user successfully puts their iDevice into Recovery Mode. Adjust the model and choose the System Version to meet your needs. After that, hit Start to unlock your phone’s screen.

- Step 6: The following screen shows how far along the iOS firmware download is. To cancel out of it all, just hit the Stop button. If the platform’s iOS firmware download is taking too long, you can manually copy the URL to download the firmware by clicking the Copy button.
- Step 7: The next page will show the verification and installation of the iOS firmware if the download is successful. Press the Unlock Now button again to initiate the unlocking procedure.

- Step 8: A confirmation window pops up on the screen to confirm the action. To proceed, enter the code and hit Unlock. You can see the iOS device’s progress bar on the following screen as it unlocks. Remember that the gadget must remain connected; otherwise, it will brick.

- Step 9: Once the iDevice has been successfully unlocked, click the Done button to complete the process. If you still have a locked iDevice, select Try Again to restart the process.
In essence, Dr.Fone - Screen Unlock (iOS) extends the principles of secure password management beyond the Apple ecosystem. It becomes a valuable asset in scenarios where accessing your iOS device becomes a challenge, ensuring you regain control without compromising security.
Conclusion
As this article wraps up the exploration of Apple ID password requirements, remember that protecting your information goes beyond a single device. Remember, strong passwords are your digital armor, shielding not only Apple devices but all corners of your digital world. Prioritize security across every device.
Dr.Fone - Screen Unlock (iOS) is the bridge that connects your commitment to security seamlessly. In the dynamic landscape of digital living, having a reliable companion like Dr.Fone - Screen Unlock (iOS) ensures you’re always in control, effortlessly managing and securing your passwords across various platforms.
Tips: Are you searching for a powerful Screen Unlock tool? No worries as Dr.Fone is here to help you. Download it and start a seamless unlock experience!
Your Account Has Been Disabled in the App Store and iTunes On Apple iPhone 14 Plus?
You may see the error message, “Your account has been disabled in the App Store and iTunes” when you try to log in. This is often an indication that for some reason your Apple ID is not working as it should. When you consider that you will not be able to download or update apps or even make a purchase using Apple Pay without your Apple ID, it is easy to see why this error message can be a problem.
Why is my account disabled in the App store? Here, we take a look at the reasons why you may see the error messages and what you can do to fix them.
Part 1. Why has my account been disabled in the App Store and iTunes?
The following are some reasons why you may see this error message popup on your screen:
- Entering the incorrect Apple ID and password multiple times
- Not using your Apple ID for an extended period of time
- Any billing issues such as unpaid iTunes and App Store orders
- Safety and security reasons like when Apple suspects your account may be hacked
- When there are charging disputes on your credit card
Part 2. How to fix “Your account has been disabled in App store and iTunes”?
There are numerous methods to tackle this issue and regain access to your device. For a quick and concise understanding, you can watch our informative video tutorial. If you prefer a more in-depth, step-by-step explanation, continue reading this article for detailed instructions on each method.
Tips: Did you forget your Apple ID password or are you struggling to remove your Apple ID account? Worry not, as Dr.Fone is here to help you remove your Apple ID without password in a matter of seconds. By logging into a new account, you can fully restore access to all your iCloud services and Apple ID features, ensuring a seamless user experience.
Method 1. Wait 24 hours and Try Again
This method will prove useful to you if you have entered the wrong password several times. If this is the reason your account has been disabled, leave it alone for about 24 hours. When the time has elapsed, try entering the correct password to see if this fixes the issue.
If you just forget the password and cannot remember it, you can follow the steps below to reset the password on your own iOS device:
- Step 1: Open Settings.
- Step 2: Tap [your name] on top of the screen> Password & Security > Change Password.
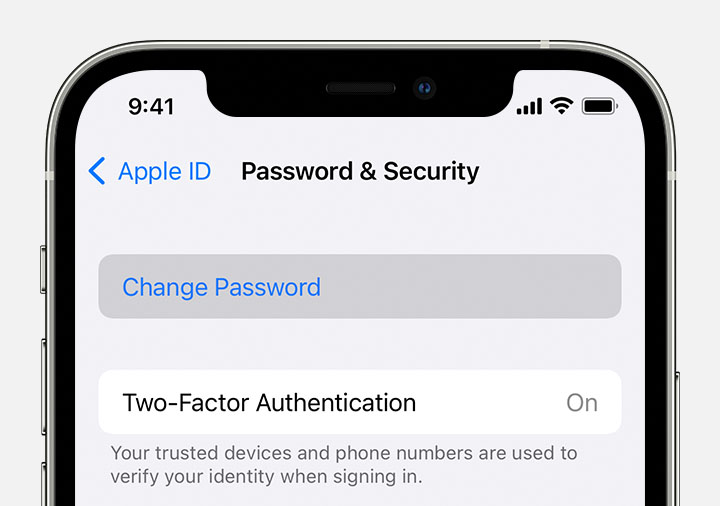
- Step 3: Enter the passcode for your device.
- Step 4: Follow the onscreen steps to reset your password.
If the above steps were unable to change or reset the password, follow the steps below:
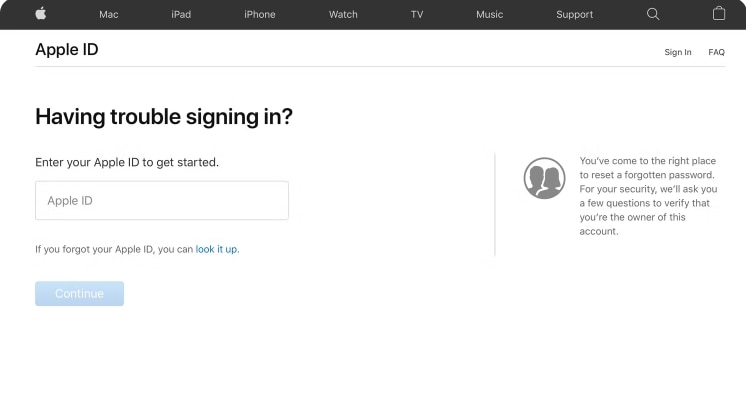
- Step 1: Go to https://iforgot.apple.com/ .
- Step 2: Put your Apple ID (email) in the box and click “Continue”.
- Step 3 Enter the phone number that you use with your Apple ID.
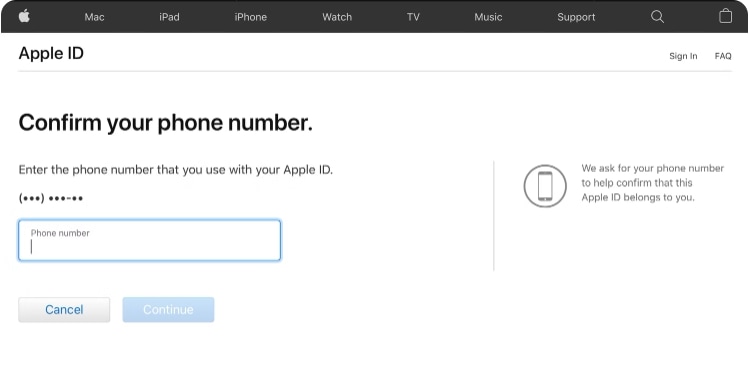
- Step 4: Look for the notification on iPhone, Mac, or iPad and follow the instructions to reset the password.

Note that if you are changing your Apple ID password on an iPhone or iPad, you will need to enter your device’s six-digit passcode, then reset a new password.
Forgetting the password is particularly troublesome, but there is good news. That is, you can use Password Manager to find your passwords on your Apple iPhone 14 Plus/iPad without spending too much time remembering them!
Dr.Fone - Password Manager (iOS)
Recover and keep all your passwords in one place
- Unlock and manage various passcodes, PINs, Face IDs, Apple ID, WhatsApp password reset, and touch ID without limitations.
- To find your password on an iOS device, it effectively functions without harming or leaking your information.
- Ease your job by finding any strong password across various platforms to manage multiple email accounts.
- The installation of Dr.Fone on your device won’t take much space, without any disturbing ads.
3981454 people have downloaded it
Method 2. View Your Payment Methods and Update Them
If you think that your account has been disabled because of a payment issue, it is necessary to check your payment methods and update them. Follow these simple steps to do it:
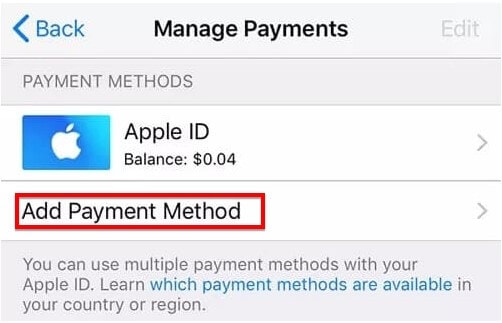
- Step 1: Open the Settings and then tap on your name at the top.
- Step 2: Select “iTunes & App Store” and then choose your Apple ID.
- Step 3: Tap “View Apple ID” and then select “Manage Payments”.
- Step 4: Tap “Add Payment Method” to add a new payment method.
If the payment method was the issue, your account will be re-enabled after these steps.
Method 3. Settle Any Unpaid Charges
Do you have any unpaid purchases or subscriptions?
It is important to keep track of any purchases or subscriptions that you have signed up for and ensure that you pay for them on time. This not only helps you avoid late fees and penalties, but it also ensures that your account remains active and accessible. If you do have any unpaid charges, it is recommended that you settle them as soon as possible in order to reinstate your account and prevent any further issues. Keep a record of all your expenses and regularly review your bills to avoid missing any payments and keep your accounts in good standing.
Method 4. Sign Out and Sign in Again
Signing out of your account and then signing back in may help if this issue is caused by a software glitch.
- On your iOS device, go to Settings > [Your Name] > iTunes & App Store and Sign Out. Then sign in again.
- On your Mac, open the App Store (Store > Sign Out) and iTunes (Account > Sign Out. Then sign in again.
Method 5. Try Contacting Apple Support Directly
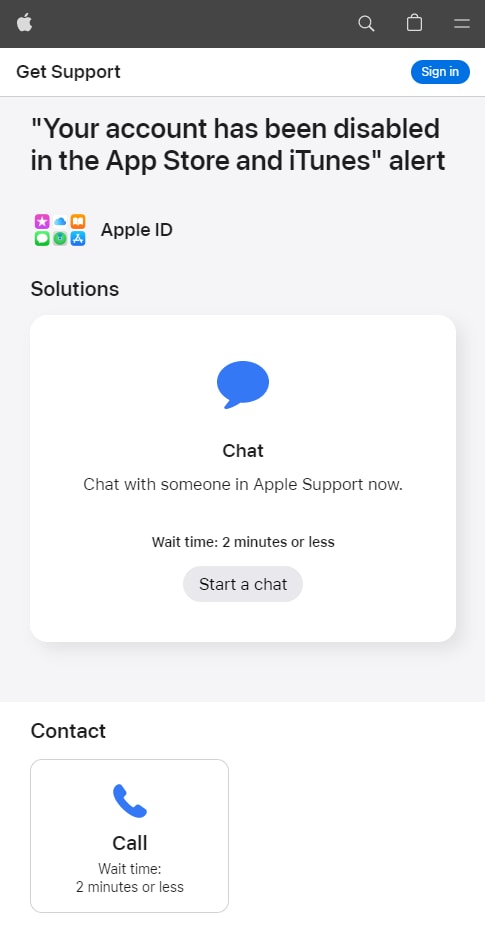
If you see a message that says, “Your account has been disabled in the App Store and iTunes,” contact Apple Support for help. You can follow these simple steps to contact Apple support:
- Step 1: Go to https://getsupport.apple.com/solutions .
- Step 2: Then click “Start a chat” to chat with someone in Apple Support now.
- Step 3: Or schedule a call with Apple Support, and they should be able to help you fix your account disabled in App store.
Part 3. What does it influence when “Your account has been disabled in the App Store and iTunes”?
When you see the error message “Your account has been disabled in the App Store and iTunes” it often means the following:
- You cannot access Apple Books, App Store purchases, and even iTunes purchases.
- You may not have access to your iCloud account or any of the data stored in the account until you fix the problem.
- Furthermore, you may not be able to access Apple services and any Apple Store orders and repairs may need to be rescheduled.
- Until you can fix the issue, you will not be able to receive iMessage, FaceTime, and iCloud Mail.
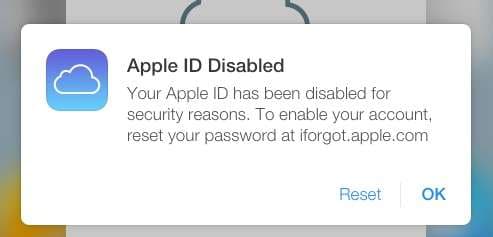
Part 4. Is “Your account has been disabled in the App Store and iTunes” the same as “Apple ID disabled”?
No. The error message “Your account has been disabled in the App Store and iTunes” differs from “Apple ID disabled”. You will primarily see the “Your account has been disabled in the App Store and iTunes” when you try to access content in the App Store. On the other hand, you may see the message “Apple ID disabled” when you enter the Apple ID and password to bypass the iCloud Activation Lock screen .
After you see these errors, you will not be able to access some of the features and apps that require your Apple ID for access.
Part 5. How to fix Apple ID disabled by removing Apple ID?
Sometimes the only way to fix “Apple ID Disabled” is to remove the Apple ID from the Apple iPhone 14 Plus device. This may become a viable solution if you lost or forgot the Apple ID password or ID and you have no way to recover them. It is also one of the best solutions when you purchased a second-hand device, and you don’t know the Apple ID password for the account associated with the Apple iPhone 14 Plus device.
One of the best ways to remove the Apple ID from an iOS device is to use Dr.Fone - Screen Unlock (iOS) . This third-party unlocking software is designed to easily and effectively remove the Apple ID password from any device. The following are some things it can do;
Dr.Fone - Screen Unlock (iOS)
Remove iCloud Account without Password in Minutes
- Remove Apple ID/iCloud Account efficiently.
- Save your Apple iPhone 14 Plus quickly from the disabled state.
- Free your sim out of any carrier worldwide.
- Bypass iCloud activation lock and enjoy all iCloud services.

- Works for all models of iPhone, iPad, and iPod touch.

4,008,669 people have downloaded it
Here’s how to use Dr.Fone Screen Unlock to remove the Apple ID from the Apple iPhone 14 Plus device;
- Step 1: Install the Program
To begin, download the Dr.Fone Toolkit from the program’s main website. Install the toolkit onto your computer. Open it after successful installation and then choose “Screen Unlock” from the main screen.
- Step 2: Choose to Remove Apple ID
On the next screen, you should see three options. Choose “Remove Apple ID” since we want to remove the Apple ID from the Apple iPhone 14 Plus device.

- Step 3: Connect the iOS Device
Connect the iOS device to the computer using its lightning cable. Then enter the Apple iPhone 14 Plus device’s passcode and, when prompted, tap “Trust” to allow the computer to detect the Apple iPhone 14 Plus device. The program should detect the Apple iPhone 14 Plus device and display information about it. Then click “Unlock Now”.

- Step 4: Apple ID Removal will Begin
Dr.Fone will immediately begin removing the Apple ID from the Apple iPhone 14 Plus device. You should see a progress bar indicating how long the process will take. Ordinarily, the removal should take just a few seconds. When the process is complete, you will see a notification on the screen letting you know that the Apple ID has been removed.

You should then be able to sign in to another Apple ID or create a new Apple ID and password to use on the Apple iPhone 14 Plus device.
Conclusion
In conclusion, encountering a disabled Apple account in the App Store and iTunes can be a frustrating experience. However, by understanding the reasons behind it, following the recommended steps to resolve the issue, and considering the broader impact on your digital life, you can navigate this situation effectively. Remember, prompt action and patience are key to restoring your account and getting back to enjoying the Apple ecosystem hassle-free.
How to Remove an AirTag from Your Apple ID Account On Apple iPhone 14 Plus?
Apple provides many exciting features in its products, including the AirTag feature on iPhone devices. However, after enabling the function, many iPhone users forget to remove it from the FindMy app ahead of time. Therefore, if you are selling or resetting the Apple iPhone 14 Plus device, you need to remove AirTag from Apple ID to be usable later.
If someone removes the AirTag without resetting it while operating in the Bluetooth range, deleting AirTag ownership will require manually breaking the Apple iPhone 14 Plus device apart and further configuration.
Remove this connection from the Apple ID account with simple steps first-hand to avoid that. Read on to know the steps involved in this process directly or with the best software alternative.

Part 1. What Exactly Does an AirTag Do?
Before discussing how to remove AirTag from Apple ID, you should know better about the function itself. The AirTag feature is available for iOS devices. Therefore, one can register the AirTag process with the Apple ID you are utilizing on your smartphone.
Apple users can attach the AirTag to different objects like backpacks or keychains. This makes it simple to find these objects later in case they get misplaced or lost through the Find My app on the iPhone.
Users can add their AirTag to one Apple ID account, so you cannot access this from the Find My app via other accounts. In case of loss, you must remove the AirTag from your device entirely.

Part 2. How to Remove an AirTag from Your Apple ID onApple iPhone 14 Plus & iPad?
After adding the AirTag to any object, it instantly syncs with the Apple ID of the user. So, only the primary Apple ID user can use or monitor the AirTagged item. Other users can use it only after resetting the AirTag. So, learn how to remove AirTag from Apple ID via the Find My app on different iOS device types.
Version 1: Removing AirTag on iPhone
Step 1: Access the Apple iPhone 14 Plus homepage and access the Find My app.
Step 2: From the bottom menu bar, tap on the Items option.
Step 3: The information about which AirTag is associated with your chosen item will appear in the next page list.

Step 4: Choose the selected items and swipe upwards on the screen. Then, find the Remove Item button and press it.

Step 5: Following this, select and press the Remove button. Repeat for confirmation.
Version 2: Removing AirTag on iPad
Step 1: Access the Find My app from the home screen on your iPad device.
Step 2: When the app opens, click on the Items icon at the bottom part of the screen.

Step 3: Choose the items you want to delete by tapping them.
Step 4: Swipe up and choose the “Remove Item” option.
Step 5: On the next confirmation prompt that comes up, click Remove.

Part 3. Bonus Tips: How to Unlock an Apple ID That’s Locked?
Typically, it is impossible to use a PC or Mac to access and remove AirTag from Apple ID. One has to use the Apple iPhone 14 Plus or iPad device only. But what if the smartphone screen or Apple ID is locked?
You need to unlock the Apple iPhone 14 Plus device using capable software like Dr.Fone - Screen Unlock (iOS) to remove the blockage. This software can remove many different Apple screen lock types, like Black Screen of Death, Face ID Lock, Screen Time Passcode, and more.
The process of bypassing Apple ID as a feature is available for iOS 14.0 or its previous conversions. It does not require extremely complex jailbreaking or configuration steps- all is complete in some clicks only.
Top Features:
- Users get at least ten retries for the password or lock removal attempt.
- Suitable for removing various screen locks, Apple ID locks, etc.
- Works to bypass Apple ID account locking without a password within seconds.
- It allows Apple ID lock removal even with the active Find My iPhone feature on the smartphone.
How to use it?
Step 1: Install the Dr.Fone app and launch it on the computer. Choose Screen Unlock.
Step 2: On the next page, tap the Remove Apple ID option. Then enter the necessary passcode to verify that you trust the PC. Then, do further scanning.

Step 3: Back up all devices before the procedure. Then, visit the Settings page > user profile > Password & Security. Then, toggle the Two Factor Authentication feature to the ON part. Then, press Unlock Now.
Step 4: Put the smartphone into recovery mode with on-screen instructions. Then, restart the phone. Complete the resetting steps and press the Restart button. It will unlock the Apple iPhone 14 Plus device automatically.

Step 5: Verify on your device that the Apple ID is unlocked. Then, go to the Find My app and remove the AirTag feature as detailed previously.
Part 4. FAQs about AirTag
- How to Set Up and Add an AirTag on Your Apple iPhone 14 Plus?
Firstly, get your device ready to get set up. Remove the wrap around the AirTag and pull the tab out to start the battery. After it plays a tiny sound, hold the Apple iPhone 14 Plus device near the iPhone/iPad and press Connect. Next, change the name of the AirTag on your list, give an emoji to it, and press Continue. Register it with the Apple ID in the next prompt and then choose Done.
- How to Rename AirTag and Change Its Emoji?
You can access the Items tab on the Find My application and choose the AirTagged item. Then, scroll downward and choose Rename item to change the name. Finally, create a customized name and add an emoji as well.
- How Far Can You Track an Apple AirTag?
With the Bluetooth connection switched on, one can track Apple AirTag for approximately 100 feet.
Conclusion
The added AirTag stays connected with one Apple ID account until you reset it. So, use the process mentioned to remove the AirTag via iPhone or iPad. If the iPad or iPhone you are using has locked the Apple ID, you can use another software Dr.Fone - Screen Unlock (iOS) , to access it without data loss securely. Then, follow the steps mentioned to reset the AirTag here.
Also read:
- [Updated] 2024 Approved From Game to Giga Full PS4 Capture Using OBS
- [Updated] 2024 Approved The Ultimate Playbook Speaking with Flair on Slides
- [Updated] Tricks for Making FB Ads Pop Up on Screen
- 2024 Approved Enhancing Engagement OneStream Streaming Best Practices
- Full Tutorial to Bypass Your ZTE Face Lock?
- Guide on How To Remove Apple ID From iPhone 12 Pro Max
- How To Remove the Two Factor Authentication On iPhone 8
- In 2024, Forgot Your Apple ID Password and Email From Apple iPhone 15 Pro? Heres the Best Fixes
- In 2024, Your Account Has Been Disabled in the App Store and iTunes From iPhone 12 mini?
- New In 2024, Send Local Videos to Chromecast Easy Setup for Windows, Mac, Android, and iOS
- Vivo S17 Not Connecting to Wi-Fi? 12 Quick Ways to Fix | Dr.fone
- Title: Everything To Know About Apple ID Password Requirements For Apple iPhone 14 Plus
- Author: Alma
- Created at : 2024-10-19 03:07:27
- Updated at : 2024-10-26 13:20:35
- Link: https://apple-account.techidaily.com/everything-to-know-about-apple-id-password-requirements-for-apple-iphone-14-plus-by-drfone-ios/
- License: This work is licensed under CC BY-NC-SA 4.0.