
Everything To Know About Apple ID Password Requirements For Apple iPhone XS
Everything To Know About Apple ID Password Requirements For Apple iPhone XS
In the digital realm, your Apple ID is the guardian of your haven. Understanding the importance of a potent shield, this article delves into the essential realm of Apple ID password requirements.
A strong password is the key to safeguarding your digital kingdom. Dive in and unravel the significance of robust Apple ID passwords. Learn everything about the Apple ID password criteria and rules to secure your device. Fortify your Apple ID with simple yet effective measures because your device deserves the best defense!

Part I. Apple ID Password Requirements: What You Need To Know
Your Apple ID is the gatekeeper to a world of digital wonders, and a sturdy password is your first line of defense. Let’s unravel the secrets of crafting unbreakable Apple ID passwords with requirements examples that keep your account secure and your mind at ease.
- Length and Complexity
When it comes to passwords, size matters! Apple recommends a minimum of eight characters, but why stop there? Aim for a longer passphrase to add an extra layer of security. Mix it up with a blend of uppercase and lowercase letters, numbers, and sprinkle in some special characters for good measure.
- Variety is Key
To truly fortify your Apple ID, embrace diversity in your password creation. Incorporate a variety of characters, avoiding predictable sequences or easily guessable choices. This diversity acts as a shield against unauthorized access, making your password a robust fortress.
- Avoid Common Pitfalls
Beware of the password pitfalls! Apple urges users to steer clear of common patterns and dictionary words. Craft a password that is uniquely yours, steering away from easily guessable choices. You create a password that stands tall against potential threats by dodging the usual suspects.

Apple ID Password Criteria
Below are the Apple ID password rules for constructing a fortress-like password:
- Your password must not be your Apple ID or a minor variation.
- Avoid using the same password across multiple accounts.
- Regularly update your password for an added layer of security.
- Enabling two-factor authentication is your ally in the quest for an impenetrable Apple ID.
Understanding and implementing these guidelines isn’t just a security measure; it’s a digital necessity. In the next part of this series, you’ll explore practical tips for crafting a strong Apple ID password effortlessly. Stay tuned and continue your journey to fortify your digital world!
Part II. Best Practices for Creating a Strong Apple ID Password
Now that you’ve understood the Apple account password requirements, let’s embark on crafting a password that not only meets the criteria but also stands as a beacon of impenetrable security. Here are some simple yet effective best practices to guide you:

- Create Uniquely Memorable Passwords
Crafting a strong yet memorable password might seem challenging, but fear not! Blend words, add some numbers or special characters, and create a combination that is uniquely yours. This way, you ensure a password that’s strong and easy for you to recall.
- Embrace Password Managers
Why juggle multiple passwords in your mind when technology can lend a hand? Password managers are your digital sidekick, securely storing and organizing your passwords. They generate complex passwords for you, taking the hassle out of password creation and ensuring each account gets its unique shield.
- Regular Updates and Two-factor Authentication
Keep your digital fortress up to date by regularly refreshing your password. Set a reminder to change it periodically, adding an extra layer of security. And don’t forget the superhero of digital protection – two-factor authentication. Enabling this feature ensures that even if your password is known, an additional step is needed for access, making your Apple ID virtually impervious to unauthorized entry.
By incorporating these Apple account password requirements, you’re not just following rules but fortifying your Apple ID against potential threats. In the next part, you’ll see a couple of examples of strong Apple ID passwords. It will provide you with practical insights to elevate your digital security game.
Part III. Example of Strong Apple ID Passwords
Now that you know the groundwork for crafting a robust Apple ID password, let’s bring those concepts to life with practical examples. Remember, the key is to strike a balance between uniqueness and complexity. Here are a few examples to inspire your digital shield:

- Code 1: Sunrise$Pineapple42
Uniqueness: The combination of “Sunrise” and “Pineapple” adds a personal touch.
Complexity: Adding “$” and “42” meets Apple’s special character and number requirements.
- Code 2: Dance!Rainbow@73
Uniqueness: The pairing of “Dance” and “Rainbow” creates a memorable combination.
Complexity: Including “!” and “@73” adds the essential complexity.
- Code3: Adventure$4EverYolo
Uniqueness: Merging “Adventure” and “4EverYolo” gives a distinct touch.
Complexity: The presence of “$” and numbers meets the criteria for complexity.
These examples showcase the creativity and strength you can infuse into your Apple ID password with criteria. Remember, the goal is to make it yours, ensuring it’s easy to remember while providing a robust defense against unauthorized access. In the final segment, you’ll be introduced to a tool that extends this security mindset beyond Apple devices. Stay tuned for the exciting conclusion of this journey to fortify your digital presence!
Bonus: A Professional Solution for Bypassing Apple ID
As you navigate the digital security landscape, it’s crucial to extend your focus beyond Apple devices and explore solutions catering to the broader spectrum. Imagine this scenario: you’ve diligently followed the guidelines for creating a robust Apple ID password, but what if you find yourself locked out of your Android device due to a forgotten password? Fear not; here’s a reliable solution: Wondershare Dr.Fone - Screen Unlock (iOS).
Dr.Fone - Screen Unlock (iOS) isn’t just a tool confined to Apple’s realm; it’s your trusted ally in managing and securing Android devices’ passwords. If you ever find yourself unable to access your Android device, this professional solution steps in to efficiently unlock it, ensuring you regain control effortlessly.

Key Features and Benefits
Dr.Fone - Screen Unlock (iOS) is a user-friendly and efficient tool that goes beyond simple unlocking. Check out its key features and benefits below:
- **Effortless Unlocking.**Fone makes unlocking your iOS device a breeze. Regain access to your Apple iPhone XS or iPad without any hassle, even if you forget your password.
- **Versatile Password Management.**Beyond unlocking, Dr.Fone manages various password types (PIN, pattern, password). Ensure your preferred method of device security is both convenient and secure.
- **Wide Device Compatibility.**Compatible with various iOS devices like iPhones and iPads. No matter which Apple device you have, Dr.Fone is ready to assist in unlocking and securing it.
- User-friendly Interface. Intuitive and easy-to-use interface. No technical expertise is required; effortlessly navigate and use the tool to unlock your device.
- **Secure Data Protection.**Protecting your data during the unlocking process. Your private information remains secure while regaining access to your device.
- **No Data Loss.**Unlock your device without losing any data. Regain access without sacrificing your photos, messages, or other important information.
- **Time-efficient Solution.**Fone swiftly unlocks your device. Regain access to your iOS device quickly, minimizing downtime.
- **Reliable Support.**Accessible customer support. Assistance is available if you encounter any issues or have questions during the unlocking process.
Step-by-Step Guide
The easy-to-follow steps provided below will make the unlocking process stress-free and straightforward.
- Step 1: Launch the iOS tool in a new window after downloading and installing Wondershare Dr.Fone on your PC. You may do this by navigating to Toolbox > Screen Unlock > iOS.
- Step 2: To unlock the iOS device screen, click the Unlock iOS Screen button in the popup that appears.

- Step 3: Click Start on the following screen to begin unlocking the iOS device. It is imperative that you check the battery life of your gadget before you proceed so the operation won’t get interrupted.
- Step 4: After that, you should switch your Apple iPhone XS into Recovery mode. Just follow the on-screen prompts to switch your iOS device into the appropriate mode for your specific model. To get the instructions for entering DFU mode on the iDevice, click the Try DFU Mode button on the bottom if Recovery mode does not solve the problem.

- Step 5: The platform automatically detects the Device Model and shows it in the corresponding section after the user successfully puts their iDevice into Recovery Mode. Adjust the model and choose the System Version to meet your needs. After that, hit Start to unlock your phone’s screen.

- Step 6: The following screen shows how far along the iOS firmware download is. To cancel out of it all, just hit the Stop button. If the platform’s iOS firmware download is taking too long, you can manually copy the URL to download the firmware by clicking the Copy button.
- Step 7: The next page will show the verification and installation of the iOS firmware if the download is successful. Press the Unlock Now button again to initiate the unlocking procedure.

- Step 8: A confirmation window pops up on the screen to confirm the action. To proceed, enter the code and hit Unlock. You can see the iOS device’s progress bar on the following screen as it unlocks. Remember that the gadget must remain connected; otherwise, it will brick.

- Step 9: Once the iDevice has been successfully unlocked, click the Done button to complete the process. If you still have a locked iDevice, select Try Again to restart the process.
In essence, Dr.Fone - Screen Unlock (iOS) extends the principles of secure password management beyond the Apple ecosystem. It becomes a valuable asset in scenarios where accessing your iOS device becomes a challenge, ensuring you regain control without compromising security.
Conclusion
As this article wraps up the exploration of Apple ID password requirements, remember that protecting your information goes beyond a single device. Remember, strong passwords are your digital armor, shielding not only Apple devices but all corners of your digital world. Prioritize security across every device.
Dr.Fone - Screen Unlock (iOS) is the bridge that connects your commitment to security seamlessly. In the dynamic landscape of digital living, having a reliable companion like Dr.Fone - Screen Unlock (iOS) ensures you’re always in control, effortlessly managing and securing your passwords across various platforms.
Tips: Are you searching for a powerful Screen Unlock tool? No worries as Dr.Fone is here to help you. Download it and start a seamless unlock experience!
How To Remove the Two Factor Authentication On Apple iPhone XS
Want To Remove the Two Factor Authentication? Check Out This Guide

Continuous technology innovation has introduced many advanced encryption and security methods to protect data from hackers. With these innovations, companies like Apple and Google have introduced the two-factor authentication process to protect user data.
But sometimes, this security method becomes a hassle to access your data daily, due to which many users try to remove it. That is why, in this article, we have discussed how you can remove iCloud two-factor authentication easily.
- Part 1: What Is Two-Factor Authentication and How Helpful It Is
- Part 2: Can You Remove the Two Factor Authentication iCloud at Anytime
- Part 3: How To Remove the Two-Factor Authentication Within 14 Days
- Part 4: iPhone Apple ID Got Locked? Here’s a Reliable Tool To Get It Unlocked Without Passcode

Part 1: What Is Two-Factor Authentication and How Helpful It Is
Protecting users’ devices and online accounts is one of the major responsibilities of tech companies like Apple. Due to this, they have added multiple security features, including two-factor authentication. Thus, if you create an Apple ID, you can see a two-factor authentication option that adds an extra layer of security.
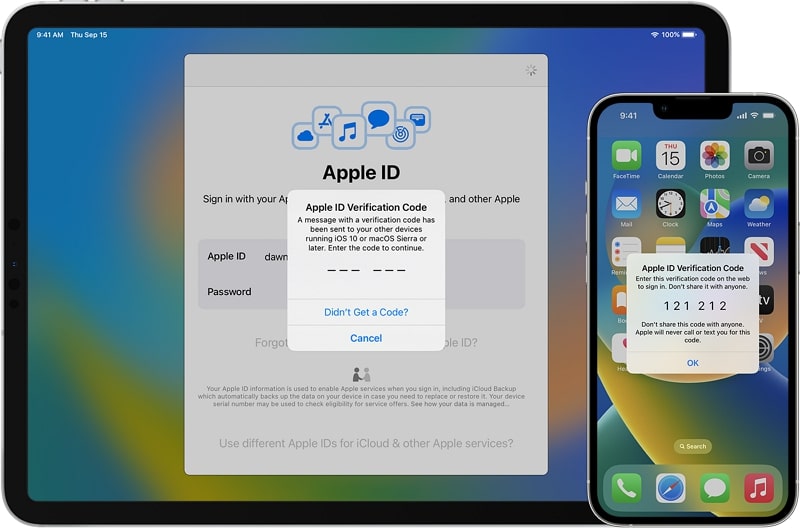
2FA is activated when the user provides the password to log into the Apple ID or software through a new device, and it acts as a second layer for account security. Apple ID or any software containing sensitive data cannot be accessed without it. This method provides a higher security level than single-factor authentication. To understand more benefits of this security system in detail, check the following points:
- Protection From Password Theft: 2FA acts as an additional security level. It protects your accounts and devices in case your password is leaked.
- Migrations of Unauthorized Assets: Online banking applications use 2FA to protect users from unauthorized bank transfers. If someone accesses their app, this is a beneficial security measure.
- Protection on Multiple Services: Platforms, including social media, banks, and cloud storage, use 2FA. It means that 2FA can be used in various digital aspects.
Part 2: Can You Remove the Two Factor Authentication iCloud at Anytime
Many people use 2FA globally to protect their personal information and devices from hackers and unauthorized access. However, in some cases, users may want to remove two-factor authentication iCloud for multiple reasons. This includes scenarios in which their device is lost or damaged or if they have found a better security option than this one.
Moreover, there is one important key point to note: Apple has removed the feature of deactivating 2FA from the Apple ID. It means you need to think twice before activating this feature on your Apple ID because it cannot be reversed. For the following reasons, Apple has taken this initiative:
- Enhanced Security: By removing the deactivation option for 2FA, Apple is trying to strengthen its account security to ensure that no one can access its user’s data.
- Reducing Vulnerabilities: Allowing users to deactivate 2FA could cause vulnerabilities in the Apple ecosystem that can be a weak point for protecting users’ data. That is why Apple has removed the deactivation option to stop malicious actors from taking advantage of this vulnerability.
- Encouraging Security Awareness: To make Apple users more security conscious, Apple has made it difficult on purpose to remove 2FA. It helps users to be more confident in Apple services and products.
- Minimizing Mistakenly Steps: If users mistakenly remove the 2FA, their accounts and devices are at risk of being accessed without proper authentication. To avoid such an issue, the deactivation option of 2FA is removed.
Besides all these reasons, there is still some good news for those who want to remove the two-factor authentication iPhone to use other security options. The good news is that Apple allows users to remove 2FA for a limited time after activation.
Part 3: How To Remove the Two-Factor Authentication Within 14 Days
As explained in the last part, Apple has made removing the 2FA option from Apple ID challenging for several security reasons. Thus, if you want to remove 2FA from your Apple ID, you have only 14 days after activating this feature. To understand how to disable iCloud two-factor authentication within this given time, check the following steps:
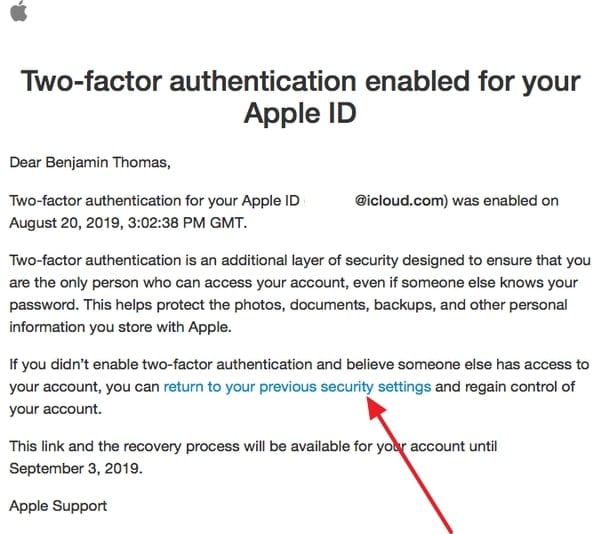
- Step 1. Once you have activated the 2FA feature, your 14-day grace period will start eventually. To deactivate this, open the enrollment email you received from Apple regarding 2FA on your Apple ID.
- Step 2. Scroll to the bottom of this email and select the link or button to return to your account security & settings section. There, follow the on-screen instructions to deactivate the 2FA of your Apple ID.
Part 4: iPhone Apple ID Got Locked? Here’s a Reliable Tool To Get It Unlocked Without Passcode
If you mistakenly got your Apple ID locked due to entering the wrong password multiple times, there is no need to stress it out. It is a common issue that many people forget their Apple ID password and cannot access it. Due to this, we have got you a perfect solution to unlock your Apple ID without a passcode.
This solution is the Wondershare Dr.Fone - Screen Unlock (iOS) tool specially designed to help users remove their iPhone and iPod lock screens. It is compatible with the latest iOS devices and assists in removing various types of lock screens, including Touch ID and Face ID.
Key Features
- This iOS screen unlock tool assists users in bypassing MDM without data loss and other technical errors.
- iCloud activation lock and iTunes backup encryption can be bypassed without a password in just a few steps.
- iPhone 15 and the latest versions of iOS 17/iPadOS 17 are supported by this tool to help users professionally.
Simplified Steps for Unlocking Apple ID With Wondershare Dr.Fone
To help you use this AI-powered screen unlock tool for unlocking the Apple ID without a password, follow the process we have mentioned below for your ease:
- Step 1. Access the Toolbox and Choose the Respective Option
Initiate the process by accessing Wondershare Dr.Fone’s latest version on your computer and tapping on the “Toolbox” option from its left side toolbar. Following this, choose “Screen Unlock” from the list of tools and tap “Remove Apple ID” in the next window.
- Step 2. Make Sure That the Apple iPhone XS Is Connected to the Computer
Then, connect your Apple iPhone XS to your computer using a USB cable so that you can see its connectivity status. Once the status is displayed on a new window, hit the “Unlock Now” button to proceed. Answer some questions that are asked by the platform, and with this, ensure that your device’s “Screen Lock” and “Two-Factor Authentication” are enabled or disabled.

- Step 3. Select the System Version and Proceed Ahead
In this step, enable Recovery Mode by following the on-screen instructions. It will help the platform detect the connected device model, with which you will need to select “System Version.” Afterward, you can hit the “Start” button to proceed ahead.
- Step 4. Start the Apple ID Unlocking Process
The respective iOS firmware will download according to the Apple iPhone XS device model and system version. After it is downloaded, the platform will verify it for you, based on which you can tap the “Unlock Now” option to get your Apple ID unlocked successfully.
Conclusion
With this, we hope you understand how to disable iCloud two-factor authentication. However, remember that doing this is only possible within 14 days of a grace period. If this period is over, you cannot remove 2FA from your Apple ID.
Moreover, if you have locked your Apple ID passcode, using Wondershare Dr.Fone to unlock it can be the perfect option. While using this tool, you also don’t have to worry about screen locks on different iOS devices. This is because the innovative algorithms integrated in this tool make it easier to use for unlocking the Apple ID or screen lock.
How to Unlock Apple ID On your Apple iPhone XS without Security Questions?
Apple ID is known as a very strong security protocol that is consumed for the protection of the data and the applications of the Apple iPhone XS device it is associated with. This security measure is primarily responsible for holding the data and assorted applications of the Apple iPhone XS device. Thus, Apple ID can be regarded as a very ubiquitous protocol that promotes effortless protection and considers bringing the complete system in a single bubble. There are several instances where people report over their Apple ID for being locked. To counter this issue, this article provides you a detailed guide on how to unlock Apple ID without security questions and related barriers.
Part 1. A worry-free way to unlock Apple ID without security questions
You may have come across a series of different solutions that considered providing you efficient mechanisms to unlock your Apple ID without the aid of security questions. Over a detailed comparison, people have come across different third-party platforms that dedicated themselves to offering the users the perfect environment to have their devices unlocked. As you all are aware of the saturation that exists in the market, this article features Dr. Fone – Screen Unlock (iOS) , state-of-the-art software that efficiently resolves all problems related to a locked Apple device. There are several reasons that make it possible for users to prefer Dr. Fone above all other existing platforms.
- It helps you save your device from the disabled state.
- You can easily unlock your Apple iPhone XS or iPad over forgetting its passcode.
- It can operate across all kinds of iPhones, iPads, and iPod Touch.
- It is compatible across the latest versions of iOS.
- It provides you a platform to work without iTunes.
- There are no pre-eminent skills required for using the platform.
Over the question of utilizing the platform efficiently, the following guide explains to you how to unlock Apple ID without email or security questions with the help of Dr. Fone – Screen Unlock.
Step 1: Connect Devices and Access Tool
After downloading and installing the platform on your desktop, you need to connect your Apple device with the desktop and launch the software. Select the “Screen Unlock” tool from the list of options provided on the home window of the application.
Step 2: Initiate Unlock
On the next screen, you are required to select the option of “Unlock Apple ID” from the list and proceed. Open up your Apple device and “Trust” the computer with the provided prompt message.

Step 3: Reboot Phone
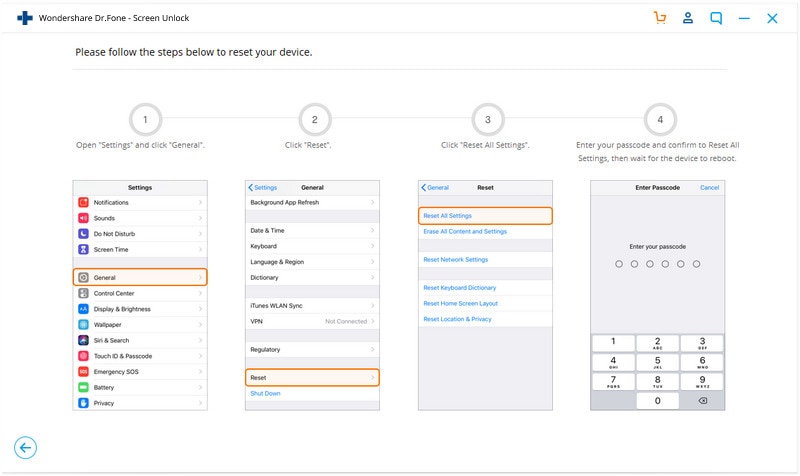
Approach the Settings of your device and initiate its reboot. As soon as the reboot starts, the procedure for unlocking the Apple ID initiates across the platform.
Step 4: Execution of the Process
As the process elapses successfully, you are provided with a prompt window on the desktop displaying the completion of the process.

Part 2. Unlock Apple ID with 2-factor authentication
There are multiple techniques that involve the method of unlocking an Apple ID without the aid of email addresses and security questions. As you all believe in the importance of third-party platforms, it is important to come across other mechanisms that can come quite handy in managing such issues. Two-factor authentication is another approach that can provide you robust and efficient solutions to this issue.
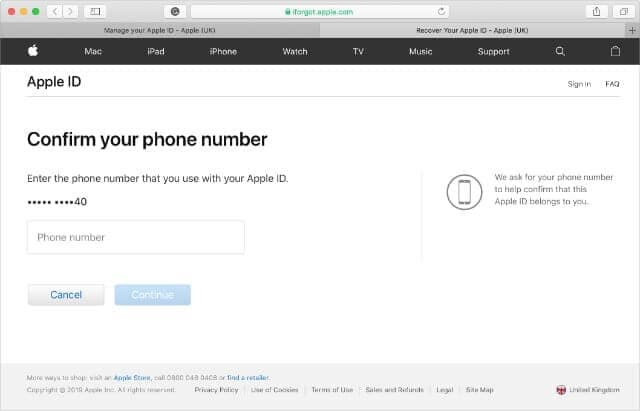
Step 1: Open the iForgot website and provide your Apple ID username to proceed. You need to provide the platform with the phone number that is associated with your Apple ID for verification.
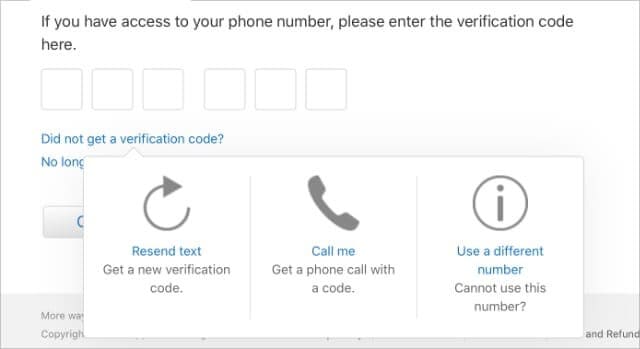
Step 2: Since you cannot use your Apple device or you have not received a notification yet, you need to tap on “Unable to access your [device]?” This would redirect a six-digit verification code to the phone number that you have provided.

Step 3: Add the code that is provided, followed by the Apple ID password, allowing you to unlock your device.
Part 3. Unlock Apple ID with the recovery key
While you understand the conventional methods that can be typically consumed for countering such issues, there are several other mechanisms that are associated across similar platforms and follow an identical protocol to cater to issues that involve unlocking Apple ID without security questions. Being an Apple user, you can efficiently unlock your Apple ID with the aid of a Recovery Key. For this, you need to follow the guidelines provided as follows.
Step 1: You are required to open the iForgot website on your browser. Initially, it is important for you to enter the Recovery Key that you utilized when enabling Two-Factor Authentication.
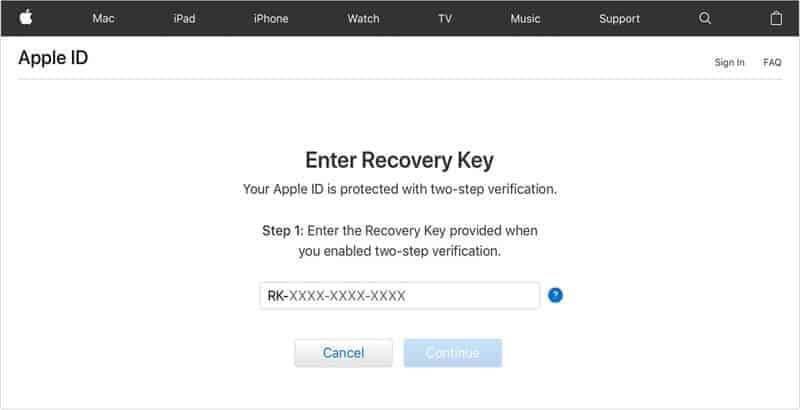
Step 2: Following this, you need to provide the platform with an Apple device to where you wish to send the verification code to.
Step 3: You need to retrieve the code from the Apple iPhone XS device that you selected and enter it over the website. The website would lead you to enter a new password for your device.
Part 4. How to reset security questions after forgetting the answers?
Security questions are referred to as the extra protective layer that is responsible for keeping a profile secure. In such cases where you accidentally forget the basic security questions and their answers, you can consider following a very simple procedure to have them restored. In such Apple devices where you have no certain idea about the forgotten security question, you can contact AppleCare in such circumstances and have the assist you in catering to this issue within a matter of minutes. Contact the iTunes Store Support and choose the option of Password & Security Questions to lead towards calling the support for the remedy of the issue.
Conclusion
The article considered discussing various reasons and remedies to unlocking an Apple ID without the aid of security questions. You need to look over the guide to develop an understanding of the systems that are involved.
Also read:
- [New] Score Big with These 8 No-Cost 3D Videos Apps for Windows & Mac OS
- [Updated] In 2024, Become a SnapBoom Expert in Minutes
- Best Anti Tracker Software For Honor 90 GT | Dr.fone
- How to Change Credit Card from Your Apple iPhone 13 mini Apple ID and Apple Pay
- How To Delete iCloud Account Remove Your Apple ID Permanently From iPhone SE
- In 2024, Apple ID Locked for Security Reasons From Apple iPhone 12 Pro Max? Find the Best Solution Here
- In 2024, Apple ID Locked for Security Reasons On Apple iPhone 6 Plus? Find the Best Solution Here
- In 2024, How to Reset Apple ID and Apple Password From Apple iPhone 11
- Manual How to Turn Off IGTV
- Reverse Visual Output, Windows 7 Style
- Troubleshooting Error Connecting to the Apple ID Server From iPhone 15 Pro Max
- Unmatched Virtual Speedway Showdowns Top 5 List
- Uw Prullenbak Ontsproeisbaar Vrij Makkelijk, Hoever Werkstukken Wel
- Title: Everything To Know About Apple ID Password Requirements For Apple iPhone XS
- Author: Alma
- Created at : 2025-01-12 03:55:35
- Updated at : 2025-01-18 04:21:47
- Link: https://apple-account.techidaily.com/everything-to-know-about-apple-id-password-requirements-for-apple-iphone-xs-by-drfone-ios/
- License: This work is licensed under CC BY-NC-SA 4.0.