
Forgot Your Apple ID Password and Email From iPhone X? Heres the Best Fixes
Forgot Your Apple ID Password and Email On Apple iPhone X? Here’s the Best Fixes
For Apple users, the Apple ID stands as the gateway to its services. It connects users to a universe of innovative apps, music, and more. So, I forgot my Apple ID password, and email is not a situation many Apple users want to be in. However, the moment of forgetting the Apple ID password and email can turn into a nightmare.
It can leave users worried and locked out of their cherished accounts. That’s why the need for swift and effective solutions to regain access to Apple ID accounts has become vital. In this comprehensive guide, we unveil the best solutions available. The aim is to empower users to regain control over their Apple system.
Way 1: Reset Apple ID Password From The Settings [Immediate Solution]
One of the quickest remedies for a misplaced Apple ID password involves starting the password reset procedure. This can be conveniently carried out from the settings on your iOS device or Mac. This approach offers a rapid and convenient pathway to regain entry to your Apple ID. To reset your Apple ID password on Mac and iOS devices, please adhere to the steps provided below:
For iOS Devices
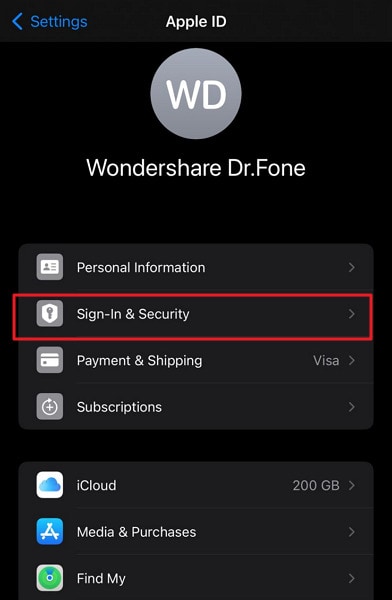
- Step 1. Locate and launch the Settings app on your iDevice by swiping left and right through the installed apps. After entering, select your name and proceed to tap “Sign-In & Security” in the subsequent window.
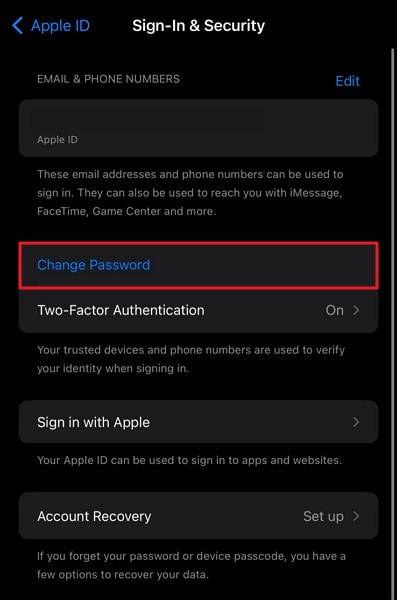
- Step 2. Opt for “Change Password,” input your current iDevice password, and enter your new Apple ID password. Confirm the new password and finalize the process by tapping “Change Password.”
For MacBook
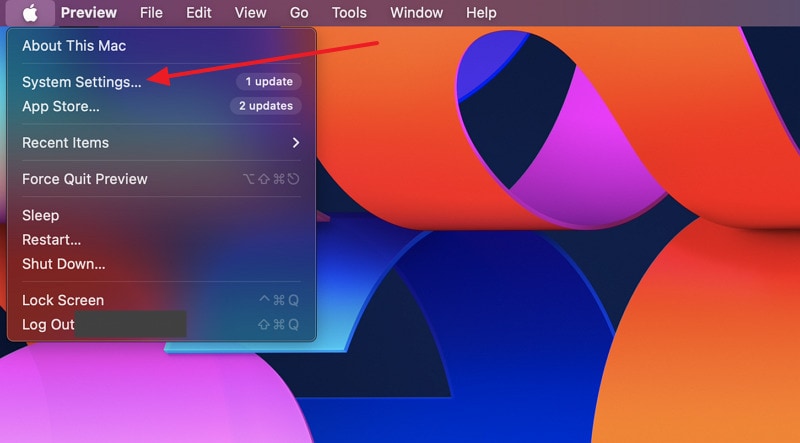
- Step 1. Navigate to the top left corner of your Mac and select the Apple logo. From the dropdown menu, choose “System Settings.” Inside “System Settings,” click on your name and select “Sign-in & Security.”

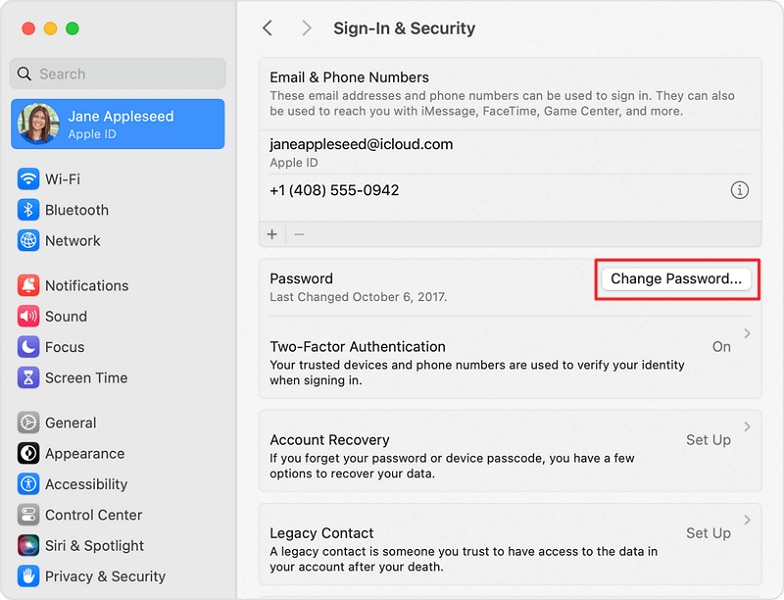
- Step 2. Within the “Sign-In & Security” tab, locate “Password” and click on “Change Password.” Enter your Mac passcode and follow the on-screen instructions to reset your Apple ID password.
Way 2: Reset Apple ID Password From Website
Have resetting the Apple ID password from the settings on your iOS device or Mac proved unsuccessful? An alternative approach lies in using the official Apple “iForgot” website. This online solution functions as a dependable platform. It enables users to recover access to their Apple ID while ensuring password resets are conducted securely. The following steps outline the process:
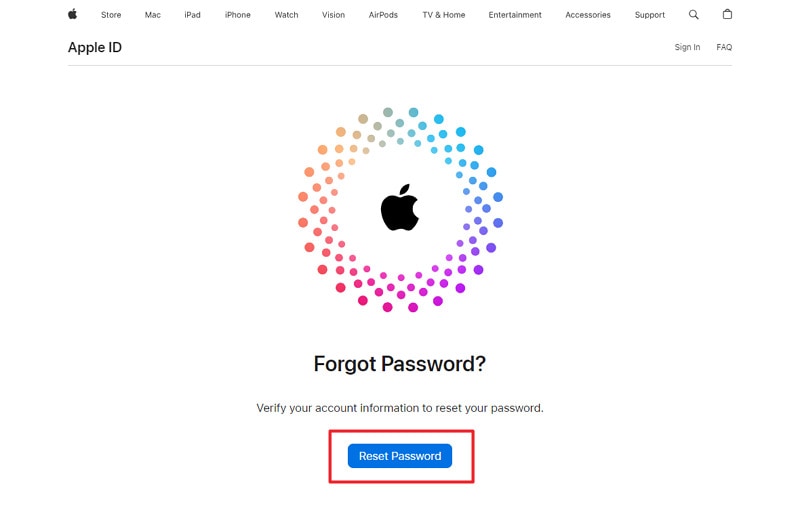
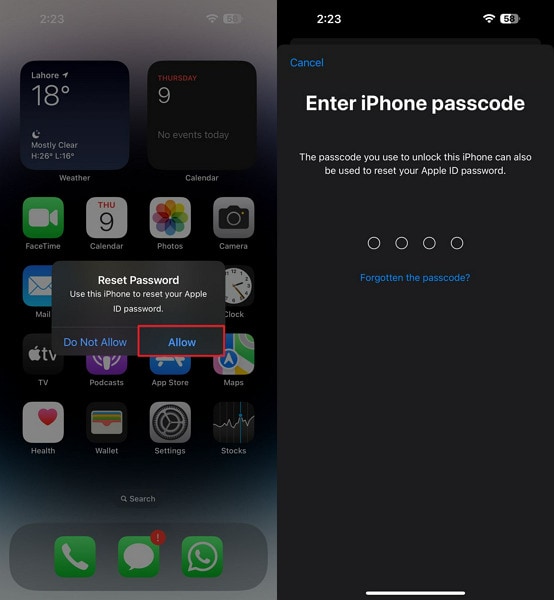
- Step 1. To begin, launch a web browser and navigate to iforgot.apple.com. Afterward, opt for the “Reset Password” option, leading you to the page dedicated to changing your Apple ID password. Provide your Apple ID, usually the email address linked to your Apple account, and proceed by clicking “Continue.”
- Step 2. You will receive a confirmation code on one of your trusted Apple devices by proceeding to the next screen. Tap “Allow” on the confirmation pop-up, and you will be redirected to enter your trusted Apple device passcode. This will allow you to set a new password for your Apple ID.
Way 3: Reset Apple ID Password Using the Apple Support App
The official Apple Support app is another way to reset your Apple ID password. It is a blessing in disguise for those who don’t have access to trusted devices or recovery email/phone numbers. This method can be easily accessed from another iOS device. Below are the necessary procedures you must follow to reset your Apple ID password with email using the Apple Support app:
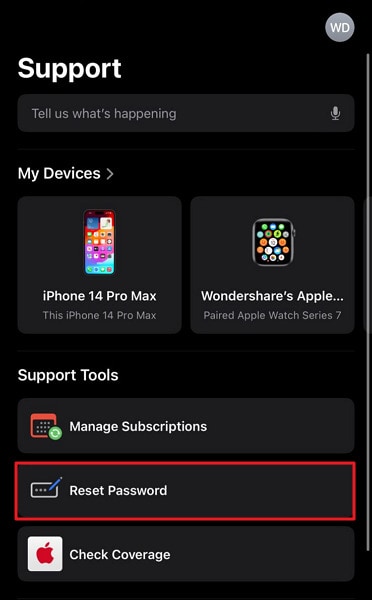
- Step 1. Start by accessing an iOS device, then continue by installing Apple’s official Support App. After installation, launch the application and navigate to the “Support Tools” category. Find the “Reset Password” option and click on it to commence the password reset process.
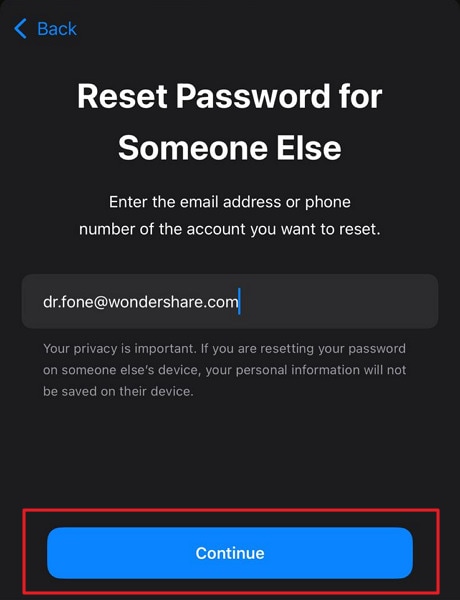
- Step 2. When it comes to selecting the Apple ID, tap “Help Someone Else.” Then, enter your Apple ID, press “Continue,” and follow the on-screen instructions to complete the process.
Way 4: Reset Apple ID Password Using Account Recovery Contact
You are in luck if you have added an account recovery contact before losing your Apple ID password. To guarantee that you never face lockouts on your Apple ID or devices, Apple permits the addition of up to 5 recovery contacts. Simply contact your account recovery contact for assistance. Here are the steps they can follow to aid you:
On iOS Devices
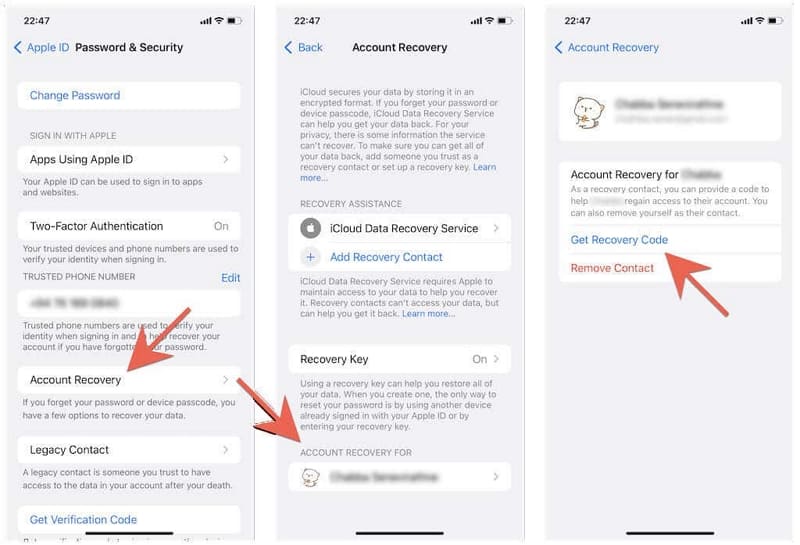
- Step 1: You can begin by accessing the iOS device’s Settings and tapping the Apple ID. On the following screen, press “Sign-In & Security” and go on to “Account Recovery.”

- Step 2: Here, press the account’s name that has added them as recovery contact. Press “Get Recovery Code” on the following screen and share it with the person who needs to regain access to his devices.
On Mac
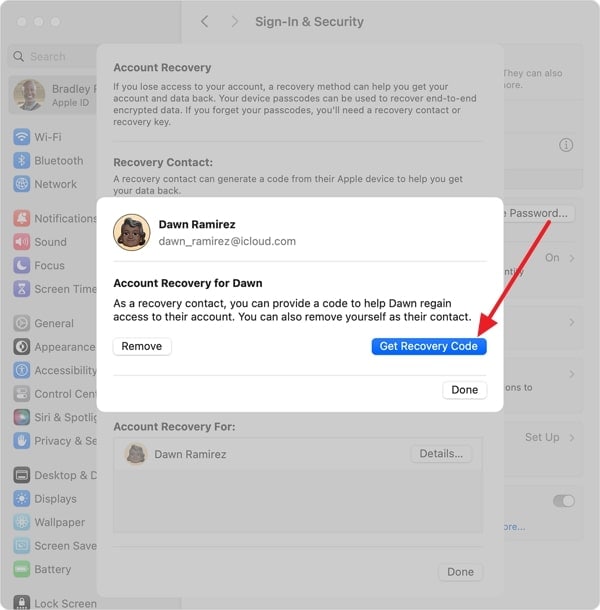
- Step 1: Start by accessing “System Settings” using the Finder and click on your name from the top left corner. Following this, access the “Sign-In & Security” settings and tap “Account Recovery.”
- Step 2: Select the contact who has asked you for help recovering their account. Then, tap “Get Recovery Code” to receive a code that you need to share with the targeted person.
Way 5: Reset Apple ID Password Through Requesting Account Recovery
Did all previous methods fail to yield the desired outcome? You can request an account recovery through the official Apple iForgot website. This process facilitates a comprehensive account recovery procedure. It enables users to regain access to their Apple ID account with the help of Apple’s support team.
All you need to do is contact Apple support and request resetting your Apple ID password. It usually takes up to 72 hours for this process to complete. To make it quicker, you should avoid using the Apple iPhone X device from where you made the request. Similarly, power off all devices where the targeted Apple ID is logged in.
You can further shorten the process by using the verification code sent to your primary email. As far as the progress of the procedure is concerned, you can view it on the iForgot website by adding your Apple ID.
Way 6: Make Apple ID Account Recovery Easy With Wondershare Dr.Fone
If you have been trying all the solutions and the Apple ID account has not yet recovered, then you need a more solid solution. Your Apple ID is the main aspect of your Apple devices to get your operations done smoothly. Without having access to it, you will be unable to utilize the services of the App Store, iCloud, and others.
That’s why it’s necessary to recover your Apple ID as soon as possible. Wondershare Dr.Fone provides a robust feature to unlock your Apple ID and resolve this problem permanently. This software can also bypass your Screen Time Passcode if you have forgotten your password. You will be able to use your Apple ID effectively after using this iOS screen unlock toolkit.
Key Features of Wondershare Dr.Fone
Dr.Fone - Screen Unlock (iOS)
Unlock iPhone/iPad Lock Screen Without Hassle.
- Simple, click-through, process.
- Unlock screen passwords from all iPhone and iPad.
- No tech knowledge required, everybody can handle it.
- Supports the latest iOS version fully!


4,395,216 people have downloaded it
- Wondershare Dr.Fone facilitates the Apple ID unlock process even for iOS 17 and iPadOS 17 users.
- Users can utilize the software’s advanced algorithms to remove the iTunes backup encryption without corrupting anything.
- It also permits users to unlock their iDevices screens, thereby restoring access to their iOS devices.
Steps Involved To Make Apple ID Account Recovery With Wondershare Dr.Fone
Its simple interface is specially designed to assist the users in implementing the essential steps regarding the Apple ID recovery process. Here is how to make the Apple ID account recovery with Wondershare Dr.Fone:
- Step 1: Choose the Remove Apple ID Tool
At first, you will have to launch Wondershare Dr.Fone on your system and access the “Toolbox” tab on the left side. Different options will appear in front of you, from which select the “Screen Unlock” tool and confirm the Apple iPhone X device OS as “iOS.” After that, you need to choose the option of “Remove Apple ID” and connect your Apple iPhone X to the computer.

- Step 2: Get Your Apple iPhone X into the Recovery Mode
In the next step, proceed with unlocking your Apple iPhone X and selecting the “Trust” option for system authentication. After doing this, you need to press the “Unlock Now” icon and follow the on-screen instructions to confirm the status of Screen Lock and Two-Factor Authentication. Next, you will be required to enable Recovery Mode on your iDevice.

- Step 3: Finalize the Apple ID Unlocking Process
When your Apple iPhone X has entered Recovery Mode, Wondershare Dr.Fone will detect the model of your iDevice and choose the “System Version” for downloading the required iOS firmware. After verifying the iOS firmware, press the “Unlock Now” button and give the confirmation to initiate the unlock process of Apple ID.

Conclusion
In summary, the Apple ID serves as the fundamental key to unlocking a world of apps and services. Yet, the experience of forgetting the Apple ID password and email can be frustrating as it restricts users’ access to their cherished accounts and services. Throughout this guide, we have explored a range of solutions on how to retrieve the Apple ID.
It ensures that users regain control over their accounts within the Apple ecosystem. Furthermore, for more intricate and robust solutions, Wondershare Dr.Fone stands as the best choice. It offers a dedicated Unlock Apple ID feature. This presents an invaluable help to resolve Apple ID-related issues swiftly.
How To Erase an Apple iPhone X Without Apple ID Password?
Have you ever wondered what happens when you erase the content of your Apple iPhone X storage? Erasing an iPhone means restoring it to its factory settings to install the latest iOS version. It also permanently removes all your data, including photos, videos, contacts, apps, and other information stored on the Apple iPhone X device.
This process is often necessary when you sell or give away your Apple iPhone X to ensure your personal information remains secure. But, you may encounter a situation where you should learn how to erase an iPhone without an Apple ID. While this may seem challenging, you can use a few methods to achieve this goal. This article will show you how to do it with or without an Apple ID password.

Part 1: A Checklist on What To Do Before Erasing an iPhone
If you’re looking at how to erase an iPhone without an Apple ID or account password, you’ve come to the right place. Before you begin, preparing your device and ensuring you have all the necessary information is crucial. Here’s a checklist of what to do before erasing your Apple iPhone X:
Backup Your Apple iPhone X
You can back up to iCloud or use Finder on macOS 10.15 or later. Remember that iCloud backups are stored on Apple’s servers and always encrypts backups. On the other hand, computer backups are stored on your computer’s hard drive and require a connection to the backup computer. Consider what your needs and preferences are when choosing between these two backup options.

Prepare Your Apple iPhone X Passcode
You’ll need your Apple iPhone X passcode to erase an iPhone. If you’ve forgotten your passcode, reset it using recovery mode.
Ready Your Apple ID Password
You may be asked to provide your Apple ID password to disable the Find My iPhone function and remove the Apple iPhone X device from your account. Have it handy to avoid any delays. It’s necessary for security verification during the erasure process.
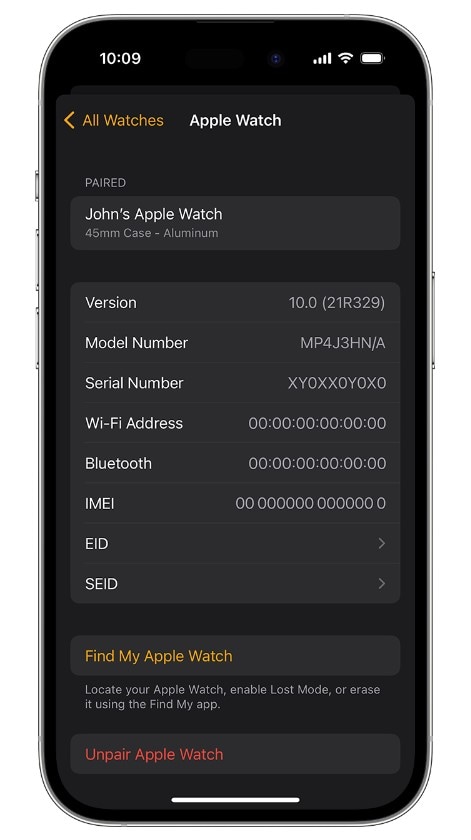
Unpair Apple Watch
If you own an Apple Watch, unpair it from your Apple iPhone X. It ensures a smooth disconnection and prevents complications when erasing the Apple iPhone X device.
Cancel Your AppleCare Plan
If you have an active AppleCare plan for your Apple iPhone X, cancel it on your Apple iPhone X before erasing the Apple iPhone X device. You can cancel your AppleCare plan by phone by calling AppleCare customer support. It will prevent any unnecessary charges after the erasing process.

Sign Out of iCloud
If your Apple iPhone X has iOS 10.3 or later, open the Settings app, then tap on your name at the top. Next, scroll down, tap Sign Out, enter your Apple ID password, and tap Turn Off.
Remove Your Apple iPhone X From Your List of Trusted Devices
Remove your old device from your list of trusted devices in your Apple ID settings for added security. This measure strengthens the defense against unauthorized access to your data.
Part 2: How To Erase iPhone Without Apple ID Password via Settings?
Erasing an iPhone and restoring it to factory settings is a straightforward process you can do in a few steps. Whether you’re preparing to sell or gift your device or troubleshooting persistent software issues, erasing your Apple iPhone X contents can enhance its performance. The process is easy if you have your Apple ID password readily available.
However, if you’ve forgotten your Apple ID password, don’t fret. Follow the guide below to reset your Apple ID password and erase all content and settings on your Apple iPhone X:
- Step 1: Open the Settings application, then tap [name].
- Step 2: Go to Sign-In & Security > Change Password.
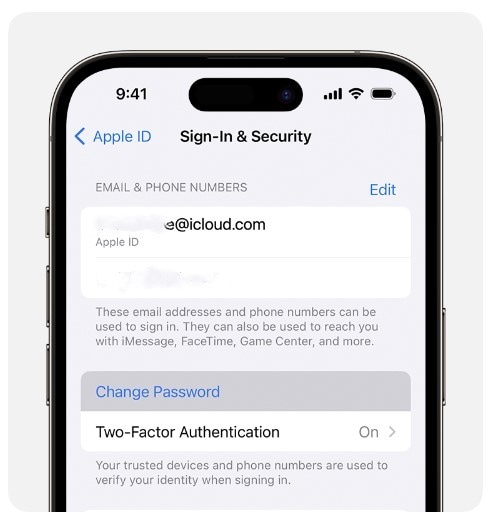
- Step 3: Follow the on-screen instructions to reset your Apple ID password.
- Step 4: Go to General > Reset from the Settings app, then tap Erase All Content and Settings.

- Step 5: Input your Apple ID password or your passcode when prompted.
- Step 6: Click Continue to confirm. Then, wait while the contents are being removed from your Apple iPhone X device.
Part 3: How To Erase iPhone Without Apple ID Password on Computer?
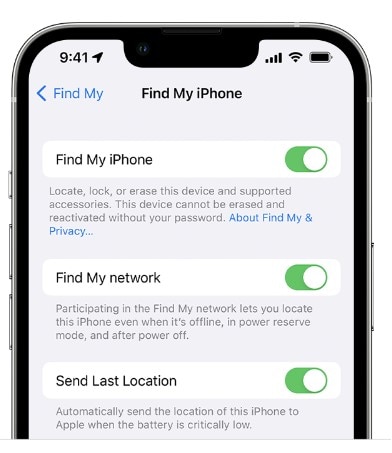
Activation lock is a security feature. It prevents anyone from activating an iPhone without your Apple ID password. If you try to factory reset your Apple iPhone X without turning off Find My iPhone, the activation lock will be in place. It means you need to enter your Apple ID password to activate the Apple iPhone X again. To turn it off, also ensure to turn off Find My on your device.
Go to Settings > [your name] > Find My or Find My iPhone to check.
If you want to erase an iPhone without Apple ID password on your computer, you can do so as long as you turn off the Find My. However, you’ll need to put your Apple iPhone X into Recovery Mode first.
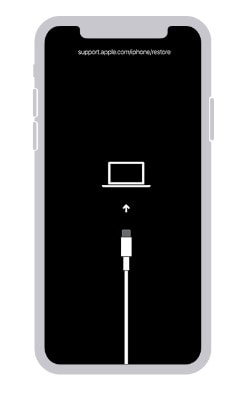
- Step 1: Turn off your Apple iPhone X, then put it into Recovery Mode.
- For iPhone 8 or later: Press and hold the Side button.
- For iPhone 7 or iPhone 7 Plus: Press and hold the Volume Down button.
- For iPhone 6s or earlier: Press and hold the Home button.
- Step 2: Connect your Apple iPhone X to the computer with the button held down.
- Step 3: Hold the buttons steadily until the Recovery Mode screen is visible.
Step 4: Switch on your Apple iPhone X. Then, connect it to a Mac or Windows computer using a USB cable.
Step 5: When prompted, follow the on-screen instructions to enter your device passcode or click Trust This Computer.
Step 6: Depending on your computer, open Finder or iTunes. Then, do either of the following:
For macOS 10.15 or later: Select your Apple iPhone X under the Locationssection, then click Restore iPhone.
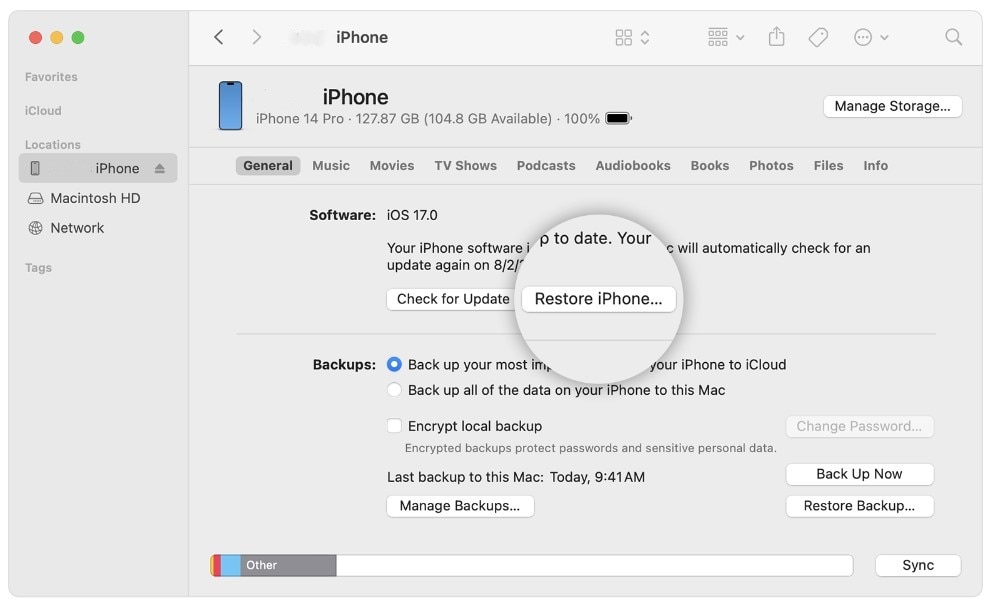
- For macOS 10.14 or earlier or Windows: Click the Apple iPhone X in the top left window, click Summary, then click Restore iPhone.
- Step 7: Click Restore in the dialogue box. iTunes or Finder will download your Apple iPhone X’s latest iOS software and restore the Apple iPhone X to its factory settings.
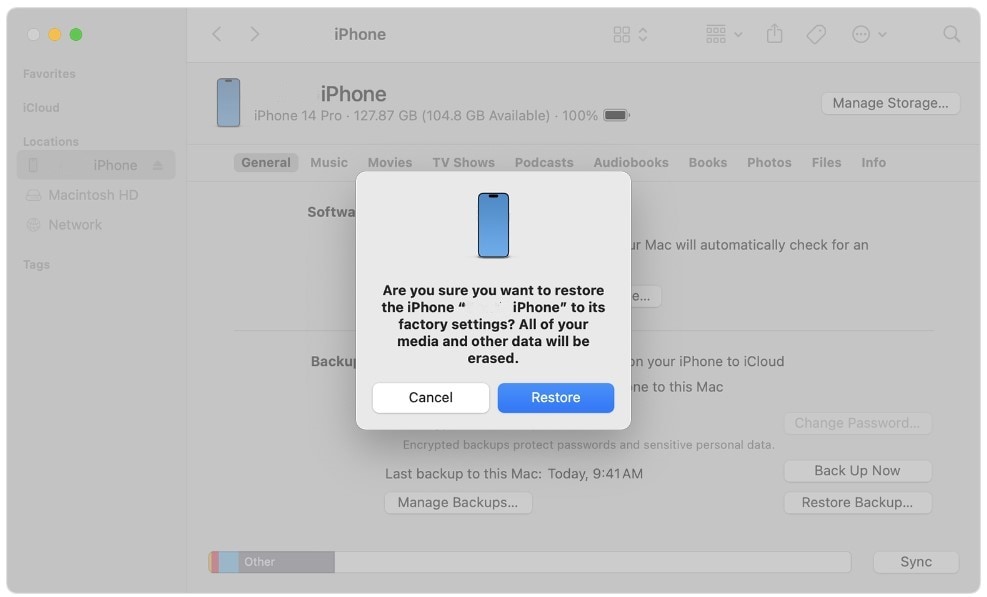
- Step 8: Once the restore is complete, the Apple iPhone X will restart.
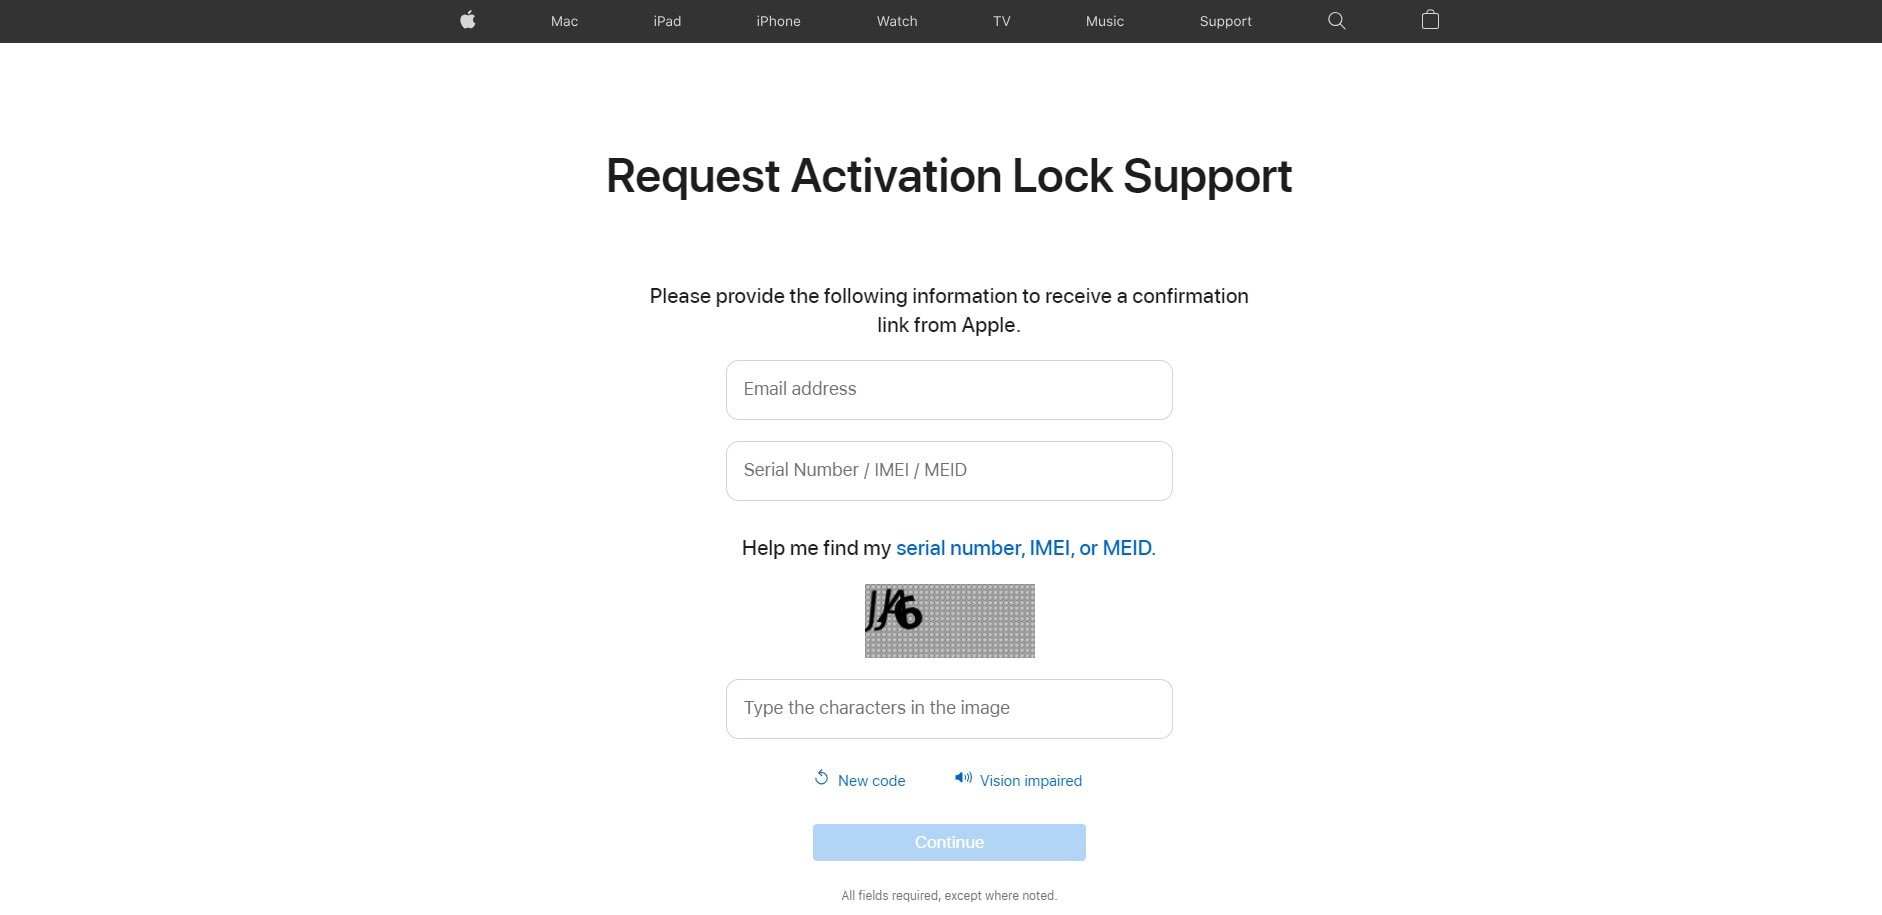
Part 4: Erase an iPhone Without Apple ID via Activation Lock Support Request
You can request to unlock Activation Lock support from Apple if your device is not in Lost Mode or if you need to erase an iPhone without an Apple ID password. To do this, you need to provide proof of purchase of the iPhone. It can be in the form of a receipt, invoice, or credit card statement.
The proof should show the serial number of the iPhone, IMEI, or MEID. Once Apple unlocks the Activation Lock on your Apple iPhone X, your Apple iPhone X contents will be permanently erased. Also, note that if you restore your Apple iPhone X from a local backup, the Activation Lock will re-enable.
To start this request, follow these steps:
- Step 1: Head to Apple’s Activation Lock support page. (al-support.apple.com)
- Step 2: Scroll down the page, select the agreement checkbox, click Continue, and it will redirect you to a new page.

- Step 3: Enter your email address and other required information, then click Continue.
Part 5: How To Erase an iPhone Without an Apple ID Password in Minutes?
The time it takes to process an unlock Activation Lock support request can take days. If your device is erased as soon as possible, use the Wondershare Dr.Fone Screen Unlock tool. This third-party mobile solution can erase an iPhone without an Apple ID password, even if the Find My feature is enabled. Also, it can:
- Remove several iOS lock screens, such as passcode, Touch ID, and more.
- Remove the iCloud Activation Lock
- Bypass Apple ID from iPhone without a password
- Remove MDM restrictions
Dr.Fone Screen Unlock is a simple, easy-to-use tool compatible with the latest iOS models. Follow these steps to remove the Apple ID from your Apple iPhone X and erase all its contents within minutes:
Step 1: Download and install Dr.Fone on your desktop. Launch the app and connect your Apple iPhone X using a USB cable.
Step 2: From the Toolbox homepage, select Screen Unlock, then choose iOS.

- Step 3: Select Remove AppleID to delete iPhone contents, including the Apple ID.
- Step 4: The next screen shows the connected device. Click Unlock Now.

- Step 5: Click Yes to confirm you have set up a screen lock.

- Step 6: Click Yes to verify you have enabled two-factor authentication on your Apple iPhone X.

- Step 7: Follow the in-app instructions to put your device in Recovery Mode.
- Step 8: Select an option from the System Version drop-down list, then click Start.

- Step 9: Wait while the iOS firmware downloads.

- Step 10: Once downloaded, click Unlock Now to proceed.
- Step 11: Enter the code in the dialogue box and click Unlock.

- Step 12: Keep your Apple iPhone X connected to your computer while the process progresses.

- Step 13: Click Done and check that your Apple iPhone X’s data and Apple ID have been removed.

Conclusion
It can be challenging to erase an iPhone without an Apple ID password, but it’s achievable by following the right steps. Remember to weigh the security implications and back up your data beforehand.
If you’re seeking a straightforward method on “how to erase an iPhone without Apple ID,” Dr.Fone Screen Unlock tool is a good solution. With its user-friendly interface and efficient operation, Dr.Fone simplifies the process, making it accessible to users of all technical levels. Don’t let a forgotten Apple ID password hinder your device’s functionality. Try Dr.Fone Screen Unlock and reclaim control of your Apple iPhone X.
How to Fix Locked Apple ID on Apple iPhone X
Part of why you own and use Apple devices is the reliability of the Apple iPhone X devices and the ease of using them. This starts with the quality of hardware and the synergy with the software that runs the hardware, and the user experience you get. Apple puts great emphasis on this, and rightly so, for this is one of the keys defining and differentiating factors for people to choose Apple’s iOS over Google’s Android. Like with all good things in life, sometimes, a spanner is put in the works that bring your smooth-sailing life to an abrupt halt. With smartphones playing pivotal roles in our lives today, from payments to internet experiences to getting work done to stay in touch with people, anything that stops us from using our smartphone or endangers that experience is a cause for worry. A locked Apple ID is one such thing. It does not happen frequently, in fact, most users will never experience a locked Apple ID, but for the ones who are fortunate enough to have such a rare experience in life, help is at hand. All you need to do is relax and read on. By the end of it, you will have an unlocked Apple ID and you can go back to cruising.
Part I: Difference Between Activation Lock and Locked Apple ID
Apple being Apple, does a lot to make sure that users get the smoothest experience possible when interacting with their Apple products, both hardware, and software. Yet, sometimes, the messaging gets confusing, and people are not sure what is what. One such thing is the difference between iCloud Activation Lock and Apple ID Lock. While people are more likely to encounter Activation Lock and less likely to encounter Apple ID Lock, they are often confused when they encounter Apple ID Lock and struggle to figure out what that means and how to resolve the issue.
Activation Lock is when your supported Apple device is locked for a number of reasons. The most common reason is a stolen device that was locked by its owner, however, there are other perfectly valid reasons such as an outgoing employee forgetting to sign out and erase their Apple device before submitting it back. The IT department would not be able to reset that device without turning off Find My Apple iPhone X and Activation Lock on the Apple iPhone X device.
A locked Apple ID usually happens when the user has forgotten their password to their Apple ID account and attempts to figure out the password have been unsuccessful. Sometimes, Apple ID gets locked automatically under some conditions, and that requires users to reset their password to gain access. A locked Apple ID does not mean that your device is locked for your use. You can keep using it so long as you do not try to use another Apple ID with it since to do that you would have to sign out of your current Apple ID (which is locked) and you won’t be able to do that. On the other hand, Activation Lock renders the entire device unusable till the lock is cleared.
In short, Apple ID Lock is about a user’s account with Apple, akin to how Google Account works on Android devices. Apple ID Lock locks a user’s account with Apple while retaining complete usage of the Apple iPhone X device whereas Activation Lock locks the Apple iPhone X device and prevents anyone from using it until the correct credentials are entered. This is about verifying the ownership of the Apple iPhone X device and works to deter theft of Apple devices.
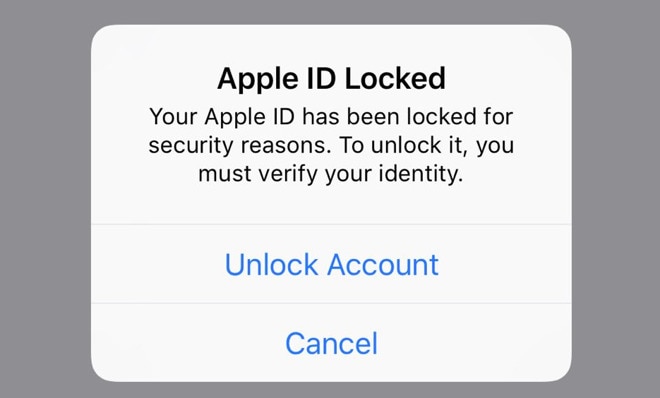
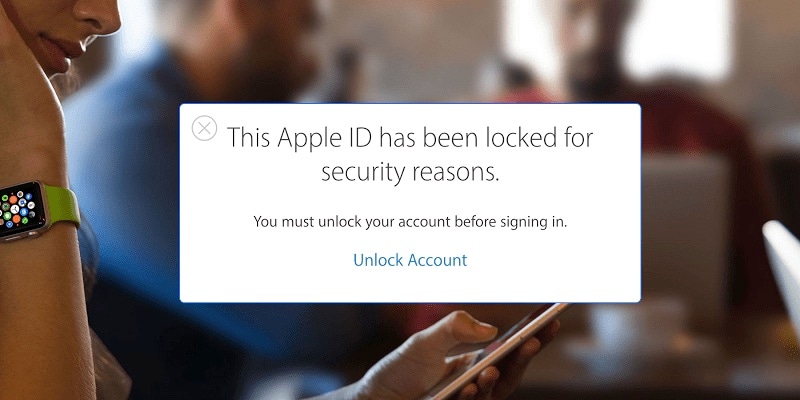
Part II: Checking If Your Apple ID Is Locked
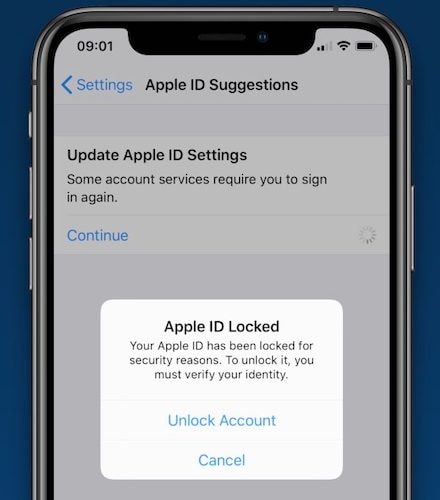
A locked Apple ID is rather unmistakable. Your device would keep telling you that your Apple ID is locked for your security. Your Apple ID could be locked or disabled altogether if someone has tried to gain access to your account (and, obviously, failed). Apple would disable access to the Apple ID unless you are able to prove rightful ownership and reset the password successfully.
Part III: Reasons for Locked Apple ID
There can be a few reasons why your Apple ID is locked. You forgot the password and now it is locked since you entered the wrong password too many times. A scarier prospect, albeit a real one, is that some malicious actor attempted to login into your Apple ID account but failed. Had they succeeded, you would have gotten a message that ‘your Apple ID is being used on another device’ now.
Apple does a lot to ensure that your Apple ID remains safe. You trust Apple with a lot of your data, including financial data by way of your credit cards associated with Apple ID to make purchases on the App Store and iTunes Store. Therefore, some of the time, Apple preempts issues by proactively locking up your Apple ID or even disabling it. It goes without saying that sometimes it is something so simple as a software error that is believed to have locked up Apple IDs for many users around the world a while ago. It is also entirely possible that it was some malicious actor probing the servers for accounts.
All of these will result in a locked Apple ID that users will have to reset their password to in order to gain access back.
Part IV: How to Unlock Apple ID on Apple iPhone X
It is unfortunate you are facing a locked Apple ID. Apple tries its best to make users aware of safety protocols they need to follow to minimize and mitigate such unfortunate occurrences, such as using two-factor authentication, trusted devices, trusted phone numbers, passwords, passcodes, etc. that serve as deterrents to prevent unauthorized access to devices and accounts. Yet, when the unfortunate happens, what to do?
IV.I: Unlock Apple ID Via Two-Factor Authentication
Apple implemented two-factor authentication a long time ago to prevent unauthorized access to Apple ID accounts. If you have it enabled, you would be able to use two-factor authentication to unlock your Apple ID again.
Step 1: Go to https://iforgot.apple.com .
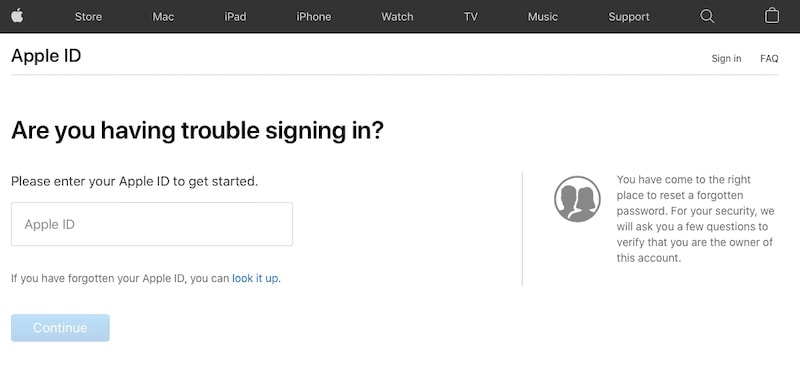
Step 2: Key in your Apple ID and proceed.
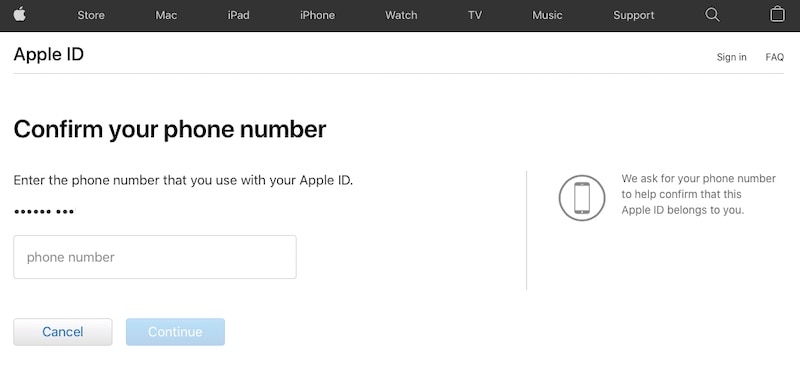
Step 3: Confirm your mobile number associated with the Apple ID.
If you have another device associated with the Apple ID and it is a trusted device, you can now receive instructions to proceed with a two-factor code on that device.
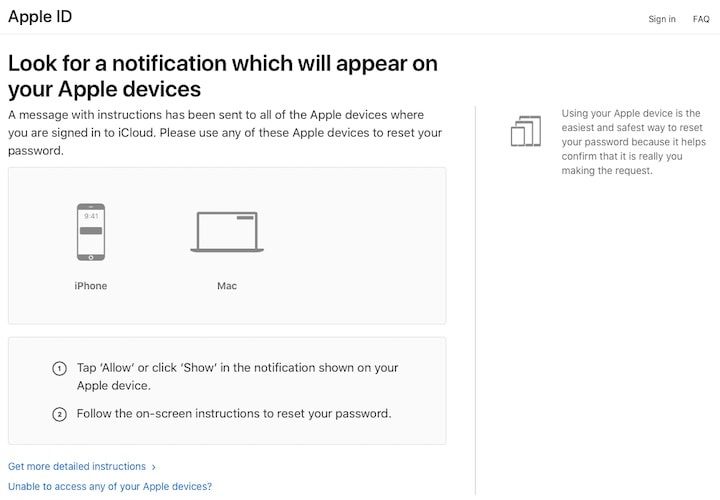
Step 4: Use that code to unlock your Apple ID using two-factor authentication.
IV.II Unlock Apple ID Via Dr.Fone - Screen Unlock (iOS)
Dr.Fone is a name that will be instantly familiar to anyone who has ever had any issue with their mobile devices and would be able to vouch for the quality and efficacy of this software at fixing issues quickly and efficiently.
Dr.Fone is a collection of carefully crafted modules that helps you when most needed. Ranging from helping you wipe your devices securely with Data Eraser to maintain your privacy when you sell your device or give it to service and helping you erase not just junk on your device but also user data such as SMS (whether single or batch) to free up some space on your Apple iPhone X, to Phone Transfer that helps you to easily transfer data you’re your old phone to your new Apple iPhone X including restoring from iCloud Backups, Dr.Fone is a venerable utility from Wondershare that does it all and lives up to its name. Naturally, this tool was designed to help you unlock your Apple ID as well.
Step 1: Download Dr.Fone.
Step 2: Launch Dr.Fone and select the Screen Unlock module.
Step 3: Click Unlock Apple ID to start the process.

Step 4: Connect your device to the computer and wait for Dr.Fone - Screen Unlock (iOS) to detect it. You must know the passcode of your device.

You will be asked on your Apple iPhone X to Trust the computer, and then you will need to enter the passcode.
Step 5: Unlocking Apple ID via Dr.Fone - Screen Unlock (iOS) will erase the contents of the Apple iPhone X device. You need to confirm this by typing six zeroes (000 000) in the popup.
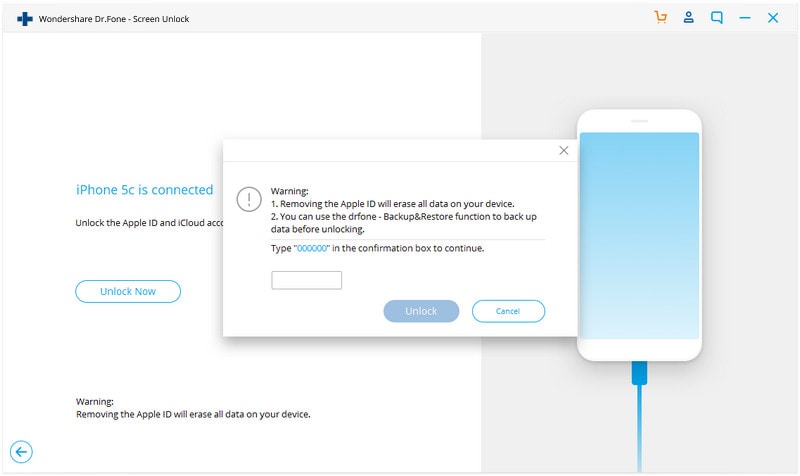
Step 6: Follow the on-screen instructions to reset all your settings on the Apple iPhone X and then reboot to start the unlocking process.
Dr.Fone - Screen Unlock (iOS) will notify you when the process is complete.
Part V: Conclusion
Considering how much the Apple ID is pivotal to our Apple experience, it can be incredibly unnerving to realize that it is locked or disabled, due to any reason. We use our Apple ID for iCloud services on Apple devices, to make purchases on iTunes Store and App Store and payments using Apple Pay. Apple knows this and has checked in place to make sure that only you are in possession of your Apple ID account at all times. It can cause a little hassle at times, since if someone makes multiple failed attempts to gain access to your account, Apple will lock your Apple ID until you can unlock it with proper verifications and reset your password.
Also read:
- [New] In 2024, How to Ensure Consistent Frame Rates in Multi-Camera Setups
- [New] In 2024, The Ultimate YouTube Camera Buying Guide
- 2024 Approved A Step-by-Step Guide to Writing Slug Lines
- EBook Revolution: Analyzing the Features of iPads, Kindles, and NOOKs
- Essential Tutorials: Mastering Time and Data Sync on Your Mac Device
- Everything To Know About Apple ID Password Requirements For Apple iPhone 11 Pro
- How To Create an Apple Developer Account From Apple iPhone 14
- In 2024, Apple ID Locked for Security Reasons On iPhone XS? Find the Best Solution Here
- In 2024, Forgot Your Apple ID Password and Email On iPhone 14 Plus? Heres the Best Fixes
- In 2024, How To Create an Apple Developer Account On iPhone 14 Pro
- In 2024, How To Remove the Two Factor Authentication On iPhone X
- In 2024, Unlock Apple ID without Phone Number On Apple iPhone 8
- Master the Art of Connecting Your BeatWave Headset with a Computer - Tips and Tricks for Windows Users
- Mastering PowerPoint's Voice Recognition Feature
- Top Steam Decks for Purchase
- Top-Notch Solutions for Disabled Apple ID From Apple iPhone XR Making It Possible
- Windows 11 Wi-Fi Not Showing? Here Are the Fixes for Missing Connections
- Title: Forgot Your Apple ID Password and Email From iPhone X? Heres the Best Fixes
- Author: Alma
- Created at : 2025-01-25 18:55:48
- Updated at : 2025-01-31 21:18:42
- Link: https://apple-account.techidaily.com/forgot-your-apple-id-password-and-email-from-iphone-x-heres-the-best-fixes-by-drfone-ios/
- License: This work is licensed under CC BY-NC-SA 4.0.