
How to Change Credit Card on Your Apple iPhone X Apple ID and Apple Pay
How to Change Credit Card on Your Apple iPhone X Apple ID and Apple Pay
Apple’s ecosystem offers convenience with services like Apple ID and Apple Pay. Managing your digital life has never been more convenient. In this interconnected system, your credit card plays a crucial role. It’s essential to understand that your credit card details can be associated with both your Apple ID and Apple Pay, each serving unique functions.
In this comprehensive guide, we’ll learn how to change the credit card on Apple ID and Apple Pay. Additionally, we will introduce you to a helpful tool for unlocking your Apple ID if you ever encounter access issues.
Part 1: 3 Ways To Change the Credit Card on Apple ID
We’ll explore 3 different methods to change the credit card details associated with your Apple ID in this section. These methods allow you to update your payment information effortlessly, ensuring uninterrupted access to Apple services.
Way 1: Update Credit Card on iPhone/iPad
The first method involves updating your payment information directly from your Apple iPhone X or iPad’s settings. This method is convenient for those who prefer managing their Apple ID details on their iOS devices. Here is how to change your credit card on Apple ID via iPhone or iPad:
- Step 1: Begin by launching the Settings app on your device and then touch your name to enter your Apple ID settings. Afterward, choose the “Payment & Shipping” option to move ahead. In addition, log in using your Apple ID credentials if necessary.

- Step 2: Next, press “Add Payment Method” and provide information for your new payment method. Once you’ve entered all the required details, tap “Done” to confirm and save your updates.

- Step 3: To remove the old payment method, tap “Edit.” Now, locate the old payment method you want to delete and tap the “Red Delete” button next to it. Confirm the deletion by tapping “Delete.”

Way 2: Change Credit Card on Mac
Now, we shift our focus to those who prefer managing their payment information on their Mac. Changing your credit card details from Mac’s settings is a straightforward and easy process. Therefore, using the following steps, you can learn how to change your credit card on Apple ID without any errors:
- Step 1: Start by opening the App Store on your device. Then, in the bottom-left corner of the App Store, tap on your name and proceed to access “Account Settings.”

- Step 2: Locate the “Apple ID Summary” section in the “Account Settings” menu and select the “Manage Payments” option next to it. After this, introduce a fresh payment method by opting for the “Add Payment” option.

- Step 3: This action will prompt you to input the details of your new payment method, including credit card information. After you’ve provided the required information, select “Done” to save your newly added payment method.

- Step 4: If you want to remove the old method linked to your Apple ID, click “Delete” in front of it. Now, tap “Delete” to remove this payment method from your Apple account.

Way 3: Update the Credit Card Details on Windows PC
To update the credit card information linked to your Apple ID, we’ll now provide instructions specifically tailored for Windows PC users. This approach offers flexibility for individuals looking to maintain accurate payment details. With the help of the simplified steps given below, you can easily change the credit card on the Apple account:
- Step 1: Access iTunes on your computer and click on “Account” from the menu bar that is given at the top. Afterward, a drop-down menu will appear on which you need to select “View My Account.”

- Step 2: Following this, click on “Manage Payments,” and your current payment methods that are listed will be shown to you. There, click on “Add Payment” to add a new payment method quickly.

- Step 3: After clicking on this option, you can enter details of your new payment method. Once the details are entered successfully, click “Done” to save the changes, and you are good to go. Tap the “Edit” option in front of the old credit card and choose “Remove Payment Method” to remove it from your Apple ID.

Pro Tip: Locked Out Your Apple ID? Get It Unlocked Instantly
While learning how to change a credit card on your Apple Account, you encounter an unexpected hurdle - your Apple ID has become locked. This can undoubtedly be a frustrating and troublesome scenario, considering the crucial role your Apple ID plays within the Apple ecosystem. Nevertheless, there’s no cause for alarm, as we’ve got a solution ready to promptly unlock your Apple ID and have you back on course.
The solution is Wondershare Dr.Fone, a tool that is able to remove Apple ID from your iOS devices without needing the password. It is a comprehensive tool that has the ability to remove your Apple ID from your device permanently. This tool works its magic in removing Apple ID, whereas other tools fail when the Find My feature is enabled.
Dr.Fone - Screen Unlock (iOS)
Unlock iPhone/iPad Lock Screen Without Hassle.
- Simple, click-through, process.
- Unlock screen passwords from all iPhone and iPad.
- No tech knowledge required, everybody can handle it.
- Supports the latest iOS version fully!


4,395,218 people have downloaded it
Key Features of Wondershare Dr.Fone
- Unlock iPhone, iPad, and iPod touch by removing various types of lock screens, ensuring access to your device.
- Gain access to your Apple device by bypassing the iCloud activation lock and Apple ID verification without requiring the password.
- Safely bypass Mobile Device Management (MDM) restrictions and Screen Time limitations without the risk of losing any data.
Simplified Steps To Remove Apple ID on Your iOS Device via Wondershare Dr.Fone
Following are the steps to unlock and remove old Apple ID from your iOS device using Wondershare Dr.Fone:
- Step 1: Access the Screen Unlock Tool
To initiate the Apple ID unlocking process, you will need to install and launch Wondershare Dr.Fone. Then, choose “Toolbox” from the left bar and go on to click “Screen Unlock.” Select “iPhone” as your device type, and since we are removing Apple ID, click “Remove Apple ID.”

- Step 2: Proceed to Activate Recovery Mode
Now is the time to connect your iOS device to the computer using a respective cable and click “Unlock Now.” Now, Wondershare Dr.Fone will ask you about having a screen lock and 2FA on the iOS device. The answer needs to be affirmative to proceed further. When done with it, enable Recovery Mode on your iOS device with the help of on-screen instructions.

- Step 3: Remove the Apple ID From Your iOS Device
Wondershare Dr.Fone will detect your device model once it is in Recovery Mode. Choose a system version to download by clicking “Start.” Once it has been downloaded and verified, tap “Unlock Now.” It will lead to a prompt warning about data loss. Here, enter “000000” to confirm your choice and click “Unlock.” Dr.Fone will go on to remove Apple ID from your device.

Part 2: 3 Methods To Change the Default Credit Card on Apple Pay
In our exploration of managing your credit card within the Apple ecosystem, we now focus on changing the default credit card linked to your Apple Pay. Apple Pay stands as a robust digital wallet solution, and understanding the process of updating your payment details is crucial for ensuring a secure user experience. Here, we will explore three approaches on how to change credit card on Apple Pay:
Method 1: Change the Default Card on the iPhone
We start by exploring how to change the default credit card on Apple Pay using your Apple iPhone X. This method is particularly handy for iPhone users who want to ensure their preferred payment card is set as the default option. These are the instructions for setting a card as the default card for Apple Pay:
Instructions: On your Apple iPhone X, access and open the Wallet app. Inside the app, locate the payment card you wish to set as your default. Touch and hold the selected payment card. Drag the card to the forefront, positioning it ahead of your other cards.

Method 2: Set New Card as Default on iPad or Mac
Whether you prefer using your iPad for managing your payment methods or you’re on your Mac, you can easily set a new card as the default option. Use the following instructions to set a credit card as the default card on Apple Pay:
For Mac
Instructions: Access System Settings through the Dock or Apple menu and move to Wallet & Apple Pay. Afterward, once you’re in Wallet & Apple Pay, choose a card from the “Default Card” settings and set it as the default card.

For iPad
Instructions: Navigate to Settings on your iPad and move to “Wallet & Apple Pay.” Here, scroll down to “Transaction Defaults” and press “Default Card.” Then, choose a card from the list to set it as your default card.

Method 3: Use Apple Watch to Change Default Card
The last stop on our journey to manage your default credit card on Apple Pay is the Apple Watch. If you are an Apple Watch user, then these instructions can assist you in how to change your credit card on Apple Pay:
Instructions: Access and launch the Apple Watch app on your Apple iPhone X and navigate the “My Watch” tab. There, tap on “Wallet & Apple Pay” within My Watch tab and scroll down in it to find the section labeled “Transaction Defaults.” In this section, you’ll find the “Default Card” option. Simply tap on it to select the card you wish to set as the default.

Conclusion
To summarize, we’ve navigated the complex world of how to change the credit card on Apple account. We’ve explored two critical aspects: changing the credit card on your Apple ID and altering the default credit card on Apple Pay. It’s important to understand that your credit card details for Apple ID and Apple Pay are distinct. Thus, it’s crucial to know how to update both to ensure a secure digital experience.
We explored many methods to change the credit card on Apple ID and Apple Pay, depending on your device and preference. Furthermore, there are unfortunate instances where you find yourself locked out of your Apple ID. For these, we introduced a valuable tool: Wondershare Dr.Fone - iOS Screen Unlock. This tool can efficiently unlock your Apple ID without causing any data loss, ensuring you can regain access to your account promptly.
How To Unlink Your Apple iPhone X From Your Apple ID
iPhones are known for their robust security features. The Apple ID is the central feature used to provide many security services that ensure the safety of personal data. Yet, life often leads you to moments when you must part ways you’re your devices. Be it for selling, gifting, or any other reason.
In such cases, it’s essential to understand how to unlink iPhones from your Apple ID. This 2023 guide is your go-to resource, providing insight into various methods to disassociate your Apple iPhone X from your Apple ID, even when facing a forgotten or unrecoverable passcode.
Part 1. How the Apple ID System Works
The Apple ID is like the key to your Apple iPhone X’s world. It’s a special account that connects your Apple iPhone X to Apple’s services. With it, you can download apps, back up your data, and more. It’s an essential part of your Apple iPhone X experience.
Here are ways that it protects your device.
- **Preventing use when stolen.**If your Apple iPhone X gets into the wrong hands, your Apple ID keeps it locked. Even if someone tries to reset or erase the phone, they can’t use it without your Apple ID passcode.
- **Preventing use even after reformatting the phone.**Even if you reset or erase your Apple iPhone X, it stays locked to your Apple ID. This is super important for keeping your data safe.
- **Other ways.**Apple ID helps you find your lost iPhone and secures your payments and personal info.
Remembering your Apple ID passcode is an intelligent move. It makes managing your Apple iPhone X more accessible and safer. Forgetting it can make things tricky, especially when you want to unlink your Apple iPhone X from your Apple ID. But don’t worry, there are solutions for that, too!
Part 2. How To Unlink Your Apple iPhone X Normally
The usual way to unlink your Apple iPhone X from your Apple ID is recommended, especially when remembering your Apple ID passcode. This ensures a smooth and secure transition for your device. Here’s how you can do it, step-by-step:
Step 1. Sign out of Apple ID (through Settings):
Open your Apple iPhone X’s Settings.
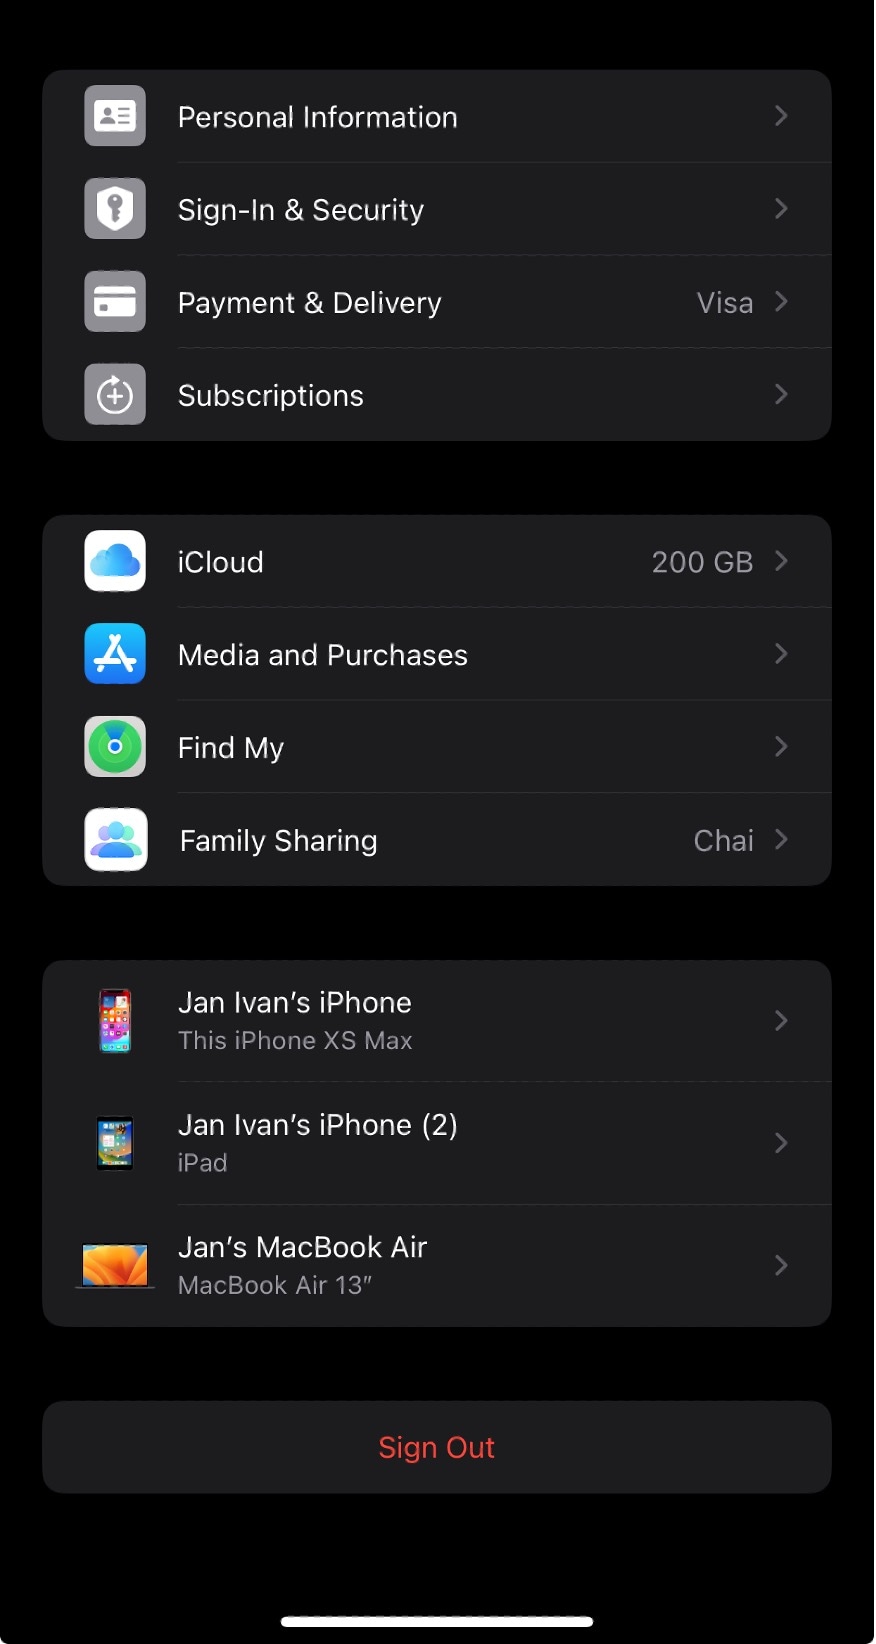
Scroll down and tap on your name at the top.
Next, scroll to the bottom of the screen and choose Sign Out.
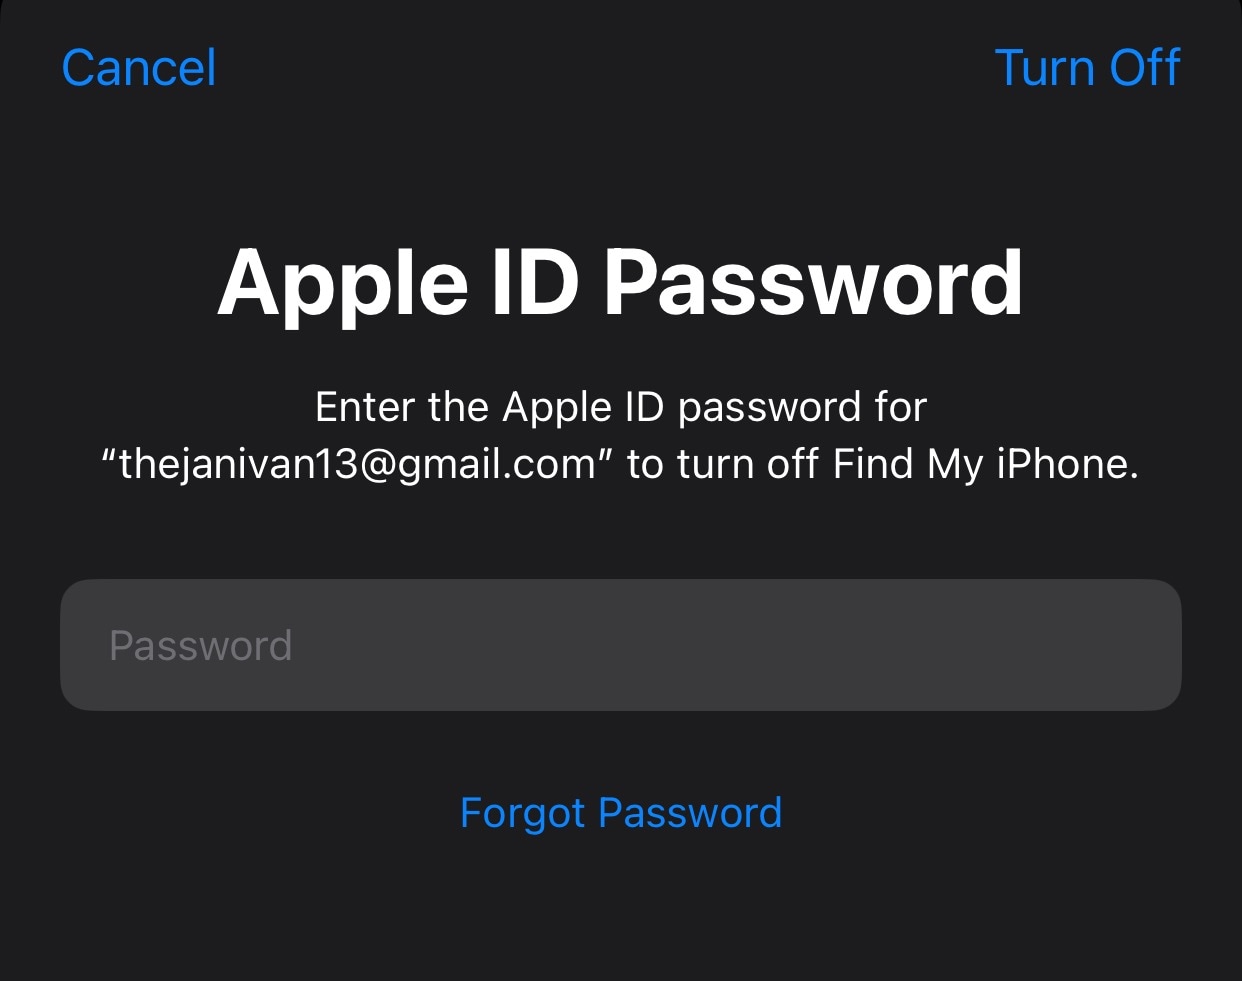
You’ll be asked to enter your Apple ID passcode and tap Turn Off.
Confirm by selecting the data you want to keep on your Apple iPhone X.
Finally, tap Sign Out.
Step 2. Deactivating iMessage and FaceTime:
After signing out of your Apple ID, go back to
Scroll down to Messages and tap it.
Turn off iMessage by flipping the switch.
Go back to Settingsand tap FaceTime.
Turn off FaceTime by flipping the switch.

Step 3. Reformat the phone:
Return to
Scroll down and tap
Scroll down and select
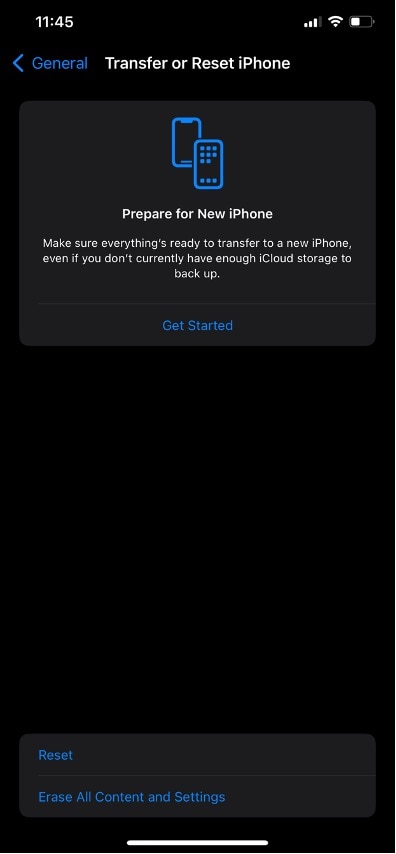
Choose Erase All Content and Settings.
Confirm this action. Your Apple iPhone X will reset to its original state.
Following these steps, your Apple iPhone X will be unlinked from your Apple ID and ready for a new user or any other purpose. Remember, this method is best when you can easily recall your Apple ID passcode.
Part 3. What To Do If You Forgot Your Apple ID Passcode
If you still need to remember your Apple ID Passcode, following the steps in the previous section would be unadvisable, as it will leave your Apple iPhone X locked and inaccessible. In this case, recovering your Apple ID Passcode is essential before unlinking iPhones.
These are some ways to recover your Apple ID passcode:
Use the Forgot Your Password Option
Start by going to the Apple ID account page or using the “Forgot Your Apple ID or Password?” link on your Apple iPhone X’s login screen. You must enter your Apple ID and follow the steps provided to reset your passcode. Apple will guide you through resetting your Apple ID passcode, often requiring you to verify your identity via email or other security questions.

Contact Apple Customer Service
If the above method doesn’t work or you’re facing difficulties, contacting Apple Customer Service is a good idea. They can assist you in recovering your Apple ID passcode and provide expert guidance.
After recovering your Apple ID Passcode, you can perform the steps outlined in the previous section to unlink your Apple iPhone X normally. With your passcode in hand, the process becomes straightforward, allowing you to maintain control of your device while preparing it for a new user or another purpose. Remember, your Apple ID Passcode is a vital key to unlocking the full potential of your Apple iPhone X, so it’s essential to keep it safe and secure.
Part 4. If You Can’t Recover Your Passcode: Wondershare Dr.Fone
If, for instance, you find yourself in a situation where you really can’t recover your Apple ID passcode, or perhaps you’ve reformatted your phone without unlinking your Apple ID, leaving it inaccessible, it’s time to turn to a trusted third-party tool to help you unlock and unlink your Apple ID from your Apple iPhone X.
Wondershare Dr.Fone is a versatile and powerful phone management tool designed to assist you in various aspects of your iOS device. It offers a range of features to help you manage and troubleshoot your Apple iPhone X, including data recovery, system repair, and device unlocking. It’s a user-friendly solution that caters to your needs when dealing with complex issues like opening your Apple iPhone X from an Apple ID.
One of Dr.Fone’s standout features is the Screen Unlock feature. It is an invaluable tool when facing challenges like an inaccessible iPhone due to a forgotten Apple ID passcode or a device that has been reformatted without unlinking the Apple ID. With Dr.Fone – Screen Unlock, you can learn how to unpair iPhones from the previous Apple ID, ensuring you can use it effectively.
How To Unlink Apple ID With Wondershare Dr.Fone – Screen Unlock
Before anything, be warned that this method removes all data from an iPhone. Creating a backup of your phone before performing the steps below is best.
Step 1: Launch Dr.Fone. Click Toolbox and then select Screen Unlock (iOS).
Step 2: Click Remove Apple ID.

- Step 3: Connect your Apple iPhone X to your computer. Click Unlock Now once you’ve confirmed its connection.
- Step 4: Click Yes on the screen lock verification page.

- Step 5: Click Yes on the Two-Factor Authentication verification page.

- Step 6: Follow the instructions to put your device into Recovery Mode. If they don’t work, click Try DFU Mode.

- Step 7: Verify your device details**.** Edit manually for any discrepancies. Click Start once done.

- Step 8: The firmware will start downloading. If it is slow, click Copy for a direct download link of the firmware.

- Step 9: Click Unlock Now once downloading is done.

- Step 10: Input the code “000000” on the appearing prompt and click Unlock.
- Step 11: Avoid any disconnection during the unlocking process.

- Step 12: Click Done once you see this page. Click Try Again if the method does not work.

Conclusion
In summary, this guide has navigated you on how to unlink iPhones from their Apple ID, covering both the normal process and what to do when you’ve forgotten your passcode. However, the critical lesson here is remembering your Apple ID passcode to avoid unnecessary complications.
Should you ever find yourself locked out of your device, Wondershare Dr.Fone - Screen Unlock emerges as your go-to solution. The all-around phone management tool can rescue you from tricky situations and help you unlink your device effortlessly. Remember to keep your Apple ID passcode safe and handy, but know that Dr.Fone has your back when you need it.
Unlock Apple ID without Phone Number On Apple iPhone X
Introduction
Apple is well known for securing its customers’ data. Breaching Apple security is a bit far difficult than breaching Android ones. That means if you are using Apple phones then you are in the safe hand. If you are an iPhone user and someone is trying to get through your data or Apple account then Apple ID would be disabled automatically for security purposes. This way your data and account will remain safe and secure and you need to log in again to access your Apple id. To access your Apple id, you need the associated phone number. The task becomes easy when you have the phone number otherwise you need to explore alternative methods for how to unlock apple id without phone number.
1. How to unlock Apple ID without a trusted phone number?
Dr.Fone Screen Unlock (iOS) is a one-stop solution tool for multiple problems. It enables you to unlock Apple ID without phone number and unlock the screen of iPhone and iPad with a few clicks. The tool is easy to use and handle. Even a non-tech savvy person can learn how to unlock Apple ID without a trusted phone number at ease with the help of this tool. The tool is fully compatible with Windows as well as iOS.
Step by step tutorial:
In the world of technology, if you want to perform any task out of the box then you require software for the same. Similarly, unlocking Apple ID without phone number can be easily done with the help of a tool. If you are looking for the best tool to perform the task then Dr.Fone Screen Unlock (iOS) is made for you. This tool makes the tricky and handy task easy and simple for everyone.
Let’s dive into how to unlock Apple ID without a trusted phone number.
Step1: Connect your device to your system via USB
Install and open Dr.Fone software on your PC. The home interface of the software will open, click on “Screen Unlock”.
Afterward, a new screen will pop up on the screen of your system. Just click on the last option, “Unlock Apple ID” to begin the process.

Step 2: Enter the required credentials
Enter the password of the connected device and then tap on the “Trust” button to continue the process.
Note- This process will wipe out all your data from the phone. Make sure you have backup all your data before commencing the process.

Step 3: Reset all settings
Before going ahead, you need to reset all settings of your Apple iPhone X. For more help, follow the instructions shown in the below pictures. The unlocking of Apple ID process will begin automatically post the completion of resetting all your settings process.
Step 4: Unlocking will take place
The unlocking process will start and it will complete within few seconds.
Note: Don’t use the Apple iPhone X device while the completion of the process.
Step 5: Process is accomplished
A new window will be appeared showing “Apple ID has been completely unlocked”. That means the process is accomplished and you can access your Apple ID seamlessly.
2. How to unlock Apple ID without phone number by recovery key?
The recovery key is a good option to unlock Apple ID without phone number. But you can use this feature if you had enabled it before and remember or save the recovery key. You can unlock your Apple ID on any iOS device or Apple’s website. That’s impressive! Let’s know how to do it using the recovery key.
Step 1: Click on the following link, https://appleid.apple.com/#!&page=signin , and tap on “Forgot Apple ID or Password” to commence the process.

Step 2: Enter your Apple ID and tap on “Continue”.

Step 3: You will be redirected to a new page where you need to select an option that lets you use the recovery key.
Step 4: Insert your recovery key. Then create a new password. Follow the further on-screen instructions to accomplish the process.
Step 5: Unlock Apple ID with a new password.
3. How to unlock Apple ID using iforgot.apple.com [Apple ID’s security questions needed]
If you don’t have a phone number or don’t have access to the trusted device then you can reset your account password using security questions to unlock your Apple ID. Prior to this process, recall the answers to Apple ID’s security questions because you need them while the completion of the process.
Let’s know how to unlock Apple ID without a trusted phone number using iforgot.apple.com.
Step 1: Click on the https://iforgot.apple.com/ and enter your Apple ID to begin the process.

Step 2: Enter the registered phone number and tap on continue.

Step 3: A notification will be sent to your device now. Please note that we are talking about the Apple iPhone X device that is linked with the same Apple ID. It should be Mac or iPhone or iPad. You need to tap on the “Allow” button on your device.

Step4: Follow the instructions and you will then unlock your Apple ID.
This is how you will access your Apple ID via iforgot.apple.com.
4. How to change Apple ID password on iPhone?
Your data is precious to you. You always want it to be secure and safe. To do so, you should create a strong password or should change it at a regular interval. Also, if you are suspicious that your friend gets hands on your password then you should change your account password instantly. If you are a new iOS user and don’t know how to change Apple ID password on iPhone then don’t bother. Here, we will tell you the process in an easy and simple way.
You need to follow few steps to change your Apple ID password.
Step1: Go to your Apple iPhone X setting.
Step 2: Tap on your name.

Step 3: Select the “Password and Security” option.

Step 4: Opt for “Change Password” shown on the phone screen.

Step 5: Enter your phone’s passcode.

Step 6: Enter desired password and verify it by typing the same password again. Then, click on “Change Password”.

Step 7: Hurray! You have changed your password. Now, you can log in to your Apple ID with this new password.
Also read:
- [Updated] Elite 4K Displays for High-Fidelity Games
- [Updated] In 2024, Daily Movie Storage Hours to GB Calculation
- 2024 Approved On-The-Go Video Making Essentials
- Boosting Views Mastering Hashtags in FreeFire Vids
- Fix Dead by Daylight Error Code 8014 - Step-by-Step Guide
- Fixing Persistent Crashes in 'Remnant: From the Ashes' Game
- Forgot Your Apple ID Password and Email From Apple iPhone 12? Heres the Best Fixes
- Getting Deathloop Running Smoothly Again: Expert Advice to Stop Freezes and Lag on Your Gaming Systems
- How Can I Use a Fake GPS Without Mock Location On Honor Magic 6 Lite? | Dr.fone
- How To Get the Apple ID Verification Code From iPhone 15 Plus in the Best Ways
- How To Reset the Security Questions of Your Apple ID From Your iPhone 8
- In 2024, How To Remove the Two Factor Authentication From iPhone 12
- In 2024, Protecting Your Privacy How To Remove Apple ID From Apple iPhone 15
- In 2024, Tips and Tricks for Apple ID Locked Issue From Apple iPhone 14 Plus
- The Essential Steps for Clearance Prior to TikTok Uploads for 2024
- Unlock Apple ID without Phone Number On Apple iPhone 12 Pro Max
- Title: How to Change Credit Card on Your Apple iPhone X Apple ID and Apple Pay
- Author: Alma
- Created at : 2025-01-24 19:06:44
- Updated at : 2025-01-31 20:32:25
- Link: https://apple-account.techidaily.com/how-to-change-credit-card-on-your-apple-iphone-x-apple-id-and-apple-pay-by-drfone-ios/
- License: This work is licensed under CC BY-NC-SA 4.0.