
How To Change Your iPhone SE Apple ID on MacBook
How To Change Your Apple iPhone SE Apple ID on MacBook
Your Apple ID is a key component of your Apple ecosystem. It serves as your digital identity across all Apple devices. Whether you have an Intel-based MacBook or one with Apple Silicon, understanding how to change your Apple ID is crucial. Therefore, in this detailed guide, we will walk you through the process of how to change your Apple ID on your MacBookwithout facing any issues.
Besides this, it will also assist you in exploring the significance of your Apple ID and the services it enables on your MacBook. The article will ensure that you make the most of this essential account.
Part 1: What Are the Benefits of Changing the Apple ID on MacBook
Apple ID is the cornerstone that simplifies the management of your Apple devices. It’s more than just a username; it’s your passport to a world of smooth integration and services. Changing your Apple ID on your MacBook can yield several significant benefits. It enhances your overall user experience. Here are some of the key advantages of learning how to change your Apple ID MacBook:
1. Personalization
Changing your Apple ID allows you to customize your MacBook according to your preferences. You can sync your contacts, calendars, and settings. This ensures a personalized and consistent experience across all your Apple devices.
2. App Store and iTunes Purchases
You can access a distinct collection of applications, music, films, and books by creating or logging in with a different Apple ID. This proves especially beneficial when considering a change of region. It also helps when sharing your MacBook with family members, each of whom has their individual Apple ID.
3. iCloud Storage
Your Apple ID is closely linked with iCloud, Apple’s cloud storage service. Changing your Apple ID allows you to gain access to an alternative iCloud account with its dedicated storage capacity. This can be advantageous when you require additional storage or wish to keep your data separate from a previous account.
4. Privacy and Security Settings
Frequently updating your Apple ID can enhance your online privacy and security. It enhances the challenge for unauthorized parties to acquire your personal information. This, consequently, reduces the risk of accessing your MacBook’s sensitive information.
5. Family Sharing
If you’re part of a Family Sharing group, changing your Apple ID can simplify sharing purchases, subscriptions, and iCloud storage with family members. Each family member can have their own Apple ID while still enjoying the benefits of shared content.
Part 2: How To Change the Apple ID on MacBook Through the Settings
In summary, there are many advantages to updating your Apple ID on your MacBook. Let’s now proceed to the actionable steps for accomplishing this task. Below is a comprehensive, step-by-step tutorial on how to change your Apple ID on a MacBookwith the help of System Settings:
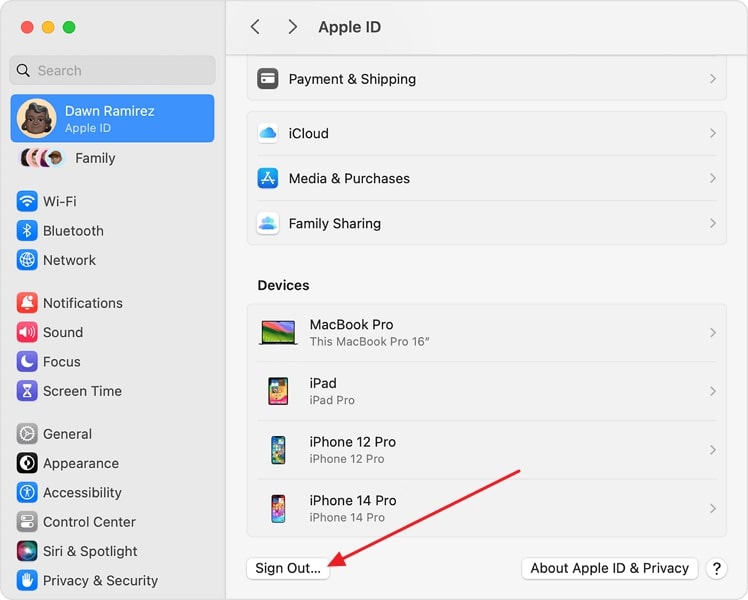
- **Step 1:**Access your Mac’s System Setting through the Dock. Tap the Apple ID icon from the left sidebar within the “System Settings.”
- **Step 2:**Here, scroll down to find and tap “Sign Out.” The option is located at the bottom near the left corner. Afterward, tap “Sign Out” again to confirm your choice, and then, if your device asks, provide your Apple ID password to move ahead.
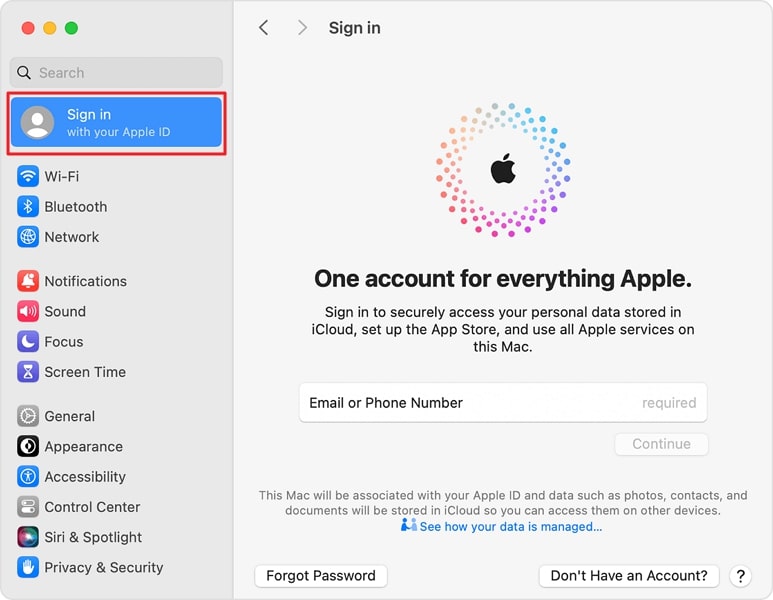
- **Step 3:**After logging out of your Apple ID, reboot your device, and when it is done, go back to System Settings. From there, hit the “Sign in to with your Apple ID” option so that you can quickly log in with a new Apple ID.
Part 3: Other Ways To Change the Apple ID With Ease
Changing your Apple ID on your MacBook through Settings is a straightforward process. There are scenarios where some adjustments may be necessary and some may not. For instance, in the case of purchasing a used MacBook, it’s conceivable that the prior owner’s Apple ID could still be linked to the Apple iPhone SE device.
In such instances, you’ll need to contact the previous owner and request them to disassociate their Apple ID. Here are two practical methods for how to change Apple ID on MacBook Air:
Way 1: Using the iPhone
The first way the previous owner can remove the Apple ID from your MacBook is by using his iPhone. You can ask the previous owner to follow these steps on their iPhone:
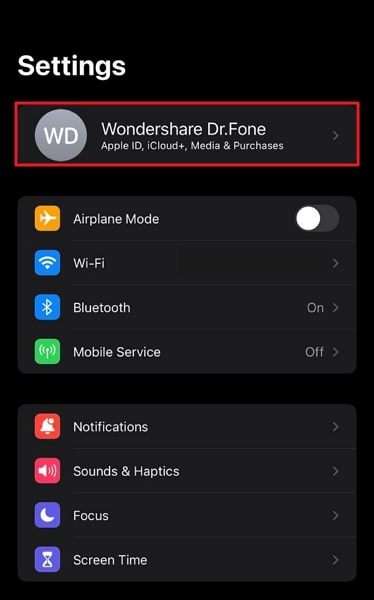
- **Step 1:**Start the process by accessing the Settings app on your Apple iPhone SE. From there, click on Apple ID on top of the main settings page.
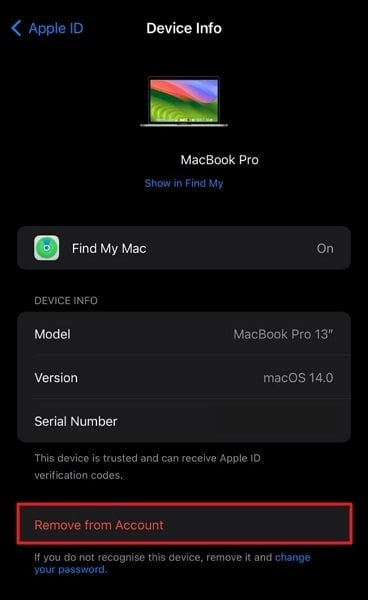
- **Step 2:**Scroll down on the screen to devices that are connected with the Apple ID. Tap on the MacBook and use the “Remove from Account” option to remove Apple ID from MacBook.
Way 2: Using Find My App
Another way to remove the Apple ID is by asking the previous owner to use the Find My service. The steps for removing Apple ID using the Find My app are given below:
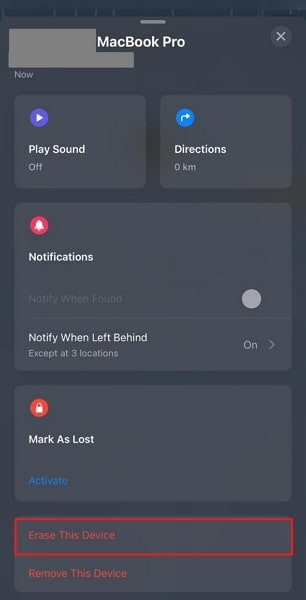
- **Step 1:**Begin by opening the Find My app on the iPhone. There, select the MacBook from the Apple iPhone SE devices section. On the following screen, scroll to the last option, “Erase This Device.”
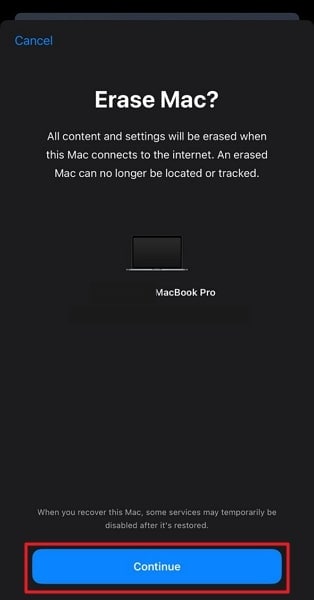
- **Step 2:**Here, select “Continue” to confirm your choice, and follow on-screen instructions to erase the Apple iPhone SE device. After this, provide your Apple ID password to complete the process, and when the Apple iPhone SE device eraser is done, the Apple ID will be removed from your MacBook.
Bonus Part: How To Fix Unable To Logout (Change) the Old Apple ID on Mac
Although changing your Apple ID on your Mac is usually a swift procedure, there may be instances where you find it challenging. It’s essential to resolve this matter promptly. The reason is that many essential procedures and services are directly linked to your Apple ID. Here are some common reasons why you might face difficulty logging out of the old Apple ID and their solutions:
1. Ongoing iCloud Backup
While the data is backed up on the iCloud from your Mac, you cannot log out from the Apple ID. It is because, while the data is being uploaded, logging out of Apple ID is restricted to ensure that data is not lost during the process.
Solution
Wait for the iCloud backup to complete before attempting to log out. You can access the backup information through “iCloud” within your Apple ID settings of System Settings. Here, tap “iCloud Drive” and stop syncing to stop the ongoing iCloud backup process.

2. Bug in macOS
Occasionally, macOS may encounter bugs or glitches that prevent you from logging out of your Apple ID. These issues can usually be resolved with software updates or troubleshooting steps.
Solution
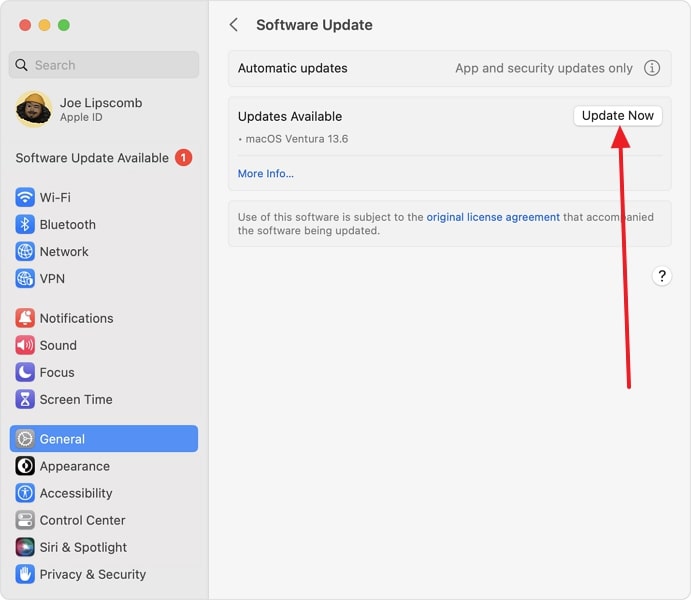
To resolve the bugs and glitches within the MacBook, the best option is to update macOS to its latest version. For that, access “System Settings” through Dock and move to the “General” tab. Here, select “Software Update“ to verify if an update is available and if an update is available, use “Update Now” to update the macOS.
3. Apple Server Inactivity
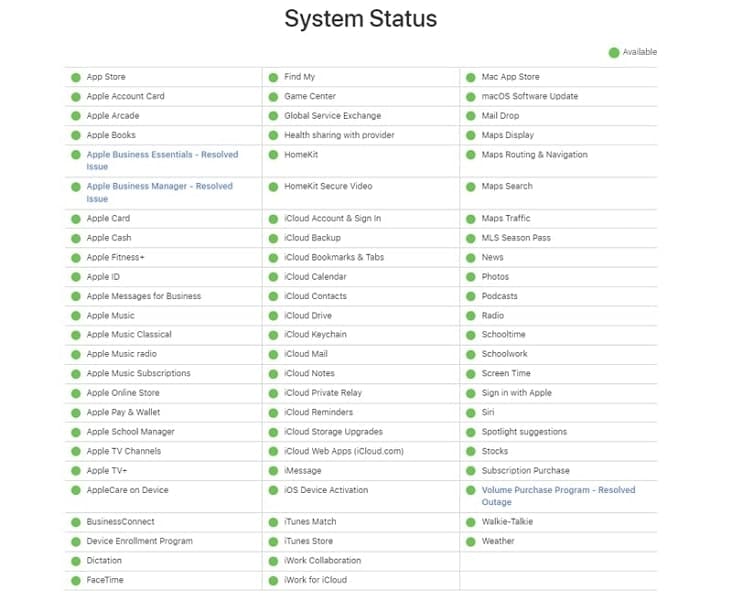
Sometimes, issues on Apple’s servers can disrupt the log-out process. It’s recommended to visit Apple’s System Status page to ascertain the presence of any ongoing server issues.
Solution
You will need to check the official Apple System Status page at https://www.apple.com/support/systemstatus/. Here, you can find out if the problem behind your inability to log out lies with the Apple servers.
Forgetting a password to your Apple ID is a nightmare for Apple users. Considering the pivotal role of Apple ID in the Apple ecosystem, it’s not surprising that forgetting your Apple ID password can be a concern. Nevertheless, the real question is how to proceed if you find yourself in this predicament. While it may initially appear impossible, rest assured there are solutions available. Where there’s determination, there’s a path forward.
If it is an iOS device where your Apple ID is locked, we have the best tool for you in the form of Wondershare Dr.Fone. This tool enables you to remove Apple ID from the Apple iPhone SE device without needing a password. Dr.Fone’s iPhone unlocker has the capability to bypass the Apple ID lock permanently. It even works when the Find My/Find My iPhone feature is active on the Apple iPhone SE device.
You can fully restore access to all your iCloud services and Apple ID features by signing in with a new account. Following are the steps you need to adhere to remove the locked Apple ID from your iOS device using Wondershare Dr.Fone:
- Step 1: Navigate To Remove Apple ID in Wondershare Dr.Fone
Click “Toolbox” from the left sidebar after launching Wondershare Dr.Fone. From the available options on the screen, choose “Screen Unlock” and select “iPhone” as your device type. Now connect your Apple iPhone SE to the computer using a USB cable and click “Remove Apple ID“ in Dr.Fone.

- Step 2: Enable Recovery Mode on Your Device
Tap “Unlock Now” and proceed to confirm that your device has setup screen lock and 2FA is enabled. These are necessary steps for the removal process of Apple ID. Next, put your device into Recovery Mode following the guidelines available on-screen.

- Step 3: Remove the Locked Apple ID
Once your device is in Recovery Mode, Wondershare Dr.Fone will detect its model. You need to choose the iOS version and click “Start” to download the firmware. When it is downloaded and verified, tap “Unlock Now” to initiate the process. The last step involves confirming that you agree to the procedure by typing “000000” into the warning prompt and clicking “Unlock.”

Conclusion
In conclusion, this article has provided you with valuable insights into the process of how to change Apple ID on MacBook. We began by highlighting the primary purpose of the Apple ID and discussing the countless benefits it offers. We’ve walked you through two main methods for changing your Apple ID. The first one is using the Settings on your MacBook.
The other included alternative approaches for scenarios like purchasing a second-hand MacBook. We also addressed the issue of forgetting your Apple ID password on iOS devices. For it, we used the specialized software Wondershare Dr.Fone to remove Apple ID without needing a password.
How to Reset Apple ID and Apple Password On Apple iPhone SE
Forgetting your Apple ID or password sucks, right! You are locked out of App Store, iCloud and iTunes, literally all of Apple. It becomes impossible to view your files on iCloud or to download anything from App store or iTunes if you forgot Apple ID password. Well luckily, you are not the first person to forget Apple ID or forgot iPhone password . You can rest it easy because we have prepared this guide just for you.
In this guide, we will uncover all the safeguards that Apple has put in place to help you recover your Apple account. We will walk you through 5 methods of how you can reset your password or recover your Apple ID from any web browser or iOS device.
Part 1: A Preliminary Check
Before doing anything else, it may just happen that you have not forgotten Apple ID password but you are just making a small mistake when signing in to your account. Here is a quick checklist you should review before subjecting yourself to a meaningless hassle:
- Turn off your Caps Lock as you type in your password unless you have uppercase letters in your password of course.
- If you have more than one email address, you could sometimes get them mixed up so review the email you are using to sign in. You could also have made a spelling mistake in your email address.
- Lastly, your sign in attempts may be fruitless because your account has been disabled for security reasons. In this case you should receive a notification asking you to reset your password so go over your emails.
If none of the above solutions work, you can safely conclude that you forgot Apple ID password but not to worry, we’ve has got you covered. Also, before we proceed with any solutions, it’s better to backup iPhone without passcode , to invoid any data loss during the process.
Part 2: Recover or Reset Forgotten Apple ID or Password on iPhone/iPad
The following is the first method you should try out to log back into your Apple account. This is because even though it isn’t a guaranteed method, it is the simplest method by which to recover forgotten Apple ID.
- In your iOS device, go to Settings, then scroll down to “iCloud.”
- Tap on the email address, which is at the top of the iCloud screen.
- Tap on “Forgot Apple ID or Password?” Now you have one of two options:
- • If you forgot the Password, type your Apple ID, and click “Next.”
- • If you forgot the Apple ID, then click on “Forgot your Apple ID?” You’ll have to enter your full name and details, and then you’ll receive your Apple ID.
- You’ll have to answer your security questions to receive your Apple ID.
However, this process will only work if you know either your Apple ID, or your Password, and the answers to your security questions. If not, then you can follow the next methods.
You May Like: How to Reset iPhone Without Apple ID >>
Part 3: Recover/Reset Apple Password via Email or Security Questions
This method only works if you have a verified recovery email for your Apple account or a set of security questions that you set up. The recovery instructions can be sent to your recovery email or you can answer the security questions on the Apple website. Here is a step-by-step guide:
- Go to iforgot.apple.com on your web browser.
- You should see an option for “Enter your Apple ID”. Click on it and type in your Apple ID to embark on the road to recovery. If for some reason, you forgot Apple ID as well, it’s not over yet! Go to the Part 4 for a recovery solution.
- Tap on “my password.”
- Click the “Next” button.
- You should now see two options. Click on “Get an email” to receive the account reset instructions on your recovery email. If you have security questions that you had set up, click on “Answer Security Questions” to recover your account right there on the website.

Note: Having a recovery email for your Apple account is probably the easiest method for future recovery. If you however prefer security questions, avoid obvious questions and instead use questions that only you can get.
Also Read: How to Remove iCloud Account with or without Password >>
Part 4: Reset Apple ID with no need to remember Password and Email
If you want to try a 100% working technique to reset Apple ID, then use Dr.Fone - Screen Unlock (iOS) . The application would get rid of the Apple ID linked to the Apple iPhone SE device without any related details like email id or password. Though, you should know that this will cause the loss of stored data on your device. You can reset Apple ID using Dr.Fone – Screen Unlock (iOS) easily, but make sure that you don’t use it for any illegal activity.
Dr.Fone - Screen Unlock
Unlock Disabled iPhone in 5 Minutes.
- Easy operations to unlock iPhone without the passcode.
- Removes the Apple iPhone SE lock screen without relying on iTunes.
- Works for all models of iPhone, iPad and iPod touch.
- Fully compatible with the latest iOS/iPadOS version.


4,395,216 people have downloaded it
Step 1: Connect your Apple iPhone SE to the system
Firstly, connect your iOS device to the system using a working lightning cable. Also, launch the Dr.Fone toolkit and visit the “Screen Unlock” section from its home.
Now, you will be given an option to either unlock an Android or an iOS device. Simply select the option to unlock Apple ID of the Apple iPhone SE device.
Step 2: Trust the computer
Whenever we connect an iOS device to a new system, we get a “Trust This Computer” prompt on it. If you get the same pop-up, then just tap on the “Trust” button. This will give the application access to your smartphone.
Step 3: Reset and restart your phone
To proceed, the application would require erasing the Apple iPhone SE device. As the following prompt will appear, you can enter the on-screen displayed code to confirm your choice. Afterward, click on the “Unlock Now” button.

Step 4: Reset Apple ID
As the Apple iPhone SE device restarted, the application would follow the needed process to reset its Apple ID. You can wait for a few minutes for the process to be completed.

When the Apple ID is unlocked, you will be notified. You can now safely remove the Apple iPhone SE device and use it the way you like.
 safe & secure
Part 5: Forgot Apple ID? How to Reset Apple ID
Like your password, Apple can help you recover your Apple ID or username as well. Just follow this concise guide:
- Open any web browser and go to the following URL: iforgot.apple.com .
- Click the “Forgot Apple ID” option.
- You will be prompted to enter your First Name, Last Name and your Email Address.
- You also have the option of entering up to 3 email addresses that you have used in the past.
- Click the “Next” button after which you will be presented with two other options. Click “Reset By Email” to receive the account reset instructions on your recovery email. Alternatively, click on “Answer Security Questions” to recover your Apple account right there on the website.

Also Read: 3 Ways to Recover iCloud Password >>
Part 6: Using Apple’s Two-step Verification (Forgot Apple Password)
Two-step authentication is an old Apple security feature and it still happens to be up and running. If you had set it up for your account, you can use it if you forgot Apple ID password. Here’s how it works:
- Go to the URL iforgot.apple.com .
- Click the “Enter your Apple ID” option and type in your Apple ID to launch the recovery process.
- You should be prompted to enter your recovery key. Type it in and click “Continue”.

- You should then choose a trusted recovery device that is currently available to you and click “Next”.
- Apple should send a verification code to the Apple iPhone SE device you selected. Enter this code as requested on the website and click “Next”.
- After the verification is complete, you can now set up a new password and hopefully, you’ll remember it this time.
Note: Be wary of using recovery keys! Though they are a very secure and effective method of password recovery, you could easily get permanently locked out of your Apple account. When using a recovery key, you initially need:
- An Apple ID password.
- A trusted device that you can easily access.
- The actual Recovery Key.
Now if you happen to lose any two of the above at the same time, there is no way of recovering your account and you simply have to create a new one.
Also Read: How to Factory Reset iPhone without Passcode >>
Part 7: Using Apple’s Two-Factor Authentication (Forgot Apple ID Password)
This is a new account recovery option that is built into iOS 9 and OS X El Capitan. If you have enabled it for your account, you can change or reset Apple password from iforgot.apple.com or from any trusted iPad, iPhone, or iPod touch if you forgot your Apple ID password. The trusted device, however, only works if it has a passcode enabled.
How to reset Apple password on Your own iPhone
- Open iforgot.apple.com on any web browser and enter your Apple ID.
- You can now choose to “Reset from another device,” or you can “Use trusted phone number.” Choose either option, then click “Continue.”

- It would help if you now waited for prompt requesting access to the trusted device or phone number. Click “Allow.” You can now reset your password.
Recover/reset Apple password on a trusted Apple iOS device
- On the Apple iPhone SE device, open Settings > iCloud.
- Select your name, then select “Password & Security.”
- Select “Change Password” and enter your new password. Voila! You’re now reunited with your account.
If you can’t access the trusted device, you can recover your password on any other iOS device:
Recover/reset Apple password on any other iOS device
- Open Settings > iCloud.
- Select Forgot Apple ID and Password.
- Follow the given steps to recover your account.
Now, if none of these methods work and you’re completely locked out and completely frustrated, then you should contact Apple and seek their help to regain access to your account.
Part 8: Recover lost data (Forgot Apple ID or Apple Password)
If you can’t log into your Apple account even after all this hassle, and if you’re permanently locked out of your iCloud and Apple accounts, then you can try to recover iCloud password , but your biggest concern should be to save and recover as much data as possible.
Because the iCloud and Apple passwords are the same, you would also lose all the data that you’ve kept in your iCloud. However, you can retrieve it all using third-party software called Dr.Fone - Data Recovery (iOS) .
Dr.Fone - Data Recovery (iOS)
World’s 1st iPhone and iPad data recovery software.
- Fast, simple and reliable.
- Recover lost data directly from iPhone, iTunes backup and iCloud backup.
- Recover data lost due to deletion, device loss, jailbreak, iOS upgrade, etc.
- Preview and selectively recover what you want from iPhone, iTunes and iCloud backup.
- Compatible with all iOS devices.
3,680,398 people have downloaded it
Conclusion
With this guide, we now hope that you have been reunited with your estranged Apple account. To save yourself this hassle in the future, create a password close to your heart and pops up in your head every time you see a password field.
If you get permanently locked out of your Apple or iCloud accounts, you could also use the Dr.Fone solution we mentioned to recover whatever data you can. Have they been able to help you? Do you know of other solutions to the problem of losing your Apple ID and Password ? If so, we’d love to hear from you Do leave a comment and let us know what you think about our solutions.!
How To Erase an Apple iPhone SE Without Apple ID Password?
Have you ever wondered what happens when you erase the content of your Apple iPhone SE storage? Erasing an iPhone means restoring it to its factory settings to install the latest iOS version. It also permanently removes all your data, including photos, videos, contacts, apps, and other information stored on the Apple iPhone SE device.
This process is often necessary when you sell or give away your Apple iPhone SE to ensure your personal information remains secure. But, you may encounter a situation where you should learn how to erase an iPhone without an Apple ID. While this may seem challenging, you can use a few methods to achieve this goal. This article will show you how to do it with or without an Apple ID password.
Part 1: A Checklist on What To Do Before Erasing an iPhone
If you’re looking at how to erase an iPhone without an Apple ID or account password, you’ve come to the right place. Before you begin, preparing your device and ensuring you have all the necessary information is crucial. Here’s a checklist of what to do before erasing your Apple iPhone SE:
Backup Your Apple iPhone SE
You can back up to iCloud or use Finder on macOS 10.15 or later. Remember that iCloud backups are stored on Apple’s servers and always encrypts backups. On the other hand, computer backups are stored on your computer’s hard drive and require a connection to the backup computer. Consider what your needs and preferences are when choosing between these two backup options.

Prepare Your Apple iPhone SE Passcode
You’ll need your Apple iPhone SE passcode to erase an iPhone. If you’ve forgotten your passcode, reset it using recovery mode.
Ready Your Apple ID Password
You may be asked to provide your Apple ID password to disable the Find My iPhone function and remove the Apple iPhone SE device from your account. Have it handy to avoid any delays. It’s necessary for security verification during the erasure process.
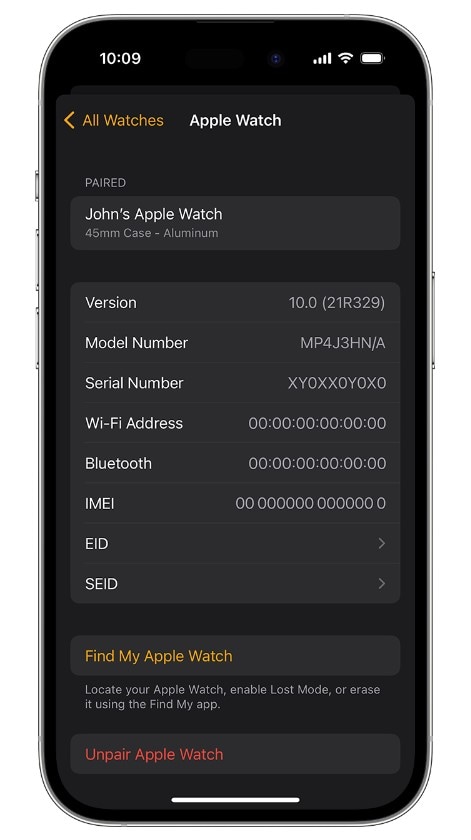
Unpair Apple Watch
If you own an Apple Watch, unpair it from your Apple iPhone SE. It ensures a smooth disconnection and prevents complications when erasing the Apple iPhone SE device.
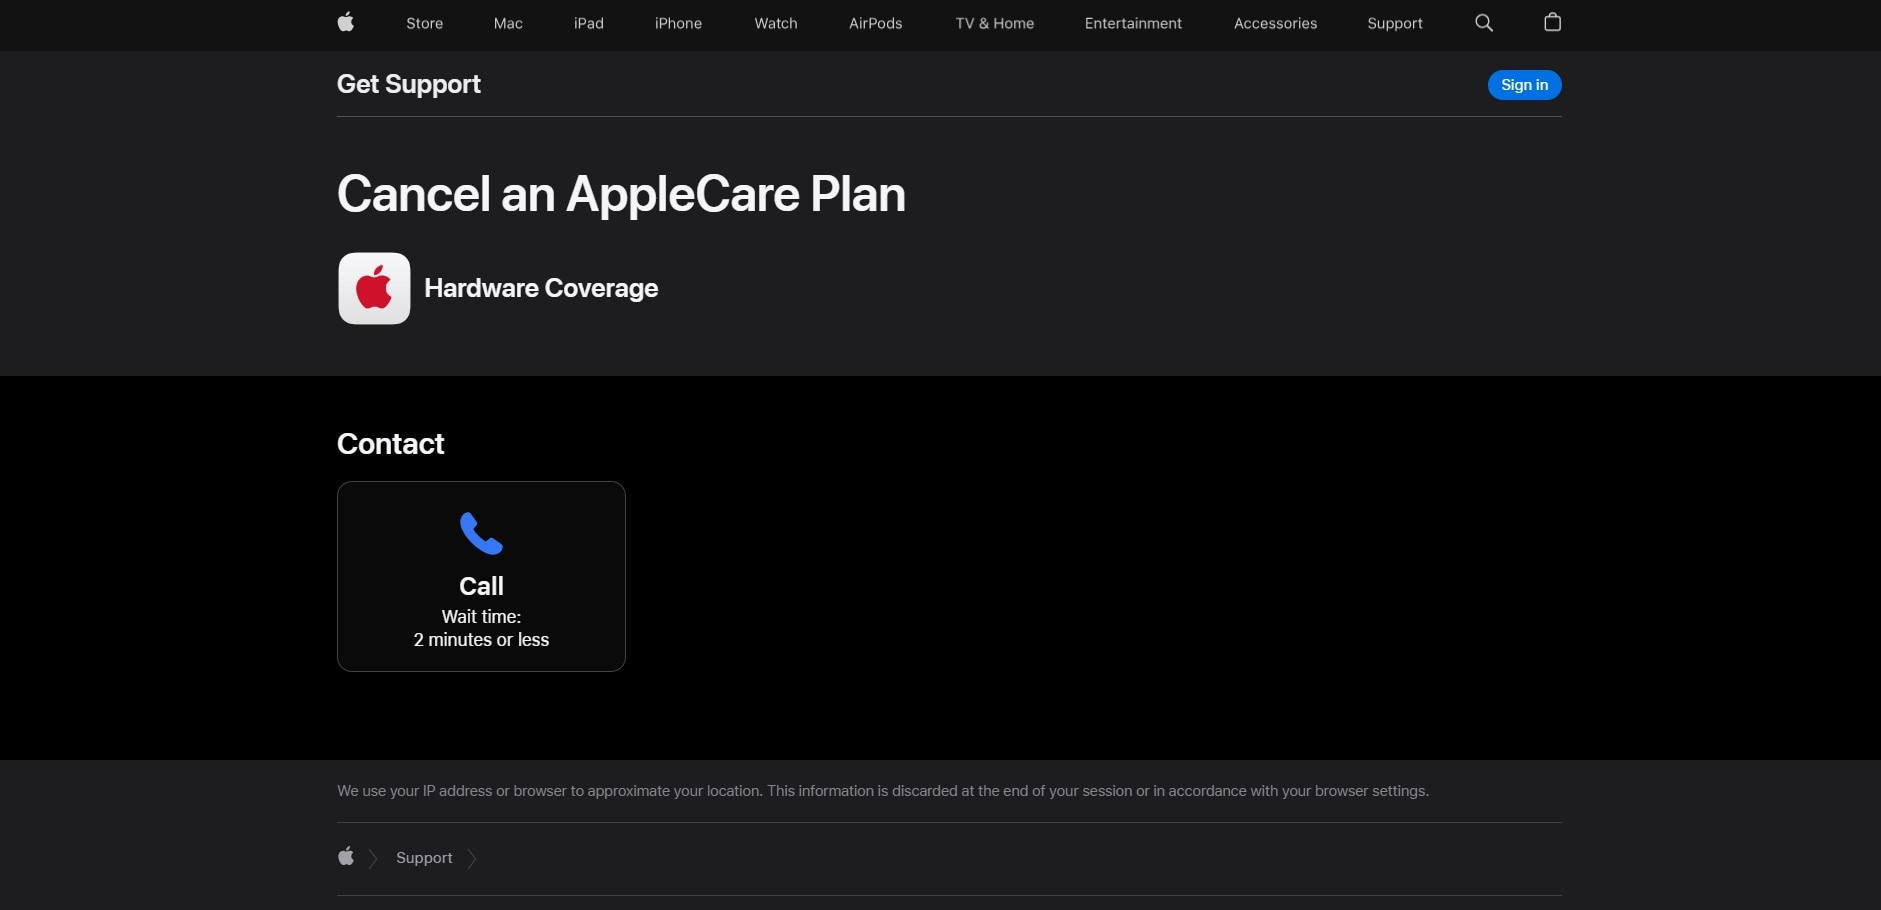
Cancel Your AppleCare Plan
If you have an active AppleCare plan for your Apple iPhone SE, cancel it on your Apple iPhone SE before erasing the Apple iPhone SE device. You can cancel your AppleCare plan by phone by calling AppleCare customer support. It will prevent any unnecessary charges after the erasing process.
Sign Out of iCloud
If your Apple iPhone SE has iOS 10.3 or later, open the Settings app, then tap on your name at the top. Next, scroll down, tap Sign Out, enter your Apple ID password, and tap Turn Off.
Remove Your Apple iPhone SE From Your List of Trusted Devices
Remove your old device from your list of trusted devices in your Apple ID settings for added security. This measure strengthens the defense against unauthorized access to your data.
Part 2: How To Erase iPhone Without Apple ID Password via Settings?
Erasing an iPhone and restoring it to factory settings is a straightforward process you can do in a few steps. Whether you’re preparing to sell or gift your device or troubleshooting persistent software issues, erasing your Apple iPhone SE contents can enhance its performance. The process is easy if you have your Apple ID password readily available.
However, if you’ve forgotten your Apple ID password, don’t fret. Follow the guide below to reset your Apple ID password and erase all content and settings on your Apple iPhone SE:
- Step 1: Open the Settings application, then tap [name].
- Step 2: Go to Sign-In & Security > Change Password.
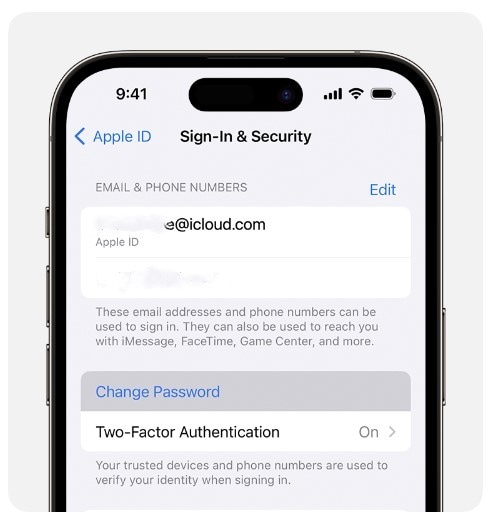
- Step 3: Follow the on-screen instructions to reset your Apple ID password.
- Step 4: Go to General > Reset from the Settings app, then tap Erase All Content and Settings.

- Step 5: Input your Apple ID password or your passcode when prompted.
- Step 6: Click Continue to confirm. Then, wait while the contents are being removed from your Apple iPhone SE device.
Part 3: How To Erase iPhone Without Apple ID Password on Computer?
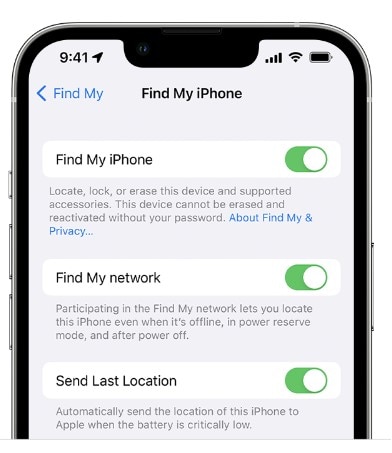
Activation lock is a security feature. It prevents anyone from activating an iPhone without your Apple ID password. If you try to factory reset your Apple iPhone SE without turning off Find My iPhone, the activation lock will be in place. It means you need to enter your Apple ID password to activate the Apple iPhone SE again. To turn it off, also ensure to turn off Find My on your device.
Go to Settings > [your name] > Find My or Find My iPhone to check.
If you want to erase an iPhone without Apple ID password on your computer, you can do so as long as you turn off the Find My. However, you’ll need to put your Apple iPhone SE into Recovery Mode first.
- Step 1: Turn off your Apple iPhone SE, then put it into Recovery Mode.
- For iPhone 8 or later: Press and hold the Side button.
- For iPhone 7 or iPhone 7 Plus: Press and hold the Volume Down button.
- For iPhone 6s or earlier: Press and hold the Home button.
- Step 2: Connect your Apple iPhone SE to the computer with the button held down.
- Step 3: Hold the buttons steadily until the Recovery Mode screen is visible.
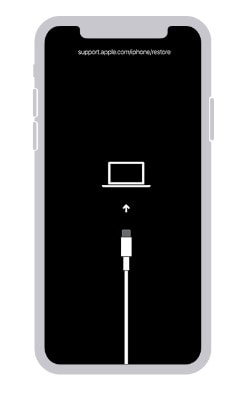
Step 4: Switch on your Apple iPhone SE. Then, connect it to a Mac or Windows computer using a USB cable.
Step 5: When prompted, follow the on-screen instructions to enter your device passcode or click Trust This Computer.
Step 6: Depending on your computer, open Finder or iTunes. Then, do either of the following:
For macOS 10.15 or later: Select your Apple iPhone SE under the Locationssection, then click Restore iPhone.
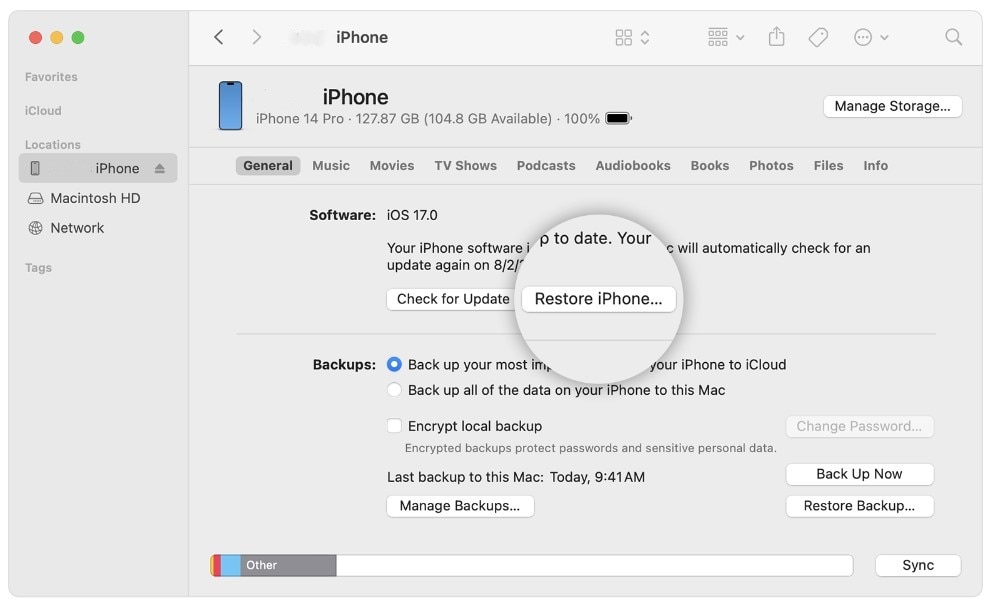
- For macOS 10.14 or earlier or Windows: Click the Apple iPhone SE in the top left window, click Summary, then click Restore iPhone.
- Step 7: Click Restore in the dialogue box. iTunes or Finder will download your Apple iPhone SE’s latest iOS software and restore the Apple iPhone SE to its factory settings.
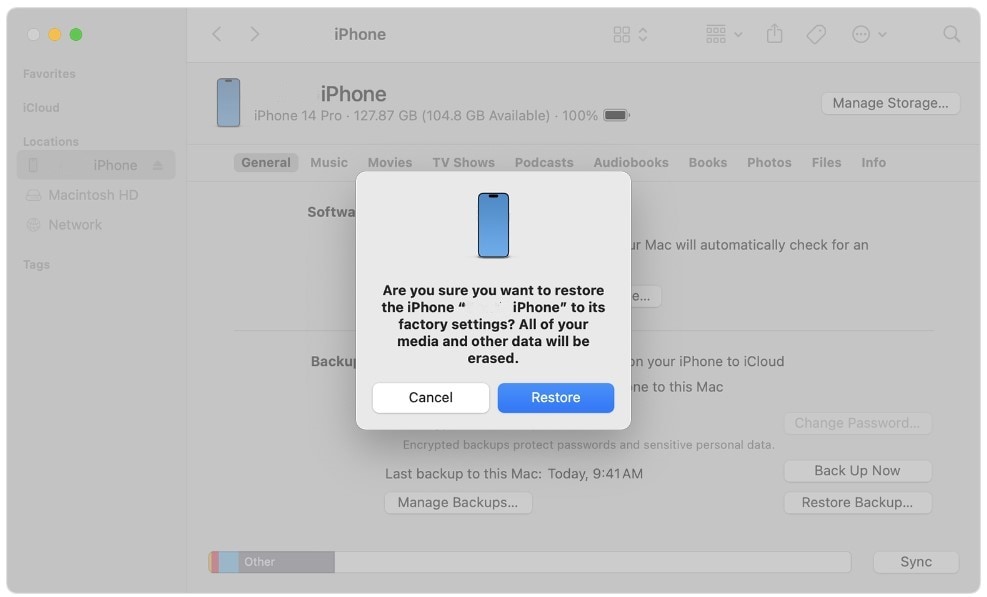
- Step 8: Once the restore is complete, the Apple iPhone SE will restart.
Part 4: Erase an iPhone Without Apple ID via Activation Lock Support Request
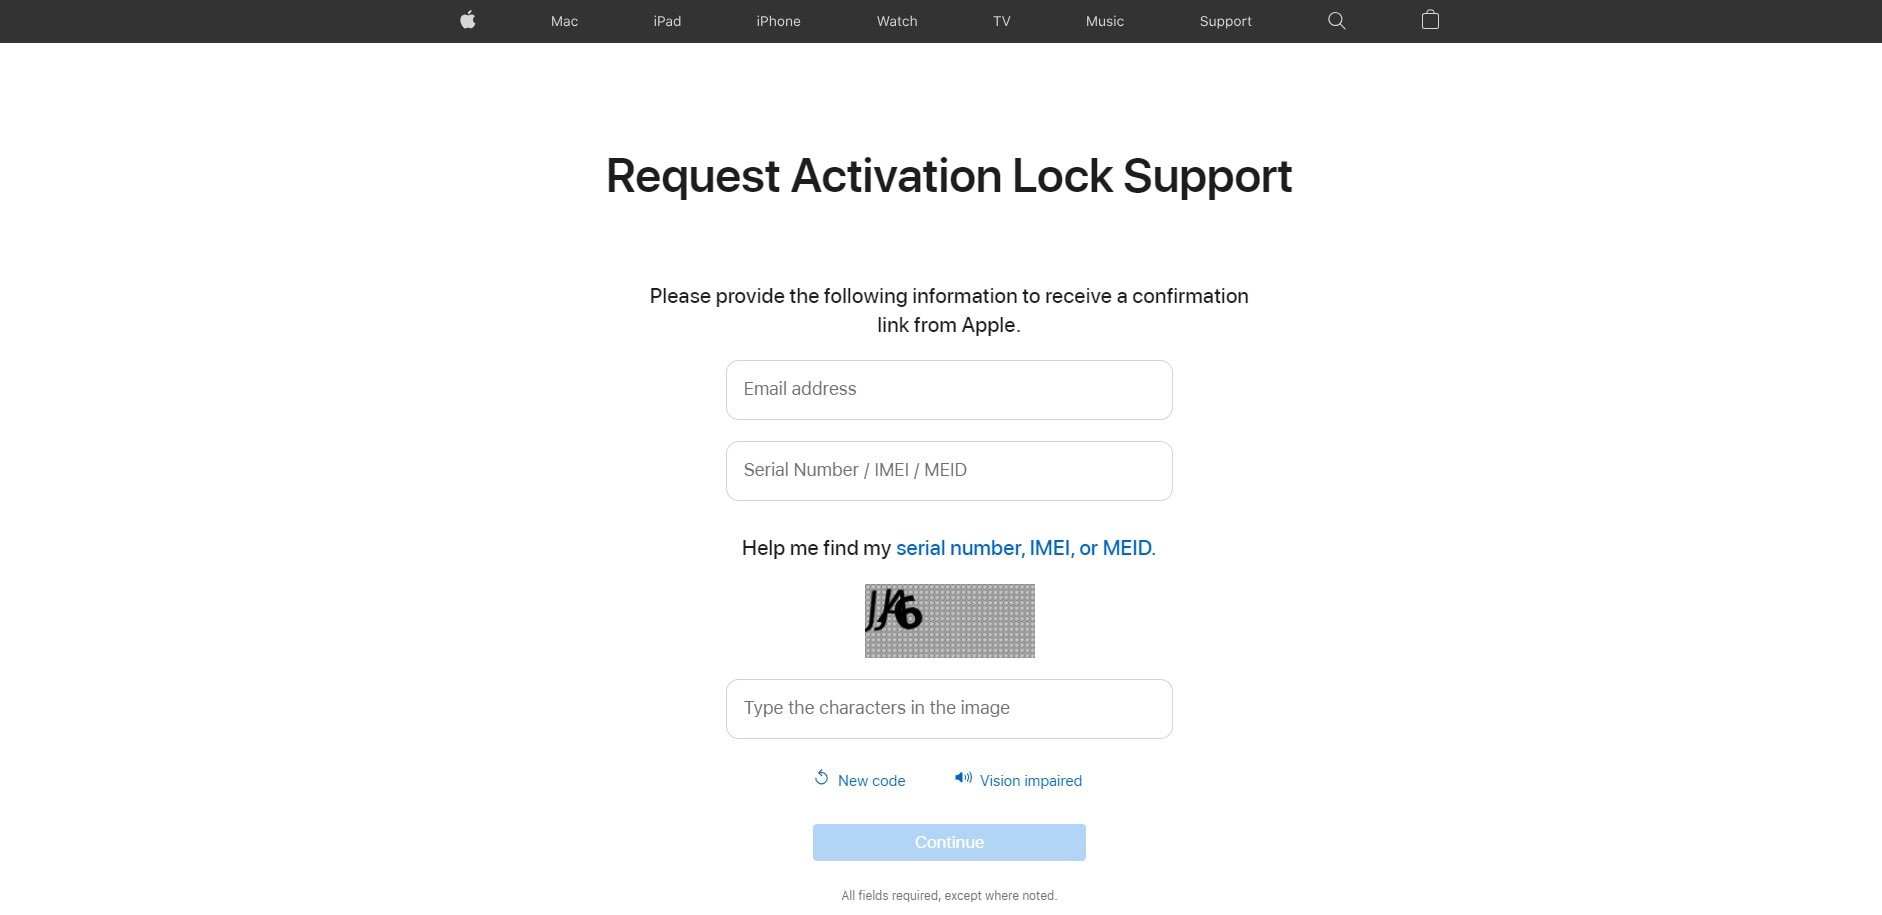
You can request to unlock Activation Lock support from Apple if your device is not in Lost Mode or if you need to erase an iPhone without an Apple ID password. To do this, you need to provide proof of purchase of the iPhone. It can be in the form of a receipt, invoice, or credit card statement.
The proof should show the serial number of the iPhone, IMEI, or MEID. Once Apple unlocks the Activation Lock on your Apple iPhone SE, your Apple iPhone SE contents will be permanently erased. Also, note that if you restore your Apple iPhone SE from a local backup, the Activation Lock will re-enable.
To start this request, follow these steps:
- Step 1: Head to Apple’s Activation Lock support page. (al-support.apple.com)
- Step 2: Scroll down the page, select the agreement checkbox, click Continue, and it will redirect you to a new page.

- Step 3: Enter your email address and other required information, then click Continue.
Part 5: How To Erase an iPhone Without an Apple ID Password in Minutes?
The time it takes to process an unlock Activation Lock support request can take days. If your device is erased as soon as possible, use the Wondershare Dr.Fone Screen Unlock tool. This third-party mobile solution can erase an iPhone without an Apple ID password, even if the Find My feature is enabled. Also, it can:
- Remove several iOS lock screens, such as passcode, Touch ID, and more.
- Remove the iCloud Activation Lock
- Bypass Apple ID from iPhone without a password
- Remove MDM restrictions
Dr.Fone Screen Unlock is a simple, easy-to-use tool compatible with the latest iOS models. Follow these steps to remove the Apple ID from your Apple iPhone SE and erase all its contents within minutes:
Step 1: Download and install Dr.Fone on your desktop. Launch the app and connect your Apple iPhone SE using a USB cable.
Step 2: From the Toolbox homepage, select Screen Unlock, then choose iOS.

- Step 3: Select Remove AppleID to delete iPhone contents, including the Apple ID.
- Step 4: The next screen shows the connected device. Click Unlock Now.

- Step 5: Click Yes to confirm you have set up a screen lock.

- Step 6: Click Yes to verify you have enabled two-factor authentication on your Apple iPhone SE.

- Step 7: Follow the in-app instructions to put your device in Recovery Mode.
- Step 8: Select an option from the System Version drop-down list, then click Start.

- Step 9: Wait while the iOS firmware downloads.

- Step 10: Once downloaded, click Unlock Now to proceed.
- Step 11: Enter the code in the dialogue box and click Unlock.
- Step 12: Keep your Apple iPhone SE connected to your computer while the process progresses.
- Step 13: Click Done and check that your Apple iPhone SE’s data and Apple ID have been removed.

Conclusion
It can be challenging to erase an iPhone without an Apple ID password, but it’s achievable by following the right steps. Remember to weigh the security implications and back up your data beforehand.
If you’re seeking a straightforward method on “how to erase an iPhone without Apple ID,” Dr.Fone Screen Unlock tool is a good solution. With its user-friendly interface and efficient operation, Dr.Fone simplifies the process, making it accessible to users of all technical levels. Don’t let a forgotten Apple ID password hinder your device’s functionality. Try Dr.Fone Screen Unlock and reclaim control of your Apple iPhone SE.
Also read:
- [New] 2024 Approved Beat-Making Brilliance Music for Your InstaReals
- [New] 2024 Approved Best Tools for Animating with 3D Models
- [New] Instagram TV Disable Guide
- [New] Leveraging Live Streaming for Maximum Impact on YouTube with Limited Subscribers for 2024
- Curated Index of Leading Vector Art and Illustration Pages for 2024
- How To Erase an Apple iPhone 11 Without Apple ID Password?
- How to Remove Apple iPhone 11 Pro Device from iCloud
- How To Remove Phone Number From Your Apple ID on Your Apple iPhone XS?
- In 2024, Apple ID Locked for Security Reasons On iPhone 7 Plus? Find the Best Solution Here
- In 2024, How to Reset Apple ID and Apple Password From Apple iPhone 8 Plus
- In 2024, How to Sign Out of Apple ID From iPhone 14 Pro Max without Password?
- In 2024, Still Using Pattern Locks with Xiaomi Redmi A2? Tips, Tricks and Helpful Advice
- In 2024, Tips and Tricks for Apple ID Locked Issue On Apple iPhone SE (2020)
- In 2024, Unveiling YouTube's Hidden Feature Stop Snippet Viewing
- Innovative Approach in Healthcare Finance: How NHS Upgraded to No-Code Invoice Systems
- Supreme Graphics Power For 4K Gamers Only for 2024
- Tips and Tricks for Apple ID Locked Issue On iPhone 12 mini
- Top 3 Ripping Software Di DVD Libero Da Pagare per Windows: Conversione in MP4/AVI/WMV Su Windows 10
- Your Account Has Been Disabled in the App Store and iTunes On Apple iPhone 11 Pro Max?
- Title: How To Change Your iPhone SE Apple ID on MacBook
- Author: Alma
- Created at : 2025-03-01 10:21:48
- Updated at : 2025-03-03 18:24:17
- Link: https://apple-account.techidaily.com/how-to-change-your-iphone-se-apple-id-on-macbook-by-drfone-ios/
- License: This work is licensed under CC BY-NC-SA 4.0.