
How To Change Your iPhone X Apple ID on MacBook
How To Change Your Apple iPhone X Apple ID on MacBook
Your Apple ID is a key component of your Apple ecosystem. It serves as your digital identity across all Apple devices. Whether you have an Intel-based MacBook or one with Apple Silicon, understanding how to change your Apple ID is crucial. Therefore, in this detailed guide, we will walk you through the process of how to change your Apple ID on your MacBookwithout facing any issues.
Besides this, it will also assist you in exploring the significance of your Apple ID and the services it enables on your MacBook. The article will ensure that you make the most of this essential account.
Part 1: What Are the Benefits of Changing the Apple ID on MacBook
Apple ID is the cornerstone that simplifies the management of your Apple devices. It’s more than just a username; it’s your passport to a world of smooth integration and services. Changing your Apple ID on your MacBook can yield several significant benefits. It enhances your overall user experience. Here are some of the key advantages of learning how to change your Apple ID MacBook:
1. Personalization
Changing your Apple ID allows you to customize your MacBook according to your preferences. You can sync your contacts, calendars, and settings. This ensures a personalized and consistent experience across all your Apple devices.
2. App Store and iTunes Purchases
You can access a distinct collection of applications, music, films, and books by creating or logging in with a different Apple ID. This proves especially beneficial when considering a change of region. It also helps when sharing your MacBook with family members, each of whom has their individual Apple ID.
3. iCloud Storage
Your Apple ID is closely linked with iCloud, Apple’s cloud storage service. Changing your Apple ID allows you to gain access to an alternative iCloud account with its dedicated storage capacity. This can be advantageous when you require additional storage or wish to keep your data separate from a previous account.
4. Privacy and Security Settings
Frequently updating your Apple ID can enhance your online privacy and security. It enhances the challenge for unauthorized parties to acquire your personal information. This, consequently, reduces the risk of accessing your MacBook’s sensitive information.
5. Family Sharing
If you’re part of a Family Sharing group, changing your Apple ID can simplify sharing purchases, subscriptions, and iCloud storage with family members. Each family member can have their own Apple ID while still enjoying the benefits of shared content.
Part 2: How To Change the Apple ID on MacBook Through the Settings
In summary, there are many advantages to updating your Apple ID on your MacBook. Let’s now proceed to the actionable steps for accomplishing this task. Below is a comprehensive, step-by-step tutorial on how to change your Apple ID on a MacBookwith the help of System Settings:
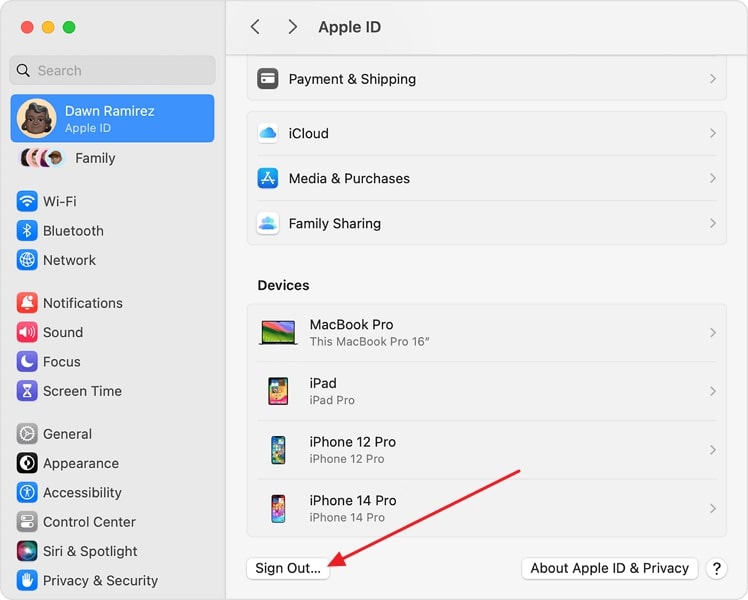
- **Step 1:**Access your Mac’s System Setting through the Dock. Tap the Apple ID icon from the left sidebar within the “System Settings.”
- **Step 2:**Here, scroll down to find and tap “Sign Out.” The option is located at the bottom near the left corner. Afterward, tap “Sign Out” again to confirm your choice, and then, if your device asks, provide your Apple ID password to move ahead.
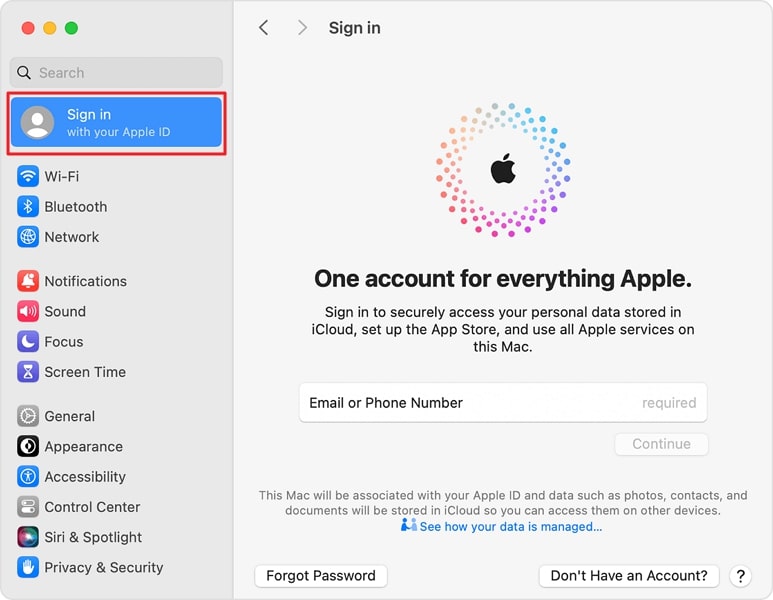
- **Step 3:**After logging out of your Apple ID, reboot your device, and when it is done, go back to System Settings. From there, hit the “Sign in to with your Apple ID” option so that you can quickly log in with a new Apple ID.
Part 3: Other Ways To Change the Apple ID With Ease
Changing your Apple ID on your MacBook through Settings is a straightforward process. There are scenarios where some adjustments may be necessary and some may not. For instance, in the case of purchasing a used MacBook, it’s conceivable that the prior owner’s Apple ID could still be linked to the Apple iPhone X device.
In such instances, you’ll need to contact the previous owner and request them to disassociate their Apple ID. Here are two practical methods for how to change Apple ID on MacBook Air:
Way 1: Using the iPhone
The first way the previous owner can remove the Apple ID from your MacBook is by using his iPhone. You can ask the previous owner to follow these steps on their iPhone:
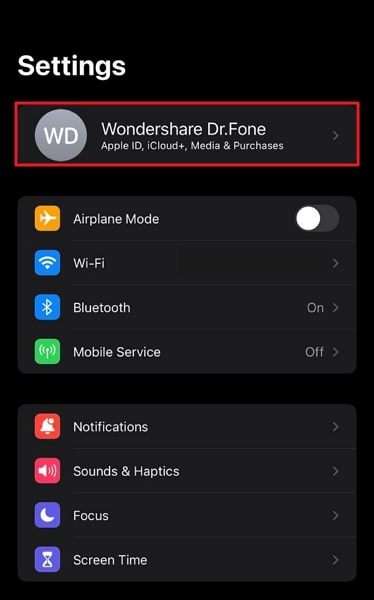
- **Step 1:**Start the process by accessing the Settings app on your Apple iPhone X. From there, click on Apple ID on top of the main settings page.
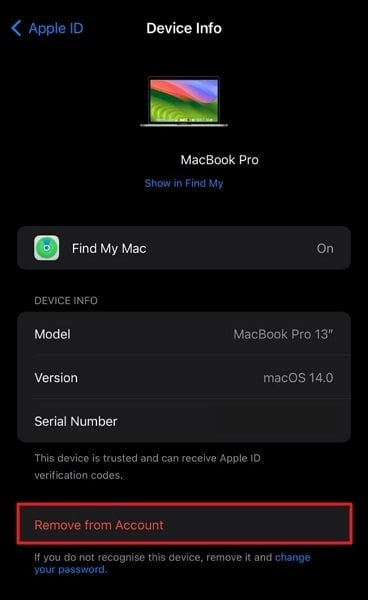
- **Step 2:**Scroll down on the screen to devices that are connected with the Apple ID. Tap on the MacBook and use the “Remove from Account” option to remove Apple ID from MacBook.
Way 2: Using Find My App
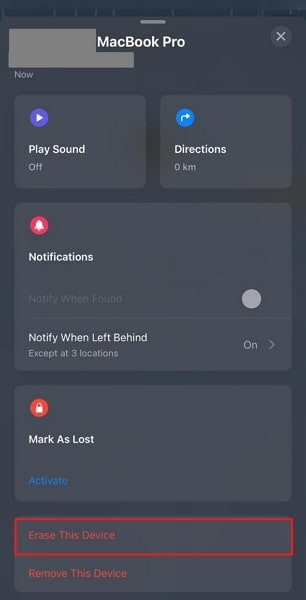
Another way to remove the Apple ID is by asking the previous owner to use the Find My service. The steps for removing Apple ID using the Find My app are given below:
- **Step 1:**Begin by opening the Find My app on the iPhone. There, select the MacBook from the Apple iPhone X devices section. On the following screen, scroll to the last option, “Erase This Device.”
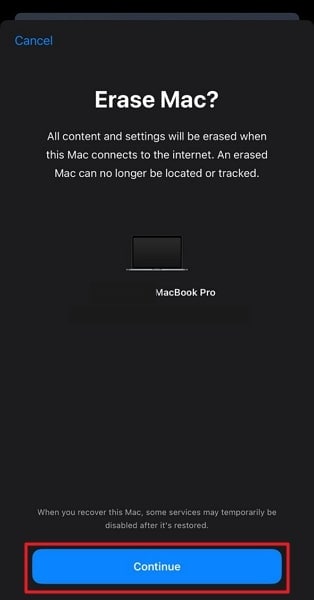
- **Step 2:**Here, select “Continue” to confirm your choice, and follow on-screen instructions to erase the Apple iPhone X device. After this, provide your Apple ID password to complete the process, and when the Apple iPhone X device eraser is done, the Apple ID will be removed from your MacBook.
Bonus Part: How To Fix Unable To Logout (Change) the Old Apple ID on Mac
Although changing your Apple ID on your Mac is usually a swift procedure, there may be instances where you find it challenging. It’s essential to resolve this matter promptly. The reason is that many essential procedures and services are directly linked to your Apple ID. Here are some common reasons why you might face difficulty logging out of the old Apple ID and their solutions:
1. Ongoing iCloud Backup
While the data is backed up on the iCloud from your Mac, you cannot log out from the Apple ID. It is because, while the data is being uploaded, logging out of Apple ID is restricted to ensure that data is not lost during the process.
Solution
Wait for the iCloud backup to complete before attempting to log out. You can access the backup information through “iCloud” within your Apple ID settings of System Settings. Here, tap “iCloud Drive” and stop syncing to stop the ongoing iCloud backup process.

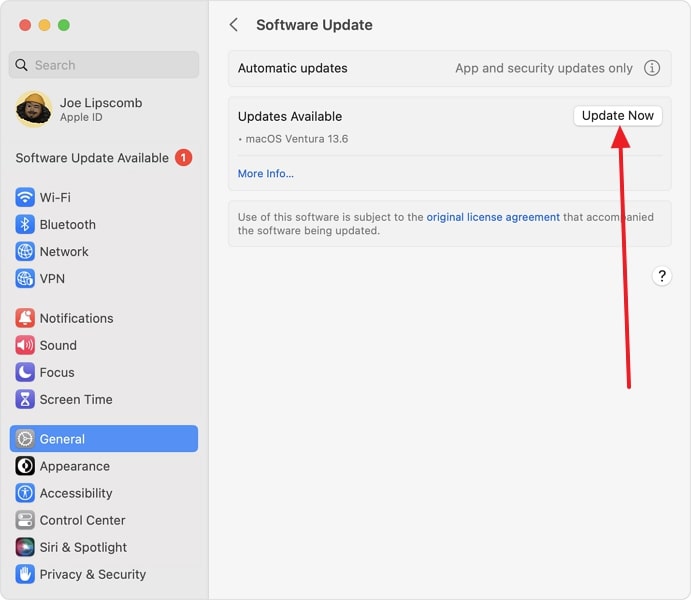
2. Bug in macOS
Occasionally, macOS may encounter bugs or glitches that prevent you from logging out of your Apple ID. These issues can usually be resolved with software updates or troubleshooting steps.
Solution
To resolve the bugs and glitches within the MacBook, the best option is to update macOS to its latest version. For that, access “System Settings” through Dock and move to the “General” tab. Here, select “Software Update“ to verify if an update is available and if an update is available, use “Update Now” to update the macOS.
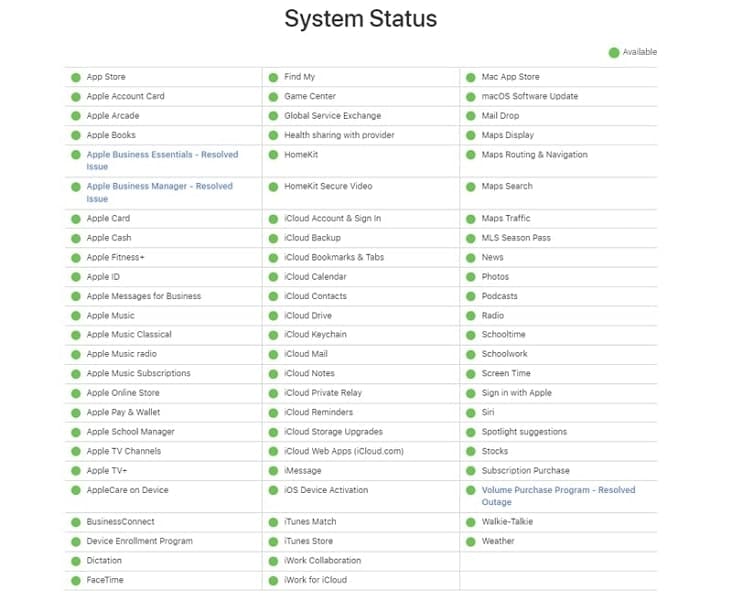
3. Apple Server Inactivity
Sometimes, issues on Apple’s servers can disrupt the log-out process. It’s recommended to visit Apple’s System Status page to ascertain the presence of any ongoing server issues.
Solution
You will need to check the official Apple System Status page at https://www.apple.com/support/systemstatus/. Here, you can find out if the problem behind your inability to log out lies with the Apple servers.
Forgetting a password to your Apple ID is a nightmare for Apple users. Considering the pivotal role of Apple ID in the Apple ecosystem, it’s not surprising that forgetting your Apple ID password can be a concern. Nevertheless, the real question is how to proceed if you find yourself in this predicament. While it may initially appear impossible, rest assured there are solutions available. Where there’s determination, there’s a path forward.
If it is an iOS device where your Apple ID is locked, we have the best tool for you in the form of Wondershare Dr.Fone. This tool enables you to remove Apple ID from the Apple iPhone X device without needing a password. Dr.Fone’s iPhone unlocker has the capability to bypass the Apple ID lock permanently. It even works when the Find My/Find My iPhone feature is active on the Apple iPhone X device.
You can fully restore access to all your iCloud services and Apple ID features by signing in with a new account. Following are the steps you need to adhere to remove the locked Apple ID from your iOS device using Wondershare Dr.Fone:
- Step 1: Navigate To Remove Apple ID in Wondershare Dr.Fone
Click “Toolbox” from the left sidebar after launching Wondershare Dr.Fone. From the available options on the screen, choose “Screen Unlock” and select “iPhone” as your device type. Now connect your Apple iPhone X to the computer using a USB cable and click “Remove Apple ID“ in Dr.Fone.

- Step 2: Enable Recovery Mode on Your Device
Tap “Unlock Now” and proceed to confirm that your device has setup screen lock and 2FA is enabled. These are necessary steps for the removal process of Apple ID. Next, put your device into Recovery Mode following the guidelines available on-screen.

- Step 3: Remove the Locked Apple ID
Once your device is in Recovery Mode, Wondershare Dr.Fone will detect its model. You need to choose the iOS version and click “Start” to download the firmware. When it is downloaded and verified, tap “Unlock Now” to initiate the process. The last step involves confirming that you agree to the procedure by typing “000000” into the warning prompt and clicking “Unlock.”

Conclusion
In conclusion, this article has provided you with valuable insights into the process of how to change Apple ID on MacBook. We began by highlighting the primary purpose of the Apple ID and discussing the countless benefits it offers. We’ve walked you through two main methods for changing your Apple ID. The first one is using the Settings on your MacBook.
The other included alternative approaches for scenarios like purchasing a second-hand MacBook. We also addressed the issue of forgetting your Apple ID password on iOS devices. For it, we used the specialized software Wondershare Dr.Fone to remove Apple ID without needing a password.
How To Create an Apple Developer Account On Apple iPhone X
The world of technology undergoes continuous evolution. This emphasizes the crucial need for developers to stay on the cutting edge of innovation. Specifically, the Apple ecosystem continues to assert its significant influence in mobile applications. Are you aiming to make your mark in the thriving iOS and macOS app market? There’s a crucial requirement you must meet, which is obtaining an Apple Developer Account.
This thorough guide is designed to lead you step by step through the process of how to create an Apple Developer account. It aims to equip you with the essential knowledge needed to complete this entire Apple Developer account creation process smoothly.
Part 1: What Is an Apple Developer Account?
In the realm of technology, Apple emerges as an undeniable powerhouse. It is renowned for its pioneering advancements in both software and hardware. From the iconic Apple iPhone X to the powerful Mac computers, Apple has influenced the tech world greatly. It has prompted developers to craft applications that integrate with Apple’s ecosystem. This is why learning how to make an Apple Developer Account is pivotal.
The Apple Developer Account or Apple Developer ID is the gateway to the Apple ecosystem. It is the key that opens the doors to creating, distributing, and managing apps for Apple devices. If you aspire to develop apps for Apple devices, acquiring an Apple Developer account is your crucial initial step. This account is not limited to individual developers.
It is also essential for companies and organizations to develop their software solutions. By obtaining an Apple Developer Account, you unlock many valuable resources. These include the essential SDKs, tools, and documentation. Moreover, it grants you entry into the Apple Developer Program. It is the premium tier of developer membership that offers exclusive benefits. Some benefits are beta software access, advanced app capabilities, and the ability to distribute apps.
Part 2: What Items Are Included in Apple Developer Account
If you are wondering what this membership encompasses, your Apple Developer account isn’t just a card that grants you entry. It is a comprehensive toolkit you need to succeed in the Apple ecosystem. Following are some of the benefits you get after learning how to get an Apple Developer Account:
1. Software Tools
At the heart of your Apple Developer Account lies access to powerful software tools. An essential inclusion is Xcode. It’s a full-fledged integrated development environment (IDE) tailored for Apple’s platforms. With its help, you can streamline the development process. It provides debugging, testing, and design tools, simplifying app creation.
You can build user interfaces with Interface Builder and visualize your app’s flow with Storyboards. Moreover, you will be provided with MapKit JS Dashboard for tracking the use of Apple Maps services on your website and SF Symbols to configure symbols in your iDevice apps. Besides this, it contains many other tools such as Reality Converter, Snapshots Studio (beta), Classroom and Schoolwork, Create ML, and many more.
2. Services and Capabilities
Creating an Apple Developer account grants you access to various services you can embed in your apps to make them easier to use. It enables you to fully leverage Apple’s technology stack. You can leverage services like iCloud or Core ML. These two services and capabilities will help you with data synchronization and integration of machine learning into your apps.
Additionally, you gain access to Apple’s ARKit for augmented reality development. Moreover, you also get SiriKit for voice interaction and Apple Pay for accepting payments for your services, packages, or goods on your developed apps or websites. These services and capabilities don’t end here because you also get HomeKit, CarPlay, CloudKit, PassKit, AirPrint, AirPlay, GameKit, Handoff, etc.
3. Beta Testing and Feedback
As an Apple Developer Program member, you can engage in beta testing. This includes forthcoming releases of iOS, iPadOS, macOS, watchOS, and tvOS. It gives you the privilege of accessing new features and APIs ahead of the general public.
This will help guarantee that your applications remain updated and well-prepared for the latest advancements. Moreover, you can conveniently provide feedback and report bugs directly to Apple. It can also help you test your application on the new beta version so you can fix the bugs on time and give users a smooth experience.
4. Developer Resources and Support
Apple understands that developers are at the core of its ecosystem’s growth. That’s why it provides access to extensive documentation, tutorials, and resources. These cover everything from app design principles to API references.
It also enables you to refine your expertise while staying updated with cutting-edge technologies. Furthermore, it allows you to connect with Apple’s developer community. You can also seek assistance, share your knowledge, and collaborate with fellow developers.
5. App Distribution
Having an Apple Developer account confers a significant benefit. It grants you the capability to distribute your applications to a worldwide audience. This opportunity allows you to debut your apps on the App Store and reach millions of Apple users in 175 regions.
For testing and internal use, you can distribute apps privately to specific individuals. In addition, Ad Hoc distribution allows you to share apps with a limited number of devices. The most significant advantage of an Apple Developer account is that it doesn’t cost any hosting fee for distributing the app.
Part 3: What Are the Enrollment Requirements of Apple Developer Program
Obtaining an Apple Developer account isn’t merely a formality. It involves key steps and criteria to ensure the platform’s integrity. You can register as an individual developer or represent an organization. Here’s a breakdown of what’s needed to join the Apple Developer Program:
Requirements for Individuals
The following are the requirements needed to enroll in the Apple Developer Program as an individual:
- You will need an iPhone, iPad, or Mac equipped with either Touch ID, Face ID, or a passcode. Or a Mac featuring the T2 Security Chip or Apple Silicon will also work. It is essential to use the same device throughout the entire enrollment process.
- Confirm that your Apple ID has two-factor authentication enabled. Moreover, all your Apple ID information is current and precise. This includes your first name (given name), last name (family name), address, phone number, trusted phone number, and trusted devices.
- Ensure you’ve installed the latest version of the Apple Developer app on your device.
- The last requirement you have to ensure is thatyou will need to log in to iCloud on your iDevice.
Requirements for Organizations
To create an Apple developer account as an organization, you need the following information along with the requirements mentioned above for individuals:
- You must provide the entity type, such asnonprofit, educational, or government.
- The legal entity name is required. It is used for the “seller” designation for the apps you distribute.
- Your organization is required to possess a unique nine-digit D‑U‑N‑S Number assigned by Dun & Bradstreet.
- You will need to provide your organization’s headquarters address and contact number.
- Your organization’s website must be publicly accessible. Moreover, the domain name should be linked to your organization.
- Verify that you possess the legal authority to enter into agreements on behalf of your organization.
Part 4: How To Make an Apple Developer Account With the Most Simplified Steps
After completing all the requirements, let’s start the process of how to get an Apple Developer account for free with the help of the following detailed steps:
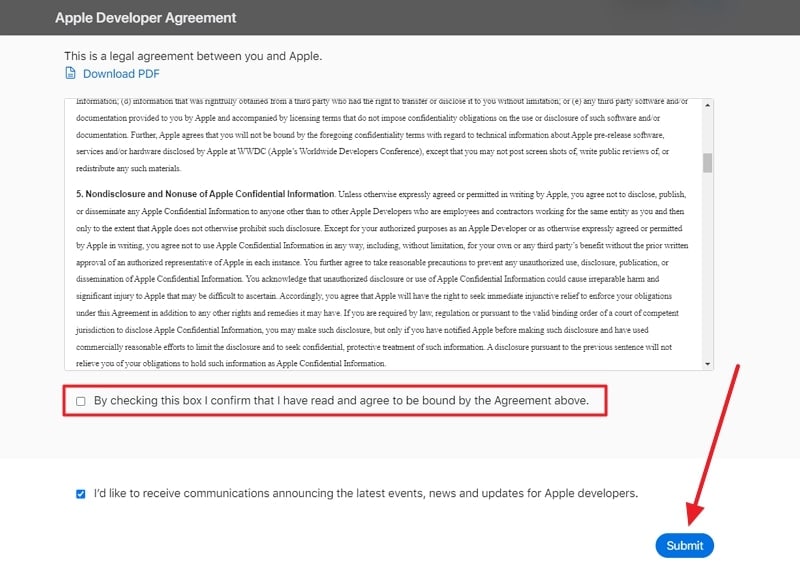
- Step 1. Head towards the Apple Developer official website on your Apple iPhone X, iPad, or Mac browser and tap the “Account” option. This will take you to a new window where you can log in with your Apple ID. After successful login, you will see a page with an agreement between you and Apple. Read the agreement carefully, agree to it, and press the “Submit” button to continue the process.
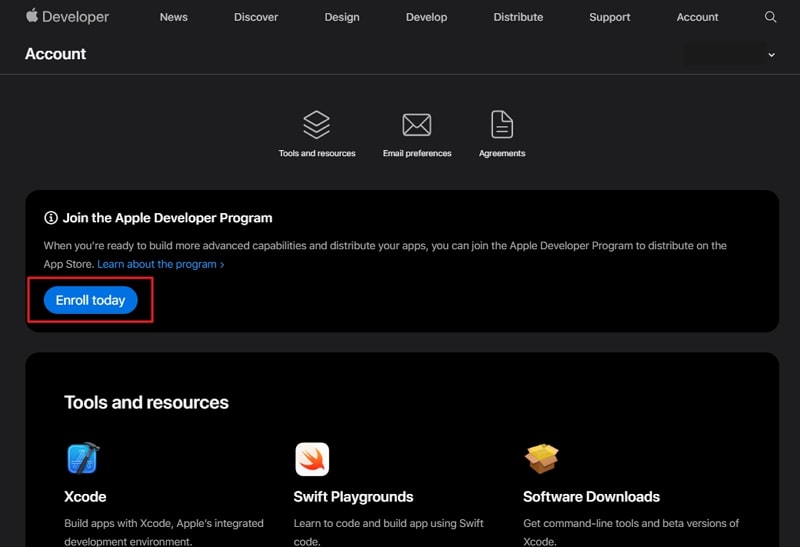
- Step 2. A new page will appear, from which you need to choose the “Enroll Today” button and choose the “Continue enrollment on the web” option if you are using a web browser. This will take you to the form where you need to fill in the basic information such as your legal name, phone number, address, Zip code, and other details.
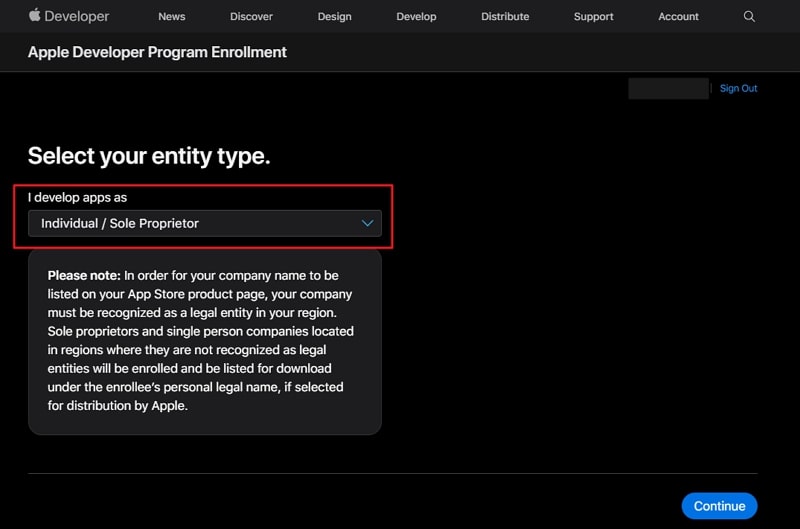
- Step 3. After filling in the basic information, click the “Continue” button. A new page will appear where you can choose whether to proceed as an individual or an organization. Once the selection is made, follow the on-screen instructions to proceed. In the end, you will be asked to complete the purchase of an Apple Developer Program subscription, which is $99 for 1 year.
Bonus Tip: The Most Efficient Tool To Unlock the Apple ID Without Passcode in 2023
The key requirement to create an Apple Developer Account is having an Apple ID. It’s undeniable that the entire Apple ecosystem centers around the Apple account. What should you do if you discover that you’ve forgotten your password? Forgetting your password can lead to various challenges. Fortunately, there’s no need to be concerned because we have a solution for you.
Thus, in such situations, when the user finds no option to unlock their Apple ID without a passcode, we recommend you use Wondershare Dr.Fone - Screen Unlock (iOS) to unlock your device easily. Furthermore, this tool enables you to remove all types of lock screens of various iOS devices, including iPhones, iPad, and iPods.
Dr.Fone - Screen Unlock (iOS)
Unlock iPhone/iPad Lock Screen Without Hassle.
- Simple, click-through, process.
- Unlock screen passwords from all iPhone and iPad.
- No tech knowledge required, everybody can handle it.
- Supports the latest iOS version fully!


4,395,217 people have downloaded it
Key Features of Wondershare Dr.Fone
- Using Wondershare Dr.Fone, you can bypass and remove the MDM profile from your iOS device without data loss.
- Users don’t need technical skills to use this unlock Apple ID tool because it resolves issues within three steps.
- This iOS screen unlock tool can also help you bypass the iCloud activation lock and remove iTunes backup encryption.
Simplified Steps To Unlock iPhone Using Wondershare Dr.Fone – Screen Unlock (iOS)
Having an unlocked Apple ID is crucial before you learn how to make an Apple Developer Account. Following are the straightforward instructions to unlock Apple ID with Wondershare Dr.Fone:
- Step 1: Choose the Remove Apple ID Tool
Begin the process by installing Wondershare Dr.Fone on your computer and accessing its main interface. After this, tap on the “Toolbox” from the left side toolbar and choose the “Screen Unlock” option. This will take you to a new window where you need to select “iOS” as your device’s nature. From the new window, tap on the “Remove Apple ID” to proceed with the Apple ID unlocking process.
- Step 2: Proceed Further by Choosing the Respective Options
Ensure that your iOS device whose lock you are trying to remove is connected to your computer and tap “Unlock Now.” Moving ahead, the platform will ask you whether screen lock and 2FA are enabled. This needs to be enabled for the Apple ID removal process. After this, put your device in Recovery Mode with the help of on-screen instructions.
- Step 3: Select the iOS Firmware Version
Once the platform detects your device model, choose your system version and then click the “Start” button. The respective iOS firmware will start downloading, and Wondershare Dr.Fone will verify it once it is downloaded. Following this, click “Unlock Now,” which will lead to a warning popup.
- Step 4: Conclude the Process To Unlock Your Apple ID
The warning informs you about the imminent data loss that will result during Apple ID unlocking. To confirm that you agree with the procedure, you are required to type in “000000” as the PIN code. Finally, click “Unlock” to start the Apple ID unlocking procedure. On its completion, hit the “Done” button to conclude the process.

Conclusion
In conclusion, we’ve guided you through a thorough exploration of the steps involved in how to get an Apple Developer account. We’ve given clear, easy-to-follow instructions to facilitate the setup of your Apple Developer account. If your objective is to join the Apple Developer Program, we strongly advise adhering to the enrollment prerequisites outlined earlier in this article.
Additionally, for those who may encounter issues with their Apple ID due to forgotten passwords, we’ve introduced the Wondershare Dr.Fone tool. This efficient solution provides a seamless method for regaining access to your Apple ID without compromising your data. We highly recommend it for its user-friendliness and compatibility with all iOS devices.
Apple ID is Greyed Out On Apple iPhone X: How to Bypass?
An Apple ID functions as a vital passageway to a diverse array of Apple services. These encompass iCloud, the App Store, iTunes, and other offerings. It serves as a unified account that enables users to connect with different Apple products and services. Yet, even with its significance, Apple ID users can encounter various issues that may disrupt their experience.
One such problem is the daunting phenomenon of the Apple ID being greyed out. It also prevents users from accessing essential features and services. Thankfully, solutions to these issues do exist. Understanding the root cause and implementing the appropriate solution is crucial. This article aims to delve into one of the most effective methods to tackle the troubling problem of the Apple ID greyed-out issue.
Part 1: Why Did the Apple ID Greyed Out? Coming to the Reasons
Dealing with a greyed-out Apple ID can undoubtedly lead to a frustrating experience. It also hinders your access to essential Apple services. Before delving into the solutions, understanding why Apple ID is grayed out is essential. Several factors can contribute to the greying out of your Apple ID, and some of these are given below:
1. Apple ID Signed In on Another Device
One common reason for the Apple ID to appear greyed out is when it is actively signed in on another device. This often happens when users forget to log out of their account on a different Apple device. It leads to a conflict that prevents the smooth functioning of the Apple ID.
2. Incorrect Password Attempts
Multiple failed attempts at entering the Apple ID password can trigger security measures. It can temporarily disable the account, causing it to grey out. This security measure is created to safeguard the account against unauthorized entry. Nevertheless, it may limit access to the Apple ID in the event of multiple incorrect password entries.
3. Network Connection Issues
Fluctuating or unstable network connections can also contribute to the Apple ID greying out. When the Apple iPhone X device is unable to establish a stable connection with Apple’s servers, it may manifest as an unresponsive or greyed-out Apple ID. Thus restricting access to various Apple services and features.
4. Software Glitches or Bugs
Software inconsistencies within the Apple iPhone X device’s operating system can lead to temporary malfunctions. That results in the greying out of the Apple ID. Such glitches can arise due to software updates or incomplete installations. It can also happen due to conflicts between different applications.
5. Apple Server Maintenance or Outage
Periodic maintenance or unexpected server outages on Apple’s end can disrupt the functionality of the Apple ID. As a result, you experience temporary Apple ID grey-out issues. During such occurrences, users may experience difficulties accessing their Apple ID.
Part 2: Finding the Proper Solutions to Apple ID Greyed Out [Highly Effective]
Encountering a greyed-out Apple ID can be a daunting experience. However, there exist many resolutions to this issue that can be implemented. This article aims to guide you through several effective remedies that can help resolve the problem. By following the solution outlined below, you can fix the Apple ID greyed out on iPad:
Solution 1: Checking Screen Time Passcode Settings
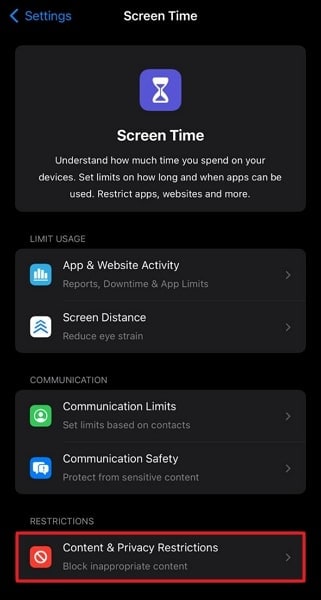
In some instances, the greying out of the Apple ID can be attributed to specific settings, such as the Screen Time passcode. Checking and adjusting the Screen Time passcode settings can help ensure your Apple ID is not inadvertently restricted. Follow the steps below to check and manage your Screen Time passcode settings for fixing the Apple ID that is greyed out in the settings option:
- Step 1: Access the Settings app on your Apple iPhone X and tap “Screen Time.” Here, select “Content & Privacy Restrictions” and move down to the “Allow Changes” section.
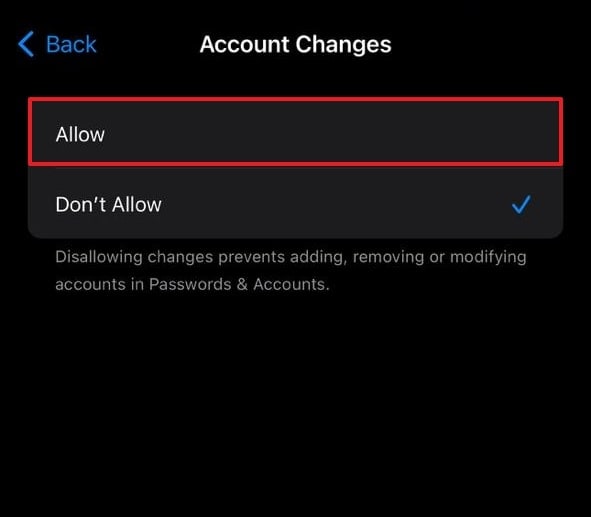
- Step 2: Now, navigate to “Account Changes” and ensure it is set to “Allow.” Afterward, check if the Apple ID is working normally again.
Solution 2: Checking Apple System Status Page
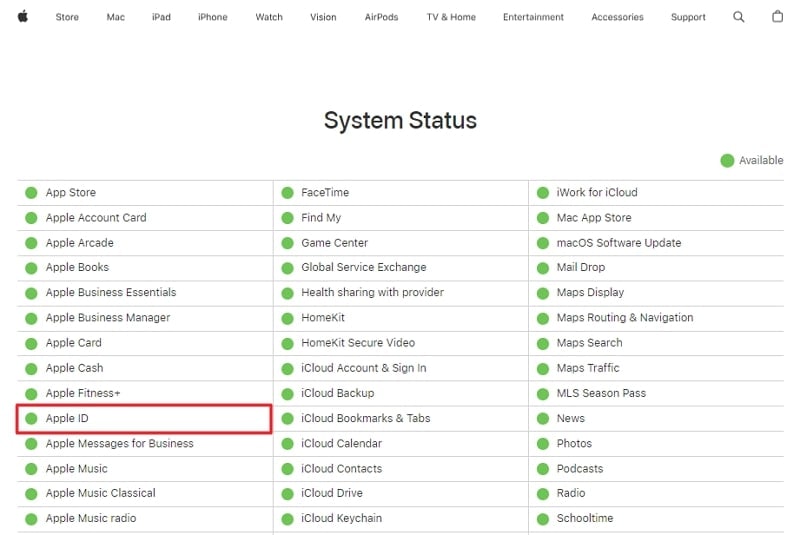
Checking the Apple System Status page can help determine if the problem lies at Apple’s end. The greying-out issue can be related to any ongoing server maintenance or outage. By staying informed about the status of Apple services, you can ensure that you can take the necessary steps. Follow these steps to check the Apple System Status page to check the Apple ID greyed-out status:
- Step 1: Start by accessing a web browser and opening the Apple System Status page. Here, look for the entry named “Apple ID.”
Step 2: When the indicator is green, there are no issues at the server’s end. Yet, if it turns orange or red, it signifies a server problem, and you’ll need to be patient until it’s resolved.
Solution 3: By Turning Off Screen Time
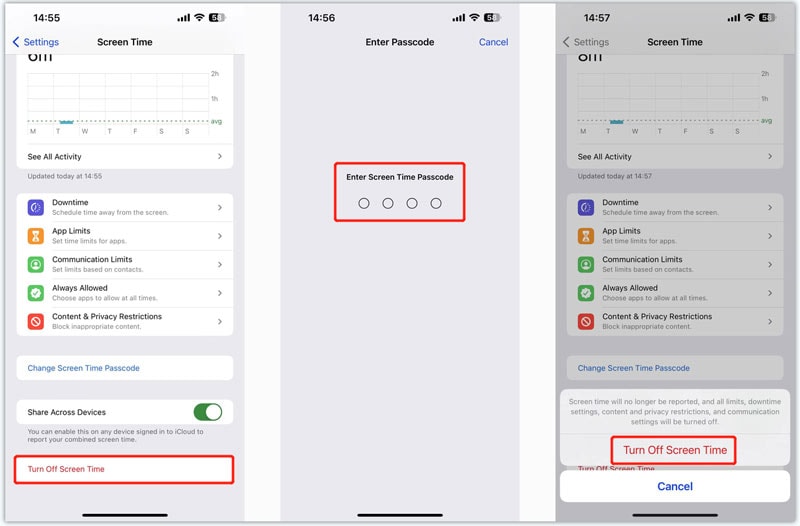
If the greying out issue persists and is related to Screen Time settings, disabling Screen Time can serve as a potential solution. By turning off Screen Time, you can potentially resolve any conflicts or restrictions that might be causing the greying out of your Apple ID.
This simple solution can help restore full access to your Apple ID and associated services. To disable Screen Time and fix Apple ID greyed out on iPad, follow these simplified step-by-step instructions:
- Step 1: From the Settings of your Apple iPhone X, access “Screen Time.” On the following screen, scroll to the last option, “Turn Off Screen Time.”
- Step 2: Now tap “Turn Off Screen Time” and provide the screen time passcode for confirmation. Finally, confirm the action by selecting “Turn Off Screen Time” in the pop-up confirmation message.
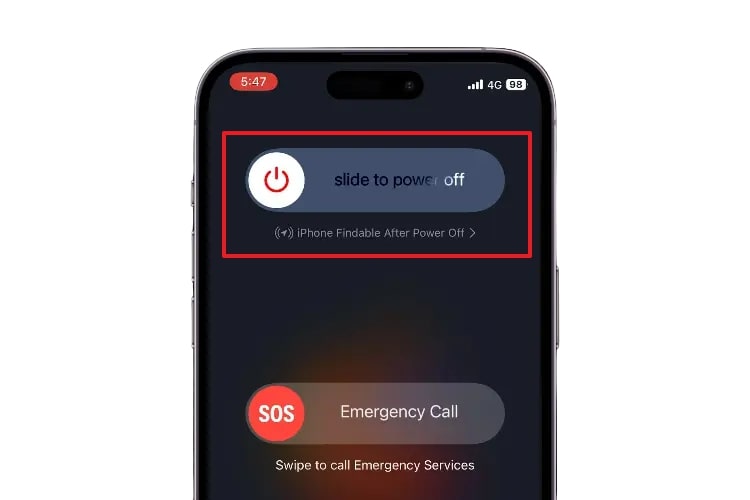
Solution 4: Restarting the iOS Device
Performing a simple restart on your iOS device can resolve various software-related glitches. It also includes glitches behind the greying out of the Apple ID. By restarting your iOS device, you can refresh the system’s processes. This simple yet effective solution can help restore normal functionality to your device. Follow these steps to restart your iOS device to fix the Apple ID grayed-out problem:
- Step 1: Press and hold the Power button and either the Volume Up or Volume Down button simultaneously. Keep holding these two iDevice buttons until the “Slide to Power Off” slider appears.
- Step 2: Drag the slider towards the right to power off your device. Allow a few moments to pass before using the “Side” button to switch on your Apple iPhone X.
Solution 5: Checking Internet Connectivity Status on Device
Ensuring a consistent and reliable internet connection is crucial for the optimal performance of your Apple ID. If you’re utilizing Wi-Fi, be sure to connect to a dependable network to guarantee seamless functionality. When utilizing cellular data, verify your signal strength and confirm the availability of an active data plan. A stable internet connection is of utmost importance for the effective operation of your Apple ID.
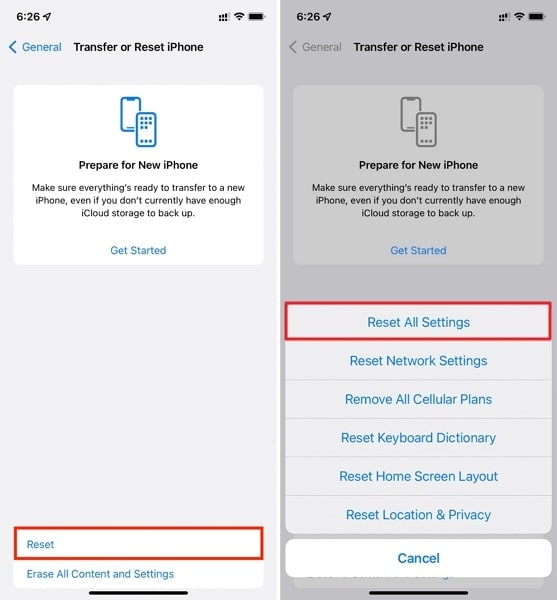
Solution 6: Reset All Settings Within iOS Device
Resetting all settings on your iOS device can effectively resolve persistent software-related issues. This means if conflicts in settings where the root of Apple ID is grayed out, the problem would be resolved. Be aware that initiating this action will restore all settings to their original defaults while preserving your data. Follow the steps outlined below to reset all settings on your iOS device:
- Step 1: To start, you access the Settings app and navigate to the “General” settings tab. There, scroll to the bottom till the last option and tap on “Transfer or Reset iPhone.”
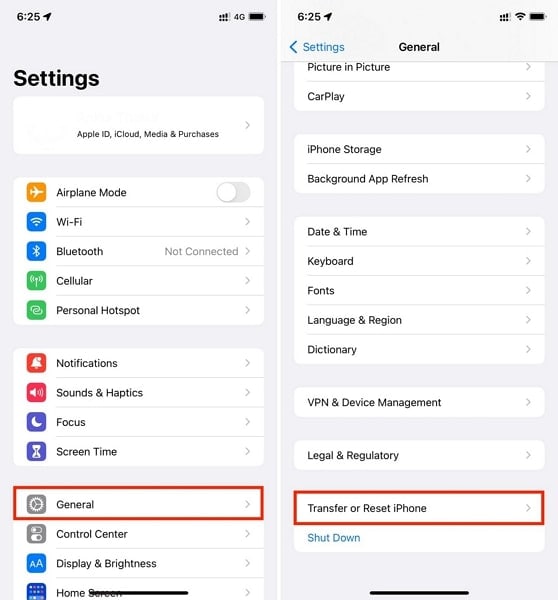
- Step 2: Navigate to the next screen and tap “Reset.” From there, choose the option for “Reset All Settings.” A prompt will appear, requesting your device passcode for verification. Once entered, proceed with the “Reset All Settings” to finalize the process.
Solution 7: Contact Apple Customer Support
If the previous solutions have not resolved the issue of your Apple ID greying out. It may be necessary to seek help from Apple’s customer support. Apple’s support team can provide personalized guidance and troubleshooting steps.
By contacting Apple’s customer support, you can receive expert help. The support team can offer tailored solutions and further guidance. This can help you regain access to your Apple ID and associated services.
Part 3: Advanced Solution: Try Wondershare Dr.Fone Screen Unlock if the Previous Solutions Are Ineffective
You have implemented all the methods mentioned above, and your Apple ID greyed-out issue is not resolved. It means you need a more efficient solution. Wondershare Dr.Fone is one of the most effective and solid solutions to fix the Apple ID greyed-out issue. Without resolving this problem, your Apple ID would be of no use; that is the main functional unit in your iOS devices.
Dr.Fone does this resolving procedure through its powerful Screen Time Passcode unlock feature. It is also a primary remedy to unlock the locked screen of your Apple devices. Moreover, this tool can bypass the iCloud activation lock and Apple ID without any password requirement. Through this Screen Unlock tool, you will be able to resolve your issue quickly and without any technical knowledge.
Key Features of Wondershare Dr.Fone
Dr.Fone - Screen Unlock (iOS)
Unlock iPhone/iPad Lock Screen Without Hassle.
- Simple, click-through, process.
- Unlock screen passwords from all iPhone and iPad.
- No tech knowledge required, everybody can handle it.
- Supports the latest iOS version fully!
4,395,217 people have downloaded it
- This enhanced and powerful iDevice toolkit can also help unlock Apple ID for iOS 17 devices.
- It can also bypass the MDM or remove the MDM profiles to allow you to use your Apple iPhone X normally.
- You can unlock your Apple iPhone X or iPad screen lock without a password if you can’t remember it.
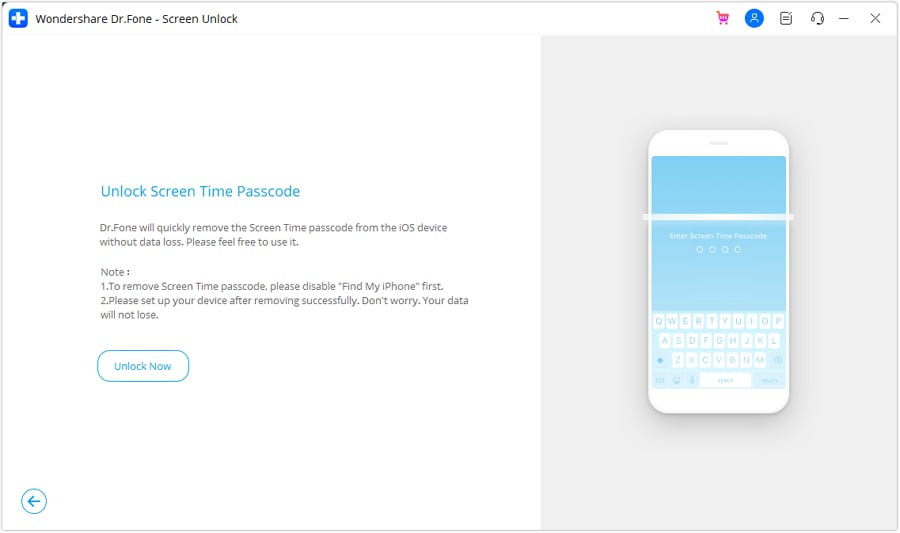
Fix Apple ID Greyed Out Issues by Unlocking Forgotten Screen Time Passcode
Wondershare Dr.Fone is an easy-to-use software with a simple guide to fix your Apple device issues. Here is how to fix Apple ID greyed-out issues with Wondershare Dr.Fone - Screen Unlock (iOS):
- Step 1: Access the Screen Unlock Tool
You need to start the process by opening Wondershare Dr.Fone and moving towards the “Toolbox” section. At that location, select “Screen Unlock” from the options provided. Then, select the “iOS” option from the window to define the type of your device.

- Step 2: Start the Unlocking Process and Connect Your iDevice
You will find yourself in a list of options from where you need to continue with the “Unlock Screen Time Passcode” option. Next, connect your iOS device to the computer via a USB cable. Then, wait for Wondershare Dr.Fone to detect your Apple iPhone X.

- Step 3: Unlock Your iDevice and Toggle off Find My Feature
After the connection, select the “Unlock Now” button to unlock your screen time passcode, and turn off the “Find My iPhone” feature by following the on-screen instructions. Completion of the screen time passcode unlocking process will start to display after clicking the “OK” button. Finally, after the completion message, hit “Done” to end the entire operation.
Final Words
Throughout this article, we have explored the perplexing issue of the Apple ID grayed out in settings. It can hinder the smooth functioning of your iOS device and access to various Apple services. By going through the root causes behind this problem, we have outlined several solutions. These can help users address the issue and regain access to their Apple ID.
We recommend that users diligently follow the steps provided in each solution. So that they can identify and rectify the specific cause of the problem. However, in cases where the issue persists, we highlighted the significance of using Wondershare Dr.Fone. It offers a specialized Screen Time Passcode Unlock feature. Moreover, this ensures the smooth operation of Apple ID and associated services.
Also read:
- [New] How to Get Windows Photo Viewer Running Smoothly on Win 11
- [Updated] Step-by-Step Applying the Cartoon Face Filter in Snapchat
- 2024 Approved Building Harmonious Forms Crafting Circles and Spheres
- 2024年度上市的綜合免費複製軟件清單:最高效率DVD及重點電影複製解決方案
- 3 Ways of How to Get Someones Apple ID Off Apple iPhone XS Max without Password
- A Step-by-Step Guide to Finding Your Apple ID From Your iPhone 6s Plus
- Apple ID Unlock From Apple iPhone X? How to Fix it?
- Decoding WhatsApp Voice Communication
- How to Sign Out of Apple ID From Apple iPhone 12 without Password?
- In 2024, Astral Adventures with Your Luxury SJ4000 - Essential Accompaniments
- In 2024, Deconstructing User Sentiments for VLLO
- In 2024, How to Fix when Apple Account Locked From iPhone 11?
- In 2024, How to Unlock Apple ID From your iPhone X without Security Questions?
- In 2024, How to Use Pokémon Emerald Master Ball Cheat On OnePlus Nord N30 SE | Dr.fone
- In 2024, Protecting Your Privacy How To Remove Apple ID From Apple iPhone SE (2020)
- In 2024, Tips and Tricks for Apple ID Locked Issue From Apple iPhone XR
- In 2024, Unlock Apple ID without Phone Number On iPhone 12
- Step-by-Step Repair Instructions for Dealing with the Dark Screen Glitch in Fallout 4
- Unstick the Power Play: How to Jumpstart Your PS5 Controller’s Charge Cycle
- Title: How To Change Your iPhone X Apple ID on MacBook
- Author: Alma
- Created at : 2025-01-29 16:41:04
- Updated at : 2025-01-31 21:51:32
- Link: https://apple-account.techidaily.com/how-to-change-your-iphone-x-apple-id-on-macbook-by-drfone-ios/
- License: This work is licensed under CC BY-NC-SA 4.0.