
How to Delete iCloud Account From iPhone 11 Pro without Password?
How to Delete iCloud Account On Apple iPhone 11 Pro without Password?
If you own various Apple products, you must be familiar with the significance of iCloud service. iCloud is a cloud storage service that allows Apple users to sync their data and access it across different Apple devices, be it iPhone, iPad, or Macbook.
Now, there are several situations where a user might want to delete their iCloud account, especially when one has created too many iCloud accounts and don’t remember the passwords to all of them.
So, in this guide, we’re going to share some insight into how to delete iCloud account without password so that you can get rid of all the unnecessary accounts and use a single one across all your iDevices.
Part 1: How to delete iCloud account without password on iPhone?
If you have an iPhone at the moment, here are three different ways to delete an iCloud account using your phone itself.
1.1 Remove iCloud from settings on iPhone
Follow these instructions to delete the iCloud account from the “Settings” menu on your Apple iPhone 11 Pro.
Step 1: Open “Settings” and scroll down to click on “iCloud”.
Step 2: You’ll be asked to enter your password. Here enter any random number and click “Done”.
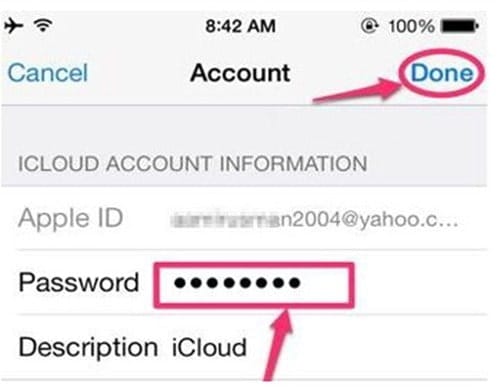
Step 3: iCloud will tell you the password is incorrect. Tap “Ok” and you’ll be prompted back to the iCloud screen.
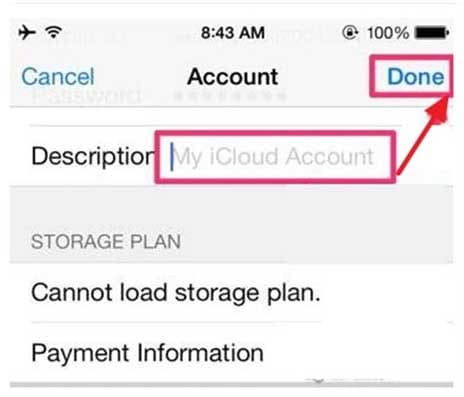
Step 4: Now, click on “Account” and erase everything from “Description”. Click “Done” and you’ll again go back to the iCloud screen. This will disable the “Find My iPhone” feature and you’ll be able to remove the iCloud account easily.
Step 5: Again, tap on iCloud and scroll down till the end. Tap “Delete Account” and again click “Delete” to confirm your action.

That’s how to delete iCloud account without password directly from “Settings” on your Apple iPhone 11 Pro.
1.2 Delete iCloud account via iTunes
Another convenient way to delete the iCloud account is to use iTunes on your Apple iPhone 11 Pro. Let’s walk you through the process of deleting an iCloud account using iTunes.
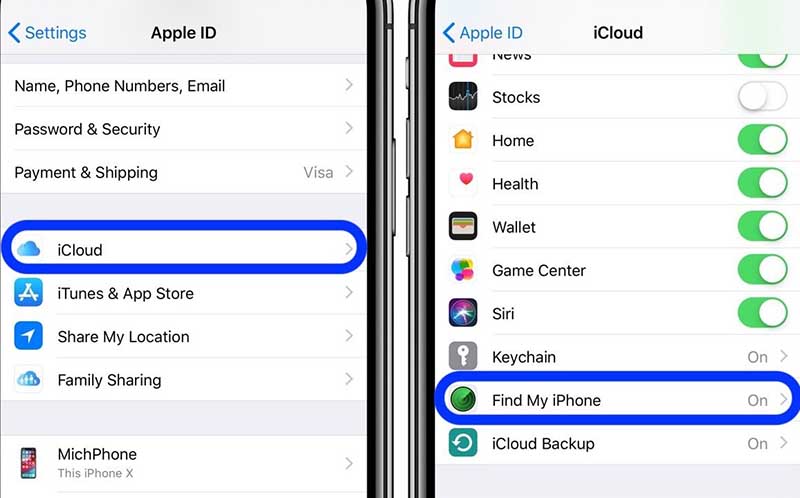
Step 1: First of all, make sure to disable the “Find My iPhone” feature. Navigate to “Settings” > “iCloud” > “Find My iPhone” and toggle the switch off to turn off the feature.
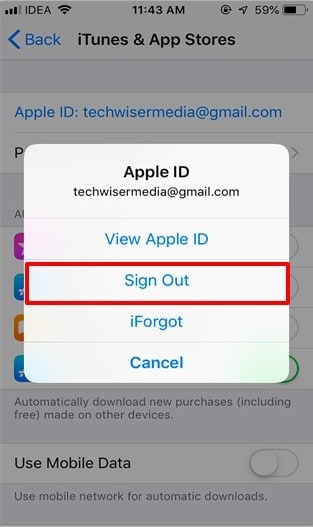
Step 2: Now, go back to the “Settings” window and click “iTunes & App Store”.

Step 3: Tap on your “Account” at the top. A pop-up will appear on your screen. Here, click “Sign Out” and the iCloud account will be removed from your iDevice.
1.3 Create a new password
If you have enabled two-way verification on your Apple iPhone 11 Pro, you can also delete the iCloud account by resetting the password. In this case, however, you’ll have to visit the Apple ID Account Page and use it to reset the password.
Here’s how to delete iCloud account without password by creating a new password.
Step 1: Visit the Apple ID Account page and select “Forgot Apple ID or Password”.
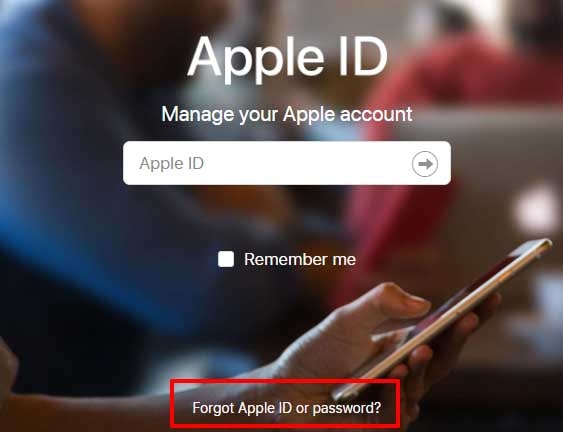
Step 2: Now, enter your Apple ID and tap “Continue”. Select “I Need to Reset My Password” to initiate the password resetting process.
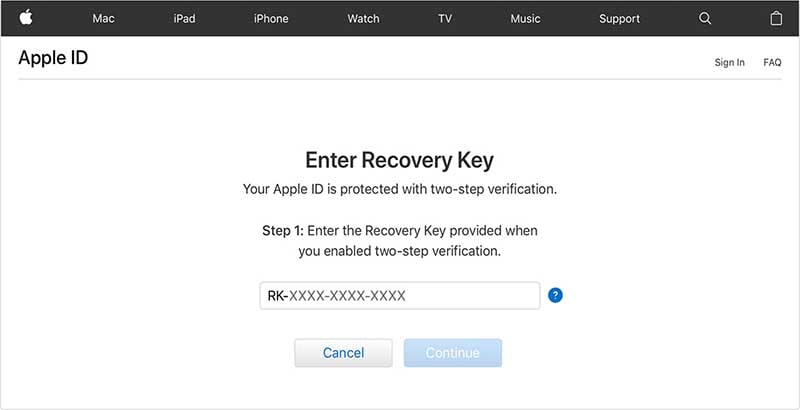
Step 3: You’ll be prompted to a new window where you’ll have to enter the “Recover Key”. This key is an exclusive that’s generated when a user enables two-way verification for their iCloud account.
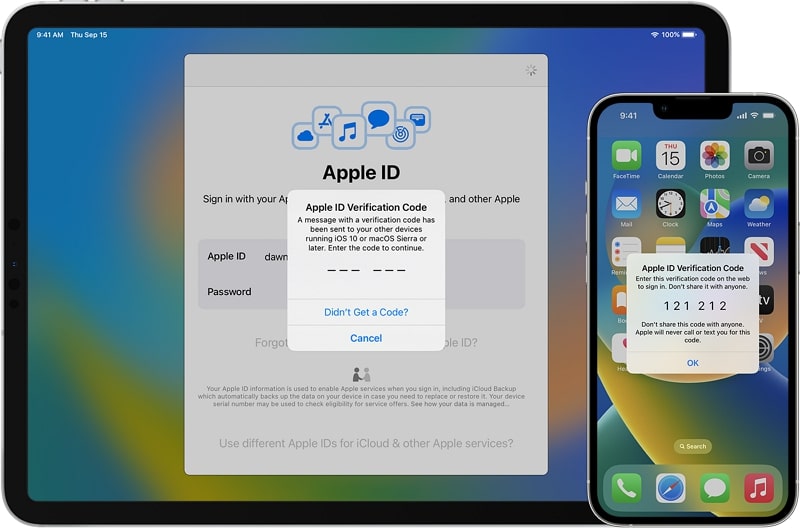
Step 4: Enter the recovery key and tap “Continue”. Now, select a trusted device where you want to receive the verification code. Enter this verification code to continue with the process.
Step 5: In the next window, you can reset the password. Simply, add the new password and click the “Reset Password” button.
Once the password is changed, you can easily delete your iCloud account by going to “Settings” > “iCloud” > “Delete Account”. Enter the new password and your iCloud account will be deleted permanently.
In case you haven’t enabled two-way verification for your iCloud account, there’s still a way to reset the password. However, you must remember the security questions that you answered or the recovery e-mail you had added while setting up your iCloud account.
Step 1: Open the Apple ID Account page and tap “Forgot Apple ID or Password”. Enter your Apple ID and select “I need to reset my password”.
Step 2: You’ll be redirected to a new window displaying two different methods, i.e., “Answer Security Questions” an “Get an Email.” Choose a suitable method and follow the further steps to reset your password.

Part 2: How to delete iCloud account without password on computer using Dr.Fone - Screen Unlock (iOS)?
If you find all the above methods slightly challenging, we have a simpler solution for you. Wondershare Dr.Fone Screen Unlock (iOS) is an exclusive tool for iOS users that’ll help them remove screen locks and delete iCloud accounts from an iDevice, even if you don’t remember the password or even if the “Find My iPhone” feature is enabled.
Thanks to its user-friendly interface, it’ll become a hassle-free task to delete the iCloud account using Dr.Fone Screen Unlock. Since the software is available for Windows as well as Mac, one can easily use it to bypass Apple ID sign-in, irrespective of the OS one’s using on their PC.
So, let’s quickly discuss how to delete iCloud account without password using Dr.Fone Screen Unlock.
Note: Before moving further, make sure to back up the entire data as this will erase everything from your Apple iPhone 11 Pro.
Step 1: Launch Dr.Fone Screen Unlock
Install Dr.Fone Screen Unlock on your PC and double-tap its icon to launch the software. Now, connect your iDevice to the computer using a USB cable.
Step 2: Select Screen Unlock
Now, in the main interface of Dr. Fone Screen Unlock, select “Screen Unlock”.

Step 3: Choose the Option
In the next window, you’ll see three different options. Select “Remove Apple ID” as we want to delete the iCloud account.

Step 4: Trust the Apple iPhone 11 Pro device
Now, to successfully establish the connection between the two devices, enter the passcode on your iDevice and tap the “Trust” button to confirm the connection.

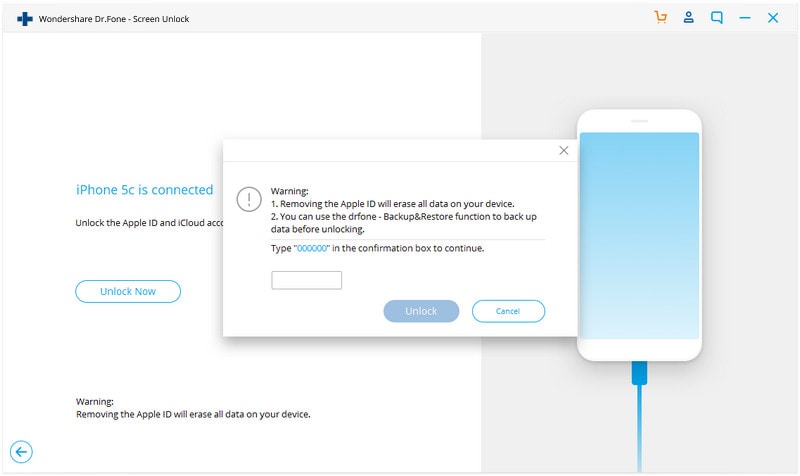
Step 5: Reset Your Apple iPhone 11 Pro
Once the two devices are successfully connected, tap “Unlock Now” on your computer screen. This will trigger a warning message. Click “Unlock” to continue with the process.
At this point, you’ll be asked to enter recovery mode. You can follow the on-screen instructions to successfully enter recovery mode.

Step 6: Unlock Apple ID
After entering the recovery mode, Dr.Fone will automatically initiate the unlocking process. Do not disconnect the iDevice from your computer as this can cause damage to the Apple iPhone 11 Pro device itself.

As soon as your Apple ID gets unlocked, a confirmation message will pop up on your screen. Simply reboot your smartphone and you’ll be able to sign in with a new Apple ID without any hassle.

It doesn’t matter if you’re using Windows or Mac, Dr.Fone – Screen Unlock for iOS will make it extremely easy to delete the iCloud account without the password. So, if you are looking for a reliable and convenient way to remove an iCloud account, make sure to use Dr.Fone – Screen Unlock.
Conclusion
That’s the entire guide on how to delete iCloud account without password. Even though iCloud is an exceptional feature, one is likely to forget the password to his iCloud account. If you’re stuck in a similar situation and want to create a new iCloud account, make sure to use the above tactics to delete the previous iCloud account, even if you don’t remember the password.
How To Remove the Two Factor Authentication On Apple iPhone 11 Pro
Want To Remove the Two Factor Authentication? Check Out This Guide

Continuous technology innovation has introduced many advanced encryption and security methods to protect data from hackers. With these innovations, companies like Apple and Google have introduced the two-factor authentication process to protect user data.
But sometimes, this security method becomes a hassle to access your data daily, due to which many users try to remove it. That is why, in this article, we have discussed how you can remove iCloud two-factor authentication easily.
- Part 1: What Is Two-Factor Authentication and How Helpful It Is
- Part 2: Can You Remove the Two Factor Authentication iCloud at Anytime
- Part 3: How To Remove the Two-Factor Authentication Within 14 Days
- Part 4: iPhone Apple ID Got Locked? Here’s a Reliable Tool To Get It Unlocked Without Passcode

Part 1: What Is Two-Factor Authentication and How Helpful It Is
Protecting users’ devices and online accounts is one of the major responsibilities of tech companies like Apple. Due to this, they have added multiple security features, including two-factor authentication. Thus, if you create an Apple ID, you can see a two-factor authentication option that adds an extra layer of security.
2FA is activated when the user provides the password to log into the Apple ID or software through a new device, and it acts as a second layer for account security. Apple ID or any software containing sensitive data cannot be accessed without it. This method provides a higher security level than single-factor authentication. To understand more benefits of this security system in detail, check the following points:
- Protection From Password Theft: 2FA acts as an additional security level. It protects your accounts and devices in case your password is leaked.
- Migrations of Unauthorized Assets: Online banking applications use 2FA to protect users from unauthorized bank transfers. If someone accesses their app, this is a beneficial security measure.
- Protection on Multiple Services: Platforms, including social media, banks, and cloud storage, use 2FA. It means that 2FA can be used in various digital aspects.
Part 2: Can You Remove the Two Factor Authentication iCloud at Anytime
Many people use 2FA globally to protect their personal information and devices from hackers and unauthorized access. However, in some cases, users may want to remove two-factor authentication iCloud for multiple reasons. This includes scenarios in which their device is lost or damaged or if they have found a better security option than this one.
Moreover, there is one important key point to note: Apple has removed the feature of deactivating 2FA from the Apple ID. It means you need to think twice before activating this feature on your Apple ID because it cannot be reversed. For the following reasons, Apple has taken this initiative:
- Enhanced Security: By removing the deactivation option for 2FA, Apple is trying to strengthen its account security to ensure that no one can access its user’s data.
- Reducing Vulnerabilities: Allowing users to deactivate 2FA could cause vulnerabilities in the Apple ecosystem that can be a weak point for protecting users’ data. That is why Apple has removed the deactivation option to stop malicious actors from taking advantage of this vulnerability.
- Encouraging Security Awareness: To make Apple users more security conscious, Apple has made it difficult on purpose to remove 2FA. It helps users to be more confident in Apple services and products.
- Minimizing Mistakenly Steps: If users mistakenly remove the 2FA, their accounts and devices are at risk of being accessed without proper authentication. To avoid such an issue, the deactivation option of 2FA is removed.
Besides all these reasons, there is still some good news for those who want to remove the two-factor authentication iPhone to use other security options. The good news is that Apple allows users to remove 2FA for a limited time after activation.
Part 3: How To Remove the Two-Factor Authentication Within 14 Days
As explained in the last part, Apple has made removing the 2FA option from Apple ID challenging for several security reasons. Thus, if you want to remove 2FA from your Apple ID, you have only 14 days after activating this feature. To understand how to disable iCloud two-factor authentication within this given time, check the following steps:
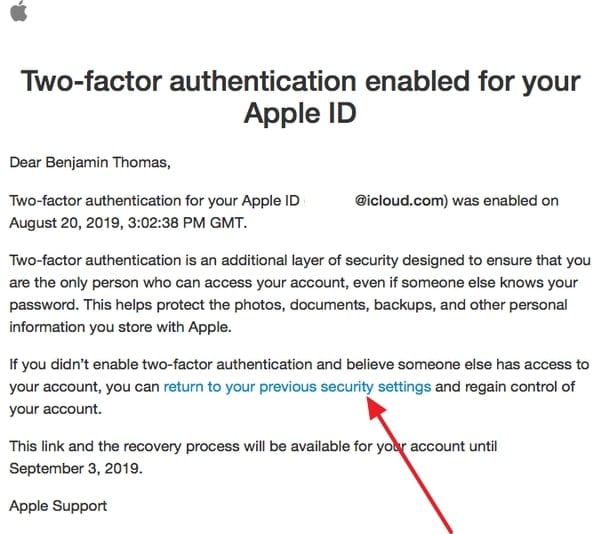
- Step 1. Once you have activated the 2FA feature, your 14-day grace period will start eventually. To deactivate this, open the enrollment email you received from Apple regarding 2FA on your Apple ID.
- Step 2. Scroll to the bottom of this email and select the link or button to return to your account security & settings section. There, follow the on-screen instructions to deactivate the 2FA of your Apple ID.
Part 4: iPhone Apple ID Got Locked? Here’s a Reliable Tool To Get It Unlocked Without Passcode
If you mistakenly got your Apple ID locked due to entering the wrong password multiple times, there is no need to stress it out. It is a common issue that many people forget their Apple ID password and cannot access it. Due to this, we have got you a perfect solution to unlock your Apple ID without a passcode.
This solution is the Wondershare Dr.Fone - Screen Unlock (iOS) tool specially designed to help users remove their iPhone and iPod lock screens. It is compatible with the latest iOS devices and assists in removing various types of lock screens, including Touch ID and Face ID.
Key Features
- This iOS screen unlock tool assists users in bypassing MDM without data loss and other technical errors.
- iCloud activation lock and iTunes backup encryption can be bypassed without a password in just a few steps.
- iPhone 15 and the latest versions of iOS 17/iPadOS 17 are supported by this tool to help users professionally.
Simplified Steps for Unlocking Apple ID With Wondershare Dr.Fone
To help you use this AI-powered screen unlock tool for unlocking the Apple ID without a password, follow the process we have mentioned below for your ease:
- Step 1. Access the Toolbox and Choose the Respective Option
Initiate the process by accessing Wondershare Dr.Fone’s latest version on your computer and tapping on the “Toolbox” option from its left side toolbar. Following this, choose “Screen Unlock” from the list of tools and tap “Remove Apple ID” in the next window.
- Step 2. Make Sure That the Apple iPhone 11 Pro Is Connected to the Computer
Then, connect your Apple iPhone 11 Pro to your computer using a USB cable so that you can see its connectivity status. Once the status is displayed on a new window, hit the “Unlock Now” button to proceed. Answer some questions that are asked by the platform, and with this, ensure that your device’s “Screen Lock” and “Two-Factor Authentication” are enabled or disabled.

- Step 3. Select the System Version and Proceed Ahead
In this step, enable Recovery Mode by following the on-screen instructions. It will help the platform detect the connected device model, with which you will need to select “System Version.” Afterward, you can hit the “Start” button to proceed ahead.

- Step 4. Start the Apple ID Unlocking Process
The respective iOS firmware will download according to the Apple iPhone 11 Pro device model and system version. After it is downloaded, the platform will verify it for you, based on which you can tap the “Unlock Now” option to get your Apple ID unlocked successfully.

Conclusion
With this, we hope you understand how to disable iCloud two-factor authentication. However, remember that doing this is only possible within 14 days of a grace period. If this period is over, you cannot remove 2FA from your Apple ID.
Moreover, if you have locked your Apple ID passcode, using Wondershare Dr.Fone to unlock it can be the perfect option. While using this tool, you also don’t have to worry about screen locks on different iOS devices. This is because the innovative algorithms integrated in this tool make it easier to use for unlocking the Apple ID or screen lock.
How To Erase an Apple iPhone 11 Pro Without Apple ID Password?
Have you ever wondered what happens when you erase the content of your Apple iPhone 11 Pro storage? Erasing an iPhone means restoring it to its factory settings to install the latest iOS version. It also permanently removes all your data, including photos, videos, contacts, apps, and other information stored on the Apple iPhone 11 Pro device.
This process is often necessary when you sell or give away your Apple iPhone 11 Pro to ensure your personal information remains secure. But, you may encounter a situation where you should learn how to erase an iPhone without an Apple ID. While this may seem challenging, you can use a few methods to achieve this goal. This article will show you how to do it with or without an Apple ID password.

Part 1: A Checklist on What To Do Before Erasing an iPhone
If you’re looking at how to erase an iPhone without an Apple ID or account password, you’ve come to the right place. Before you begin, preparing your device and ensuring you have all the necessary information is crucial. Here’s a checklist of what to do before erasing your Apple iPhone 11 Pro:
Backup Your Apple iPhone 11 Pro
You can back up to iCloud or use Finder on macOS 10.15 or later. Remember that iCloud backups are stored on Apple’s servers and always encrypts backups. On the other hand, computer backups are stored on your computer’s hard drive and require a connection to the backup computer. Consider what your needs and preferences are when choosing between these two backup options.

Prepare Your Apple iPhone 11 Pro Passcode
You’ll need your Apple iPhone 11 Pro passcode to erase an iPhone. If you’ve forgotten your passcode, reset it using recovery mode.
Ready Your Apple ID Password
You may be asked to provide your Apple ID password to disable the Find My iPhone function and remove the Apple iPhone 11 Pro device from your account. Have it handy to avoid any delays. It’s necessary for security verification during the erasure process.
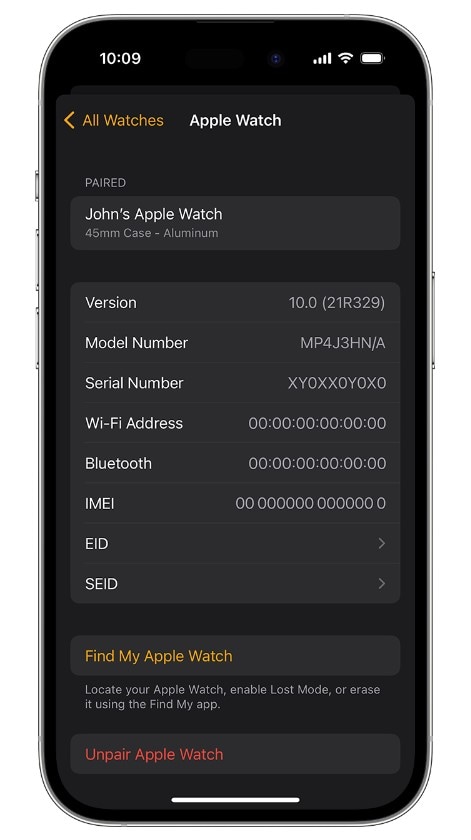
Unpair Apple Watch
If you own an Apple Watch, unpair it from your Apple iPhone 11 Pro. It ensures a smooth disconnection and prevents complications when erasing the Apple iPhone 11 Pro device.
Cancel Your AppleCare Plan
If you have an active AppleCare plan for your Apple iPhone 11 Pro, cancel it on your Apple iPhone 11 Pro before erasing the Apple iPhone 11 Pro device. You can cancel your AppleCare plan by phone by calling AppleCare customer support. It will prevent any unnecessary charges after the erasing process.

Sign Out of iCloud
If your Apple iPhone 11 Pro has iOS 10.3 or later, open the Settings app, then tap on your name at the top. Next, scroll down, tap Sign Out, enter your Apple ID password, and tap Turn Off.
Remove Your Apple iPhone 11 Pro From Your List of Trusted Devices
Remove your old device from your list of trusted devices in your Apple ID settings for added security. This measure strengthens the defense against unauthorized access to your data.
Part 2: How To Erase iPhone Without Apple ID Password via Settings?
Erasing an iPhone and restoring it to factory settings is a straightforward process you can do in a few steps. Whether you’re preparing to sell or gift your device or troubleshooting persistent software issues, erasing your Apple iPhone 11 Pro contents can enhance its performance. The process is easy if you have your Apple ID password readily available.
However, if you’ve forgotten your Apple ID password, don’t fret. Follow the guide below to reset your Apple ID password and erase all content and settings on your Apple iPhone 11 Pro:
- Step 1: Open the Settings application, then tap [name].
- Step 2: Go to Sign-In & Security > Change Password.
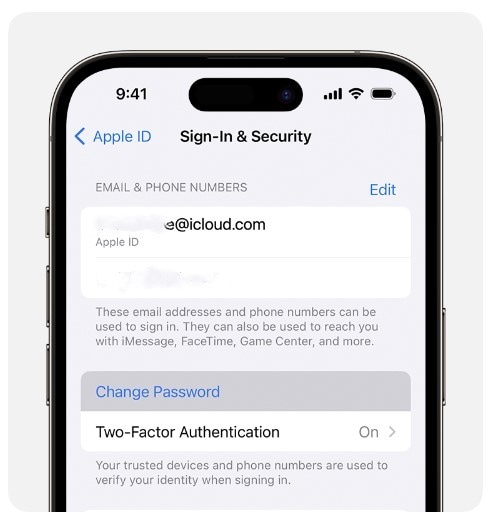
- Step 3: Follow the on-screen instructions to reset your Apple ID password.
- Step 4: Go to General > Reset from the Settings app, then tap Erase All Content and Settings.

- Step 5: Input your Apple ID password or your passcode when prompted.
- Step 6: Click Continue to confirm. Then, wait while the contents are being removed from your Apple iPhone 11 Pro device.
Part 3: How To Erase iPhone Without Apple ID Password on Computer?
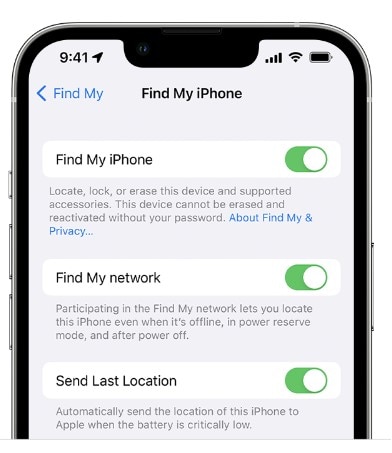
Activation lock is a security feature. It prevents anyone from activating an iPhone without your Apple ID password. If you try to factory reset your Apple iPhone 11 Pro without turning off Find My iPhone, the activation lock will be in place. It means you need to enter your Apple ID password to activate the Apple iPhone 11 Pro again. To turn it off, also ensure to turn off Find My on your device.
Go to Settings > [your name] > Find My or Find My iPhone to check.
If you want to erase an iPhone without Apple ID password on your computer, you can do so as long as you turn off the Find My. However, you’ll need to put your Apple iPhone 11 Pro into Recovery Mode first.
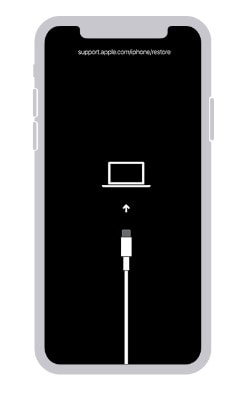
- Step 1: Turn off your Apple iPhone 11 Pro, then put it into Recovery Mode.
- For iPhone 8 or later: Press and hold the Side button.
- For iPhone 7 or iPhone 7 Plus: Press and hold the Volume Down button.
- For iPhone 6s or earlier: Press and hold the Home button.
- Step 2: Connect your Apple iPhone 11 Pro to the computer with the button held down.
- Step 3: Hold the buttons steadily until the Recovery Mode screen is visible.
Step 4: Switch on your Apple iPhone 11 Pro. Then, connect it to a Mac or Windows computer using a USB cable.
Step 5: When prompted, follow the on-screen instructions to enter your device passcode or click Trust This Computer.
Step 6: Depending on your computer, open Finder or iTunes. Then, do either of the following:
For macOS 10.15 or later: Select your Apple iPhone 11 Pro under the Locationssection, then click Restore iPhone.
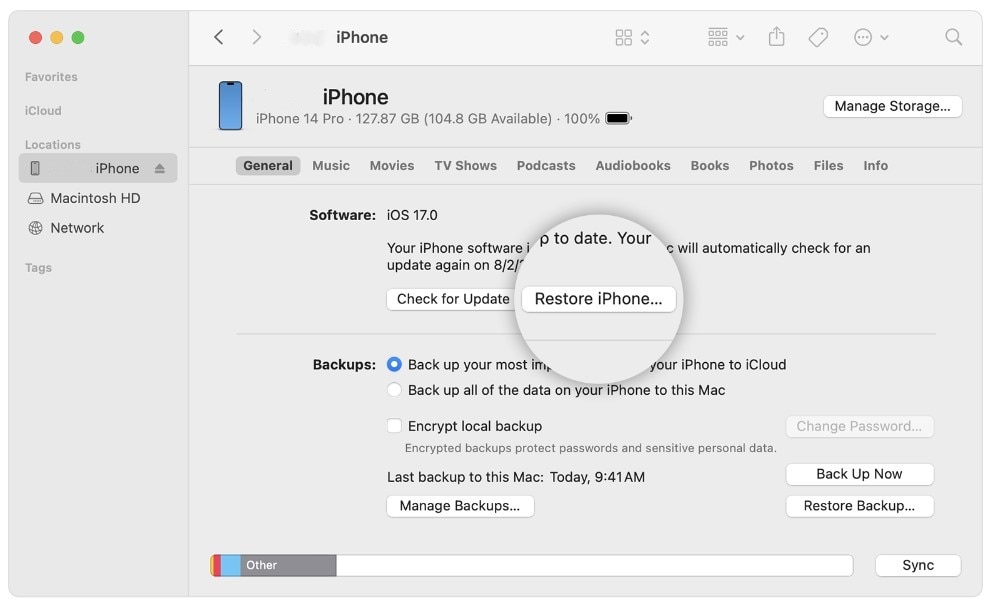
- For macOS 10.14 or earlier or Windows: Click the Apple iPhone 11 Pro in the top left window, click Summary, then click Restore iPhone.
- Step 7: Click Restore in the dialogue box. iTunes or Finder will download your Apple iPhone 11 Pro’s latest iOS software and restore the Apple iPhone 11 Pro to its factory settings.
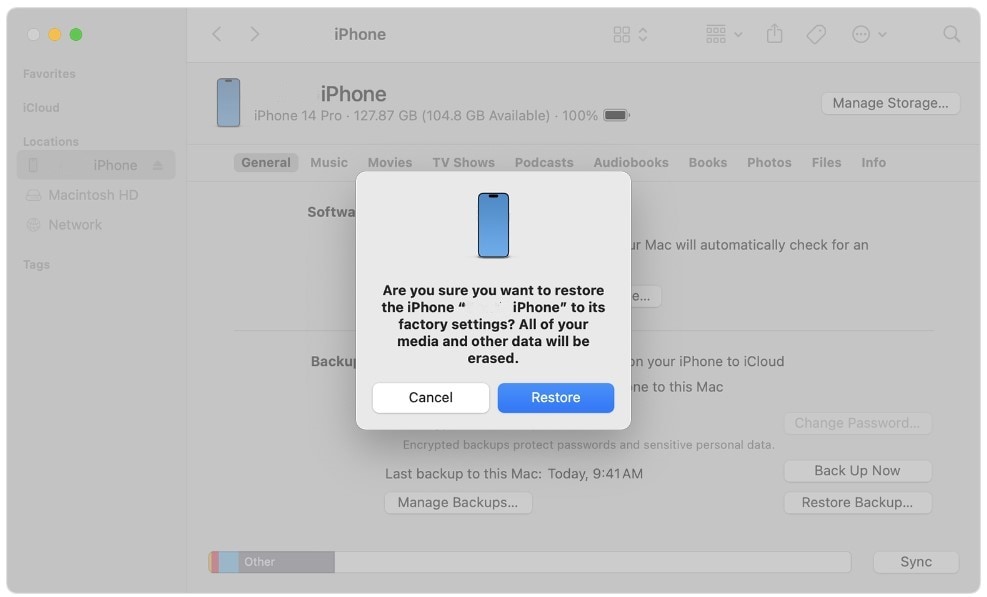
- Step 8: Once the restore is complete, the Apple iPhone 11 Pro will restart.
Part 4: Erase an iPhone Without Apple ID via Activation Lock Support Request
You can request to unlock Activation Lock support from Apple if your device is not in Lost Mode or if you need to erase an iPhone without an Apple ID password. To do this, you need to provide proof of purchase of the iPhone. It can be in the form of a receipt, invoice, or credit card statement.
The proof should show the serial number of the iPhone, IMEI, or MEID. Once Apple unlocks the Activation Lock on your Apple iPhone 11 Pro, your Apple iPhone 11 Pro contents will be permanently erased. Also, note that if you restore your Apple iPhone 11 Pro from a local backup, the Activation Lock will re-enable.
To start this request, follow these steps:
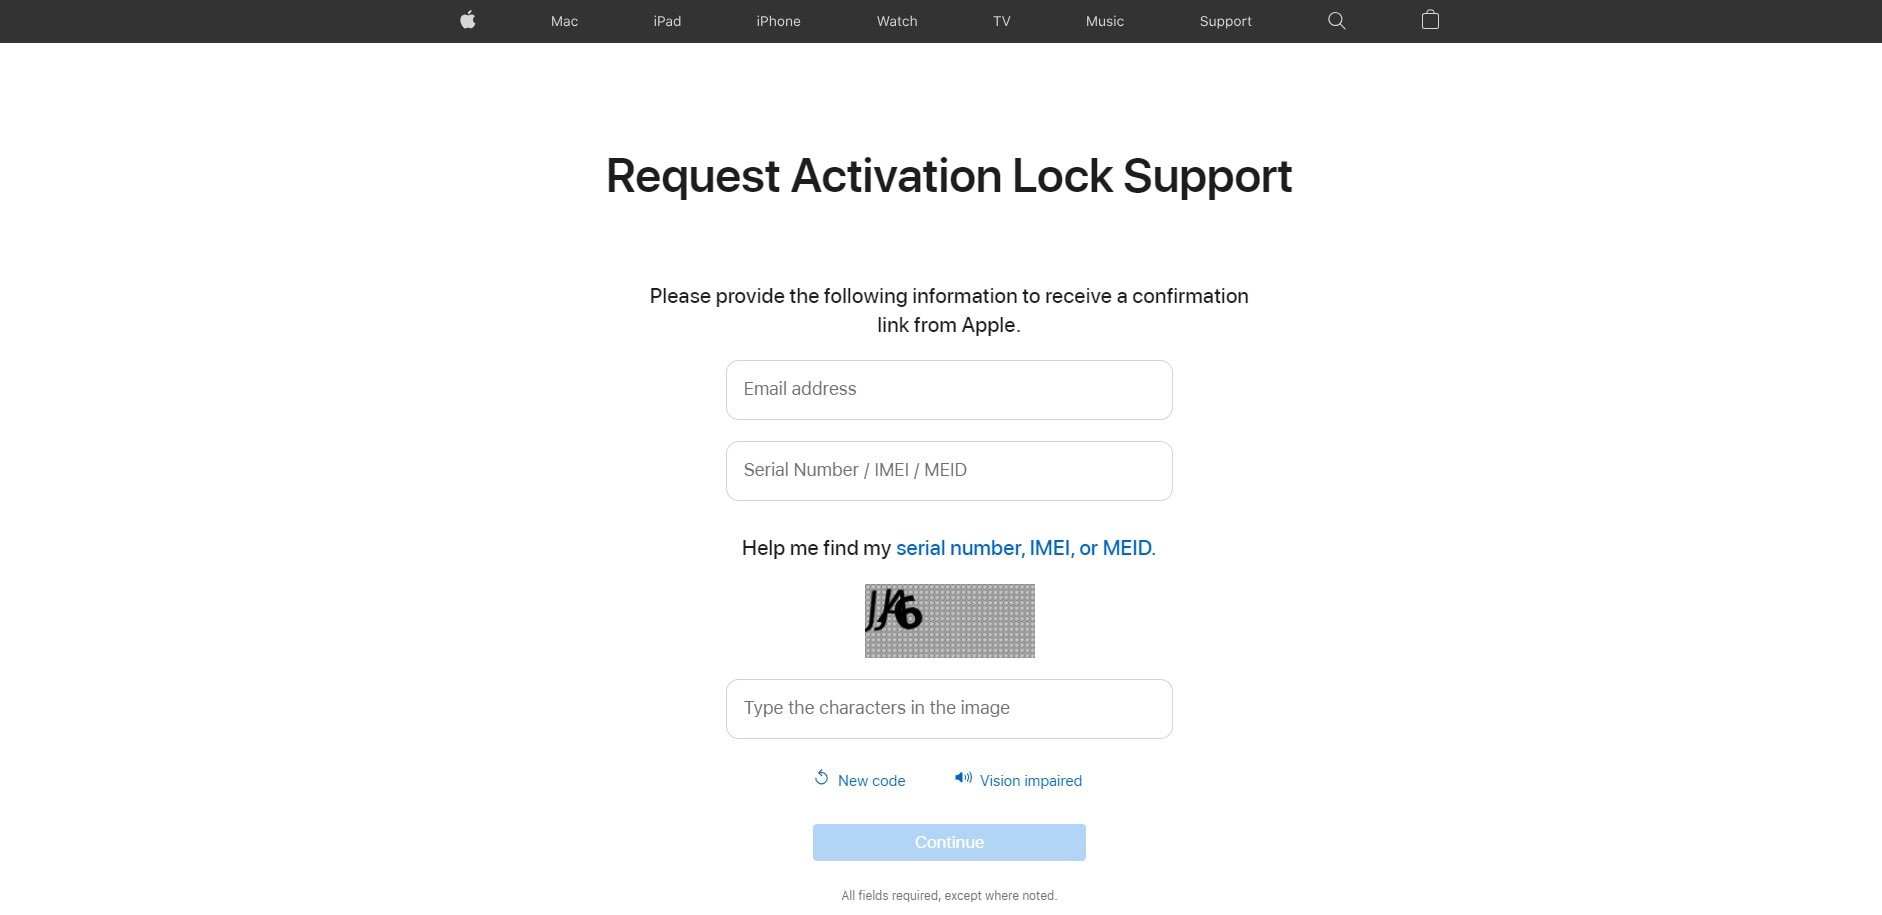
- Step 1: Head to Apple’s Activation Lock support page. (al-support.apple.com)
- Step 2: Scroll down the page, select the agreement checkbox, click Continue, and it will redirect you to a new page.

- Step 3: Enter your email address and other required information, then click Continue.
Part 5: How To Erase an iPhone Without an Apple ID Password in Minutes?
The time it takes to process an unlock Activation Lock support request can take days. If your device is erased as soon as possible, use the Wondershare Dr.Fone Screen Unlock tool. This third-party mobile solution can erase an iPhone without an Apple ID password, even if the Find My feature is enabled. Also, it can:
- Remove several iOS lock screens, such as passcode, Touch ID, and more.
- Remove the iCloud Activation Lock
- Bypass Apple ID from iPhone without a password
- Remove MDM restrictions
Dr.Fone Screen Unlock is a simple, easy-to-use tool compatible with the latest iOS models. Follow these steps to remove the Apple ID from your Apple iPhone 11 Pro and erase all its contents within minutes:
Step 1: Download and install Dr.Fone on your desktop. Launch the app and connect your Apple iPhone 11 Pro using a USB cable.
Step 2: From the Toolbox homepage, select Screen Unlock, then choose iOS.
- Step 3: Select Remove AppleID to delete iPhone contents, including the Apple ID.

- Step 4: The next screen shows the connected device. Click Unlock Now.
- Step 5: Click Yes to confirm you have set up a screen lock.

- Step 6: Click Yes to verify you have enabled two-factor authentication on your Apple iPhone 11 Pro.

- Step 7: Follow the in-app instructions to put your device in Recovery Mode.
- Step 8: Select an option from the System Version drop-down list, then click Start.
- Step 9: Wait while the iOS firmware downloads.

- Step 10: Once downloaded, click Unlock Now to proceed.
- Step 11: Enter the code in the dialogue box and click Unlock.

- Step 12: Keep your Apple iPhone 11 Pro connected to your computer while the process progresses.
- Step 13: Click Done and check that your Apple iPhone 11 Pro’s data and Apple ID have been removed.
Conclusion
It can be challenging to erase an iPhone without an Apple ID password, but it’s achievable by following the right steps. Remember to weigh the security implications and back up your data beforehand.
If you’re seeking a straightforward method on “how to erase an iPhone without Apple ID,” Dr.Fone Screen Unlock tool is a good solution. With its user-friendly interface and efficient operation, Dr.Fone simplifies the process, making it accessible to users of all technical levels. Don’t let a forgotten Apple ID password hinder your device’s functionality. Try Dr.Fone Screen Unlock and reclaim control of your Apple iPhone 11 Pro.
Also read:
- [New] 2024 Approved Freedom Through Jokes Ranking the Most Hilarious Social Media Prisons
- [New] Step-by-Step Guide to Optimal Screen Casting via Meet for 2024
- [Updated] 2024 Approved Streamlining Video Submissions From iMovie to Vimeo
- [Updated] In 2024, Controlling Comment Visibility on YouTube Videos
- [Updated] In 2024, Dissecting the Narrative in YouTube Dialogues
- [Updated] In 2024, Expert Insights Capturing the Essence of Online Meetings
- Apple ID is Greyed Out From Apple iPhone 13 Pro How to Bypass?
- Complete Tutorial to Use VPNa to Fake GPS Location On Nokia C12 Pro | Dr.fone
- Efficient Strategies for Disk Space Management - Insights From YL Computing
- Guide on How To Remove Apple ID From Apple iPhone 11
- In 2024, A Step-by-Step Guide to Finding Your Apple ID From Your Apple iPhone 8
- In 2024, How To Remove the Two Factor Authentication On iPhone XS
- In 2024, How to Reset Apple ID and Apple Password On Apple iPhone 14 Pro Max
- OLED Monitor - My Secret Weapon for Games
- The Easy Way to Remove an Apple ID from Your MacBook For your Apple iPhone 6s
- The Easy Way to Remove an Apple ID from Your MacBook For your iPhone 14 Plus
- Troubleshooting Error Connecting to the Apple ID Server On iPhone SE (2020)
- Title: How to Delete iCloud Account From iPhone 11 Pro without Password?
- Author: Alma
- Created at : 2024-12-16 20:57:17
- Updated at : 2024-12-21 23:43:41
- Link: https://apple-account.techidaily.com/how-to-delete-icloud-account-from-iphone-11-pro-without-password-by-drfone-ios/
- License: This work is licensed under CC BY-NC-SA 4.0.