
How To Delete iCloud Account Remove Your Apple ID Permanently From iPhone 12 Pro
How To Delete iCloud Account: Remove Your Apple ID Permanently On Apple iPhone 12 Pro
Searching “How to delete iCloud account?” If you want to delete an iCloud account, you must delete an Apple ID account. And before you take this irreversible step, it’s crucial to understand the implications. Deleting your Apple ID account means permanently erasing all contents stored in your iCloud, such as media and documents. You’ll also lose access to essential Apple services such as the App Store, iMessage, and iTunes.
Deleting your Apple ID is a significant decision that should not be taken lightly. Proceeding with Apple ID deletion is a final decision. Once initiated, there’s no turning back. If you’re certain about it, refer to this article for a step-by-step guide on how to delete iCloud account and explore alternative options if you need it.

Part 1: Deleting iCloud Account? Essential Preparations Before You Proceed
Before you learn the steps on “how to delete icloud account,” take steps to ensure a smooth transition and prevent the loss of valuable data. Before you permanently remove an iCloud account, ensure you’ve completed the following:
Backup Your Data
Create a local copy of your files, photos, videos, and documents on your computer or an external hard drive. You can use cloud storage services or third-party apps like Wondershare Dr.Fone to selectively restore it later.
Request a Copy of Your Data
Apple provides a service on selected regions that allows you to request a copy of data associated with your Apple ID before deleting your account. It includes records of your sign-in, account details, iCloud contents, and Apple retail store transactions. Having a copy of this data can be useful if you need to access it in the future.
To request a copy of your data, go to Privacy Apple on your web browser. Under the Obtain a copy of your data section, click Request a copy of your data. Next, select the data you need and click Continue.

Review Your Active Subscriptions
Also, to “delete iCloud account,” first review any active subscriptions you may have, such as Apple Music, Apple TV+, or iCloud+ storage. If you don’t want to continue these subscriptions, cancel them before deleting your account.

Download Backups of Your Apps, Games, Music, Movies, TV Shows, Books, and Audiobooks
Your iCloud account may contain backups of your apps, games, and media purchases. Before deleting your Apple ID account, download them to your device or a computer to ensure you don’t lose access to your favorite content.
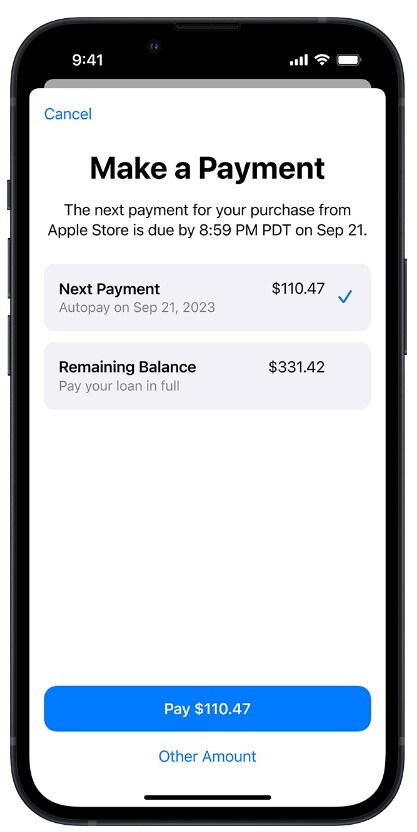
Pay Loan Installments You Have With Apple Pay Later
If you have an outstanding loan with Apple Pay Later, pay off any remaining installments before you delete your iCloud account. Otherwise, you may incur late fees or other penalties.
Sign Out of Your Devices and Web Browser
Before deleting your iCloud account, ensure you sign out of your account on all devices, including iPhones, iPads, Macs, and web browsers. Failure to sign out of an account can lead to several potential risks and inconveniences, including:
- Restricted device access
- App malfunctioning
- Constant Sign-in errors
- Web browsers retain your Apple ID information
Part 2: Remove iCloud Account Without Deleting: Maintaining Your Apple ID
Removing an iCloud account from your device doesn’t necessarily mean deleting the account itself. It simply means signing out of your iCloud account on that device. Your iCloud data remains intact and accessible from other devices.
However, when you sign out of iCloud on your device, you will be signed out of all Apple services that use your iCloud account. It includes Apple Pay, Find My, iCloud Mail, Siri Shortcuts, and others. You need to sign in with your Apple ID to use these services again.
Remove iCloud Account on iPhone
Here’s “how to remove iCloud account“ from your Apple iPhone 12 Pro without deleting the account:
- Step 1: Open the Settings app, then tap the Apple ID at the top of the Apple iPhone 12 Pro screen.
- Step 2: Scroll down, tap on Sign Out, enter your Apple ID password, and tap on Turn Off.
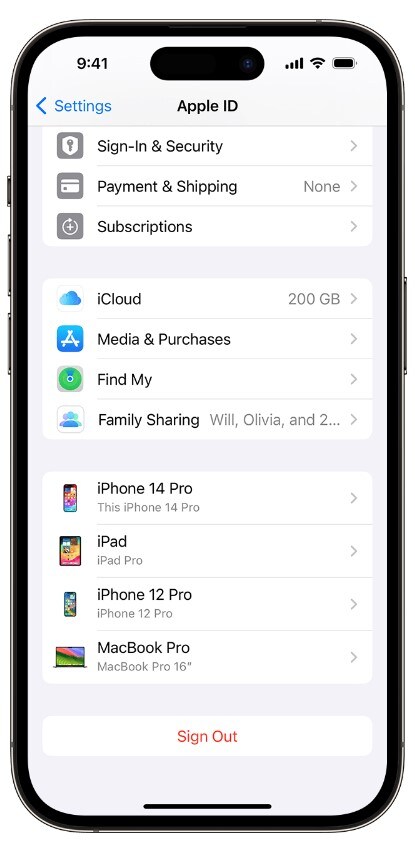
- Step 3: Tap on Sign Out to verify.
Remove iCloud Account on Mac Device
Follow these steps below to remove an iCloud account from your macOS Ventura or later:
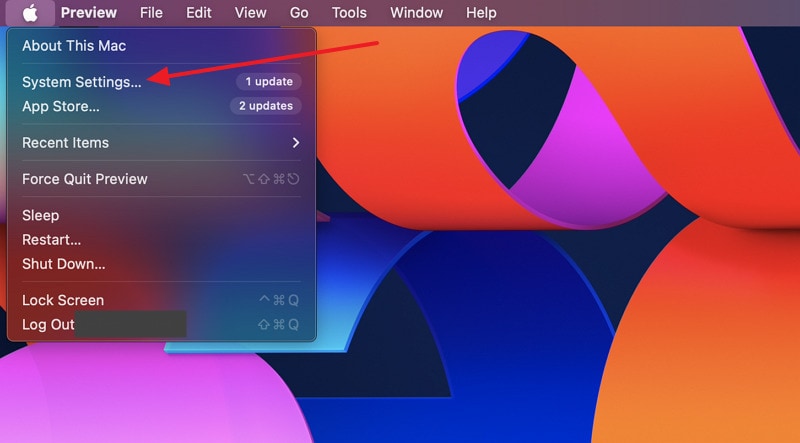
- Step 1: Click on the Apple logo in the top left corner of your screen, then choose System Settings.
- Step 2: Click on the Apple ID icon and click Sign Out.
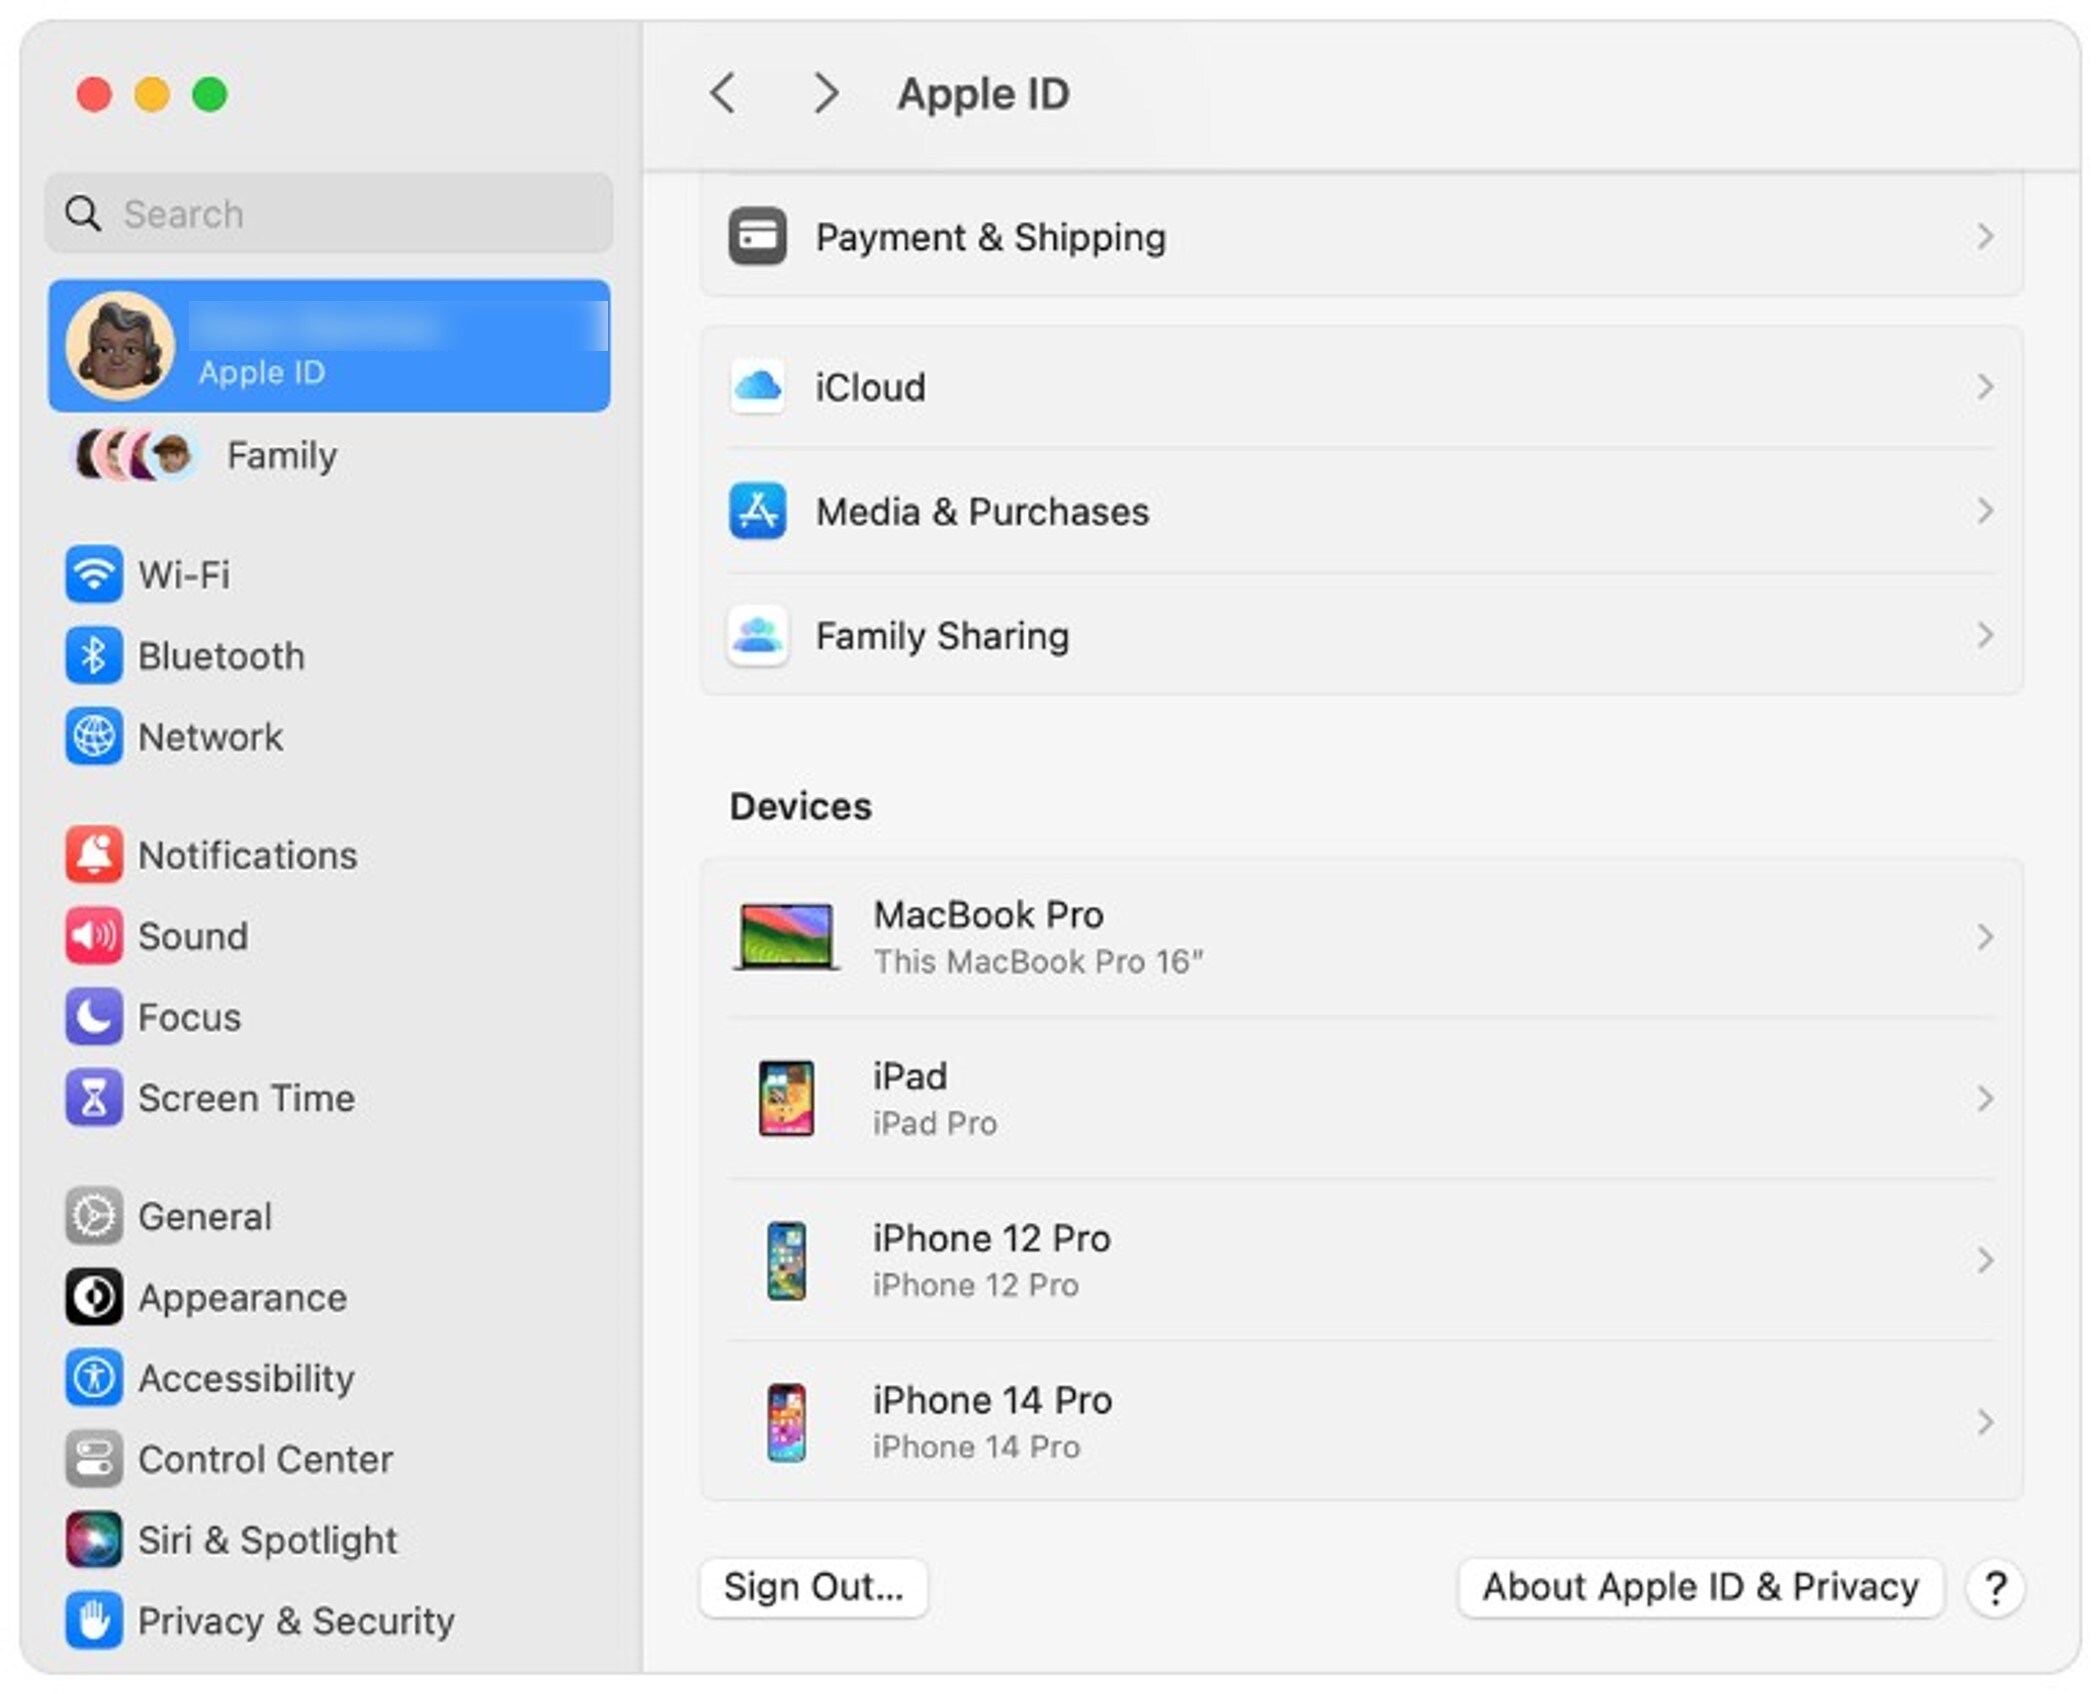
- Step 3: Select the data files you want to save, then click Keep a Copy.
Part 3: How To Delete iCloud Account Permanently?
Deleting your Apple ID has effects beyond the loss of data and services. These include:
- Apple will not be able to recover your Apple ID or any associated data once deleted.
- After deleting your iCloud account, any messages sent to you via iCloud Mail or iMessage will not be delivered.
- If you have any unused credit balance in your iCloud account, you cannot redeem or refund it upon deletion.
- The email address associated with your deleted Apple ID becomes unavailable for creating a new Apple ID.
If you are sure of your decision and have prepared for the consequences, here’s how to permanently delete your iCloud account:
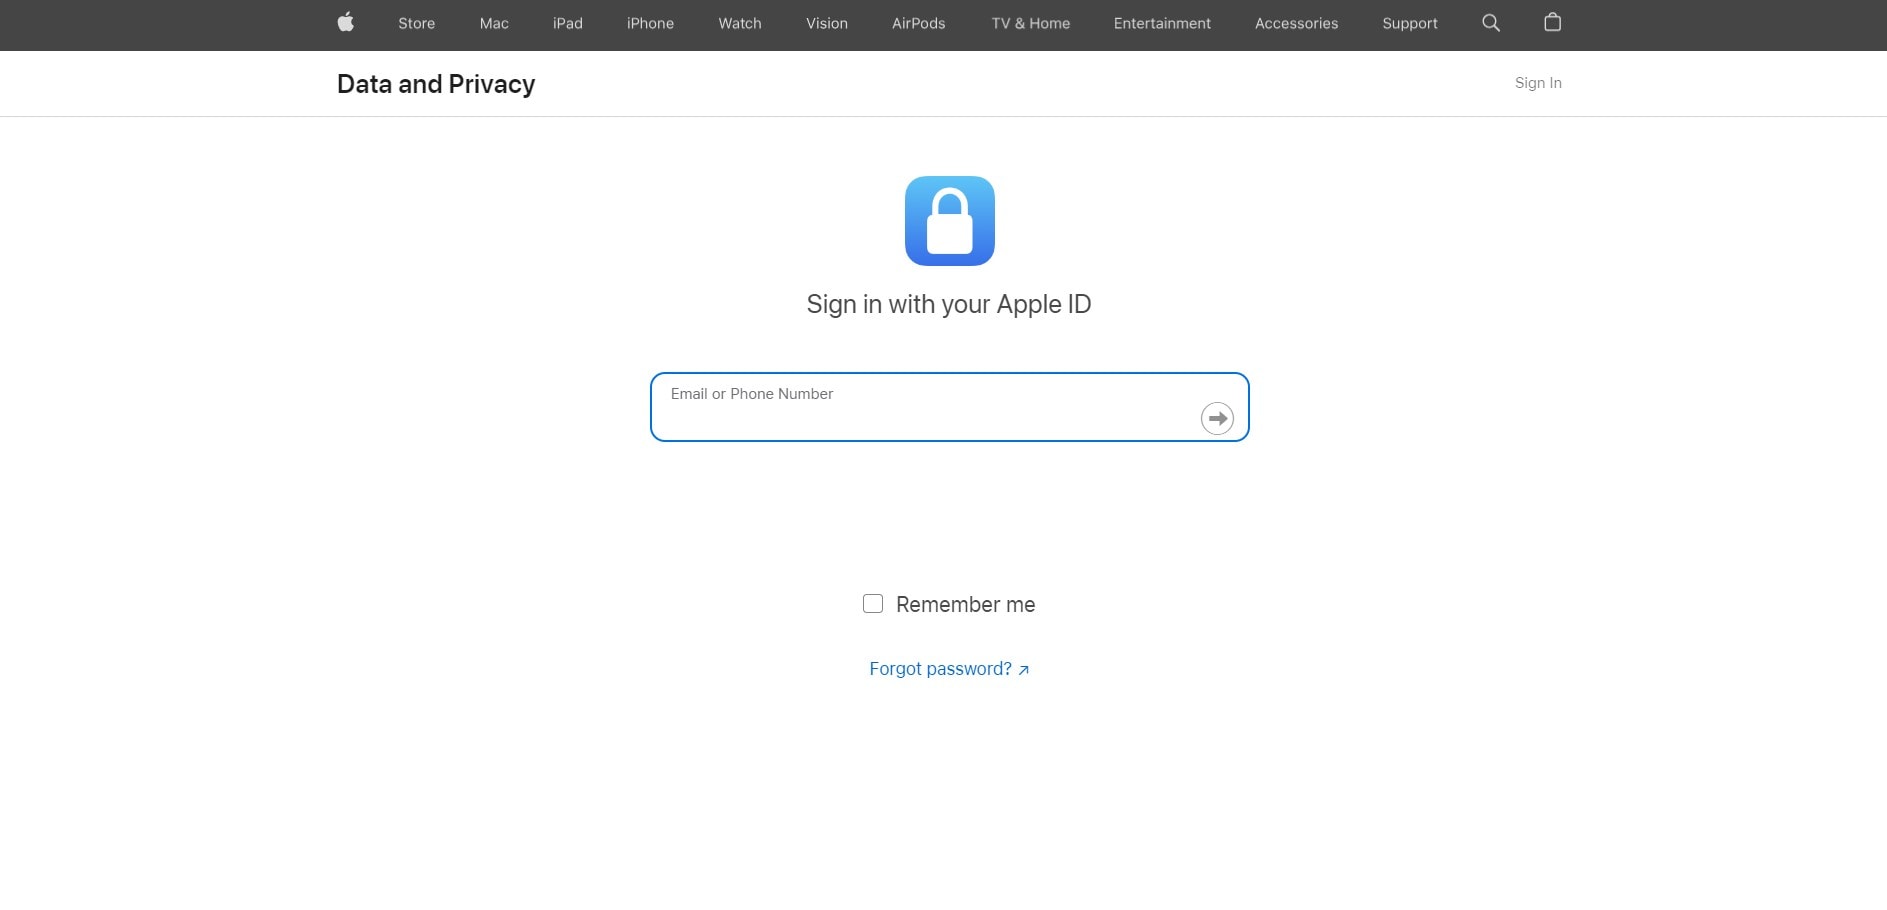
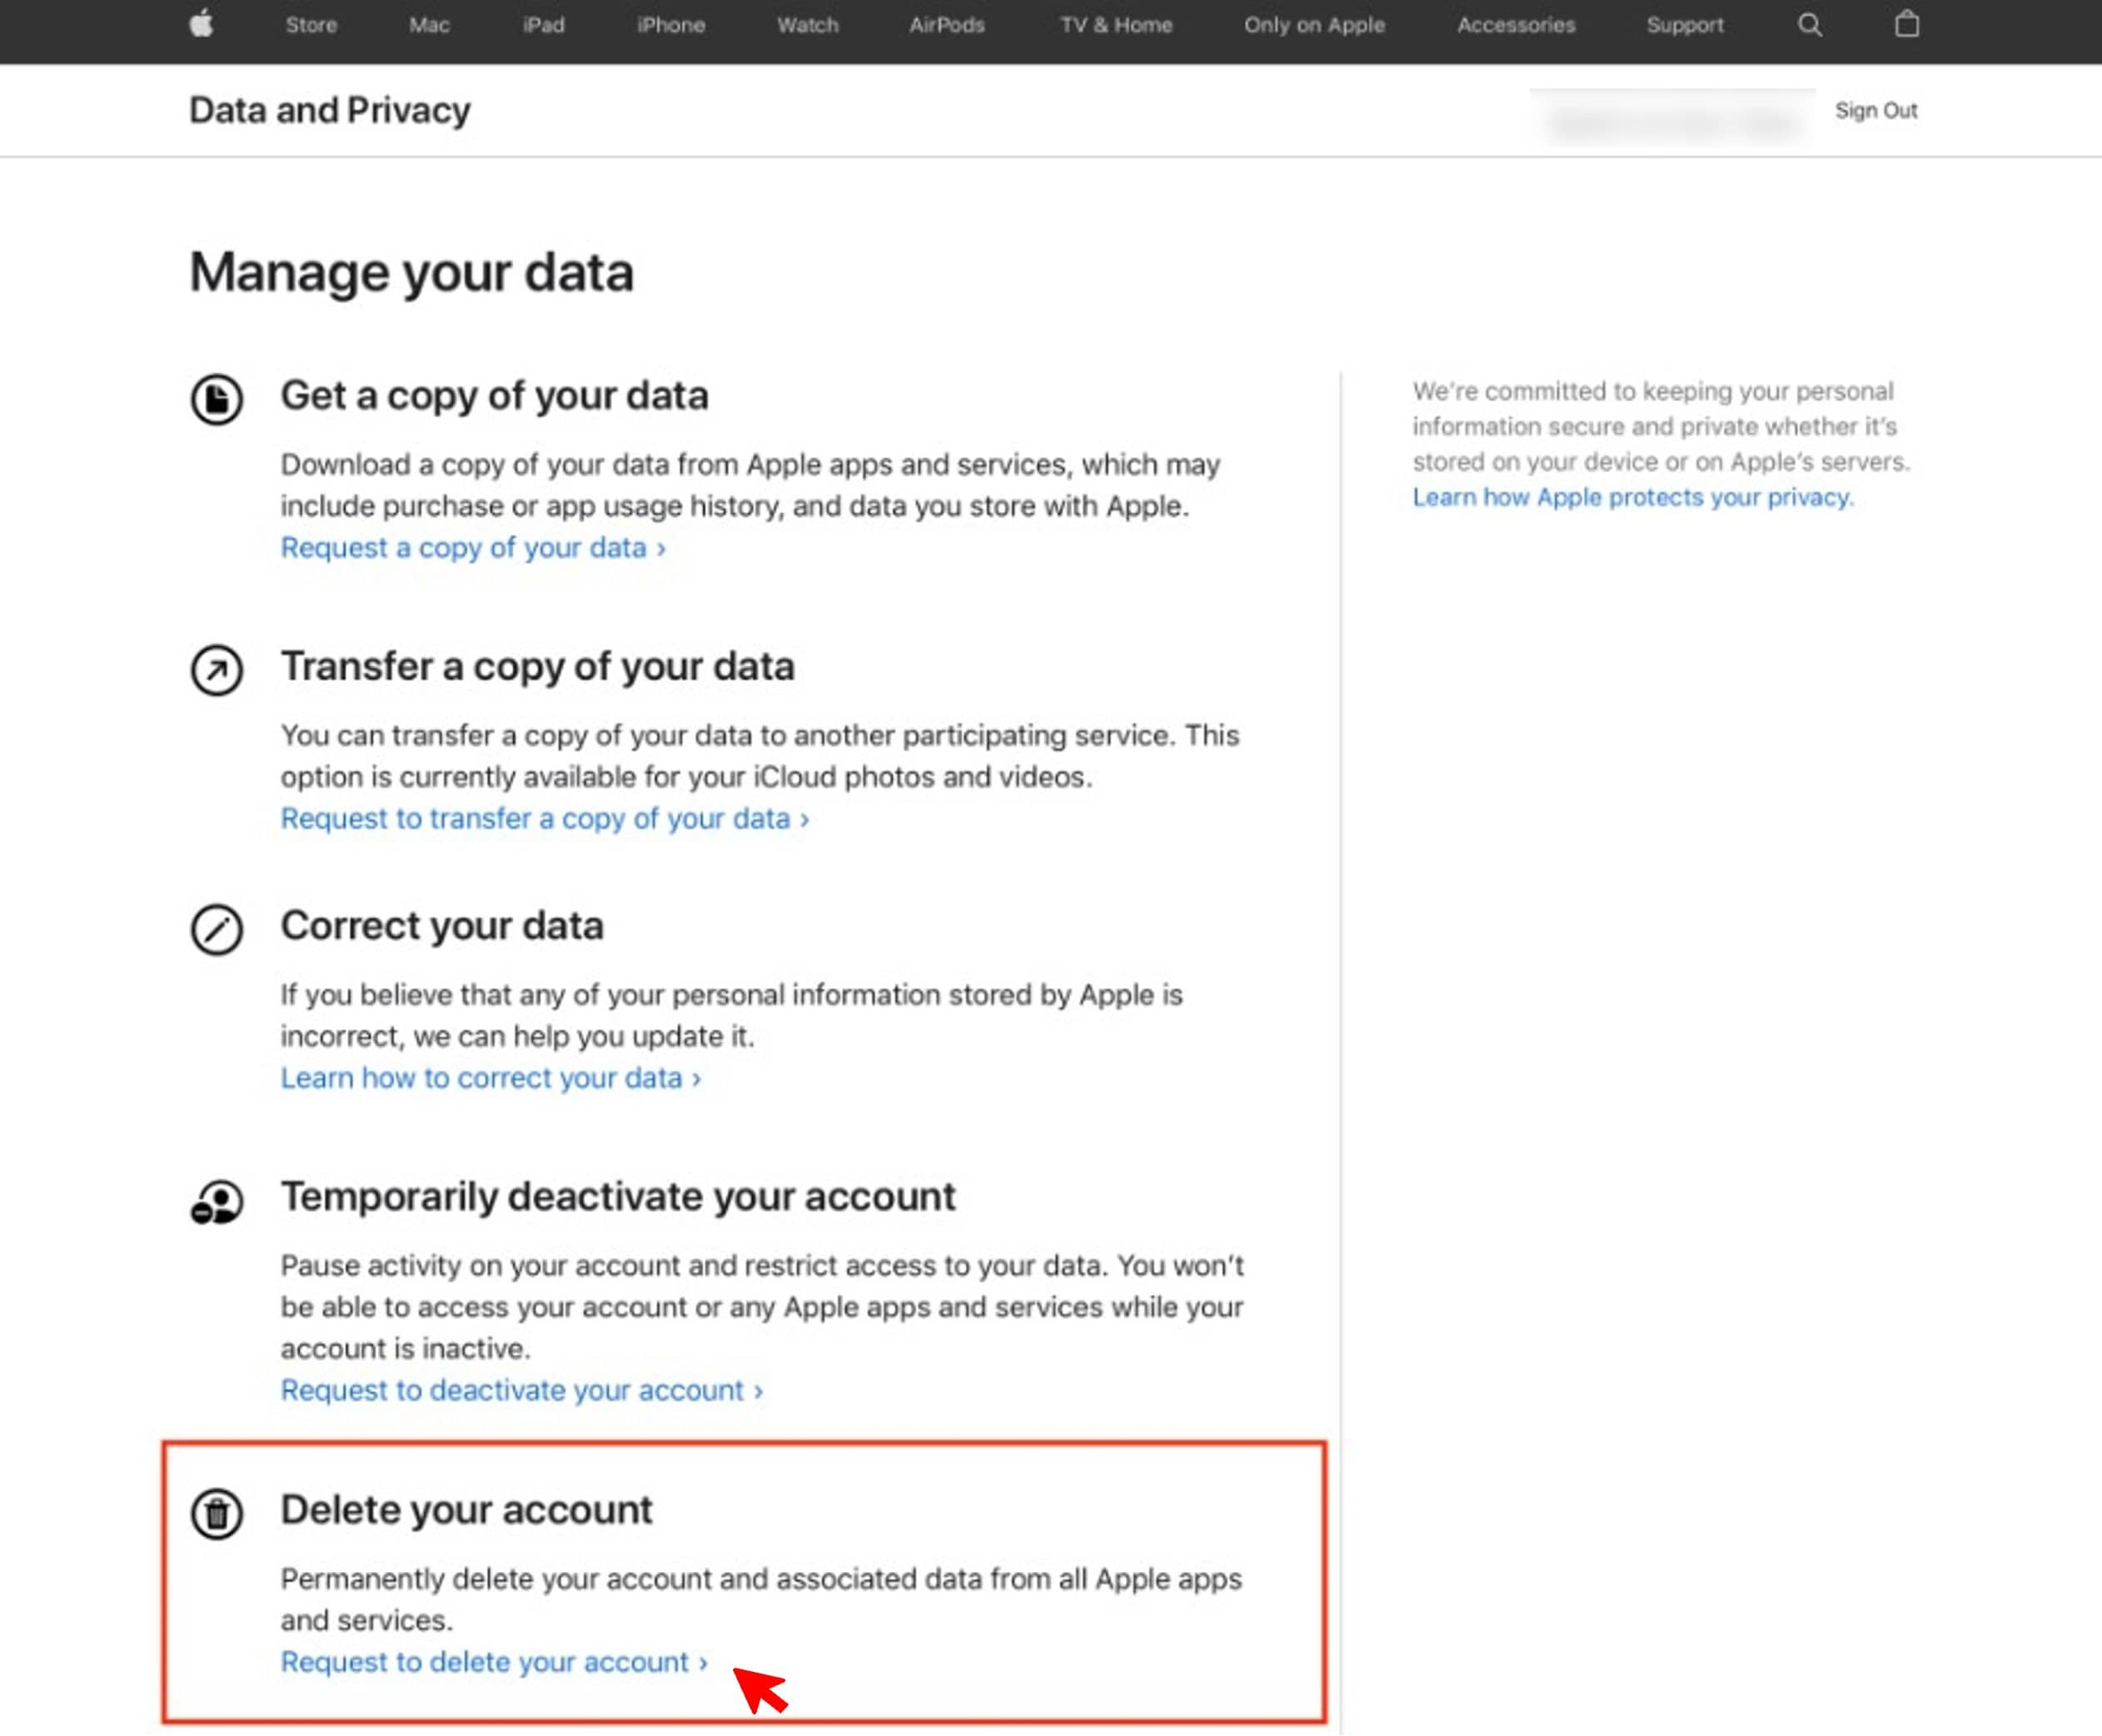
- Step 1: Open a web browser and visit Apple’s privacy website: privacy.apple.com. Sign in using the Apple ID associated with the iCloud account you want to delete.
- Step 2: From Delete your account section, click Request to delete your account.
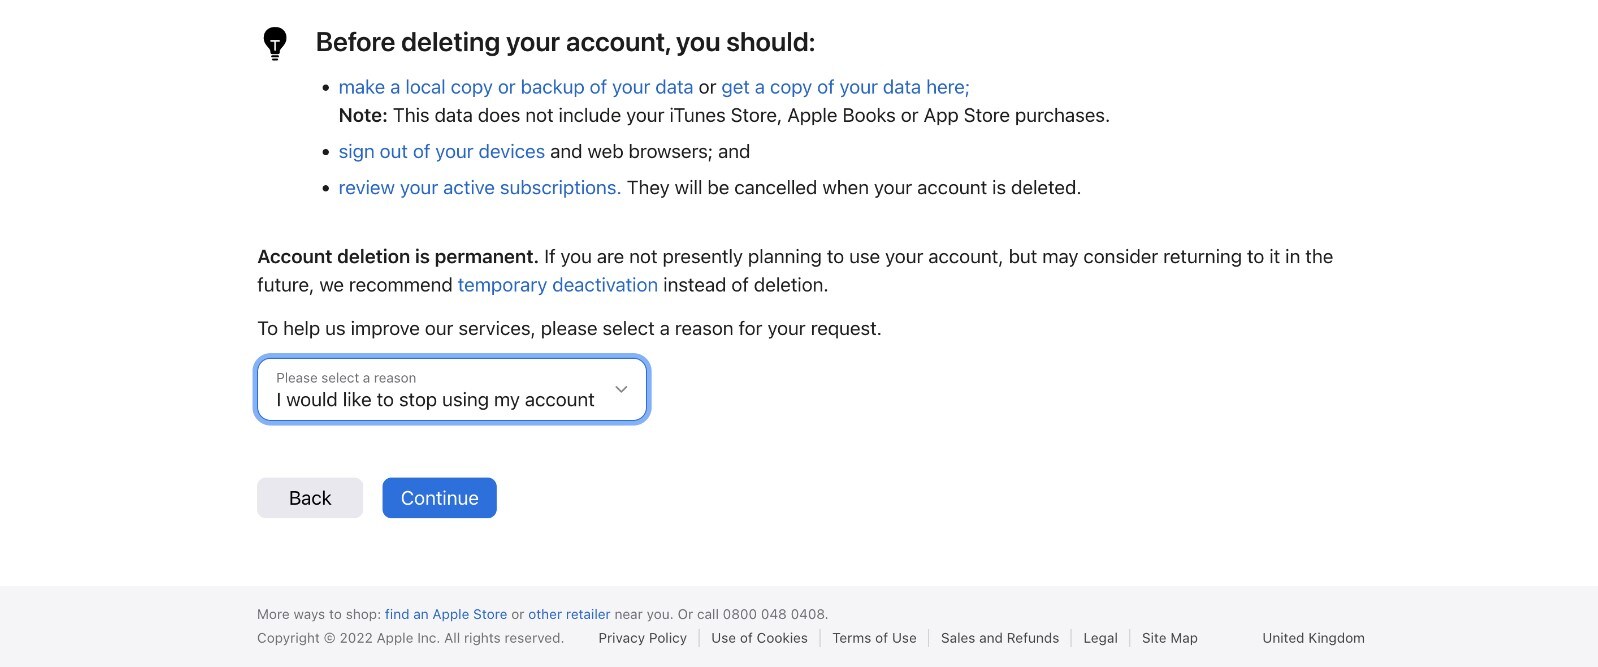
- Step 3: Choose a reason from the provided options in the drop-down menu for deleting your iCloud account, then click Continue.
- Step 4: Review the information displayed, ensuring you want to proceed with deleting your iCloud account. Click Continue.
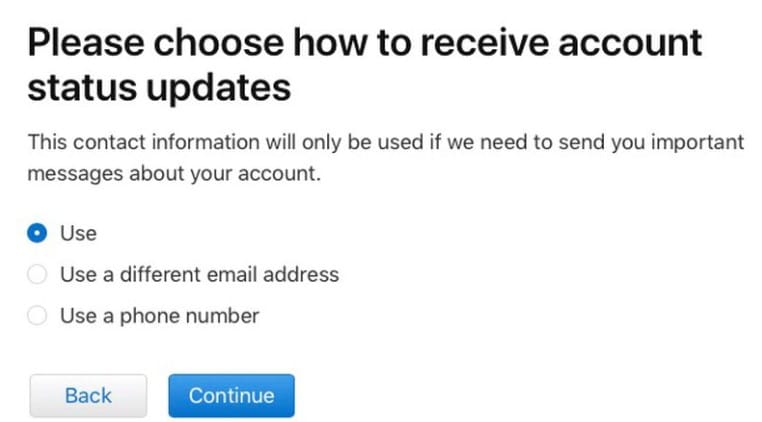
- Step 5: Choose where Apple can send you updates regarding your deletion request. Click Continue.
- Step 6: Follow the instructions provided to verify your identity. It may involve entering a code sent to your trusted device or answering security questions.

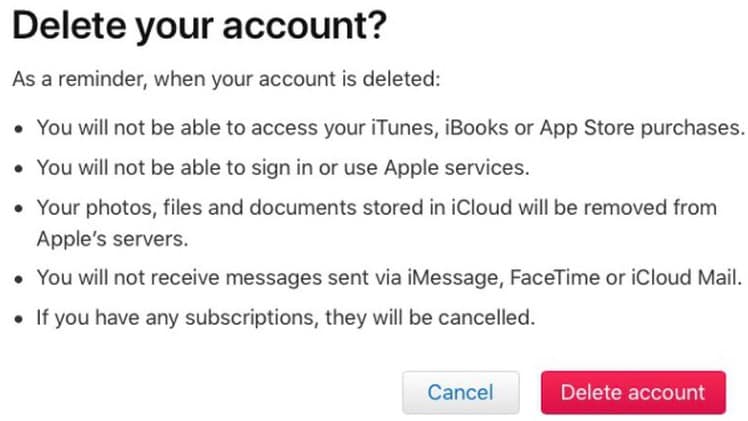
- Step 7: Review the summary of your deletion request, ensuring all details are accurate. Next, click Delete Account to finalize the deletion process.
Part 4: How To Remove an iCloud Account Without a Password?
You’re not alone if you’ve forgotten your Apple ID password or bought a used iPhone with the previous owner’s Apple ID still on it. Many people find themselves in this situation, and it can be frustrating not being able to remove the iCloud account without the password. Fortunately, there is a way to do this using Dr. Fone’s iOS Screen Unlock tool:
- Compatible with all versions of iOS, including the latest iOS 17.
- Unlock different iPhone locks, such as screen locks and SIM locks.
- Bypass iCloud Activation lock
- Remove Apple ID even if the iOS device has enabled Find My service
Here’s a step-by-step guide on how to use Dr.Fone to remove an iCloud account without a password:
Step 1: Download and install Dr.Fone on your desktop.
Step 2: Launch the software and go to My Device. Follow the in-app instructions to connect your Apple iPhone 12 Pro to your computer using a USB cable.
Image name: how-to-delete-icloud-account-13.png
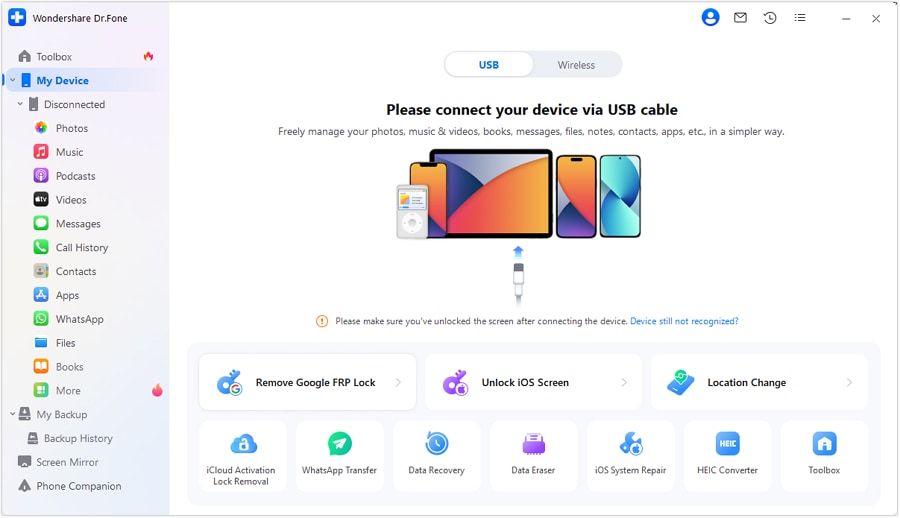
- Step 3: Go to Toolbox from the left navigation pane and select Screen Unlock > iOS.

- Step 4: Select Remove AppleID on the next window.

- Step 5: Click Unlock Now to proceed.

Note:
If you continue to “remove iCloud account“, this will erase all data from your Apple iPhone 12 Pro.
- Step 6: Click Yes if you have set up a screen lock.

- Step 7: Click Yes if you have already enabled Two-Factor Authentication on your Apple iPhone 12 Pro.

- Step 8: Follow the on-screen instructions to put your device into Recovery Mode.

- Step 9: Dr.Fone will recognize your device in the Device Model. Choose an option from the System Version drop-down list and click Start.

- Step 10: The latest iOS firmware is being downloaded.

- Step 11: Click Unlock Now to proceed.

- Step 12: Enter the code given in the dialogue box and click Unlock to continue.

- Step 13: Dr.Fone will then begin removing the iCloud account. Do not disconnect or use your device while the process is ongoing to avoid device issues.

- Step 14: To finalize the Apple ID removal process, please check your device and click Done once you’ve verified it.

Part 5: How To Remove an iCloud Account Without Deleting an Apple ID Account?
Deciding to permanently “delete iCloud account“ or Apple ID is a significant step. If you’re unsure about this irreversible action, consider deactivating your account. Deactivating your Apple ID temporarily suspends it. However, this feature may depend on your location.
Once you deactivate your Apple ID, you can no longer use it to sign into any Apple services, including iCloud, the App Store, iTunes, Apple Books, FaceTime, and Apple Pay. Even so, deactivating your Apple ID does not delete your account. You can reactivate your account anytime to regain access to all your Apple services and data.
Here’s how to temporarily deactivate your Apple ID account:
- Step 1: Go to Apple’s Data and Privacy website. Sign in using your Apple ID.
- Step 2: Scroll down to the Temporarily deactivate your account section and click Request to deactivate your account.
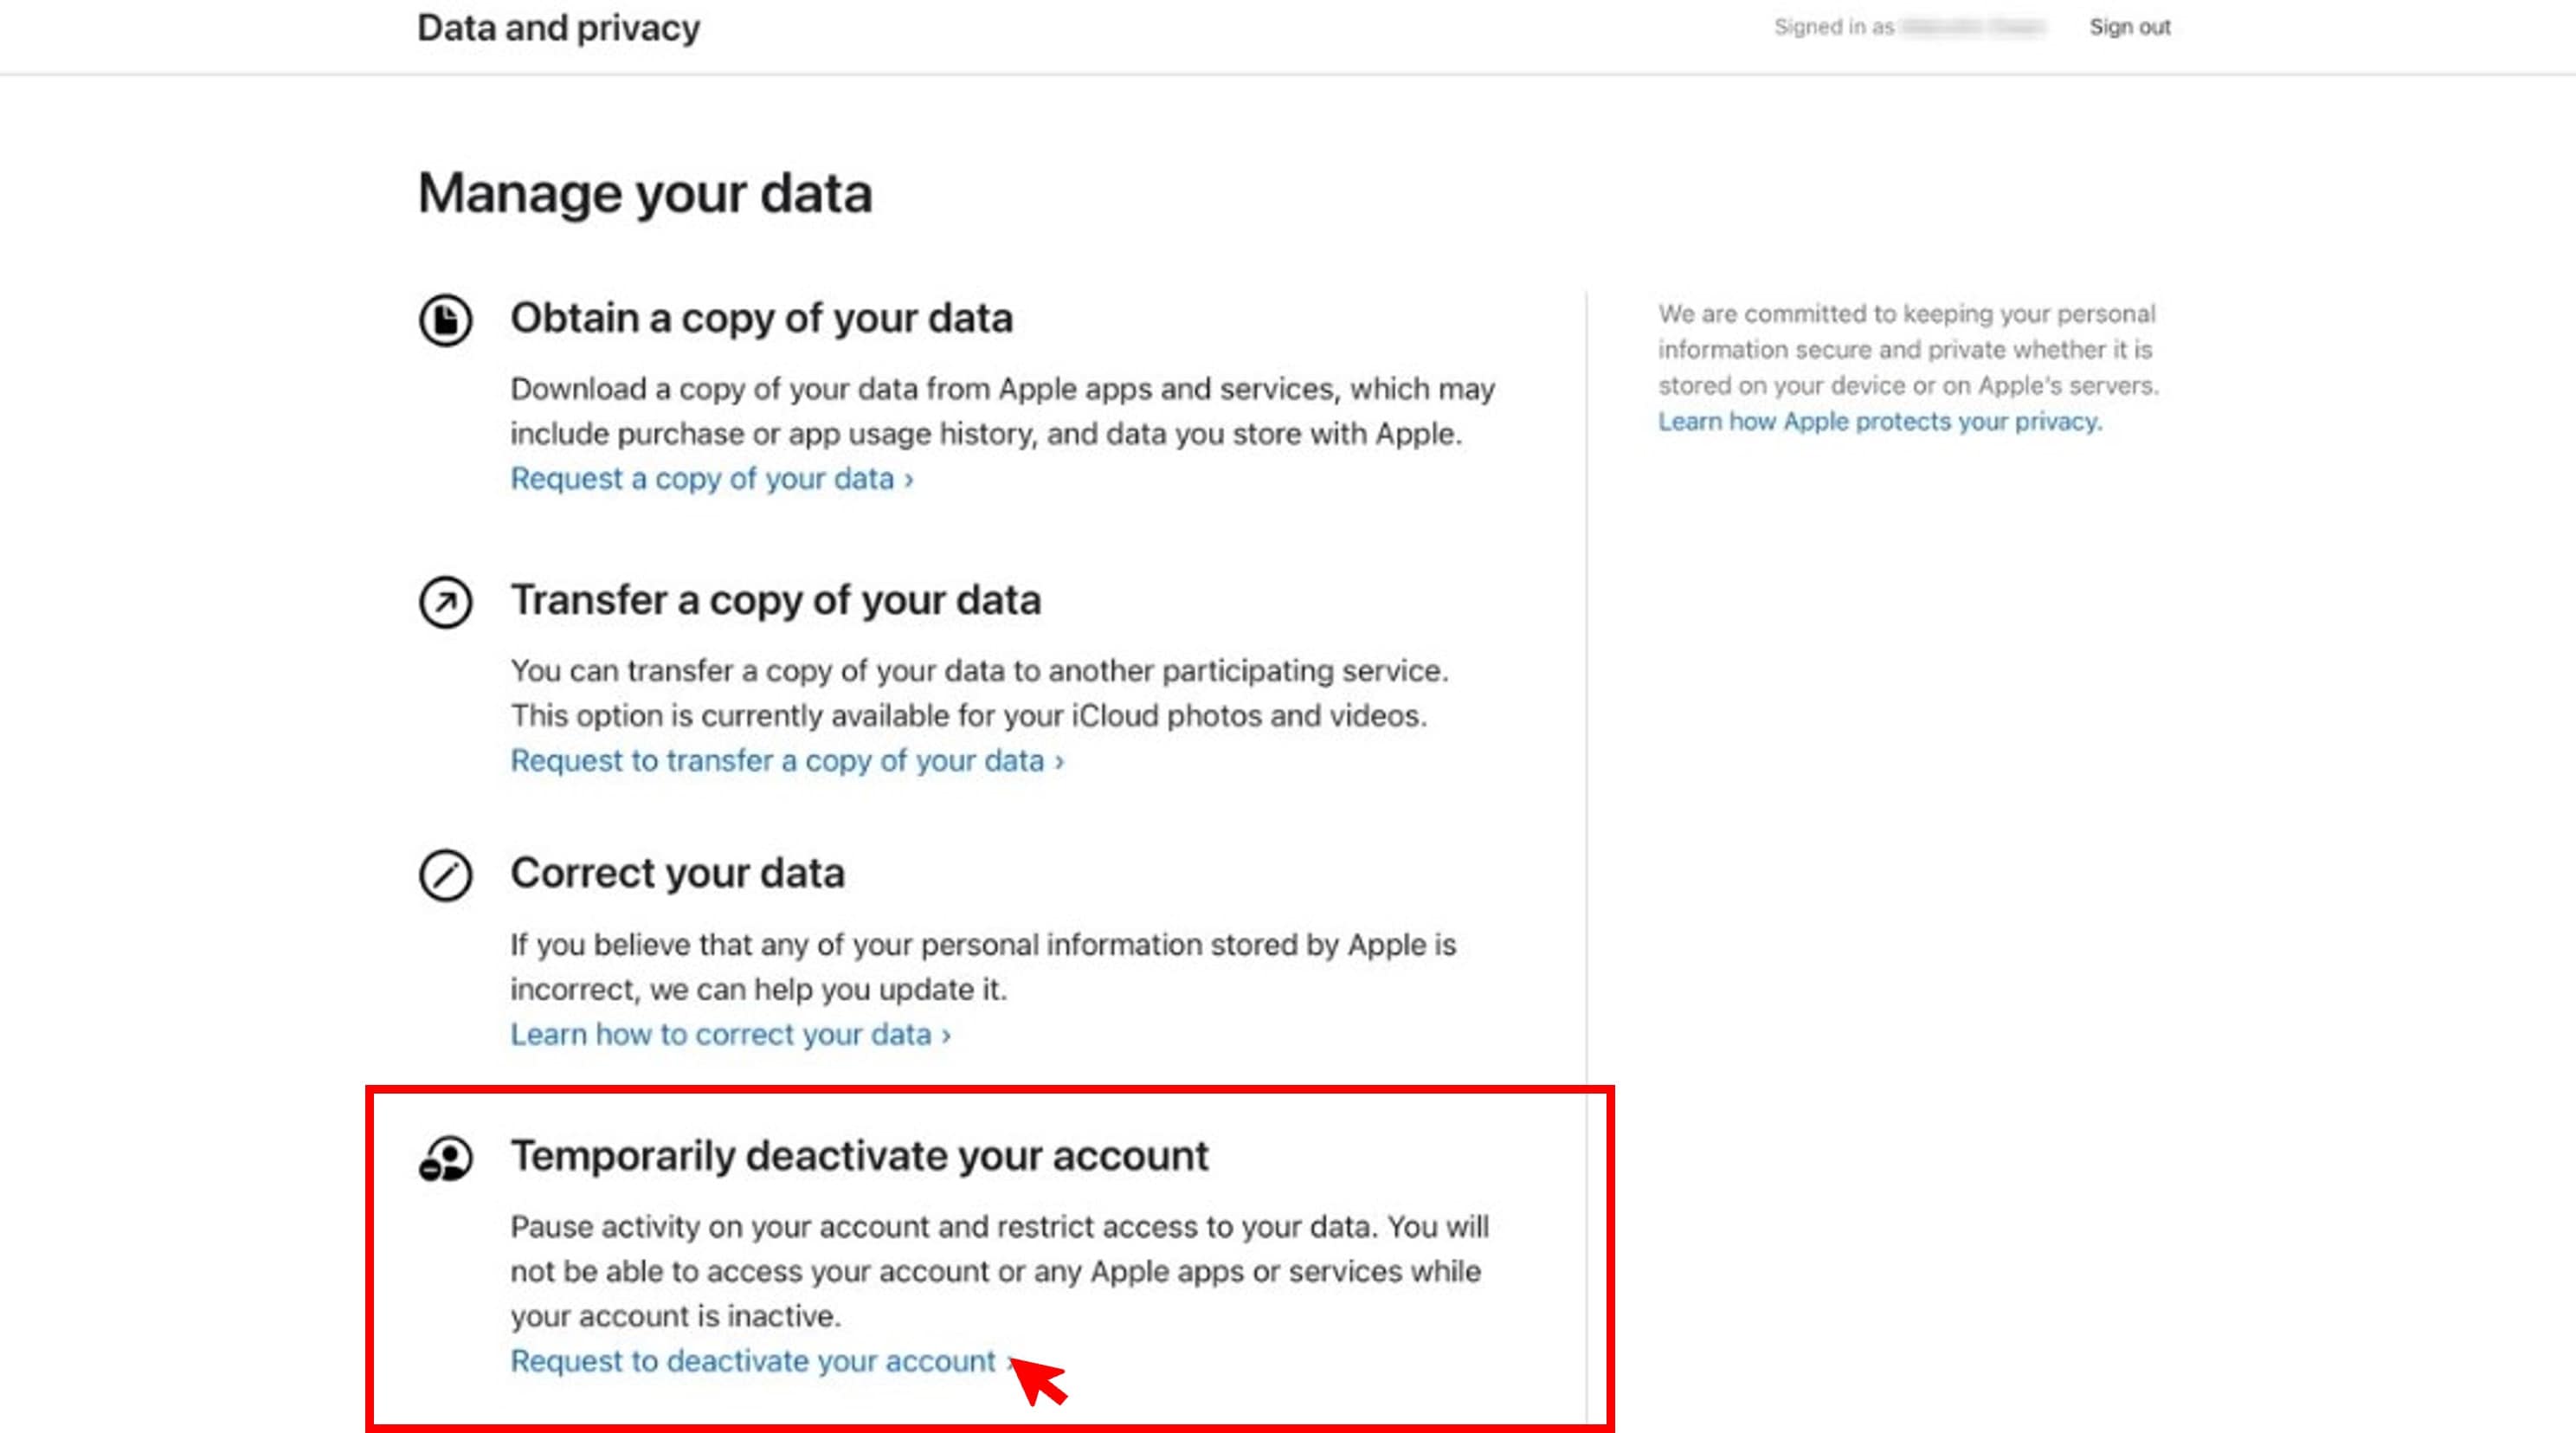
- Step 3: Select a reason for deactivating your account from the drop-down menu, then click Continue.
- Step 4: Review the information and follow the on-screen instructions to complete deactivation.
Note:
Keep the unique alphanumeric access code you’ll receive. You’ll need it to reactivate your Apple ID account.
More Article About iCloud Account:
Ways to Restore from iCloud Backup Without Reset
3 Ways to Recover iCloud Password
iOS 16: Best Ways to Bypass iCloud Activation Lock on iPhone/iPad
Conclusion
As you’ve learned, deleting an iCloud account is a permanent decision you cannot reverse. Once deleted, your account and all associated data will be permanently erased from Apple’s servers. Thus, it’s crucial to back up your data before proceeding.
Apps like Dr.Fone provide a comprehensive solution for backing up your data and removing an iCloud account without a password. Its user-friendly interface and streamlined processes make it an ideal choice for those seeking a quick and hassle-free experience. Whether you’re looking for an answer on “how to delete iCloud account“ or “remove iCloud account,” Dr.Fone is the ultimate tool to guide you through the process.
Top-Notch Solutions for Disabled Apple ID On Apple iPhone 12 Pro: Making It Possible
The Apple ID serves as the cornerstone of an iOS user’s digital identity. It grants access to a multitude of essential services and applications. This unique identifier is crucial for accessing the App Store, iTunes, iCloud, and other Apple services. However, the security of this pivotal account is paramount. Any security breaches or suspicious activities can prompt Apple ID to be disabled.
To avoid the potential consequences of a disabled Apple ID, it is imperative to explore effective solutions. This guide seeks to furnish users with a range of excellent strategies to address the issue at hand. So, if you are wondering why is my Apple ID disabled, continue to read the article.
Part 1. Discussing the Reasons for Apple ID Getting Disabled
Wondering why your Apple ID has been disabled? Experiencing intense frustration is not uncommon in this scenario. Nonetheless, understanding the potential triggers behind this issue is crucial. For Apple users, learning the factors leading to the Apple ID disabled problem is essential. The following are some typical reasons that can account for this predicament:
1. Security Questions
Failing to answer security questions accurately during the account recovery process can trigger Apple’s security protocols. It can lead to the temporary or permanent disabling of the Apple ID. Inaccurate or forgotten responses to these critical security measures can raise red flags. This eventually results in restricted access to the account.
2. Unauthorized Access Attempts
Apple’s strict security measures are designed to identify and prevent unauthorized access attempts. If the system detects unusual login activities or repeated failed login attempts, it may automatically disable the ID. Moreover, it is done to protect the user’s personal information and sensitive data.
3. Suspicious Account Activities
Any suspicious activities associated with the Apple ID can prompt Apple’s security algorithms to disable the ID. These include unusual purchase patterns, unauthorized transactions, or reports of account misuse. Furthermore, it usually results in temporary disabling as a precautionary measure.
4. Breach of Terms of Service
Not adhering to Apple’s terms and conditions may result in the prompt Apple ID being disabled. Examples include engaging in fraudulent activities or using unauthorized software or tools. In addition, manipulating Apple’s services or violating the company’s usage policies can also cause disablement. It is often accompanied by a permanent suspension from Apple’s ecosystem.
5. Unresolved Billing Issues
Unresolved billing disputes or outstanding payment issues can trigger the disabled problem. Moreover, declined transactions linked to the Apple ID can also be a cause. It restricts the user’s access to various Apple services until the payment concerns are rectified.
Part 2. Reset the Password: Solve Apple ID Disabled Issues
With Apple ID disabled, one of its primary solutions involves resetting the password. Fortunately, this can be achieved directly from an iOS device or a Mac. Users are offered convenient choices to regain authority over their accounts quickly. Here, you’ll find detailed, sequential instructions for each approach:
Resetting Password From iOS Device
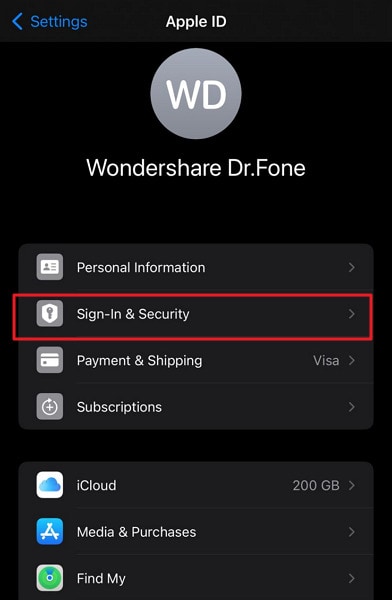
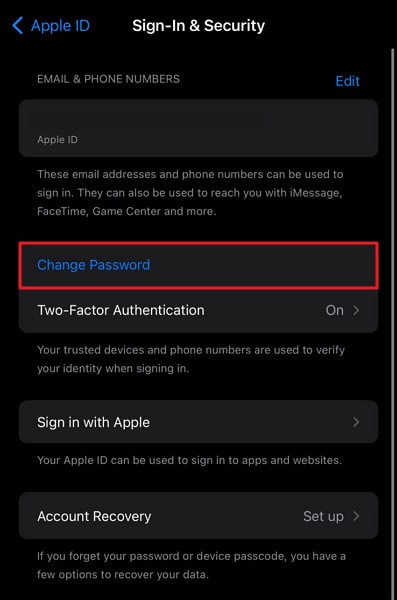
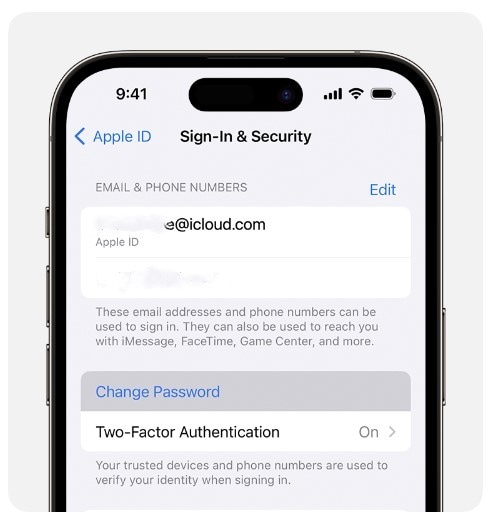
- Step 1: To access the Settings app on your iOS device, locate and open the application with the “Gear” icon. Once inside, select your name and proceed to the subsequent screen, where you should tap “Sign-In & Security.”
- Step 2: Now, tap the “Change Password” option and follow it by entering your iOS device passcode. Then, enter and confirm the new password and press “Change Password” to finalize it.
Resetting Password From Mac
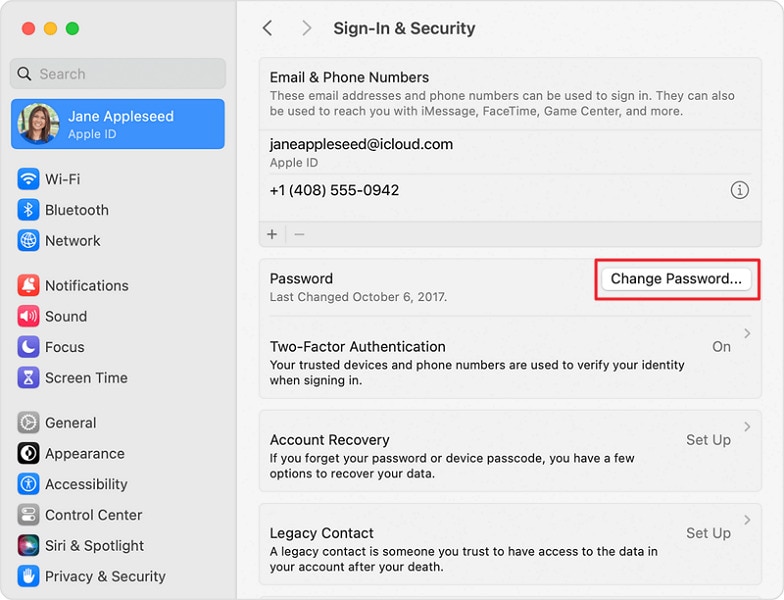
- Step 1: On your MacBook, navigate to the “Apple” menu from the top left side and choose the “System Settings” option. Next, tap on your name and press “Sign-In & Security” on the following screen.
- Step 2: Move to the “Password” option and click “Change Password.” Now, follow the on-screen prompts to complete the password resetting process by providing your MacBook passcode.
Part 3. Use Apple Support App: Solve Apple ID Disabled Issues
If you lack access to a dependable device for resetting your password, there’s no cause for concern. Apple provides to reset your Apple ID password using an alternative device. This can be accomplished through the official Apple Support app. The following procedures offer a thorough walkthrough:
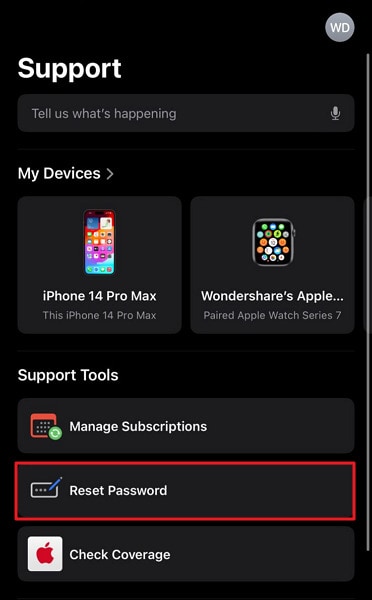
- Step 1: On a device you’ve borrowed, download the official Apple Support app and launch it. Scroll down within the app to “Support Tools” and select “Reset Password.”
Image name: fix-apple-id-disabled-5.jpg
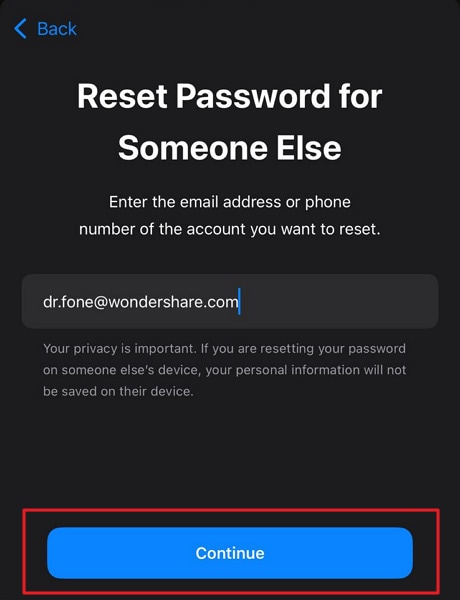
- Step 2: Following this, choose “Help Someone Else,” input your Apple ID, and tap “Continue.” Follow the on-screen prompts to complete the password reset process.
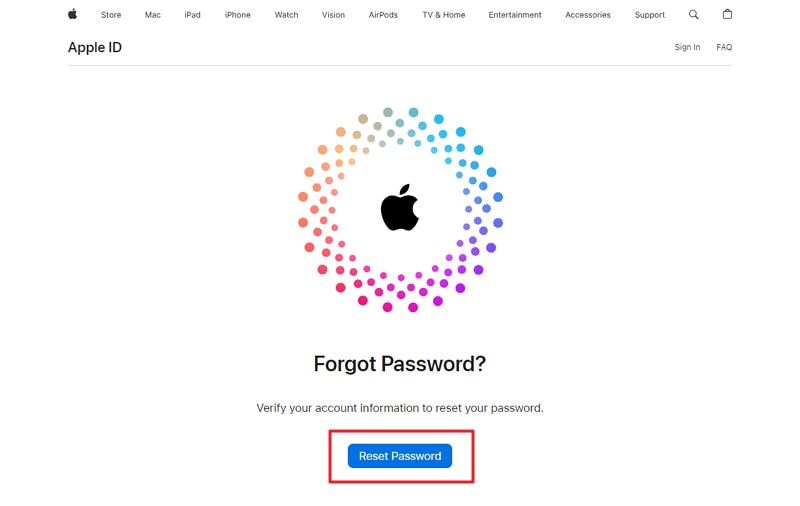
Part 4. Using iForgot Website: Solve Apple ID Disabled Issues
In instances where conventional methods fail, using the iForgot website can offer an alternative route. The platform provides an extensive range of tools and resources. It is tailored to aid users in the process of resetting their Apple ID credentials. Follow these step-by-step instructions to use the iForgot website effectively to fix the “Why is My Apple ID Disabled” problem:
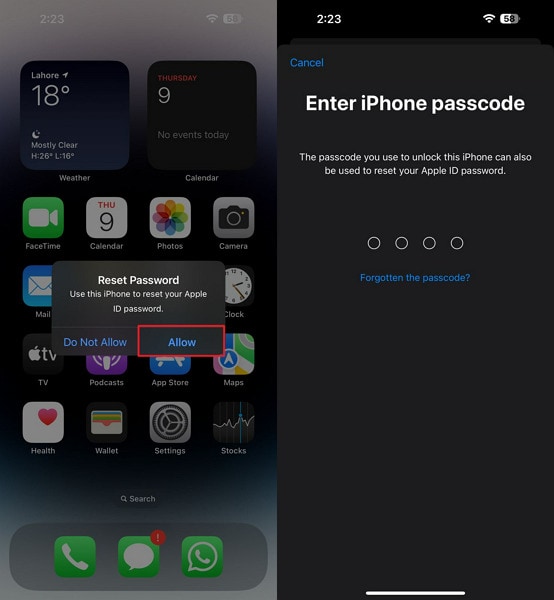
- Step 1: Launch a web browser, visit iforgot.apple.com, and select the “Reset Password” option. It will give you access to the Apple ID password reset page. Here, provide your Apple ID, usually your email address linked to your Apple account, and proceed by clicking “Continue.”
- Step 2: On the next screen, Apple will inform you that they have sent a confirmation message to your trusted devices for resetting the password. Tap “Allow” on one of your trusted devices and provide your iDevice passcode to reset the Apple ID password.
Part 5. Wondershare Dr.Fone - Screen Unlock (iOS): A Comprehensive Solution To Solve Apple ID Disabled Issues
No need to worry if you’re experiencing difficulties accessing iCloud and other Apple services due to a forgotten Apple ID password. Wondershare Dr.Fone can bypass the Apple ID lock completely. This tool allows users to regain access to their iCloud services and other Apple ID features. Otherwise, your Apple ID would lose its functionality within your iOS devices.
Furthermore, this capability of Wondershare Dr.Fone remains effective even if the Find My iPhone feature is activated on the Apple iPhone 12 Pro device. This tool can also bypass the Screen Time Passcode if you have forgotten your password. By utilizing this feature, you will be able to resolve your disabled Apple ID issue.
Dr.Fone - Screen Unlock (iOS)
Unlock iPhone/iPad Lock Screen Without Hassle.
- Simple, click-through, process.
- Unlock screen passwords from all iPhone and iPad.
- No tech knowledge required, everybody can handle it.
- Supports the latest iOS version fully!


4,395,217 people have downloaded it
Key Features of Wondershare Dr.Fone
- Wondershare Dr.Fone allows users to unlock their iDevices screen, which enables them to regain access to their devices.
- You can also use this robust iPhone unlock tool to remove the SIM carrier lock to use your device internationally.
- This iDevice screen unlock software provides multiple tools like data eraser, data recovery, phone transfer, WhatsApp transfer, system repair, etc.
Instructions Involved To Solve Apple ID Disabled Issues via Wondershare Dr.Fone
Wondershare Dr.Fone is specially designed for users with various technical experiences. It presents an easy-to-follow guide with its user-friendly interface to assist its users in every way possible. Here is how to Solve Apple ID disabled issues via Wondershare Dr.Fone - Screen Unlock (iOS):
- Step 1. Access the Robust Screen Unlock Tool
You will have to start by opening Wondershare Dr.Fone on your system and accessing the “Toolbox” section present in the left panel. Then, continue with the “Screen Unlock” feature and select the “iOS” device. Proceed with the “Remove Apple ID” option among different options from the next window.
- Step 2. Begin Unlocking the Apple ID
After connecting your iDevice to the system, you need to move forward with the “Unlock Now” button. Before moving forward, it’s essential to ensure you have Screen Lock and Two-Factor Authentication enabled on your Apple iPhone 12 Pro. After that confirmation, carry on with the on-screen instructions.
- Step 3. Put iPhone in the Recovery Mode and Recognize the Model
You need to put your Apple iPhone 12 Pro in Recovery Mode by following the on-screen instructions to initiate the Apple ID unlocking process. The software will recognize the “Device Model” in a self-controlling way. After that, you will have to go ahead with the “System Version” selection and hit the “Start” button.
- Step 4. Download the Firmware and Provide Confirmation
The relevant firmware will start downloading, and you will have to proceed with the “Unlock Now” button after the downloading. You will have to enter a code for confirmation, and after that, you can view the removal progress. Move forward by hitting the “Done” button if the Apple ID gets unlocked.
Conclusion
In conclusion, this article aims to address the critical issue of Apple ID disabled. It can significantly disrupt the smooth operation of iOS devices. We have offered a thorough examination of the different elements that may result in the deactivation of an Apple ID. Moreover, we have introduced several effective measures to assist you in addressing this matter. It allows you to regain access to your Apple ID.
Furthermore, the article has highlighted the comprehensive capabilities of Wondershare Dr.Fone. It is for users encountering persistent challenges in resolving their disabled Apple ID. Moreover, Dr.Fone is a robust and reliable solution that can offer a more in-depth remedy to the problem.
How To Erase an Apple iPhone 12 Pro Without Apple ID Password?
Have you ever wondered what happens when you erase the content of your Apple iPhone 12 Pro storage? Erasing an iPhone means restoring it to its factory settings to install the latest iOS version. It also permanently removes all your data, including photos, videos, contacts, apps, and other information stored on the Apple iPhone 12 Pro device.
This process is often necessary when you sell or give away your Apple iPhone 12 Pro to ensure your personal information remains secure. But, you may encounter a situation where you should learn how to erase an iPhone without an Apple ID. While this may seem challenging, you can use a few methods to achieve this goal. This article will show you how to do it with or without an Apple ID password.

Part 1: A Checklist on What To Do Before Erasing an iPhone
If you’re looking at how to erase an iPhone without an Apple ID or account password, you’ve come to the right place. Before you begin, preparing your device and ensuring you have all the necessary information is crucial. Here’s a checklist of what to do before erasing your Apple iPhone 12 Pro:
Backup Your Apple iPhone 12 Pro
You can back up to iCloud or use Finder on macOS 10.15 or later. Remember that iCloud backups are stored on Apple’s servers and always encrypts backups. On the other hand, computer backups are stored on your computer’s hard drive and require a connection to the backup computer. Consider what your needs and preferences are when choosing between these two backup options.

Prepare Your Apple iPhone 12 Pro Passcode
You’ll need your Apple iPhone 12 Pro passcode to erase an iPhone. If you’ve forgotten your passcode, reset it using recovery mode.
Ready Your Apple ID Password
You may be asked to provide your Apple ID password to disable the Find My iPhone function and remove the Apple iPhone 12 Pro device from your account. Have it handy to avoid any delays. It’s necessary for security verification during the erasure process.
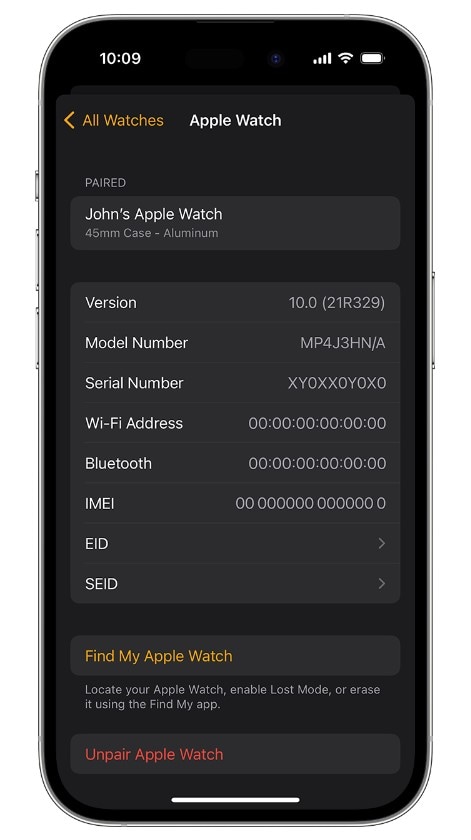
Unpair Apple Watch
If you own an Apple Watch, unpair it from your Apple iPhone 12 Pro. It ensures a smooth disconnection and prevents complications when erasing the Apple iPhone 12 Pro device.
Cancel Your AppleCare Plan
If you have an active AppleCare plan for your Apple iPhone 12 Pro, cancel it on your Apple iPhone 12 Pro before erasing the Apple iPhone 12 Pro device. You can cancel your AppleCare plan by phone by calling AppleCare customer support. It will prevent any unnecessary charges after the erasing process.

Sign Out of iCloud
If your Apple iPhone 12 Pro has iOS 10.3 or later, open the Settings app, then tap on your name at the top. Next, scroll down, tap Sign Out, enter your Apple ID password, and tap Turn Off.
Remove Your Apple iPhone 12 Pro From Your List of Trusted Devices
Remove your old device from your list of trusted devices in your Apple ID settings for added security. This measure strengthens the defense against unauthorized access to your data.
Part 2: How To Erase iPhone Without Apple ID Password via Settings?
Erasing an iPhone and restoring it to factory settings is a straightforward process you can do in a few steps. Whether you’re preparing to sell or gift your device or troubleshooting persistent software issues, erasing your Apple iPhone 12 Pro contents can enhance its performance. The process is easy if you have your Apple ID password readily available.
However, if you’ve forgotten your Apple ID password, don’t fret. Follow the guide below to reset your Apple ID password and erase all content and settings on your Apple iPhone 12 Pro:
- Step 1: Open the Settings application, then tap [name].
- Step 2: Go to Sign-In & Security > Change Password.
- Step 3: Follow the on-screen instructions to reset your Apple ID password.
- Step 4: Go to General > Reset from the Settings app, then tap Erase All Content and Settings.

- Step 5: Input your Apple ID password or your passcode when prompted.
- Step 6: Click Continue to confirm. Then, wait while the contents are being removed from your Apple iPhone 12 Pro device.
Part 3: How To Erase iPhone Without Apple ID Password on Computer?
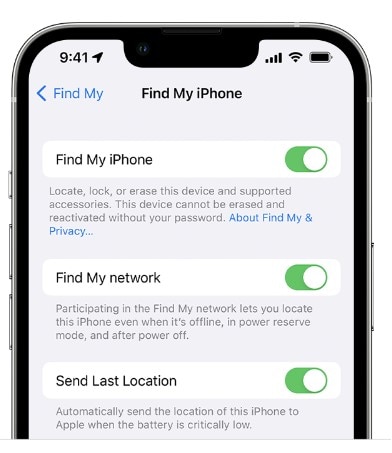
Activation lock is a security feature. It prevents anyone from activating an iPhone without your Apple ID password. If you try to factory reset your Apple iPhone 12 Pro without turning off Find My iPhone, the activation lock will be in place. It means you need to enter your Apple ID password to activate the Apple iPhone 12 Pro again. To turn it off, also ensure to turn off Find My on your device.
Go to Settings > [your name] > Find My or Find My iPhone to check.
If you want to erase an iPhone without Apple ID password on your computer, you can do so as long as you turn off the Find My. However, you’ll need to put your Apple iPhone 12 Pro into Recovery Mode first.
- Step 1: Turn off your Apple iPhone 12 Pro, then put it into Recovery Mode.
- For iPhone 8 or later: Press and hold the Side button.
- For iPhone 7 or iPhone 7 Plus: Press and hold the Volume Down button.
- For iPhone 6s or earlier: Press and hold the Home button.
- Step 2: Connect your Apple iPhone 12 Pro to the computer with the button held down.
- Step 3: Hold the buttons steadily until the Recovery Mode screen is visible.
Step 4: Switch on your Apple iPhone 12 Pro. Then, connect it to a Mac or Windows computer using a USB cable.
Step 5: When prompted, follow the on-screen instructions to enter your device passcode or click Trust This Computer.
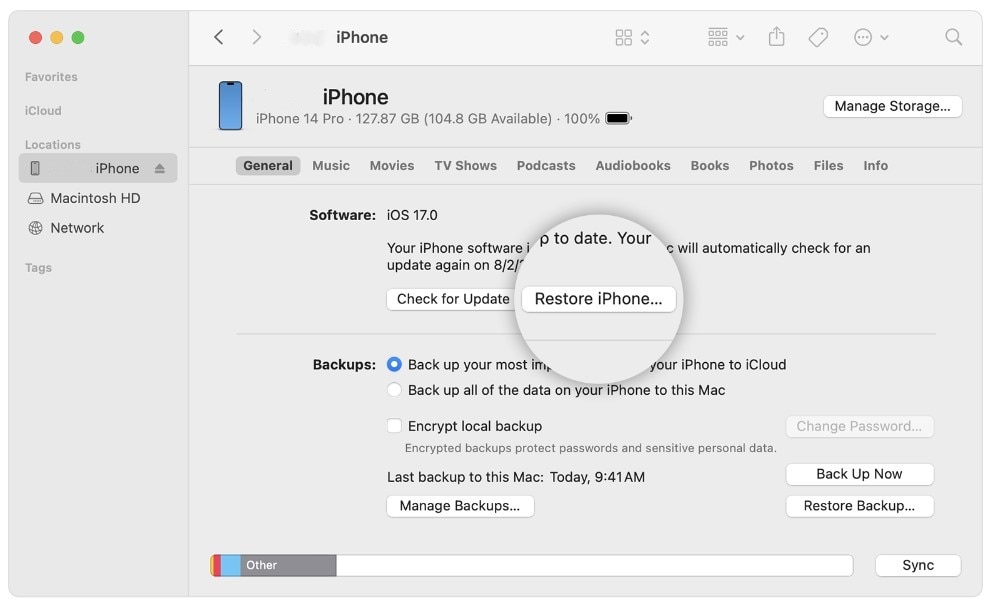
Step 6: Depending on your computer, open Finder or iTunes. Then, do either of the following:
For macOS 10.15 or later: Select your Apple iPhone 12 Pro under the Locationssection, then click Restore iPhone.
- For macOS 10.14 or earlier or Windows: Click the Apple iPhone 12 Pro in the top left window, click Summary, then click Restore iPhone.
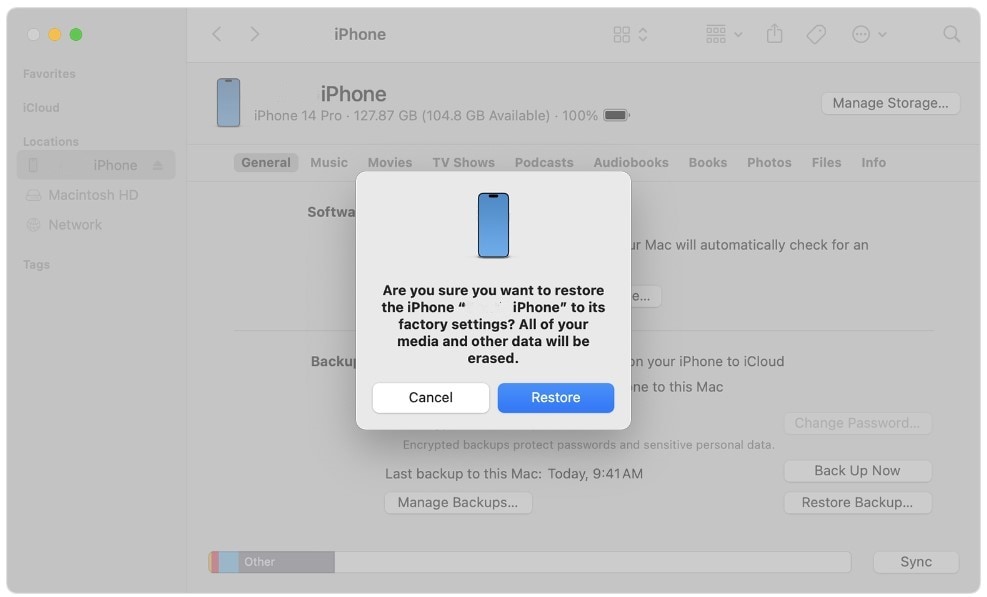
- Step 7: Click Restore in the dialogue box. iTunes or Finder will download your Apple iPhone 12 Pro’s latest iOS software and restore the Apple iPhone 12 Pro to its factory settings.
- Step 8: Once the restore is complete, the Apple iPhone 12 Pro will restart.
Part 4: Erase an iPhone Without Apple ID via Activation Lock Support Request
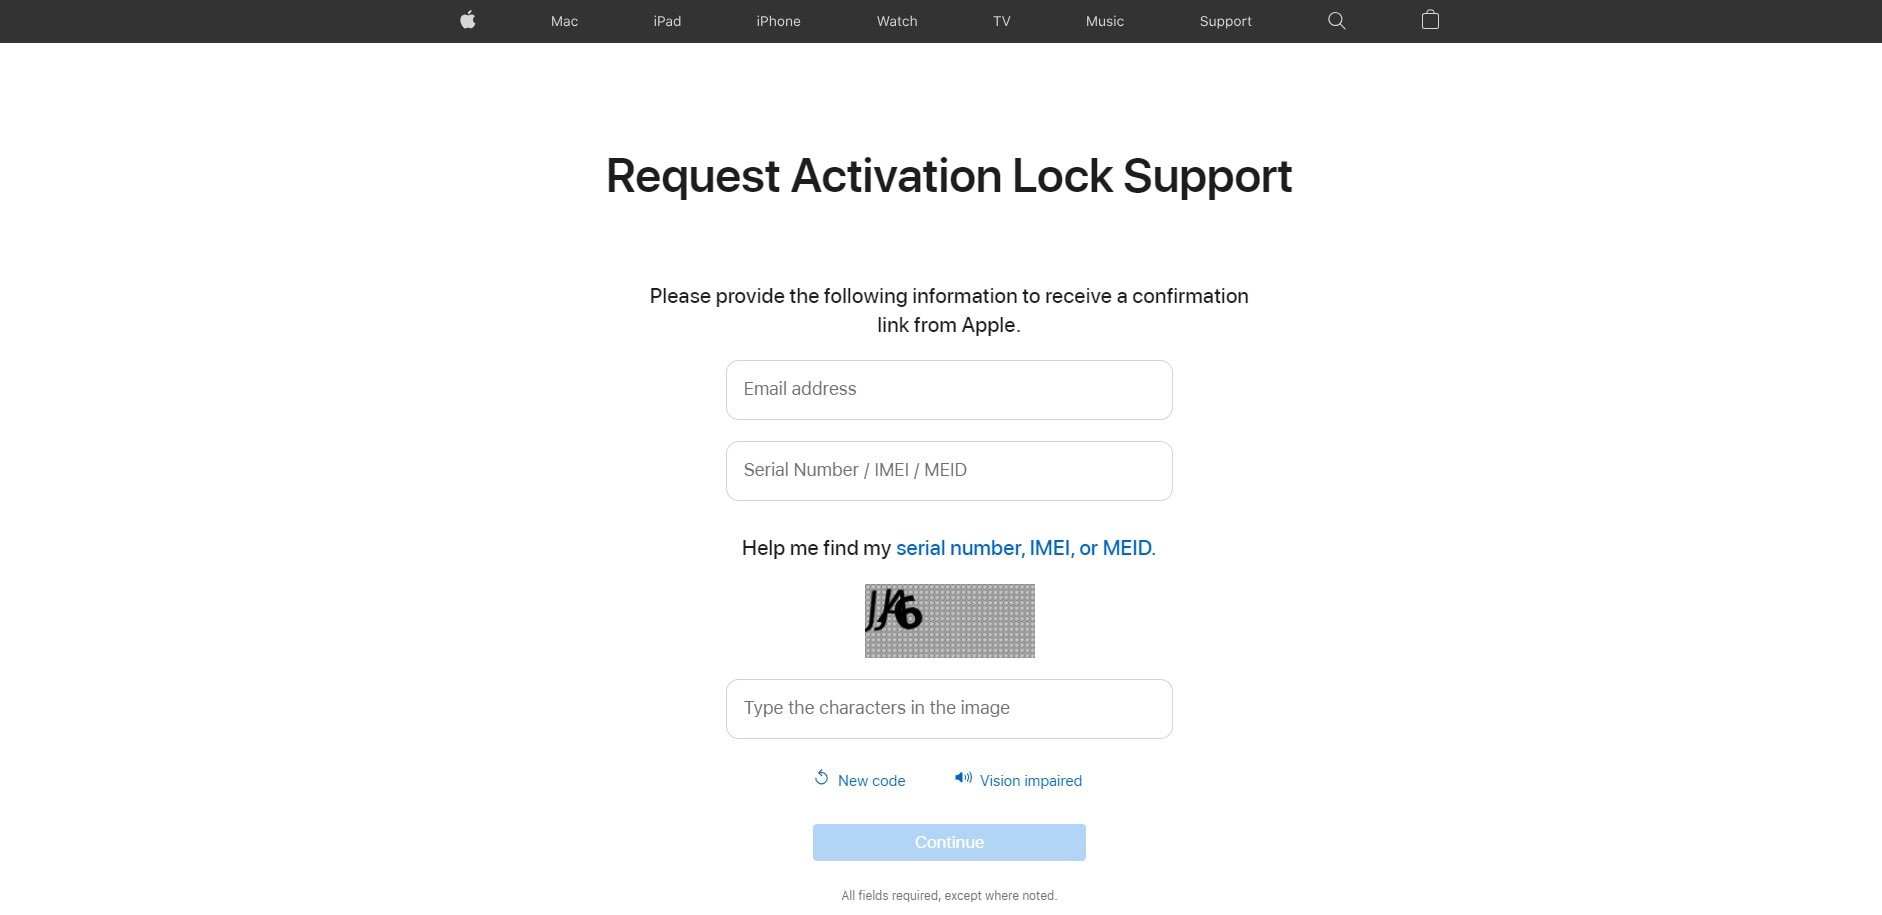
You can request to unlock Activation Lock support from Apple if your device is not in Lost Mode or if you need to erase an iPhone without an Apple ID password. To do this, you need to provide proof of purchase of the iPhone. It can be in the form of a receipt, invoice, or credit card statement.
The proof should show the serial number of the iPhone, IMEI, or MEID. Once Apple unlocks the Activation Lock on your Apple iPhone 12 Pro, your Apple iPhone 12 Pro contents will be permanently erased. Also, note that if you restore your Apple iPhone 12 Pro from a local backup, the Activation Lock will re-enable.
To start this request, follow these steps:
- Step 1: Head to Apple’s Activation Lock support page. (al-support.apple.com)
- Step 2: Scroll down the page, select the agreement checkbox, click Continue, and it will redirect you to a new page.

- Step 3: Enter your email address and other required information, then click Continue.
Part 5: How To Erase an iPhone Without an Apple ID Password in Minutes?
The time it takes to process an unlock Activation Lock support request can take days. If your device is erased as soon as possible, use the Wondershare Dr.Fone Screen Unlock tool. This third-party mobile solution can erase an iPhone without an Apple ID password, even if the Find My feature is enabled. Also, it can:
- Remove several iOS lock screens, such as passcode, Touch ID, and more.
- Remove the iCloud Activation Lock
- Bypass Apple ID from iPhone without a password
- Remove MDM restrictions
Dr.Fone Screen Unlock is a simple, easy-to-use tool compatible with the latest iOS models. Follow these steps to remove the Apple ID from your Apple iPhone 12 Pro and erase all its contents within minutes:
Step 1: Download and install Dr.Fone on your desktop. Launch the app and connect your Apple iPhone 12 Pro using a USB cable.
Step 2: From the Toolbox homepage, select Screen Unlock, then choose iOS.
- Step 3: Select Remove AppleID to delete iPhone contents, including the Apple ID.
- Step 4: The next screen shows the connected device. Click Unlock Now.
- Step 5: Click Yes to confirm you have set up a screen lock.
- Step 6: Click Yes to verify you have enabled two-factor authentication on your Apple iPhone 12 Pro.
- Step 7: Follow the in-app instructions to put your device in Recovery Mode.
- Step 8: Select an option from the System Version drop-down list, then click Start.
- Step 9: Wait while the iOS firmware downloads.
- Step 10: Once downloaded, click Unlock Now to proceed.
- Step 11: Enter the code in the dialogue box and click Unlock.
- Step 12: Keep your Apple iPhone 12 Pro connected to your computer while the process progresses.
- Step 13: Click Done and check that your Apple iPhone 12 Pro’s data and Apple ID have been removed.
Conclusion
It can be challenging to erase an iPhone without an Apple ID password, but it’s achievable by following the right steps. Remember to weigh the security implications and back up your data beforehand.
If you’re seeking a straightforward method on “how to erase an iPhone without Apple ID,” Dr.Fone Screen Unlock tool is a good solution. With its user-friendly interface and efficient operation, Dr.Fone simplifies the process, making it accessible to users of all technical levels. Don’t let a forgotten Apple ID password hinder your device’s functionality. Try Dr.Fone Screen Unlock and reclaim control of your Apple iPhone 12 Pro.
Also read:
- [New] Elevate Your Storytelling with Strategic Video Callouts
- [New] In 2024, Tailored Engagement Design Your YouTube Sign-Up Bar with an Animated Approach Using Filmora
- In 2024, How to Check Distance and Radius on Google Maps For your Apple iPhone 15 Plus | Dr.fone
- In 2024, How to Delete iCloud Account On Apple iPhone XR without Password?
- In 2024, How To Delete iCloud Account Remove Your Apple ID Permanently From Apple iPhone SE
- In 2024, How to Unlock Apple ID From your iPhone XS without Security Questions?
- In 2024, Premium Gopro Enhancements Guide
- In 2024, Top-Notch Solutions for Disabled Apple ID On iPhone 15 Making It Possible
- Insights Into AMD's Radeon XT Series: 7800, 7700
- Top Techniques for Streamlining Your Twitter Content Calendar
- Title: How To Delete iCloud Account Remove Your Apple ID Permanently From iPhone 12 Pro
- Author: Alma
- Created at : 2024-12-08 16:00:19
- Updated at : 2024-12-12 16:04:12
- Link: https://apple-account.techidaily.com/how-to-delete-icloud-account-remove-your-apple-id-permanently-from-iphone-12-pro-by-drfone-ios/
- License: This work is licensed under CC BY-NC-SA 4.0.