
How to Erase an Apple iPhone 12 without Apple ID?
How to Erase an Apple iPhone 12 without Apple ID?
Our generation is all about high-performance gadgets and, a phone is one of the most important of it all. But with the concept of a smartphone, things have changed. iPhone/iPad has emerged as an important fashion quotient for a long now.
We often end up buying second-hand iPhones/iPads or sell our old version of the phones/pads to an unknown person and buy a new version of other brands, like Samsung S22. At times, be it after-sale/purchase or old iPhone, or if you may have yourself forgotten the password to your Apple ID, we often come across a big challenge, and that is how to erase an iPhone without an Apple ID password. Well, if that’s the case with you, then you’ve reached the right place. We’re about to discuss the most effective ways to erase an iPhone without an Apple ID password. Let’s discover them.
Part 1. How to erase an iPhone without Apple ID and iTunes
When it comes to taking care of all your Apple iPhone 12 recovery solutions, Dr. Fone has effectively managed to make a mark in the field. Especially when it comes to erasing an iPhone without an Apple ID password, the Dr.Fone – Screen Unlock (iOS) can help you get it done without a hitch. Not only can you erase an iPhone without an Apple ID password, but you can also get the Apple ID/iCloud lock removed too with much ease. With over 5 million-plus users, the tool is the most recommended in the market, serving every customer to their content.
Key Features:
The key features of Dr.Fone – Screen Unlock (iOS) are –
- It can unlock an iPhone/iPad by erasing an iPhone without an Apple ID password.
- Even when your screen is damaged and you cannot enter a passcode, Dr. Fone – Screen Unlock (iOS) can effortlessly get it done.
- If the passcode is wrongly set by your kids or an unknown, this software can help unlock the same.
- Works efficiently with almost all iOS devices and supports even the latest iOS version 14.
Step by Step Tutorial:
Let’s get to understand how to erase an iPhone without an Apple ID password:
Step 1: Connecting the iPhone/iPad
The first thing to do is download and install the Dr.Fone – Screen Unlock (iOS) software on your computer/laptop. Before you move on to any other step, connect your affected iPhone/iPad to your computer or laptop with the help of a USB.

Step 2: Select the correct Mode.
After the installation is done completely, launch the tool and select the “Screen Unlock” option on the software’s home interface. A new screen interface will appear, you will have three different options. You need to select the “Unlock iOS Screen” option and, this will start the entire process of unlocking.

Step 3: Boot your device into Recovery/DFU Mode
You now have to boot your Apple iPhone 12 or iPad device into Recovery mode or DFU mode so that the software can recognize your device for further process. For your convenience, Dr. Fone Screen Unlock (iOS) has a built-in instruction facility that helps you to follow the steps.

Step 4: Confirm the information and download firmware
After a successful reboot into Recovery mode, the tool will automatically detect your device’s information and the most compatible iOS firmware. To start the process of downloading the firmware, you need to hit on “Start” button.

Step 5: Erase an iPhone without an Apple ID password.
Once the download is complete, you can get started with erasing an iPhone without an Apple ID password. Hit the “Unlock Now” button, and voila! In no time, you’ve successfully erased an iPhone without an Apple ID password.

Part 2. Erase an iPhone without Apple ID via iTunes
Sometimes your phone might ask for an Apple ID and password to confirm your authority. In such cases, you may get stuck as either you have forgotten the password to it, or you don’t remember the Apple ID in the first place. For that matter, where it needs immediate help, we have listed down a set of steps that can help you erase an iPhone without Apple ID via iTunes –
Step 1: Connect your Apple iPhone 12 to the computer with the help of a USB and then open your iTunes.
Step 2: The best way to start the process is to move your phone to recovery mode. For this, you need to:
In iPhone 8 or later: Tap the Volume Up, then quickly tap Volume Down and hold down the Power key afterward.

In the case of iPhone 7/7Plus: Press the “Sleep/Power” and “Volume Down” keys together.
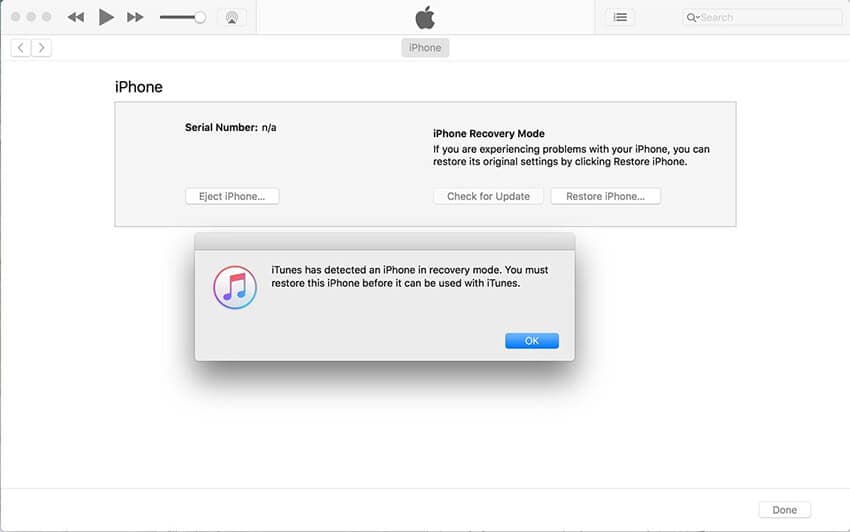
Hold down the keys until you see the message on your iTunes screen about “your iPhone has been detected in recovery mode.”
Step 3: Once done, click on “Ok” and choose the “Restore iPhone” option. Confirm your actions, and you’re done.
Part 3. How to erase an iPhone without Apple ID via Settings
Erasing an iPhone without Apple ID becomes necessary when we happen to use a second-hand phone or when we share a phone with someone. It is indeed a hard task to overcome these issues as we constantly strive to change our phone or replace it with a second-hand one. We have jotted a few steps that can help you erase an iPhone without Apple ID via settings for your ease.
Step 1: On your Apple iPhone 12, press the “Settings” icon on your App drawer.
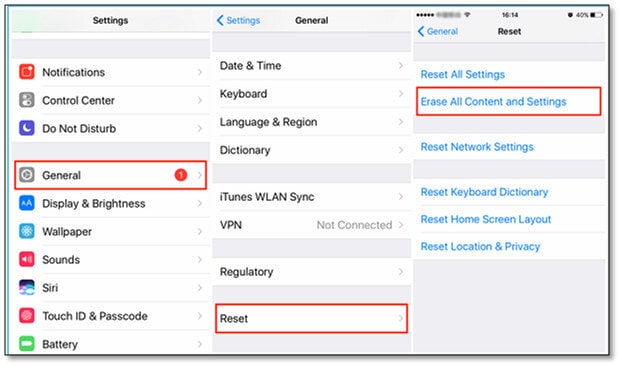
Step 2: Under the Settings, scroll down and click on the “General” option.
Step 3: Now, you need to scroll all the way down to the “Reset” button and click on it. Then, look for “Erase All Content and Settings” and tap on the same.
Step 4: Enter your passcode to confirm. This action will pop up a screen where you need to select Erase iPhone again, and boom, you are done now.
Part 4. Tip you may need to erase Apple ID
Now, just in case you wish to delete your Apple ID completely, you need to perform a simple practice of removing any devices associated with your Apple ID.
Step 1: One can simply visit appleid.apple.com and log in with the Apple ID credentials already allotted to the user.
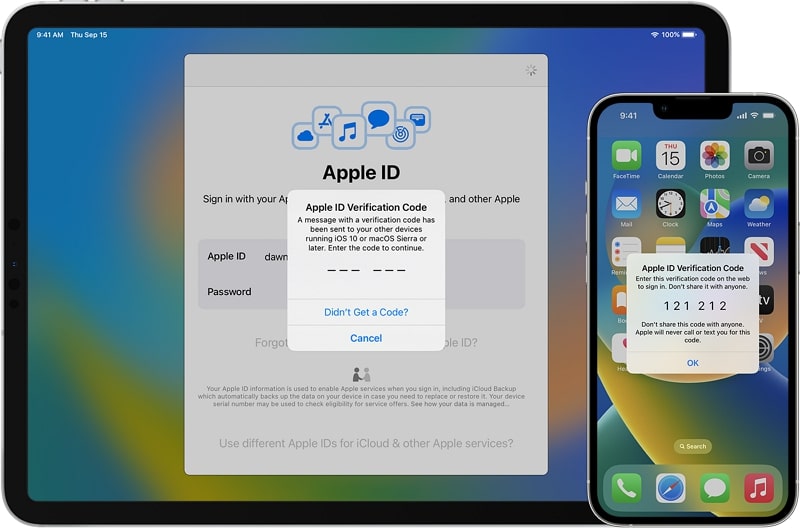
Note: You might get a prompt of a two-factor authentication code while being on this page.
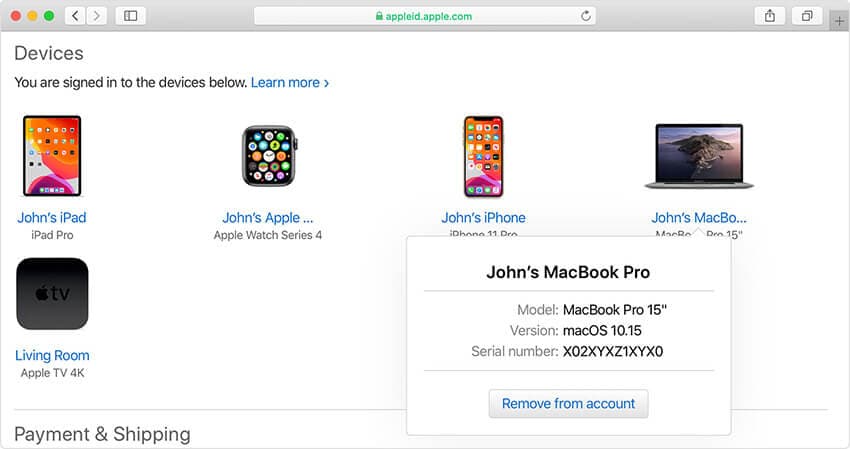
Step 2: Once you scroll down the line, choose, and click on the “Device” option.
Step 3: Choose the desired device and click on the “Remove from account” option followed by a “Remove this – Device Name” to confirm the action. Perform this step for all other devices.
How to erase an Apple ID via Apple’s Data and Privacy website
Now let’s get started with erasing an Apple ID via Apple’s Data and Privacy website are simple and, we have mentioned a simple way to take care of the same:
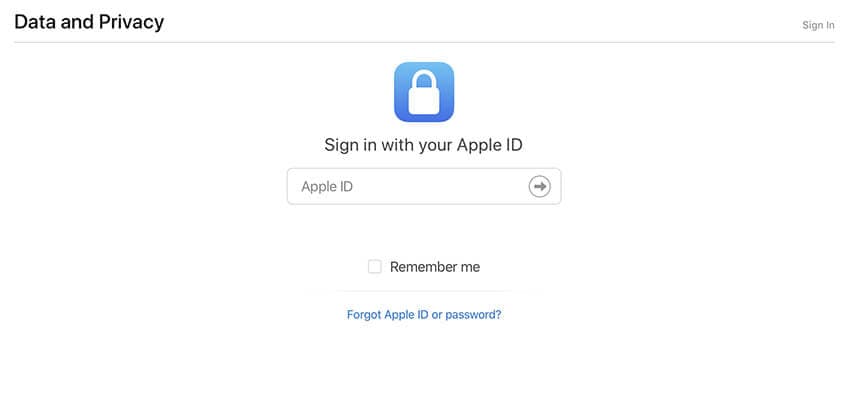
Step 1: Once you’re done removing the Apple iPhone 12 devices linked to your Apple ID, visit privacy.apple.com and log in with the same Apple ID and password credentials.
Step 2: Once you authenticate, click on the prompt indicating the option to “Continue.”
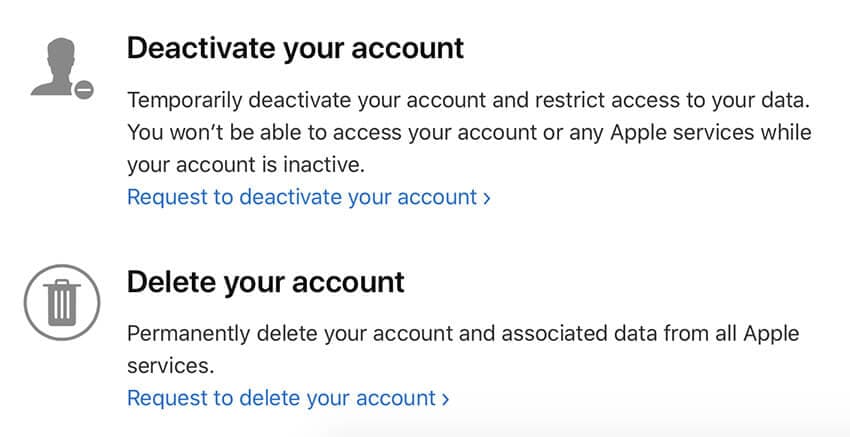
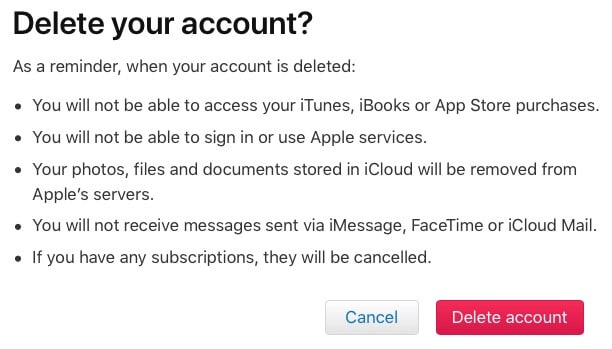
Step 3: Once you click on the “Get started” prompt on the screen, you will get a tab to “Delete your account.” This will prompt you with an Apple message indicating the information regarding the deletion process time.
Step 4: Before everything, make sure you back up your data and follow the instructions steps prompted by Apple’s website. This will lead you to choose a reason for deletion from the click-down option and click “Continue.”
Message – You will get the details of the entire process for a quick review before you can submit for the final deletion of the policies
Step 5: Click on “Delete terms and conditions” by checking the read and agreed on the box. Make sure to provide a good call-back number to finalize the process.
Step 6: This submission will give you your access code which you can later use for clarification and, now you can click on the “Delete Account” option
Conclusion
Coming towards the end of the topic, we now are fully sure that you fully understand how to erase an iPhone without an Apple ID. Just in case you have any doubts, please feel free to comment below. And do remember to share this with your friends and family if you find it useful.
How To Remove the Two Factor Authentication On Apple iPhone 12
Want To Remove the Two Factor Authentication? Check Out This Guide

Continuous technology innovation has introduced many advanced encryption and security methods to protect data from hackers. With these innovations, companies like Apple and Google have introduced the two-factor authentication process to protect user data.
But sometimes, this security method becomes a hassle to access your data daily, due to which many users try to remove it. That is why, in this article, we have discussed how you can remove iCloud two-factor authentication easily.
- Part 1: What Is Two-Factor Authentication and How Helpful It Is
- Part 2: Can You Remove the Two Factor Authentication iCloud at Anytime
- Part 3: How To Remove the Two-Factor Authentication Within 14 Days
- Part 4: iPhone Apple ID Got Locked? Here’s a Reliable Tool To Get It Unlocked Without Passcode

Part 1: What Is Two-Factor Authentication and How Helpful It Is
Protecting users’ devices and online accounts is one of the major responsibilities of tech companies like Apple. Due to this, they have added multiple security features, including two-factor authentication. Thus, if you create an Apple ID, you can see a two-factor authentication option that adds an extra layer of security.
2FA is activated when the user provides the password to log into the Apple ID or software through a new device, and it acts as a second layer for account security. Apple ID or any software containing sensitive data cannot be accessed without it. This method provides a higher security level than single-factor authentication. To understand more benefits of this security system in detail, check the following points:
- Protection From Password Theft: 2FA acts as an additional security level. It protects your accounts and devices in case your password is leaked.
- Migrations of Unauthorized Assets: Online banking applications use 2FA to protect users from unauthorized bank transfers. If someone accesses their app, this is a beneficial security measure.
- Protection on Multiple Services: Platforms, including social media, banks, and cloud storage, use 2FA. It means that 2FA can be used in various digital aspects.
Part 2: Can You Remove the Two Factor Authentication iCloud at Anytime
Many people use 2FA globally to protect their personal information and devices from hackers and unauthorized access. However, in some cases, users may want to remove two-factor authentication iCloud for multiple reasons. This includes scenarios in which their device is lost or damaged or if they have found a better security option than this one.
Moreover, there is one important key point to note: Apple has removed the feature of deactivating 2FA from the Apple ID. It means you need to think twice before activating this feature on your Apple ID because it cannot be reversed. For the following reasons, Apple has taken this initiative:
- Enhanced Security: By removing the deactivation option for 2FA, Apple is trying to strengthen its account security to ensure that no one can access its user’s data.
- Reducing Vulnerabilities: Allowing users to deactivate 2FA could cause vulnerabilities in the Apple ecosystem that can be a weak point for protecting users’ data. That is why Apple has removed the deactivation option to stop malicious actors from taking advantage of this vulnerability.
- Encouraging Security Awareness: To make Apple users more security conscious, Apple has made it difficult on purpose to remove 2FA. It helps users to be more confident in Apple services and products.
- Minimizing Mistakenly Steps: If users mistakenly remove the 2FA, their accounts and devices are at risk of being accessed without proper authentication. To avoid such an issue, the deactivation option of 2FA is removed.
Besides all these reasons, there is still some good news for those who want to remove the two-factor authentication iPhone to use other security options. The good news is that Apple allows users to remove 2FA for a limited time after activation.
Part 3: How To Remove the Two-Factor Authentication Within 14 Days
As explained in the last part, Apple has made removing the 2FA option from Apple ID challenging for several security reasons. Thus, if you want to remove 2FA from your Apple ID, you have only 14 days after activating this feature. To understand how to disable iCloud two-factor authentication within this given time, check the following steps:
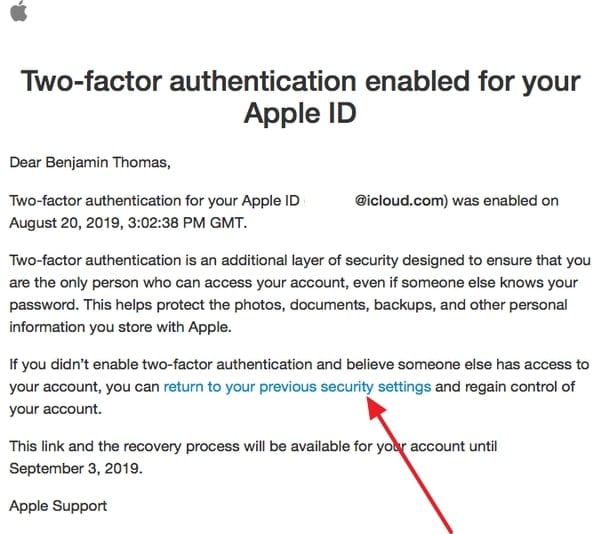
- Step 1. Once you have activated the 2FA feature, your 14-day grace period will start eventually. To deactivate this, open the enrollment email you received from Apple regarding 2FA on your Apple ID.
- Step 2. Scroll to the bottom of this email and select the link or button to return to your account security & settings section. There, follow the on-screen instructions to deactivate the 2FA of your Apple ID.
Part 4: iPhone Apple ID Got Locked? Here’s a Reliable Tool To Get It Unlocked Without Passcode
If you mistakenly got your Apple ID locked due to entering the wrong password multiple times, there is no need to stress it out. It is a common issue that many people forget their Apple ID password and cannot access it. Due to this, we have got you a perfect solution to unlock your Apple ID without a passcode.
This solution is the Wondershare Dr.Fone - Screen Unlock (iOS) tool specially designed to help users remove their iPhone and iPod lock screens. It is compatible with the latest iOS devices and assists in removing various types of lock screens, including Touch ID and Face ID.
Key Features
- This iOS screen unlock tool assists users in bypassing MDM without data loss and other technical errors.
- iCloud activation lock and iTunes backup encryption can be bypassed without a password in just a few steps.
- iPhone 15 and the latest versions of iOS 17/iPadOS 17 are supported by this tool to help users professionally.
Simplified Steps for Unlocking Apple ID With Wondershare Dr.Fone
To help you use this AI-powered screen unlock tool for unlocking the Apple ID without a password, follow the process we have mentioned below for your ease:
- Step 1. Access the Toolbox and Choose the Respective Option
Initiate the process by accessing Wondershare Dr.Fone’s latest version on your computer and tapping on the “Toolbox” option from its left side toolbar. Following this, choose “Screen Unlock” from the list of tools and tap “Remove Apple ID” in the next window.
- Step 2. Make Sure That the Apple iPhone 12 Is Connected to the Computer
Then, connect your Apple iPhone 12 to your computer using a USB cable so that you can see its connectivity status. Once the status is displayed on a new window, hit the “Unlock Now” button to proceed. Answer some questions that are asked by the platform, and with this, ensure that your device’s “Screen Lock” and “Two-Factor Authentication” are enabled or disabled.

- Step 3. Select the System Version and Proceed Ahead
In this step, enable Recovery Mode by following the on-screen instructions. It will help the platform detect the connected device model, with which you will need to select “System Version.” Afterward, you can hit the “Start” button to proceed ahead.
- Step 4. Start the Apple ID Unlocking Process
The respective iOS firmware will download according to the Apple iPhone 12 device model and system version. After it is downloaded, the platform will verify it for you, based on which you can tap the “Unlock Now” option to get your Apple ID unlocked successfully.
Conclusion
With this, we hope you understand how to disable iCloud two-factor authentication. However, remember that doing this is only possible within 14 days of a grace period. If this period is over, you cannot remove 2FA from your Apple ID.
Moreover, if you have locked your Apple ID passcode, using Wondershare Dr.Fone to unlock it can be the perfect option. While using this tool, you also don’t have to worry about screen locks on different iOS devices. This is because the innovative algorithms integrated in this tool make it easier to use for unlocking the Apple ID or screen lock.
How To Unlink Apple ID From Apple iPhone 12
Apple devices are now an essential part of our daily lives. They provide access to a variety of services and apps. But there may come a time when you need to unlink your Apple ID from your device. It could be because you’re giving away or selling your device or facing device limits or download issues.
Either way, understanding how to do it is essential for maintaining control over one’s digital footprint. This article will walk you through the step-by-step process of how to unlink Apple ID from iPhone devices and Apple Watch. We’ll provide clear and concise instructions for every scenario, whether you have your Apple ID password, have lost or forgotten it, or are dealing with a lost device.

Part 1: How To Unlink Apple ID From Connected Devices With Password
Keeping track of where your Apple ID is being used is essential for maintaining control over your digital identity. Fortunately, using your Apple iPhone 12 or Mac, you can easily identify all the Apple iPhone 12 devices currently linked to your Apple ID. It is helpful for those who have shared their Apple ID with others or suspect unauthorized access.
Removing a device from your Apple ID with two-factor authentication activated will turn off verification code delivery on that device. Also, the Apple iPhone 12 device will no longer be able to access iCloud content, such as your photos, contacts, and calendar.
How To Unlink Apple ID From iPhone?
Before you unlink an iPhone from Apple ID, it’s also essential to identify all the Apple iPhone 12 devices currently signed in with your account. This crucial step ensures you don’t inadvertently lock yourself out of your Apple ID on other devices.
Step 1: Open the Settings app on your Apple iPhone 12.
Step 2: Tap on [your name] at the top of the screen and scroll down.
Step 3: Unpair an iPhone from Apple ID in two ways:
Tap Sign Out, then enter your Apple ID password. Next, tap Sign Out Tap Delete Apple IDfrom Apple iPhone 12 to verify that you want to remove your Apple ID from the Apple iPhone 12 you are currently using.
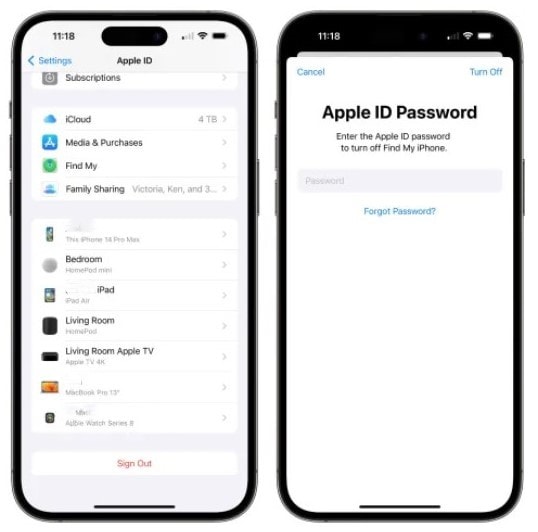
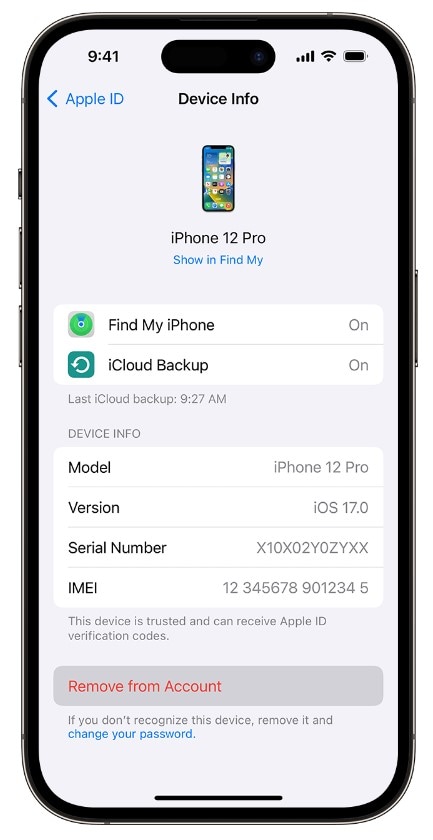
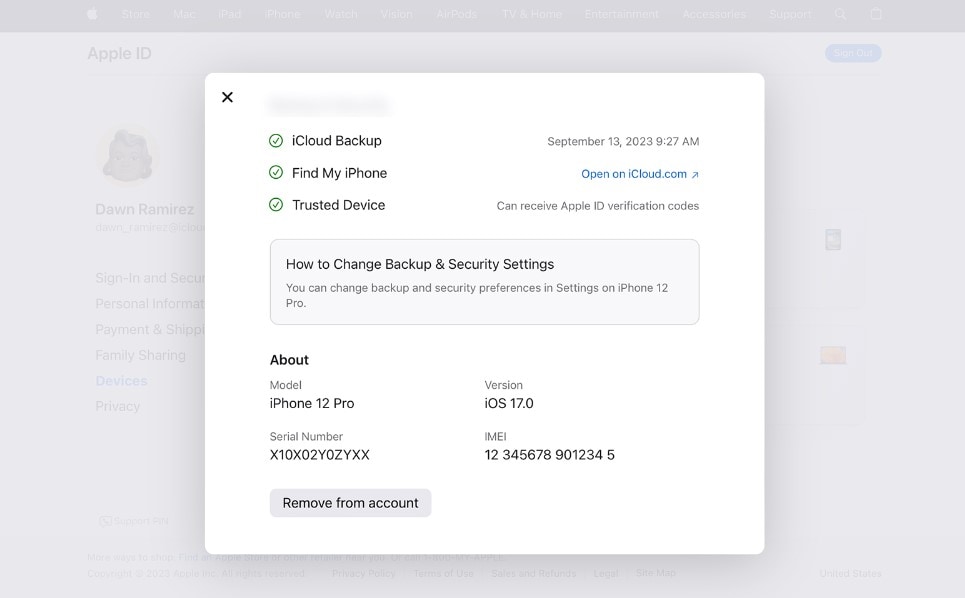
- Tap on any device name to see its details. If it is the one you trust, you can use it to receive Apple ID verification codes. Then, tap Remove from Account.
How To Unlink Apple ID Settings From Mac?
Follow these steps below to use your macOS to remove the connected devices from your Apple ID.
Step 1: Go to the Apple menu in the top left corner of the Apple iPhone 12 device’s screen.
Step 2: Select System Settings or System Preferences, depending on the Apple iPhone 12 device.
Step 3: Click [your name] or Apple ID for macOS Monterey or earlier.
Step 4: Scroll down and unpair the Apple ID on your Mac in two ways:
Click Sign Outto remove your Apple ID on the desktop you are currently using.
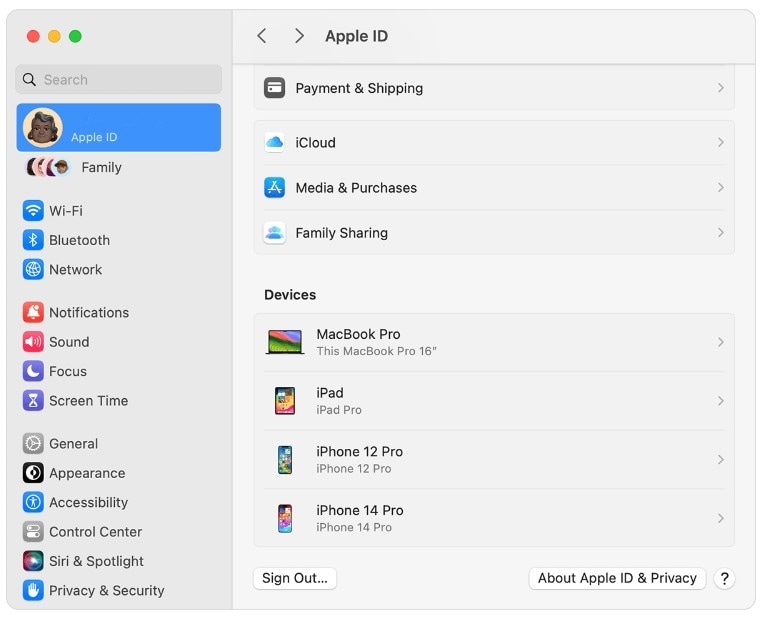
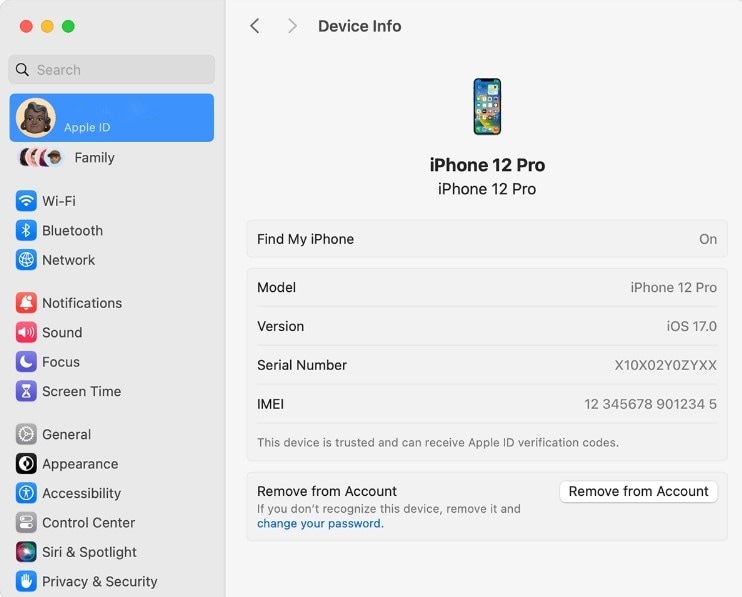
- From the Devicessection, click the connected device you want to unlink. Click Remove from Account.
Part 2: How To Unlink Apple ID From iOS Devices Without a Password?
In the previous section, we’ve explored the standard method to remove an Apple ID from an iPhone, which requires the Apple ID password. However, what if you’ve forgotten your Apple iPhone 12’s passcode or don’t have the Apple ID password? In such situations, Wondershare Dr.Fone - Screen Unlock can help you unpair your Apple ID on iOS devices without hassle. Even without an Apple ID password, Dr.Fone can help you:
- Bypass the Activation Lock
- Unpair Apple ID and erase the iPhone’s content, even if the Find My feature is enabled
- Remove the iOS lock screen
The tool guides you through the process, ensuring a seamless experience with a user-friendly interface and intuitive design. Let’s delve into the step-by-step guide to discover how to unlink Apple ID from iPhone devices using Dr. Fone’s - Screen Unlock tool.
Step 1: Download, set up, then launch Dr.Fone on your desktop. Use a USB cable to establish a connection between your Apple iPhone 12 and desktop.
Step 2: From the Toolbox homepage, select Screen Unlock and choose iOS.
- Step 3: Select Remove AppleID to unpair the existing Apple ID from your Apple iPhone 12 without an Apple ID password.

- Step 4: Click Unlock Now to continue.
- Step 5: Click Yes to confirm you have a screen lock on your Apple iPhone 12.

- Step 6: Click Yes to confirm you have enabled the two-factor authentication on your Apple iPhone 12.

- Step 7: Follow the steps on the screen to put your Apple iPhone 12 into Recovery Mode. If you are having trouble, click DFU Mode in the bottom left corner.

- Step 8: Select an option in the System Version drop-down menu and click Start.
- Step 9: Wait while the respective iOS firmware downloads. Alternatively, click Copy to do it yourself.

- Step 10: Once the firmware is ready, click Unlock Now.
- Step 11: Read the note in the dialogue box and enter the code in the confirmation box. Then, click Unlock to continue.

- Step 12: Wait while the app is unlocking the Apple ID. Refrain from using your device while connected to your desktop.

- Step 13: Click Done, then check your Apple iPhone 12 to see if the Apple ID has been removed.

Part 3: How To Unlink iPhone From Apple ID if the Apple iPhone 12 device Was Lost?
You already know the methods to unlink iPhone from Apple ID, both with and without a password, assuming the Apple iPhone 12 device is accessible. However, what if your Apple iPhone 12 or Apple Watch is lost, stolen, or you already gave away? Fortunately, there’s still a way to unpair your Apple ID from your iOS device.
Unlink iPhone From Apple ID Remotely
Follow these steps and explore how to unlink Apple ID from iPhone and other iOS devices online:
- Step 1: Navigate to appleid.apple.com on a web browser.
- Step 2: Click Devices on the right-side navigation pane.
- Step 3: Choose your iOS device from the list in the Devices section.
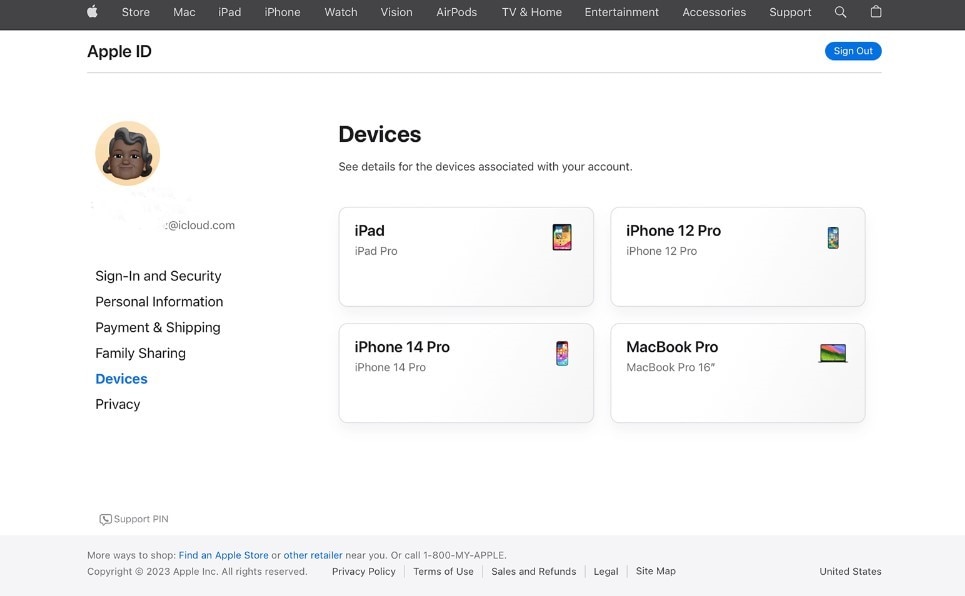
- Step 4: Click Remove from account and click Remove again to confirm.
Unlink iPhone From Apple ID Using the Find My App
Here is how to unpair your Apple ID on a device you sold or gave away via the Find My app.
- Step 1: Open the Find My app and go to the Devices tab at the lower navigation pane. Next, select the name of your Apple iPhone 12 you want to unpair.
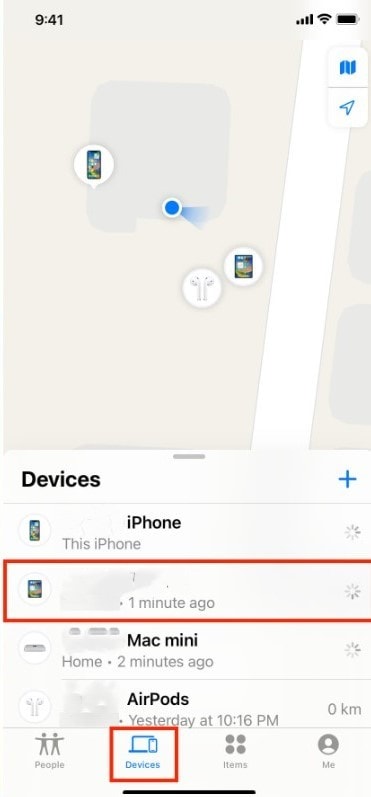
- Step 2: Tap Erase This Device, then tap Continue.

Note:
Indicate if the Apple iPhone 12 device was stolen.
- Step 3: Tap Erase, enter your Apple ID password, and then tap Erase again.
Bonus Part: How To Unlink Apple Watch From Apple ID?
There are several reasons to unpair an Apple Watch from an Apple ID. Perhaps you’re selling or giving away your Apple Watch or trading it in for a new one. Or maybe you only want to remove your Apple Watch from your Apple ID altogether.
No matter what your reason, removing an Apple Watch from an Apple ID is a simple process. Here, we’ll walk you through the steps to restore your Apple Watch to its factory settings.
How To Unlink Apple Watch From Apple ID if You Have Your Apple iPhone 12?
Follow the unpairing process on the paired Apple iPhone 12 to remove the Activation Lock and erase your Apple Watch’s content and settings.
- Step 1: Check to ensure your Apple Watch and iPhone are close.
- Step 2: Launch the Watch application on your Apple iPhone 12 and go to the My Watch tab.
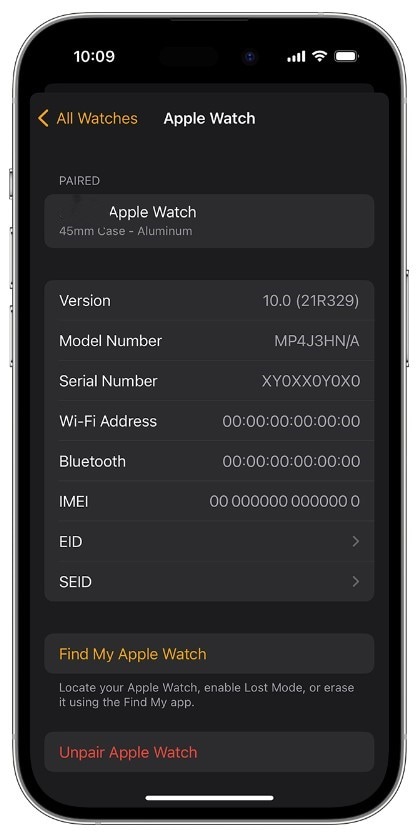
- Step 3: Tap All Watches in the upper left corner.

- Step 4: Locate and tap the information icon adjacent to the name of your Apple Watch.
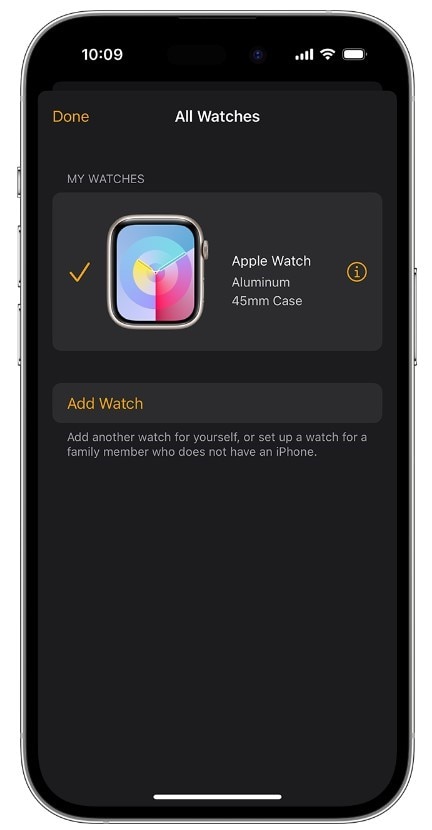
- Step 5: Tap Unpair Apple Watch, then tap Unpair Apple Watch.
- Step 6: If you have a cellular Apple Watch, tap Remove Cellular Plan, and remember to reach your carrier to cancel your subscription.
- Step 7: Provide your Apple ID password to deactivate the Activation Lock.
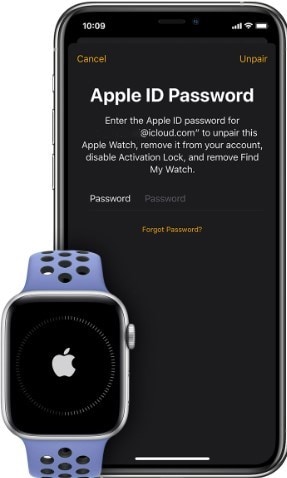
- Step 8: Tap Unpair to confirm your action.
How To Unlink Apple Watch From Apple ID Without Your Apple iPhone 12?
You can erase your Apple Watch without the paired iPhone, but the Activation Lock will still be active. But, if you give away your Apple Watch without turning off the Activation Lock, the person you give it to cannot use it. They’ll have to enter your Apple ID and password to turn off the Activation Lock and use it with a new iPhone.
- Step 1: Open the Settings app on your Apple Watch.
- Step 2: Go to General > Reset, tap Erase All Content and Settings. Then, enter your password, if needed.
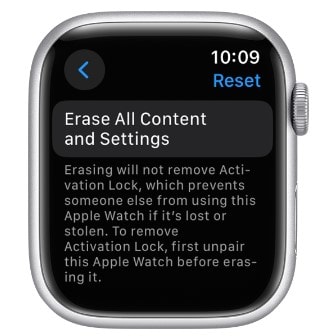
- Step 3: Tap Erase All to restore your Apple Watch to its factory settings.
Conclusion
There are several ways to unlink your Apple ID from your Apple iPhone 12 or iPad. The best way to do it depends on your situation and available iOS device. Whichever your reason is, understanding how to unlink Apple ID from iPhone and other iOS devices is crucial.
If you unfortunately encounter any challenges during the process, you can seek assistance from Apple Support. Consider using Dr.Fone for a quick and easy solution, which can unlink your Apple iPhone 12 from your Apple ID within minutes, even without an Apple ID password.
Also read:
- 2024 Approved Top Accessories to Upgrade and Improve Your Phantom 4
- Apple ID Locked or Disabled On Apple iPhone XS Max? 7 Mehtods You Cant-Miss
- Best 10 Mock Location Apps Worth Trying On Infinix Hot 40i | Dr.fone
- Deleting with Determination: Strategies for Discarding Your FB Brand Pages
- Enhance Privacy on Windows 11 - 10 Essential Tips for Protection
- Expert Techniques for Acquiring Pristine Images for 2024
- How To Create an Apple Developer Account On iPhone 12
- How To Fix Apple ID Verification Code Not Working From iPhone 14 Pro Max
- How to Unlock Apple ID On your Apple iPhone SE (2022) without Security Questions?
- In 2024, A Comprehensive Guide to Mastering Zoom (Win10)
- In 2024, Apple ID Locked or Disabled From Apple iPhone 15 Plus? 7 Mehtods You Cant-Miss
- In 2024, How To Fix Apple ID Verification Code Not Working From iPhone 15 Pro Max
- In 2024, iCloud Separation How To Disconnect Apple iPhone 15 Plus and iPad
- In 2024, Your Account Has Been Disabled in the App Store and iTunes On iPhone 11 Pro Max?
- Top 8 Rapidly Expanding YouTube Vloggers for 2024
- Troubleshoot YouTube Stuttering with Easy & Free Techniques
- Updated Must-Have iPhone Apps The Complete Roundup
- Title: How to Erase an Apple iPhone 12 without Apple ID?
- Author: Alma
- Created at : 2024-12-12 23:22:25
- Updated at : 2024-12-19 21:29:39
- Link: https://apple-account.techidaily.com/how-to-erase-an-apple-iphone-12-without-apple-id-by-drfone-ios/
- License: This work is licensed under CC BY-NC-SA 4.0.