
How To Fix Apple ID Verification Code Not Working From Apple iPhone 14 Plus
How To Fix Apple ID Verification Code Not Working On Apple iPhone 14 Plus
In smartphones, the Apple ID stands out as a cornerstone of security for iPhone users and the broader iOS ecosystem. Its robust verification features are a key reason why many people choose iPhones. Thus, its heightened security is highly valued. However, even extremely reliable systems can encounter hiccups.
Sometimes, you might need help with the issue of the Apple ID verification code not working. This leads to frustration, especially if you need to remember your Apple iPhone 14 Plus ID details. This 2024 guide will delve into practical solutions to fix issues with Apple ID verification codes, helping you regain access to Apple ID and peace of mind.

Part 1: When Does the Apple Verification ID Failed Prompt Appear?
Before diving into solutions, it’s essential to understand the various scenarios that can trigger the “Apple Verification ID Failed” prompt. Recognizing the cause of the problem is the first step toward the right fix. Let’s explore the common reasons you might encounter this issue:
Wrong Password Input
One of the most straightforward reasons for a failed verification is entering the wrong password. This could be a simple typing error or misremembering your password. Repeated wrong attempts can also lead to your account being temporarily disabled as a security measure.
Apple Server Issues
At times, the problem may not be on your end. Apple’s servers can experience downtime or technical glitches like any other online service. During such instances, verification processes might fail, as the server cannot authenticate your credentials.


Slow Internet or Intermittent Connection
A stable and reliable internet connection is improtant for the verification process. If your internet is slow or experiencing intermittent connectivity, it can disrupt the communication between your device and Apple’s servers, leading to verification failure.
Two-Factor Authentication (2FA) Issues
Apple’s two-factor authentication provides an extra layer of security. However, it can also be a source of problems. If there’s a delay in receiving the 2FA code or if 2FA fails to work, you won’t be able to complete the verification process. This could be due to network issues or, sometimes, glitches within the 2FA system itself.
Suspicious Activity
Apple takes your security seriously. If there’s any unusual activity detected on your account, such as login attempts from unfamiliar locations or devices, Apple might lock your account as a precaution. This can trigger the verification failed prompt as the system seeks to protect your account from potential unauthorized access.
By understanding these scenarios, you can diagnose better why you’re facing the issue of Apple verification ID not working. In the following sections, we will explore solutions tailored to these specific problems, helping you regain access to your account efficiently.
Part 2: How To Fix Apple ID Verification Failed
Encountering an “Apple ID Verification Failed” error can be frustrating. Here are some practical solutions that correspond to the common reasons for this issue. These steps should help you regain access to your Apple ID.
Method 1: Connecting to a Stabler Internet Connection
A stable internet connection is crucial. If you’re encountering issues, switch to a more reliable Wi-Fi network. Alternatively, toggling your Wi-Fi or mobile data off and back on can refresh your connection.
Method 2: Changing Password/2FA Device Using Apple ID Account
If you’re facing troubles due to password errors or 2FA issues, resetting your password or updating 2FA settings may help. Visit Settings > Apple ID account page > Sign In & Security and follow the instructions to Change Password or update your Two-Factor Authentication settings.

Method 3: Check iPhone’s Date & Time Settings
Incorrect date and time settings can influence Apple ID verification. Go to Settings, select General, and tap on Date & Time. Ensure Set Automatically is enabled, allowing your Apple iPhone 14 Plus to adjust these settings according to your time zone.

Method 4: Signing Out/In Your Apple ID
Sometimes, simply signing out and back into your Apple ID can resolve verification issues. Navigate to Settings, tap your name at the top, scroll down, and select Sign Out. After signing out, sign back in and check if the issue persists.
Method 5: Disabling VPN
If you’re using a VPN, it can sometimes cause issues with Apple ID verification. Try disabling your VPN from the Settings or the VPN app you’re using, and then attempt the verification process again.
Method 6: Updating to the Latest iOS
Running an outdated iOS version can cause compatibility issues. Go to Settings, select General, and tap on Software Update. If an update is available, download and install it to ensure your device is up-to-date.
Method 7: Checking Apple Server Status and Trying Again Later
Sometimes, the problem is on Apple’s end. Check the Apple System Status page to see if there are any issues with their servers. If there are, it’s best to wait and try the verification process later.
By following these methods, you should be able to resolve the “Apple ID Verification Failed” issue and regain full access to your Apple ID functionalities.
Part 3: How To Remove Apple ID Account From iOS Device
If the above fixes have proven unsuccessful, it might be time to consider removing the Apple ID directly from your device using a third-party tool. This can often resolve the failed verification of Apple ID on new or old phones when other methods fail.
Thankfully, Wondershare Dr.Fone offers a solution with its Screen Unlock (iOS) feature, which includes a Remove Apple ID/iCloud account removal function. It’s a very handy tool for reviewing verification requirements, especially when you forget your Apple ID credentials.
Removing Apple ID Account With Dr.Fone - Screen Unlock (iOS)
Here’s how to use powerful Dr.Fone’s - Screen Unlock (iOS) to remove Apple ID.
Step 1: Download, install, and launch Wondershare Dr.Fone.
Step 2: Go to Toolbox > Screen Unlock > iOS.

- Step 3: Select Remove Apple ID to proceed.

- Step 4: Choose Unlock Now once the connectivity status is confirmed.

- Step 5: Ensure you have a screen lock and the two-factor authentication enabled. Follow the on-screen instructions.

- Step 6: Put your device into Recovery Mode or DFU Mode by following the on-screen instructions. Then, confirm the correct system version of your device.

- Step 7: Wait for the download to finish on your software.

- Step 8: After the firmware is confirmed, click Unlock Now. Then, type in “000000” on the appearing text box and click Unlock.

- Step 9: After the process is completed, click Done. If it still doesn’t work, then click Try again.

Conclusion
Navigating the Apple ID Verification Code not working issue can be a source of significant frustration. This guide aimed to alleviate that by detailing common triggers, such as password errors, server issues, and connectivity problems, and providing targeted solutions like ensuring stable internet, updating iOS, and checking server status.
For those rare instances where conventional methods fall short, Dr.Fone emerges as a reliable ally. Its Screen Unlock feature effectively addresses Apple ID-related hurdles. Whether you’re grappling with verification failures or other phone-related challenges, Dr.Fone - Screen Unlock (iOS) stands out as a dependable tool, ready to assist in simplifying your digital life.
Tips: Are you searching for a powerful Screen Unlock tool? No worries as Dr.Fone is here to help you. Download it and start a seamless unlock experience!
How To Change Your Apple iPhone 14 Plus Apple ID on MacBook
Your Apple ID is a key component of your Apple ecosystem. It serves as your digital identity across all Apple devices. Whether you have an Intel-based MacBook or one with Apple Silicon, understanding how to change your Apple ID is crucial. Therefore, in this detailed guide, we will walk you through the process of how to change your Apple ID on your MacBookwithout facing any issues.
Besides this, it will also assist you in exploring the significance of your Apple ID and the services it enables on your MacBook. The article will ensure that you make the most of this essential account.
Part 1: What Are the Benefits of Changing the Apple ID on MacBook
Apple ID is the cornerstone that simplifies the management of your Apple devices. It’s more than just a username; it’s your passport to a world of smooth integration and services. Changing your Apple ID on your MacBook can yield several significant benefits. It enhances your overall user experience. Here are some of the key advantages of learning how to change your Apple ID MacBook:
1. Personalization
Changing your Apple ID allows you to customize your MacBook according to your preferences. You can sync your contacts, calendars, and settings. This ensures a personalized and consistent experience across all your Apple devices.
2. App Store and iTunes Purchases
You can access a distinct collection of applications, music, films, and books by creating or logging in with a different Apple ID. This proves especially beneficial when considering a change of region. It also helps when sharing your MacBook with family members, each of whom has their individual Apple ID.
3. iCloud Storage
Your Apple ID is closely linked with iCloud, Apple’s cloud storage service. Changing your Apple ID allows you to gain access to an alternative iCloud account with its dedicated storage capacity. This can be advantageous when you require additional storage or wish to keep your data separate from a previous account.
4. Privacy and Security Settings
Frequently updating your Apple ID can enhance your online privacy and security. It enhances the challenge for unauthorized parties to acquire your personal information. This, consequently, reduces the risk of accessing your MacBook’s sensitive information.
5. Family Sharing
If you’re part of a Family Sharing group, changing your Apple ID can simplify sharing purchases, subscriptions, and iCloud storage with family members. Each family member can have their own Apple ID while still enjoying the benefits of shared content.
Part 2: How To Change the Apple ID on MacBook Through the Settings
In summary, there are many advantages to updating your Apple ID on your MacBook. Let’s now proceed to the actionable steps for accomplishing this task. Below is a comprehensive, step-by-step tutorial on how to change your Apple ID on a MacBookwith the help of System Settings:
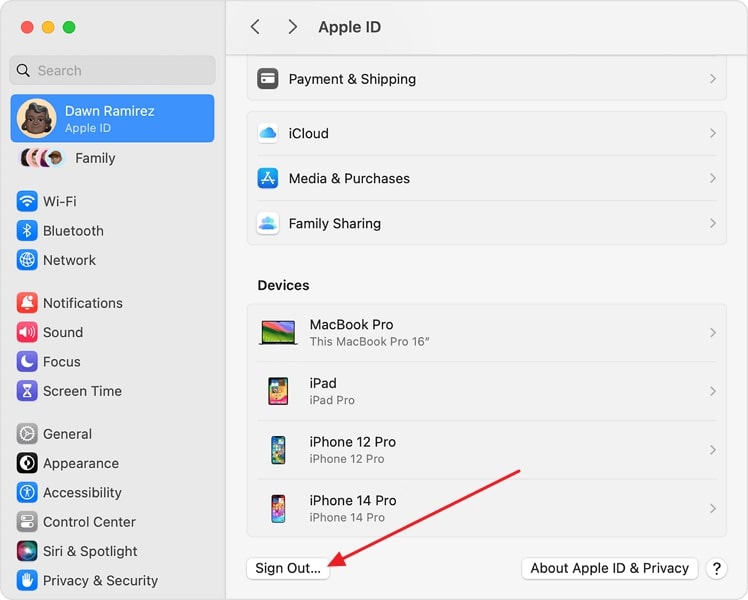
- **Step 1:**Access your Mac’s System Setting through the Dock. Tap the Apple ID icon from the left sidebar within the “System Settings.”
- **Step 2:**Here, scroll down to find and tap “Sign Out.” The option is located at the bottom near the left corner. Afterward, tap “Sign Out” again to confirm your choice, and then, if your device asks, provide your Apple ID password to move ahead.
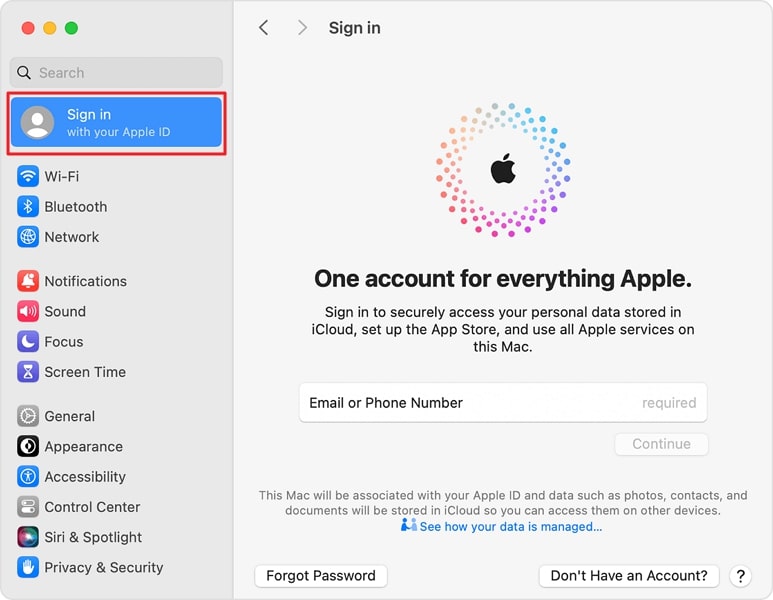
- **Step 3:**After logging out of your Apple ID, reboot your device, and when it is done, go back to System Settings. From there, hit the “Sign in to with your Apple ID” option so that you can quickly log in with a new Apple ID.
Part 3: Other Ways To Change the Apple ID With Ease
Changing your Apple ID on your MacBook through Settings is a straightforward process. There are scenarios where some adjustments may be necessary and some may not. For instance, in the case of purchasing a used MacBook, it’s conceivable that the prior owner’s Apple ID could still be linked to the Apple iPhone 14 Plus device.
In such instances, you’ll need to contact the previous owner and request them to disassociate their Apple ID. Here are two practical methods for how to change Apple ID on MacBook Air:
Way 1: Using the iPhone
The first way the previous owner can remove the Apple ID from your MacBook is by using his iPhone. You can ask the previous owner to follow these steps on their iPhone:
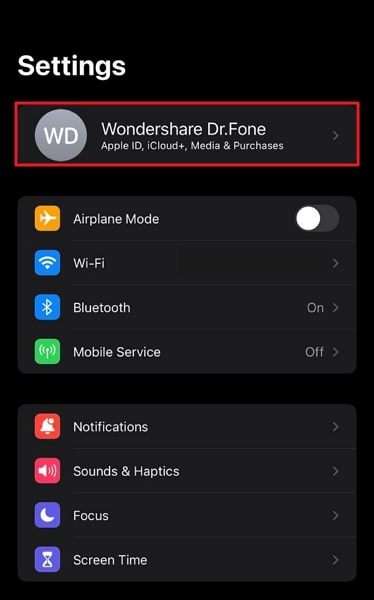
- **Step 1:**Start the process by accessing the Settings app on your Apple iPhone 14 Plus. From there, click on Apple ID on top of the main settings page.
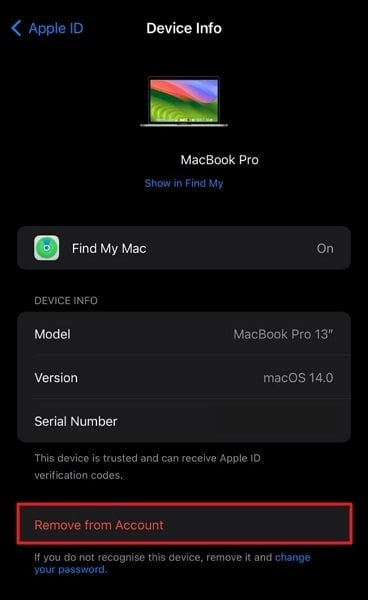
- **Step 2:**Scroll down on the screen to devices that are connected with the Apple ID. Tap on the MacBook and use the “Remove from Account” option to remove Apple ID from MacBook.
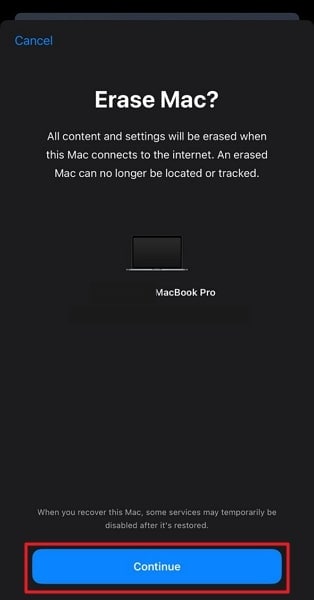
Way 2: Using Find My App
Another way to remove the Apple ID is by asking the previous owner to use the Find My service. The steps for removing Apple ID using the Find My app are given below:
- **Step 1:**Begin by opening the Find My app on the iPhone. There, select the MacBook from the Apple iPhone 14 Plus devices section. On the following screen, scroll to the last option, “Erase This Device.”
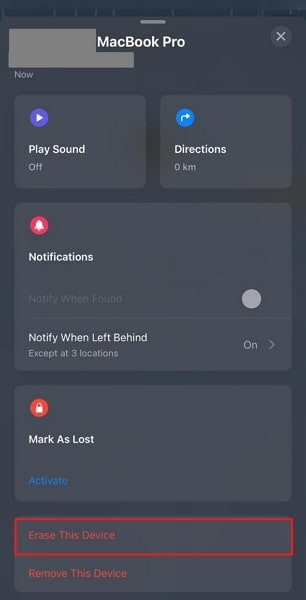
- **Step 2:**Here, select “Continue” to confirm your choice, and follow on-screen instructions to erase the Apple iPhone 14 Plus device. After this, provide your Apple ID password to complete the process, and when the Apple iPhone 14 Plus device eraser is done, the Apple ID will be removed from your MacBook.
Bonus Part: How To Fix Unable To Logout (Change) the Old Apple ID on Mac
Although changing your Apple ID on your Mac is usually a swift procedure, there may be instances where you find it challenging. It’s essential to resolve this matter promptly. The reason is that many essential procedures and services are directly linked to your Apple ID. Here are some common reasons why you might face difficulty logging out of the old Apple ID and their solutions:
1. Ongoing iCloud Backup
While the data is backed up on the iCloud from your Mac, you cannot log out from the Apple ID. It is because, while the data is being uploaded, logging out of Apple ID is restricted to ensure that data is not lost during the process.
Solution
Wait for the iCloud backup to complete before attempting to log out. You can access the backup information through “iCloud” within your Apple ID settings of System Settings. Here, tap “iCloud Drive” and stop syncing to stop the ongoing iCloud backup process.

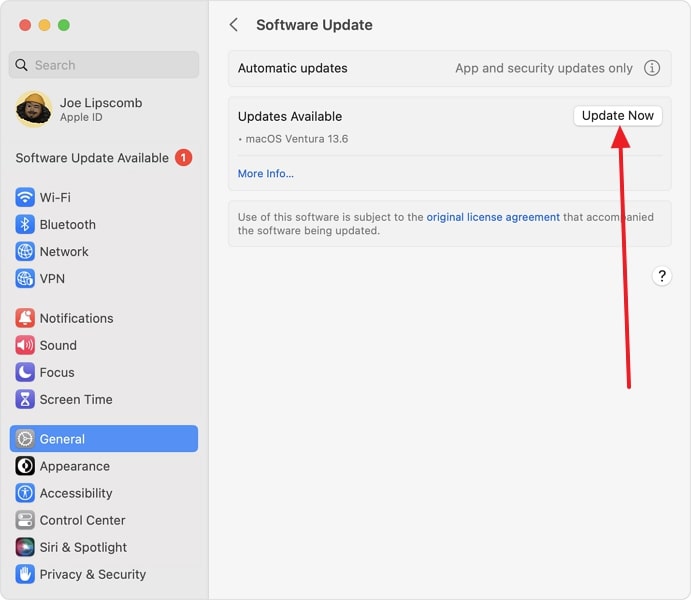
2. Bug in macOS
Occasionally, macOS may encounter bugs or glitches that prevent you from logging out of your Apple ID. These issues can usually be resolved with software updates or troubleshooting steps.
Solution
To resolve the bugs and glitches within the MacBook, the best option is to update macOS to its latest version. For that, access “System Settings” through Dock and move to the “General” tab. Here, select “Software Update“ to verify if an update is available and if an update is available, use “Update Now” to update the macOS.
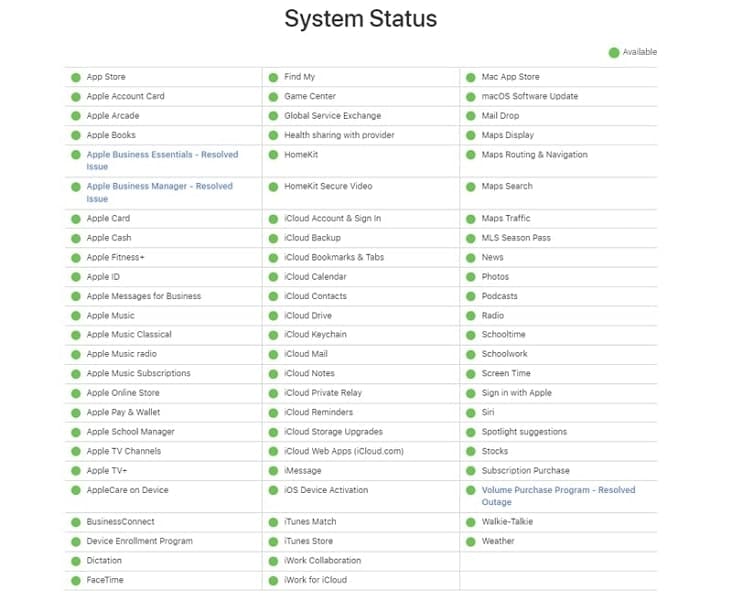
3. Apple Server Inactivity
Sometimes, issues on Apple’s servers can disrupt the log-out process. It’s recommended to visit Apple’s System Status page to ascertain the presence of any ongoing server issues.
Solution
You will need to check the official Apple System Status page at https://www.apple.com/support/systemstatus/. Here, you can find out if the problem behind your inability to log out lies with the Apple servers.
Forgetting a password to your Apple ID is a nightmare for Apple users. Considering the pivotal role of Apple ID in the Apple ecosystem, it’s not surprising that forgetting your Apple ID password can be a concern. Nevertheless, the real question is how to proceed if you find yourself in this predicament. While it may initially appear impossible, rest assured there are solutions available. Where there’s determination, there’s a path forward.
If it is an iOS device where your Apple ID is locked, we have the best tool for you in the form of Wondershare Dr.Fone. This tool enables you to remove Apple ID from the Apple iPhone 14 Plus device without needing a password. Dr.Fone’s iPhone unlocker has the capability to bypass the Apple ID lock permanently. It even works when the Find My/Find My iPhone feature is active on the Apple iPhone 14 Plus device.
You can fully restore access to all your iCloud services and Apple ID features by signing in with a new account. Following are the steps you need to adhere to remove the locked Apple ID from your iOS device using Wondershare Dr.Fone:
- Step 1: Navigate To Remove Apple ID in Wondershare Dr.Fone
Click “Toolbox” from the left sidebar after launching Wondershare Dr.Fone. From the available options on the screen, choose “Screen Unlock” and select “iPhone” as your device type. Now connect your Apple iPhone 14 Plus to the computer using a USB cable and click “Remove Apple ID“ in Dr.Fone.
- Step 2: Enable Recovery Mode on Your Device
Tap “Unlock Now” and proceed to confirm that your device has setup screen lock and 2FA is enabled. These are necessary steps for the removal process of Apple ID. Next, put your device into Recovery Mode following the guidelines available on-screen.
- Step 3: Remove the Locked Apple ID
Once your device is in Recovery Mode, Wondershare Dr.Fone will detect its model. You need to choose the iOS version and click “Start” to download the firmware. When it is downloaded and verified, tap “Unlock Now” to initiate the process. The last step involves confirming that you agree to the procedure by typing “000000” into the warning prompt and clicking “Unlock.”

Conclusion
In conclusion, this article has provided you with valuable insights into the process of how to change Apple ID on MacBook. We began by highlighting the primary purpose of the Apple ID and discussing the countless benefits it offers. We’ve walked you through two main methods for changing your Apple ID. The first one is using the Settings on your MacBook.
The other included alternative approaches for scenarios like purchasing a second-hand MacBook. We also addressed the issue of forgetting your Apple ID password on iOS devices. For it, we used the specialized software Wondershare Dr.Fone to remove Apple ID without needing a password.
3 Ways of How to Get Someone’s Apple ID Off Apple iPhone 14 Plus without Password
iPhone has its unique system of iCloud and Apple ID that allows high privacy and security for users. It is responsible for keeping an updated version of all the applications that are present within the iPhone. You might have encountered a second-hand iPhone once in your life, which has a pre-stored Apple ID belonging to another user. You might be left with more problems while using your Apple iPhone 14 Plus under complicated circumstances where users do not have the username or password to the Apple ID that is related to the previous user.
Out of these problems, users aren’t able to update or download applications that have been acquired or purchased with their own Apple ID. All the photos taken would be backed up in the iCloud connected to the certain Apple ID. Have you ever wondered if there are convenient and straightforward solutions for countering this issue? There are several ways to get rid of someone else’s Apple ID without any credentials. This article will describe the methods of how to get someone’s Apple ID off the Apple iPhone 14 Plus without a password or any other credential.
Part 1: How to get someone else’s Apple ID off iPhone without a password using Dr. Fone – Screen Unlock (iOS)
There are many prompt notifications you would receive when trying to log into the Apple ID. In many cases, we might see that the users either would have forgotten their Apple ID passwords or couldn’t find the password of someone else’s Apple ID. But here’s the kicker, with Dr.Fone - Screen Unlock (iOS) your ID can be unlocked by keenly following a few steps as described below:
![]()
Dr.Fone - Screen Unlock (iOS)
Log out iPhone’s Apple ID without Password
- Prevent your phone from being tracked or remotely blocked.
- Free download checker to see if the iCloud Activation Lock is still on.
- Bypass iCloud activation lock without Apple ID or password.
4,008,669 people have downloaded it
Step 1. Connect your Apple Device (iPhone or iPad) to the desktop with the help of a USB cable. After downloading and installing Dr.fone, you need to select the “Screen Unlock” section on its home interface.
Step 2. A new screen appears after selecting the tool. Apple ID can be unlocked by selecting the third and last option of “Remove Apple ID.”

Step 3. Unlock the phone’s lock screen for trusting on the computer to further scan the data on the phone.

Step 4. By following the on-screen guidance provided by Dr.fone, users need to enter the recovery mode. After successfully rebooting their iPhone, the process of unlocking the Apple ID automatically initiates.
Step 5. The tool automatically starts the process of unlocking the Apple ID and finishes in a few seconds.

Step 6. Another screen comes on the front after the completion of the task, which tells the users to check whether their Apple ID has been unlocked or not.
Part 2: How to get rid of someone’s Apple ID off iPhone with the previous owner’s help?
Signing out of the Apple ID on your Apple iPhone 14 Plus is very easy if you are in contact with the previous owner. There are a few methods that are available for understanding how to remove the Apple ID from the Apple iPhone 14 Plus with their help.
1st Method
- The associated person needs to sign themselves into icloud.com and the Apple iPhone 14 Plus from their account. After signing in, they can easily access the Apple iPhone 14 Plus by hitting “Find iPhone.”
- After successfully finding the iPhone, they need to click “All Devices,” followed by the Apple iPhone 14 Plus from which the account is to be removed and select “Erase iPhone.”
2nd Method
There is another alternative method available to check if the previous owner has considerable trust in you. They would have to share their Apple ID credentials, which then can be easily removed by following the steps while using the same iPhone.
3rd Method
- In cases where the previous account is not activated, users can apply this method for iPhone models later than iPhone 6S.
- Connect with the desktop and open iTunes on it. Initiate a force restart by holding down the sleep button and volume down button for 10 seconds.
- Release the Sleep button and keep a hold of the volume down button for another 10 seconds.
- The screen on the Apple iPhone 14 Plus should be black. Following this, a message would appear on the desktop screen showing an iPhone in recovery mode.
- By clicking “Ok,” the restoration of the Apple iPhone 14 Plus shall start.
Part 3: How to get rid of someone’s Apple ID off iPhone on the App Store?
There might be a case where your subordinates or relative might have downloaded an app on your Apple iPhone 14 Plus from the App Store by using their IDs and would have forgotten to sign themselves out of it. For understanding the method on how to sign out of the Apple ID without passwords and credentials, users need to follow a few simple steps.
Conclusion
Having another Apple ID logged in doesn’t mean that everything is long lost. Several ways and scenarios help users to counter this problem easily. It’s easy to bypass Apple ID without a password remotely if you have the right tool. In that case, Dr.Fone - Screen Unlock (iOS) can definitely be your right choice. This article is a complete guide on how to combat the issue of having someone else’s Apple ID logged in to your Apple iPhone 14 Plus.
Also read:
- [Updated] Haste Assessment of Windows Documents
- [Updated] Perfecting Your Playlists Adapting Spotify to the YouTube Music Ecosystem
- How to Change Credit Card from Your Apple iPhone 6 Plus Apple ID and Apple Pay
- How to Screen Mirroring Tecno Spark 20 Pro+ to PC? | Dr.fone
- In 2024, Action Cam Faceoff The Best of Both Worlds – Hero5 Black & Hero4 Silver
- In 2024, Apple ID is Greyed Out From iPhone 6 How to Bypass?
- In 2024, Apple ID Locked for Security Reasons From Apple iPhone SE (2020)? Find the Best Solution Here
- In 2024, Apple ID Locked or Disabled From Apple iPhone 12? 7 Mehtods You Cant-Miss
- In 2024, Apple ID Unlock On iPhone 15 Pro? How to Fix it?
- In 2024, How to Fix Locked Apple ID on iPhone 14 Pro Max
- In 2024, How To Remove Phone Number From Your Apple ID from Your iPhone 6 Plus?
- In 2024, Non-Disclosure Measures for Video Footage
- In 2024, Unlock Apple ID without Phone Number On iPhone 7 Plus
- Is pgsharp legal when you are playing pokemon On Samsung Galaxy M14 5G? | Dr.fone
- Mastering Windows Animation Top 9 Apps for High-Quality GIF Capture for 2024
- Phoenix Wizard Setup Guide: Ultimate Tips for Optimizing Phoenix Kodi 19
- Protecting Your Privacy How To Remove Apple ID From Apple iPhone X
- The Differences Between Auto-GPT and Its Cousin, ChatGPT
- Top 3 Reliable & Free Techniques for Downloading Japan's Melodies Anytime, Anyplace
- Title: How To Fix Apple ID Verification Code Not Working From Apple iPhone 14 Plus
- Author: Alma
- Created at : 2024-10-21 18:31:34
- Updated at : 2024-10-25 16:53:06
- Link: https://apple-account.techidaily.com/how-to-fix-apple-id-verification-code-not-working-from-apple-iphone-14-plus-by-drfone-ios/
- License: This work is licensed under CC BY-NC-SA 4.0.