
How To Fix Apple ID Verification Code Not Working From Apple iPhone SE
How To Fix Apple ID Verification Code Not Working On Apple iPhone SE
In smartphones, the Apple ID stands out as a cornerstone of security for iPhone users and the broader iOS ecosystem. Its robust verification features are a key reason why many people choose iPhones. Thus, its heightened security is highly valued. However, even extremely reliable systems can encounter hiccups.
Sometimes, you might need help with the issue of the Apple ID verification code not working. This leads to frustration, especially if you need to remember your Apple iPhone SE ID details. This 2024 guide will delve into practical solutions to fix issues with Apple ID verification codes, helping you regain access to Apple ID and peace of mind.

Part 1: When Does the Apple Verification ID Failed Prompt Appear?
Before diving into solutions, it’s essential to understand the various scenarios that can trigger the “Apple Verification ID Failed” prompt. Recognizing the cause of the problem is the first step toward the right fix. Let’s explore the common reasons you might encounter this issue:
Wrong Password Input
One of the most straightforward reasons for a failed verification is entering the wrong password. This could be a simple typing error or misremembering your password. Repeated wrong attempts can also lead to your account being temporarily disabled as a security measure.
Apple Server Issues
At times, the problem may not be on your end. Apple’s servers can experience downtime or technical glitches like any other online service. During such instances, verification processes might fail, as the server cannot authenticate your credentials.

Slow Internet or Intermittent Connection
A stable and reliable internet connection is improtant for the verification process. If your internet is slow or experiencing intermittent connectivity, it can disrupt the communication between your device and Apple’s servers, leading to verification failure.
Two-Factor Authentication (2FA) Issues
Apple’s two-factor authentication provides an extra layer of security. However, it can also be a source of problems. If there’s a delay in receiving the 2FA code or if 2FA fails to work, you won’t be able to complete the verification process. This could be due to network issues or, sometimes, glitches within the 2FA system itself.
Suspicious Activity
Apple takes your security seriously. If there’s any unusual activity detected on your account, such as login attempts from unfamiliar locations or devices, Apple might lock your account as a precaution. This can trigger the verification failed prompt as the system seeks to protect your account from potential unauthorized access.
By understanding these scenarios, you can diagnose better why you’re facing the issue of Apple verification ID not working. In the following sections, we will explore solutions tailored to these specific problems, helping you regain access to your account efficiently.
Part 2: How To Fix Apple ID Verification Failed
Encountering an “Apple ID Verification Failed” error can be frustrating. Here are some practical solutions that correspond to the common reasons for this issue. These steps should help you regain access to your Apple ID.
Method 1: Connecting to a Stabler Internet Connection
A stable internet connection is crucial. If you’re encountering issues, switch to a more reliable Wi-Fi network. Alternatively, toggling your Wi-Fi or mobile data off and back on can refresh your connection.
Method 2: Changing Password/2FA Device Using Apple ID Account
If you’re facing troubles due to password errors or 2FA issues, resetting your password or updating 2FA settings may help. Visit Settings > Apple ID account page > Sign In & Security and follow the instructions to Change Password or update your Two-Factor Authentication settings.

Method 3: Check iPhone’s Date & Time Settings
Incorrect date and time settings can influence Apple ID verification. Go to Settings, select General, and tap on Date & Time. Ensure Set Automatically is enabled, allowing your Apple iPhone SE to adjust these settings according to your time zone.

Method 4: Signing Out/In Your Apple ID
Sometimes, simply signing out and back into your Apple ID can resolve verification issues. Navigate to Settings, tap your name at the top, scroll down, and select Sign Out. After signing out, sign back in and check if the issue persists.
Method 5: Disabling VPN
If you’re using a VPN, it can sometimes cause issues with Apple ID verification. Try disabling your VPN from the Settings or the VPN app you’re using, and then attempt the verification process again.
Method 6: Updating to the Latest iOS
Running an outdated iOS version can cause compatibility issues. Go to Settings, select General, and tap on Software Update. If an update is available, download and install it to ensure your device is up-to-date.
Method 7: Checking Apple Server Status and Trying Again Later
Sometimes, the problem is on Apple’s end. Check the Apple System Status page to see if there are any issues with their servers. If there are, it’s best to wait and try the verification process later.
By following these methods, you should be able to resolve the “Apple ID Verification Failed” issue and regain full access to your Apple ID functionalities.
Part 3: How To Remove Apple ID Account From iOS Device
If the above fixes have proven unsuccessful, it might be time to consider removing the Apple ID directly from your device using a third-party tool. This can often resolve the failed verification of Apple ID on new or old phones when other methods fail.
Thankfully, Wondershare Dr.Fone offers a solution with its Screen Unlock (iOS) feature, which includes a Remove Apple ID/iCloud account removal function. It’s a very handy tool for reviewing verification requirements, especially when you forget your Apple ID credentials.
Removing Apple ID Account With Dr.Fone - Screen Unlock (iOS)
Here’s how to use powerful Dr.Fone’s - Screen Unlock (iOS) to remove Apple ID.
Step 1: Download, install, and launch Wondershare Dr.Fone.
Step 2: Go to Toolbox > Screen Unlock > iOS.

- Step 3: Select Remove Apple ID to proceed.

- Step 4: Choose Unlock Now once the connectivity status is confirmed.

- Step 5: Ensure you have a screen lock and the two-factor authentication enabled. Follow the on-screen instructions.

- Step 6: Put your device into Recovery Mode or DFU Mode by following the on-screen instructions. Then, confirm the correct system version of your device.

- Step 7: Wait for the download to finish on your software.

- Step 8: After the firmware is confirmed, click Unlock Now. Then, type in “000000” on the appearing text box and click Unlock.

- Step 9: After the process is completed, click Done. If it still doesn’t work, then click Try again.

Conclusion
Navigating the Apple ID Verification Code not working issue can be a source of significant frustration. This guide aimed to alleviate that by detailing common triggers, such as password errors, server issues, and connectivity problems, and providing targeted solutions like ensuring stable internet, updating iOS, and checking server status.
For those rare instances where conventional methods fall short, Dr.Fone emerges as a reliable ally. Its Screen Unlock feature effectively addresses Apple ID-related hurdles. Whether you’re grappling with verification failures or other phone-related challenges, Dr.Fone - Screen Unlock (iOS) stands out as a dependable tool, ready to assist in simplifying your digital life.
Tips: Are you searching for a powerful Screen Unlock tool? No worries as Dr.Fone is here to help you. Download it and start a seamless unlock experience!
iCloud Separation: How To Disconnect Apple iPhone SE and iPad
Managing your iCloud is important to maintain the security of your Apple devices. Your iCloud account is the central hub for your photos, documents, contacts, and more. It’s essential to ensure that your devices are safe and secure. However, there are scenarios when you might want to remove it.
The page below will guide you on how to disconnect your Apple iPhone SE from iCloud. It highlights the benefits of having full control over your data. Below, you can learn how to disconnect from iCloud,keeping your data organized and secure. Explore the article to learn more.

Part 1. Why Disconnect From iCloud?
iCloud is one of the most integral parts of the Apple ecosystem. It syncs your data across devices and ensures a connected digital experience. Yet, there are times when disconnecting from iCloud is necessary. Below are some specific reasons why you should learn how to disconnect your iPad/iPhone from iCloud.
Privacy Concerns
Privacy is an important concern in today’s digital age. Disconnecting from iCloud can provide a layer of security. It prevents sensitive information like photos, contacts, and documents from being stored in the cloud. This is important if you prefer to maintain complete control over your data.
Selling or Giving Away Your Device
When you decide to sell or give away your Apple iPhone SE or iPad, it’s essential to disconnect it from iCloud. Failing to do so could allow the new owner access to your data. Disconnecting ensures your device is wiped clean of your iCloud information, protecting your privacy.
Limited Storage Space
Apple offers a limited amount of free iCloud storage. If you’ve reached or exceeded your storage quota, disconnecting certain devices can help free up space. It can also prevent annoying notifications about running out of storage and keep your backups and documents accessible.
Changing Apple ID
If you decide to change your Apple ID for any reason, disconnecting from iCloud is necessary. This operation allows you to reconnect your old ID to a new one if necessary. It ensures that all purchases, app downloads, and data are linked to the new ID.
The benefits of disconnecting from iCloud include enhanced security and privacy. Disconnecting your iCloud account can also lead to reduced usage. It’s great for users who want more control over their data or prefer to keep their devices offline.
Part 2. Disconnect iPhone/iPad From iCloud Through 6 Manners
Learning how to disconnect aniPhone or iPad from iCloudcan be necessary for various reasons. To guide you through the process, here are six methods to do so.
Use Settings To Access iCloud
- Step 1: Open the Settings app on your Apple iPhone SE/iPad. Next, tap your name at the top, where your Apple ID is listed.
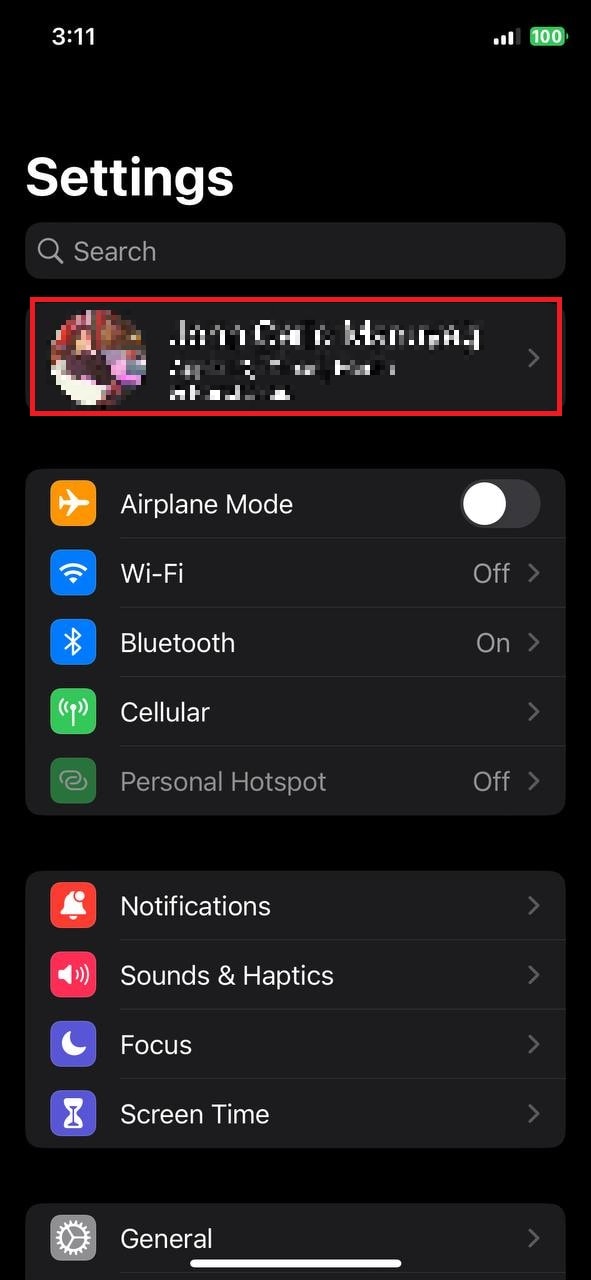
- Step 2: Scroll down and tap Sign Out. When prompted, type in your Apple ID and password. Next, choose TurnOff for the data you want to keep on your device. Afterwards, your Apple iPhone SE or iPad is now disconnected from iCloud.
Visit iCloud.com
You can also remove your iCloud account on your Apple iPhone SE/iPad by visiting the iCloud.com website. Here’s how.
- Step 1: Launch a web browser on your computer or another device. Visit iCloud.com and sign in with your Apple ID.

- Step 2: Click AccountSettingsin the interface and scroll down. Choose the option to Sign Out of All Browsers. Next, confirm your choice to disconnect your iCloud from your Apple iPhone SE or iPad.
Factory Reset
Performing a factory reset can cause all data on your device erased, effectively disconnecting it from iCloud. Here’s how.
- Step 1:Go to your device’s Settings. Next, tap on General> Reset. ChooseErase All Content and Settings.

- Step 2: You’ll be prompted to enter your passcode and Apple ID password. Enter your details and confirm the reset.
Note
Be cautious with this method, as it will erase all data on your device.
Use the Find My App (iOS 13 and later)
You can use the Find My app to remove an iCloud account from a specific device. Here are the steps below.
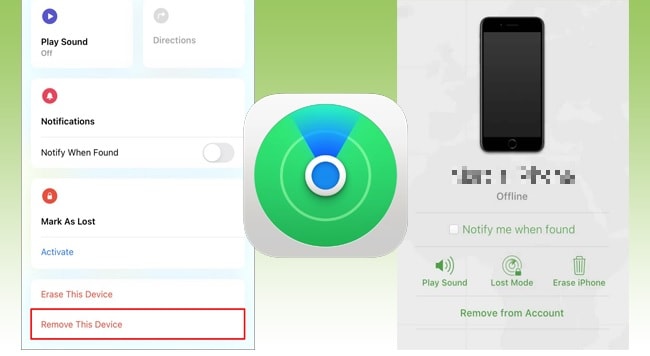
- Step 1: Open the Find Myapp on your device. Next, tap the Devicestab at the bottom.
- Step 2: Select the Apple iPhone SE device you want to disconnect. Afterwards, tap Remove This Device. Once you confirm your choice, it will disconnect the Apple iPhone SE device from an iCloud account.
Contact Apple Support
If you encounter issues disconnecting your device from iCloud, contacting Apple support is a wise choice. It’s a good option if you have difficulties using the previous methods. They can guide you through the process and offer personalized assistance.

Use a Third-Party Tool
If you’ve tried all the options and even contacted Apple support but still face persistent issues, it might indicate more serious problems. If it detects unusual activity, your Apple iPhone SE or iPad might trigger iCloud’s Activation Lock. A trusted third-party tool like Wondershare Dr.Fone- Screen Unlock can work wonders in such cases.
Part 3. Steps To Remove iCloud From iPhone/iPad With a Flexible Alternative-Wondershare Dr.Fone
Dr.Fone is a flexible alternative tool that can remove iCloud from your Apple iPhone SE or iPad. Your Apple iPhone SE or iPad will most likely trigger iCloud’s Activation Lock if all the steps above do not solve your issue. In that case, Dr.Fone - Screen Unlock can help you bypass it, allowing you to regain control of your device. The steps below show you how to disconnect from iCloudin 3 simple steps.
- Step 1: Start by downloading and installing Dr.Fone on your computer. Once installed, launch the program. Click Toolbox> ScreenUnlock> iOSto move on to the next process.
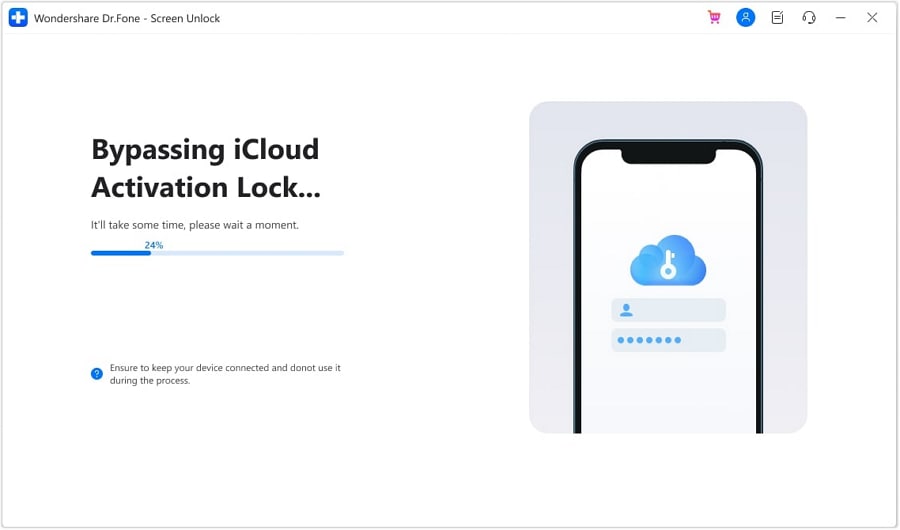
- Step 2: On the next window, select iCloud Activation Lock Removal to initiate the process. Next, connect your Apple iPhone SE/iPad to the computer with a USB cable. Wait for Dr.Fone to recognize your device, and it will lead to the next screen.

- Step 3: Follow the next on-screen instructions. Afterwards, Dr.Fone will automatically remove the ActivationLockdisplayed under the progress bar.
Once the process is completed, you should see the completion message below. Select Done to finish the removal of the iCloud Activation Lock on your Apple iPhone SE or iPad. A successful process will automatically remove the iCloud on your device.

Part 4. How Dr.Fone Can Benefit You in Other Aspect
Dr.Fone goes beyond bypassing the iCloud activation lock. It offers a wide range of essential features that can enhance your device management and data recovery capabilities. Below are some key features that make Wondershare Dr.Fone a reliable tool.

- Unlock Apple ID without a Password. Dr.Fone allows you to unlock your Apple ID without needing a password. The feature is helpful if you’ve been locked out of your account or face authentication issues.
- **Remove SIM Lock/Phone Carrier.**The tool can also remove SIM locks and phone carrier restrictions. This feature allows you to use your device with any carrier or SIM card.
- **No Data Loss.**A crucial advantage of Dr.Fone is its ability to perform all these operations without causing data loss. Your precious data, apps, and settings remain intact throughout the process.
Apart from its iCloud-related capabilities, Dr.Fone offers a comprehensive set of tools for managing your iOS device.
Data Recovery
Dr.Fone can help you recover lost or deleted data. Retrieve your messages, photos, videos, contacts, and more. The feature is a lifesaver when accidental data loss occurs.
Phone Manager
You can manage your device’s data directly on your computer. Transfer files and easily perform tasks like importing, exporting, or deleting content.
Phone Backup
Dr.Fone provides robust backup solutions. The platform allows you to create backups of your device and restore them when needed. It’s an essential part of maintaining the integrity of your data.
Conclusion
Managing your iCloud is essential for maintaining privacy and control over your Apple devices. The various methods on how to disconnect your Apple iPhone SE from iCloudcater to different scenarios. Whether you disconnect using device settings or the flexibility of third-party tools like Dr.Fone, the choice is yours.
With these options at your disposal, you can tailor your data to meet your specific needs. Always remember that having a handy third-party tool like Dr.Fone can put your data worries at ease. It ensures you have another method of how to disconnect from iCloudfor any iCloud-related concerns.
How To Get the Apple ID Verification Code On Apple iPhone SE in the Best Ways
Your digital identity serves as a vital safeguard for your personal information. This significance is particularly pronounced within the Apple ecosystem. A pivotal element of this digital identity is the Apple ID verification code. It might appear as a mere sequence of characters, but it carries immense significance. The verification code serves as a safeguard for your Apple account and all the Apple iPhone SE devices linked to it.
Whether you’ve been an Apple user for years or are just starting out in the ecosystem, grasping the process of obtaining this code is essential. This article will take you through the importance of how to get an Apple ID verification codeand discover the most effective methods to acquire it.
Part 1: How Verification Code Helps Apple Users Keeping Their Devices and Account Safe
Apple has maintained a leading position in technological innovation. It also encompasses a steadfast commitment to security. This commitment is reinforced by the implementation of rigorous security protocols and encryption measures. It understands the critical need to fortify the security of its devices and accounts. One pivotal aspect of Apple’s safety is the use of verification codes. These codes serve as an extra level of protection.
The basic idea behind verification codes is to require users to provide a temporary code in addition to their regular password. This code is commonly dispatched to a trusted device, such as an iPhone. This is to introduce an additional layer of security that proves challenging for hackers to bypass. Apple users have several methods that will help them in how to get the Apple ID verification code scenario**.**
1. SMS or Text Messages
Apple can provide you with a verification code through SMS or text message on a trusted phone number. This offers a hassle-free option for users who wish to avoid using extra applications or devices.
2. Trusted Devices
Have you connected multiple Apple devices to your Apple ID, like an iPhone, iPad, Apple Watch, or Mac? If yes, you have the convenience of receiving verification codes on these trusted devices. This functionality guarantees a smooth and user-centric experience.
Part 2: How To Receive the Verification Code on a Trusted Phone Number?
One of the fundamental methods for obtaining a verification code involves utilizing a trusted phone number. This serves as a crucial step in bolstering the security of your Apple account, ensuring that exclusive access is granted solely to you. Obtaining a verification code via your trusted phone number holds significant importance for several key reasons.
In the first place, it acts as a safeguard against unauthorized access, even if someone possesses your Apple ID password. Furthermore, it streamlines the process of identity verification, facilitating a smoother account recovery in the event of a forgotten password or a security breach. Here’s a simple guide on how to get the Apple ID verification code via phone number.
- Step 1: When signing into your account, tap “Didn’t Get a Code” after entering your Apple ID credentials. Here, opt to receive the code on your trusted phone number.
- Step 2: Shortly, you’ll receive a text message or a call from Apple containing the verification code needed to finalize your sign-in process.

Part 3: How To Receive the Verification Code Directly From iPhone or iPad?
It is worth highlighting that Apple employs verification codes in numerous fundamental procedures. This emphasis on security ensures that your personal data and devices remain protected. Apple has designed its ecosystem to smoothly integrate security features into everyday tasks. Here’s how you can access the “Get Verification Code” feature for how to get an Apple ID verification code:
- Step 1. Open your device’s Settings, and select “Apple ID” from the top. On the following screen, press “Sign-in & Security.”
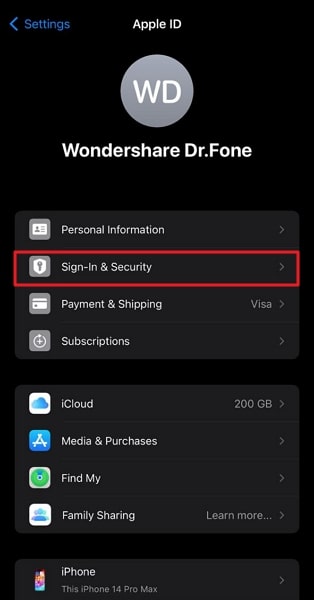
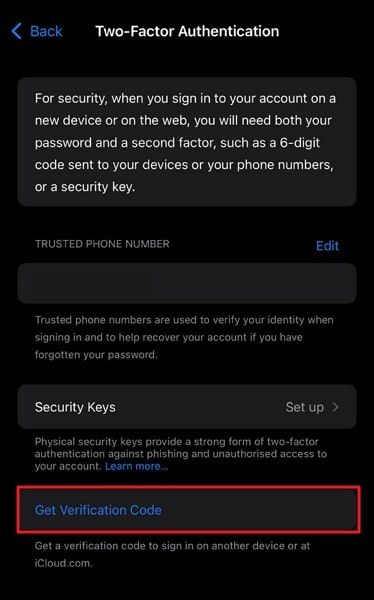
- Step 2. Here, tap “Two-Factor Authentication,” and on the ensuing screen, press “Get Verification Code.” You might be asked to log in using your Apple ID to receive the code.
Part 4: How To Get an Apple ID Verification Code Without a Phone?
Many users rely heavily on our trusted iPhones or iPads to receive Apple ID verification codes. Nonetheless, there may be situations in which you could be without your main device. Whether it’s due to misplacement or setting up a new one, Apple offers alternative methods to assist you. Here, we will explore two methods for how to get an Apple ID verification code without a phone:
Way 1: Take Help of Apple Watch
The Apple Watch serves as a versatile partner to complement your Apple iPhone SE. It offers a range of integrated features. One of its lesser-known capabilities is assisting you in situations where you need to receive an Apple ID verification code. Here is how you can use your Apple Watch for this purpose:
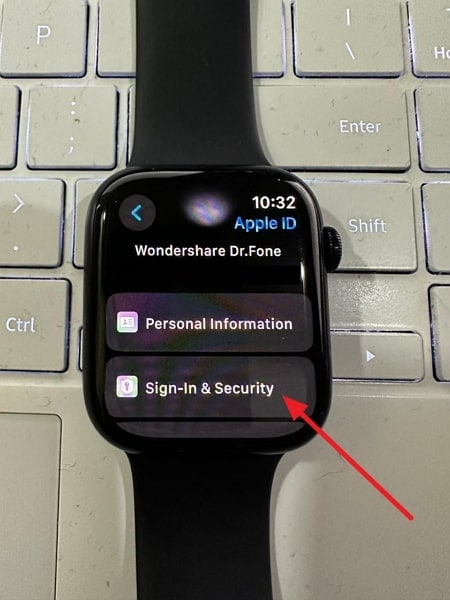
- Step 1. On your Apple Watch, open Settings and tap on your name/Apple ID. There, press “Sign-in & Security” and go on tap the option “Two-Factor Authentication.”
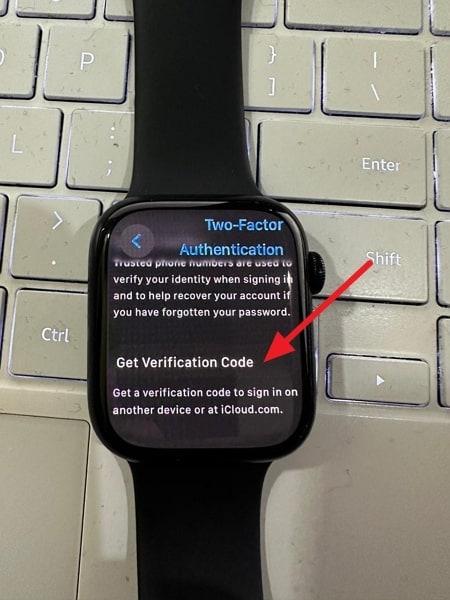
- Step 2. In the “Two-Factor Authentication” screen, press “Get Verification Code.” A 6-digit verification code will appear, which can be used for your targeted purpose.
Way 2: Use Get Verification Code on Mac
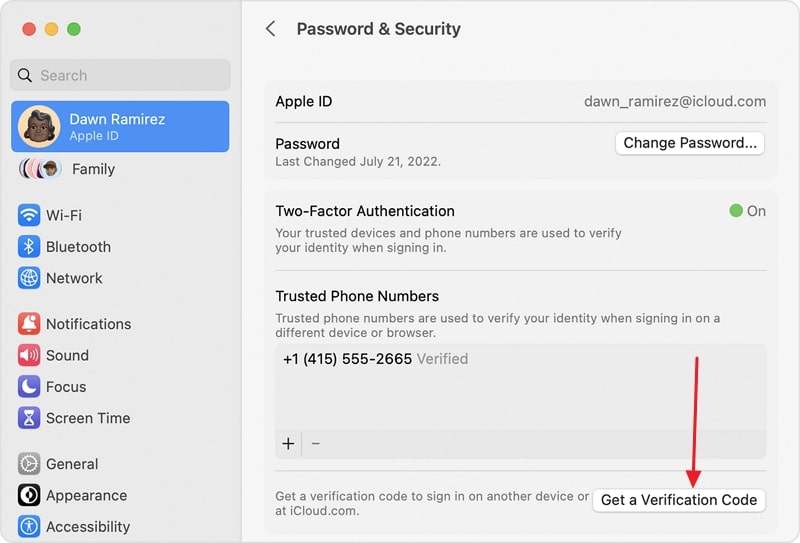
If you find yourself without your primary iPhone but have access to your Mac, you can still obtain an Apple ID verification code. Apple has integrated the “Get Verification Code” feature into the macOS system settings. That makes it easy to retrieve the code on your computer. Use the following guide to get the verification code from your Mac:
- Step 1. Navigate to “System Settings” on your Mac through the Dock or Apple menu. There, select Apple ID/your name from the left panel and click “Sign-In & Security.”
- Step 2. Within the Sign-In & Security settings, tap “Two-Factor Authentication.” Follow it by clicking “Get a Verification Code,” and a code will be displayed for your use.
Bonus Tip: The Best Screen Unlock Tool To Remove the Apple ID Without Password
Your Apple ID plays a pivotal role in the Apple ecosystem, and safeguarding its security is paramount. Nonetheless, there are instances where you might encounter the necessity of unlocking your Apple ID without the passcode. Common scenarios range from forgotten passwords to inheriting a device with an unknown Apple ID. In such cases, it’s crucial to have a reliable tool at your disposal, and one such tool is Wondershare Dr.Fone.
It provides a wide range of mobile management solutions for iOS devices. One of its standout features is the iOS screen unlock tool. This tool offers a streamlined and easy-to-use method for removing the Apple ID without a password. It permanently bypasses the previous Apple ID from your device, enabling you to sign in using a new Apple ID.
Dr.Fone - Screen Unlock (iOS)
Unlock iPhone/iPad Lock Screen Without Hassle.
- Simple, click-through, process.
- Unlock screen passwords from all iPhone and iPad.
- No tech knowledge required, everybody can handle it.
- Supports the latest iOS version fully!


4,395,218 people have downloaded it
Key Features of Wondershare Dr.Fone
- It empowers you to resolve carrier SIM problems in many situations, including issues like SIM Not Supported, SIM Not Valid, SIM Locked, etc.
- If you forgot your iTunes encrypted backup password, Wondershare Dr.Fone can remove the encryption without damaging your data.
- Wondershare Dr.Fone allows you to remove MDM profiles from your device without the risk of data loss or jailbreaking.
Steps To Unlock Apple ID From Your Apple iPhone SE/iPad via Wondershare Dr.Fone
With the help of the straightforward guidelines explained below, you can easily bypass Apple ID from your Apple iPhone SE without needing the password:
- Step 1: Access Remove Apple ID in Wondershare Dr.Fone
Install and launch Wondershare Dr.Fone on your system and move to the “Toolbox” tab. Here, click “Screen Unlock” and choose “iPhone” as your device type. In the “Screen Unlock” menu, tap “Remove Apple ID” and connect your iOS device to the computer via USB cable.
- Step 2: Enable the Recovery Mode on Your Apple iPhone SE
Once the Apple iPhone SE is connected, hit “Unlock Now” and proceed to confirm that your device has a screen lock configured and 2FA is enabled. These are necessary for the removal of Apple ID, so set them up if you haven’t already. Afterward, activate Recovery Mode following the on-screen instructions on your device.
- Step 3: Unlock the Apple ID From Your Apple iPhone SE
As your device is in Recovery Mode, Dr.Fone will detect its model. You need to choose the system version and click “Start” to download it. Once it has been downloaded and verified, hit “Unlock Now.” A warning prompt will appear about expected data loss. Put the “000000” PIN in the warning box and click “Unlock.” This will start the Apple ID unlock process.

Conclusion
In this comprehensive guide, we’ve explored the significance of Apple ID verification codes. We also explored various methods for getting an Apple ID verification code when your primary device is unavailable. From using trusted phone numbers to leveraging Apple Watch, we’ve covered a spectrum of scenarios to get the verification code of your Apple ID.
We’ve also delved into the importance of having a reliable tool like Wondershare Dr.Fone - iOS Screen Unlock at your disposal. This powerful mobile management solution aids in unlocking your Apple ID without a passcode. It also offers a wide array of features to address various iOS-related issues. Whether dealing with a forgotten password, managing a shared device, or inheriting one, Dr.Fone simplifies the process.
Also read:
- [New] Chuckle-Inducing Snaps Applying the Cartoon Face Effect on Snapchat
- [New] In 2024, Enchanting Viewers The Art of Crafting Engaging YouTube Description Templates
- [Updated] Exceptional Aspects of Inexpensive ASMR Microphones
- 2024 Approved The Ultimate Guide to Selecting a Top Screen Recorder (OBS/Fraps)
- Apple ID Unlock On Apple iPhone 13 Pro Max? How to Fix it?
- Can I Remove the Apple Watch Activation Lock By Apple iPhone XS Max without the Previous Owner?
- Can Life360 Track You When Your Infinix Note 30 Pro is off? | Dr.fone
- From SRT to SUBC Efficient Conversion Tactics for 2024
- How To Fix Apple ID Verification Code Not Working From iPhone XS
- How to Unlock Apple ID From your iPhone 14 without Security Questions?
- In 2024, How To Erase an Apple iPhone XS Max Without Apple ID Password?
- In 2024, How to Remove an AirTag from Your Apple ID Account On Apple iPhone SE?
- In 2024, How to Remove Apple iPhone 12 Pro Max Device from iCloud
- In 2024, How To Remove Phone Number From Your Apple ID from Your iPhone SE (2022)?
- In 2024, Your Account Has Been Disabled in the App Store and iTunes On iPhone 13 Pro Max?
- New In 2024, Top 9 Choices for Video Auto Translate
- Overcoming DirectX12 Barriers for Halo Infinite Launch
- The Cautionary Tale of Artificial Intelligence in Therapy: Top 9 Dangers to Consider
- The Fast Photography Path to Crafting Quick Google Collage Pics
- Title: How To Fix Apple ID Verification Code Not Working From Apple iPhone SE
- Author: Alma
- Created at : 2025-02-27 23:13:17
- Updated at : 2025-03-03 20:25:05
- Link: https://apple-account.techidaily.com/how-to-fix-apple-id-verification-code-not-working-from-apple-iphone-se-by-drfone-ios/
- License: This work is licensed under CC BY-NC-SA 4.0.