
How To Fix Apple ID Verification Code Not Working On iPhone 8 Plus
How To Fix Apple ID Verification Code Not Working On Apple iPhone 8 Plus
In smartphones, the Apple ID stands out as a cornerstone of security for iPhone users and the broader iOS ecosystem. Its robust verification features are a key reason why many people choose iPhones. Thus, its heightened security is highly valued. However, even extremely reliable systems can encounter hiccups.
Sometimes, you might need help with the issue of the Apple ID verification code not working. This leads to frustration, especially if you need to remember your Apple iPhone 8 Plus ID details. This 2024 guide will delve into practical solutions to fix issues with Apple ID verification codes, helping you regain access to Apple ID and peace of mind.

Part 1: When Does the Apple Verification ID Failed Prompt Appear?
Before diving into solutions, it’s essential to understand the various scenarios that can trigger the “Apple Verification ID Failed” prompt. Recognizing the cause of the problem is the first step toward the right fix. Let’s explore the common reasons you might encounter this issue:
Wrong Password Input
One of the most straightforward reasons for a failed verification is entering the wrong password. This could be a simple typing error or misremembering your password. Repeated wrong attempts can also lead to your account being temporarily disabled as a security measure.
Apple Server Issues
At times, the problem may not be on your end. Apple’s servers can experience downtime or technical glitches like any other online service. During such instances, verification processes might fail, as the server cannot authenticate your credentials.

Slow Internet or Intermittent Connection
A stable and reliable internet connection is improtant for the verification process. If your internet is slow or experiencing intermittent connectivity, it can disrupt the communication between your device and Apple’s servers, leading to verification failure.
Two-Factor Authentication (2FA) Issues
Apple’s two-factor authentication provides an extra layer of security. However, it can also be a source of problems. If there’s a delay in receiving the 2FA code or if 2FA fails to work, you won’t be able to complete the verification process. This could be due to network issues or, sometimes, glitches within the 2FA system itself.
Suspicious Activity
Apple takes your security seriously. If there’s any unusual activity detected on your account, such as login attempts from unfamiliar locations or devices, Apple might lock your account as a precaution. This can trigger the verification failed prompt as the system seeks to protect your account from potential unauthorized access.
By understanding these scenarios, you can diagnose better why you’re facing the issue of Apple verification ID not working. In the following sections, we will explore solutions tailored to these specific problems, helping you regain access to your account efficiently.
Part 2: How To Fix Apple ID Verification Failed
Encountering an “Apple ID Verification Failed” error can be frustrating. Here are some practical solutions that correspond to the common reasons for this issue. These steps should help you regain access to your Apple ID.
Method 1: Connecting to a Stabler Internet Connection
A stable internet connection is crucial. If you’re encountering issues, switch to a more reliable Wi-Fi network. Alternatively, toggling your Wi-Fi or mobile data off and back on can refresh your connection.
Method 2: Changing Password/2FA Device Using Apple ID Account
If you’re facing troubles due to password errors or 2FA issues, resetting your password or updating 2FA settings may help. Visit Settings > Apple ID account page > Sign In & Security and follow the instructions to Change Password or update your Two-Factor Authentication settings.

Method 3: Check iPhone’s Date & Time Settings
Incorrect date and time settings can influence Apple ID verification. Go to Settings, select General, and tap on Date & Time. Ensure Set Automatically is enabled, allowing your Apple iPhone 8 Plus to adjust these settings according to your time zone.

Method 4: Signing Out/In Your Apple ID
Sometimes, simply signing out and back into your Apple ID can resolve verification issues. Navigate to Settings, tap your name at the top, scroll down, and select Sign Out. After signing out, sign back in and check if the issue persists.
Method 5: Disabling VPN
If you’re using a VPN, it can sometimes cause issues with Apple ID verification. Try disabling your VPN from the Settings or the VPN app you’re using, and then attempt the verification process again.
Method 6: Updating to the Latest iOS
Running an outdated iOS version can cause compatibility issues. Go to Settings, select General, and tap on Software Update. If an update is available, download and install it to ensure your device is up-to-date.
Method 7: Checking Apple Server Status and Trying Again Later
Sometimes, the problem is on Apple’s end. Check the Apple System Status page to see if there are any issues with their servers. If there are, it’s best to wait and try the verification process later.
By following these methods, you should be able to resolve the “Apple ID Verification Failed” issue and regain full access to your Apple ID functionalities.
Part 3: How To Remove Apple ID Account From iOS Device
If the above fixes have proven unsuccessful, it might be time to consider removing the Apple ID directly from your device using a third-party tool. This can often resolve the failed verification of Apple ID on new or old phones when other methods fail.
Thankfully, Wondershare Dr.Fone offers a solution with its Screen Unlock (iOS) feature, which includes a Remove Apple ID/iCloud account removal function. It’s a very handy tool for reviewing verification requirements, especially when you forget your Apple ID credentials.
Removing Apple ID Account With Dr.Fone - Screen Unlock (iOS)
Here’s how to use powerful Dr.Fone’s - Screen Unlock (iOS) to remove Apple ID.
Step 1: Download, install, and launch Wondershare Dr.Fone.
Step 2: Go to Toolbox > Screen Unlock > iOS.

- Step 3: Select Remove Apple ID to proceed.

- Step 4: Choose Unlock Now once the connectivity status is confirmed.

- Step 5: Ensure you have a screen lock and the two-factor authentication enabled. Follow the on-screen instructions.

- Step 6: Put your device into Recovery Mode or DFU Mode by following the on-screen instructions. Then, confirm the correct system version of your device.

- Step 7: Wait for the download to finish on your software.

- Step 8: After the firmware is confirmed, click Unlock Now. Then, type in “000000” on the appearing text box and click Unlock.

- Step 9: After the process is completed, click Done. If it still doesn’t work, then click Try again.

Conclusion
Navigating the Apple ID Verification Code not working issue can be a source of significant frustration. This guide aimed to alleviate that by detailing common triggers, such as password errors, server issues, and connectivity problems, and providing targeted solutions like ensuring stable internet, updating iOS, and checking server status.
For those rare instances where conventional methods fall short, Dr.Fone emerges as a reliable ally. Its Screen Unlock feature effectively addresses Apple ID-related hurdles. Whether you’re grappling with verification failures or other phone-related challenges, Dr.Fone - Screen Unlock (iOS) stands out as a dependable tool, ready to assist in simplifying your digital life.
Tips: Are you searching for a powerful Screen Unlock tool? No worries as Dr.Fone is here to help you. Download it and start a seamless unlock experience!
How to Fix when Apple Account Locked On Apple iPhone 8 Plus?
You pick up your phone to perform a routine task, and your Apple iPhone 8 Plus gives you a surprise that you have gotten your Apple account locked. It will remain this way, and you will not be able to use the phone unless you follow the proper steps.
Several Apple device users face this problem, and one of these messages might be on your screen:
- “This Apple ID has been disabled for security reasons.”
- “You can’t sign in because your account was disabled for security reasons.”
- “This Apple ID has been locked for security reasons.”
Getting your Apple account locked can be frustrating and might hinder the performance of your phone. In this article, we will discuss the various tips to solve the Apple account locked issue.

Part 1. Why is Apple Account Locked?
Although annoying, Apple locks your Apple Account for a good reason. There might be various reasons, but the most common one is that your account’s integrity was in danger. Apple locks your account when it sees an “unusual activity” surrounding your account or device. It generally happens when some unauthorized person attempts to access your account.
Your activity can also lock your account. If you fail to log in to your Apple ID several times, Apple might lock it. Moreover, your account can even get locked when you answer the security questions incorrectly more than once. Furthermore, Apple tries to keep your ID dedicated to a few devices. Besides, it could shut it down when you aimlessly try to open the account on multiple Apple devices.
Part 2. 3 Tips to Unlock Apple Account
Well, now you know the reasons behind the Apple Account getting locked. The next step is to learn the best tips to unlock it. Here, we will share various tricks that will open the Apple account in no time. So let’s dive in!
Tip 1. Use Dr.Fone to Unlock Apple Account (without Password)
Wondershare’s Dr.Fone comes with a complete set of tools to help with a range of different and challenging problems related to your Android or iPhone. The software has an intuitive interface, making unlocking Apple account a lot easier than its competitors. The application Dr. Fone - Screen Unlock (iOS) has robust versions for both Windows and macOS.
Some of the top and vital features of Dr.Fone are as follows:
- It can repair the system of both Android and iOS devices.
- It can backup data available on your device.
- You can transfer WhatsApp, Line, and Kik chat history from one phone to another.
Download the tool on your respective system, and follow the guidelines stated below to unlock Apple account without the password:
Step 1: Run the Application
Once the download is complete, get your USB cable and connect your Apple iPhone 8 Plus/iPad to your computer.
Select the “Screen Unlock” tool, and a new interface will greet you. Select the “Unlock Apple ID” option to begin the process to unlock your Apple Account.

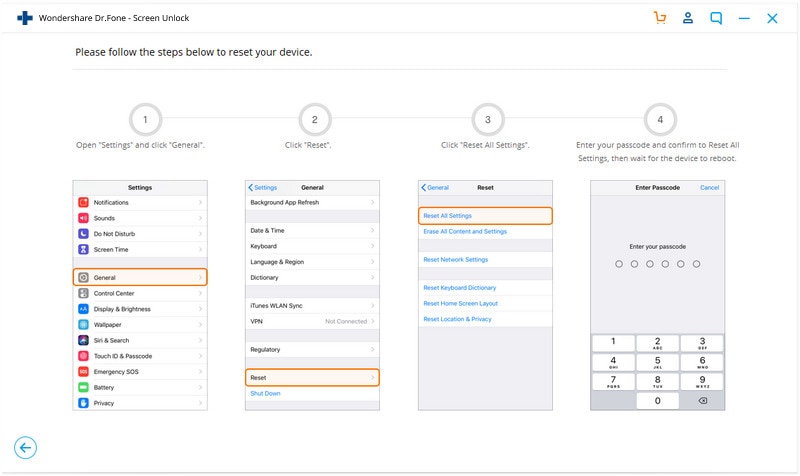
Step 2: Reset your Apple iPhone 8 Plus using Dr.Fone
Dr.Fone will present you with detailed on-screen instructions that show precisely how to reset your Apple iPhone 8 Plus Settings. Dr.Fone must unlock your Apple iPhone 8 Plus/iPad.
Step 3: Unlock the Phone
When your Apple device has been reset, Dr.Fone will get to work and will give you your unlocked iPhone/iPad in a matter of seconds.
When the process finishes, a pop-up message will notify you. It will point out that you can now unplug your Apple iPhone 8 Plus from the PC and check if the operation was successful.
Tip 2. Use iTunes to Unlock Apple Account
Apple also offers the services of its built-in utilities such as iTunes to unlock Apple account. Here before doing anything else, you will need to get your Apple iPhone 8 Plus into recovery mode. For added convenience, we have listed how to get into recovery mode with iPhone so you can smoothly proceed with the process.
Step 1. Power off your device.
Step 2. Once it’s powered off, press the side button and keep holding it while connecting your Apple iPhone 8 Plus to your computer.
Step 3. Once the recovery mode logo appears, leave the button.
Now that you have entered into recovery mode, the next step is to restore the iPhone. The process is simple. You can learn it quickly by going through the steps listed below:
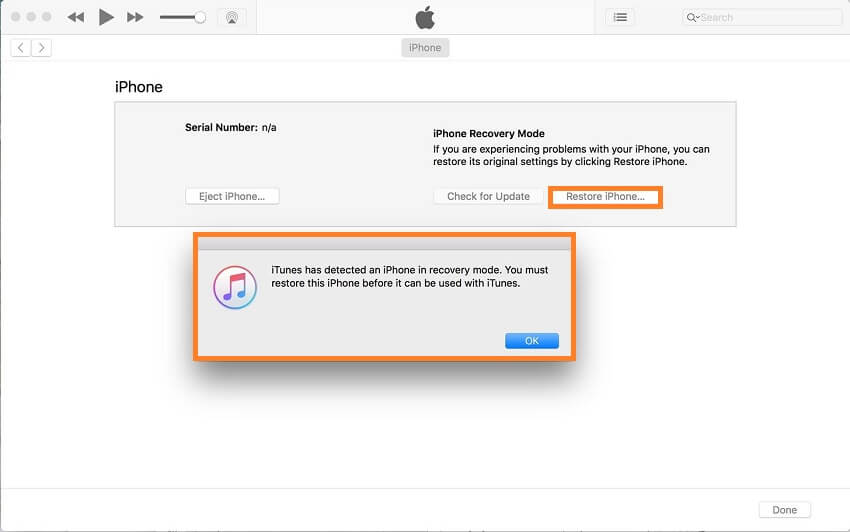
Step 1. After successfully getting your Apple iPhone 8 Plus into recovery mode, select the Restore or Update option from iTunes.
Step 2. iTunes will download the necessary files to restore your phone, which can take some time.
Step 3. After the download, you can press shift while clicking restore, which will let you select the firmware file.
Step 4. Wait for the firmware update to finish, and then you are done!
Step 5. Access your Apple iPhone 8 Plus, and you will find that the Apple account will be disabled.
Tip 3. Recover Your Apple ID via Apple (Reset Password)
If you have forgotten your Apple device’s password, it’s recommended not to input your password more than one time. It would lead to a 24-hour shutdown. It cannot be lifted even if you know your password, so proceed wisely. The recommended solution instead is to reset your password.
Here are the steps to reset the password for any of your Apple devices, provided they are in your trusted devices’ list.
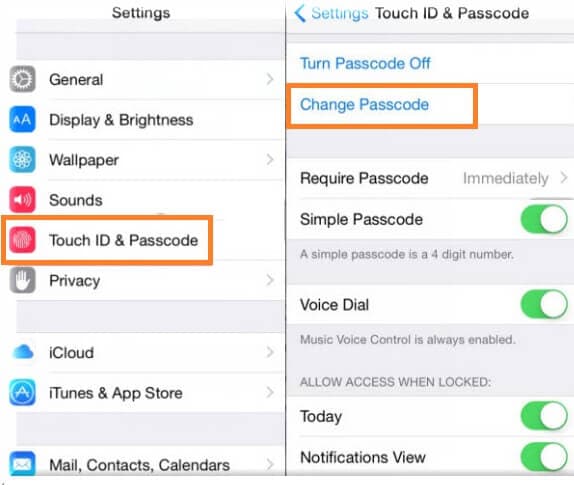
Step 1. Go to Settings on your Apple device and tap your name.
Step 2. Now, go to Password & Security and then Change passcode.
Step 3. If your Apple device is signed in to iCloud, you will be required to enter a password.
Step 4. Enter the iCloud password and then set a new code for your device.
Part 3. How to Change Apple ID on an iPhone?
If you have purchased a refurbished iPhone and the previous owner’s Apple ID added to it, it is wise to change the Apple ID. You can add your own or add the ID of someone you know. Apple provides simple steps for you to change your account on iPhone.
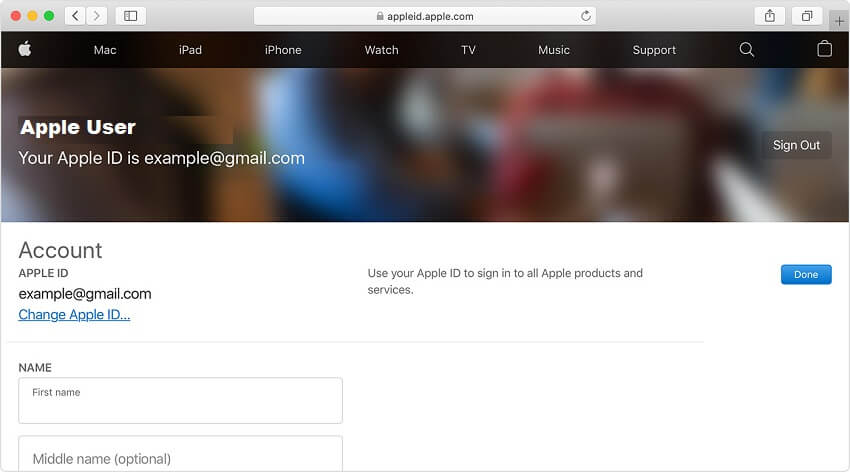
Step 1. Visit the relevant site of Apple to remove the ID and sign in with your account.
Step 2. Navigate to the Account section and choose Edit. From there, you will see a new list of options.
Step 3. Select Change Apple ID.
Step 4. Update your email address and click continue.
Step 5. That’s it!
Conclusion
Getting your Apple account can ruin your day and hinder your work. Luckily, there are suitable methods to fix the Apple Account Locked issue quickly and without any damage. Here, we have discussed the top techniques to unlock the Apple account. Hopefully, these tips have helped you can access the contents of your Apple iPhone 8 Plus.
How to Unlock Apple ID On your Apple iPhone 8 Plus without Security Questions?
Apple ID is known as a very strong security protocol that is consumed for the protection of the data and the applications of the Apple iPhone 8 Plus device it is associated with. This security measure is primarily responsible for holding the data and assorted applications of the Apple iPhone 8 Plus device. Thus, Apple ID can be regarded as a very ubiquitous protocol that promotes effortless protection and considers bringing the complete system in a single bubble. There are several instances where people report over their Apple ID for being locked. To counter this issue, this article provides you a detailed guide on how to unlock Apple ID without security questions and related barriers.
Part 1. A worry-free way to unlock Apple ID without security questions
You may have come across a series of different solutions that considered providing you efficient mechanisms to unlock your Apple ID without the aid of security questions. Over a detailed comparison, people have come across different third-party platforms that dedicated themselves to offering the users the perfect environment to have their devices unlocked. As you all are aware of the saturation that exists in the market, this article features Dr. Fone – Screen Unlock (iOS) , state-of-the-art software that efficiently resolves all problems related to a locked Apple device. There are several reasons that make it possible for users to prefer Dr. Fone above all other existing platforms.
- It helps you save your device from the disabled state.
- You can easily unlock your Apple iPhone 8 Plus or iPad over forgetting its passcode.
- It can operate across all kinds of iPhones, iPads, and iPod Touch.
- It is compatible across the latest versions of iOS.
- It provides you a platform to work without iTunes.
- There are no pre-eminent skills required for using the platform.
Over the question of utilizing the platform efficiently, the following guide explains to you how to unlock Apple ID without email or security questions with the help of Dr. Fone – Screen Unlock.
Step 1: Connect Devices and Access Tool
After downloading and installing the platform on your desktop, you need to connect your Apple device with the desktop and launch the software. Select the “Screen Unlock” tool from the list of options provided on the home window of the application.
Step 2: Initiate Unlock
On the next screen, you are required to select the option of “Unlock Apple ID” from the list and proceed. Open up your Apple device and “Trust” the computer with the provided prompt message.
Step 3: Reboot Phone
Approach the Settings of your device and initiate its reboot. As soon as the reboot starts, the procedure for unlocking the Apple ID initiates across the platform.
Step 4: Execution of the Process
As the process elapses successfully, you are provided with a prompt window on the desktop displaying the completion of the process.
Part 2. Unlock Apple ID with 2-factor authentication
There are multiple techniques that involve the method of unlocking an Apple ID without the aid of email addresses and security questions. As you all believe in the importance of third-party platforms, it is important to come across other mechanisms that can come quite handy in managing such issues. Two-factor authentication is another approach that can provide you robust and efficient solutions to this issue.
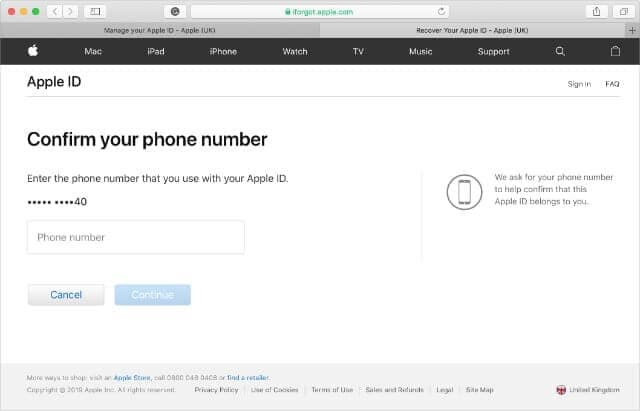
Step 1: Open the iForgot website and provide your Apple ID username to proceed. You need to provide the platform with the phone number that is associated with your Apple ID for verification.
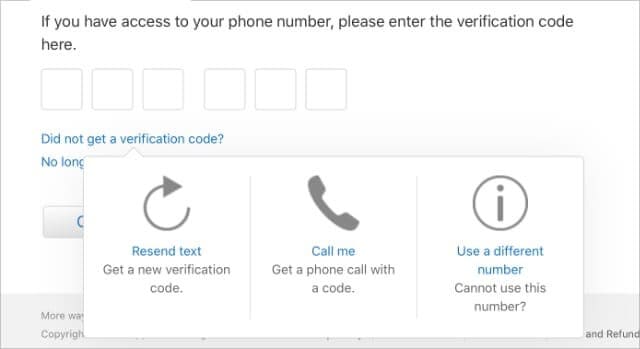
Step 2: Since you cannot use your Apple device or you have not received a notification yet, you need to tap on “Unable to access your [device]?” This would redirect a six-digit verification code to the phone number that you have provided.

Step 3: Add the code that is provided, followed by the Apple ID password, allowing you to unlock your device.
Part 3. Unlock Apple ID with the recovery key
While you understand the conventional methods that can be typically consumed for countering such issues, there are several other mechanisms that are associated across similar platforms and follow an identical protocol to cater to issues that involve unlocking Apple ID without security questions. Being an Apple user, you can efficiently unlock your Apple ID with the aid of a Recovery Key. For this, you need to follow the guidelines provided as follows.
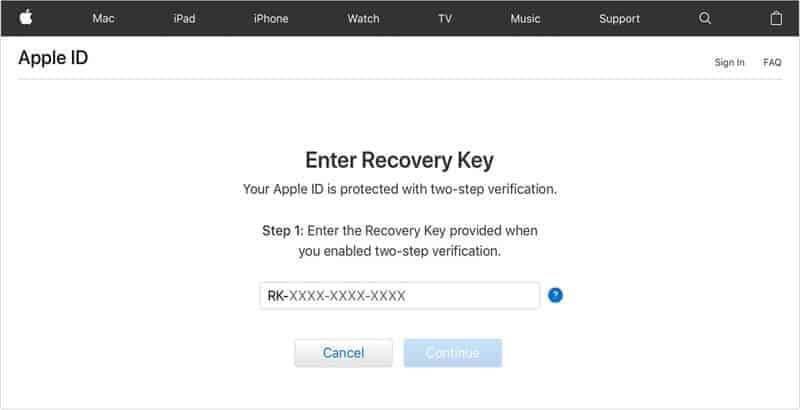
Step 1: You are required to open the iForgot website on your browser. Initially, it is important for you to enter the Recovery Key that you utilized when enabling Two-Factor Authentication.
Step 2: Following this, you need to provide the platform with an Apple device to where you wish to send the verification code to.
Step 3: You need to retrieve the code from the Apple iPhone 8 Plus device that you selected and enter it over the website. The website would lead you to enter a new password for your device.
Part 4. How to reset security questions after forgetting the answers?
Security questions are referred to as the extra protective layer that is responsible for keeping a profile secure. In such cases where you accidentally forget the basic security questions and their answers, you can consider following a very simple procedure to have them restored. In such Apple devices where you have no certain idea about the forgotten security question, you can contact AppleCare in such circumstances and have the assist you in catering to this issue within a matter of minutes. Contact the iTunes Store Support and choose the option of Password & Security Questions to lead towards calling the support for the remedy of the issue.
Conclusion
The article considered discussing various reasons and remedies to unlocking an Apple ID without the aid of security questions. You need to look over the guide to develop an understanding of the systems that are involved.
Also read:
- [New] Unlocking Superior Sound Recordings Minus the Mic for 2024
- [Updated] 2024 Approved Unlinking From YouTube Shorts - Easy and Permanent
- Complete Tutorial to Use VPNa to Fake GPS Location On Lava Yuva 2 Pro | Dr.fone
- Elite Selection of Keyboards for 2T4y: In-Depth Testing and Expert Opinions Featured on ZDNET
- Free electronic signature - For .xls files
- Get Lexar's USB Drivers Instantly - Smooth and Swift Installation Awaits You!
- How To Create an Apple Developer Account On iPhone 6s
- How to Simulate GPS Movement in AR games On Oppo A78? | Dr.fone
- In 2024, Apple ID Locked or Disabled On iPhone 14? 7 Mehtods You Cant-Miss
- In 2024, Delete Gmail Account With/Without Password On Oppo A78
- In 2024, How to Delete iCloud Account From iPhone 12 mini without Password?
- In 2024, How To Erase an iPhone 8 Without Apple ID Password?
- In 2024, How To Fix Apple ID Verification Code Not Working On iPhone 14 Pro
- In 2024, Troubleshooting Error Connecting to the Apple ID Server From iPhone 13 Pro
- Seamlessly Integrate Ubuntu Linux Within macOS XCode Using a Clever Trick - How-To Guide
- Tips and Tricks for Apple ID Locked Issue On Apple iPhone 12
- Unlock Apple ID without Phone Number From iPhone 15
- Title: How To Fix Apple ID Verification Code Not Working On iPhone 8 Plus
- Author: Alma
- Created at : 2025-01-19 16:00:46
- Updated at : 2025-01-24 16:02:31
- Link: https://apple-account.techidaily.com/how-to-fix-apple-id-verification-code-not-working-on-iphone-8-plus-by-drfone-ios/
- License: This work is licensed under CC BY-NC-SA 4.0.