
How to Remove an AirTag from Your Apple ID Account From Apple iPhone XS?
How to Remove an AirTag from Your Apple ID Account On Apple iPhone XS?
Apple provides many exciting features in its products, including the AirTag feature on iPhone devices. However, after enabling the function, many iPhone users forget to remove it from the FindMy app ahead of time. Therefore, if you are selling or resetting the Apple iPhone XS device, you need to remove AirTag from Apple ID to be usable later.
If someone removes the AirTag without resetting it while operating in the Bluetooth range, deleting AirTag ownership will require manually breaking the Apple iPhone XS device apart and further configuration.
Remove this connection from the Apple ID account with simple steps first-hand to avoid that. Read on to know the steps involved in this process directly or with the best software alternative.

Part 1. What Exactly Does an AirTag Do?
Before discussing how to remove AirTag from Apple ID, you should know better about the function itself. The AirTag feature is available for iOS devices. Therefore, one can register the AirTag process with the Apple ID you are utilizing on your smartphone.
Apple users can attach the AirTag to different objects like backpacks or keychains. This makes it simple to find these objects later in case they get misplaced or lost through the Find My app on the iPhone.
Users can add their AirTag to one Apple ID account, so you cannot access this from the Find My app via other accounts. In case of loss, you must remove the AirTag from your device entirely.

Part 2. How to Remove an AirTag from Your Apple ID onApple iPhone XS & iPad?
After adding the AirTag to any object, it instantly syncs with the Apple ID of the user. So, only the primary Apple ID user can use or monitor the AirTagged item. Other users can use it only after resetting the AirTag. So, learn how to remove AirTag from Apple ID via the Find My app on different iOS device types.
Version 1: Removing AirTag on iPhone
Step 1: Access the Apple iPhone XS homepage and access the Find My app.
Step 2: From the bottom menu bar, tap on the Items option.
Step 3: The information about which AirTag is associated with your chosen item will appear in the next page list.

Step 4: Choose the selected items and swipe upwards on the screen. Then, find the Remove Item button and press it.

Step 5: Following this, select and press the Remove button. Repeat for confirmation.
Version 2: Removing AirTag on iPad
Step 1: Access the Find My app from the home screen on your iPad device.
Step 2: When the app opens, click on the Items icon at the bottom part of the screen.

Step 3: Choose the items you want to delete by tapping them.
Step 4: Swipe up and choose the “Remove Item” option.
Step 5: On the next confirmation prompt that comes up, click Remove.

Part 3. Bonus Tips: How to Unlock an Apple ID That’s Locked?
Typically, it is impossible to use a PC or Mac to access and remove AirTag from Apple ID. One has to use the Apple iPhone XS or iPad device only. But what if the smartphone screen or Apple ID is locked?
You need to unlock the Apple iPhone XS device using capable software like Dr.Fone - Screen Unlock (iOS) to remove the blockage. This software can remove many different Apple screen lock types, like Black Screen of Death, Face ID Lock, Screen Time Passcode, and more.
The process of bypassing Apple ID as a feature is available for iOS 14.0 or its previous conversions. It does not require extremely complex jailbreaking or configuration steps- all is complete in some clicks only.
Top Features:
- Users get at least ten retries for the password or lock removal attempt.
- Suitable for removing various screen locks, Apple ID locks, etc.
- Works to bypass Apple ID account locking without a password within seconds.
- It allows Apple ID lock removal even with the active Find My iPhone feature on the smartphone.
How to use it?
Step 1: Install the Dr.Fone app and launch it on the computer. Choose Screen Unlock.

Step 2: On the next page, tap the Remove Apple ID option. Then enter the necessary passcode to verify that you trust the PC. Then, do further scanning.

Step 3: Back up all devices before the procedure. Then, visit the Settings page > user profile > Password & Security. Then, toggle the Two Factor Authentication feature to the ON part. Then, press Unlock Now.

Step 4: Put the smartphone into recovery mode with on-screen instructions. Then, restart the phone. Complete the resetting steps and press the Restart button. It will unlock the Apple iPhone XS device automatically.

Step 5: Verify on your device that the Apple ID is unlocked. Then, go to the Find My app and remove the AirTag feature as detailed previously.

Part 4. FAQs about AirTag
- How to Set Up and Add an AirTag on Your Apple iPhone XS?
Firstly, get your device ready to get set up. Remove the wrap around the AirTag and pull the tab out to start the battery. After it plays a tiny sound, hold the Apple iPhone XS device near the iPhone/iPad and press Connect. Next, change the name of the AirTag on your list, give an emoji to it, and press Continue. Register it with the Apple ID in the next prompt and then choose Done.
- How to Rename AirTag and Change Its Emoji?
You can access the Items tab on the Find My application and choose the AirTagged item. Then, scroll downward and choose Rename item to change the name. Finally, create a customized name and add an emoji as well.
- How Far Can You Track an Apple AirTag?
With the Bluetooth connection switched on, one can track Apple AirTag for approximately 100 feet.
Conclusion
The added AirTag stays connected with one Apple ID account until you reset it. So, use the process mentioned to remove the AirTag via iPhone or iPad. If the iPad or iPhone you are using has locked the Apple ID, you can use another software Dr.Fone - Screen Unlock (iOS) , to access it without data loss securely. Then, follow the steps mentioned to reset the AirTag here.
Top-Notch Solutions for Disabled Apple ID On Apple iPhone XS: Making It Possible
The Apple ID serves as the cornerstone of an iOS user’s digital identity. It grants access to a multitude of essential services and applications. This unique identifier is crucial for accessing the App Store, iTunes, iCloud, and other Apple services. However, the security of this pivotal account is paramount. Any security breaches or suspicious activities can prompt Apple ID to be disabled.
To avoid the potential consequences of a disabled Apple ID, it is imperative to explore effective solutions. This guide seeks to furnish users with a range of excellent strategies to address the issue at hand. So, if you are wondering why is my Apple ID disabled, continue to read the article.
Part 1. Discussing the Reasons for Apple ID Getting Disabled
Wondering why your Apple ID has been disabled? Experiencing intense frustration is not uncommon in this scenario. Nonetheless, understanding the potential triggers behind this issue is crucial. For Apple users, learning the factors leading to the Apple ID disabled problem is essential. The following are some typical reasons that can account for this predicament:
1. Security Questions
Failing to answer security questions accurately during the account recovery process can trigger Apple’s security protocols. It can lead to the temporary or permanent disabling of the Apple ID. Inaccurate or forgotten responses to these critical security measures can raise red flags. This eventually results in restricted access to the account.
2. Unauthorized Access Attempts
Apple’s strict security measures are designed to identify and prevent unauthorized access attempts. If the system detects unusual login activities or repeated failed login attempts, it may automatically disable the ID. Moreover, it is done to protect the user’s personal information and sensitive data.
3. Suspicious Account Activities
Any suspicious activities associated with the Apple ID can prompt Apple’s security algorithms to disable the ID. These include unusual purchase patterns, unauthorized transactions, or reports of account misuse. Furthermore, it usually results in temporary disabling as a precautionary measure.
4. Breach of Terms of Service
Not adhering to Apple’s terms and conditions may result in the prompt Apple ID being disabled. Examples include engaging in fraudulent activities or using unauthorized software or tools. In addition, manipulating Apple’s services or violating the company’s usage policies can also cause disablement. It is often accompanied by a permanent suspension from Apple’s ecosystem.
5. Unresolved Billing Issues
Unresolved billing disputes or outstanding payment issues can trigger the disabled problem. Moreover, declined transactions linked to the Apple ID can also be a cause. It restricts the user’s access to various Apple services until the payment concerns are rectified.
Part 2. Reset the Password: Solve Apple ID Disabled Issues
With Apple ID disabled, one of its primary solutions involves resetting the password. Fortunately, this can be achieved directly from an iOS device or a Mac. Users are offered convenient choices to regain authority over their accounts quickly. Here, you’ll find detailed, sequential instructions for each approach:
Resetting Password From iOS Device
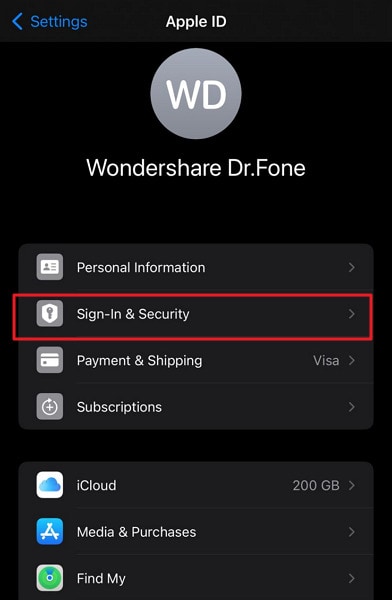
- Step 1: To access the Settings app on your iOS device, locate and open the application with the “Gear” icon. Once inside, select your name and proceed to the subsequent screen, where you should tap “Sign-In & Security.”
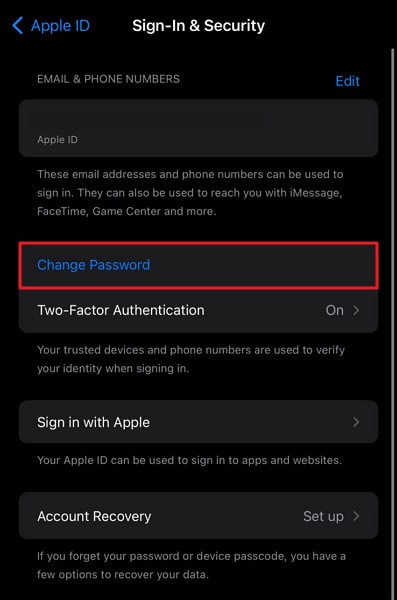
- Step 2: Now, tap the “Change Password” option and follow it by entering your iOS device passcode. Then, enter and confirm the new password and press “Change Password” to finalize it.
Resetting Password From Mac
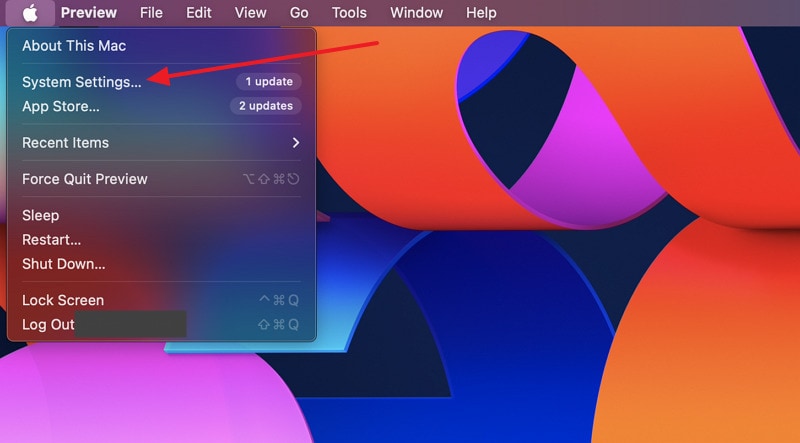
- Step 1: On your MacBook, navigate to the “Apple” menu from the top left side and choose the “System Settings” option. Next, tap on your name and press “Sign-In & Security” on the following screen.
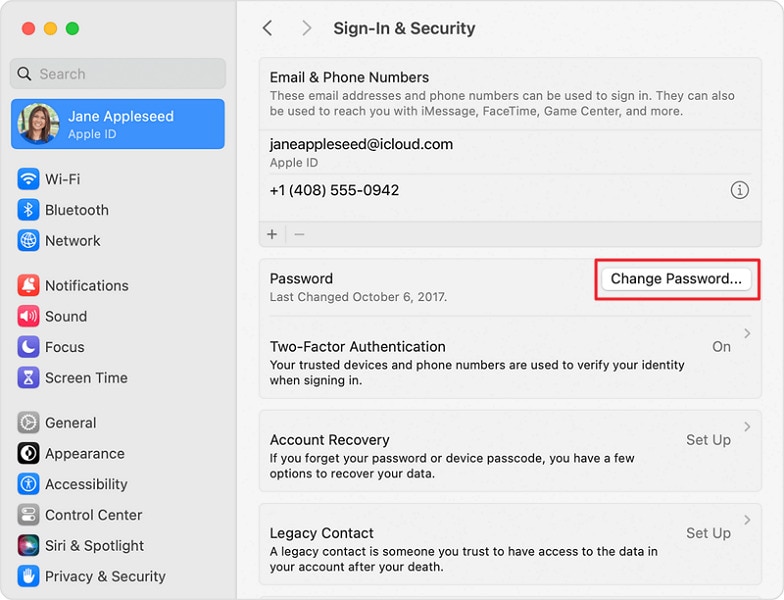
- Step 2: Move to the “Password” option and click “Change Password.” Now, follow the on-screen prompts to complete the password resetting process by providing your MacBook passcode.
Part 3. Use Apple Support App: Solve Apple ID Disabled Issues
If you lack access to a dependable device for resetting your password, there’s no cause for concern. Apple provides to reset your Apple ID password using an alternative device. This can be accomplished through the official Apple Support app. The following procedures offer a thorough walkthrough:
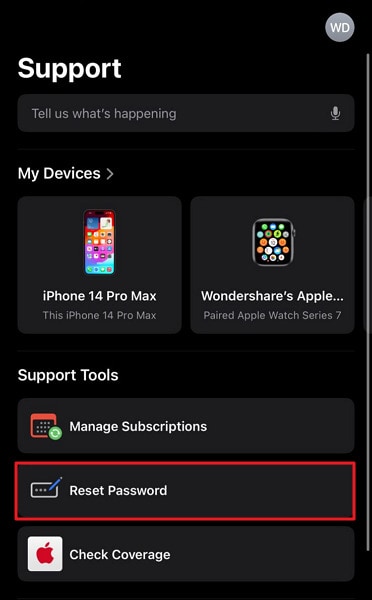
- Step 1: On a device you’ve borrowed, download the official Apple Support app and launch it. Scroll down within the app to “Support Tools” and select “Reset Password.”
Image name: fix-apple-id-disabled-5.jpg
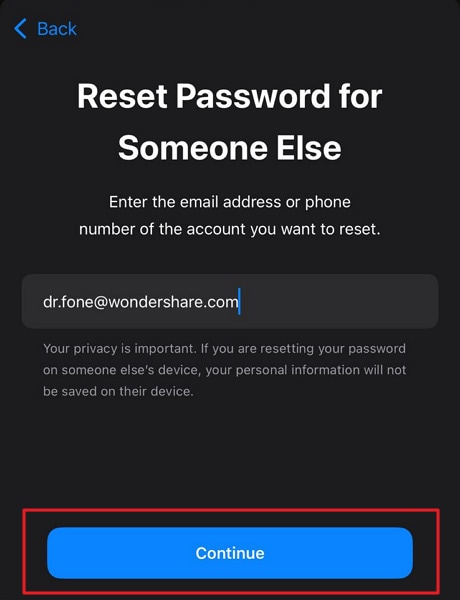
- Step 2: Following this, choose “Help Someone Else,” input your Apple ID, and tap “Continue.” Follow the on-screen prompts to complete the password reset process.
Part 4. Using iForgot Website: Solve Apple ID Disabled Issues
In instances where conventional methods fail, using the iForgot website can offer an alternative route. The platform provides an extensive range of tools and resources. It is tailored to aid users in the process of resetting their Apple ID credentials. Follow these step-by-step instructions to use the iForgot website effectively to fix the “Why is My Apple ID Disabled” problem:
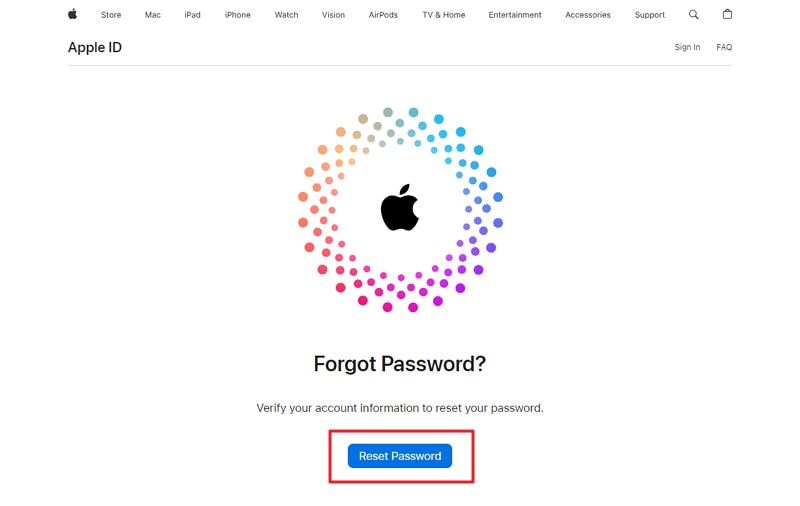
- Step 1: Launch a web browser, visit iforgot.apple.com, and select the “Reset Password” option. It will give you access to the Apple ID password reset page. Here, provide your Apple ID, usually your email address linked to your Apple account, and proceed by clicking “Continue.”
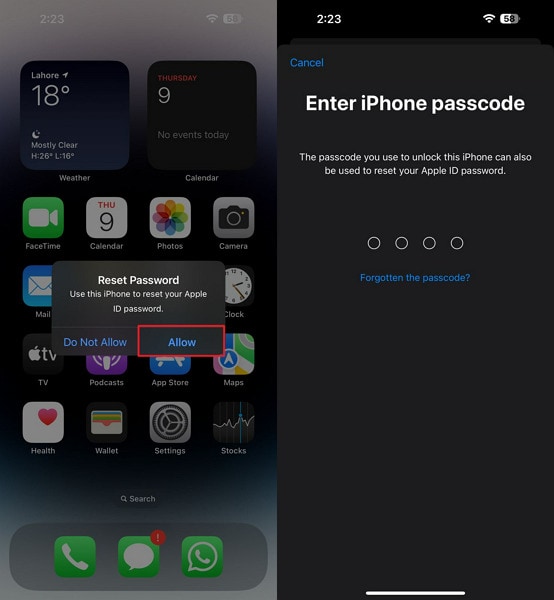
- Step 2: On the next screen, Apple will inform you that they have sent a confirmation message to your trusted devices for resetting the password. Tap “Allow” on one of your trusted devices and provide your iDevice passcode to reset the Apple ID password.
Part 5. Wondershare Dr.Fone - Screen Unlock (iOS): A Comprehensive Solution To Solve Apple ID Disabled Issues
No need to worry if you’re experiencing difficulties accessing iCloud and other Apple services due to a forgotten Apple ID password. Wondershare Dr.Fone can bypass the Apple ID lock completely. This tool allows users to regain access to their iCloud services and other Apple ID features. Otherwise, your Apple ID would lose its functionality within your iOS devices.
Furthermore, this capability of Wondershare Dr.Fone remains effective even if the Find My iPhone feature is activated on the Apple iPhone XS device. This tool can also bypass the Screen Time Passcode if you have forgotten your password. By utilizing this feature, you will be able to resolve your disabled Apple ID issue.
Dr.Fone - Screen Unlock (iOS)
Unlock iPhone/iPad Lock Screen Without Hassle.
- Simple, click-through, process.
- Unlock screen passwords from all iPhone and iPad.
- No tech knowledge required, everybody can handle it.
- Supports the latest iOS version fully!


4,395,217 people have downloaded it
Key Features of Wondershare Dr.Fone
- Wondershare Dr.Fone allows users to unlock their iDevices screen, which enables them to regain access to their devices.
- You can also use this robust iPhone unlock tool to remove the SIM carrier lock to use your device internationally.
- This iDevice screen unlock software provides multiple tools like data eraser, data recovery, phone transfer, WhatsApp transfer, system repair, etc.
Instructions Involved To Solve Apple ID Disabled Issues via Wondershare Dr.Fone
Wondershare Dr.Fone is specially designed for users with various technical experiences. It presents an easy-to-follow guide with its user-friendly interface to assist its users in every way possible. Here is how to Solve Apple ID disabled issues via Wondershare Dr.Fone - Screen Unlock (iOS):
- Step 1. Access the Robust Screen Unlock Tool
You will have to start by opening Wondershare Dr.Fone on your system and accessing the “Toolbox” section present in the left panel. Then, continue with the “Screen Unlock” feature and select the “iOS” device. Proceed with the “Remove Apple ID” option among different options from the next window.

- Step 2. Begin Unlocking the Apple ID
After connecting your iDevice to the system, you need to move forward with the “Unlock Now” button. Before moving forward, it’s essential to ensure you have Screen Lock and Two-Factor Authentication enabled on your Apple iPhone XS. After that confirmation, carry on with the on-screen instructions.
- Step 3. Put iPhone in the Recovery Mode and Recognize the Model
You need to put your Apple iPhone XS in Recovery Mode by following the on-screen instructions to initiate the Apple ID unlocking process. The software will recognize the “Device Model” in a self-controlling way. After that, you will have to go ahead with the “System Version” selection and hit the “Start” button.
- Step 4. Download the Firmware and Provide Confirmation
The relevant firmware will start downloading, and you will have to proceed with the “Unlock Now” button after the downloading. You will have to enter a code for confirmation, and after that, you can view the removal progress. Move forward by hitting the “Done” button if the Apple ID gets unlocked.

Conclusion
In conclusion, this article aims to address the critical issue of Apple ID disabled. It can significantly disrupt the smooth operation of iOS devices. We have offered a thorough examination of the different elements that may result in the deactivation of an Apple ID. Moreover, we have introduced several effective measures to assist you in addressing this matter. It allows you to regain access to your Apple ID.
Furthermore, the article has highlighted the comprehensive capabilities of Wondershare Dr.Fone. It is for users encountering persistent challenges in resolving their disabled Apple ID. Moreover, Dr.Fone is a robust and reliable solution that can offer a more in-depth remedy to the problem.
How to Remove Apple iPhone XS Device from iCloud
Apple is known for developing its own unique operating system with its own dedicated operations and functions. They have developed an impressive, interconnected model that helps the user keep the data intact across the Apple iPhone XS device. With unique identification protocols to keep the Apple iPhone XS device safe from illegal access, Apple provides its user with its own cloud backup platform. iCloud offers Apple users a unique platform with the ability to synchronize and back their data up. This helps the users keep a duplicate in places where they accidentally lose their important data. However, if you have stopped using an Apple device that had an activated iCloud backup system, you may find it necessary to remove the Apple iPhone XS device from the iCloud account. For such cases, there are a few techniques that can be adapted to cater to the issue at hand. This article introduces and provides you a detailed guide on how to remove a device from iCloud through the implementation of straightforward and notable techniques.

Part 1. What happens if I remove a device from my iCloud?
If you look over the operation of iCloud service for any Apple device, the exemption of the service will lead you into losing access from a service that offers you a backing up feature along with synchronization. Furthermore, this will also affect the Find My service, leading you to make your device theft evasive. The removal of the Find My service makes it possible for thieves to wipe off data of the Apple iPhone XS device and have it sold across the market, with no chances of retrieval. Despite the removal of the iCloud service from your device, it will function normally; however, the security and tranquility offered by the Apple iPhone XS device would not remain intact with its exemption. The iCloud account that has been removed will keep the data that has been previously stored in it by the Apple iPhone XS device backup, but it would not accept any new addition.
Whenever you consider removing the iCloud backup from the Apple iPhone XS device, it prompts over keeping the data on your device, if necessary. All the data that is not selected by the user will be removed from the iPhone.
Part 2. How to remove a device from iCloud remotely? (iPhone)
iCloud backup is usually important in keeping a synchronized model in effect across a device. However, when the Apple iPhone XS device that is in use of an iCloud account is not in consumption, it is better to have the Apple iPhone XS device removed from the iCloud account. For this, you can consider opting for the remote method of removing a device from the iCloud. The following guidelines explain the detailed method on how to remove a device from the iCloud through remote means.
Step 1: You need to turn off the Apple iPhone XS device and open the iCloud.com website across the web browser.
Step 2: Access the “Find My iPhone” service on the webpage and tap on “All Devices.”
Step 3: This opens up the list of devices that are connected across the account. Select the Apple iPhone XS device and tap “Remove from Account” to conclude. Proceed to confirmation of the process and have the Apple iPhone XS device removed successfully from the iCloud account.

Part 3. How to remove a device from iCloud? (Mac)
While you consider a method that provides you a technique of removing a device from the iCloud through an iPhone, there are several other means of operation that can be utilized to remove a device from the iCloud. You can consider removing a device from the iCloud through a Mac, which needs to be concluded through a series of steps provided as follows.
Step 1: Tap on the Apple icon on the top-left of the Mac screen to open up the menu. Select “System Preferences” from the drop-down menu that appears on the screen.
Step 2: In the “System Preferences” window, you need to tap on the “Apple ID” present at the top-right of the screen.

Step 3: Over the new page that opens, scroll down on the left pane of the window, and tap on the Apple iPhone XS device that you seek to remove. Click on “Remove from Account…” from the list of options and confirm the execution of the process. This successfully removes the Apple iPhone XS device from the iCloud with the aid of a Mac.

Part 4. How to rescue when I accidentally remove a device from iCloud?
While you get to know a variety of platforms and techniques that can be adapted to remove a device from the iCloud, there are several circumstances where you accidentally remove a wrong device from the iCloud. The process of retrieving it is quite simple and efficient, where the Apple iPhone XS device would be automatically added back into the iCloud account once it is connected with the Internet. It should be kept in mind that the Apple iPhone XS device should contain the iCloud username and password under the iCloud Settings to automatically have it updated over a network connection.
Part 5. You may wonder how to remove an iCloud account without a password
The following methods are quite direct and have no issues with the iCloud username and password. Apart from the existing methods, there are several cases where the user usually forgets a specific iCloud credential that makes it impossible for them to execute a procedure that has been mentioned above. In such cases, the necessity of dedicated third-party unlocking tools gets into action. These third-party platforms are unique in setting up such an environment that keeps the Apple iPhone XS device protected and aids in complete execution of the task with no discrepancy. There are hundreds of tools that are present in the market for removing an iCloud account from a device without a password. However, when it comes to selecting the appropriate platform, it usually gets difficult for the user to specify a unique choice. This leads the article to introduce a very impressive third-party tool known as Dr.Fone – Screen Unlock (iOS) that offers a flawless environment to cover all the requirements of removing an iCloud account from a device without a password. There are various pointers that should be kept in mind while selecting Dr. Fone as your first rated choice in removing an iCloud account without a password.
- You can easily unlock an iPhone or other Apple device if you have forgotten its passcode.
- It protects your Apple device from getting into the disabled state.
- Operates perfectly across all iPhone, iPad, and iPod Touch models.
- Compatible across the latest iOS.
- It does not require iTunes to function properly.
- Very easy to use and implement.
As you get to understand this simplistic platform, the following guide explains to the user how to remove the iCloud account from a device through the steps shown below.
Step 1: Download and Launch
You need to download and install the platform on your desktop to function. After downloading it, you need to connect your Apple iPhone XS with the desktop and launch the platform. Select the “Screen Unlock” tool from the home window and proceed.
Step 2: Select Appropriate Option
Following this, you need to select the “Unlock Apple ID” option from the next screen that opens on your front.
Step 3: Operating your Device
As soon as the process initiates, you need to take up your device and open it up to “Trust” the computer for proceeding. Open the Settings of your Apple device and initiate a reboot.

Step 4: Execution of the Process
Once the reboot executes, the platform automatically recognizes and initiates the removal of the iCloud account from the Apple iPhone XS device. With the execution of the process, the user is provided with a detailed prompt screen displaying the completion of the process. The removal of the iCloud account from the Apple iPhone XS device without a password has been successfully executed.
Conclusion
As you have recognized the importance of iCloud backup across your device, there are several dynamics of operation that are to be understood to keep the system prevalent and intact, in every sense. Where users wish to remove their iCloud service from the Apple device, the article has presented a series of different methods and techniques that can be implemented across various platforms to cover the requirements and successfully remove the iCloud account without any issues. Following this, the article has also looked forward to offering a third-party platform that allows the user to successfully reboot and remove the iCloud account from the Apple iPhone XS device to make it operable. You need to look over the guide in detail to get more knowledge of the procedures and mechanisms.
Also read:
- [Updated] Excellent Webcams for Clear Podcast Broadcasts
- [Updated] Free Logo Blueprint Tailor and Share Your Brand Identity
- Apple ID Locked or Disabled From Apple iPhone SE (2022)? 7 Mehtods You Cant-Miss
- How To Get the Apple ID Verification Code On iPhone SE (2020) in the Best Ways
- How to Sign Out of Apple ID From Apple iPhone 8 without Password?
- How to Spy on Text Messages from Computer & Infinix Note 30i | Dr.fone
- In 2024, 3 Methods to Mirror Realme Narzo N53 to Roku | Dr.fone
- In 2024, Apple ID is Greyed Out From Apple iPhone 12 How to Bypass?
- In 2024, How To Create an Apple Developer Account On Apple iPhone 8 Plus
- In 2024, How to Fix Locked Apple ID from Apple iPhone 15 Pro Max
- In 2024, How to Stop Google Chrome from Tracking Your Location On Apple iPhone 7? | Dr.fone
- In 2024, Tips and Tricks for Apple ID Locked Issue From iPhone XS
- In 2024, Ultimate Guide on Nokia FRP Bypass
- In 2024, Your Account Has Been Disabled in the App Store and iTunes On iPhone 12 Pro Max?
- Remove Device Supervision From your Apple iPhone 15 Pro | Dr.fone
- Select High-Quality Drones For Sale for 2024
- Troubleshoot and Triumph: A Comprehensive Guide to Resolving Among Us Game Crashes
- Why Apple Account Disabled From your iPhone XS Max? How to Fix
- Windows 7 Connectivity Problems: Mastering the Network Driver Challenge
- Title: How to Remove an AirTag from Your Apple ID Account From Apple iPhone XS?
- Author: Alma
- Created at : 2025-01-10 17:15:35
- Updated at : 2025-01-17 18:52:42
- Link: https://apple-account.techidaily.com/how-to-remove-an-airtag-from-your-apple-id-account-from-apple-iphone-xs-by-drfone-ios/
- License: This work is licensed under CC BY-NC-SA 4.0.