
How to Remove an AirTag from Your Apple ID Account On iPhone 15 Plus?
How to Remove an AirTag from Your Apple ID Account On Apple iPhone 15 Plus?
Apple provides many exciting features in its products, including the AirTag feature on iPhone devices. However, after enabling the function, many iPhone users forget to remove it from the FindMy app ahead of time. Therefore, if you are selling or resetting the Apple iPhone 15 Plus device, you need to remove AirTag from Apple ID to be usable later.
If someone removes the AirTag without resetting it while operating in the Bluetooth range, deleting AirTag ownership will require manually breaking the Apple iPhone 15 Plus device apart and further configuration.
Remove this connection from the Apple ID account with simple steps first-hand to avoid that. Read on to know the steps involved in this process directly or with the best software alternative.

Part 1. What Exactly Does an AirTag Do?
Before discussing how to remove AirTag from Apple ID, you should know better about the function itself. The AirTag feature is available for iOS devices. Therefore, one can register the AirTag process with the Apple ID you are utilizing on your smartphone.
Apple users can attach the AirTag to different objects like backpacks or keychains. This makes it simple to find these objects later in case they get misplaced or lost through the Find My app on the iPhone.
Users can add their AirTag to one Apple ID account, so you cannot access this from the Find My app via other accounts. In case of loss, you must remove the AirTag from your device entirely.

Part 2. How to Remove an AirTag from Your Apple ID onApple iPhone 15 Plus & iPad?
After adding the AirTag to any object, it instantly syncs with the Apple ID of the user. So, only the primary Apple ID user can use or monitor the AirTagged item. Other users can use it only after resetting the AirTag. So, learn how to remove AirTag from Apple ID via the Find My app on different iOS device types.
Version 1: Removing AirTag on iPhone
Step 1: Access the Apple iPhone 15 Plus homepage and access the Find My app.
Step 2: From the bottom menu bar, tap on the Items option.
Step 3: The information about which AirTag is associated with your chosen item will appear in the next page list.

Step 4: Choose the selected items and swipe upwards on the screen. Then, find the Remove Item button and press it.

Step 5: Following this, select and press the Remove button. Repeat for confirmation.
Version 2: Removing AirTag on iPad
Step 1: Access the Find My app from the home screen on your iPad device.
Step 2: When the app opens, click on the Items icon at the bottom part of the screen.

Step 3: Choose the items you want to delete by tapping them.
Step 4: Swipe up and choose the “Remove Item” option.
Step 5: On the next confirmation prompt that comes up, click Remove.

Part 3. Bonus Tips: How to Unlock an Apple ID That’s Locked?
Typically, it is impossible to use a PC or Mac to access and remove AirTag from Apple ID. One has to use the Apple iPhone 15 Plus or iPad device only. But what if the smartphone screen or Apple ID is locked?
You need to unlock the Apple iPhone 15 Plus device using capable software like Dr.Fone - Screen Unlock (iOS) to remove the blockage. This software can remove many different Apple screen lock types, like Black Screen of Death, Face ID Lock, Screen Time Passcode, and more.
The process of bypassing Apple ID as a feature is available for iOS 14.0 or its previous conversions. It does not require extremely complex jailbreaking or configuration steps- all is complete in some clicks only.
Top Features:
- Users get at least ten retries for the password or lock removal attempt.
- Suitable for removing various screen locks, Apple ID locks, etc.
- Works to bypass Apple ID account locking without a password within seconds.
- It allows Apple ID lock removal even with the active Find My iPhone feature on the smartphone.
How to use it?
Step 1: Install the Dr.Fone app and launch it on the computer. Choose Screen Unlock.

Step 2: On the next page, tap the Remove Apple ID option. Then enter the necessary passcode to verify that you trust the PC. Then, do further scanning.

Step 3: Back up all devices before the procedure. Then, visit the Settings page > user profile > Password & Security. Then, toggle the Two Factor Authentication feature to the ON part. Then, press Unlock Now.


Step 4: Put the smartphone into recovery mode with on-screen instructions. Then, restart the phone. Complete the resetting steps and press the Restart button. It will unlock the Apple iPhone 15 Plus device automatically.

Step 5: Verify on your device that the Apple ID is unlocked. Then, go to the Find My app and remove the AirTag feature as detailed previously.

Part 4. FAQs about AirTag
- How to Set Up and Add an AirTag on Your Apple iPhone 15 Plus?
Firstly, get your device ready to get set up. Remove the wrap around the AirTag and pull the tab out to start the battery. After it plays a tiny sound, hold the Apple iPhone 15 Plus device near the iPhone/iPad and press Connect. Next, change the name of the AirTag on your list, give an emoji to it, and press Continue. Register it with the Apple ID in the next prompt and then choose Done.
- How to Rename AirTag and Change Its Emoji?
You can access the Items tab on the Find My application and choose the AirTagged item. Then, scroll downward and choose Rename item to change the name. Finally, create a customized name and add an emoji as well.
- How Far Can You Track an Apple AirTag?
With the Bluetooth connection switched on, one can track Apple AirTag for approximately 100 feet.
Conclusion
The added AirTag stays connected with one Apple ID account until you reset it. So, use the process mentioned to remove the AirTag via iPhone or iPad. If the iPad or iPhone you are using has locked the Apple ID, you can use another software Dr.Fone - Screen Unlock (iOS) , to access it without data loss securely. Then, follow the steps mentioned to reset the AirTag here.
How to Remove Apple ID from Apple iPhone 15 Plus without Password?
“Is it possible to remove the Apple ID of an old iPhone without entering the password? I have purchased an iPhone from someone and forgot to remove his Apple ID from the Apple iPhone 15 Plus device, and now I am unable to use it. Can I still go past the password? If yes, then what is the best method available?”
The security of the users and their data is among the primary priorities of Apple. Due to this, it is now more challenging than ever to access any Apple-built device without entering the required credentials.
However, there might come a scenario when the iPhone’s rightful owner wouldn’t use the Apple iPhone 15 Plus device. It generally happens when you are not the first owner of the said device, and the previous holder forgot to remove the security protocols such as their Apple ID.
Still, it is possible to remove the Apple ID from the Apple iPhone 15 Plus without the password. There’s no need to worry, though, as we have assembled a guide to get your Apple iPhone 15 Plus unlocked in no time. Three methods are offered here on how to remove Apple ID from the Apple iPhone 15 Plus without the password.

Part 1. Remove Apple ID from iPhone without Password using Dr.Fone
The first method here revolves around a popular software, Dr. Fone - Screen Unlock (iOS) . Wondershare is the brand behind Dr.fone, which has been in this industry for quite some time. The application offers a robust solution for unlocking your Apple iPhone 15 Plus. Here are some of the features you can expect from Dr.Fone.
- It can remove four different types of screen locks: fingerprints, PIN, pattern, and password.
- It offers compatibility with Android 10 and iOS 14, making sure you could remove the password or screen lock of even the latest devices.
- You can remove the passcode even if the screen is unusable.
- Dr.Fone works with a wide range of manufacturers: Xiaomi, Samsung, iPhone, and LG.
- It allows transferring data from one phone to another.
Dr.Fone is a powerful tool enabling you to remove Apple ID from the Apple iPhone 15 Plus without much of a hassle. Here’s the step by step guide on how the process works.
Step 1: Install Dr.Fone on your Computer
Install the software. Launch it and connect your Apple iPhone 15 Plus to the computer using a USB cable. Choose the “Screen Unlock” option from the menu.
The interface will present another set of options before you. You need to access the one at the end, which says, “Unlock Apple ID.” Choose the option and begin to remove Apple ID from the iPhone.
Step 2: Enter Screen Password
Dr.Fone will not be able to detect your device just yet. You need to tap the “Trust this Computer” option on your phone, and then Dr.Fone will begin to access your device. It would help if you kept in mind that proceeding with this process will wipe all your Apple iPhone 15 Plus data.

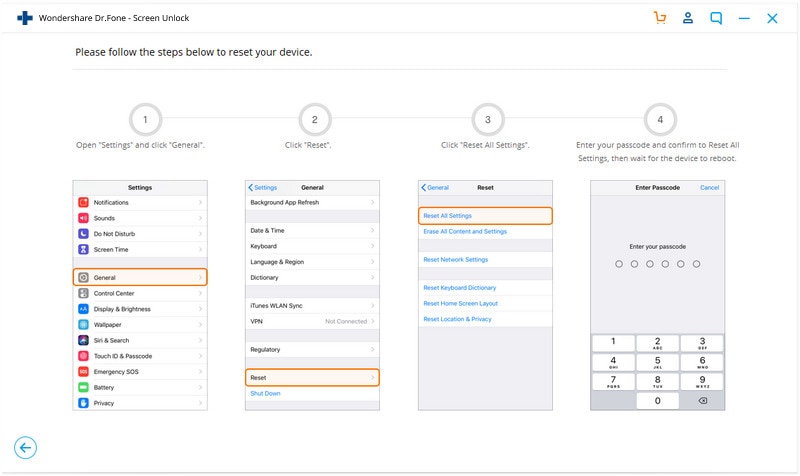
Step 3: Reset all your Apple iPhone 15 Plus Settings
Dr.Fone will present a set of instructions for you to follow. Stick to these steps and reset all your Apple iPhone 15 Plus settings. Once this is done, the Apple iPhone 15 Plus will reboot, and the process to unlock your Apple iPhone 15 Plus will begin.
Step 4: Unlock the iPhone
The unlocking process will begin once your Apple iPhone 15 Plus has finished resetting. Removing the Apple ID from your phone will only take a couple of seconds.
Once the process is finished, make sure the Apple ID is no longer there. Proceed to your settings and check if Dr.Fone has removed the Apple ID.
Part 2. Remove Apple ID from iPhone without Password with iCloud.com
It is better to possess more than one solution to a single issue, which could come in handy when the first one doesn’t work for you. To remove the Apple ID without the password would require you to use iCloud.
You would use the Find My Devices utility of the service to remove the ID. Here are the steps:
Step 1. Visit the iCloud website using your favorite browser. Once you are there, sign in through your Apple ID.
Step 2. Select the “Find iPhone” option to initiate removing the Apple ID from the Apple iPhone 15 Plus permanently.
Step 3. There will be an option in front of you with the title “My Devices” select it.
Step 4. You will be presented with four options, select “Remove from Account,” and the Apple ID of the previous owner will no longer plague the iPhone.
That’s it! Once you complete the steps mentioned above, the account will be removed from the iPhone, and you can sign in with your own Apple ID.

Part 3. Remove Apple ID by Restoring the Apple iPhone 15 Plus in iTunes
In the case that neither of the above methods works for you, you can try removing the Apple ID from the Apple iPhone 15 Plus without a password through Apple’s popular platform, iTunes. It is better to remember that this method will not work if the Apple iPhone 15 Plus has iCloud enabled.
The first step is to get your Apple iPhone 15 Plus into recovery mode. The process of entering recovery mode varies depending on which iPhone you have.
So here, we have listed the method for every Apple iPhone 15 Plus to provide convenience. Here’s how to enter recovery mode:
Step 1. Power off your device by pressing one of the volume buttons and the side button until you see the power off slider. Slide to power off your device.
Step 2. Get your USB cable and connect your phone to our computer while holding the side button. Leave the side button when you see the recovery-mode screen.
Step 3. Once you have gotten your Apple iPhone 15 Plus into recovery mode, you can begin to restore it using iTunes. If the Apple iPhone 15 Plus device stays like this for more than 15 minutes, then the Apple iPhone 15 Plus will reboot, and you will need to repeat the above steps till you get it back to recovery mode.
Step 4. Select the Restore or Update option on your Apple iPhone 15 Plus.
Step 5. Select Restore. iTunes will download the necessary software to reset your Apple iPhone 15 Plus.
Step 6. Please wait for your device to restore, and that’s it!
Conclusion
Now you know how to remove the Apple ID from your old or new iPhone without having to enter the password. Each method is reliable and works well if you follow the steps mentioned above, one by one. If you wish to pick a winner, then there is no better option than Dr.Fone. The platform keeps the phone and its content safe during the process. Additionally, there are a ton of other features that you can utilize at the same time.
Detailed Guide on Removing Apple iPhone 15 Plus Activation Lock without Previous Owner?
Today, many individuals will purchase a utilized iPad or a recycled iOS phone instead of a fresh, box new one. However, they are often disturbed by the Activation Lock screen showing up on the screen once they buy them. This case will probably happen because the iPad is associated with the past user’s iCloud account and will be an iPad locked to the owner.
It becomes a difficult issue as removing a connected iCloud account without the past user is almost difficult. However, sit back and relax. We’ve discovered a few potential ways. This guide will show you the iPad locked to owner bypass. Furthermore, you can use our expert tool, i.e., Dr.Fone-Screen Unlock, to bypass the lock.
After reading this guide, you will understand how to erase the Activation Lock without a past user. How about we get everything started?
Method 1. Dr.Fone - Screen Unlock
Rather than making our readers wait about how to remove Activation Lock without Apple ID or past user, we suggest you with Wondershare Dr.Fone-Screen Unlock.
It is an expert iCloud activation lock bypass program that can remove the activation lock on your iPad. It is the best possible solution when you fail to remember your Mac ID or password. Download the application on your Windows or Macintosh and follow the steps to remove the activation lock without a previous user.
Steps to Follow:
Step 1. Install and launch the Dr.Fone program and choose the Screen Unlock tool.
Step 2. Pick the “iCloud Activation Lock Removal” option.

Step 3. Now you can start to bypass the lock.

Step 4. Begin to remove and wait briefly. The phone will be in a typical state with practically no lock after removing the activation lock.
Step 5. The program will remove the activation lock like a flash. Your iPad will begin with no activation lock. You can access and utilize the iPad now. However, you must know that you can’t call or use cellular data and iCloud of your new Apple ID after bypassing the lock.

Method 2. Remove it from iCloud
If you cannot reach the past user but rather you are still in contact with them, they can unlock your iPad. Here are the step-by-step guidelines on eliminating the iPad activation lock through the iCloud web:
- Open the iCloud site in a browser.
- Sign in to the current iCloud account being used with the locked iPhone.
- When you sign in, click on the choice that says Find iPhone.
- Presently, you can remotely perform activities on your phone.
- Click on the drop-down named All Gadgets and pick your iPad.
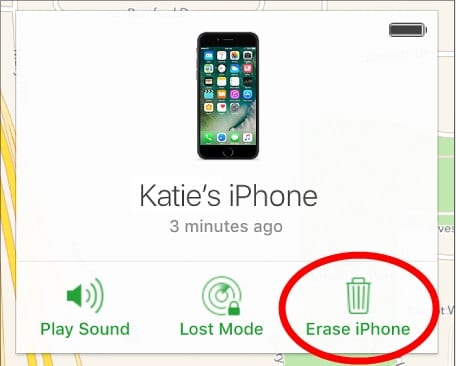
- Click on Erase iPhone.
Method 3. Use DNS bypass
Bypassing DNS Server is one more way for you if you’re searching for simple methods for eliminating Activation Lock without the past user. Note that this DNS strategy can bypass the iCloud lock for a brief time. Here’s how:
Step 1. Open your iPad and explore the “Choose a Wi-Fi Network” page.
Step 2. Presently, press the Home button and select Wi-Fi settings. Presently, tap the “I” symbol right behind your Wi-Fi network. It will show the properties of the Wi-Fi.
Step 3. Select “Configure DNS” and set it as indicated by your region:
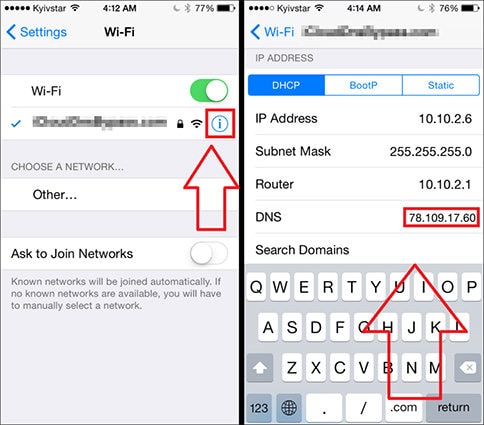
- USA: 104.154.51.7
- South America: 35.199.88.219
- Europe: 104.155.28.90
- Asia: 104.155.220.58
- Australia and Oceania: 35.189.47.23
- Other Continents: 78.100.17.60
Step 4. From that point forward, return to the Wi-Fi page.
Step 5. Presently, click over and again on “Next” and “Back” and hold on until the iPad connects with your area’s iCloud DNS bypass server.
Method 4. Local Apple Support
Following the techniques above, you can try reaching Apple’s local service when you can’t remove the Activation Lock. However, you need to provide the following things:
- iPad serial number
- Buying receipt
When they confirm you own the iOS iPad legitimately, they will help you further by unlocking your iPad.
Part 2: How to Reset iPad without Passcode?
1. Reset iPad by Computer
- Connect your iPad to a computer. Press and hold the Power button + Home button (if your iPad has a Home button). Otherwise, press and hold the Power button + either Volume button (if your iPad doesn’t have a Home button) until you see the Recovery Mode screen.
- On your Macintosh, find the connected iPad.
- Tap Restore and trust that the process will end.
- Set up your iPad and restore the factory default settings without a password.
2. Reset it by Find My
- Go to iCloud.com, and sign in with your Apple ID and password.
- Click on the Find [device] symbol in the menu.
- Select your iPad from the list of all the connected devices.
- Select Erase iPad.
- Follow the prompts for iPad locked to owner reset.
3. Reset with iTunes
- Open the iTunes application or website.
- Connect your iPad to your PC with a connector. Enter your password whenever required.
- Click on the iPad symbol in the upper-left corner.
- Select Summary in the left section.
- Click Restore iPad and then click the Restore button to confirm and reset the iPad locked to the owner.
Conclusion
This iPad locked to owner bypass guide explains how to remove the activation lock. We have mentioned a list of helpful methods to remove the lock from your device. However, if you are still looking for a quick and efficient answer, we suggest you install Dr.Fone - Screen Unlock (iOS) . Dr.Fone is a safe and effective tool for all your unlocking needs.
Also read:
- [New] Illuminating Your Android Videos A Quick Guide
- [New] In 2024, The Path to Perfected Video Covers Update Guide & Tips
- [New] In 2024, The Ultimate Roundup Best Budget-Friendly Virtual Calls
- [New] In a Sea of Silence The Perils of Pretense in Profiles
- [Updated] 2024 Approved Beyond the Buzz The Top 10 Competitive Video Editors
- 2024 Approved Mastering YouTube Login Validation
- Apple ID Locked for Security Reasons On iPhone SE (2022)? Find the Best Solution Here
- How To Reset the Security Questions of Your Apple ID From Your Apple iPhone 7
- In 2024, How to Change Credit Card on Your iPhone X Apple ID and Apple Pay
- In 2024, How to Unlock iPhone 7 Plus When We Dont Have Apple ID or Password?
- In 2024, Sky Storage Spectacle Unlimited Free & Elite Premium Alternatives for Your Pics
- The Next Big Thing From Apple? Discover the Latest Gossip on Home Robot Releases and Features
- Turning Off Two Factor Authentication From iPhone SE (2020)? 5 Tips You Must Know
- Title: How to Remove an AirTag from Your Apple ID Account On iPhone 15 Plus?
- Author: Alma
- Created at : 2024-10-01 16:53:18
- Updated at : 2024-10-08 16:05:36
- Link: https://apple-account.techidaily.com/how-to-remove-an-airtag-from-your-apple-id-account-on-iphone-15-plus-by-drfone-ios/
- License: This work is licensed under CC BY-NC-SA 4.0.