
How to Remove iPhone 7 Device from iCloud
How to Remove Apple iPhone 7 Device from iCloud
Apple is known for developing its own unique operating system with its own dedicated operations and functions. They have developed an impressive, interconnected model that helps the user keep the data intact across the Apple iPhone 7 device. With unique identification protocols to keep the Apple iPhone 7 device safe from illegal access, Apple provides its user with its own cloud backup platform. iCloud offers Apple users a unique platform with the ability to synchronize and back their data up. This helps the users keep a duplicate in places where they accidentally lose their important data. However, if you have stopped using an Apple device that had an activated iCloud backup system, you may find it necessary to remove the Apple iPhone 7 device from the iCloud account. For such cases, there are a few techniques that can be adapted to cater to the issue at hand. This article introduces and provides you a detailed guide on how to remove a device from iCloud through the implementation of straightforward and notable techniques.

Part 1. What happens if I remove a device from my iCloud?
If you look over the operation of iCloud service for any Apple device, the exemption of the service will lead you into losing access from a service that offers you a backing up feature along with synchronization. Furthermore, this will also affect the Find My service, leading you to make your device theft evasive. The removal of the Find My service makes it possible for thieves to wipe off data of the Apple iPhone 7 device and have it sold across the market, with no chances of retrieval. Despite the removal of the iCloud service from your device, it will function normally; however, the security and tranquility offered by the Apple iPhone 7 device would not remain intact with its exemption. The iCloud account that has been removed will keep the data that has been previously stored in it by the Apple iPhone 7 device backup, but it would not accept any new addition.
Whenever you consider removing the iCloud backup from the Apple iPhone 7 device, it prompts over keeping the data on your device, if necessary. All the data that is not selected by the user will be removed from the iPhone.
Part 2. How to remove a device from iCloud remotely? (iPhone)
iCloud backup is usually important in keeping a synchronized model in effect across a device. However, when the Apple iPhone 7 device that is in use of an iCloud account is not in consumption, it is better to have the Apple iPhone 7 device removed from the iCloud account. For this, you can consider opting for the remote method of removing a device from the iCloud. The following guidelines explain the detailed method on how to remove a device from the iCloud through remote means.
Step 1: You need to turn off the Apple iPhone 7 device and open the iCloud.com website across the web browser.
Step 2: Access the “Find My iPhone” service on the webpage and tap on “All Devices.”
Step 3: This opens up the list of devices that are connected across the account. Select the Apple iPhone 7 device and tap “Remove from Account” to conclude. Proceed to confirmation of the process and have the Apple iPhone 7 device removed successfully from the iCloud account.

Part 3. How to remove a device from iCloud? (Mac)
While you consider a method that provides you a technique of removing a device from the iCloud through an iPhone, there are several other means of operation that can be utilized to remove a device from the iCloud. You can consider removing a device from the iCloud through a Mac, which needs to be concluded through a series of steps provided as follows.
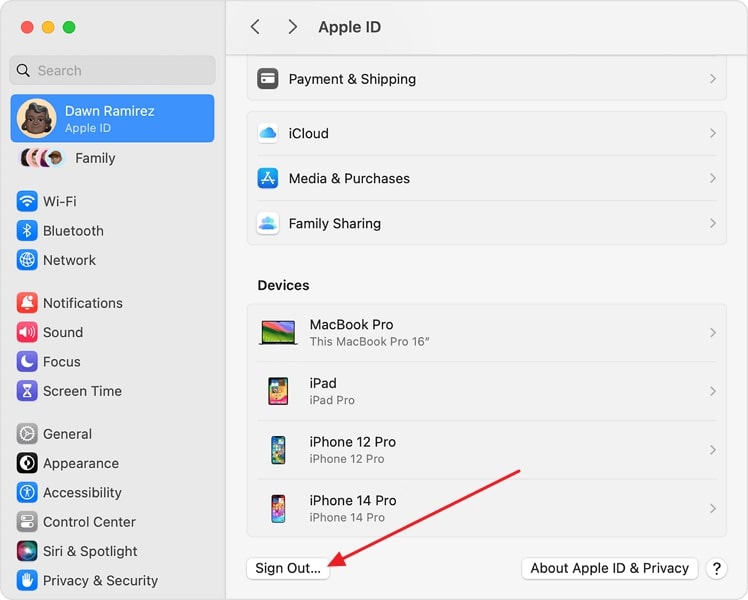
Step 1: Tap on the Apple icon on the top-left of the Mac screen to open up the menu. Select “System Preferences” from the drop-down menu that appears on the screen.
Step 2: In the “System Preferences” window, you need to tap on the “Apple ID” present at the top-right of the screen.

Step 3: Over the new page that opens, scroll down on the left pane of the window, and tap on the Apple iPhone 7 device that you seek to remove. Click on “Remove from Account…” from the list of options and confirm the execution of the process. This successfully removes the Apple iPhone 7 device from the iCloud with the aid of a Mac.

Part 4. How to rescue when I accidentally remove a device from iCloud?
While you get to know a variety of platforms and techniques that can be adapted to remove a device from the iCloud, there are several circumstances where you accidentally remove a wrong device from the iCloud. The process of retrieving it is quite simple and efficient, where the Apple iPhone 7 device would be automatically added back into the iCloud account once it is connected with the Internet. It should be kept in mind that the Apple iPhone 7 device should contain the iCloud username and password under the iCloud Settings to automatically have it updated over a network connection.
Part 5. You may wonder how to remove an iCloud account without a password
The following methods are quite direct and have no issues with the iCloud username and password. Apart from the existing methods, there are several cases where the user usually forgets a specific iCloud credential that makes it impossible for them to execute a procedure that has been mentioned above. In such cases, the necessity of dedicated third-party unlocking tools gets into action. These third-party platforms are unique in setting up such an environment that keeps the Apple iPhone 7 device protected and aids in complete execution of the task with no discrepancy. There are hundreds of tools that are present in the market for removing an iCloud account from a device without a password. However, when it comes to selecting the appropriate platform, it usually gets difficult for the user to specify a unique choice. This leads the article to introduce a very impressive third-party tool known as Dr.Fone – Screen Unlock (iOS) that offers a flawless environment to cover all the requirements of removing an iCloud account from a device without a password. There are various pointers that should be kept in mind while selecting Dr. Fone as your first rated choice in removing an iCloud account without a password.
- You can easily unlock an iPhone or other Apple device if you have forgotten its passcode.
- It protects your Apple device from getting into the disabled state.
- Operates perfectly across all iPhone, iPad, and iPod Touch models.
- Compatible across the latest iOS.
- It does not require iTunes to function properly.
- Very easy to use and implement.
As you get to understand this simplistic platform, the following guide explains to the user how to remove the iCloud account from a device through the steps shown below.
Step 1: Download and Launch
You need to download and install the platform on your desktop to function. After downloading it, you need to connect your Apple iPhone 7 with the desktop and launch the platform. Select the “Screen Unlock” tool from the home window and proceed.

Step 2: Select Appropriate Option
Following this, you need to select the “Unlock Apple ID” option from the next screen that opens on your front.

Step 3: Operating your Device
As soon as the process initiates, you need to take up your device and open it up to “Trust” the computer for proceeding. Open the Settings of your Apple device and initiate a reboot.

Step 4: Execution of the Process
Once the reboot executes, the platform automatically recognizes and initiates the removal of the iCloud account from the Apple iPhone 7 device. With the execution of the process, the user is provided with a detailed prompt screen displaying the completion of the process. The removal of the iCloud account from the Apple iPhone 7 device without a password has been successfully executed.

Conclusion
As you have recognized the importance of iCloud backup across your device, there are several dynamics of operation that are to be understood to keep the system prevalent and intact, in every sense. Where users wish to remove their iCloud service from the Apple device, the article has presented a series of different methods and techniques that can be implemented across various platforms to cover the requirements and successfully remove the iCloud account without any issues. Following this, the article has also looked forward to offering a third-party platform that allows the user to successfully reboot and remove the iCloud account from the Apple iPhone 7 device to make it operable. You need to look over the guide in detail to get more knowledge of the procedures and mechanisms.
How To Change Your Apple iPhone 7 Apple ID on MacBook
Your Apple ID is a key component of your Apple ecosystem. It serves as your digital identity across all Apple devices. Whether you have an Intel-based MacBook or one with Apple Silicon, understanding how to change your Apple ID is crucial. Therefore, in this detailed guide, we will walk you through the process of how to change your Apple ID on your MacBookwithout facing any issues.
Besides this, it will also assist you in exploring the significance of your Apple ID and the services it enables on your MacBook. The article will ensure that you make the most of this essential account.
Part 1: What Are the Benefits of Changing the Apple ID on MacBook
Apple ID is the cornerstone that simplifies the management of your Apple devices. It’s more than just a username; it’s your passport to a world of smooth integration and services. Changing your Apple ID on your MacBook can yield several significant benefits. It enhances your overall user experience. Here are some of the key advantages of learning how to change your Apple ID MacBook:
1. Personalization
Changing your Apple ID allows you to customize your MacBook according to your preferences. You can sync your contacts, calendars, and settings. This ensures a personalized and consistent experience across all your Apple devices.
2. App Store and iTunes Purchases
You can access a distinct collection of applications, music, films, and books by creating or logging in with a different Apple ID. This proves especially beneficial when considering a change of region. It also helps when sharing your MacBook with family members, each of whom has their individual Apple ID.
3. iCloud Storage
Your Apple ID is closely linked with iCloud, Apple’s cloud storage service. Changing your Apple ID allows you to gain access to an alternative iCloud account with its dedicated storage capacity. This can be advantageous when you require additional storage or wish to keep your data separate from a previous account.
4. Privacy and Security Settings
Frequently updating your Apple ID can enhance your online privacy and security. It enhances the challenge for unauthorized parties to acquire your personal information. This, consequently, reduces the risk of accessing your MacBook’s sensitive information.
5. Family Sharing
If you’re part of a Family Sharing group, changing your Apple ID can simplify sharing purchases, subscriptions, and iCloud storage with family members. Each family member can have their own Apple ID while still enjoying the benefits of shared content.
Part 2: How To Change the Apple ID on MacBook Through the Settings
In summary, there are many advantages to updating your Apple ID on your MacBook. Let’s now proceed to the actionable steps for accomplishing this task. Below is a comprehensive, step-by-step tutorial on how to change your Apple ID on a MacBookwith the help of System Settings:
- **Step 1:**Access your Mac’s System Setting through the Dock. Tap the Apple ID icon from the left sidebar within the “System Settings.”
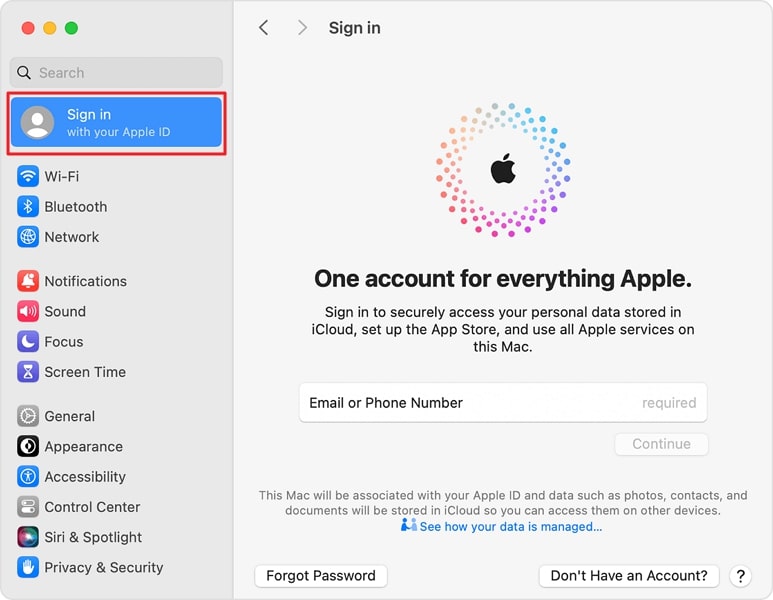
- **Step 2:**Here, scroll down to find and tap “Sign Out.” The option is located at the bottom near the left corner. Afterward, tap “Sign Out” again to confirm your choice, and then, if your device asks, provide your Apple ID password to move ahead.
- **Step 3:**After logging out of your Apple ID, reboot your device, and when it is done, go back to System Settings. From there, hit the “Sign in to with your Apple ID” option so that you can quickly log in with a new Apple ID.
Part 3: Other Ways To Change the Apple ID With Ease
Changing your Apple ID on your MacBook through Settings is a straightforward process. There are scenarios where some adjustments may be necessary and some may not. For instance, in the case of purchasing a used MacBook, it’s conceivable that the prior owner’s Apple ID could still be linked to the Apple iPhone 7 device.
In such instances, you’ll need to contact the previous owner and request them to disassociate their Apple ID. Here are two practical methods for how to change Apple ID on MacBook Air:
Way 1: Using the iPhone
The first way the previous owner can remove the Apple ID from your MacBook is by using his iPhone. You can ask the previous owner to follow these steps on their iPhone:
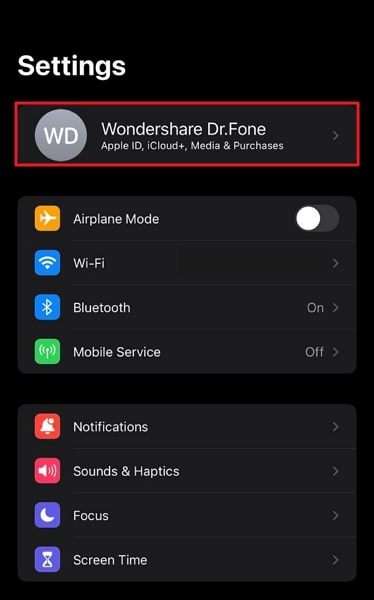
- **Step 1:**Start the process by accessing the Settings app on your Apple iPhone 7. From there, click on Apple ID on top of the main settings page.
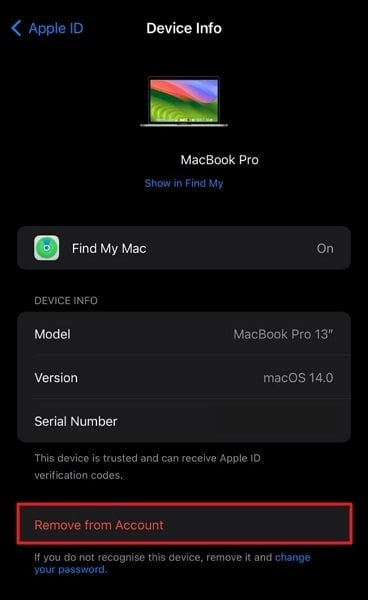
- **Step 2:**Scroll down on the screen to devices that are connected with the Apple ID. Tap on the MacBook and use the “Remove from Account” option to remove Apple ID from MacBook.
Way 2: Using Find My App
Another way to remove the Apple ID is by asking the previous owner to use the Find My service. The steps for removing Apple ID using the Find My app are given below:
- **Step 1:**Begin by opening the Find My app on the iPhone. There, select the MacBook from the Apple iPhone 7 devices section. On the following screen, scroll to the last option, “Erase This Device.”
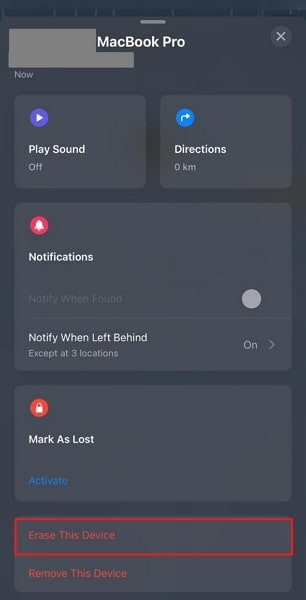
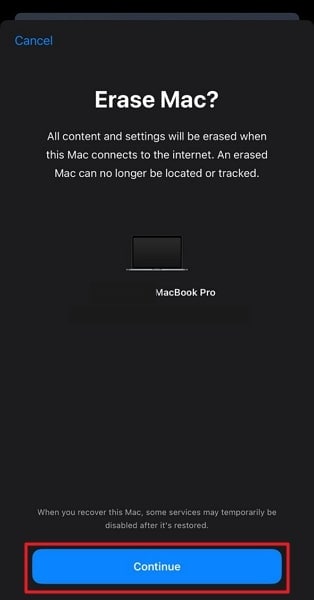
- **Step 2:**Here, select “Continue” to confirm your choice, and follow on-screen instructions to erase the Apple iPhone 7 device. After this, provide your Apple ID password to complete the process, and when the Apple iPhone 7 device eraser is done, the Apple ID will be removed from your MacBook.
Bonus Part: How To Fix Unable To Logout (Change) the Old Apple ID on Mac
Although changing your Apple ID on your Mac is usually a swift procedure, there may be instances where you find it challenging. It’s essential to resolve this matter promptly. The reason is that many essential procedures and services are directly linked to your Apple ID. Here are some common reasons why you might face difficulty logging out of the old Apple ID and their solutions:
1. Ongoing iCloud Backup
While the data is backed up on the iCloud from your Mac, you cannot log out from the Apple ID. It is because, while the data is being uploaded, logging out of Apple ID is restricted to ensure that data is not lost during the process.
Solution
Wait for the iCloud backup to complete before attempting to log out. You can access the backup information through “iCloud” within your Apple ID settings of System Settings. Here, tap “iCloud Drive” and stop syncing to stop the ongoing iCloud backup process.

2. Bug in macOS
Occasionally, macOS may encounter bugs or glitches that prevent you from logging out of your Apple ID. These issues can usually be resolved with software updates or troubleshooting steps.
Solution
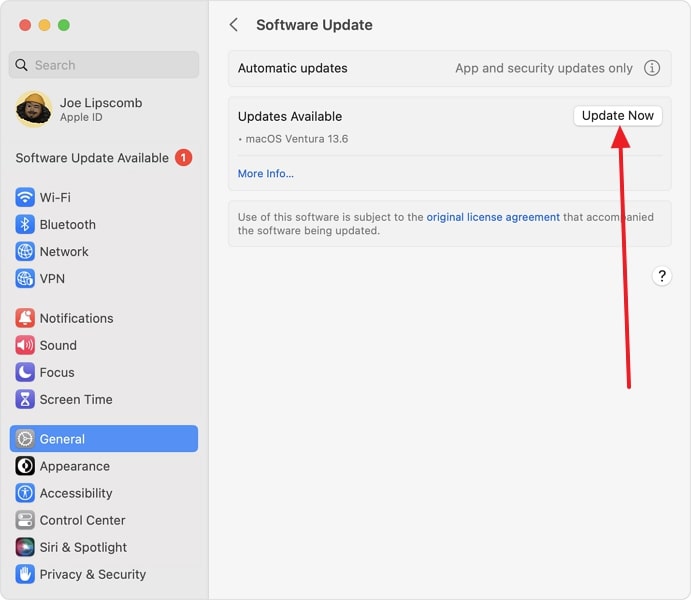
To resolve the bugs and glitches within the MacBook, the best option is to update macOS to its latest version. For that, access “System Settings” through Dock and move to the “General” tab. Here, select “Software Update“ to verify if an update is available and if an update is available, use “Update Now” to update the macOS.
3. Apple Server Inactivity
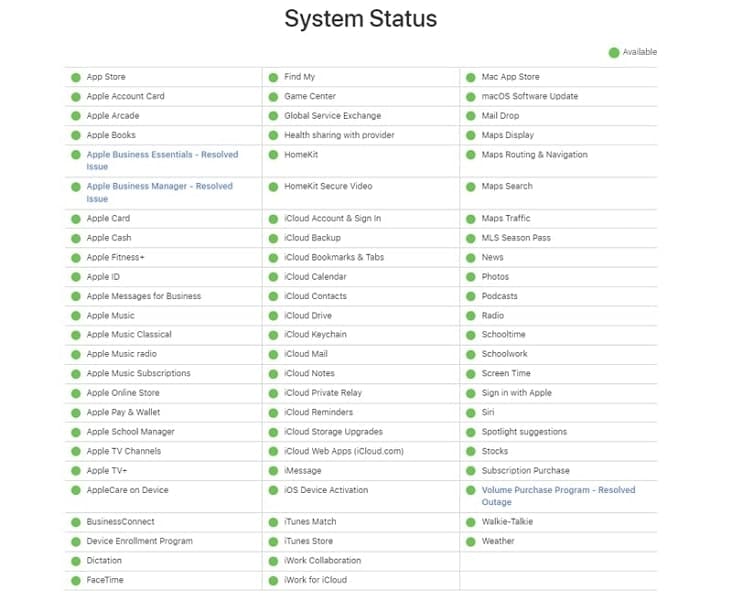
Sometimes, issues on Apple’s servers can disrupt the log-out process. It’s recommended to visit Apple’s System Status page to ascertain the presence of any ongoing server issues.
Solution
You will need to check the official Apple System Status page at https://www.apple.com/support/systemstatus/. Here, you can find out if the problem behind your inability to log out lies with the Apple servers.
Forgetting a password to your Apple ID is a nightmare for Apple users. Considering the pivotal role of Apple ID in the Apple ecosystem, it’s not surprising that forgetting your Apple ID password can be a concern. Nevertheless, the real question is how to proceed if you find yourself in this predicament. While it may initially appear impossible, rest assured there are solutions available. Where there’s determination, there’s a path forward.
If it is an iOS device where your Apple ID is locked, we have the best tool for you in the form of Wondershare Dr.Fone. This tool enables you to remove Apple ID from the Apple iPhone 7 device without needing a password. Dr.Fone’s iPhone unlocker has the capability to bypass the Apple ID lock permanently. It even works when the Find My/Find My iPhone feature is active on the Apple iPhone 7 device.
You can fully restore access to all your iCloud services and Apple ID features by signing in with a new account. Following are the steps you need to adhere to remove the locked Apple ID from your iOS device using Wondershare Dr.Fone:
- Step 1: Navigate To Remove Apple ID in Wondershare Dr.Fone
Click “Toolbox” from the left sidebar after launching Wondershare Dr.Fone. From the available options on the screen, choose “Screen Unlock” and select “iPhone” as your device type. Now connect your Apple iPhone 7 to the computer using a USB cable and click “Remove Apple ID“ in Dr.Fone.

- Step 2: Enable Recovery Mode on Your Device
Tap “Unlock Now” and proceed to confirm that your device has setup screen lock and 2FA is enabled. These are necessary steps for the removal process of Apple ID. Next, put your device into Recovery Mode following the guidelines available on-screen.

- Step 3: Remove the Locked Apple ID
Once your device is in Recovery Mode, Wondershare Dr.Fone will detect its model. You need to choose the iOS version and click “Start” to download the firmware. When it is downloaded and verified, tap “Unlock Now” to initiate the process. The last step involves confirming that you agree to the procedure by typing “000000” into the warning prompt and clicking “Unlock.”

Conclusion
In conclusion, this article has provided you with valuable insights into the process of how to change Apple ID on MacBook. We began by highlighting the primary purpose of the Apple ID and discussing the countless benefits it offers. We’ve walked you through two main methods for changing your Apple ID. The first one is using the Settings on your MacBook.
The other included alternative approaches for scenarios like purchasing a second-hand MacBook. We also addressed the issue of forgetting your Apple ID password on iOS devices. For it, we used the specialized software Wondershare Dr.Fone to remove Apple ID without needing a password.
Guide on How To Remove Apple ID From Apple iPhone 7
Apple products are considered one of the most secure devices, and it is difficult for any second person to breach their system. The Apple ID is the reason behind it, which serves as the main controlling system of Apple products. Apple ID gives access to various functionalities such as the App Store, iCloud, and more. These services ensure the seamless and proper functioning of the Apple iPhone 7 operating system.
However, you may want to remove Apple ID from iOS devices for any reason. Don’t worry; this article has got you covered in this context. It will provide you with an effective guide to how to remove Apple ID from an iPad.
Part 1: What Are the Possibilities That a User Wants To Remove Apple ID From Their iPad?
When it comes to removing an Apple ID from an iPad, the reasons behind such a decision can be pretty straightforward. These are crucial in maintaining privacy and managing one’s digital presence. Some of the key possibilities that lead users to remove their Apple ID from an iPad include:
1. Device Sale or Transfer
When preparing to sell or transfer ownership of an iPad, removing the associated Apple ID becomes essential. This ensures that the new owner can set up their own Apple ID and prevents any data or privacy issues from arising.
2. Privacy Concerns
There are situations where users feel the need to safeguard their personal information or maintain privacy. In this regard, removing the Apple ID from the iPad can be a crucial step. This ensures that no personal data is accessible to others who might gain access to the Apple iPhone 7 device.
3. Switching to a New Apple ID
For a variety of reasons, including changes within an organization or a desire for a clean slate, individuals may opt to transition to a new Apple ID. By deleting the previous Apple ID from the iPad, the transition to the fresh account can occur smoothly, minimizing any potential conflicts or overlaps.
4. Resolving Apple ID-Related Issues
There are instances where an Apple ID is causing technical issues. It can prevent the smooth operation of the iPad, requiring the removal of the existing Apple ID. This can serve as a troubleshooting measure to resolve any persistent problems.
5. Upgrading to a New iPad
When acquiring a new iPad, individuals may wish to transfer their data and settings from their previous device. By removing the Apple ID from the former iPad, users can streamline the data transfer procedure.
Part 2: Primary Ways of Removing Apple ID From the iPad (With Password)
When dealing with the removal of an Apple ID from an iPad, there are multiple approaches available. Each method is designed to accommodate different situations and user choices. Whether you possess the Apple ID password or require a password reset, this guide will lead you through the diverse methods. Summarized below are the top 5 ways for how to remove Apple ID from an iPad:
Way 1: From the Settings
A simple way to eliminate your Apple ID from your iPad involves accessing the Apple ID settings and logging out. This technique works well for individuals who remember their Apple ID password and wish to unlink their account from the Apple iPhone 7 device. Below is a detailed walkthrough to assist you in executing this process:
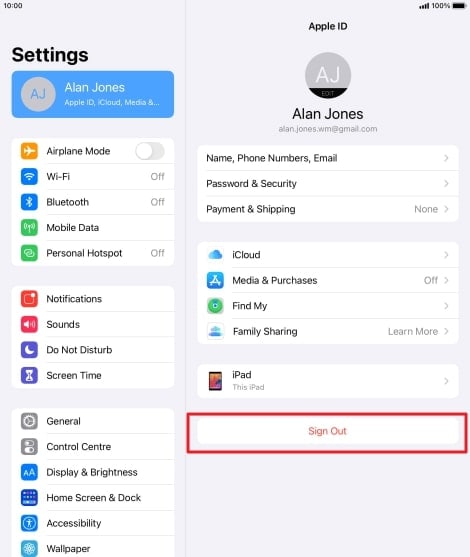
Instructions: Access the “Settings” application on your iPad and select the Apple ID option. Proceed by scrolling down and choosing the “Sign Out” function. You will then receive a prompt to input your Apple ID password. Upon entering the password, tap “Turn Off” to finalize the procedure by disabling Find my iPad.
Way 2: From the iCloud Website
Another effective method to remove your Apple ID from your iPad is by accessing the iCloud website. This method allows you to manage your devices remotely, making it convenient if your iPad is unavailable or lost. Follow these steps on how to remove Apple ID from an iPad using iCloud:
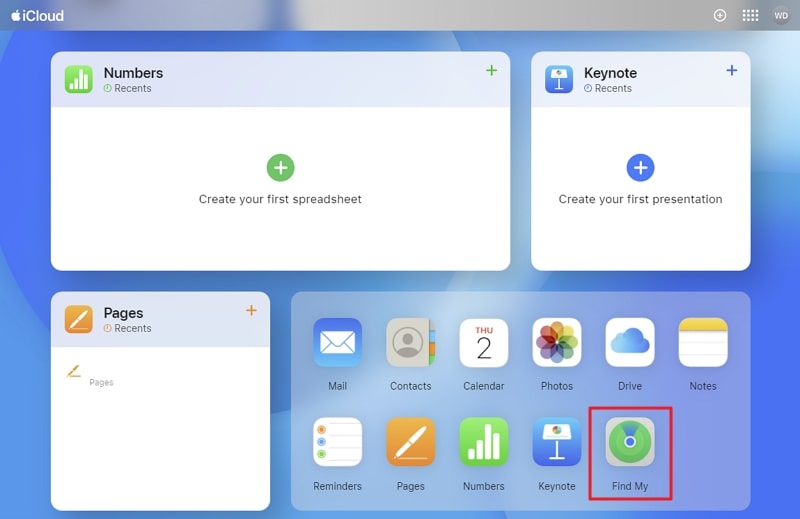
- Step 1: After logging into the iCloud website using the same Apple ID associated with the iPad, tap “Find My.” It will take you to a screen with a map where all devices linked to the Apple ID are shown.
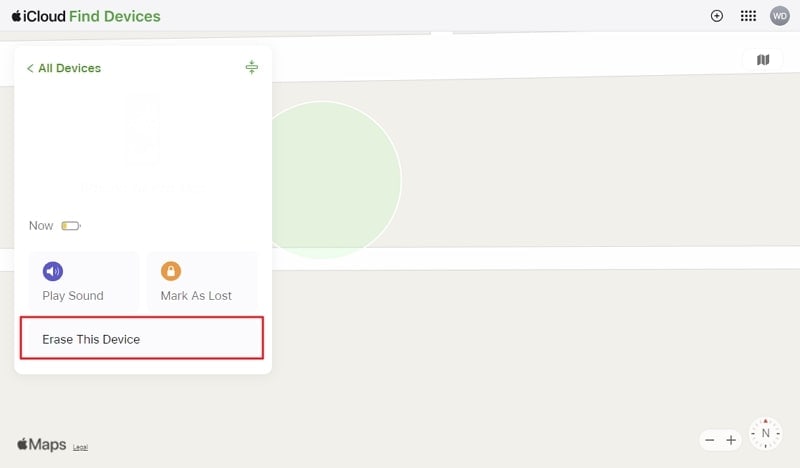
- Step 2: Here, select the targeted iPad and click “Erase This Device” from the available three options. It will prompt a confirmation message where you will need to press “Next” and provide the Apple ID password to initiate the process of removing the Apple ID from the iPad.
Way 3: From the App Store
You can also eliminate an Apple ID from your iPad by utilizing the App Store. This technique permits you to directly remove your Apple ID from a particular iPadOS device through the settings of the App Store. You can use the following steps to remove Apple ID via the App Store:
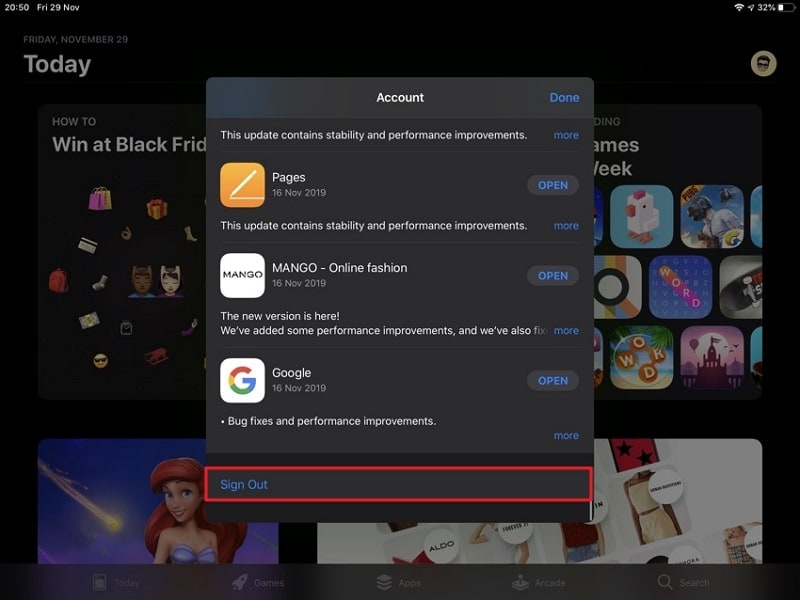
Instructions: Access the App Store on your iPad and tap on the “Profile” image from the top right corner to access the updates and settings options. Then, scroll down to the end of the options and choose the “Sign Out” option to remove the Apple ID from the iPad.
Way 4: From iTunes
To remove an Apple ID from your iPad, you can also utilize iTunes. By facilitating a complete restoration, you can effectively refresh the software on the Apple iPhone 7 device. This approach proves especially beneficial when seeking to thoroughly erase the Apple iPhone 7 device’s content and initiate anew. Here are the steps to be followed for how to remove Apple ID from iPad without a password via iTunes:
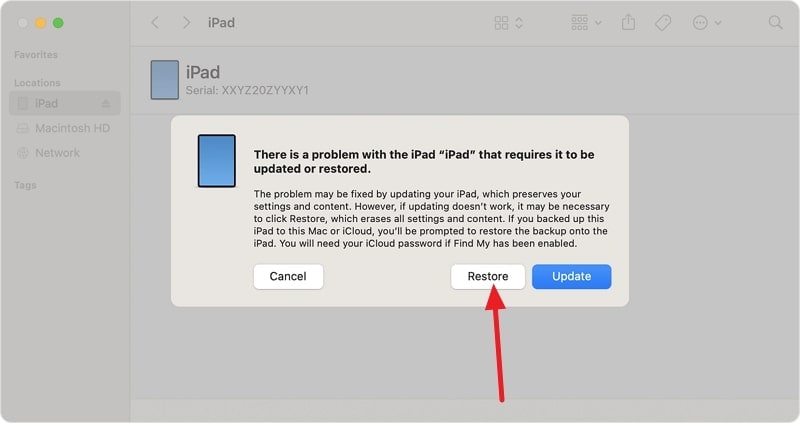
Step 1: Turn off your iPad and connect it to a computer that has the latest version of iTunes. Launch iTunes and put your iPad into Recovery Mode using one of these guidelines:
**For iPads with Face ID.**You will first have to press and release the “Volume Up” button. Then repeat the process with the “Volume Down” button and afterward press and hold the “Top” button. Release the button when the Recovery Mode screen appears on your iPad.
For iPad with Home Button. At the same time, press and hold the “Home” and “Top” buttons. Keep holding them until you see the Recovery Mode screen, and then release them.

- Step 2: When your iPad enters Recovery Mode, iTunes will recognize it and offer the options to “Update” or “Restore” it. Select “Restore” and then follow the on-screen instructions to finalize the procedure of removing the Apple ID.
Way 5: From Find My App on Other Device
In case your Apple ID is currently in use on other devices, the Find My service enables you to detach it from the specific iPad. By employing this approach, you can conveniently oversee your linked devices via the Find My application on an alternate Apple device. To facilitate this procedure, here is a detailed, step-by-step walkthrough:
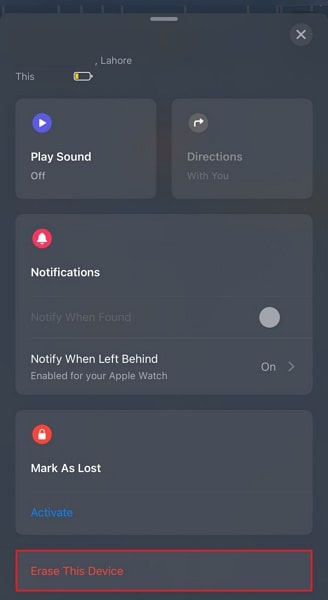
- Step 1: Launch the “Find My” app on the other trusted iPad or iPhone and tap the “Devices” option. From all the Apple iPhone 7 devices connected to the Apple ID, find and select the targeted iPad.
- Step 2: After finding the iPad, tap “Erase This Device” and follow it by pressing “Continue.” Finally, confirm your action by tapping “Erase” and providing the Apple ID password.
Part 3: Remove Apple ID Without Password by a Powerful Tool - Wondershare Dr.Fone
If the problem of removing Apple ID from your iPad is not resolved, your iPad is not of particular use. This is because an Apple ID is responsible for all the basic functions, and you don’t even know the password. There is a need for a more effective and powerful solution in order to maximally utilize your iPad. This is where the feature of Wondershare Dr.Fone – Screen Unlock (iOS) comes out with its extraordinary ability to resolve such issues.
This software is an easy-to-implement solution in answer to the nonfunctioning of all the remedies mentioned above. It removes screen passcodes face ID and bypasses the iCloud activation lock effectively in no time.
Dr.Fone - Screen Unlock (iOS)
Unlock iPhone/iPad Lock Screen Without Hassle.
- Simple, click-through, process.
- Unlock screen passwords from all iPhone and iPad.
- No tech knowledge required, everybody can handle it.
- Supports the latest iOS version fully!


4,395,216 people have downloaded it
Key Features of Wondershare Dr.Fone
- Wondershare Dr.Fone – Screen Unlock removes all types of locks like Apple ID, Face ID, Touch ID, Screen Time Passcode, etc.
- This tool can bypass the iPhone/iPad iCloud activation lock in a matter of a few seconds.
- With Wondershare Dr.Fone, you don’t have to worry about security risks as it provides full-time security with advanced encryption.
- It also removes the MDM if you have forgotten your username and password of your Apple iPhone 7/iPad.
Step-by-Step Guide Involved To Unlock and Remove Apple ID From iPad
Wondershare Dr.Fone provides you with simple steps to remove Apple ID effectively from your iPad without any effort. Here is the step-by-step guide on the process of how to remove Apple ID from an iPad without a password:
- Step 1: Move To Remove Apple ID in Wondershare Dr.Fone
The first thing you need to do is download and install Wondershare Dr.Fone on your computer from the official site. Then, launch it, click “Toolbox” from the left side, and choose “Screen Unlock” from the available options. The next part includes identifying your device as “iOS” and moving on to tap “Remove Apple ID.”
- Step 2: Enable Screen Lock and Two-Factor Authentication
At this point, you need to connect your iPad to the computer and tap the “Unlock Now” button. Now, Wondershare Dr.Fone will ask you whether you have enabled a screen lock and 2FA on your iPad or not. The answer needs to be affirmative for the process to work. So, if you haven’t done so already, go on to set up a screen lock and enable 2FA.

- Step 3: Download the Right iPadOS Firmware
Now is the time to put your iPadOS device into Recovery Mode, a process made easier by the given detailed instructions. Wondershare Dr.Fone will detect your iPad model and ask you to pick the right “System Version.” Afterward, tap “Start” to download the firmware and wait for the process to complete.

- Step 4: Complete the Unlocking of the Apple ID
Once the iPadOS firmware is downloaded and verified, click “Unlock Now.” This will initiate a confirmation prompt where you need to enter the code “000000” to confirm you agree to the procedure. Enter the code and click “Unlock” to kickstart the Apple ID removal process, which will take a few moments to complete.
Conclusion
In conclusion, this comprehensive guide has provided users with various effective methods for removing an Apple ID from an iPad. Recognizing the importance of this process for privacy, device transfer, and account management, the guide has addressed common scenarios and offered step-by-step instructions for each approach. From the simple settings adjustments and iCloud website methods to utilizing the App Store and iTunes, users have a range of options to choose from.
The provided solutions cater to most scenarios. Yet, for users encountering persistent issues, the use of Wondershare Dr.Fone is recommended. This powerful tool serves as a reliable and efficient means to unlock Apple ID and addresses complex Apple ID removal issues. By following the steps outlined in this guide, users can confidently navigate the process to remove Apple ID from their iPad without a password.
Also read:
- [New] From Search Patterns to Screenplay Crafting Videos From Google Data for 2024
- [Updated] 2024 Approved Advanced Techniques in Post-Uploaded YouTube Content Enhancement
- [Updated] In 2024, Audiovisual Standards for Success on YouTube – Top Format Choices
- [Updated] Windows 10 Tips Inserting Title/Text Onto Videos Using Photos for 2024
- Apple ID Locked for Security Reasons From Apple iPhone 14 Pro? Find the Best Solution Here
- Apple ID Locked for Security Reasons On Apple iPhone 11 Pro? Find the Best Solution Here
- CAF WAV 무료 스트리밍: 이웃에서 원특유 방법은 Movavi!
- How to Remove Apple ID from iPhone 12 without Password?
- In 2024, How To Remove Phone Number From Your Apple ID on Your Apple iPhone 12 Pro?
- Superior Web-Based Recording Tools - The Leaders 2023
- Unveiling Google Play Games for Computers: Access Methods Explained
- Title: How to Remove iPhone 7 Device from iCloud
- Author: Alma
- Created at : 2025-02-26 18:47:09
- Updated at : 2025-03-04 06:13:29
- Link: https://apple-account.techidaily.com/how-to-remove-iphone-7-device-from-icloud-by-drfone-ios/
- License: This work is licensed under CC BY-NC-SA 4.0.