
How To Remove Phone Number From Your Apple ID from Your iPhone 13?
How To Remove Phone Number From Your Apple ID on Your Apple iPhone 13?
After getting a new device, iPhone users must prepare a unique identification term for their Apple ID. Creating and setting up this ID is not different each time. Not to mention, one can use this one registered ID to access multiple Apple-based features like podcast subscriptions, apps, etc.
While the code is essential, it can become inactive if your registered phone number is no longer available or your change your number. You must remove the phone number from your Apple ID and add a new one.
Unsure about the steps, though? This post covers that, so read ahead.
Part 1. What is the Purpose of a Phone Number for Apple ID?
Typically, the email is not linked with Apple ID since the function is linked with phone numbers. Apple services-based communication is passed through the Messages app on the iPad, iPhone, iPod Touch, and the Apple ID.
Registering the phone number to Apple ID will allow you to get the necessary account-related messages on your device smoothly. If you do not sign in to iCloud with a SIM card, using Messages or the FaceTime app will become challenging. So, you need to know how to remove your phone number from iCloud or Apple ID when your registered number is inactive.
Part 2. Can You Remove the Trusted Phone Number from Apple ID?
If you want to learn how to remove the number from Apple ID and if possible, the answer is yes and quite quickly. Apple allows users switching to another carrier to remove their already authorized and linked phone number from the Apple ID. This is helpful for two-factor authentication phases so that the Apple iPhone 13 user can avoid getting fully locked out from the account.
Part 3. 3 Ways to Remove a Phone Number from Your Apple ID
If you are wondering about the steps for how to remove an old phone number from Apple ID, there are different styles available. Here are the main processes you can utilize.
Method 1. Remove Phone Number via iPhone/iPad’s Settings
In the matter of how to remove a phone number from an Apple ID, the most effortless process is to go into the Settings app and delete it from there. This is possible if you have your registered phone with you and the Apple ID. Simple access and remove the number.
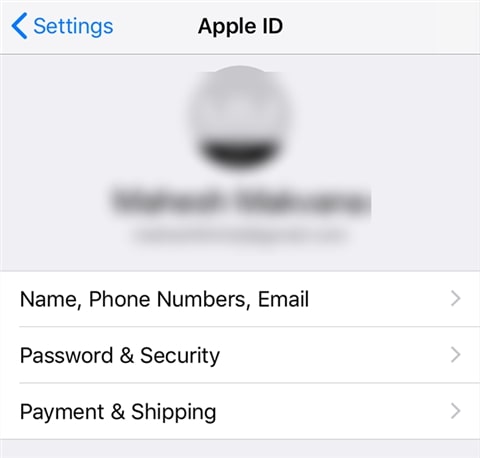
Step 1: Access the Settings option on your iPad or iPhone device.
Step 2: Tap on the Apple account ID.
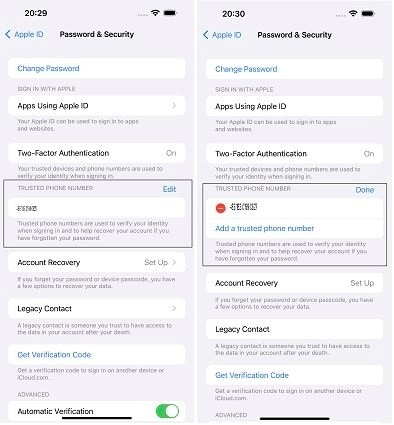
Step 3: Reach the Password & Security section.

Step 4: You will see the Edit icon on the right-hand side. Click on it and then tap on the “Add a Trusted Phone Number” option.
Step 5: Add the Apple iPhone 13 Passcode > new phone number.
Step 6: Select Edit again to delete the old phone number. Press Done.
Method 2. Remove the Phone Number Using a Mac
Users can turn the phone number OFF that they registered to Apple ID through their Mac device. In this context, accessing the FaceTime or Messages app is essential in the context of how to remove phone number from Apple ID via Mac steps.
Step 1: Access the FaceTime or Messages app. Sign in using the same Apple ID you use for the apps on your Apple iPhone 13.
Step 2: Go to Messages and tap on the Settings option. Then, choose the iMessage selection.
For Facetime, click on the FaceTime option and go to Preferences > General.
Step 3: From the list, choose the tickmark beside the phone number to uncheck it. That will deactivate the phone number for your account.

Method 3: Remove Phone Number via Change Apple ID Password
It is possible to change the password for Apple ID in the matter of how to remove a phone number from Apple ID. Adjusting the phone number is the natural next step when you carry out this step, so you can remove the number and use another at this stage.
Step 1: On your iPad and iPhone, tap on the Settings menu.
Step 2: Tap on the icon with your name and click on the Password & Security option.
Step 3: Select the Change Password option.

Step 4: The prompt to add the current Apple ID password, or the passcode, will appear. Add it to confirm, and then insert your new password.
Step 5: Hit the Change Password button.
Step 6: You will get logged out of the account. Sign in with the new password, and the phone number will get removed.
Part 4. How to Remove Apple ID without Password?
All the methods mentioned help remove phone numbers associated with the Apple ID but still require you to access the Apple iPhone 13 device. What if the Apple iPhone 13 device is locked and the necessary details are unavailable, like the password? You can use Dr.Fone - Screen Unlock (iOS) to remove the Apple ID by bypassing the passcode.
It is possible to remove phone number from Apple ID by accessing the Apple iPhone 13 device with simple taps through this app. You have to make the Find My iPhone feature active, and the app will bypass the Apple ID password within seconds.
Best Features:
- Supported on various iOS and iPadOS devices.
- Remove all types of lock screens, like Apple ID, Face ID, Touch ID, Screen Time Passcode, etc.
- Fast process of screen and password bypassing.
How to use it?
Step 1: Download/install/launch the app on Mac/Windows. Select Screen Unlock when the app opens on the interface.

Step 2: Choose the “Remove Apple ID” option and add the passcode, as instructed. Allow the system to trust the Apple iPhone 13 device for authentication through the following prompt.

Step 3: Put the Apple iPhone 13 device into recovery mode following the on-screen instructions. Then, restart the Apple iPhone 13 device. This will automatically kickstart the unlocking process and will take some seconds.

Step 4: Finally, see that Apple ID’s device has been unlocked on the next page.

Video Guide: How to Remove Apple ID without Password?
Part 5. FAQs about Apple ID Phone Number
- How to Add a Trusted Phone Number to Your Apple ID?
The steps for adding the trusted phone number to Apple ID are accessible through Settings > Apple ID icon/name > Password & Security > Edit icon beside the phone number already in use. Click on the “Add a trusted phone number” option and insert the new one. Confirm with your device passcode at the end.
- Why Isn’t My Apple ID Accepting My Apple iPhone 13 Number?
Apple ID accepts phone numbers for linking for two-factor authentication. The local number in the region is needed for pairing the number and Apple ID.
- Does Changing Apple ID affect Phone Number?
No, the Apple ID and phone number are not connected as features or codes. So, adjusting the Apple ID will not affect your device’s phone number.
Conclusion
Indeed, there are multiple methods you can take to remove the phone number registered to your Apple ID successfully. They are accessible in multiple ways through Mac, iPad, or iPhone settings. If you forgot the Apple ID, you could even remove it using Dr.Fone - Screen Unlock (iOS) . Ultimately, choose the process to trust based on your specific needs.
How to Remove an AirTag from Your Apple ID Account On Apple iPhone 13?
Apple provides many exciting features in its products, including the AirTag feature on iPhone devices. However, after enabling the function, many iPhone users forget to remove it from the FindMy app ahead of time. Therefore, if you are selling or resetting the Apple iPhone 13 device, you need to remove AirTag from Apple ID to be usable later.
If someone removes the AirTag without resetting it while operating in the Bluetooth range, deleting AirTag ownership will require manually breaking the Apple iPhone 13 device apart and further configuration.
Remove this connection from the Apple ID account with simple steps first-hand to avoid that. Read on to know the steps involved in this process directly or with the best software alternative.

Part 1. What Exactly Does an AirTag Do?
Before discussing how to remove AirTag from Apple ID, you should know better about the function itself. The AirTag feature is available for iOS devices. Therefore, one can register the AirTag process with the Apple ID you are utilizing on your smartphone.
Apple users can attach the AirTag to different objects like backpacks or keychains. This makes it simple to find these objects later in case they get misplaced or lost through the Find My app on the iPhone.
Users can add their AirTag to one Apple ID account, so you cannot access this from the Find My app via other accounts. In case of loss, you must remove the AirTag from your device entirely.

Part 2. How to Remove an AirTag from Your Apple ID onApple iPhone 13 & iPad?
After adding the AirTag to any object, it instantly syncs with the Apple ID of the user. So, only the primary Apple ID user can use or monitor the AirTagged item. Other users can use it only after resetting the AirTag. So, learn how to remove AirTag from Apple ID via the Find My app on different iOS device types.
Version 1: Removing AirTag on iPhone
Step 1: Access the Apple iPhone 13 homepage and access the Find My app.
Step 2: From the bottom menu bar, tap on the Items option.
Step 3: The information about which AirTag is associated with your chosen item will appear in the next page list.

Step 4: Choose the selected items and swipe upwards on the screen. Then, find the Remove Item button and press it.

Step 5: Following this, select and press the Remove button. Repeat for confirmation.
Version 2: Removing AirTag on iPad
Step 1: Access the Find My app from the home screen on your iPad device.
Step 2: When the app opens, click on the Items icon at the bottom part of the screen.

Step 3: Choose the items you want to delete by tapping them.
Step 4: Swipe up and choose the “Remove Item” option.
Step 5: On the next confirmation prompt that comes up, click Remove.

Part 3. Bonus Tips: How to Unlock an Apple ID That’s Locked?
Typically, it is impossible to use a PC or Mac to access and remove AirTag from Apple ID. One has to use the Apple iPhone 13 or iPad device only. But what if the smartphone screen or Apple ID is locked?
You need to unlock the Apple iPhone 13 device using capable software like Dr.Fone - Screen Unlock (iOS) to remove the blockage. This software can remove many different Apple screen lock types, like Black Screen of Death, Face ID Lock, Screen Time Passcode, and more.
The process of bypassing Apple ID as a feature is available for iOS 14.0 or its previous conversions. It does not require extremely complex jailbreaking or configuration steps- all is complete in some clicks only.
Top Features:
- Users get at least ten retries for the password or lock removal attempt.
- Suitable for removing various screen locks, Apple ID locks, etc.
- Works to bypass Apple ID account locking without a password within seconds.
- It allows Apple ID lock removal even with the active Find My iPhone feature on the smartphone.
How to use it?
Step 1: Install the Dr.Fone app and launch it on the computer. Choose Screen Unlock.
Step 2: On the next page, tap the Remove Apple ID option. Then enter the necessary passcode to verify that you trust the PC. Then, do further scanning.

Step 3: Back up all devices before the procedure. Then, visit the Settings page > user profile > Password & Security. Then, toggle the Two Factor Authentication feature to the ON part. Then, press Unlock Now.

Step 4: Put the smartphone into recovery mode with on-screen instructions. Then, restart the phone. Complete the resetting steps and press the Restart button. It will unlock the Apple iPhone 13 device automatically.

Step 5: Verify on your device that the Apple ID is unlocked. Then, go to the Find My app and remove the AirTag feature as detailed previously.
Part 4. FAQs about AirTag
- How to Set Up and Add an AirTag on Your Apple iPhone 13?
Firstly, get your device ready to get set up. Remove the wrap around the AirTag and pull the tab out to start the battery. After it plays a tiny sound, hold the Apple iPhone 13 device near the iPhone/iPad and press Connect. Next, change the name of the AirTag on your list, give an emoji to it, and press Continue. Register it with the Apple ID in the next prompt and then choose Done.
- How to Rename AirTag and Change Its Emoji?
You can access the Items tab on the Find My application and choose the AirTagged item. Then, scroll downward and choose Rename item to change the name. Finally, create a customized name and add an emoji as well.
- How Far Can You Track an Apple AirTag?
With the Bluetooth connection switched on, one can track Apple AirTag for approximately 100 feet.
Conclusion
The added AirTag stays connected with one Apple ID account until you reset it. So, use the process mentioned to remove the AirTag via iPhone or iPad. If the iPad or iPhone you are using has locked the Apple ID, you can use another software Dr.Fone - Screen Unlock (iOS) , to access it without data loss securely. Then, follow the steps mentioned to reset the AirTag here.
How To Fix Apple ID Verification Code Not Working On Apple iPhone 13
In smartphones, the Apple ID stands out as a cornerstone of security for iPhone users and the broader iOS ecosystem. Its robust verification features are a key reason why many people choose iPhones. Thus, its heightened security is highly valued. However, even extremely reliable systems can encounter hiccups.
Sometimes, you might need help with the issue of the Apple ID verification code not working. This leads to frustration, especially if you need to remember your Apple iPhone 13 ID details. This 2024 guide will delve into practical solutions to fix issues with Apple ID verification codes, helping you regain access to Apple ID and peace of mind.

Part 1: When Does the Apple Verification ID Failed Prompt Appear?
Before diving into solutions, it’s essential to understand the various scenarios that can trigger the “Apple Verification ID Failed” prompt. Recognizing the cause of the problem is the first step toward the right fix. Let’s explore the common reasons you might encounter this issue:
Wrong Password Input
One of the most straightforward reasons for a failed verification is entering the wrong password. This could be a simple typing error or misremembering your password. Repeated wrong attempts can also lead to your account being temporarily disabled as a security measure.
Apple Server Issues
At times, the problem may not be on your end. Apple’s servers can experience downtime or technical glitches like any other online service. During such instances, verification processes might fail, as the server cannot authenticate your credentials.

Slow Internet or Intermittent Connection
A stable and reliable internet connection is improtant for the verification process. If your internet is slow or experiencing intermittent connectivity, it can disrupt the communication between your device and Apple’s servers, leading to verification failure.
Two-Factor Authentication (2FA) Issues
Apple’s two-factor authentication provides an extra layer of security. However, it can also be a source of problems. If there’s a delay in receiving the 2FA code or if 2FA fails to work, you won’t be able to complete the verification process. This could be due to network issues or, sometimes, glitches within the 2FA system itself.
Suspicious Activity
Apple takes your security seriously. If there’s any unusual activity detected on your account, such as login attempts from unfamiliar locations or devices, Apple might lock your account as a precaution. This can trigger the verification failed prompt as the system seeks to protect your account from potential unauthorized access.
By understanding these scenarios, you can diagnose better why you’re facing the issue of Apple verification ID not working. In the following sections, we will explore solutions tailored to these specific problems, helping you regain access to your account efficiently.
Part 2: How To Fix Apple ID Verification Failed
Encountering an “Apple ID Verification Failed” error can be frustrating. Here are some practical solutions that correspond to the common reasons for this issue. These steps should help you regain access to your Apple ID.
Method 1: Connecting to a Stabler Internet Connection
A stable internet connection is crucial. If you’re encountering issues, switch to a more reliable Wi-Fi network. Alternatively, toggling your Wi-Fi or mobile data off and back on can refresh your connection.
Method 2: Changing Password/2FA Device Using Apple ID Account
If you’re facing troubles due to password errors or 2FA issues, resetting your password or updating 2FA settings may help. Visit Settings > Apple ID account page > Sign In & Security and follow the instructions to Change Password or update your Two-Factor Authentication settings.

Method 3: Check iPhone’s Date & Time Settings
Incorrect date and time settings can influence Apple ID verification. Go to Settings, select General, and tap on Date & Time. Ensure Set Automatically is enabled, allowing your Apple iPhone 13 to adjust these settings according to your time zone.

Method 4: Signing Out/In Your Apple ID
Sometimes, simply signing out and back into your Apple ID can resolve verification issues. Navigate to Settings, tap your name at the top, scroll down, and select Sign Out. After signing out, sign back in and check if the issue persists.
Method 5: Disabling VPN
If you’re using a VPN, it can sometimes cause issues with Apple ID verification. Try disabling your VPN from the Settings or the VPN app you’re using, and then attempt the verification process again.
Method 6: Updating to the Latest iOS
Running an outdated iOS version can cause compatibility issues. Go to Settings, select General, and tap on Software Update. If an update is available, download and install it to ensure your device is up-to-date.
Method 7: Checking Apple Server Status and Trying Again Later
Sometimes, the problem is on Apple’s end. Check the Apple System Status page to see if there are any issues with their servers. If there are, it’s best to wait and try the verification process later.
By following these methods, you should be able to resolve the “Apple ID Verification Failed” issue and regain full access to your Apple ID functionalities.
Part 3: How To Remove Apple ID Account From iOS Device
If the above fixes have proven unsuccessful, it might be time to consider removing the Apple ID directly from your device using a third-party tool. This can often resolve the failed verification of Apple ID on new or old phones when other methods fail.
Thankfully, Wondershare Dr.Fone offers a solution with its Screen Unlock (iOS) feature, which includes a Remove Apple ID/iCloud account removal function. It’s a very handy tool for reviewing verification requirements, especially when you forget your Apple ID credentials.
Removing Apple ID Account With Dr.Fone - Screen Unlock (iOS)
Here’s how to use powerful Dr.Fone’s - Screen Unlock (iOS) to remove Apple ID.
Step 1: Download, install, and launch Wondershare Dr.Fone.
Step 2: Go to Toolbox > Screen Unlock > iOS.
- Step 3: Select Remove Apple ID to proceed.
- Step 4: Choose Unlock Now once the connectivity status is confirmed.
- Step 5: Ensure you have a screen lock and the two-factor authentication enabled. Follow the on-screen instructions.

- Step 6: Put your device into Recovery Mode or DFU Mode by following the on-screen instructions. Then, confirm the correct system version of your device.
- Step 7: Wait for the download to finish on your software.

- Step 8: After the firmware is confirmed, click Unlock Now. Then, type in “000000” on the appearing text box and click Unlock.

- Step 9: After the process is completed, click Done. If it still doesn’t work, then click Try again.
Conclusion
Navigating the Apple ID Verification Code not working issue can be a source of significant frustration. This guide aimed to alleviate that by detailing common triggers, such as password errors, server issues, and connectivity problems, and providing targeted solutions like ensuring stable internet, updating iOS, and checking server status.
For those rare instances where conventional methods fall short, Dr.Fone emerges as a reliable ally. Its Screen Unlock feature effectively addresses Apple ID-related hurdles. Whether you’re grappling with verification failures or other phone-related challenges, Dr.Fone - Screen Unlock (iOS) stands out as a dependable tool, ready to assist in simplifying your digital life.
Tips: Are you searching for a powerful Screen Unlock tool? No worries as Dr.Fone is here to help you. Download it and start a seamless unlock experience!
Also read:
- [New] In 2024, Elevate Your Cycling TOP VR Bike Games
- [Updated] 2024 Approved Optimizing Live OBS Broadcasts for FB Viewers
- Apple ID Locked for Security Reasons From iPhone 8 Plus? Find the Best Solution Here
- Detailed Guide on Removing iPhone 14 Plus Activation Lock without Previous Owner?
- How To Erase an Apple iPhone 11 Pro Without Apple ID Password?
- In 2024, How To Unlink Your iPhone 12 mini From Your Apple ID
- In 2024, Protecting Your Privacy How To Remove Apple ID From Apple iPhone 8
- In 2024, Tutorial to Change Vivo Y100i Power 5G IMEI without Root A Comprehensive Guide
- Outstanding OnePlus
- Premium Audio Narrative Compositions
- Prime Windows Photo Reader Pro
- The 6 Best SIM Unlock Services That Actually Work On Your Vivo Y100t Device
- Troubleshooting Error Connecting to the Apple ID Server On Apple iPhone 11 Pro Max
- Title: How To Remove Phone Number From Your Apple ID from Your iPhone 13?
- Author: Alma
- Created at : 2024-12-04 16:07:36
- Updated at : 2024-12-06 16:04:19
- Link: https://apple-account.techidaily.com/how-to-remove-phone-number-from-your-apple-id-from-your-iphone-13-by-drfone-ios/
- License: This work is licensed under CC BY-NC-SA 4.0.