
How to Sign Out of Apple ID On iPhone 14 Plus without Password?
How to Sign Out of Apple ID On Apple iPhone 14 Plus without Password?
“Why can’t I sign out of my iPhone?”
It’s no secret that all Apple products have one common USP, i.e., security. Whether you’re using an iPhone or an iPad, creating an Apple ID online is needed. It is practically impossible for someone else to access your device without your permission. However, this factor can also become a severe headache, especially if you have forgotten the password to your Apple ID.
Without the password, you can’t even sign out of your Apple ID, let alone use different services on the iDevice. If you’re also stuck in a similar situation, we’re here to help. In this guide, we’ve compiled a list of effective tactics on how to sign out of Apple ID without password. These methods will help you remove your Apple ID from your iDevice, even if you don’t remember the password.
Part 1: Sign Out of Apple ID with Password
Before delving into methods for signing out of your Apple ID without a password, it’s essential to outline the conventional procedure of signing out with your password. Follow these steps to successfully sign out of your Apple ID on your iOS device:
Step 1: Open the “Settings” app on your device and tap on your name at the top of the Settings menu. Following this, tap on “Sign Out” at the bottom of the Apple ID settings page.
Step 2: Enter your Apple ID password when prompted. Choose the data you want to keep a copy of on your device and tap “Sign Out.”

Part 2: Sign out of Apple ID without Password by Apple ID Unlocker
If you have forgotten the password of your Apple ID and don’t have a way to recover it, there is no need to panic. You can easily remove passwords from your iOS device using Wondershare Dr.Fone - Screen Unlock (iOS) . Its “Remove Apple ID “ feature can effectively assist you in signing out of your Apple ID without requiring a password. This method provides a smooth solution for users facing issues related to forgotten passwords.
Dr.Fone - Screen Unlock (iOS)
One click to Sign Out of Apple ID without Password.
- Simple, click-through, process.
- Unlock screen passwords or Apple ID from all iPhones and iPads.
- No tech knowledge is required, everybody can handle it.
- Supports almost all iPhones and the latest iOS version fully!


4,395,216 people have downloaded it
Dr.Fone’s iPhone unlocking tool can permanently bypass the Apple ID lock. It works even if the Find My/Find My iPhone feature is active on the Apple iPhone 14 Plus device. This tool helps restore access to all your iCloud services and Apple ID features by signing in with a new account. Following are the steps to remove the Apple ID from your iOS Device:
Step 1: Access Remove Apple ID in Wondershare Dr.Fone
To begin, open Wondershare Dr.Fone on your computer. Then, navigate to “Toolbox,” tap “Screen Unlock,” and define “iOS” as the Apple iPhone 14 Plus device type. It will give you access to the iOS screen unlock menu, where you need to choose “Remove Apple ID.” Now, you need to connect your iDevice to the computer.

Step 2: Enable Lock Screen and 2FA
When your iDevice is connected to your computer, you’ll notice a connectivity status displayed on the following screen. Proceed by clicking the “Unlock Now” button. Dr.Fone will now ask if you have the screen lock and 2FA enabled on your device. The answer to these questions needs to be affirmative, and if you don’t have the option enabled, you will need to do it before proceeding.

Step 3: Enable Recovery Mode on Your iOS Device
Once you’ve confirmed these options, you’ll be directed to a screen that presents on-screen guidelines for placing your iDevice in Recovery Mode. Adhere to the instructions that correspond to your specific iOS model. After initiating Recovery Mode on the Apple iPhone 14 Plus device, the subsequent screen will present its details.

Step 4: Complete the Apple ID Removal Process
Upon the identification of the Apple iPhone 14 Plus device Model, you will simply be prompted to choose the “System Version” and initiate the process by clicking on “Start.” Now, wait for the firmware to download, and once it is downloaded, click “Unlock Now.” A confirmation window promptly emerges on the screen, prompting you to input a code for further progress. Enter the code and select “Unlock” to begin the process.

Part 3: Sign Out of Apple ID Without Password by Resetting Your Apple ID Password
If you find yourself unable to recall your Apple ID password, you can reset it through a simple process. Here’s how to sign out of your Apple ID without a password by resetting your Apple ID password:
Step 1: Access the Settings menu and select your name. Then, navigate to the Sign-In & Security section and choose the option labeled “Change Password.”

Step 2: Simply follow the on-screen instructions to complete the password reset process. You can also perform these steps on a trusted iPad or Apple Watch.
Part 4: Sign Out of Apple ID without Password on Apple Web
Another convenient way how to sign out of Apple ID without the password is to reset the password of your Apple ID by tapping the “Forgot Password” option. In this case, however, you must remember all the security questions to reset your password successfully. If you don’t remember the security questions, you can also reset the recovery password using the registered e-mail ID.
Follow these instructions to reset your password and then sign out of the Apple ID.
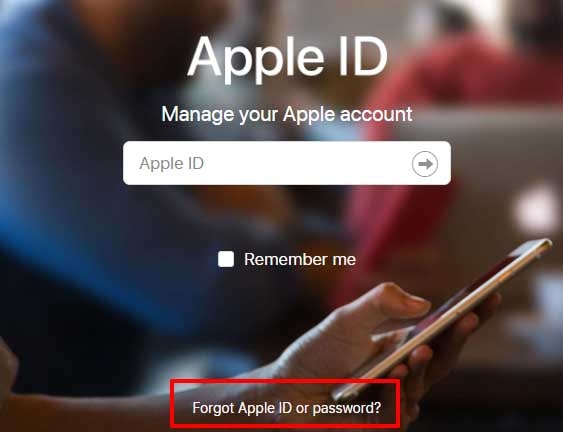
Step 1: Go to the Apple ID Account Page and click “Forgot Apple ID or Password”.
Step 2: Enter your Apple ID and click “Continue”. In the next window, select “I Need to Reset My Password”.
Step 3: Now, select the method using which you want to reset the password. Here are the three possible options.
If you’ve set up security questions while creating your Apple ID, you can choose “Answer Security Questions”. This method will only work if you remember all the answers to every security question. Once you select this method, you’ll be prompted to a new window, with all security questions. Answer these questions and follow the further instructions to reset your password.
If you’ve added a recovery e-mail while creating your Apple ID, you can also use it to reset the password. In this case, select “Get an E-mail”. You’ll receive a password reset e-mail on your registered email.
Whichever recovery method you choose, make sure to follow the on-screen instructions carefully. Once your password reset process completes, you’ll have to individually update the password in every iCloud service, be it iTunes or iMessage.

In case you have enabled two-way verification on your Apple iPhone 14 Plus, you’ll receive a different screen after clicking “Forgot Apple ID or Password”. In this case, you’ll have to follow a different approach to reset your Apple ID password.
Step 1: Go to the Apple ID Account page and click “Forgot ID or Password”.
Step 2: Enter your Apple ID and select the “Reset Password” option.
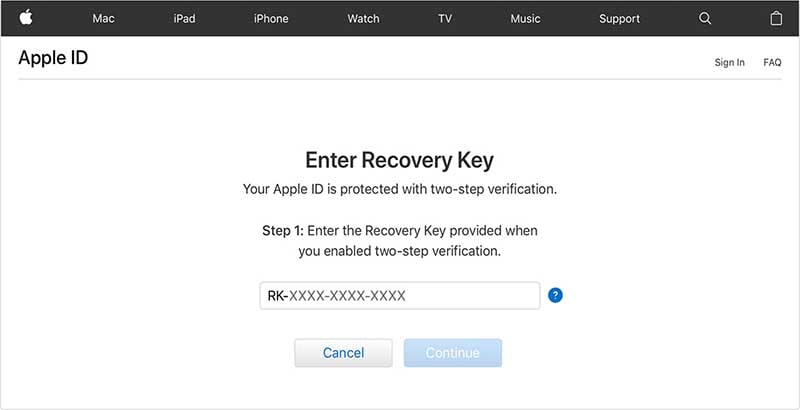
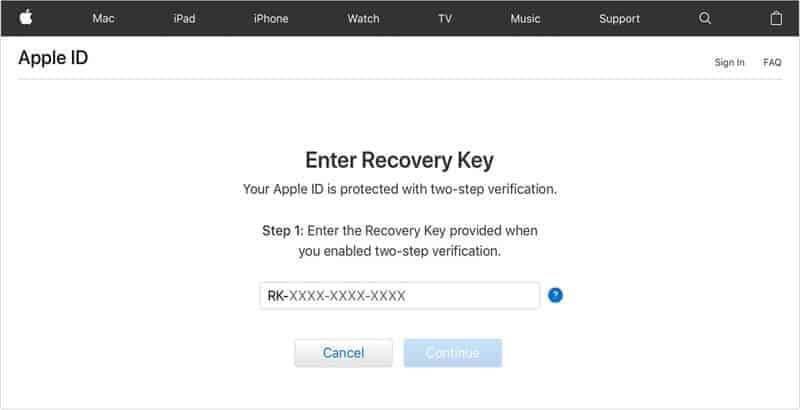
Step 3: In the next window, you’ll be asked to enter the “Recovery Key”. This is a unique key that is provided when a user enables two-way verification for their iCloud account. Enter the recovery key and click “Continue”.
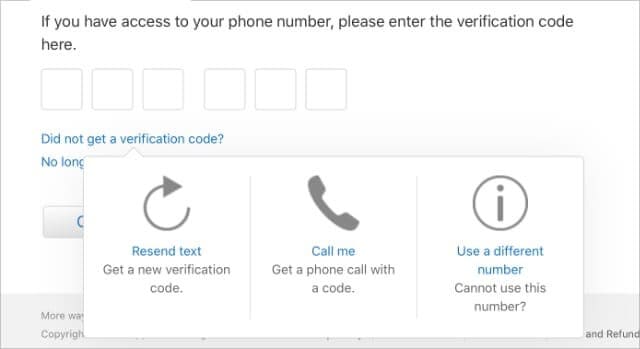
Step 4: Choose a trusted device to receive the verification code. Now, enter this verification code and click “Continue”.
Step 5: In the next window, enter a new password and tap “Reset Password”.
Once you’ve reset the password, you can easily sign out of the Apple ID by navigating through Settings>Apple ID>Sign Out on your Apple iPhone 14 Plus.
Part 5: Sign Out of Apple ID without Password by Apple Support App
If you’re unable to reset your Apple ID password on your own, you can seek assistance from Apple’s official Support app. It provides expert guidance and troubleshooting. Here’s how to use the Apple Support app to sign out of your Apple ID without a password:
Step 1: Access the Apple Support app on another Apple device. In case it’s not available, you have the option to download the Apple Support app from the App Store. Scroll to the bottom until you find Support Tools, then select “Reset Password.” Here, opt for “A different Apple ID.”

Step 2: Provide your Apple ID, and if your Apple ID slips your mind, you can attempt using your email address or phone number instead. Proceed by tapping “Next,” and adhere to the step-by-step guidelines on the screen to reset your password.

Conclusion
That wraps up our tips on how to sign out of Apple ID without password. No doubt, Apple products are probably the most secure devices on the planet, but it can become extremely challenging to access the features of your iDevice when you’ve forgotten the password. If that’s the case, make sure to follow the above-mentioned tactics to sign out of the previous Apple ID and create a new one to regain control over your iDevice.
How to Unlock Apple ID On your Apple iPhone 14 Plus without Security Questions?
Apple ID is known as a very strong security protocol that is consumed for the protection of the data and the applications of the Apple iPhone 14 Plus device it is associated with. This security measure is primarily responsible for holding the data and assorted applications of the Apple iPhone 14 Plus device. Thus, Apple ID can be regarded as a very ubiquitous protocol that promotes effortless protection and considers bringing the complete system in a single bubble. There are several instances where people report over their Apple ID for being locked. To counter this issue, this article provides you a detailed guide on how to unlock Apple ID without security questions and related barriers.
Part 1. A worry-free way to unlock Apple ID without security questions
You may have come across a series of different solutions that considered providing you efficient mechanisms to unlock your Apple ID without the aid of security questions. Over a detailed comparison, people have come across different third-party platforms that dedicated themselves to offering the users the perfect environment to have their devices unlocked. As you all are aware of the saturation that exists in the market, this article features Dr. Fone – Screen Unlock (iOS) , state-of-the-art software that efficiently resolves all problems related to a locked Apple device. There are several reasons that make it possible for users to prefer Dr. Fone above all other existing platforms.
- It helps you save your device from the disabled state.
- You can easily unlock your Apple iPhone 14 Plus or iPad over forgetting its passcode.
- It can operate across all kinds of iPhones, iPads, and iPod Touch.
- It is compatible across the latest versions of iOS.
- It provides you a platform to work without iTunes.
- There are no pre-eminent skills required for using the platform.
Over the question of utilizing the platform efficiently, the following guide explains to you how to unlock Apple ID without email or security questions with the help of Dr. Fone – Screen Unlock.
Step 1: Connect Devices and Access Tool
After downloading and installing the platform on your desktop, you need to connect your Apple device with the desktop and launch the software. Select the “Screen Unlock” tool from the list of options provided on the home window of the application.

Step 2: Initiate Unlock
On the next screen, you are required to select the option of “Unlock Apple ID” from the list and proceed. Open up your Apple device and “Trust” the computer with the provided prompt message.

Step 3: Reboot Phone
Approach the Settings of your device and initiate its reboot. As soon as the reboot starts, the procedure for unlocking the Apple ID initiates across the platform.
Step 4: Execution of the Process
As the process elapses successfully, you are provided with a prompt window on the desktop displaying the completion of the process.

Part 2. Unlock Apple ID with 2-factor authentication
There are multiple techniques that involve the method of unlocking an Apple ID without the aid of email addresses and security questions. As you all believe in the importance of third-party platforms, it is important to come across other mechanisms that can come quite handy in managing such issues. Two-factor authentication is another approach that can provide you robust and efficient solutions to this issue.
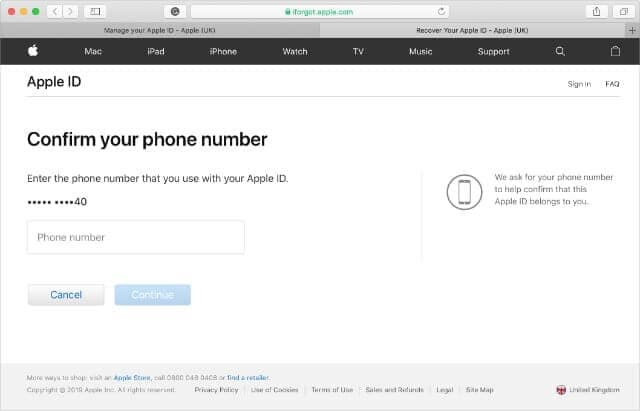
Step 1: Open the iForgot website and provide your Apple ID username to proceed. You need to provide the platform with the phone number that is associated with your Apple ID for verification.
Step 2: Since you cannot use your Apple device or you have not received a notification yet, you need to tap on “Unable to access your [device]?” This would redirect a six-digit verification code to the phone number that you have provided.

Step 3: Add the code that is provided, followed by the Apple ID password, allowing you to unlock your device.
Part 3. Unlock Apple ID with the recovery key
While you understand the conventional methods that can be typically consumed for countering such issues, there are several other mechanisms that are associated across similar platforms and follow an identical protocol to cater to issues that involve unlocking Apple ID without security questions. Being an Apple user, you can efficiently unlock your Apple ID with the aid of a Recovery Key. For this, you need to follow the guidelines provided as follows.
Step 1: You are required to open the iForgot website on your browser. Initially, it is important for you to enter the Recovery Key that you utilized when enabling Two-Factor Authentication.
Step 2: Following this, you need to provide the platform with an Apple device to where you wish to send the verification code to.
Step 3: You need to retrieve the code from the Apple iPhone 14 Plus device that you selected and enter it over the website. The website would lead you to enter a new password for your device.
Part 4. How to reset security questions after forgetting the answers?
Security questions are referred to as the extra protective layer that is responsible for keeping a profile secure. In such cases where you accidentally forget the basic security questions and their answers, you can consider following a very simple procedure to have them restored. In such Apple devices where you have no certain idea about the forgotten security question, you can contact AppleCare in such circumstances and have the assist you in catering to this issue within a matter of minutes. Contact the iTunes Store Support and choose the option of Password & Security Questions to lead towards calling the support for the remedy of the issue.
Conclusion
The article considered discussing various reasons and remedies to unlocking an Apple ID without the aid of security questions. You need to look over the guide to develop an understanding of the systems that are involved.
How to Remove Apple ID from Apple iPhone 14 Plus without Password?
“Is it possible to remove the Apple ID of an old iPhone without entering the password? I have purchased an iPhone from someone and forgot to remove his Apple ID from the Apple iPhone 14 Plus device, and now I am unable to use it. Can I still go past the password? If yes, then what is the best method available?”
The security of the users and their data is among the primary priorities of Apple. Due to this, it is now more challenging than ever to access any Apple-built device without entering the required credentials.
However, there might come a scenario when the iPhone’s rightful owner wouldn’t use the Apple iPhone 14 Plus device. It generally happens when you are not the first owner of the said device, and the previous holder forgot to remove the security protocols such as their Apple ID.
Still, it is possible to remove the Apple ID from the Apple iPhone 14 Plus without the password. There’s no need to worry, though, as we have assembled a guide to get your Apple iPhone 14 Plus unlocked in no time. Three methods are offered here on how to remove Apple ID from the Apple iPhone 14 Plus without the password.

Part 1. Remove Apple ID from iPhone without Password using Dr.Fone
The first method here revolves around a popular software, Dr. Fone - Screen Unlock (iOS) . Wondershare is the brand behind Dr.fone, which has been in this industry for quite some time. The application offers a robust solution for unlocking your Apple iPhone 14 Plus. Here are some of the features you can expect from Dr.Fone.
- It can remove four different types of screen locks: fingerprints, PIN, pattern, and password.
- It offers compatibility with Android 10 and iOS 14, making sure you could remove the password or screen lock of even the latest devices.
- You can remove the passcode even if the screen is unusable.
- Dr.Fone works with a wide range of manufacturers: Xiaomi, Samsung, iPhone, and LG.
- It allows transferring data from one phone to another.
Dr.Fone is a powerful tool enabling you to remove Apple ID from the Apple iPhone 14 Plus without much of a hassle. Here’s the step by step guide on how the process works.
Step 1: Install Dr.Fone on your Computer
Install the software. Launch it and connect your Apple iPhone 14 Plus to the computer using a USB cable. Choose the “Screen Unlock” option from the menu.
The interface will present another set of options before you. You need to access the one at the end, which says, “Unlock Apple ID.” Choose the option and begin to remove Apple ID from the iPhone.
Step 2: Enter Screen Password
Dr.Fone will not be able to detect your device just yet. You need to tap the “Trust this Computer” option on your phone, and then Dr.Fone will begin to access your device. It would help if you kept in mind that proceeding with this process will wipe all your Apple iPhone 14 Plus data.

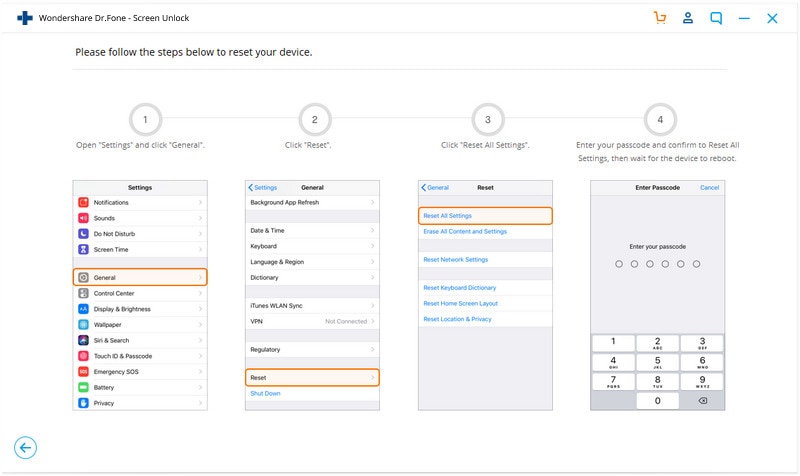
Step 3: Reset all your Apple iPhone 14 Plus Settings
Dr.Fone will present a set of instructions for you to follow. Stick to these steps and reset all your Apple iPhone 14 Plus settings. Once this is done, the Apple iPhone 14 Plus will reboot, and the process to unlock your Apple iPhone 14 Plus will begin.
Step 4: Unlock the iPhone
The unlocking process will begin once your Apple iPhone 14 Plus has finished resetting. Removing the Apple ID from your phone will only take a couple of seconds.
Once the process is finished, make sure the Apple ID is no longer there. Proceed to your settings and check if Dr.Fone has removed the Apple ID.
Part 2. Remove Apple ID from iPhone without Password with iCloud.com
It is better to possess more than one solution to a single issue, which could come in handy when the first one doesn’t work for you. To remove the Apple ID without the password would require you to use iCloud.
You would use the Find My Devices utility of the service to remove the ID. Here are the steps:
Step 1. Visit the iCloud website using your favorite browser. Once you are there, sign in through your Apple ID.
Step 2. Select the “Find iPhone” option to initiate removing the Apple ID from the Apple iPhone 14 Plus permanently.
Step 3. There will be an option in front of you with the title “My Devices” select it.
Step 4. You will be presented with four options, select “Remove from Account,” and the Apple ID of the previous owner will no longer plague the iPhone.
That’s it! Once you complete the steps mentioned above, the account will be removed from the iPhone, and you can sign in with your own Apple ID.

Part 3. Remove Apple ID by Restoring the Apple iPhone 14 Plus in iTunes
In the case that neither of the above methods works for you, you can try removing the Apple ID from the Apple iPhone 14 Plus without a password through Apple’s popular platform, iTunes. It is better to remember that this method will not work if the Apple iPhone 14 Plus has iCloud enabled.
The first step is to get your Apple iPhone 14 Plus into recovery mode. The process of entering recovery mode varies depending on which iPhone you have.
So here, we have listed the method for every Apple iPhone 14 Plus to provide convenience. Here’s how to enter recovery mode:
Step 1. Power off your device by pressing one of the volume buttons and the side button until you see the power off slider. Slide to power off your device.
Step 2. Get your USB cable and connect your phone to our computer while holding the side button. Leave the side button when you see the recovery-mode screen.
Step 3. Once you have gotten your Apple iPhone 14 Plus into recovery mode, you can begin to restore it using iTunes. If the Apple iPhone 14 Plus device stays like this for more than 15 minutes, then the Apple iPhone 14 Plus will reboot, and you will need to repeat the above steps till you get it back to recovery mode.
Step 4. Select the Restore or Update option on your Apple iPhone 14 Plus.
Step 5. Select Restore. iTunes will download the necessary software to reset your Apple iPhone 14 Plus.
Step 6. Please wait for your device to restore, and that’s it!
Conclusion
Now you know how to remove the Apple ID from your old or new iPhone without having to enter the password. Each method is reliable and works well if you follow the steps mentioned above, one by one. If you wish to pick a winner, then there is no better option than Dr.Fone. The platform keeps the phone and its content safe during the process. Additionally, there are a ton of other features that you can utilize at the same time.
Also read:
- [New] 2024 Approved Top Free Audio Samples for YouTube Creators
- [Updated] In 2024, Aquatic Videography Evolved - Top Camcorders of the Year
- 2024 Approved Unseen Horizons Hot List of VR Peripherals (Top 10)
- Bestenliste: 13 Kostenlose DVD-Softwares, Kompatibel Mit Windows 10/11 – Fügen Sie Ihrem PC Neue Funktionen Hinzu!
- Forgot iPhone 15 Pro Backup Password? Heres What to Do
- How To Change Your iPhone 12 Pro Apple ID on MacBook
- How To Delete iCloud Account Remove Your Apple ID Permanently On iPhone 7
- How to Remove an AirTag from Your Apple ID Account From iPhone 13?
- How To Reset the Security Questions of Your Apple ID From Your Apple iPhone 6s
- How To Successfully Revoke Nvidia Drivers in Windows 10 System
- In 2024, Apple ID Locked for Security Reasons From Apple iPhone 13? Find the Best Solution Here
- In 2024, How to Change Credit Card from Your Apple iPhone 15 Pro Apple ID and Apple Pay
- In 2024, How To Fix Apple ID Verification Code Not Working On iPhone 12
- In 2024, Top IMEI Unlokers for Your Oppo A59 5G Phone
- Seamless Gaming Experience: Steps to Linking PS VR Headset to Windows or Mac Systems
- Title: How to Sign Out of Apple ID On iPhone 14 Plus without Password?
- Author: Alma
- Created at : 2024-10-20 17:36:00
- Updated at : 2024-10-26 07:41:42
- Link: https://apple-account.techidaily.com/how-to-sign-out-of-apple-id-on-iphone-14-plus-without-password-by-drfone-ios/
- License: This work is licensed under CC BY-NC-SA 4.0.