
How to Unlock Apple ID On your Apple iPhone 13 without Security Questions?
How to Unlock Apple ID On your Apple iPhone 13 without Security Questions?
Apple ID is known as a very strong security protocol that is consumed for the protection of the data and the applications of the Apple iPhone 13 device it is associated with. This security measure is primarily responsible for holding the data and assorted applications of the Apple iPhone 13 device. Thus, Apple ID can be regarded as a very ubiquitous protocol that promotes effortless protection and considers bringing the complete system in a single bubble. There are several instances where people report over their Apple ID for being locked. To counter this issue, this article provides you a detailed guide on how to unlock Apple ID without security questions and related barriers.
Part 1. A worry-free way to unlock Apple ID without security questions
You may have come across a series of different solutions that considered providing you efficient mechanisms to unlock your Apple ID without the aid of security questions. Over a detailed comparison, people have come across different third-party platforms that dedicated themselves to offering the users the perfect environment to have their devices unlocked. As you all are aware of the saturation that exists in the market, this article features Dr. Fone – Screen Unlock (iOS) , state-of-the-art software that efficiently resolves all problems related to a locked Apple device. There are several reasons that make it possible for users to prefer Dr. Fone above all other existing platforms.
- It helps you save your device from the disabled state.
- You can easily unlock your Apple iPhone 13 or iPad over forgetting its passcode.
- It can operate across all kinds of iPhones, iPads, and iPod Touch.
- It is compatible across the latest versions of iOS.
- It provides you a platform to work without iTunes.
- There are no pre-eminent skills required for using the platform.
Over the question of utilizing the platform efficiently, the following guide explains to you how to unlock Apple ID without email or security questions with the help of Dr. Fone – Screen Unlock.
Step 1: Connect Devices and Access Tool
After downloading and installing the platform on your desktop, you need to connect your Apple device with the desktop and launch the software. Select the “Screen Unlock” tool from the list of options provided on the home window of the application.

Step 2: Initiate Unlock
On the next screen, you are required to select the option of “Unlock Apple ID” from the list and proceed. Open up your Apple device and “Trust” the computer with the provided prompt message.

Step 3: Reboot Phone
Approach the Settings of your device and initiate its reboot. As soon as the reboot starts, the procedure for unlocking the Apple ID initiates across the platform.
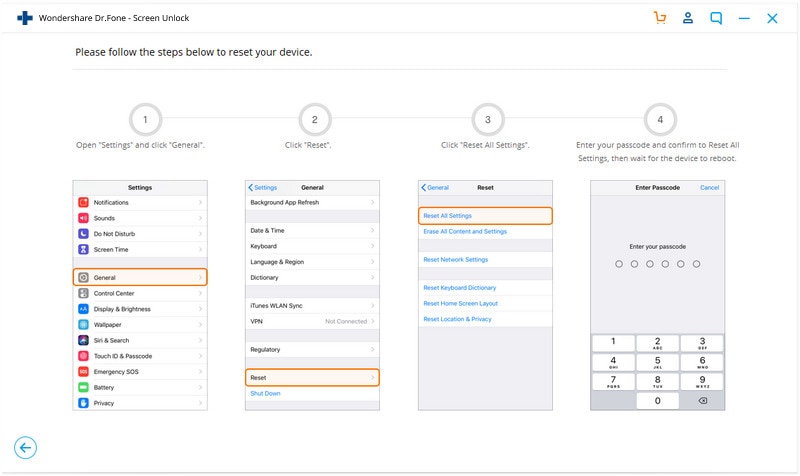
Step 4: Execution of the Process
As the process elapses successfully, you are provided with a prompt window on the desktop displaying the completion of the process.

Part 2. Unlock Apple ID with 2-factor authentication
There are multiple techniques that involve the method of unlocking an Apple ID without the aid of email addresses and security questions. As you all believe in the importance of third-party platforms, it is important to come across other mechanisms that can come quite handy in managing such issues. Two-factor authentication is another approach that can provide you robust and efficient solutions to this issue.
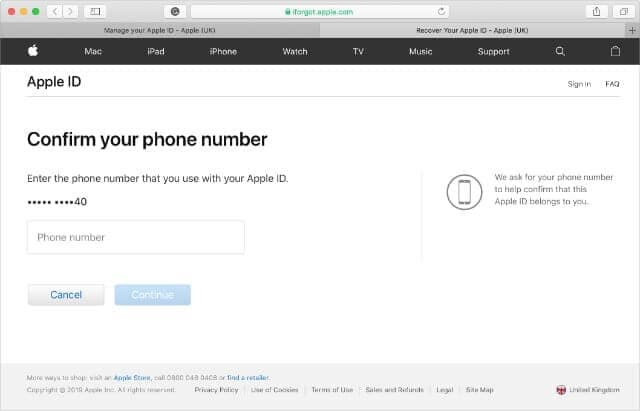
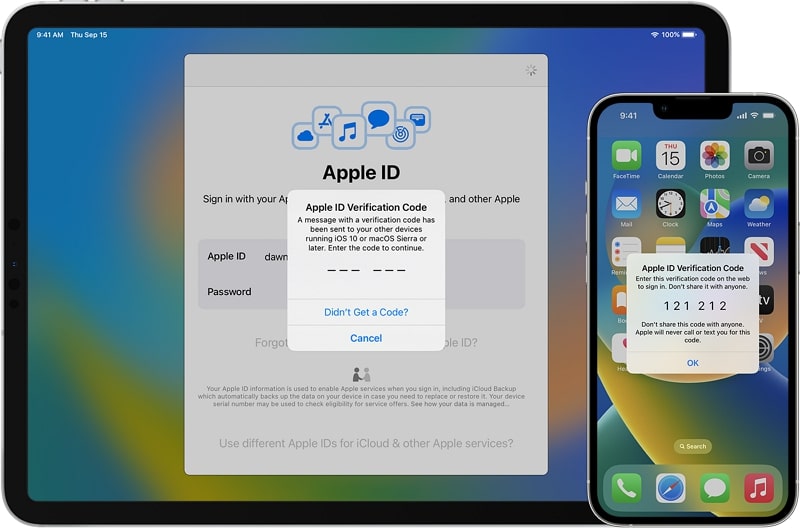
Step 1: Open the iForgot website and provide your Apple ID username to proceed. You need to provide the platform with the phone number that is associated with your Apple ID for verification.
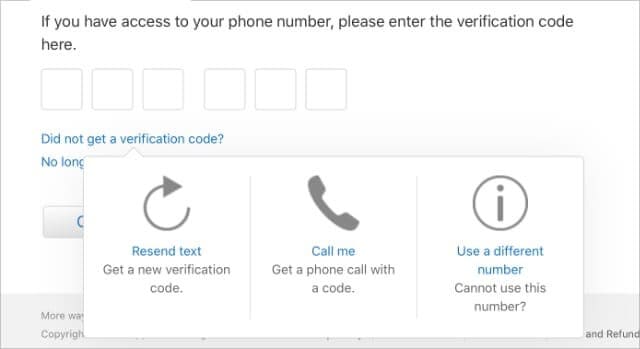
Step 2: Since you cannot use your Apple device or you have not received a notification yet, you need to tap on “Unable to access your [device]?” This would redirect a six-digit verification code to the phone number that you have provided.

Step 3: Add the code that is provided, followed by the Apple ID password, allowing you to unlock your device.
Part 3. Unlock Apple ID with the recovery key
While you understand the conventional methods that can be typically consumed for countering such issues, there are several other mechanisms that are associated across similar platforms and follow an identical protocol to cater to issues that involve unlocking Apple ID without security questions. Being an Apple user, you can efficiently unlock your Apple ID with the aid of a Recovery Key. For this, you need to follow the guidelines provided as follows.
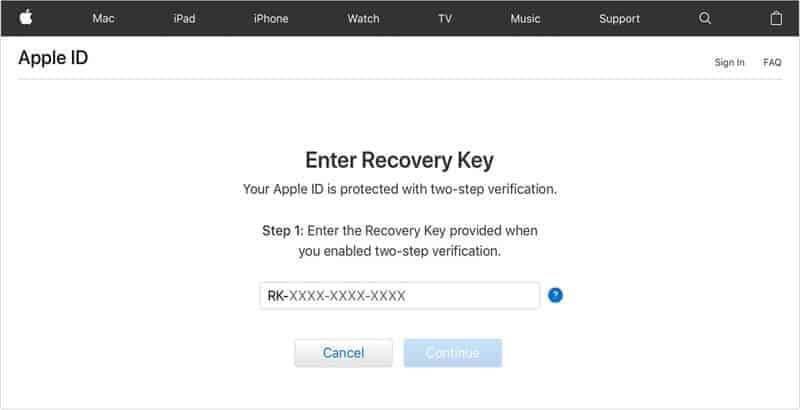
Step 1: You are required to open the iForgot website on your browser. Initially, it is important for you to enter the Recovery Key that you utilized when enabling Two-Factor Authentication.
Step 2: Following this, you need to provide the platform with an Apple device to where you wish to send the verification code to.
Step 3: You need to retrieve the code from the Apple iPhone 13 device that you selected and enter it over the website. The website would lead you to enter a new password for your device.
Part 4. How to reset security questions after forgetting the answers?
Security questions are referred to as the extra protective layer that is responsible for keeping a profile secure. In such cases where you accidentally forget the basic security questions and their answers, you can consider following a very simple procedure to have them restored. In such Apple devices where you have no certain idea about the forgotten security question, you can contact AppleCare in such circumstances and have the assist you in catering to this issue within a matter of minutes. Contact the iTunes Store Support and choose the option of Password & Security Questions to lead towards calling the support for the remedy of the issue.
Conclusion
The article considered discussing various reasons and remedies to unlocking an Apple ID without the aid of security questions. You need to look over the guide to develop an understanding of the systems that are involved.
Forgot Your Apple ID Password and Email On Apple iPhone 13? Here’s the Best Fixes
For Apple users, the Apple ID stands as the gateway to its services. It connects users to a universe of innovative apps, music, and more. So, I forgot my Apple ID password, and email is not a situation many Apple users want to be in. However, the moment of forgetting the Apple ID password and email can turn into a nightmare.
It can leave users worried and locked out of their cherished accounts. That’s why the need for swift and effective solutions to regain access to Apple ID accounts has become vital. In this comprehensive guide, we unveil the best solutions available. The aim is to empower users to regain control over their Apple system.
Way 1: Reset Apple ID Password From The Settings [Immediate Solution]
One of the quickest remedies for a misplaced Apple ID password involves starting the password reset procedure. This can be conveniently carried out from the settings on your iOS device or Mac. This approach offers a rapid and convenient pathway to regain entry to your Apple ID. To reset your Apple ID password on Mac and iOS devices, please adhere to the steps provided below:
For iOS Devices
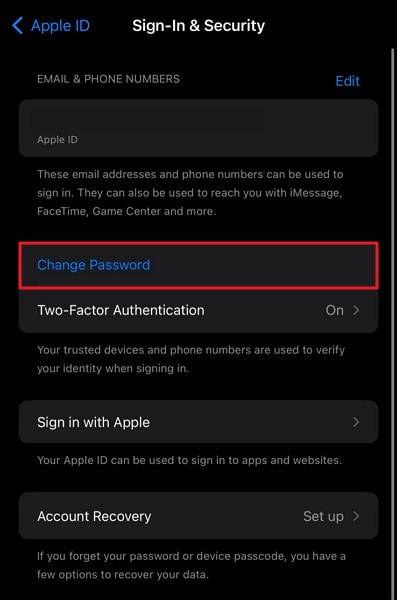
- Step 1. Locate and launch the Settings app on your iDevice by swiping left and right through the installed apps. After entering, select your name and proceed to tap “Sign-In & Security” in the subsequent window.
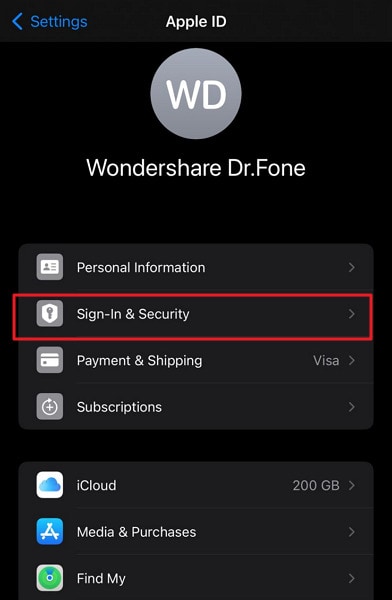
- Step 2. Opt for “Change Password,” input your current iDevice password, and enter your new Apple ID password. Confirm the new password and finalize the process by tapping “Change Password.”
For MacBook
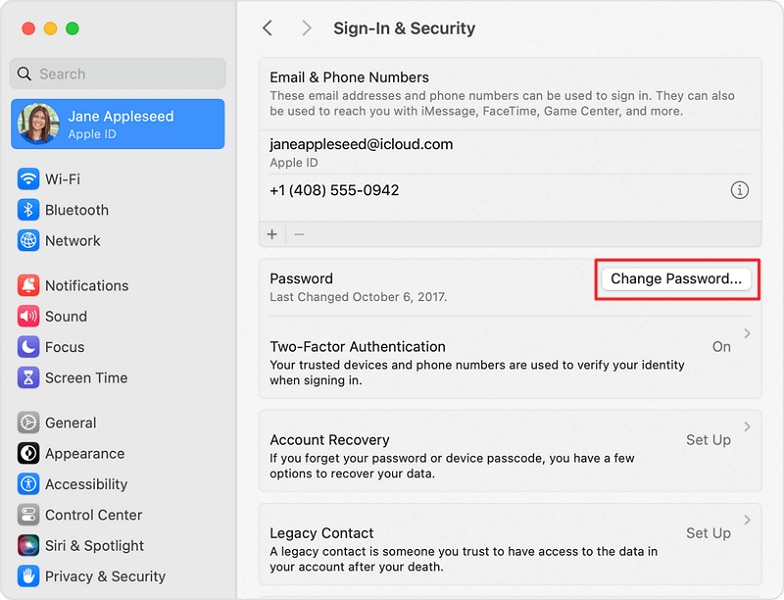
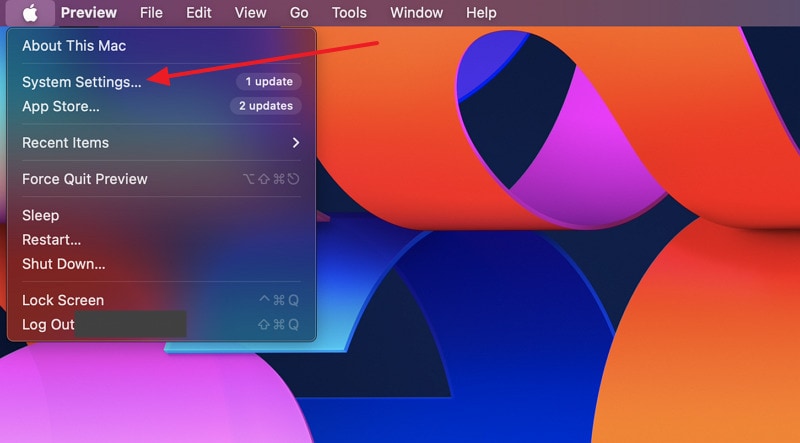
- Step 1. Navigate to the top left corner of your Mac and select the Apple logo. From the dropdown menu, choose “System Settings.” Inside “System Settings,” click on your name and select “Sign-in & Security.”

- Step 2. Within the “Sign-In & Security” tab, locate “Password” and click on “Change Password.” Enter your Mac passcode and follow the on-screen instructions to reset your Apple ID password.
Way 2: Reset Apple ID Password From Website
Have resetting the Apple ID password from the settings on your iOS device or Mac proved unsuccessful? An alternative approach lies in using the official Apple “iForgot” website. This online solution functions as a dependable platform. It enables users to recover access to their Apple ID while ensuring password resets are conducted securely. The following steps outline the process:
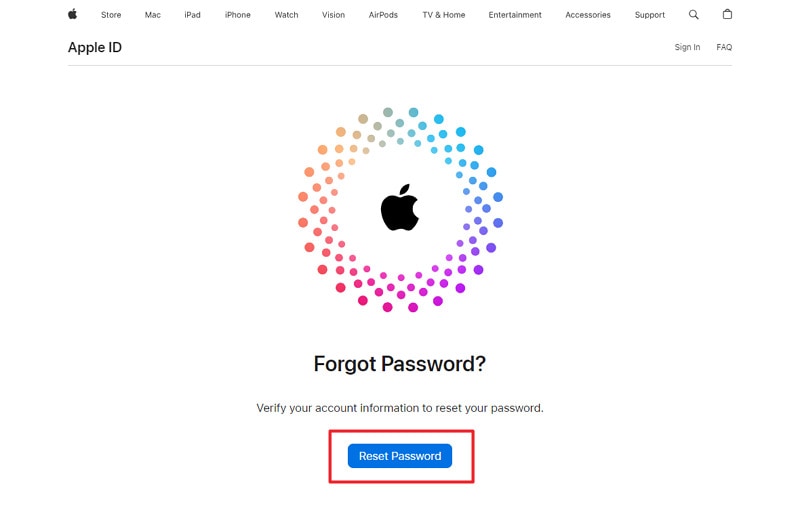
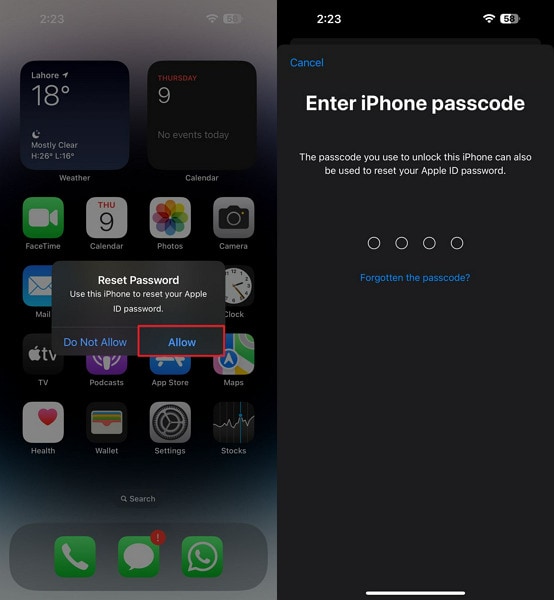
- Step 1. To begin, launch a web browser and navigate to iforgot.apple.com. Afterward, opt for the “Reset Password” option, leading you to the page dedicated to changing your Apple ID password. Provide your Apple ID, usually the email address linked to your Apple account, and proceed by clicking “Continue.”
- Step 2. You will receive a confirmation code on one of your trusted Apple devices by proceeding to the next screen. Tap “Allow” on the confirmation pop-up, and you will be redirected to enter your trusted Apple device passcode. This will allow you to set a new password for your Apple ID.
Way 3: Reset Apple ID Password Using the Apple Support App
The official Apple Support app is another way to reset your Apple ID password. It is a blessing in disguise for those who don’t have access to trusted devices or recovery email/phone numbers. This method can be easily accessed from another iOS device. Below are the necessary procedures you must follow to reset your Apple ID password with email using the Apple Support app:
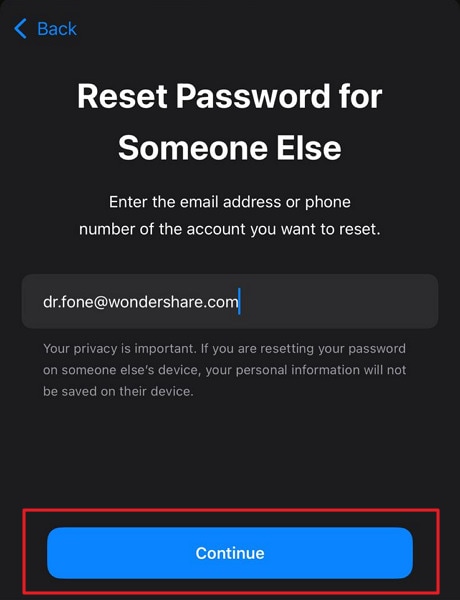
- Step 1. Start by accessing an iOS device, then continue by installing Apple’s official Support App. After installation, launch the application and navigate to the “Support Tools” category. Find the “Reset Password” option and click on it to commence the password reset process.
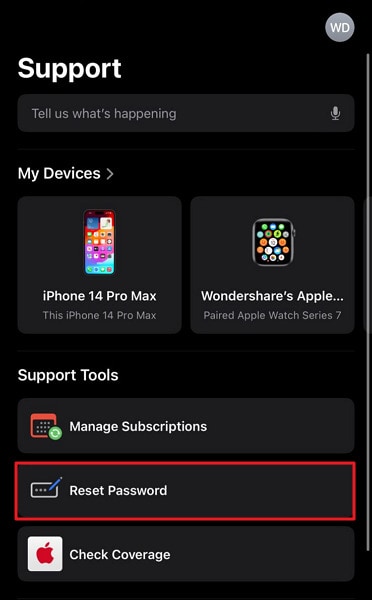
- Step 2. When it comes to selecting the Apple ID, tap “Help Someone Else.” Then, enter your Apple ID, press “Continue,” and follow the on-screen instructions to complete the process.
Way 4: Reset Apple ID Password Using Account Recovery Contact
You are in luck if you have added an account recovery contact before losing your Apple ID password. To guarantee that you never face lockouts on your Apple ID or devices, Apple permits the addition of up to 5 recovery contacts. Simply contact your account recovery contact for assistance. Here are the steps they can follow to aid you:
On iOS Devices
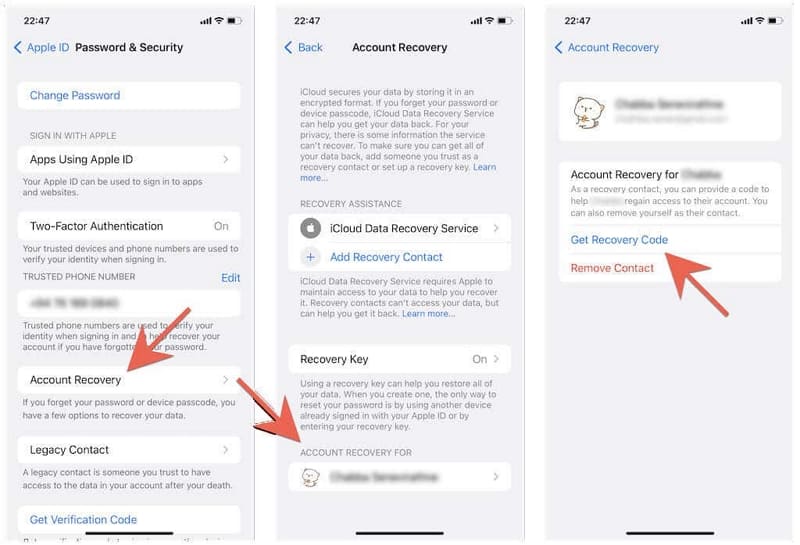
- Step 1: You can begin by accessing the iOS device’s Settings and tapping the Apple ID. On the following screen, press “Sign-In & Security” and go on to “Account Recovery.”

- Step 2: Here, press the account’s name that has added them as recovery contact. Press “Get Recovery Code” on the following screen and share it with the person who needs to regain access to his devices.
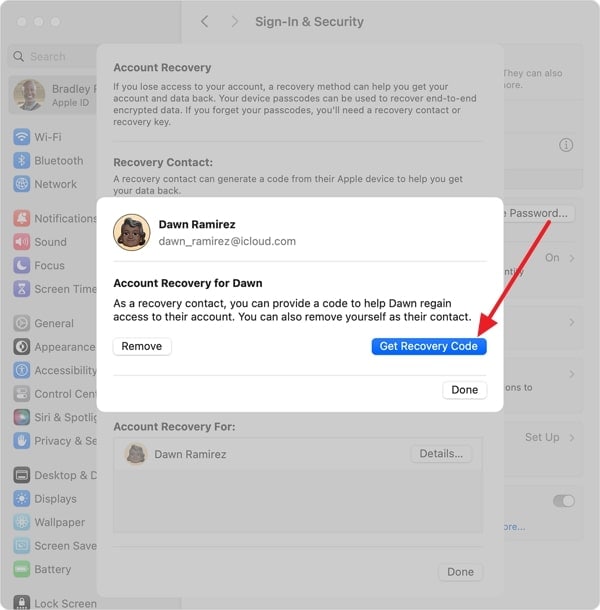
On Mac
- Step 1: Start by accessing “System Settings” using the Finder and click on your name from the top left corner. Following this, access the “Sign-In & Security” settings and tap “Account Recovery.”
- Step 2: Select the contact who has asked you for help recovering their account. Then, tap “Get Recovery Code” to receive a code that you need to share with the targeted person.
Way 5: Reset Apple ID Password Through Requesting Account Recovery
Did all previous methods fail to yield the desired outcome? You can request an account recovery through the official Apple iForgot website. This process facilitates a comprehensive account recovery procedure. It enables users to regain access to their Apple ID account with the help of Apple’s support team.
All you need to do is contact Apple support and request resetting your Apple ID password. It usually takes up to 72 hours for this process to complete. To make it quicker, you should avoid using the Apple iPhone 13 device from where you made the request. Similarly, power off all devices where the targeted Apple ID is logged in.
You can further shorten the process by using the verification code sent to your primary email. As far as the progress of the procedure is concerned, you can view it on the iForgot website by adding your Apple ID.
Way 6: Make Apple ID Account Recovery Easy With Wondershare Dr.Fone
If you have been trying all the solutions and the Apple ID account has not yet recovered, then you need a more solid solution. Your Apple ID is the main aspect of your Apple devices to get your operations done smoothly. Without having access to it, you will be unable to utilize the services of the App Store, iCloud, and others.
That’s why it’s necessary to recover your Apple ID as soon as possible. Wondershare Dr.Fone provides a robust feature to unlock your Apple ID and resolve this problem permanently. This software can also bypass your Screen Time Passcode if you have forgotten your password. You will be able to use your Apple ID effectively after using this iOS screen unlock toolkit.
Key Features of Wondershare Dr.Fone
Dr.Fone - Screen Unlock (iOS)
Unlock iPhone/iPad Lock Screen Without Hassle.
- Simple, click-through, process.
- Unlock screen passwords from all iPhone and iPad.
- No tech knowledge required, everybody can handle it.
- Supports the latest iOS version fully!


4,395,216 people have downloaded it
- Wondershare Dr.Fone facilitates the Apple ID unlock process even for iOS 17 and iPadOS 17 users.
- Users can utilize the software’s advanced algorithms to remove the iTunes backup encryption without corrupting anything.
- It also permits users to unlock their iDevices screens, thereby restoring access to their iOS devices.
Steps Involved To Make Apple ID Account Recovery With Wondershare Dr.Fone
Its simple interface is specially designed to assist the users in implementing the essential steps regarding the Apple ID recovery process. Here is how to make the Apple ID account recovery with Wondershare Dr.Fone:
- Step 1: Choose the Remove Apple ID Tool
At first, you will have to launch Wondershare Dr.Fone on your system and access the “Toolbox” tab on the left side. Different options will appear in front of you, from which select the “Screen Unlock” tool and confirm the Apple iPhone 13 device OS as “iOS.” After that, you need to choose the option of “Remove Apple ID” and connect your Apple iPhone 13 to the computer.

- Step 2: Get Your Apple iPhone 13 into the Recovery Mode
In the next step, proceed with unlocking your Apple iPhone 13 and selecting the “Trust” option for system authentication. After doing this, you need to press the “Unlock Now” icon and follow the on-screen instructions to confirm the status of Screen Lock and Two-Factor Authentication. Next, you will be required to enable Recovery Mode on your iDevice.

- Step 3: Finalize the Apple ID Unlocking Process
When your Apple iPhone 13 has entered Recovery Mode, Wondershare Dr.Fone will detect the model of your iDevice and choose the “System Version” for downloading the required iOS firmware. After verifying the iOS firmware, press the “Unlock Now” button and give the confirmation to initiate the unlock process of Apple ID.

Conclusion
In summary, the Apple ID serves as the fundamental key to unlocking a world of apps and services. Yet, the experience of forgetting the Apple ID password and email can be frustrating as it restricts users’ access to their cherished accounts and services. Throughout this guide, we have explored a range of solutions on how to retrieve the Apple ID.
It ensures that users regain control over their accounts within the Apple ecosystem. Furthermore, for more intricate and robust solutions, Wondershare Dr.Fone stands as the best choice. It offers a dedicated Unlock Apple ID feature. This presents an invaluable help to resolve Apple ID-related issues swiftly.
How To Remove the Two Factor Authentication On Apple iPhone 13
Want To Remove the Two Factor Authentication? Check Out This Guide

Continuous technology innovation has introduced many advanced encryption and security methods to protect data from hackers. With these innovations, companies like Apple and Google have introduced the two-factor authentication process to protect user data.
But sometimes, this security method becomes a hassle to access your data daily, due to which many users try to remove it. That is why, in this article, we have discussed how you can remove iCloud two-factor authentication easily.
- Part 1: What Is Two-Factor Authentication and How Helpful It Is
- Part 2: Can You Remove the Two Factor Authentication iCloud at Anytime
- Part 3: How To Remove the Two-Factor Authentication Within 14 Days
- Part 4: iPhone Apple ID Got Locked? Here’s a Reliable Tool To Get It Unlocked Without Passcode
Part 1: What Is Two-Factor Authentication and How Helpful It Is
Protecting users’ devices and online accounts is one of the major responsibilities of tech companies like Apple. Due to this, they have added multiple security features, including two-factor authentication. Thus, if you create an Apple ID, you can see a two-factor authentication option that adds an extra layer of security.
2FA is activated when the user provides the password to log into the Apple ID or software through a new device, and it acts as a second layer for account security. Apple ID or any software containing sensitive data cannot be accessed without it. This method provides a higher security level than single-factor authentication. To understand more benefits of this security system in detail, check the following points:
- Protection From Password Theft: 2FA acts as an additional security level. It protects your accounts and devices in case your password is leaked.
- Migrations of Unauthorized Assets: Online banking applications use 2FA to protect users from unauthorized bank transfers. If someone accesses their app, this is a beneficial security measure.
- Protection on Multiple Services: Platforms, including social media, banks, and cloud storage, use 2FA. It means that 2FA can be used in various digital aspects.
Part 2: Can You Remove the Two Factor Authentication iCloud at Anytime
Many people use 2FA globally to protect their personal information and devices from hackers and unauthorized access. However, in some cases, users may want to remove two-factor authentication iCloud for multiple reasons. This includes scenarios in which their device is lost or damaged or if they have found a better security option than this one.
Moreover, there is one important key point to note: Apple has removed the feature of deactivating 2FA from the Apple ID. It means you need to think twice before activating this feature on your Apple ID because it cannot be reversed. For the following reasons, Apple has taken this initiative:
- Enhanced Security: By removing the deactivation option for 2FA, Apple is trying to strengthen its account security to ensure that no one can access its user’s data.
- Reducing Vulnerabilities: Allowing users to deactivate 2FA could cause vulnerabilities in the Apple ecosystem that can be a weak point for protecting users’ data. That is why Apple has removed the deactivation option to stop malicious actors from taking advantage of this vulnerability.
- Encouraging Security Awareness: To make Apple users more security conscious, Apple has made it difficult on purpose to remove 2FA. It helps users to be more confident in Apple services and products.
- Minimizing Mistakenly Steps: If users mistakenly remove the 2FA, their accounts and devices are at risk of being accessed without proper authentication. To avoid such an issue, the deactivation option of 2FA is removed.
Besides all these reasons, there is still some good news for those who want to remove the two-factor authentication iPhone to use other security options. The good news is that Apple allows users to remove 2FA for a limited time after activation.
Part 3: How To Remove the Two-Factor Authentication Within 14 Days
As explained in the last part, Apple has made removing the 2FA option from Apple ID challenging for several security reasons. Thus, if you want to remove 2FA from your Apple ID, you have only 14 days after activating this feature. To understand how to disable iCloud two-factor authentication within this given time, check the following steps:
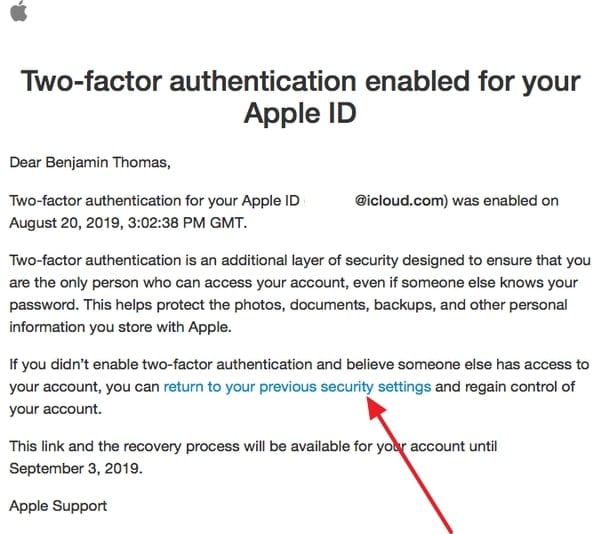
- Step 1. Once you have activated the 2FA feature, your 14-day grace period will start eventually. To deactivate this, open the enrollment email you received from Apple regarding 2FA on your Apple ID.
- Step 2. Scroll to the bottom of this email and select the link or button to return to your account security & settings section. There, follow the on-screen instructions to deactivate the 2FA of your Apple ID.
Part 4: iPhone Apple ID Got Locked? Here’s a Reliable Tool To Get It Unlocked Without Passcode
If you mistakenly got your Apple ID locked due to entering the wrong password multiple times, there is no need to stress it out. It is a common issue that many people forget their Apple ID password and cannot access it. Due to this, we have got you a perfect solution to unlock your Apple ID without a passcode.
This solution is the Wondershare Dr.Fone - Screen Unlock (iOS) tool specially designed to help users remove their iPhone and iPod lock screens. It is compatible with the latest iOS devices and assists in removing various types of lock screens, including Touch ID and Face ID.
Key Features
- This iOS screen unlock tool assists users in bypassing MDM without data loss and other technical errors.
- iCloud activation lock and iTunes backup encryption can be bypassed without a password in just a few steps.
- iPhone 15 and the latest versions of iOS 17/iPadOS 17 are supported by this tool to help users professionally.
Simplified Steps for Unlocking Apple ID With Wondershare Dr.Fone
To help you use this AI-powered screen unlock tool for unlocking the Apple ID without a password, follow the process we have mentioned below for your ease:
- Step 1. Access the Toolbox and Choose the Respective Option
Initiate the process by accessing Wondershare Dr.Fone’s latest version on your computer and tapping on the “Toolbox” option from its left side toolbar. Following this, choose “Screen Unlock” from the list of tools and tap “Remove Apple ID” in the next window.
- Step 2. Make Sure That the Apple iPhone 13 Is Connected to the Computer
Then, connect your Apple iPhone 13 to your computer using a USB cable so that you can see its connectivity status. Once the status is displayed on a new window, hit the “Unlock Now” button to proceed. Answer some questions that are asked by the platform, and with this, ensure that your device’s “Screen Lock” and “Two-Factor Authentication” are enabled or disabled.

- Step 3. Select the System Version and Proceed Ahead
In this step, enable Recovery Mode by following the on-screen instructions. It will help the platform detect the connected device model, with which you will need to select “System Version.” Afterward, you can hit the “Start” button to proceed ahead.

- Step 4. Start the Apple ID Unlocking Process
The respective iOS firmware will download according to the Apple iPhone 13 device model and system version. After it is downloaded, the platform will verify it for you, based on which you can tap the “Unlock Now” option to get your Apple ID unlocked successfully.
Conclusion
With this, we hope you understand how to disable iCloud two-factor authentication. However, remember that doing this is only possible within 14 days of a grace period. If this period is over, you cannot remove 2FA from your Apple ID.
Moreover, if you have locked your Apple ID passcode, using Wondershare Dr.Fone to unlock it can be the perfect option. While using this tool, you also don’t have to worry about screen locks on different iOS devices. This is because the innovative algorithms integrated in this tool make it easier to use for unlocking the Apple ID or screen lock.
Also read:
- [Updated] Innovative Prime Lenses for Top-Tier Film Projects
- [Updated] Protecting Privacy Top 10 Webcam Covers
- Heartfelt Gratitude Paid/Free Creative Templates for 2024
- How To Get the Apple ID Verification Code On iPhone XS Max in the Best Ways
- How to Reset Apple ID and Apple Password From iPhone 14
- How to Secure Your EPSON TM-T88V Printer with Latest Windows Drivers: Download & Install Guide
- How To Unlink Apple ID From Apple iPhone X
- How To Unlink Apple ID From iPhone 12 Pro Max
- In 2024, 3 Facts You Need to Know about Screen Mirroring Google Pixel 8 Pro | Dr.fone
- In 2024, Apple ID Locked for Security Reasons On Apple iPhone XR? Find the Best Solution Here
- In 2024, Ways to stop parent tracking your Tecno Pova 6 Pro 5G | Dr.fone
- Top AVCHD Video Transcoder Software of 2023: Compatible with macOS Monterey
- Title: How to Unlock Apple ID On your Apple iPhone 13 without Security Questions?
- Author: Alma
- Created at : 2024-12-09 16:00:39
- Updated at : 2024-12-12 16:00:17
- Link: https://apple-account.techidaily.com/how-to-unlock-apple-id-on-your-apple-iphone-13-without-security-questions-by-drfone-ios/
- License: This work is licensed under CC BY-NC-SA 4.0.