
How to Unlock Apple ID On your Apple iPhone 8 Plus without Security Questions?
How to Unlock Apple ID On your Apple iPhone 8 Plus without Security Questions?
Apple ID is known as a very strong security protocol that is consumed for the protection of the data and the applications of the Apple iPhone 8 Plus device it is associated with. This security measure is primarily responsible for holding the data and assorted applications of the Apple iPhone 8 Plus device. Thus, Apple ID can be regarded as a very ubiquitous protocol that promotes effortless protection and considers bringing the complete system in a single bubble. There are several instances where people report over their Apple ID for being locked. To counter this issue, this article provides you a detailed guide on how to unlock Apple ID without security questions and related barriers.
Part 1. A worry-free way to unlock Apple ID without security questions
You may have come across a series of different solutions that considered providing you efficient mechanisms to unlock your Apple ID without the aid of security questions. Over a detailed comparison, people have come across different third-party platforms that dedicated themselves to offering the users the perfect environment to have their devices unlocked. As you all are aware of the saturation that exists in the market, this article features Dr. Fone – Screen Unlock (iOS) , state-of-the-art software that efficiently resolves all problems related to a locked Apple device. There are several reasons that make it possible for users to prefer Dr. Fone above all other existing platforms.
- It helps you save your device from the disabled state.
- You can easily unlock your Apple iPhone 8 Plus or iPad over forgetting its passcode.
- It can operate across all kinds of iPhones, iPads, and iPod Touch.
- It is compatible across the latest versions of iOS.
- It provides you a platform to work without iTunes.
- There are no pre-eminent skills required for using the platform.
Over the question of utilizing the platform efficiently, the following guide explains to you how to unlock Apple ID without email or security questions with the help of Dr. Fone – Screen Unlock.
Step 1: Connect Devices and Access Tool
After downloading and installing the platform on your desktop, you need to connect your Apple device with the desktop and launch the software. Select the “Screen Unlock” tool from the list of options provided on the home window of the application.

Step 2: Initiate Unlock
On the next screen, you are required to select the option of “Unlock Apple ID” from the list and proceed. Open up your Apple device and “Trust” the computer with the provided prompt message.

Step 3: Reboot Phone
Approach the Settings of your device and initiate its reboot. As soon as the reboot starts, the procedure for unlocking the Apple ID initiates across the platform.
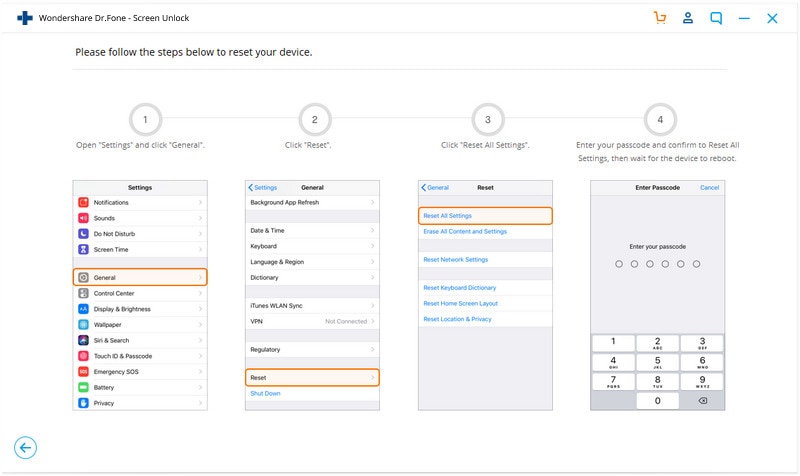
Step 4: Execution of the Process
As the process elapses successfully, you are provided with a prompt window on the desktop displaying the completion of the process.

Part 2. Unlock Apple ID with 2-factor authentication
There are multiple techniques that involve the method of unlocking an Apple ID without the aid of email addresses and security questions. As you all believe in the importance of third-party platforms, it is important to come across other mechanisms that can come quite handy in managing such issues. Two-factor authentication is another approach that can provide you robust and efficient solutions to this issue.
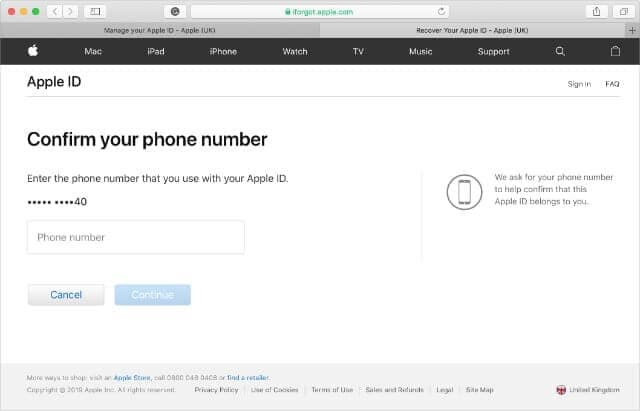
Step 1: Open the iForgot website and provide your Apple ID username to proceed. You need to provide the platform with the phone number that is associated with your Apple ID for verification.
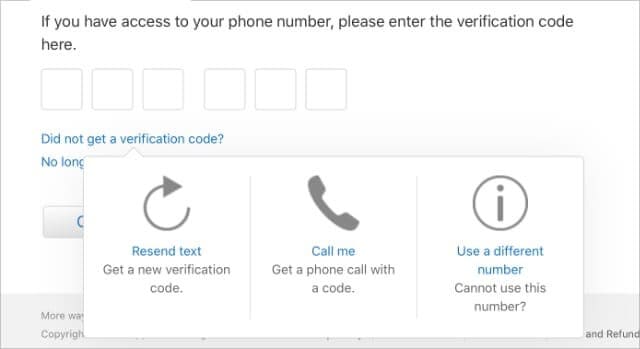
Step 2: Since you cannot use your Apple device or you have not received a notification yet, you need to tap on “Unable to access your [device]?” This would redirect a six-digit verification code to the phone number that you have provided.

Step 3: Add the code that is provided, followed by the Apple ID password, allowing you to unlock your device.
Part 3. Unlock Apple ID with the recovery key
While you understand the conventional methods that can be typically consumed for countering such issues, there are several other mechanisms that are associated across similar platforms and follow an identical protocol to cater to issues that involve unlocking Apple ID without security questions. Being an Apple user, you can efficiently unlock your Apple ID with the aid of a Recovery Key. For this, you need to follow the guidelines provided as follows.
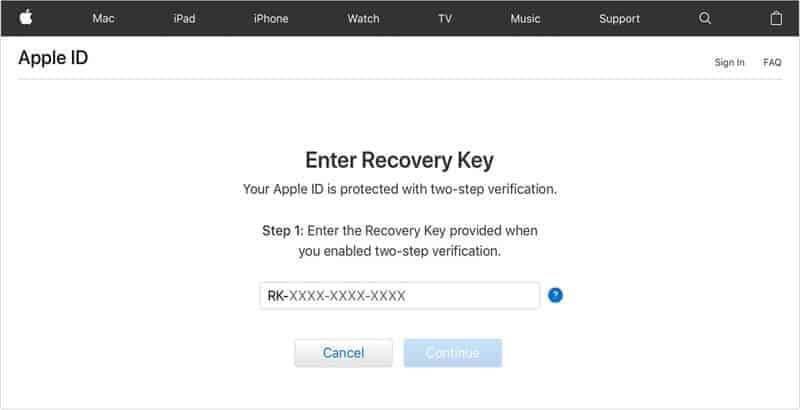
Step 1: You are required to open the iForgot website on your browser. Initially, it is important for you to enter the Recovery Key that you utilized when enabling Two-Factor Authentication.
Step 2: Following this, you need to provide the platform with an Apple device to where you wish to send the verification code to.
Step 3: You need to retrieve the code from the Apple iPhone 8 Plus device that you selected and enter it over the website. The website would lead you to enter a new password for your device.
Part 4. How to reset security questions after forgetting the answers?
Security questions are referred to as the extra protective layer that is responsible for keeping a profile secure. In such cases where you accidentally forget the basic security questions and their answers, you can consider following a very simple procedure to have them restored. In such Apple devices where you have no certain idea about the forgotten security question, you can contact AppleCare in such circumstances and have the assist you in catering to this issue within a matter of minutes. Contact the iTunes Store Support and choose the option of Password & Security Questions to lead towards calling the support for the remedy of the issue.
Conclusion
The article considered discussing various reasons and remedies to unlocking an Apple ID without the aid of security questions. You need to look over the guide to develop an understanding of the systems that are involved.
Your Account Has Been Disabled in the App Store and iTunes On Apple iPhone 8 Plus?
You may see the error message, “Your account has been disabled in the App Store and iTunes” when you try to log in. This is often an indication that for some reason your Apple ID is not working as it should. When you consider that you will not be able to download or update apps or even make a purchase using Apple Pay without your Apple ID, it is easy to see why this error message can be a problem.
Why is my account disabled in the App store? Here, we take a look at the reasons why you may see the error messages and what you can do to fix them.
Part 1. Why has my account been disabled in the App Store and iTunes?
The following are some reasons why you may see this error message popup on your screen:
- Entering the incorrect Apple ID and password multiple times
- Not using your Apple ID for an extended period of time
- Any billing issues such as unpaid iTunes and App Store orders
- Safety and security reasons like when Apple suspects your account may be hacked
- When there are charging disputes on your credit card
Part 2. How to fix “Your account has been disabled in App store and iTunes”?
There are numerous methods to tackle this issue and regain access to your device. For a quick and concise understanding, you can watch our informative video tutorial. If you prefer a more in-depth, step-by-step explanation, continue reading this article for detailed instructions on each method.
Tips: Did you forget your Apple ID password or are you struggling to remove your Apple ID account? Worry not, as Dr.Fone is here to help you remove your Apple ID without password in a matter of seconds. By logging into a new account, you can fully restore access to all your iCloud services and Apple ID features, ensuring a seamless user experience.
Method 1. Wait 24 hours and Try Again
This method will prove useful to you if you have entered the wrong password several times. If this is the reason your account has been disabled, leave it alone for about 24 hours. When the time has elapsed, try entering the correct password to see if this fixes the issue.
If you just forget the password and cannot remember it, you can follow the steps below to reset the password on your own iOS device:
- Step 1: Open Settings.
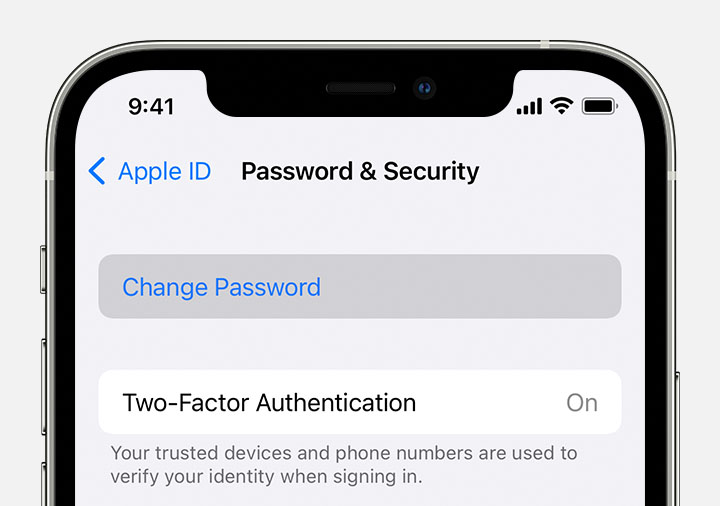
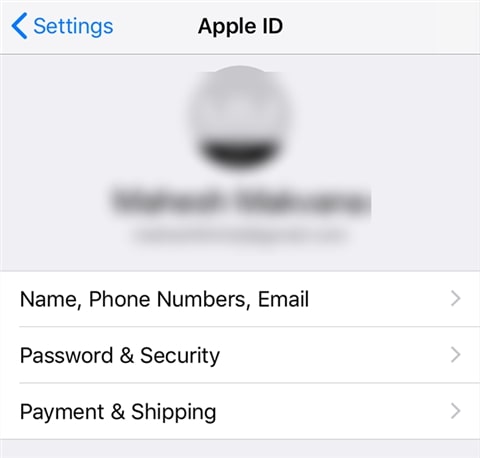
- Step 2: Tap [your name] on top of the screen> Password & Security > Change Password.
- Step 3: Enter the passcode for your device.
- Step 4: Follow the onscreen steps to reset your password.
If the above steps were unable to change or reset the password, follow the steps below:
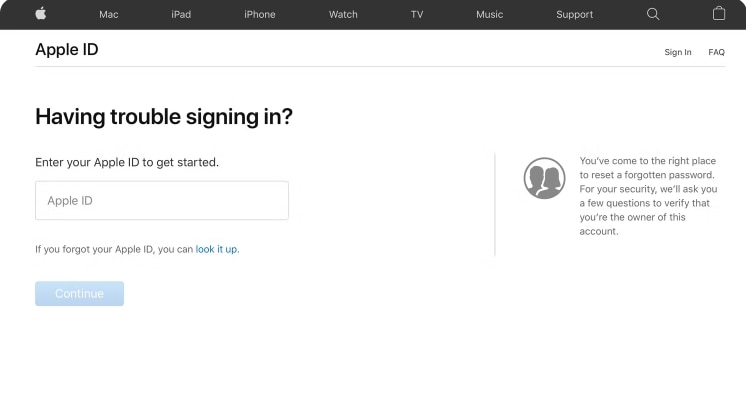
- Step 1: Go to https://iforgot.apple.com/ .
- Step 2: Put your Apple ID (email) in the box and click “Continue”.
- Step 3 Enter the phone number that you use with your Apple ID.
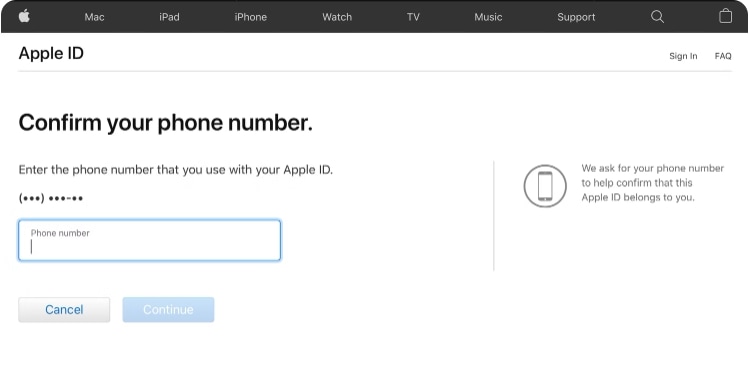
- Step 4: Look for the notification on iPhone, Mac, or iPad and follow the instructions to reset the password.

Note that if you are changing your Apple ID password on an iPhone or iPad, you will need to enter your device’s six-digit passcode, then reset a new password.
Forgetting the password is particularly troublesome, but there is good news. That is, you can use Password Manager to find your passwords on your Apple iPhone 8 Plus/iPad without spending too much time remembering them!
Dr.Fone - Password Manager (iOS)
Recover and keep all your passwords in one place
- Unlock and manage various passcodes, PINs, Face IDs, Apple ID, WhatsApp password reset, and touch ID without limitations.
- To find your password on an iOS device, it effectively functions without harming or leaking your information.
- Ease your job by finding any strong password across various platforms to manage multiple email accounts.
- The installation of Dr.Fone on your device won’t take much space, without any disturbing ads.
3981454 people have downloaded it
Method 2. View Your Payment Methods and Update Them
If you think that your account has been disabled because of a payment issue, it is necessary to check your payment methods and update them. Follow these simple steps to do it:
- Step 1: Open the Settings and then tap on your name at the top.
- Step 2: Select “iTunes & App Store” and then choose your Apple ID.
- Step 3: Tap “View Apple ID” and then select “Manage Payments”.
- Step 4: Tap “Add Payment Method” to add a new payment method.
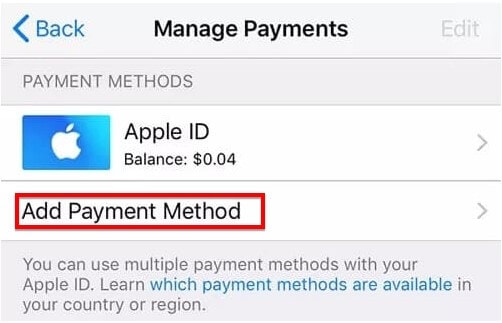
If the payment method was the issue, your account will be re-enabled after these steps.
Method 3. Settle Any Unpaid Charges
Do you have any unpaid purchases or subscriptions?
It is important to keep track of any purchases or subscriptions that you have signed up for and ensure that you pay for them on time. This not only helps you avoid late fees and penalties, but it also ensures that your account remains active and accessible. If you do have any unpaid charges, it is recommended that you settle them as soon as possible in order to reinstate your account and prevent any further issues. Keep a record of all your expenses and regularly review your bills to avoid missing any payments and keep your accounts in good standing.
Method 4. Sign Out and Sign in Again
Signing out of your account and then signing back in may help if this issue is caused by a software glitch.
- On your iOS device, go to Settings > [Your Name] > iTunes & App Store and Sign Out. Then sign in again.
- On your Mac, open the App Store (Store > Sign Out) and iTunes (Account > Sign Out. Then sign in again.
Method 5. Try Contacting Apple Support Directly
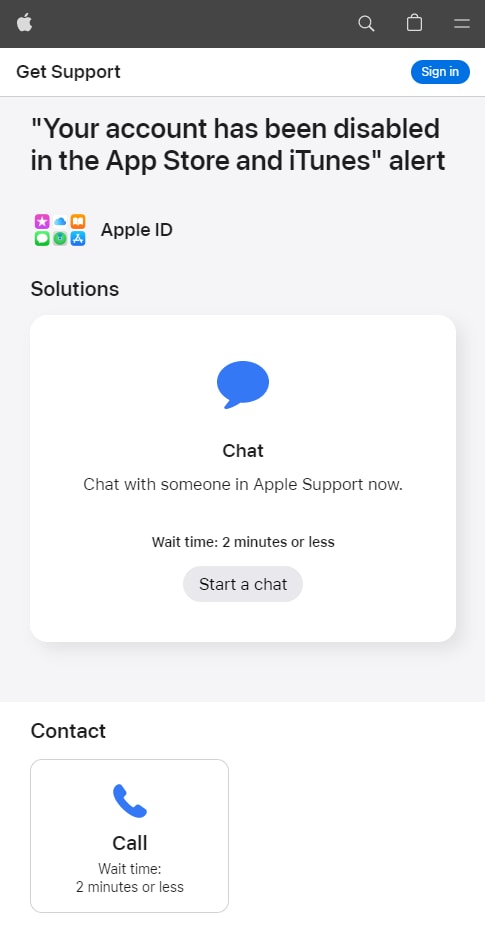
If you see a message that says, “Your account has been disabled in the App Store and iTunes,” contact Apple Support for help. You can follow these simple steps to contact Apple support:
- Step 1: Go to https://getsupport.apple.com/solutions .
- Step 2: Then click “Start a chat” to chat with someone in Apple Support now.
- Step 3: Or schedule a call with Apple Support, and they should be able to help you fix your account disabled in App store.
Part 3. What does it influence when “Your account has been disabled in the App Store and iTunes”?
When you see the error message “Your account has been disabled in the App Store and iTunes” it often means the following:
- You cannot access Apple Books, App Store purchases, and even iTunes purchases.
- You may not have access to your iCloud account or any of the data stored in the account until you fix the problem.
- Furthermore, you may not be able to access Apple services and any Apple Store orders and repairs may need to be rescheduled.
- Until you can fix the issue, you will not be able to receive iMessage, FaceTime, and iCloud Mail.
Part 4. Is “Your account has been disabled in the App Store and iTunes” the same as “Apple ID disabled”?
No. The error message “Your account has been disabled in the App Store and iTunes” differs from “Apple ID disabled”. You will primarily see the “Your account has been disabled in the App Store and iTunes” when you try to access content in the App Store. On the other hand, you may see the message “Apple ID disabled” when you enter the Apple ID and password to bypass the iCloud Activation Lock screen .
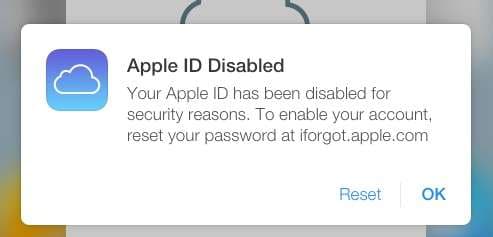
After you see these errors, you will not be able to access some of the features and apps that require your Apple ID for access.
Part 5. How to fix Apple ID disabled by removing Apple ID?
Sometimes the only way to fix “Apple ID Disabled” is to remove the Apple ID from the Apple iPhone 8 Plus device. This may become a viable solution if you lost or forgot the Apple ID password or ID and you have no way to recover them. It is also one of the best solutions when you purchased a second-hand device, and you don’t know the Apple ID password for the account associated with the Apple iPhone 8 Plus device.
One of the best ways to remove the Apple ID from an iOS device is to use Dr.Fone - Screen Unlock (iOS) . This third-party unlocking software is designed to easily and effectively remove the Apple ID password from any device. The following are some things it can do;
Dr.Fone - Screen Unlock (iOS)
Remove iCloud Account without Password in Minutes
- Remove Apple ID/iCloud Account efficiently.
- Save your Apple iPhone 8 Plus quickly from the disabled state.
- Free your sim out of any carrier worldwide.
- Bypass iCloud activation lock and enjoy all iCloud services.

- Works for all models of iPhone, iPad, and iPod touch.

4,008,669 people have downloaded it
Here’s how to use Dr.Fone Screen Unlock to remove the Apple ID from the Apple iPhone 8 Plus device;
- Step 1: Install the Program
To begin, download the Dr.Fone Toolkit from the program’s main website. Install the toolkit onto your computer. Open it after successful installation and then choose “Screen Unlock” from the main screen.
- Step 2: Choose to Remove Apple ID
On the next screen, you should see three options. Choose “Remove Apple ID” since we want to remove the Apple ID from the Apple iPhone 8 Plus device.

- Step 3: Connect the iOS Device
Connect the iOS device to the computer using its lightning cable. Then enter the Apple iPhone 8 Plus device’s passcode and, when prompted, tap “Trust” to allow the computer to detect the Apple iPhone 8 Plus device. The program should detect the Apple iPhone 8 Plus device and display information about it. Then click “Unlock Now”.

- Step 4: Apple ID Removal will Begin
Dr.Fone will immediately begin removing the Apple ID from the Apple iPhone 8 Plus device. You should see a progress bar indicating how long the process will take. Ordinarily, the removal should take just a few seconds. When the process is complete, you will see a notification on the screen letting you know that the Apple ID has been removed.
You should then be able to sign in to another Apple ID or create a new Apple ID and password to use on the Apple iPhone 8 Plus device.
Conclusion
In conclusion, encountering a disabled Apple account in the App Store and iTunes can be a frustrating experience. However, by understanding the reasons behind it, following the recommended steps to resolve the issue, and considering the broader impact on your digital life, you can navigate this situation effectively. Remember, prompt action and patience are key to restoring your account and getting back to enjoying the Apple ecosystem hassle-free.
How To Remove Phone Number From Your Apple ID on Your Apple iPhone 8 Plus?
After getting a new device, iPhone users must prepare a unique identification term for their Apple ID. Creating and setting up this ID is not different each time. Not to mention, one can use this one registered ID to access multiple Apple-based features like podcast subscriptions, apps, etc.
While the code is essential, it can become inactive if your registered phone number is no longer available or your change your number. You must remove the phone number from your Apple ID and add a new one.
Unsure about the steps, though? This post covers that, so read ahead.
Part 1. What is the Purpose of a Phone Number for Apple ID?
Typically, the email is not linked with Apple ID since the function is linked with phone numbers. Apple services-based communication is passed through the Messages app on the iPad, iPhone, iPod Touch, and the Apple ID.
Registering the phone number to Apple ID will allow you to get the necessary account-related messages on your device smoothly. If you do not sign in to iCloud with a SIM card, using Messages or the FaceTime app will become challenging. So, you need to know how to remove your phone number from iCloud or Apple ID when your registered number is inactive.
Part 2. Can You Remove the Trusted Phone Number from Apple ID?
If you want to learn how to remove the number from Apple ID and if possible, the answer is yes and quite quickly. Apple allows users switching to another carrier to remove their already authorized and linked phone number from the Apple ID. This is helpful for two-factor authentication phases so that the Apple iPhone 8 Plus user can avoid getting fully locked out from the account.
Part 3. 3 Ways to Remove a Phone Number from Your Apple ID
If you are wondering about the steps for how to remove an old phone number from Apple ID, there are different styles available. Here are the main processes you can utilize.
Method 1. Remove Phone Number via iPhone/iPad’s Settings
In the matter of how to remove a phone number from an Apple ID, the most effortless process is to go into the Settings app and delete it from there. This is possible if you have your registered phone with you and the Apple ID. Simple access and remove the number.
Step 1: Access the Settings option on your iPad or iPhone device.
Step 2: Tap on the Apple account ID.
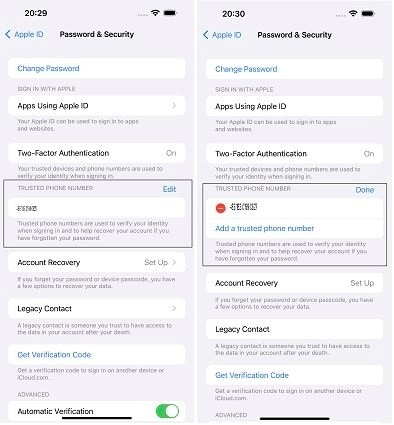
Step 3: Reach the Password & Security section.

Step 4: You will see the Edit icon on the right-hand side. Click on it and then tap on the “Add a Trusted Phone Number” option.
Step 5: Add the Apple iPhone 8 Plus Passcode > new phone number.
Step 6: Select Edit again to delete the old phone number. Press Done.
Method 2. Remove the Phone Number Using a Mac
Users can turn the phone number OFF that they registered to Apple ID through their Mac device. In this context, accessing the FaceTime or Messages app is essential in the context of how to remove phone number from Apple ID via Mac steps.
Step 1: Access the FaceTime or Messages app. Sign in using the same Apple ID you use for the apps on your Apple iPhone 8 Plus.
Step 2: Go to Messages and tap on the Settings option. Then, choose the iMessage selection.
For Facetime, click on the FaceTime option and go to Preferences > General.
Step 3: From the list, choose the tickmark beside the phone number to uncheck it. That will deactivate the phone number for your account.

Method 3: Remove Phone Number via Change Apple ID Password
It is possible to change the password for Apple ID in the matter of how to remove a phone number from Apple ID. Adjusting the phone number is the natural next step when you carry out this step, so you can remove the number and use another at this stage.
Step 1: On your iPad and iPhone, tap on the Settings menu.
Step 2: Tap on the icon with your name and click on the Password & Security option.
Step 3: Select the Change Password option.

Step 4: The prompt to add the current Apple ID password, or the passcode, will appear. Add it to confirm, and then insert your new password.
Step 5: Hit the Change Password button.
Step 6: You will get logged out of the account. Sign in with the new password, and the phone number will get removed.
Part 4. How to Remove Apple ID without Password?
All the methods mentioned help remove phone numbers associated with the Apple ID but still require you to access the Apple iPhone 8 Plus device. What if the Apple iPhone 8 Plus device is locked and the necessary details are unavailable, like the password? You can use Dr.Fone - Screen Unlock (iOS) to remove the Apple ID by bypassing the passcode.
It is possible to remove phone number from Apple ID by accessing the Apple iPhone 8 Plus device with simple taps through this app. You have to make the Find My iPhone feature active, and the app will bypass the Apple ID password within seconds.
Best Features:
- Supported on various iOS and iPadOS devices.
- Remove all types of lock screens, like Apple ID, Face ID, Touch ID, Screen Time Passcode, etc.
- Fast process of screen and password bypassing.
How to use it?
Step 1: Download/install/launch the app on Mac/Windows. Select Screen Unlock when the app opens on the interface.
Step 2: Choose the “Remove Apple ID” option and add the passcode, as instructed. Allow the system to trust the Apple iPhone 8 Plus device for authentication through the following prompt.
Step 3: Put the Apple iPhone 8 Plus device into recovery mode following the on-screen instructions. Then, restart the Apple iPhone 8 Plus device. This will automatically kickstart the unlocking process and will take some seconds.

Step 4: Finally, see that Apple ID’s device has been unlocked on the next page.
Video Guide: How to Remove Apple ID without Password?
Part 5. FAQs about Apple ID Phone Number
- How to Add a Trusted Phone Number to Your Apple ID?
The steps for adding the trusted phone number to Apple ID are accessible through Settings > Apple ID icon/name > Password & Security > Edit icon beside the phone number already in use. Click on the “Add a trusted phone number” option and insert the new one. Confirm with your device passcode at the end.
- Why Isn’t My Apple ID Accepting My Apple iPhone 8 Plus Number?
Apple ID accepts phone numbers for linking for two-factor authentication. The local number in the region is needed for pairing the number and Apple ID.
- Does Changing Apple ID affect Phone Number?
No, the Apple ID and phone number are not connected as features or codes. So, adjusting the Apple ID will not affect your device’s phone number.
Conclusion
Indeed, there are multiple methods you can take to remove the phone number registered to your Apple ID successfully. They are accessible in multiple ways through Mac, iPad, or iPhone settings. If you forgot the Apple ID, you could even remove it using Dr.Fone - Screen Unlock (iOS) . Ultimately, choose the process to trust based on your specific needs.
Also read:
- [Updated] In 2024, Are Apple's New Processors Revolutionizing Editing Tech?
- Adopting the Way of Google Meet Webinars for 2024
- Apple ID Locked or Disabled From iPhone 8? 7 Mehtods You Cant-Miss
- Efficiently Shifting Videos YouTube to Dailymotion Strategy for 2024
- Forgot Your Apple ID Password and Email From Apple iPhone XS? Heres the Best Fixes
- Guida Rapido Alla Conversione Di File WebP in GIF: Strumenti E Metodi per Un'ottimizzazione Visiva
- Highlights of Short Track Speed Skating Olympics 2022 for 2024
- How To Get the Apple ID Verification Code On Apple iPhone 11 Pro Max in the Best Ways
- In 2024, How to Delete iCloud Account On iPhone 12 mini without Password?
- In 2024, How to Send and Fake Live Location on Facebook Messenger Of your Motorola Edge 2023 | Dr.fone
- In 2024, Top-Notch Solutions for Disabled Apple ID From Apple iPhone 12 mini Making It Possible
- Title: How to Unlock Apple ID On your Apple iPhone 8 Plus without Security Questions?
- Author: Alma
- Created at : 2025-01-18 16:01:21
- Updated at : 2025-01-24 16:03:06
- Link: https://apple-account.techidaily.com/how-to-unlock-apple-id-on-your-apple-iphone-8-plus-without-security-questions-by-drfone-ios/
- License: This work is licensed under CC BY-NC-SA 4.0.