
How to Unlock Apple ID On your iPhone 11 without Security Questions?
How to Unlock Apple ID On your Apple iPhone 11 without Security Questions?
Apple ID is known as a very strong security protocol that is consumed for the protection of the data and the applications of the Apple iPhone 11 device it is associated with. This security measure is primarily responsible for holding the data and assorted applications of the Apple iPhone 11 device. Thus, Apple ID can be regarded as a very ubiquitous protocol that promotes effortless protection and considers bringing the complete system in a single bubble. There are several instances where people report over their Apple ID for being locked. To counter this issue, this article provides you a detailed guide on how to unlock Apple ID without security questions and related barriers.
Part 1. A worry-free way to unlock Apple ID without security questions
You may have come across a series of different solutions that considered providing you efficient mechanisms to unlock your Apple ID without the aid of security questions. Over a detailed comparison, people have come across different third-party platforms that dedicated themselves to offering the users the perfect environment to have their devices unlocked. As you all are aware of the saturation that exists in the market, this article features Dr. Fone – Screen Unlock (iOS) , state-of-the-art software that efficiently resolves all problems related to a locked Apple device. There are several reasons that make it possible for users to prefer Dr. Fone above all other existing platforms.
- It helps you save your device from the disabled state.
- You can easily unlock your Apple iPhone 11 or iPad over forgetting its passcode.
- It can operate across all kinds of iPhones, iPads, and iPod Touch.
- It is compatible across the latest versions of iOS.
- It provides you a platform to work without iTunes.
- There are no pre-eminent skills required for using the platform.
Over the question of utilizing the platform efficiently, the following guide explains to you how to unlock Apple ID without email or security questions with the help of Dr. Fone – Screen Unlock.
Step 1: Connect Devices and Access Tool
After downloading and installing the platform on your desktop, you need to connect your Apple device with the desktop and launch the software. Select the “Screen Unlock” tool from the list of options provided on the home window of the application.

Step 2: Initiate Unlock
On the next screen, you are required to select the option of “Unlock Apple ID” from the list and proceed. Open up your Apple device and “Trust” the computer with the provided prompt message.

Step 3: Reboot Phone
Approach the Settings of your device and initiate its reboot. As soon as the reboot starts, the procedure for unlocking the Apple ID initiates across the platform.
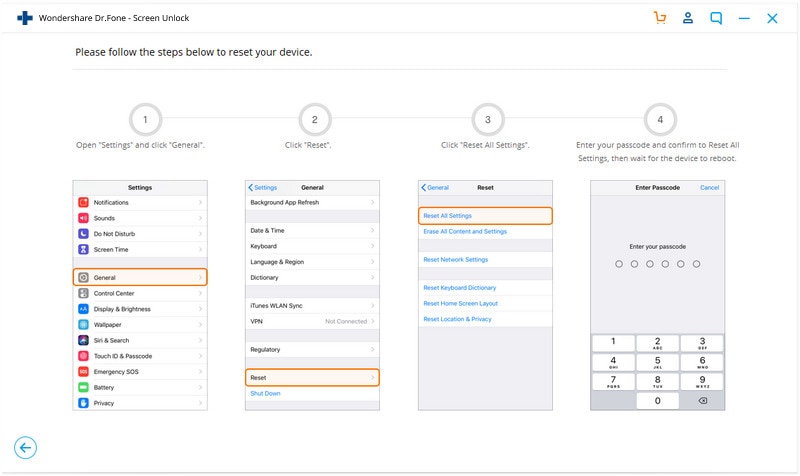
Step 4: Execution of the Process
As the process elapses successfully, you are provided with a prompt window on the desktop displaying the completion of the process.

Part 2. Unlock Apple ID with 2-factor authentication
There are multiple techniques that involve the method of unlocking an Apple ID without the aid of email addresses and security questions. As you all believe in the importance of third-party platforms, it is important to come across other mechanisms that can come quite handy in managing such issues. Two-factor authentication is another approach that can provide you robust and efficient solutions to this issue.
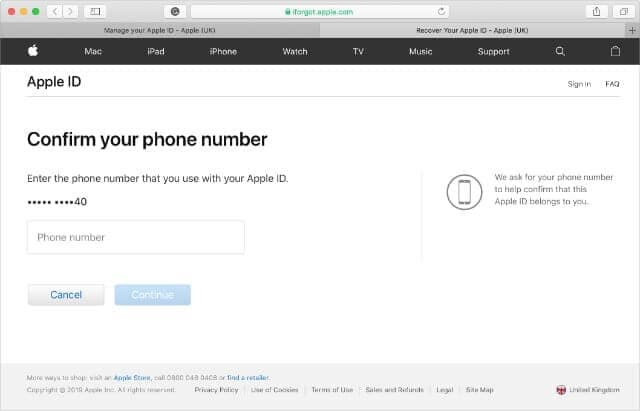
Step 1: Open the iForgot website and provide your Apple ID username to proceed. You need to provide the platform with the phone number that is associated with your Apple ID for verification.
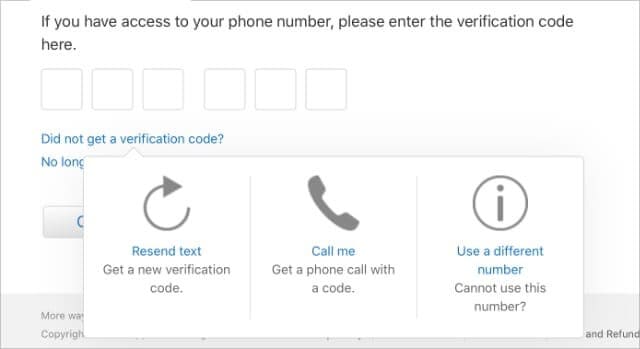
Step 2: Since you cannot use your Apple device or you have not received a notification yet, you need to tap on “Unable to access your [device]?” This would redirect a six-digit verification code to the phone number that you have provided.

Step 3: Add the code that is provided, followed by the Apple ID password, allowing you to unlock your device.
Part 3. Unlock Apple ID with the recovery key
While you understand the conventional methods that can be typically consumed for countering such issues, there are several other mechanisms that are associated across similar platforms and follow an identical protocol to cater to issues that involve unlocking Apple ID without security questions. Being an Apple user, you can efficiently unlock your Apple ID with the aid of a Recovery Key. For this, you need to follow the guidelines provided as follows.
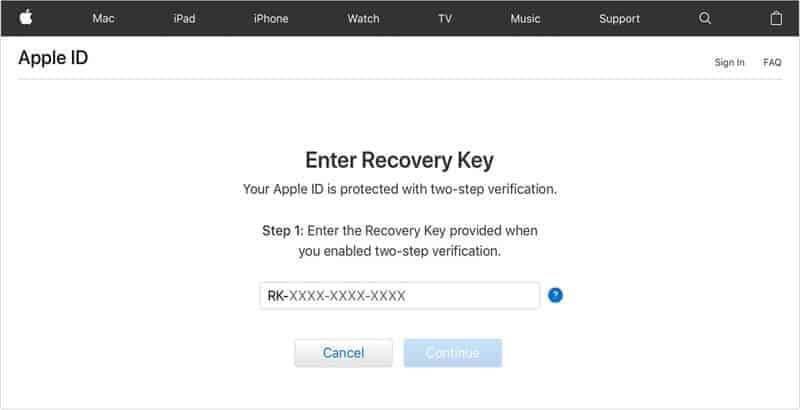
Step 1: You are required to open the iForgot website on your browser. Initially, it is important for you to enter the Recovery Key that you utilized when enabling Two-Factor Authentication.
Step 2: Following this, you need to provide the platform with an Apple device to where you wish to send the verification code to.
Step 3: You need to retrieve the code from the Apple iPhone 11 device that you selected and enter it over the website. The website would lead you to enter a new password for your device.
Part 4. How to reset security questions after forgetting the answers?
Security questions are referred to as the extra protective layer that is responsible for keeping a profile secure. In such cases where you accidentally forget the basic security questions and their answers, you can consider following a very simple procedure to have them restored. In such Apple devices where you have no certain idea about the forgotten security question, you can contact AppleCare in such circumstances and have the assist you in catering to this issue within a matter of minutes. Contact the iTunes Store Support and choose the option of Password & Security Questions to lead towards calling the support for the remedy of the issue.
Conclusion
The article considered discussing various reasons and remedies to unlocking an Apple ID without the aid of security questions. You need to look over the guide to develop an understanding of the systems that are involved.
How To Delete iCloud Account: Remove Your Apple ID Permanently On Apple iPhone 11
Searching “How to delete iCloud account?” If you want to delete an iCloud account, you must delete an Apple ID account. And before you take this irreversible step, it’s crucial to understand the implications. Deleting your Apple ID account means permanently erasing all contents stored in your iCloud, such as media and documents. You’ll also lose access to essential Apple services such as the App Store, iMessage, and iTunes.
Deleting your Apple ID is a significant decision that should not be taken lightly. Proceeding with Apple ID deletion is a final decision. Once initiated, there’s no turning back. If you’re certain about it, refer to this article for a step-by-step guide on how to delete iCloud account and explore alternative options if you need it.

Part 1: Deleting iCloud Account? Essential Preparations Before You Proceed
Before you learn the steps on “how to delete icloud account,” take steps to ensure a smooth transition and prevent the loss of valuable data. Before you permanently remove an iCloud account, ensure you’ve completed the following:
Backup Your Data
Create a local copy of your files, photos, videos, and documents on your computer or an external hard drive. You can use cloud storage services or third-party apps like Wondershare Dr.Fone to selectively restore it later.
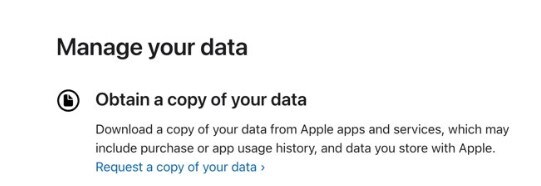
Request a Copy of Your Data
Apple provides a service on selected regions that allows you to request a copy of data associated with your Apple ID before deleting your account. It includes records of your sign-in, account details, iCloud contents, and Apple retail store transactions. Having a copy of this data can be useful if you need to access it in the future.
To request a copy of your data, go to Privacy Apple on your web browser. Under the Obtain a copy of your data section, click Request a copy of your data. Next, select the data you need and click Continue.
Review Your Active Subscriptions
Also, to “delete iCloud account,” first review any active subscriptions you may have, such as Apple Music, Apple TV+, or iCloud+ storage. If you don’t want to continue these subscriptions, cancel them before deleting your account.

Download Backups of Your Apps, Games, Music, Movies, TV Shows, Books, and Audiobooks
Your iCloud account may contain backups of your apps, games, and media purchases. Before deleting your Apple ID account, download them to your device or a computer to ensure you don’t lose access to your favorite content.
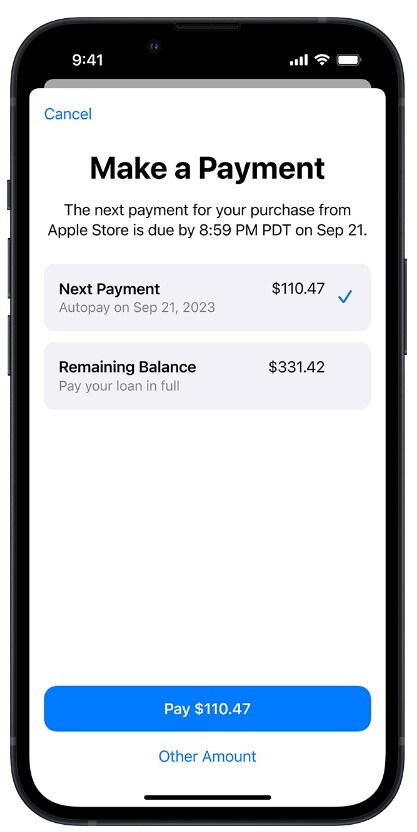
Pay Loan Installments You Have With Apple Pay Later
If you have an outstanding loan with Apple Pay Later, pay off any remaining installments before you delete your iCloud account. Otherwise, you may incur late fees or other penalties.
Sign Out of Your Devices and Web Browser
Before deleting your iCloud account, ensure you sign out of your account on all devices, including iPhones, iPads, Macs, and web browsers. Failure to sign out of an account can lead to several potential risks and inconveniences, including:
- Restricted device access
- App malfunctioning
- Constant Sign-in errors
- Web browsers retain your Apple ID information
Part 2: Remove iCloud Account Without Deleting: Maintaining Your Apple ID
Removing an iCloud account from your device doesn’t necessarily mean deleting the account itself. It simply means signing out of your iCloud account on that device. Your iCloud data remains intact and accessible from other devices.
However, when you sign out of iCloud on your device, you will be signed out of all Apple services that use your iCloud account. It includes Apple Pay, Find My, iCloud Mail, Siri Shortcuts, and others. You need to sign in with your Apple ID to use these services again.
Remove iCloud Account on iPhone
Here’s “how to remove iCloud account“ from your Apple iPhone 11 without deleting the account:
- Step 1: Open the Settings app, then tap the Apple ID at the top of the Apple iPhone 11 screen.
- Step 2: Scroll down, tap on Sign Out, enter your Apple ID password, and tap on Turn Off.
- Step 3: Tap on Sign Out to verify.
Remove iCloud Account on Mac Device
Follow these steps below to remove an iCloud account from your macOS Ventura or later:
- Step 1: Click on the Apple logo in the top left corner of your screen, then choose System Settings.
- Step 2: Click on the Apple ID icon and click Sign Out.
- Step 3: Select the data files you want to save, then click Keep a Copy.
Part 3: How To Delete iCloud Account Permanently?
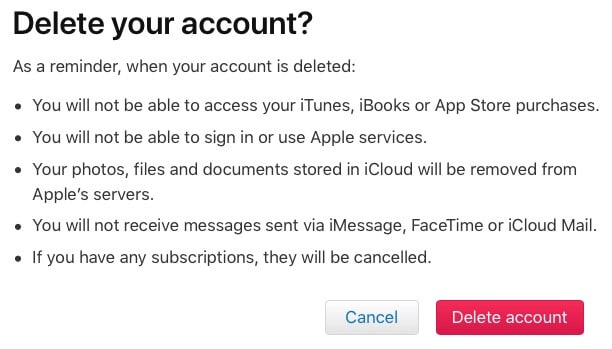
Deleting your Apple ID has effects beyond the loss of data and services. These include:
- Apple will not be able to recover your Apple ID or any associated data once deleted.
- After deleting your iCloud account, any messages sent to you via iCloud Mail or iMessage will not be delivered.
- If you have any unused credit balance in your iCloud account, you cannot redeem or refund it upon deletion.
- The email address associated with your deleted Apple ID becomes unavailable for creating a new Apple ID.
If you are sure of your decision and have prepared for the consequences, here’s how to permanently delete your iCloud account:
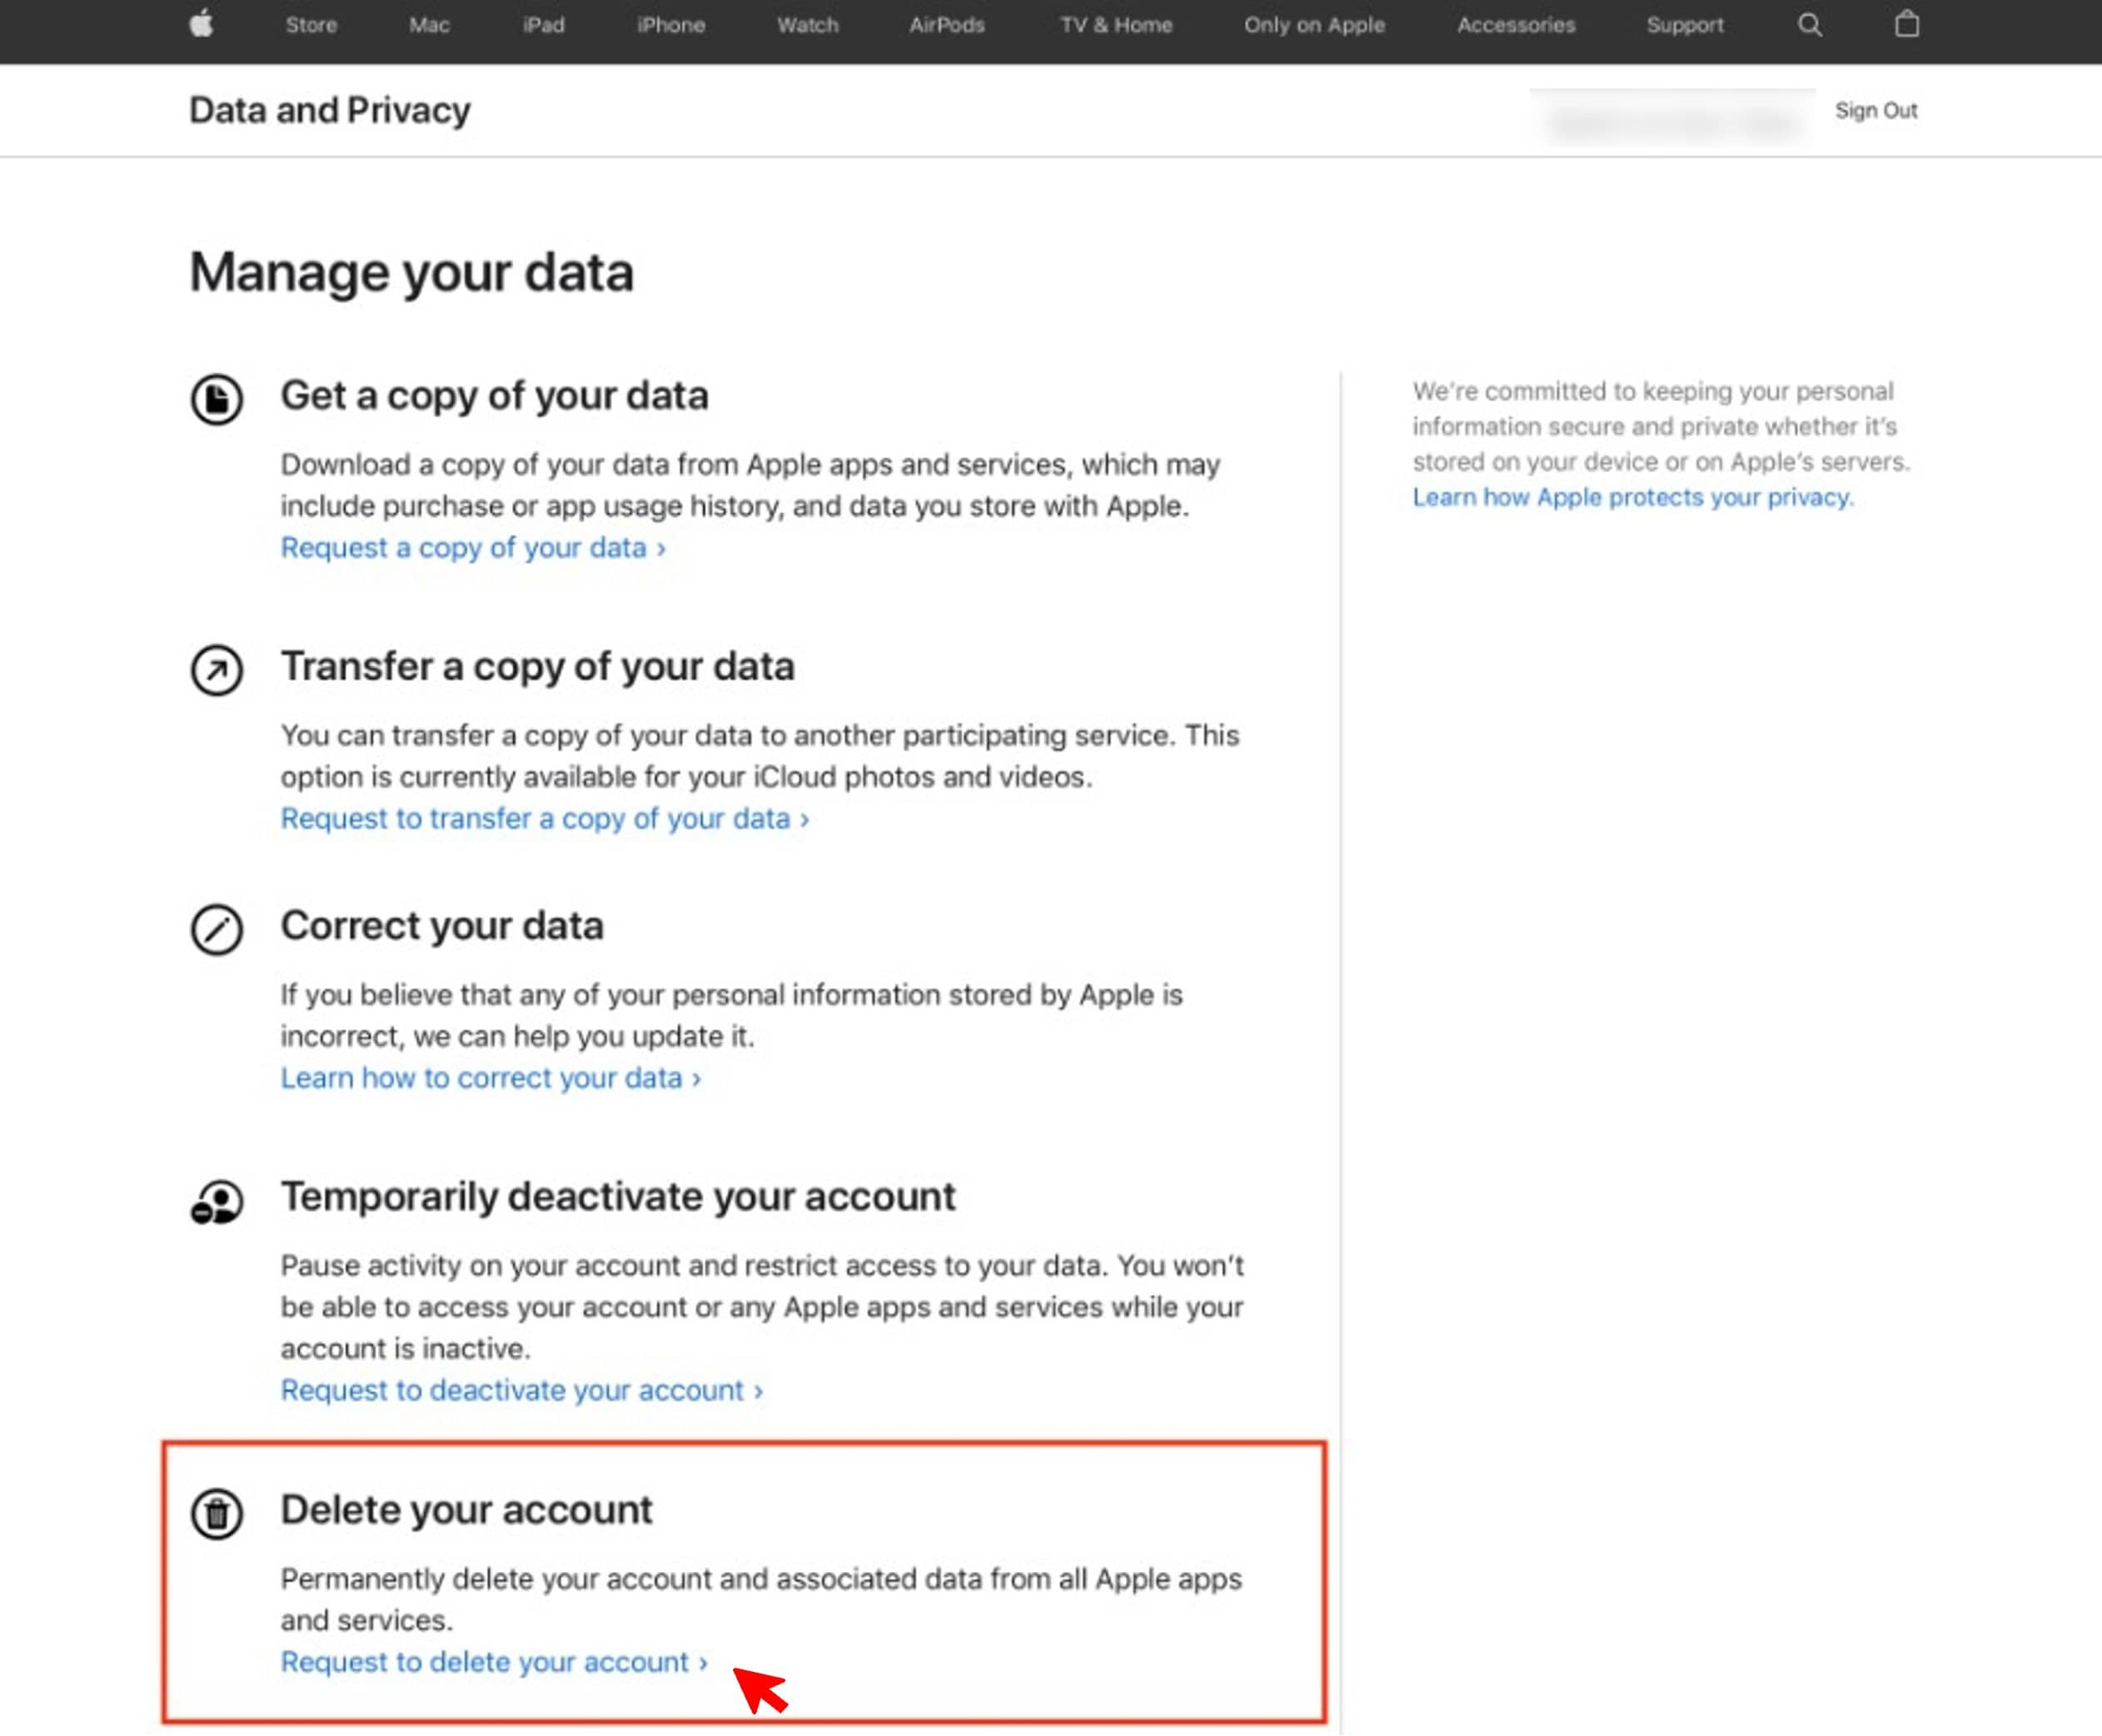
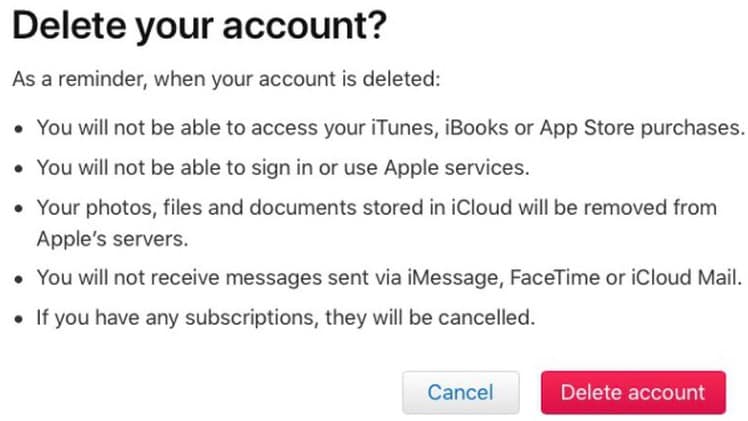
- Step 1: Open a web browser and visit Apple’s privacy website: privacy.apple.com. Sign in using the Apple ID associated with the iCloud account you want to delete.
- Step 2: From Delete your account section, click Request to delete your account.
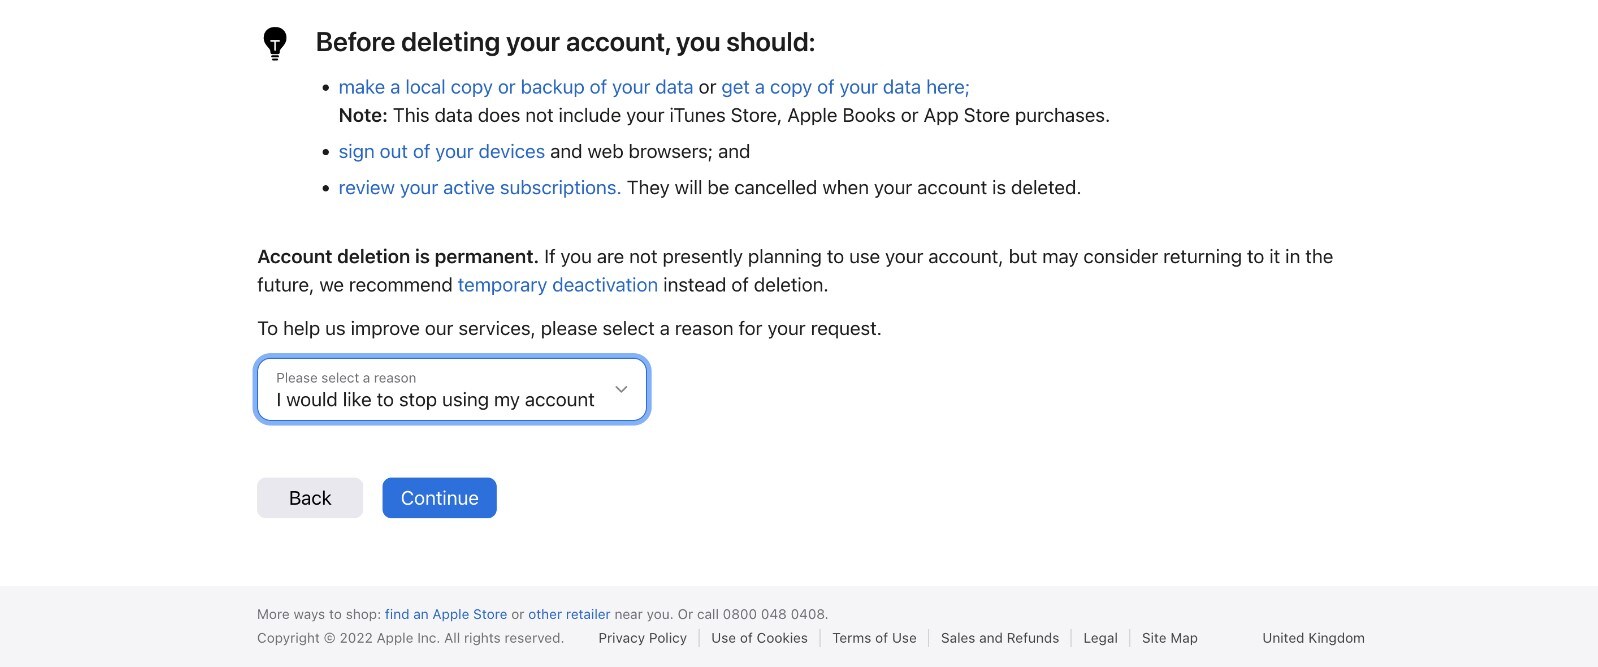
- Step 3: Choose a reason from the provided options in the drop-down menu for deleting your iCloud account, then click Continue.
- Step 4: Review the information displayed, ensuring you want to proceed with deleting your iCloud account. Click Continue.
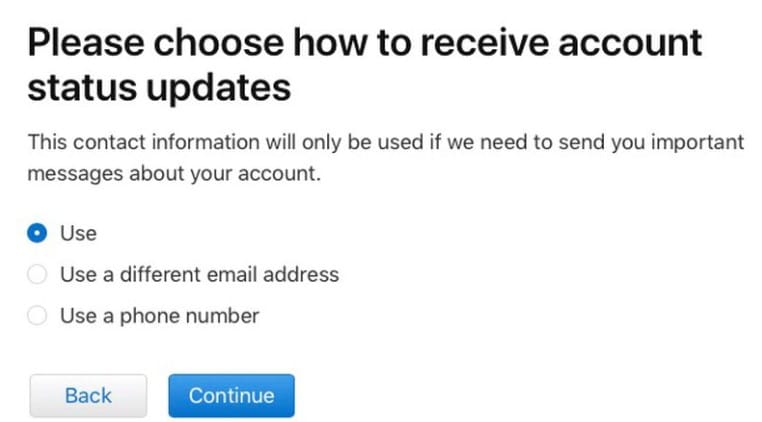
- Step 5: Choose where Apple can send you updates regarding your deletion request. Click Continue.
- Step 6: Follow the instructions provided to verify your identity. It may involve entering a code sent to your trusted device or answering security questions.

- Step 7: Review the summary of your deletion request, ensuring all details are accurate. Next, click Delete Account to finalize the deletion process.
Part 4: How To Remove an iCloud Account Without a Password?
You’re not alone if you’ve forgotten your Apple ID password or bought a used iPhone with the previous owner’s Apple ID still on it. Many people find themselves in this situation, and it can be frustrating not being able to remove the iCloud account without the password. Fortunately, there is a way to do this using Dr. Fone’s iOS Screen Unlock tool:
- Compatible with all versions of iOS, including the latest iOS 17.
- Unlock different iPhone locks, such as screen locks and SIM locks.
- Bypass iCloud Activation lock
- Remove Apple ID even if the iOS device has enabled Find My service
Here’s a step-by-step guide on how to use Dr.Fone to remove an iCloud account without a password:
Step 1: Download and install Dr.Fone on your desktop.
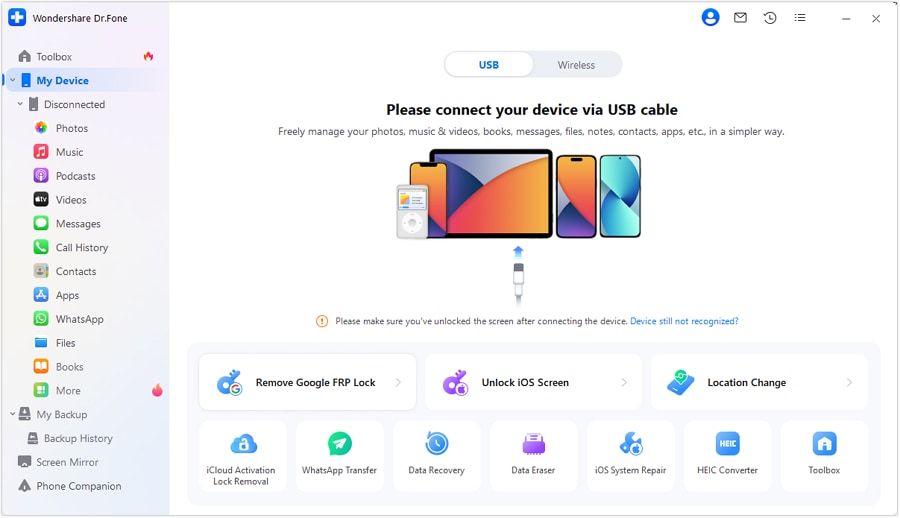
Step 2: Launch the software and go to My Device. Follow the in-app instructions to connect your Apple iPhone 11 to your computer using a USB cable.
Image name: how-to-delete-icloud-account-13.png
- Step 3: Go to Toolbox from the left navigation pane and select Screen Unlock > iOS.
- Step 4: Select Remove AppleID on the next window.

- Step 5: Click Unlock Now to proceed.

Note:
If you continue to “remove iCloud account“, this will erase all data from your Apple iPhone 11.
- Step 6: Click Yes if you have set up a screen lock.

- Step 7: Click Yes if you have already enabled Two-Factor Authentication on your Apple iPhone 11.

- Step 8: Follow the on-screen instructions to put your device into Recovery Mode.

- Step 9: Dr.Fone will recognize your device in the Device Model. Choose an option from the System Version drop-down list and click Start.

- Step 10: The latest iOS firmware is being downloaded.

- Step 11: Click Unlock Now to proceed.

- Step 12: Enter the code given in the dialogue box and click Unlock to continue.

- Step 13: Dr.Fone will then begin removing the iCloud account. Do not disconnect or use your device while the process is ongoing to avoid device issues.

- Step 14: To finalize the Apple ID removal process, please check your device and click Done once you’ve verified it.
Part 5: How To Remove an iCloud Account Without Deleting an Apple ID Account?
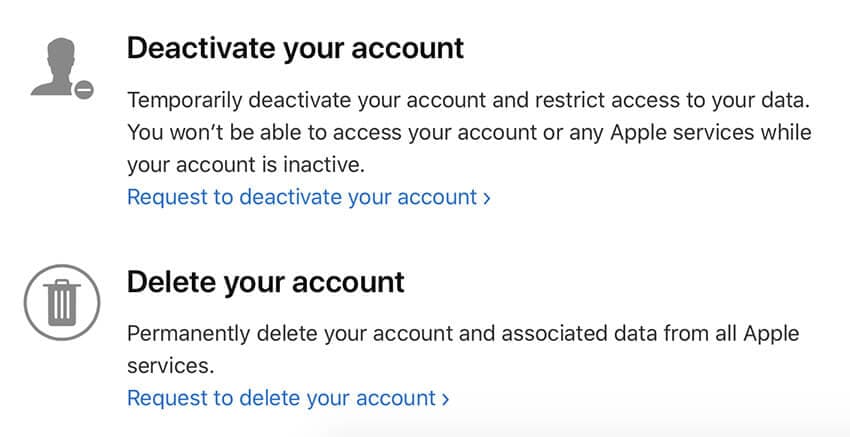
Deciding to permanently “delete iCloud account“ or Apple ID is a significant step. If you’re unsure about this irreversible action, consider deactivating your account. Deactivating your Apple ID temporarily suspends it. However, this feature may depend on your location.
Once you deactivate your Apple ID, you can no longer use it to sign into any Apple services, including iCloud, the App Store, iTunes, Apple Books, FaceTime, and Apple Pay. Even so, deactivating your Apple ID does not delete your account. You can reactivate your account anytime to regain access to all your Apple services and data.
Here’s how to temporarily deactivate your Apple ID account:
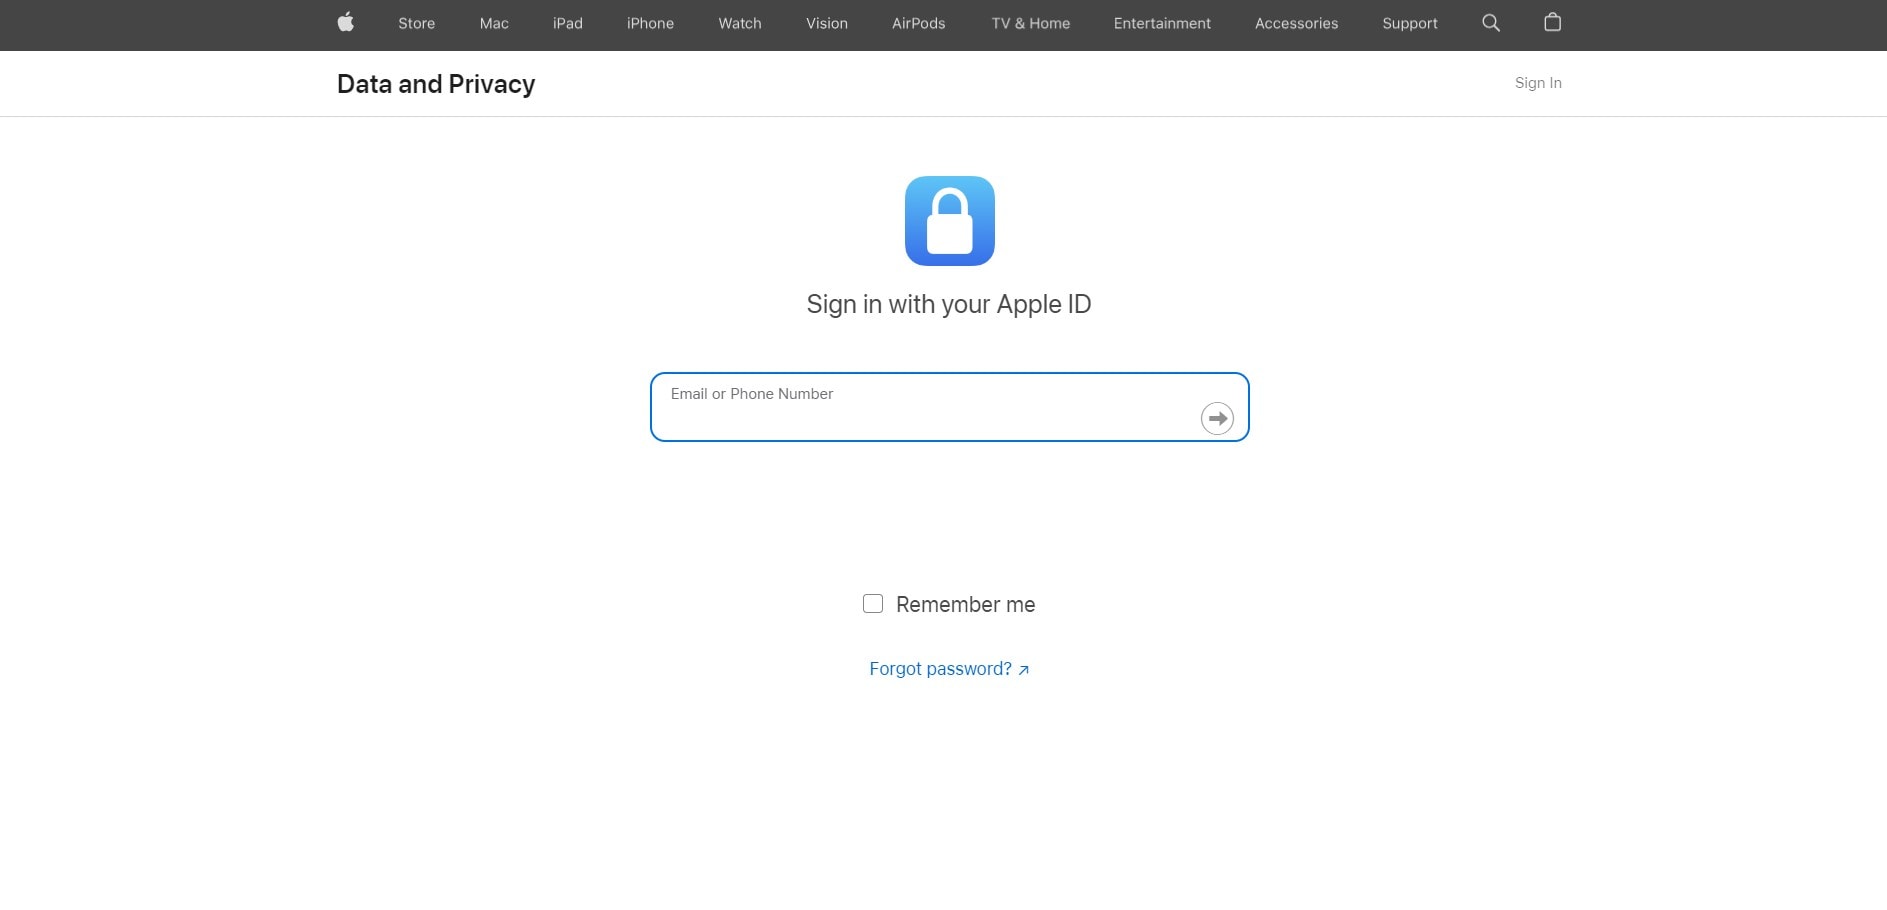
- Step 1: Go to Apple’s Data and Privacy website. Sign in using your Apple ID.
- Step 2: Scroll down to the Temporarily deactivate your account section and click Request to deactivate your account.
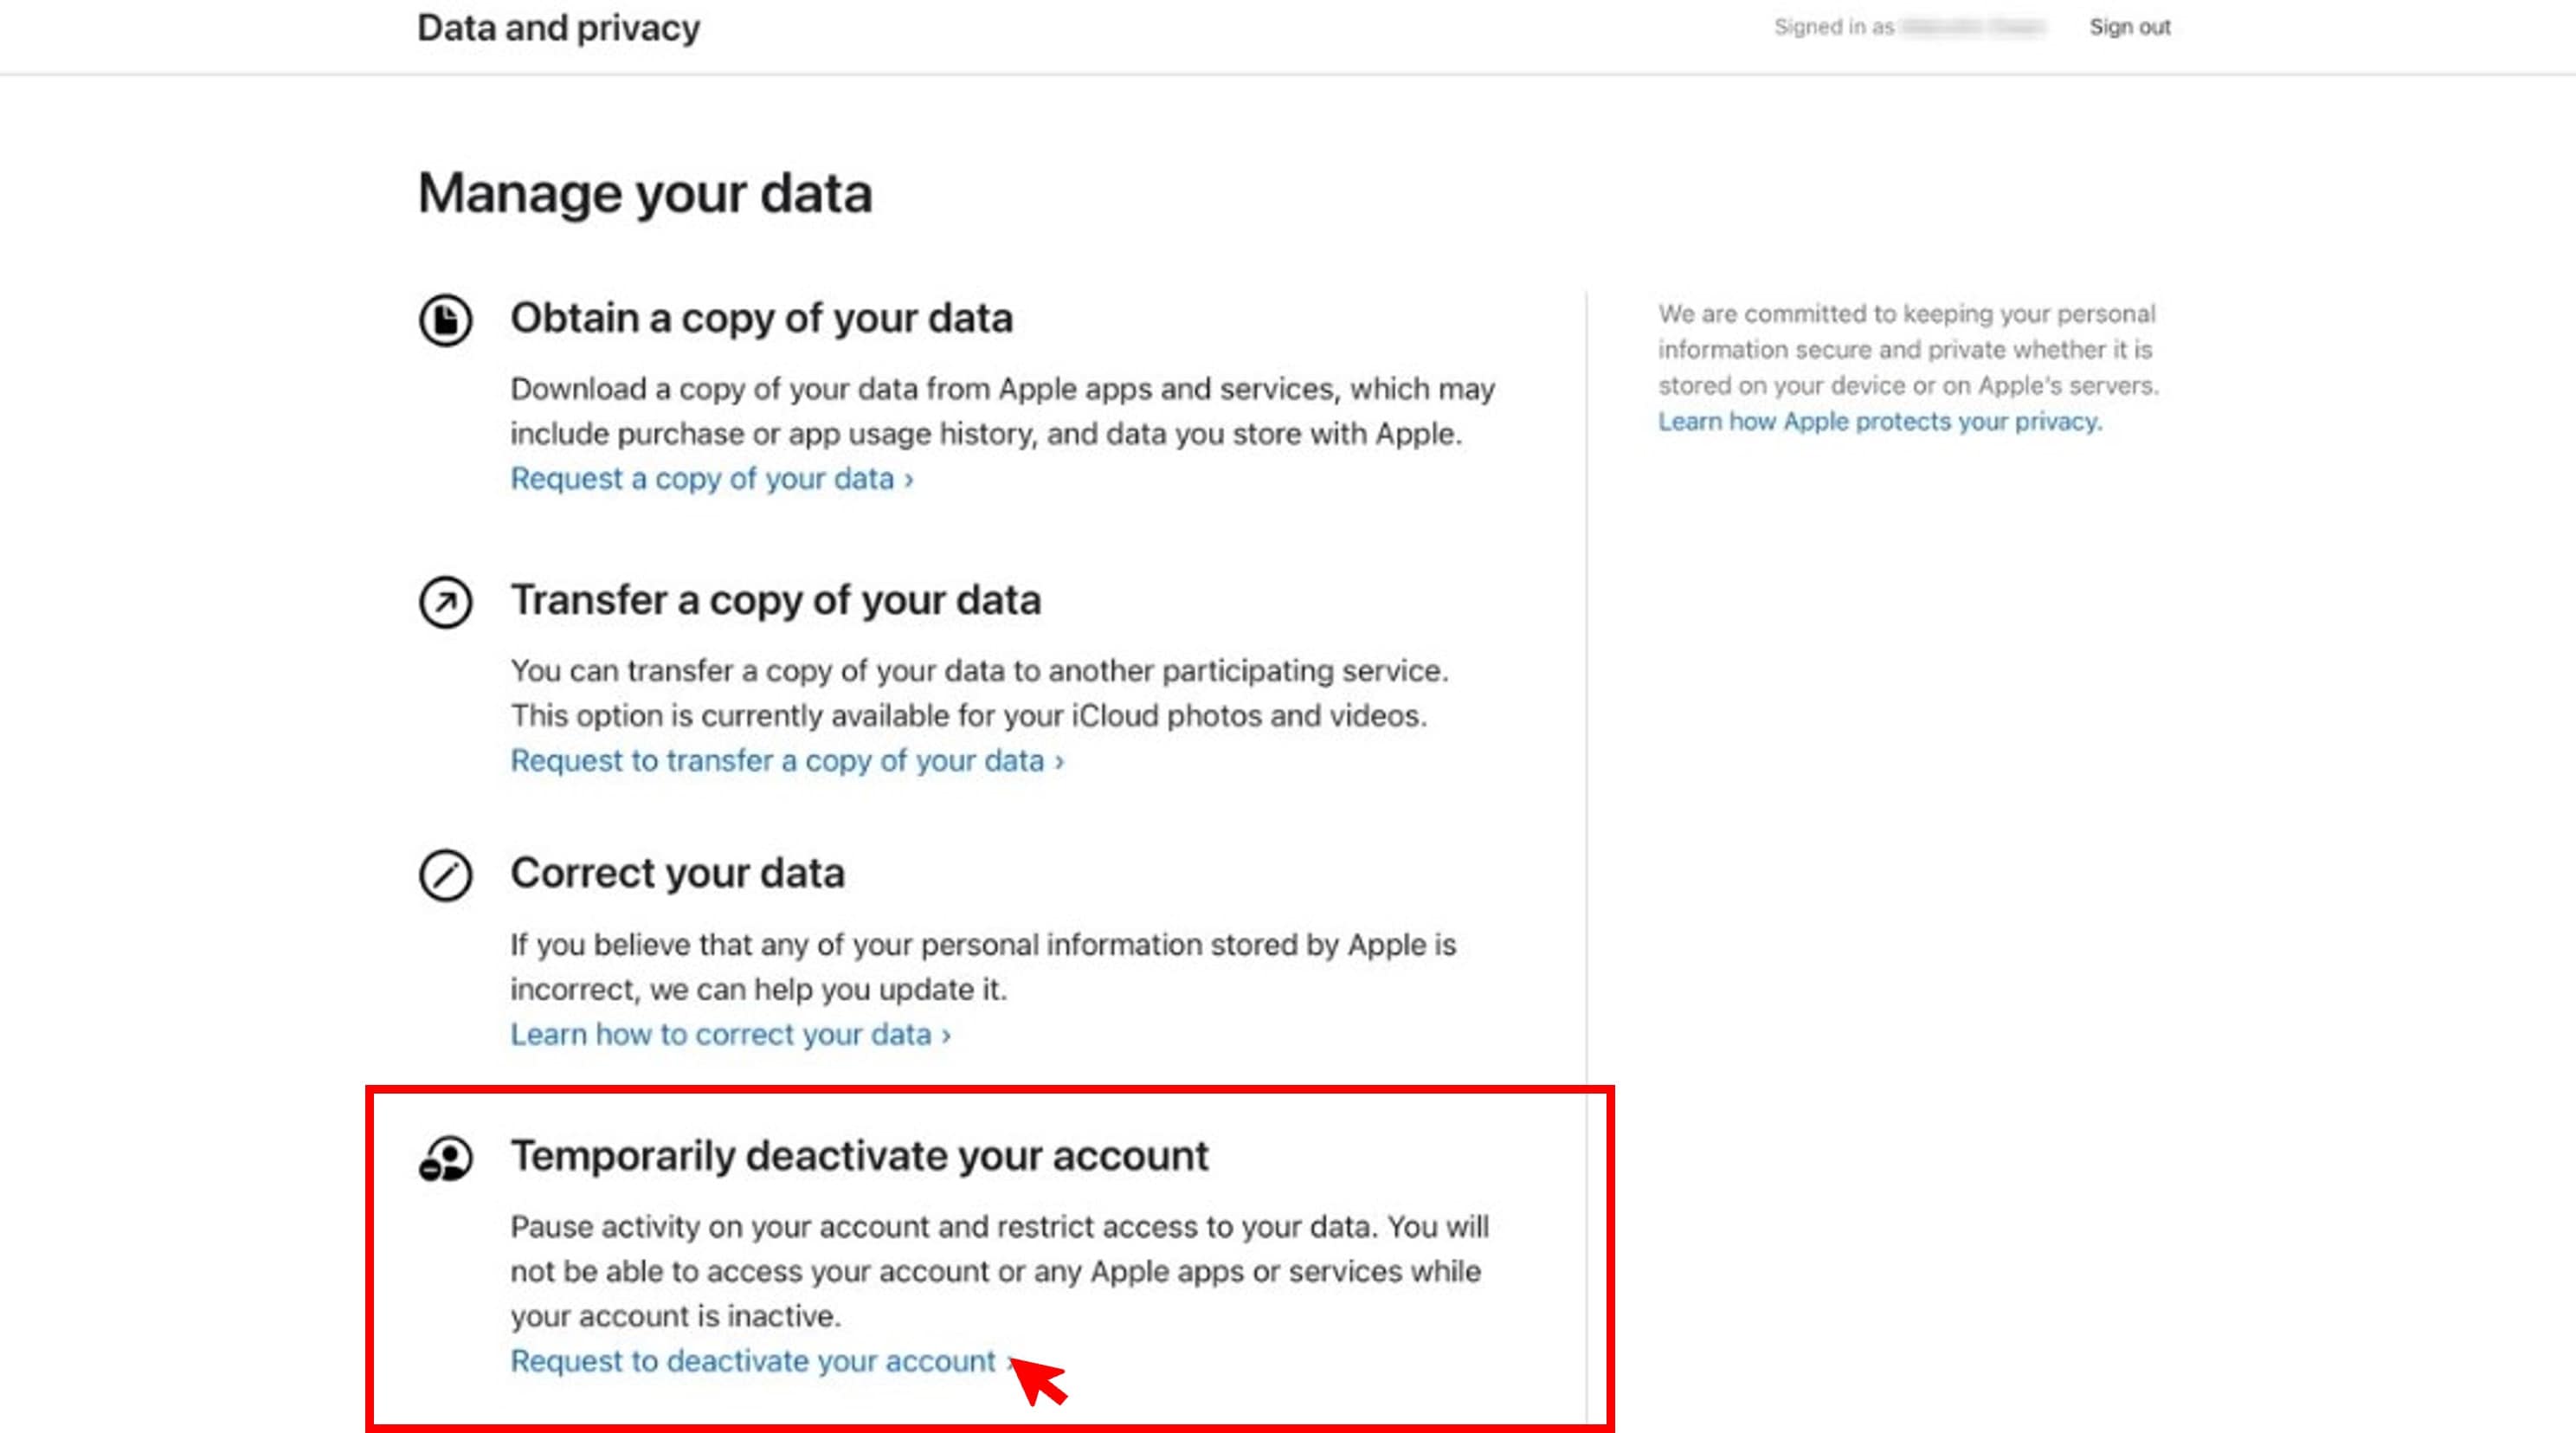
- Step 3: Select a reason for deactivating your account from the drop-down menu, then click Continue.
- Step 4: Review the information and follow the on-screen instructions to complete deactivation.
Note:
Keep the unique alphanumeric access code you’ll receive. You’ll need it to reactivate your Apple ID account.
More Article About iCloud Account:
Ways to Restore from iCloud Backup Without Reset
3 Ways to Recover iCloud Password
iOS 16: Best Ways to Bypass iCloud Activation Lock on iPhone/iPad
Conclusion
As you’ve learned, deleting an iCloud account is a permanent decision you cannot reverse. Once deleted, your account and all associated data will be permanently erased from Apple’s servers. Thus, it’s crucial to back up your data before proceeding.
Apps like Dr.Fone provide a comprehensive solution for backing up your data and removing an iCloud account without a password. Its user-friendly interface and streamlined processes make it an ideal choice for those seeking a quick and hassle-free experience. Whether you’re looking for an answer on “how to delete iCloud account“ or “remove iCloud account,” Dr.Fone is the ultimate tool to guide you through the process.
How to Erase an Apple iPhone 11 without Apple ID?
Our generation is all about high-performance gadgets and, a phone is one of the most important of it all. But with the concept of a smartphone, things have changed. iPhone/iPad has emerged as an important fashion quotient for a long now.
We often end up buying second-hand iPhones/iPads or sell our old version of the phones/pads to an unknown person and buy a new version of other brands, like Samsung S22. At times, be it after-sale/purchase or old iPhone, or if you may have yourself forgotten the password to your Apple ID, we often come across a big challenge, and that is how to erase an iPhone without an Apple ID password. Well, if that’s the case with you, then you’ve reached the right place. We’re about to discuss the most effective ways to erase an iPhone without an Apple ID password. Let’s discover them.
Part 1. How to erase an iPhone without Apple ID and iTunes
When it comes to taking care of all your Apple iPhone 11 recovery solutions, Dr. Fone has effectively managed to make a mark in the field. Especially when it comes to erasing an iPhone without an Apple ID password, the Dr.Fone – Screen Unlock (iOS) can help you get it done without a hitch. Not only can you erase an iPhone without an Apple ID password, but you can also get the Apple ID/iCloud lock removed too with much ease. With over 5 million-plus users, the tool is the most recommended in the market, serving every customer to their content.
Key Features:
The key features of Dr.Fone – Screen Unlock (iOS) are –
- It can unlock an iPhone/iPad by erasing an iPhone without an Apple ID password.
- Even when your screen is damaged and you cannot enter a passcode, Dr. Fone – Screen Unlock (iOS) can effortlessly get it done.
- If the passcode is wrongly set by your kids or an unknown, this software can help unlock the same.
- Works efficiently with almost all iOS devices and supports even the latest iOS version 14.
Step by Step Tutorial:
Let’s get to understand how to erase an iPhone without an Apple ID password:
Step 1: Connecting the iPhone/iPad
The first thing to do is download and install the Dr.Fone – Screen Unlock (iOS) software on your computer/laptop. Before you move on to any other step, connect your affected iPhone/iPad to your computer or laptop with the help of a USB.
Step 2: Select the correct Mode.
After the installation is done completely, launch the tool and select the “Screen Unlock” option on the software’s home interface. A new screen interface will appear, you will have three different options. You need to select the “Unlock iOS Screen” option and, this will start the entire process of unlocking.
Step 3: Boot your device into Recovery/DFU Mode
You now have to boot your Apple iPhone 11 or iPad device into Recovery mode or DFU mode so that the software can recognize your device for further process. For your convenience, Dr. Fone Screen Unlock (iOS) has a built-in instruction facility that helps you to follow the steps.

Step 4: Confirm the information and download firmware
After a successful reboot into Recovery mode, the tool will automatically detect your device’s information and the most compatible iOS firmware. To start the process of downloading the firmware, you need to hit on “Start” button.
Step 5: Erase an iPhone without an Apple ID password.
Once the download is complete, you can get started with erasing an iPhone without an Apple ID password. Hit the “Unlock Now” button, and voila! In no time, you’ve successfully erased an iPhone without an Apple ID password.
Part 2. Erase an iPhone without Apple ID via iTunes
Sometimes your phone might ask for an Apple ID and password to confirm your authority. In such cases, you may get stuck as either you have forgotten the password to it, or you don’t remember the Apple ID in the first place. For that matter, where it needs immediate help, we have listed down a set of steps that can help you erase an iPhone without Apple ID via iTunes –
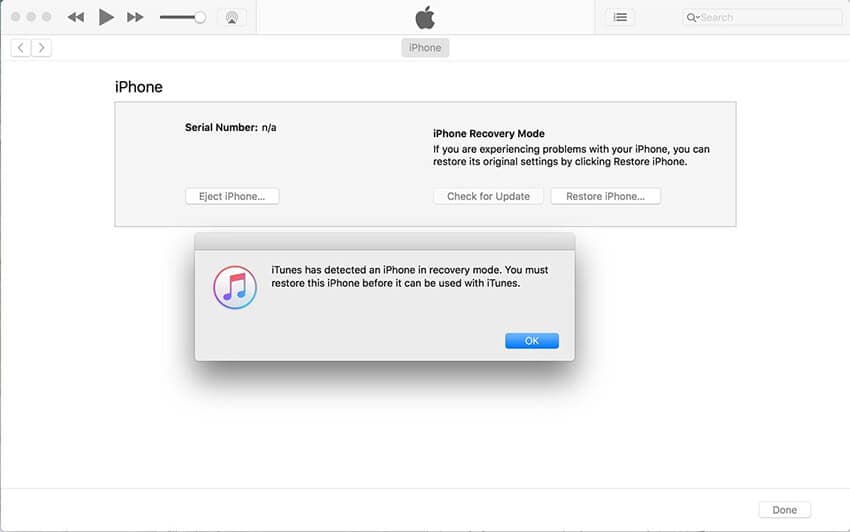
Step 1: Connect your Apple iPhone 11 to the computer with the help of a USB and then open your iTunes.
Step 2: The best way to start the process is to move your phone to recovery mode. For this, you need to:
In iPhone 8 or later: Tap the Volume Up, then quickly tap Volume Down and hold down the Power key afterward.

In the case of iPhone 7/7Plus: Press the “Sleep/Power” and “Volume Down” keys together.
Hold down the keys until you see the message on your iTunes screen about “your iPhone has been detected in recovery mode.”
Step 3: Once done, click on “Ok” and choose the “Restore iPhone” option. Confirm your actions, and you’re done.
Part 3. How to erase an iPhone without Apple ID via Settings
Erasing an iPhone without Apple ID becomes necessary when we happen to use a second-hand phone or when we share a phone with someone. It is indeed a hard task to overcome these issues as we constantly strive to change our phone or replace it with a second-hand one. We have jotted a few steps that can help you erase an iPhone without Apple ID via settings for your ease.
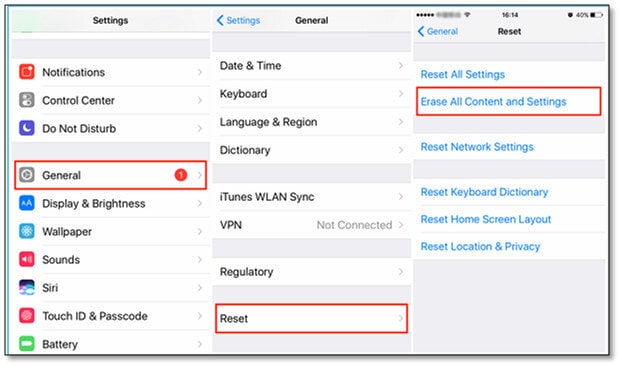
Step 1: On your Apple iPhone 11, press the “Settings” icon on your App drawer.
Step 2: Under the Settings, scroll down and click on the “General” option.
Step 3: Now, you need to scroll all the way down to the “Reset” button and click on it. Then, look for “Erase All Content and Settings” and tap on the same.
Step 4: Enter your passcode to confirm. This action will pop up a screen where you need to select Erase iPhone again, and boom, you are done now.
Part 4. Tip you may need to erase Apple ID
Now, just in case you wish to delete your Apple ID completely, you need to perform a simple practice of removing any devices associated with your Apple ID.
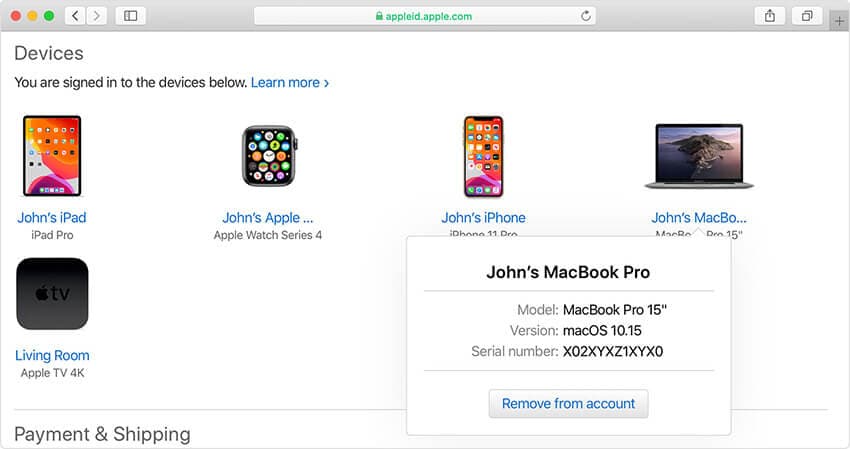
Step 1: One can simply visit appleid.apple.com and log in with the Apple ID credentials already allotted to the user.
Note: You might get a prompt of a two-factor authentication code while being on this page.
Step 2: Once you scroll down the line, choose, and click on the “Device” option.
Step 3: Choose the desired device and click on the “Remove from account” option followed by a “Remove this – Device Name” to confirm the action. Perform this step for all other devices.
How to erase an Apple ID via Apple’s Data and Privacy website
Now let’s get started with erasing an Apple ID via Apple’s Data and Privacy website are simple and, we have mentioned a simple way to take care of the same:
Step 1: Once you’re done removing the Apple iPhone 11 devices linked to your Apple ID, visit privacy.apple.com and log in with the same Apple ID and password credentials.
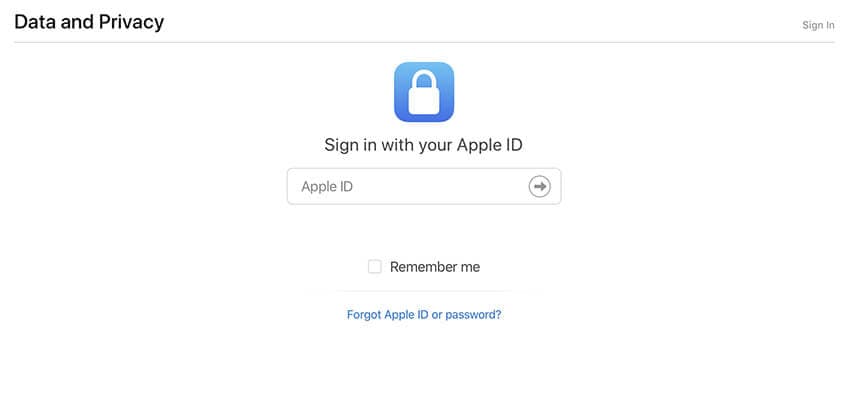
Step 2: Once you authenticate, click on the prompt indicating the option to “Continue.”
Step 3: Once you click on the “Get started” prompt on the screen, you will get a tab to “Delete your account.” This will prompt you with an Apple message indicating the information regarding the deletion process time.
Step 4: Before everything, make sure you back up your data and follow the instructions steps prompted by Apple’s website. This will lead you to choose a reason for deletion from the click-down option and click “Continue.”
Message – You will get the details of the entire process for a quick review before you can submit for the final deletion of the policies
Step 5: Click on “Delete terms and conditions” by checking the read and agreed on the box. Make sure to provide a good call-back number to finalize the process.
Step 6: This submission will give you your access code which you can later use for clarification and, now you can click on the “Delete Account” option
Conclusion
Coming towards the end of the topic, we now are fully sure that you fully understand how to erase an iPhone without an Apple ID. Just in case you have any doubts, please feel free to comment below. And do remember to share this with your friends and family if you find it useful.
Also read:
- [New] 2024 Approved Unable To See Video Sony A6400 Troubleshoot Guide
- [New] Best 10 TikFilters for Viral Video Success for 2024
- [New] Prime Image Archive Platforms
- [Updated] 2024 Approved Essential Steps to Utilizing Azure's Speech-to-Text Service Effectively
- [Updated] In 2024, From Playtime to Pixels The Ultimate List of 6 Ways to Record Minecraft
- 2024 Approved Premier Slow Motion Capture Apps Android/iOS Devices
- A Step-by-Step Guide to Finding Your Apple ID From Your Apple iPhone 11
- Effortless Steps to Snapping Screenshot on Your Desktop
- How To Leave a Life360 Group On Vivo Y78+ Without Anyone Knowing? | Dr.fone
- How to Remove Apple ID from Apple iPhone 8 Plus without Password?
- How to Remove iPhone 8 Plus Device from iCloud
- How To Remove the Two Factor Authentication From iPhone 6
- In 2024, How to Erase an Apple iPhone 13 mini without Apple ID?
- In 2024, How to Fix Locked Apple ID on iPhone 7
- In 2024, How To Get the Apple ID Verification Code From Apple iPhone XS Max in the Best Ways
- Instagram リールのスクリーンショットを取り、PC/スマホに保管するテクニック
- Troubleshooting Error Connecting to the Apple ID Server On Apple iPhone 14 Pro Max
- Title: How to Unlock Apple ID On your iPhone 11 without Security Questions?
- Author: Alma
- Created at : 2024-12-20 10:39:02
- Updated at : 2024-12-27 01:06:58
- Link: https://apple-account.techidaily.com/how-to-unlock-apple-id-on-your-iphone-11-without-security-questions-by-drfone-ios/
- License: This work is licensed under CC BY-NC-SA 4.0.