
In 2024, Apple ID Locked for Security Reasons On Apple iPhone SE (2022)? Find the Best Solution Here
Apple ID Locked for Security Reasons On Apple iPhone SE (2022)? Find the Best Solution Here
Apple ID is the main functional unit in the smooth and secure operation of Apple devices. This ID is the gateway towards many services, including iCloud, App Store, and more. In the context of these security concerns, Apple ID could get locked out for various reasons, like Apple ID locked for security reasons. This happens just because the security feature in the operating system detects some fictitious activity.
However, you don’t need to worry about your Apple ID locked for security reasons because solutions to these problems do exist. In this article, we will also provide one significant and effective solution to tackle such issues effortlessly.
Part 1. Exploring the Causes of Apple ID Locked Out for Security Purposes
Has your Apple ID been locked for security reasons, and is this problem creating some tension for you? Before we move further towards its solutions, it’s essential to know the reasons that lead to these problems. Some of them are explained below in a comprehensive manner:
1. Incorrect Attempts
Apple locks your Apple ID mainly when you or someone else has entered the password incorrectly multiple times. This is one of the most common reasons, and mostly, this happens by the original users themselves unintentionally.
2. Preventing Fraudulence
If there are unauthorized purchases or suspicious transactions on your ID, Apple may consider locking it to prevent that activity. It happens to protect the user’s financial information and to avoid any fraudulent activity from being done on that Apple ID.
3. Using Third-Party Tools
Sometimes, when using third-party tools based on open-source iCloud sources, the Apple ID could get locked. Developers can integrate iCloud features into their applications to provide users with improved accessibility to their iCloud data.
4. Security Breach Reasons
The ID can also get locked when Apple senses a potential security breach, which could lead to the exposure of your credentials. It may occur when someone tries to hack your ID to get some information, especially when it is being used in multiple areas.
5. Incorrect Security Questions
It may be due to the security questions you or someone else has entered incorrectly too many times. This is another common reason because, most often, the security questions are forgotten by the user. Ultimately, this leads to your Apple ID being locked for security reasons.
Part 2. Resolving the Apple ID Locked Out For Security Reasons by Resetting The Password
The basic solution to the Apple ID locked for security reasons is to reset the ID’s password. Apple also recommends adopting this method if you feel any suspicious activity. The password for your Apple ID can be reset from the iOS device itself or the Mac. We are providing a simple guide to reset your password either way.
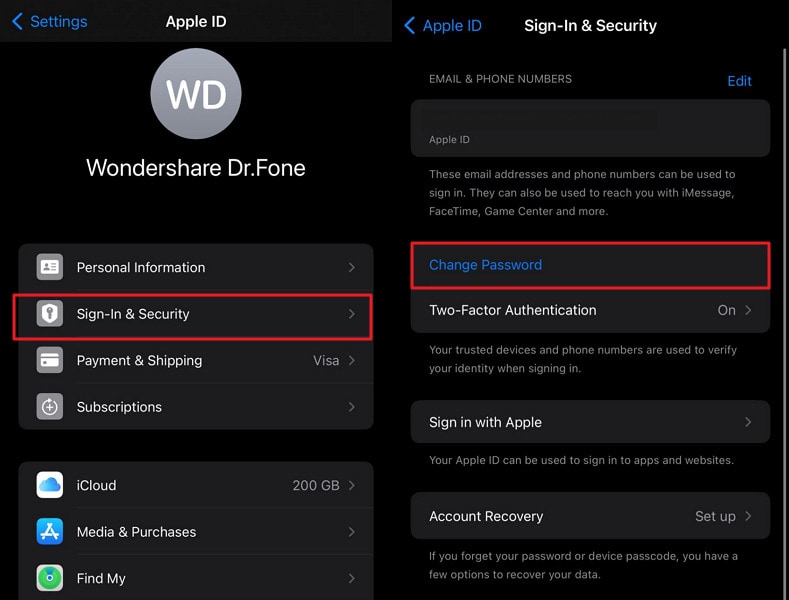
Resetting Password From iOS Device
Instructions: To reset your Apple ID password using your iOS device, open the “Settings” app and move ahead by tapping on your name in front of you. Then, continue to select the “Sign-In & Security” option and select “Change Password.” Follow the prompts on the screen to complete the Apple ID password change process.
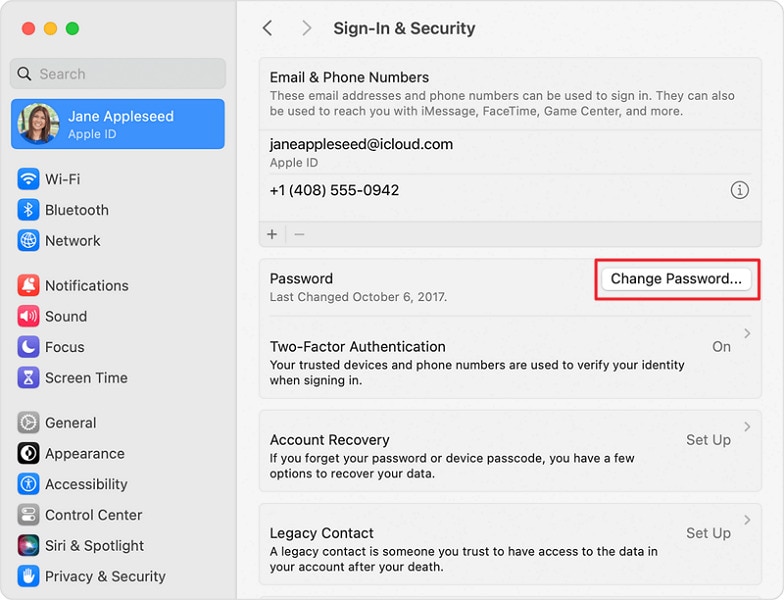
Resetting Password From Mac
Instructions: Start by tapping the Apple logo in the top left corner of your screen and choosing the option “System Settings.” Upon completion of this step, you have to access your Apple ID settings and proceed by selecting the “Sign-In & Security” option. Subsequently, opt for the “Change Password” feature to modify your Apple ID password.
Part 3. Resolving the Apple ID Locked Out for Security Reasons by iForgot Website
You have tried to resolve the problematic message indicating, “This Apple ID has been locked,” but resetting the password is not helping. Then, you need to try iforgot.apple.com, which will help you tackle this issue quickly. Here is how to resolve your Apple ID, which has been locked for security reasons, using the iforgot.apple.com website.
- Step 1: To begin with, you will have to browse the website iforgot.apple.com on your computer. Once the website has loaded, move ahead by pressing the “Reset Password” and selecting the “Continue” option after entering the Apple ID.

- Step 2: In the next stage, you need to reset your password, and for that, you need to go through a verification process sent to your trusted device. You can reset the Apple ID password by tapping the “Allow” button. Following this, you must provide the trusted device passcode to initiate the password reset process.

Part 4. Resolving the Apple ID Locked Out for Security Reasons by Apple Support App
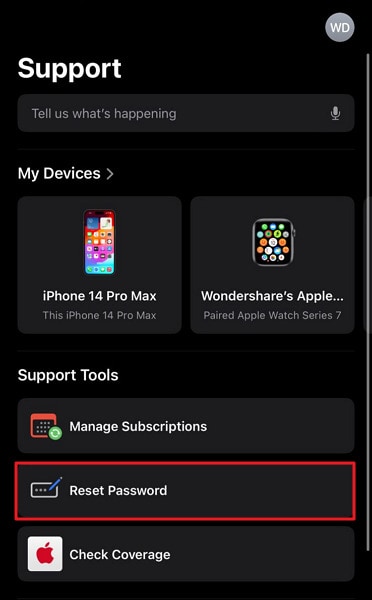
If your Apple ID is still inaccessible after implementing the methods, you can try the Apple Support app. This technique can be applied by arranging another device for downloading the Apple Support app. Users can regain access to their Apple ID and restore full device functionality through this app. The simple guide to perform this action is explained below step-wise:
- Step 1: You need to download the Apple Support App on the borrowed device and proceed to open it. After that, navigate to the “Support Tools” section, find the “Reset Password” option, and tap on it.
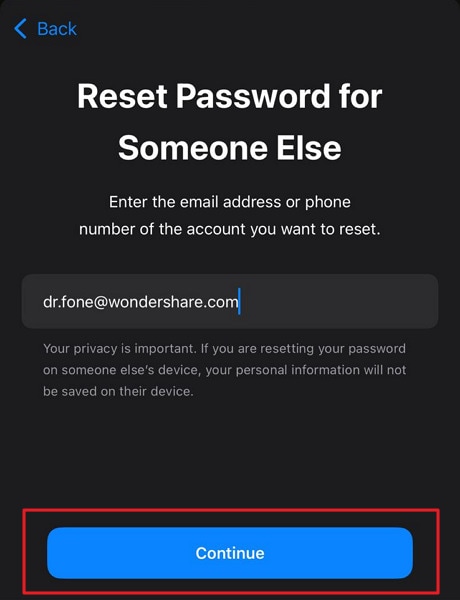
- Step 2: Choose the “Help Someone Else” option to continue. Then, give your Apple ID and hit the “Continue” button. There, you have to follow the on-screen instructions to reset your password and get access to it.
Part 5. No Solution Yet? Try Wondershare Dr.Fone – Screen Unlock (iOS) To Unlock Locked Apple ID for Security Reasons
When facing an Apple ID locked for security reasons, it becomes imperative to seek a reliable solution. All essential operations within iOS devices are intertwined with the functionality of the Apple ID. That’s why a viable resolution is crucial for seamless device usability. In such situations, Wondershare Dr.Fone emerges as a highly effective option.
It is specifically designed to tackle the intricacies of iOS device management. This tool offers a dedicated feature to unlock Apple IDs, making it the ultimate recourse. Additionally, it allows you to bypass the iCloud activation lock without requiring a password. This iOS screen unlock tool is fully compatible with the latest versions of iOS 17 and iPadOS 17.
Key Features of Wondershare Dr.Fone
- Using Wondershare Dr.Fone, you can also remove the Apple ID or screen lock from the latest iPhone 15 models.
- You can also manage your Apple iPhone SE (2022) data transfer or fix iDevice system issues with the help of Wondershare Dr.Fone.
- This tool can also help its users to remove the Screen Time Passcode and SIM lock.
How To Use Wondershare Dr.Fone To Unlock Locked Apple ID for Security Reasons
Summarized below is the detailed step-by-step process of using Wondershare Dr.Fone to unlock your Apple ID:
- Step 1: Navigate to the Remove Apple ID Feature
With Wondershare Dr.Fone launched, move to the “Toolbox” tab and access “Screen Unlock.” Then choose “iOS” as your device type, and on the following screen, press “Remove Apple ID.” Now is the time to connect your Apple iPhone SE (2022) to the computer and let Wondershare Dr.Fone detect it.

- Step 2: Enable 2FA on Your iOS Device
To proceed further, it is imperative to have screen lock and 2FA enabled on your iOS device. If it already isn’t, do it and move to put your device in Recovery Mode. Dr.Fone will guide you through the process of enabling Recovery Mode on your device. Once Wondershare Dr.Fone detects your device in Recovery Mode, it will display your device model.

- Step 3: Complete the Apple ID Unlocking Process
Now choose “System Version” and tap “Start” to let Dr.Fone download the firmware. Once it is downloaded and verified, tap “Unlock Now.” The last step involves putting the confirmation code in the confirmation prompt and pressing “Unlock.” In a few moments, Wondershare Dr.Fone will unlock your Apple ID.

Final Words
To conclude, there are scenarios that can lead to the Apple ID being locked for security reasons problem. Apple does this for your benefit. However, we have explained different methods to get you out of this situation. Although all of these methods possess the potential to resolve this problem, Wondershare Dr.Fone offers a powerful platform for more in-depth remedies.
This robust iOS toolkit feature performs this recovery in seconds, saving you time. Also, it has a simple interface for its users with various technical exposure. In short, it is the best solution if your Apple ID has been locked for security reasons.
How to Remove Apple iPhone SE (2022) Device from iCloud
Apple is known for developing its own unique operating system with its own dedicated operations and functions. They have developed an impressive, interconnected model that helps the user keep the data intact across the Apple iPhone SE (2022) device. With unique identification protocols to keep the Apple iPhone SE (2022) device safe from illegal access, Apple provides its user with its own cloud backup platform. iCloud offers Apple users a unique platform with the ability to synchronize and back their data up. This helps the users keep a duplicate in places where they accidentally lose their important data. However, if you have stopped using an Apple device that had an activated iCloud backup system, you may find it necessary to remove the Apple iPhone SE (2022) device from the iCloud account. For such cases, there are a few techniques that can be adapted to cater to the issue at hand. This article introduces and provides you a detailed guide on how to remove a device from iCloud through the implementation of straightforward and notable techniques.

Part 1. What happens if I remove a device from my iCloud?
If you look over the operation of iCloud service for any Apple device, the exemption of the service will lead you into losing access from a service that offers you a backing up feature along with synchronization. Furthermore, this will also affect the Find My service, leading you to make your device theft evasive. The removal of the Find My service makes it possible for thieves to wipe off data of the Apple iPhone SE (2022) device and have it sold across the market, with no chances of retrieval. Despite the removal of the iCloud service from your device, it will function normally; however, the security and tranquility offered by the Apple iPhone SE (2022) device would not remain intact with its exemption. The iCloud account that has been removed will keep the data that has been previously stored in it by the Apple iPhone SE (2022) device backup, but it would not accept any new addition.
Whenever you consider removing the iCloud backup from the Apple iPhone SE (2022) device, it prompts over keeping the data on your device, if necessary. All the data that is not selected by the user will be removed from the iPhone.
Part 2. How to remove a device from iCloud remotely? (iPhone)
iCloud backup is usually important in keeping a synchronized model in effect across a device. However, when the Apple iPhone SE (2022) device that is in use of an iCloud account is not in consumption, it is better to have the Apple iPhone SE (2022) device removed from the iCloud account. For this, you can consider opting for the remote method of removing a device from the iCloud. The following guidelines explain the detailed method on how to remove a device from the iCloud through remote means.
Step 1: You need to turn off the Apple iPhone SE (2022) device and open the iCloud.com website across the web browser.
Step 2: Access the “Find My iPhone” service on the webpage and tap on “All Devices.”
Step 3: This opens up the list of devices that are connected across the account. Select the Apple iPhone SE (2022) device and tap “Remove from Account” to conclude. Proceed to confirmation of the process and have the Apple iPhone SE (2022) device removed successfully from the iCloud account.

Part 3. How to remove a device from iCloud? (Mac)
While you consider a method that provides you a technique of removing a device from the iCloud through an iPhone, there are several other means of operation that can be utilized to remove a device from the iCloud. You can consider removing a device from the iCloud through a Mac, which needs to be concluded through a series of steps provided as follows.
Step 1: Tap on the Apple icon on the top-left of the Mac screen to open up the menu. Select “System Preferences” from the drop-down menu that appears on the screen.
Step 2: In the “System Preferences” window, you need to tap on the “Apple ID” present at the top-right of the screen.

Step 3: Over the new page that opens, scroll down on the left pane of the window, and tap on the Apple iPhone SE (2022) device that you seek to remove. Click on “Remove from Account…” from the list of options and confirm the execution of the process. This successfully removes the Apple iPhone SE (2022) device from the iCloud with the aid of a Mac.

Part 4. How to rescue when I accidentally remove a device from iCloud?
While you get to know a variety of platforms and techniques that can be adapted to remove a device from the iCloud, there are several circumstances where you accidentally remove a wrong device from the iCloud. The process of retrieving it is quite simple and efficient, where the Apple iPhone SE (2022) device would be automatically added back into the iCloud account once it is connected with the Internet. It should be kept in mind that the Apple iPhone SE (2022) device should contain the iCloud username and password under the iCloud Settings to automatically have it updated over a network connection.
Part 5. You may wonder how to remove an iCloud account without a password
The following methods are quite direct and have no issues with the iCloud username and password. Apart from the existing methods, there are several cases where the user usually forgets a specific iCloud credential that makes it impossible for them to execute a procedure that has been mentioned above. In such cases, the necessity of dedicated third-party unlocking tools gets into action. These third-party platforms are unique in setting up such an environment that keeps the Apple iPhone SE (2022) device protected and aids in complete execution of the task with no discrepancy. There are hundreds of tools that are present in the market for removing an iCloud account from a device without a password. However, when it comes to selecting the appropriate platform, it usually gets difficult for the user to specify a unique choice. This leads the article to introduce a very impressive third-party tool known as Dr.Fone – Screen Unlock (iOS) that offers a flawless environment to cover all the requirements of removing an iCloud account from a device without a password. There are various pointers that should be kept in mind while selecting Dr. Fone as your first rated choice in removing an iCloud account without a password.
- You can easily unlock an iPhone or other Apple device if you have forgotten its passcode.
- It protects your Apple device from getting into the disabled state.
- Operates perfectly across all iPhone, iPad, and iPod Touch models.
- Compatible across the latest iOS.
- It does not require iTunes to function properly.
- Very easy to use and implement.
As you get to understand this simplistic platform, the following guide explains to the user how to remove the iCloud account from a device through the steps shown below.
Step 1: Download and Launch
You need to download and install the platform on your desktop to function. After downloading it, you need to connect your Apple iPhone SE (2022) with the desktop and launch the platform. Select the “Screen Unlock” tool from the home window and proceed.

Step 2: Select Appropriate Option
Following this, you need to select the “Unlock Apple ID” option from the next screen that opens on your front.

Step 3: Operating your Device
As soon as the process initiates, you need to take up your device and open it up to “Trust” the computer for proceeding. Open the Settings of your Apple device and initiate a reboot.

Step 4: Execution of the Process
Once the reboot executes, the platform automatically recognizes and initiates the removal of the iCloud account from the Apple iPhone SE (2022) device. With the execution of the process, the user is provided with a detailed prompt screen displaying the completion of the process. The removal of the iCloud account from the Apple iPhone SE (2022) device without a password has been successfully executed.

Conclusion
As you have recognized the importance of iCloud backup across your device, there are several dynamics of operation that are to be understood to keep the system prevalent and intact, in every sense. Where users wish to remove their iCloud service from the Apple device, the article has presented a series of different methods and techniques that can be implemented across various platforms to cover the requirements and successfully remove the iCloud account without any issues. Following this, the article has also looked forward to offering a third-party platform that allows the user to successfully reboot and remove the iCloud account from the Apple iPhone SE (2022) device to make it operable. You need to look over the guide in detail to get more knowledge of the procedures and mechanisms.
How to Change Credit Card on Your Apple iPhone SE (2022) Apple ID and Apple Pay
Apple’s ecosystem offers convenience with services like Apple ID and Apple Pay. Managing your digital life has never been more convenient. In this interconnected system, your credit card plays a crucial role. It’s essential to understand that your credit card details can be associated with both your Apple ID and Apple Pay, each serving unique functions.
In this comprehensive guide, we’ll learn how to change the credit card on Apple ID and Apple Pay. Additionally, we will introduce you to a helpful tool for unlocking your Apple ID if you ever encounter access issues.
Part 1: 3 Ways To Change the Credit Card on Apple ID
We’ll explore 3 different methods to change the credit card details associated with your Apple ID in this section. These methods allow you to update your payment information effortlessly, ensuring uninterrupted access to Apple services.
Way 1: Update Credit Card on iPhone/iPad
The first method involves updating your payment information directly from your Apple iPhone SE (2022) or iPad’s settings. This method is convenient for those who prefer managing their Apple ID details on their iOS devices. Here is how to change your credit card on Apple ID via iPhone or iPad:
- Step 1: Begin by launching the Settings app on your device and then touch your name to enter your Apple ID settings. Afterward, choose the “Payment & Shipping” option to move ahead. In addition, log in using your Apple ID credentials if necessary.

- Step 2: Next, press “Add Payment Method” and provide information for your new payment method. Once you’ve entered all the required details, tap “Done” to confirm and save your updates.

- Step 3: To remove the old payment method, tap “Edit.” Now, locate the old payment method you want to delete and tap the “Red Delete” button next to it. Confirm the deletion by tapping “Delete.”

Way 2: Change Credit Card on Mac
Now, we shift our focus to those who prefer managing their payment information on their Mac. Changing your credit card details from Mac’s settings is a straightforward and easy process. Therefore, using the following steps, you can learn how to change your credit card on Apple ID without any errors:
- Step 1: Start by opening the App Store on your device. Then, in the bottom-left corner of the App Store, tap on your name and proceed to access “Account Settings.”

- Step 2: Locate the “Apple ID Summary” section in the “Account Settings” menu and select the “Manage Payments” option next to it. After this, introduce a fresh payment method by opting for the “Add Payment” option.

- Step 3: This action will prompt you to input the details of your new payment method, including credit card information. After you’ve provided the required information, select “Done” to save your newly added payment method.

- Step 4: If you want to remove the old method linked to your Apple ID, click “Delete” in front of it. Now, tap “Delete” to remove this payment method from your Apple account.

Way 3: Update the Credit Card Details on Windows PC
To update the credit card information linked to your Apple ID, we’ll now provide instructions specifically tailored for Windows PC users. This approach offers flexibility for individuals looking to maintain accurate payment details. With the help of the simplified steps given below, you can easily change the credit card on the Apple account:
- Step 1: Access iTunes on your computer and click on “Account” from the menu bar that is given at the top. Afterward, a drop-down menu will appear on which you need to select “View My Account.”

- Step 2: Following this, click on “Manage Payments,” and your current payment methods that are listed will be shown to you. There, click on “Add Payment” to add a new payment method quickly.

- Step 3: After clicking on this option, you can enter details of your new payment method. Once the details are entered successfully, click “Done” to save the changes, and you are good to go. Tap the “Edit” option in front of the old credit card and choose “Remove Payment Method” to remove it from your Apple ID.

Pro Tip: Locked Out Your Apple ID? Get It Unlocked Instantly
While learning how to change a credit card on your Apple Account, you encounter an unexpected hurdle - your Apple ID has become locked. This can undoubtedly be a frustrating and troublesome scenario, considering the crucial role your Apple ID plays within the Apple ecosystem. Nevertheless, there’s no cause for alarm, as we’ve got a solution ready to promptly unlock your Apple ID and have you back on course.
The solution is Wondershare Dr.Fone, a tool that is able to remove Apple ID from your iOS devices without needing the password. It is a comprehensive tool that has the ability to remove your Apple ID from your device permanently. This tool works its magic in removing Apple ID, whereas other tools fail when the Find My feature is enabled.
Dr.Fone - Screen Unlock (iOS)
Unlock iPhone/iPad Lock Screen Without Hassle.
- Simple, click-through, process.
- Unlock screen passwords from all iPhone and iPad.
- No tech knowledge required, everybody can handle it.
- Supports the latest iOS version fully!


4,395,218 people have downloaded it
Key Features of Wondershare Dr.Fone
- Unlock iPhone, iPad, and iPod touch by removing various types of lock screens, ensuring access to your device.
- Gain access to your Apple device by bypassing the iCloud activation lock and Apple ID verification without requiring the password.
- Safely bypass Mobile Device Management (MDM) restrictions and Screen Time limitations without the risk of losing any data.
Simplified Steps To Remove Apple ID on Your iOS Device via Wondershare Dr.Fone
Following are the steps to unlock and remove old Apple ID from your iOS device using Wondershare Dr.Fone:
- Step 1: Access the Screen Unlock Tool
To initiate the Apple ID unlocking process, you will need to install and launch Wondershare Dr.Fone. Then, choose “Toolbox” from the left bar and go on to click “Screen Unlock.” Select “iPhone” as your device type, and since we are removing Apple ID, click “Remove Apple ID.”
- Step 2: Proceed to Activate Recovery Mode
Now is the time to connect your iOS device to the computer using a respective cable and click “Unlock Now.” Now, Wondershare Dr.Fone will ask you about having a screen lock and 2FA on the iOS device. The answer needs to be affirmative to proceed further. When done with it, enable Recovery Mode on your iOS device with the help of on-screen instructions.

- Step 3: Remove the Apple ID From Your iOS Device
Wondershare Dr.Fone will detect your device model once it is in Recovery Mode. Choose a system version to download by clicking “Start.” Once it has been downloaded and verified, tap “Unlock Now.” It will lead to a prompt warning about data loss. Here, enter “000000” to confirm your choice and click “Unlock.” Dr.Fone will go on to remove Apple ID from your device.

Part 2: 3 Methods To Change the Default Credit Card on Apple Pay
In our exploration of managing your credit card within the Apple ecosystem, we now focus on changing the default credit card linked to your Apple Pay. Apple Pay stands as a robust digital wallet solution, and understanding the process of updating your payment details is crucial for ensuring a secure user experience. Here, we will explore three approaches on how to change credit card on Apple Pay:
Method 1: Change the Default Card on the iPhone
We start by exploring how to change the default credit card on Apple Pay using your Apple iPhone SE (2022). This method is particularly handy for iPhone users who want to ensure their preferred payment card is set as the default option. These are the instructions for setting a card as the default card for Apple Pay:
Instructions: On your Apple iPhone SE (2022), access and open the Wallet app. Inside the app, locate the payment card you wish to set as your default. Touch and hold the selected payment card. Drag the card to the forefront, positioning it ahead of your other cards.

Method 2: Set New Card as Default on iPad or Mac
Whether you prefer using your iPad for managing your payment methods or you’re on your Mac, you can easily set a new card as the default option. Use the following instructions to set a credit card as the default card on Apple Pay:
For Mac
Instructions: Access System Settings through the Dock or Apple menu and move to Wallet & Apple Pay. Afterward, once you’re in Wallet & Apple Pay, choose a card from the “Default Card” settings and set it as the default card.

For iPad
Instructions: Navigate to Settings on your iPad and move to “Wallet & Apple Pay.” Here, scroll down to “Transaction Defaults” and press “Default Card.” Then, choose a card from the list to set it as your default card.

Method 3: Use Apple Watch to Change Default Card
The last stop on our journey to manage your default credit card on Apple Pay is the Apple Watch. If you are an Apple Watch user, then these instructions can assist you in how to change your credit card on Apple Pay:
Instructions: Access and launch the Apple Watch app on your Apple iPhone SE (2022) and navigate the “My Watch” tab. There, tap on “Wallet & Apple Pay” within My Watch tab and scroll down in it to find the section labeled “Transaction Defaults.” In this section, you’ll find the “Default Card” option. Simply tap on it to select the card you wish to set as the default.

Conclusion
To summarize, we’ve navigated the complex world of how to change the credit card on Apple account. We’ve explored two critical aspects: changing the credit card on your Apple ID and altering the default credit card on Apple Pay. It’s important to understand that your credit card details for Apple ID and Apple Pay are distinct. Thus, it’s crucial to know how to update both to ensure a secure digital experience.
We explored many methods to change the credit card on Apple ID and Apple Pay, depending on your device and preference. Furthermore, there are unfortunate instances where you find yourself locked out of your Apple ID. For these, we introduced a valuable tool: Wondershare Dr.Fone - iOS Screen Unlock. This tool can efficiently unlock your Apple ID without causing any data loss, ensuring you can regain access to your account promptly.
Also read:
- [New] How to Get a YouTube Video Trending
- [Updated] Capture & Organize Essential Steps for Recording FB Video Calls for 2024
- Beta Blockers Can Be Used in Treating a Variety of Conditions Including Hypertension, Angina, Heart Failure, Atrial Fibrillation, and Anxiety
- DIY Guide: Setting Up Your Own Wireless Cinema in College Dorms
- How can I get more stardust in pokemon go On Poco M6 Pro 4G? | Dr.fone
- How to Change Credit Card from Your iPhone 14 Apple ID and Apple Pay
- How To Change Your Apple iPhone 14 Pro Max Apple ID on MacBook
- How To Create an Apple Developer Account On Apple iPhone 8 Plus
- How To Remove Phone Number From Your Apple ID on Your iPhone 12?
- How To Reset the Security Questions of Your Apple ID From Your iPhone 8 Plus
- How To Reset the Security Questions of Your Apple ID On Your Apple iPhone 14 Pro Max
- How to Unlock Apple iPhone 11 Pro Max When We Dont Have Apple ID or Password?
- In 2024, Overview of the Best Oppo Reno 10 5G Screen Mirroring App | Dr.fone
- Mastering Your Syma X8C Flight Patterns for 2024
- Restoring the Functionality of Your Windows 11 Start Menu: Expert Advice
- Title: In 2024, Apple ID Locked for Security Reasons On Apple iPhone SE (2022)? Find the Best Solution Here
- Author: Alma
- Created at : 2024-10-31 03:24:20
- Updated at : 2024-11-06 22:11:05
- Link: https://apple-account.techidaily.com/in-2024-apple-id-locked-for-security-reasons-on-apple-iphone-se-2022-find-the-best-solution-here-by-drfone-ios/
- License: This work is licensed under CC BY-NC-SA 4.0.