
In 2024, Detailed Guide on Removing Apple iPhone 8 Plus Activation Lock without Previous Owner?

Detailed Guide on Removing Apple iPhone 8 Plus Activation Lock without Previous Owner?
Today, many individuals will purchase a utilized iPad or a recycled iOS phone instead of a fresh, box new one. However, they are often disturbed by the Activation Lock screen showing up on the screen once they buy them. This case will probably happen because the iPad is associated with the past user’s iCloud account and will be an iPad locked to the owner.
It becomes a difficult issue as removing a connected iCloud account without the past user is almost difficult. However, sit back and relax. We’ve discovered a few potential ways. This guide will show you the iPad locked to owner bypass. Furthermore, you can use our expert tool, i.e., Dr.Fone-Screen Unlock, to bypass the lock.
After reading this guide, you will understand how to erase the Activation Lock without a past user. How about we get everything started?
Method 1. Dr.Fone - Screen Unlock
Rather than making our readers wait about how to remove Activation Lock without Apple ID or past user, we suggest you with Wondershare Dr.Fone-Screen Unlock.
It is an expert iCloud activation lock bypass program that can remove the activation lock on your iPad. It is the best possible solution when you fail to remember your Mac ID or password. Download the application on your Windows or Macintosh and follow the steps to remove the activation lock without a previous user.
Steps to Follow:
Step 1. Install and launch the Dr.Fone program and choose the Screen Unlock tool.
Step 2. Pick the “iCloud Activation Lock Removal” option.
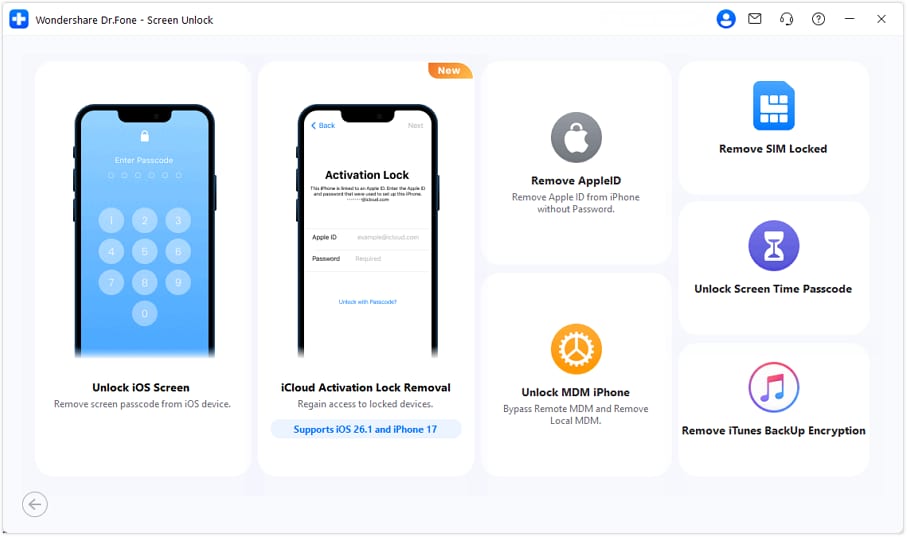
Step 3. Now you can start to bypass the lock.
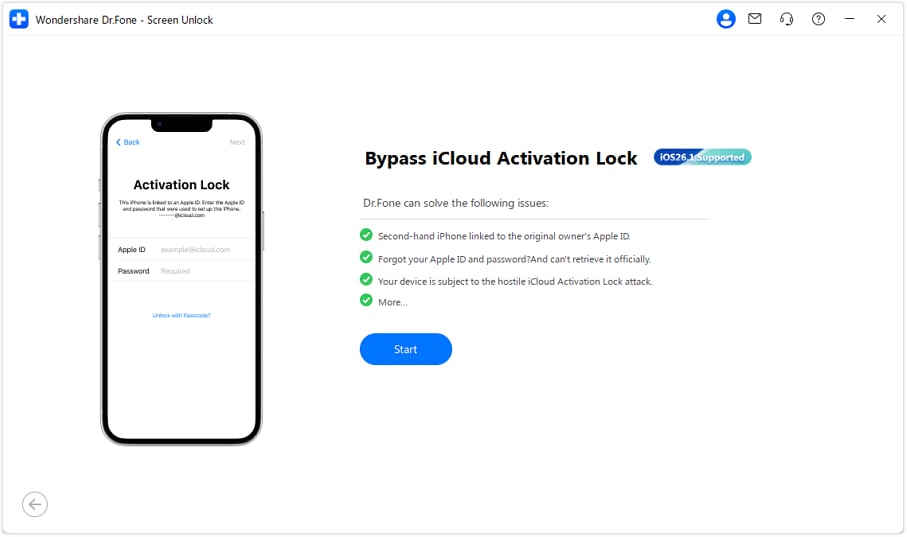
Step 4. Begin to remove and wait briefly. The phone will be in a typical state with practically no lock after removing the activation lock.
Step 5. The program will remove the activation lock like a flash. Your iPad will begin with no activation lock. You can access and utilize the iPad now. However, you must know that you can’t call or use cellular data and iCloud of your new Apple ID after bypassing the lock.

Method 2. Remove it from iCloud
If you cannot reach the past user but rather you are still in contact with them, they can unlock your iPad. Here are the step-by-step guidelines on eliminating the iPad activation lock through the iCloud web:
- Open the iCloud site in a browser.
- Sign in to the current iCloud account being used with the locked iPhone.
- When you sign in, click on the choice that says Find iPhone.
- Presently, you can remotely perform activities on your phone.
- Click on the drop-down named All Gadgets and pick your iPad.
- Click on Erase iPhone.
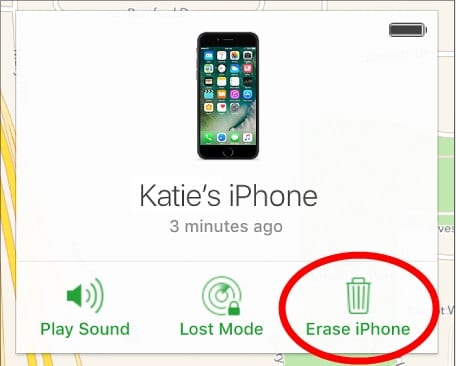
Method 3. Use DNS bypass
Bypassing DNS Server is one more way for you if you’re searching for simple methods for eliminating Activation Lock without the past user. Note that this DNS strategy can bypass the iCloud lock for a brief time. Here’s how:
Step 1. Open your iPad and explore the “Choose a Wi-Fi Network” page.
Step 2. Presently, press the Home button and select Wi-Fi settings. Presently, tap the “I” symbol right behind your Wi-Fi network. It will show the properties of the Wi-Fi.
Step 3. Select “Configure DNS” and set it as indicated by your region:
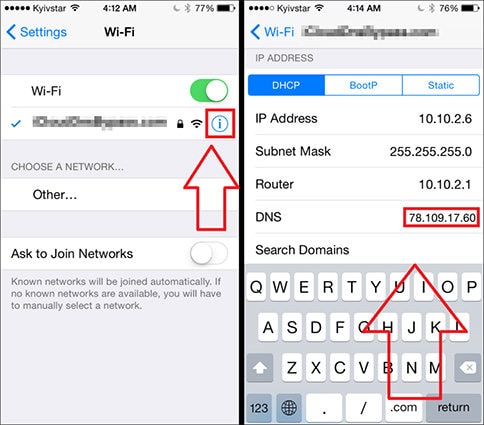
- USA: 104.154.51.7
- South America: 35.199.88.219
- Europe: 104.155.28.90
- Asia: 104.155.220.58
- Australia and Oceania: 35.189.47.23
- Other Continents: 78.100.17.60
Step 4. From that point forward, return to the Wi-Fi page.
Step 5. Presently, click over and again on “Next” and “Back” and hold on until the iPad connects with your area’s iCloud DNS bypass server.
Method 4. Local Apple Support
Following the techniques above, you can try reaching Apple’s local service when you can’t remove the Activation Lock. However, you need to provide the following things:
- iPad serial number
- Buying receipt
When they confirm you own the iOS iPad legitimately, they will help you further by unlocking your iPad.
Part 2: How to Reset iPad without Passcode?
1. Reset iPad by Computer
- Connect your iPad to a computer. Press and hold the Power button + Home button (if your iPad has a Home button). Otherwise, press and hold the Power button + either Volume button (if your iPad doesn’t have a Home button) until you see the Recovery Mode screen.
- On your Macintosh, find the connected iPad.
- Tap Restore and trust that the process will end.
- Set up your iPad and restore the factory default settings without a password.
2. Reset it by Find My
- Go to iCloud.com, and sign in with your Apple ID and password.
- Click on the Find [device] symbol in the menu.
- Select your iPad from the list of all the connected devices.
- Select Erase iPad.
- Follow the prompts for iPad locked to owner reset.
3. Reset with iTunes
- Open the iTunes application or website.
- Connect your iPad to your PC with a connector. Enter your password whenever required.
- Click on the iPad symbol in the upper-left corner.
- Select Summary in the left section.
- Click Restore iPad and then click the Restore button to confirm and reset the iPad locked to the owner.
Conclusion
This iPad locked to owner bypass guide explains how to remove the activation lock. We have mentioned a list of helpful methods to remove the lock from your device. However, if you are still looking for a quick and efficient answer, we suggest you install Dr.Fone - Screen Unlock (iOS) . Dr.Fone is a safe and effective tool for all your unlocking needs.
How To Unlink Your Apple iPhone 8 Plus From Your Apple ID
iPhones are known for their robust security features. The Apple ID is the central feature used to provide many security services that ensure the safety of personal data. Yet, life often leads you to moments when you must part ways you’re your devices. Be it for selling, gifting, or any other reason.
In such cases, it’s essential to understand how to unlink iPhones from your Apple ID. This 2023 guide is your go-to resource, providing insight into various methods to disassociate your Apple iPhone 8 Plus from your Apple ID, even when facing a forgotten or unrecoverable passcode.
Part 1. How the Apple ID System Works
The Apple ID is like the key to your Apple iPhone 8 Plus’s world. It’s a special account that connects your Apple iPhone 8 Plus to Apple’s services. With it, you can download apps, back up your data, and more. It’s an essential part of your Apple iPhone 8 Plus experience.
Here are ways that it protects your device.
- **Preventing use when stolen.**If your Apple iPhone 8 Plus gets into the wrong hands, your Apple ID keeps it locked. Even if someone tries to reset or erase the phone, they can’t use it without your Apple ID passcode.
- **Preventing use even after reformatting the phone.**Even if you reset or erase your Apple iPhone 8 Plus, it stays locked to your Apple ID. This is super important for keeping your data safe.
- **Other ways.**Apple ID helps you find your lost iPhone and secures your payments and personal info.
Remembering your Apple ID passcode is an intelligent move. It makes managing your Apple iPhone 8 Plus more accessible and safer. Forgetting it can make things tricky, especially when you want to unlink your Apple iPhone 8 Plus from your Apple ID. But don’t worry, there are solutions for that, too!
Part 2. How To Unlink Your Apple iPhone 8 Plus Normally
The usual way to unlink your Apple iPhone 8 Plus from your Apple ID is recommended, especially when remembering your Apple ID passcode. This ensures a smooth and secure transition for your device. Here’s how you can do it, step-by-step:
Step 1. Sign out of Apple ID (through Settings):
Open your Apple iPhone 8 Plus’s Settings.
Scroll down and tap on your name at the top.
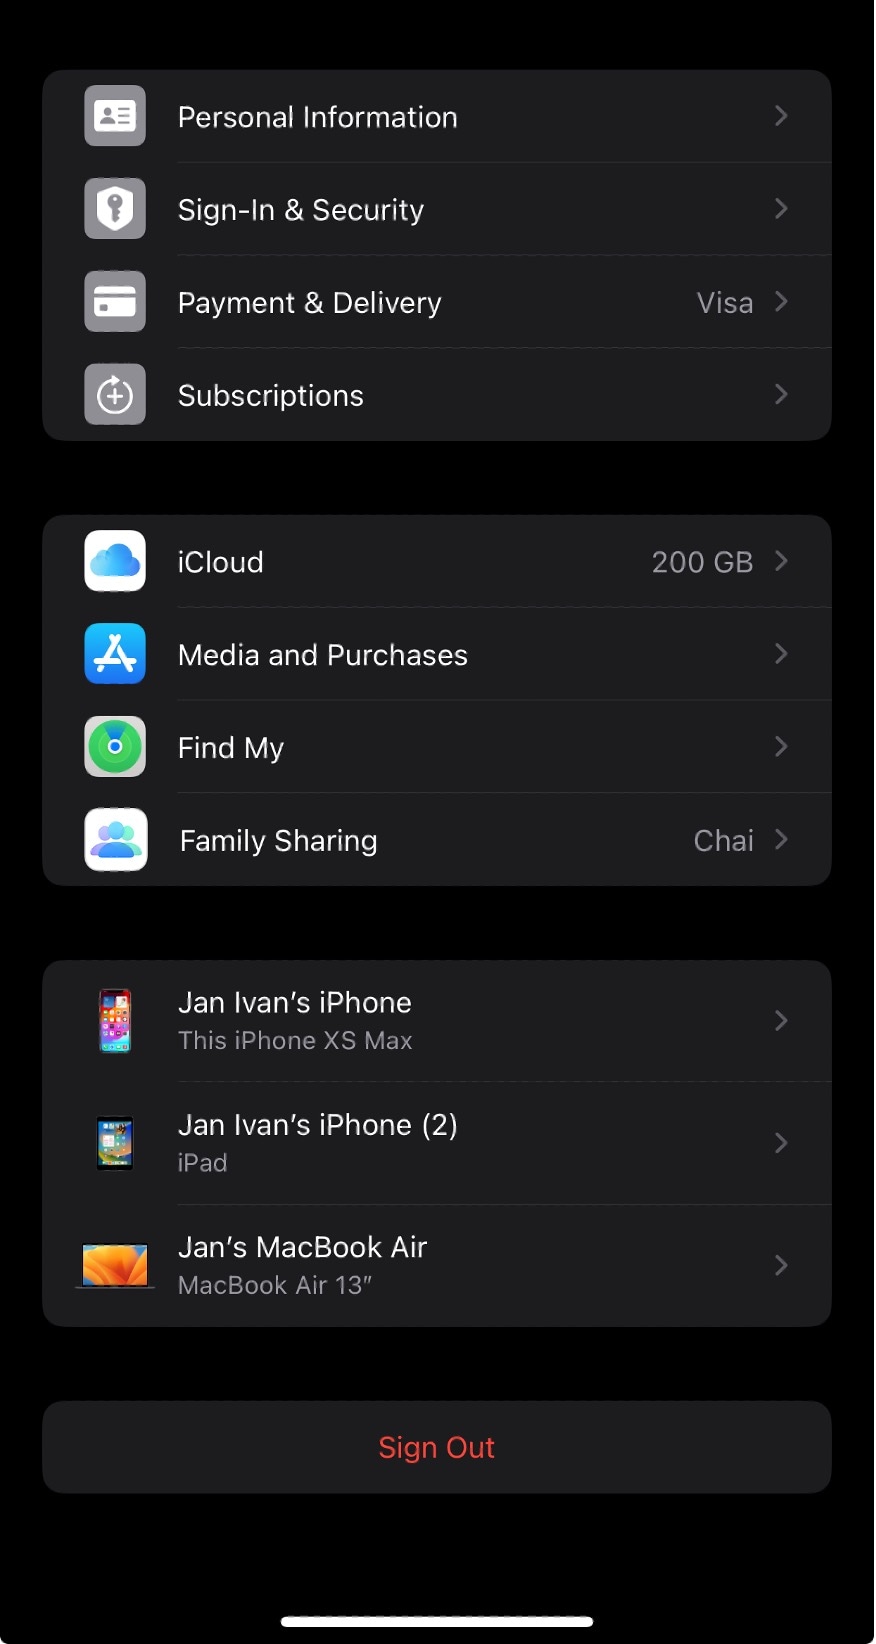
Next, scroll to the bottom of the screen and choose Sign Out.
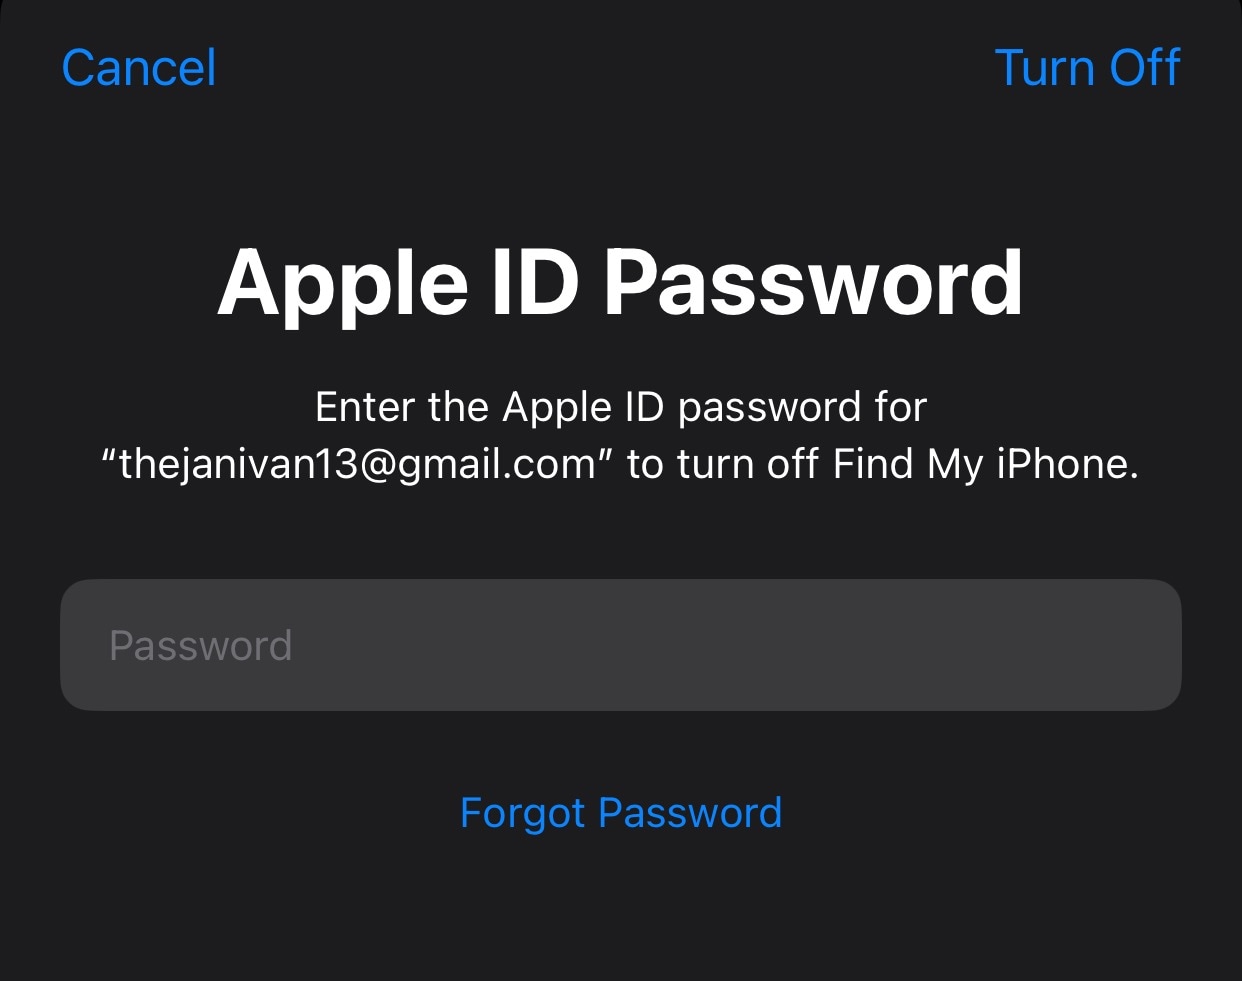
You’ll be asked to enter your Apple ID passcode and tap Turn Off.
Confirm by selecting the data you want to keep on your Apple iPhone 8 Plus.
Finally, tap Sign Out.
Step 2. Deactivating iMessage and FaceTime:
After signing out of your Apple ID, go back to
Scroll down to Messages and tap it.
Turn off iMessage by flipping the switch.
Go back to Settingsand tap FaceTime.
Turn off FaceTime by flipping the switch.

Step 3. Reformat the phone:
Return to
Scroll down and tap
Scroll down and select
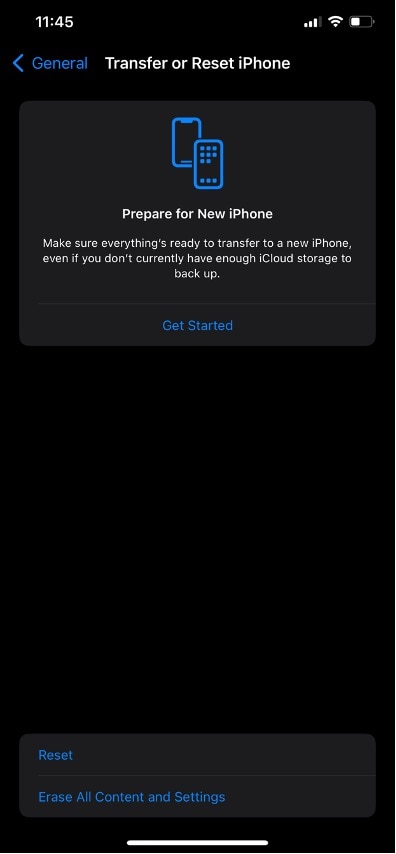
Choose Erase All Content and Settings.
Confirm this action. Your Apple iPhone 8 Plus will reset to its original state.
Following these steps, your Apple iPhone 8 Plus will be unlinked from your Apple ID and ready for a new user or any other purpose. Remember, this method is best when you can easily recall your Apple ID passcode.
Part 3. What To Do If You Forgot Your Apple ID Passcode
If you still need to remember your Apple ID Passcode, following the steps in the previous section would be unadvisable, as it will leave your Apple iPhone 8 Plus locked and inaccessible. In this case, recovering your Apple ID Passcode is essential before unlinking iPhones.
These are some ways to recover your Apple ID passcode:
Use the Forgot Your Password Option
Start by going to the Apple ID account page or using the “Forgot Your Apple ID or Password?” link on your Apple iPhone 8 Plus’s login screen. You must enter your Apple ID and follow the steps provided to reset your passcode. Apple will guide you through resetting your Apple ID passcode, often requiring you to verify your identity via email or other security questions.

Contact Apple Customer Service
If the above method doesn’t work or you’re facing difficulties, contacting Apple Customer Service is a good idea. They can assist you in recovering your Apple ID passcode and provide expert guidance.
After recovering your Apple ID Passcode, you can perform the steps outlined in the previous section to unlink your Apple iPhone 8 Plus normally. With your passcode in hand, the process becomes straightforward, allowing you to maintain control of your device while preparing it for a new user or another purpose. Remember, your Apple ID Passcode is a vital key to unlocking the full potential of your Apple iPhone 8 Plus, so it’s essential to keep it safe and secure.
Part 4. If You Can’t Recover Your Passcode: Wondershare Dr.Fone
If, for instance, you find yourself in a situation where you really can’t recover your Apple ID passcode, or perhaps you’ve reformatted your phone without unlinking your Apple ID, leaving it inaccessible, it’s time to turn to a trusted third-party tool to help you unlock and unlink your Apple ID from your Apple iPhone 8 Plus.
Wondershare Dr.Fone is a versatile and powerful phone management tool designed to assist you in various aspects of your iOS device. It offers a range of features to help you manage and troubleshoot your Apple iPhone 8 Plus, including data recovery, system repair, and device unlocking. It’s a user-friendly solution that caters to your needs when dealing with complex issues like opening your Apple iPhone 8 Plus from an Apple ID.

One of Dr.Fone’s standout features is the Screen Unlock feature. It is an invaluable tool when facing challenges like an inaccessible iPhone due to a forgotten Apple ID passcode or a device that has been reformatted without unlinking the Apple ID. With Dr.Fone – Screen Unlock, you can learn how to unpair iPhones from the previous Apple ID, ensuring you can use it effectively.
How To Unlink Apple ID With Wondershare Dr.Fone – Screen Unlock
Before anything, be warned that this method removes all data from an iPhone. Creating a backup of your phone before performing the steps below is best.
Step 1: Launch Dr.Fone. Click Toolbox and then select Screen Unlock (iOS).
Step 2: Click Remove Apple ID.

- Step 3: Connect your Apple iPhone 8 Plus to your computer. Click Unlock Now once you’ve confirmed its connection.

- Step 4: Click Yes on the screen lock verification page.

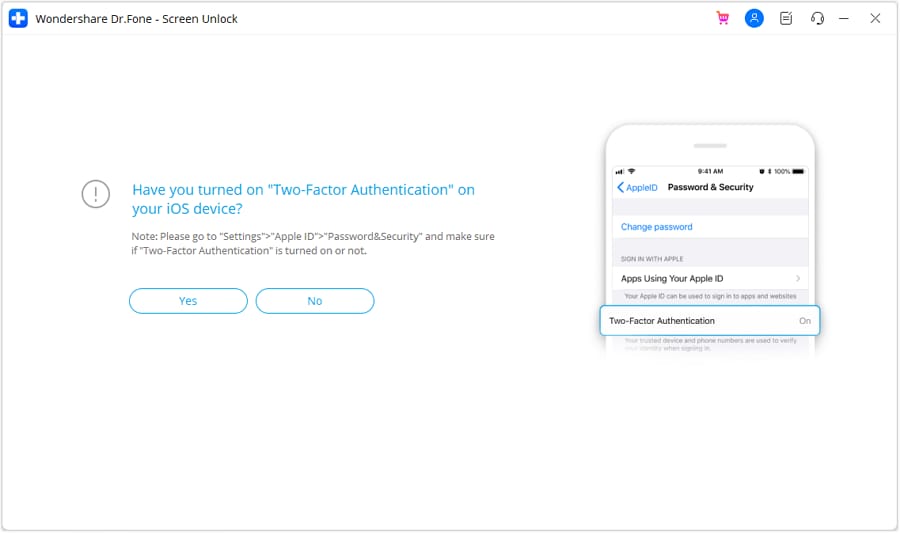
- Step 5: Click Yes on the Two-Factor Authentication verification page.
- Step 6: Follow the instructions to put your device into Recovery Mode. If they don’t work, click Try DFU Mode.

- Step 7: Verify your device details**.** Edit manually for any discrepancies. Click Start once done.

- Step 8: The firmware will start downloading. If it is slow, click Copy for a direct download link of the firmware.

- Step 9: Click Unlock Now once downloading is done.

- Step 10: Input the code “000000” on the appearing prompt and click Unlock.

- Step 11: Avoid any disconnection during the unlocking process.
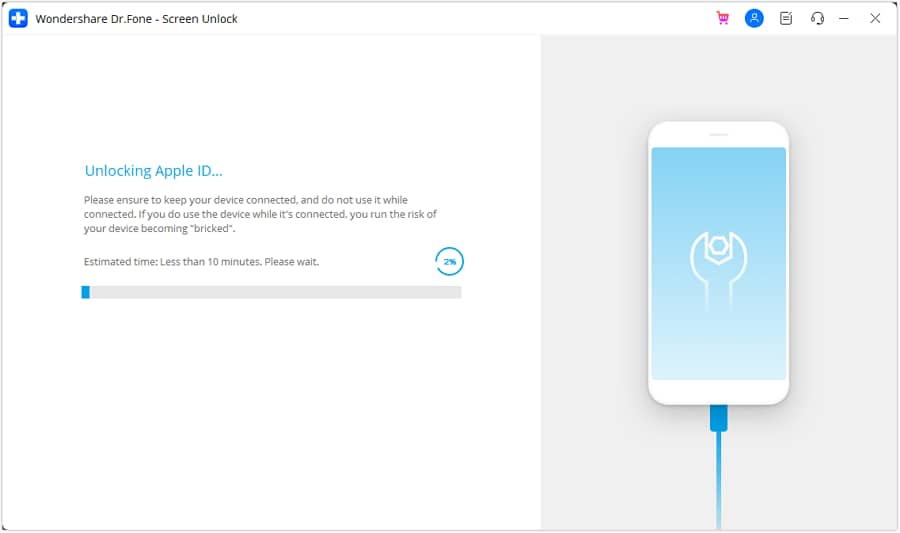
- Step 12: Click Done once you see this page. Click Try Again if the method does not work.

Conclusion
In summary, this guide has navigated you on how to unlink iPhones from their Apple ID, covering both the normal process and what to do when you’ve forgotten your passcode. However, the critical lesson here is remembering your Apple ID passcode to avoid unnecessary complications.
Should you ever find yourself locked out of your device, Wondershare Dr.Fone - Screen Unlock emerges as your go-to solution. The all-around phone management tool can rescue you from tricky situations and help you unlink your device effortlessly. Remember to keep your Apple ID passcode safe and handy, but know that Dr.Fone has your back when you need it.
How to Unlock Apple ID On your Apple iPhone 8 Plus without Security Questions?
Apple ID is known as a very strong security protocol that is consumed for the protection of the data and the applications of the Apple iPhone 8 Plus device it is associated with. This security measure is primarily responsible for holding the data and assorted applications of the Apple iPhone 8 Plus device. Thus, Apple ID can be regarded as a very ubiquitous protocol that promotes effortless protection and considers bringing the complete system in a single bubble. There are several instances where people report over their Apple ID for being locked. To counter this issue, this article provides you a detailed guide on how to unlock Apple ID without security questions and related barriers.
Part 1. A worry-free way to unlock Apple ID without security questions
You may have come across a series of different solutions that considered providing you efficient mechanisms to unlock your Apple ID without the aid of security questions. Over a detailed comparison, people have come across different third-party platforms that dedicated themselves to offering the users the perfect environment to have their devices unlocked. As you all are aware of the saturation that exists in the market, this article features Dr. Fone – Screen Unlock (iOS) , state-of-the-art software that efficiently resolves all problems related to a locked Apple device. There are several reasons that make it possible for users to prefer Dr. Fone above all other existing platforms.
- It helps you save your device from the disabled state.
- You can easily unlock your Apple iPhone 8 Plus or iPad over forgetting its passcode.
- It can operate across all kinds of iPhones, iPads, and iPod Touch.
- It is compatible across the latest versions of iOS.
- It provides you a platform to work without iTunes.
- There are no pre-eminent skills required for using the platform.
Over the question of utilizing the platform efficiently, the following guide explains to you how to unlock Apple ID without email or security questions with the help of Dr. Fone – Screen Unlock.
Step 1: Connect Devices and Access Tool
After downloading and installing the platform on your desktop, you need to connect your Apple device with the desktop and launch the software. Select the “Screen Unlock” tool from the list of options provided on the home window of the application.

Step 2: Initiate Unlock
On the next screen, you are required to select the option of “Unlock Apple ID” from the list and proceed. Open up your Apple device and “Trust” the computer with the provided prompt message.

Step 3: Reboot Phone
Approach the Settings of your device and initiate its reboot. As soon as the reboot starts, the procedure for unlocking the Apple ID initiates across the platform.

Step 4: Execution of the Process
As the process elapses successfully, you are provided with a prompt window on the desktop displaying the completion of the process.

Part 2. Unlock Apple ID with 2-factor authentication
There are multiple techniques that involve the method of unlocking an Apple ID without the aid of email addresses and security questions. As you all believe in the importance of third-party platforms, it is important to come across other mechanisms that can come quite handy in managing such issues. Two-factor authentication is another approach that can provide you robust and efficient solutions to this issue.
Step 1: Open the iForgot website and provide your Apple ID username to proceed. You need to provide the platform with the phone number that is associated with your Apple ID for verification.
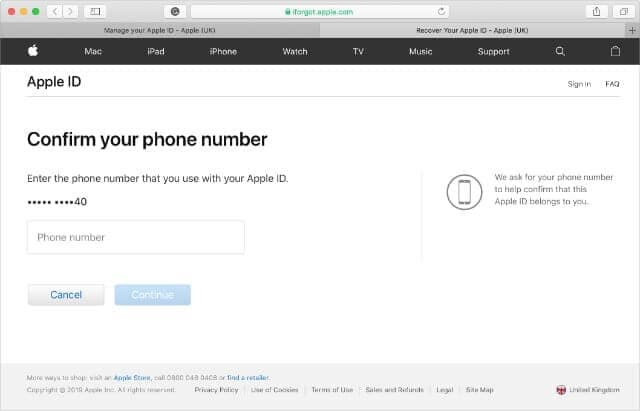
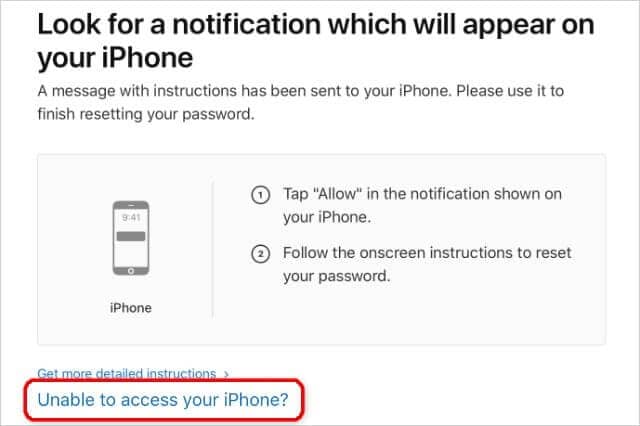
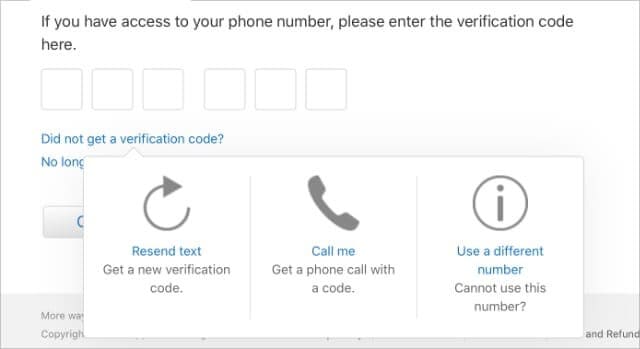
Step 2: Since you cannot use your Apple device or you have not received a notification yet, you need to tap on “Unable to access your [device]?” This would redirect a six-digit verification code to the phone number that you have provided.
Step 3: Add the code that is provided, followed by the Apple ID password, allowing you to unlock your device.
Part 3. Unlock Apple ID with the recovery key
While you understand the conventional methods that can be typically consumed for countering such issues, there are several other mechanisms that are associated across similar platforms and follow an identical protocol to cater to issues that involve unlocking Apple ID without security questions. Being an Apple user, you can efficiently unlock your Apple ID with the aid of a Recovery Key. For this, you need to follow the guidelines provided as follows.
Step 1: You are required to open the iForgot website on your browser. Initially, it is important for you to enter the Recovery Key that you utilized when enabling Two-Factor Authentication.
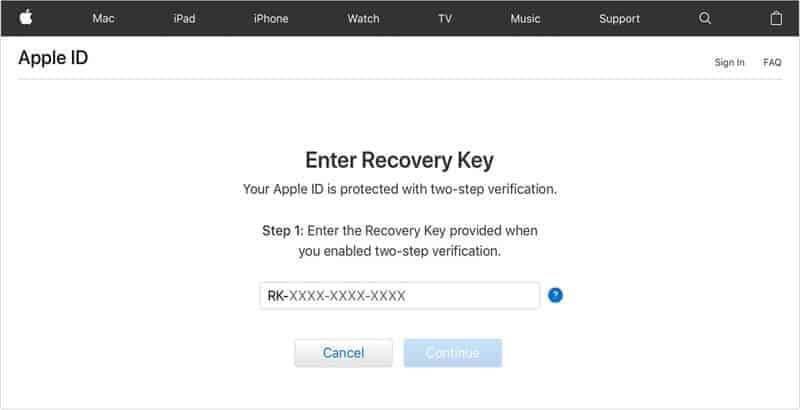
Step 2: Following this, you need to provide the platform with an Apple device to where you wish to send the verification code to.
Step 3: You need to retrieve the code from the Apple iPhone 8 Plus device that you selected and enter it over the website. The website would lead you to enter a new password for your device.
Part 4. How to reset security questions after forgetting the answers?
Security questions are referred to as the extra protective layer that is responsible for keeping a profile secure. In such cases where you accidentally forget the basic security questions and their answers, you can consider following a very simple procedure to have them restored. In such Apple devices where you have no certain idea about the forgotten security question, you can contact AppleCare in such circumstances and have the assist you in catering to this issue within a matter of minutes. Contact the iTunes Store Support and choose the option of Password & Security Questions to lead towards calling the support for the remedy of the issue.
Conclusion
The article considered discussing various reasons and remedies to unlocking an Apple ID without the aid of security questions. You need to look over the guide to develop an understanding of the systems that are involved.
Also read:
- [Updated] Strategic Approach to Dealing With YouTube Copyright Claims for 2024
- [Updated] TweetVid Puller IPhone App for Easy Video Extraction
- 15 Best Strongest Pokémon To Use in Pokémon GO PvP Leagues For Tecno Camon 20 Pro 5G | Dr.fone
- 2024 Approved Keeping Balance in the World of Immersive Virtuality
- Apple ID Locked or Disabled From Apple iPhone 14 Plus? 7 Mehtods You Cant-Miss
- CatchEmAll Celebrate National Pokémon Day with Virtual Location On Itel P55 | Dr.fone
- In 2024, 5 Easy Ways to Change Location on YouTube TV On Itel P40 | Dr.fone
- In 2024, Apple ID is Greyed Out On Apple iPhone 14 Plus How to Bypass?
- In 2024, Apple ID Locked for Security Reasons From Apple iPhone 14 Pro Max? Find the Best Solution Here
- In 2024, How To Delete iCloud Account Remove Your Apple ID Permanently On Apple iPhone 12 Pro
- In 2024, How To Remove Phone Number From Your Apple ID on Your Apple iPhone 6s Plus?
- In 2024, The Healing Power of ASMR Explained Here
- In 2024, Unlock Apple ID without Phone Number On Apple iPhone 14 Plus
- Title: In 2024, Detailed Guide on Removing Apple iPhone 8 Plus Activation Lock without Previous Owner?
- Author: Alma
- Created at : 2025-01-23 16:00:00
- Updated at : 2025-01-24 16:00:17
- Link: https://apple-account.techidaily.com/in-2024-detailed-guide-on-removing-apple-iphone-8-plus-activation-lock-without-previous-owner-by-drfone-ios/
- License: This work is licensed under CC BY-NC-SA 4.0.