
In 2024, Forgot Your Apple ID Password and Email From iPhone 8 Plus? Heres the Best Fixes
Forgot Your Apple ID Password and Email On Apple iPhone 8 Plus? Here’s the Best Fixes
For Apple users, the Apple ID stands as the gateway to its services. It connects users to a universe of innovative apps, music, and more. So, I forgot my Apple ID password, and email is not a situation many Apple users want to be in. However, the moment of forgetting the Apple ID password and email can turn into a nightmare.
It can leave users worried and locked out of their cherished accounts. That’s why the need for swift and effective solutions to regain access to Apple ID accounts has become vital. In this comprehensive guide, we unveil the best solutions available. The aim is to empower users to regain control over their Apple system.
Way 1: Reset Apple ID Password From The Settings [Immediate Solution]
One of the quickest remedies for a misplaced Apple ID password involves starting the password reset procedure. This can be conveniently carried out from the settings on your iOS device or Mac. This approach offers a rapid and convenient pathway to regain entry to your Apple ID. To reset your Apple ID password on Mac and iOS devices, please adhere to the steps provided below:
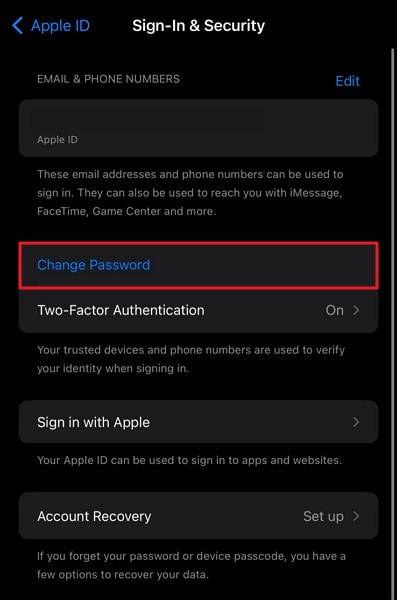
For iOS Devices
- Step 1. Locate and launch the Settings app on your iDevice by swiping left and right through the installed apps. After entering, select your name and proceed to tap “Sign-In & Security” in the subsequent window.
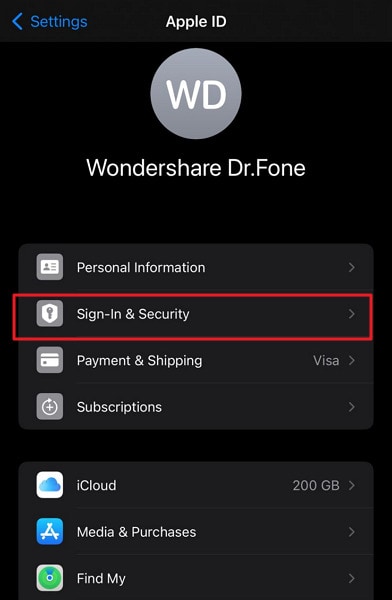
- Step 2. Opt for “Change Password,” input your current iDevice password, and enter your new Apple ID password. Confirm the new password and finalize the process by tapping “Change Password.”
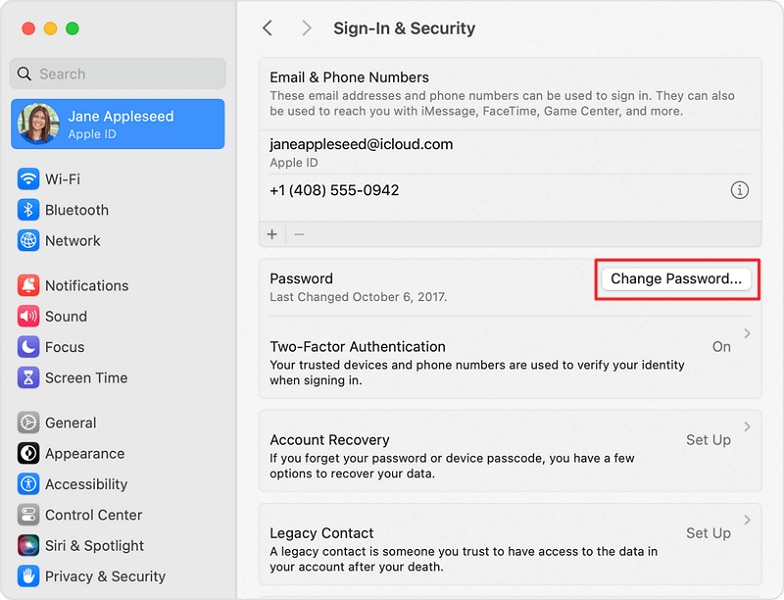
For MacBook
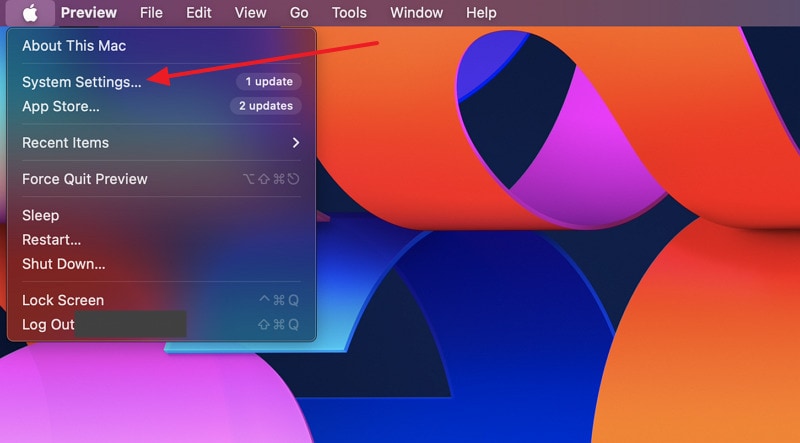
- Step 1. Navigate to the top left corner of your Mac and select the Apple logo. From the dropdown menu, choose “System Settings.” Inside “System Settings,” click on your name and select “Sign-in & Security.”

- Step 2. Within the “Sign-In & Security” tab, locate “Password” and click on “Change Password.” Enter your Mac passcode and follow the on-screen instructions to reset your Apple ID password.
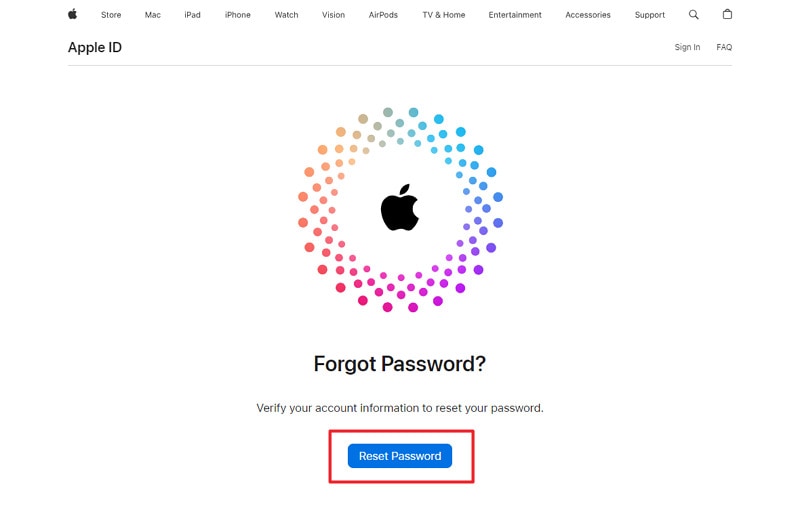
Way 2: Reset Apple ID Password From Website
Have resetting the Apple ID password from the settings on your iOS device or Mac proved unsuccessful? An alternative approach lies in using the official Apple “iForgot” website. This online solution functions as a dependable platform. It enables users to recover access to their Apple ID while ensuring password resets are conducted securely. The following steps outline the process:
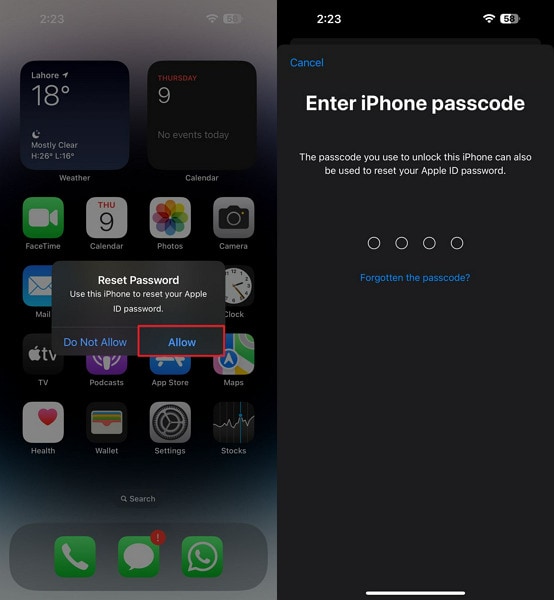
- Step 1. To begin, launch a web browser and navigate to iforgot.apple.com. Afterward, opt for the “Reset Password” option, leading you to the page dedicated to changing your Apple ID password. Provide your Apple ID, usually the email address linked to your Apple account, and proceed by clicking “Continue.”
- Step 2. You will receive a confirmation code on one of your trusted Apple devices by proceeding to the next screen. Tap “Allow” on the confirmation pop-up, and you will be redirected to enter your trusted Apple device passcode. This will allow you to set a new password for your Apple ID.
Way 3: Reset Apple ID Password Using the Apple Support App
The official Apple Support app is another way to reset your Apple ID password. It is a blessing in disguise for those who don’t have access to trusted devices or recovery email/phone numbers. This method can be easily accessed from another iOS device. Below are the necessary procedures you must follow to reset your Apple ID password with email using the Apple Support app:
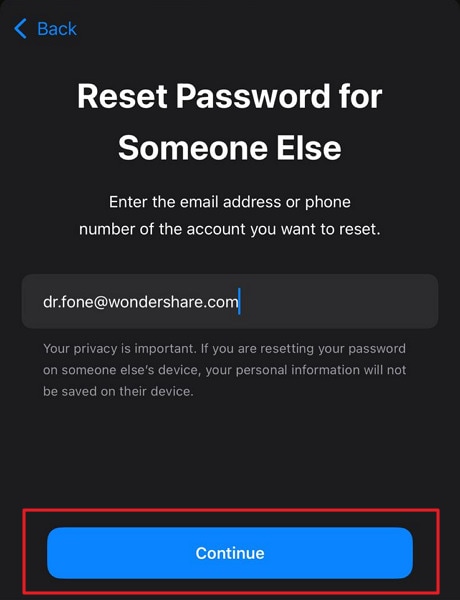
- Step 1. Start by accessing an iOS device, then continue by installing Apple’s official Support App. After installation, launch the application and navigate to the “Support Tools” category. Find the “Reset Password” option and click on it to commence the password reset process.
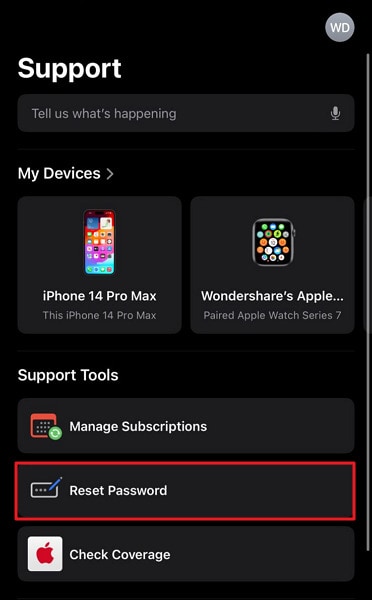
- Step 2. When it comes to selecting the Apple ID, tap “Help Someone Else.” Then, enter your Apple ID, press “Continue,” and follow the on-screen instructions to complete the process.
Way 4: Reset Apple ID Password Using Account Recovery Contact
You are in luck if you have added an account recovery contact before losing your Apple ID password. To guarantee that you never face lockouts on your Apple ID or devices, Apple permits the addition of up to 5 recovery contacts. Simply contact your account recovery contact for assistance. Here are the steps they can follow to aid you:
On iOS Devices
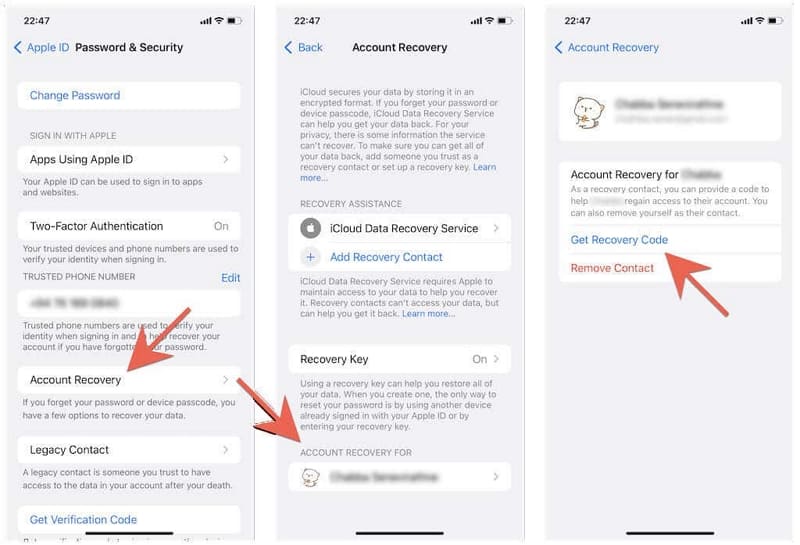
- Step 1: You can begin by accessing the iOS device’s Settings and tapping the Apple ID. On the following screen, press “Sign-In & Security” and go on to “Account Recovery.”

- Step 2: Here, press the account’s name that has added them as recovery contact. Press “Get Recovery Code” on the following screen and share it with the person who needs to regain access to his devices.
On Mac
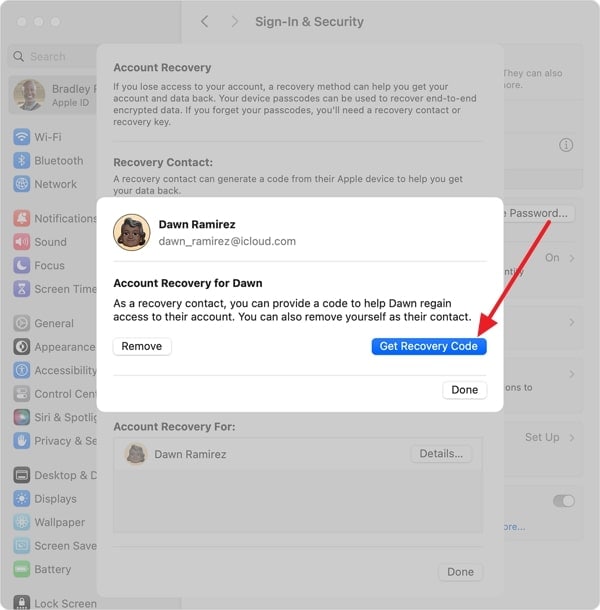
- Step 1: Start by accessing “System Settings” using the Finder and click on your name from the top left corner. Following this, access the “Sign-In & Security” settings and tap “Account Recovery.”
- Step 2: Select the contact who has asked you for help recovering their account. Then, tap “Get Recovery Code” to receive a code that you need to share with the targeted person.
Way 5: Reset Apple ID Password Through Requesting Account Recovery
Did all previous methods fail to yield the desired outcome? You can request an account recovery through the official Apple iForgot website. This process facilitates a comprehensive account recovery procedure. It enables users to regain access to their Apple ID account with the help of Apple’s support team.
All you need to do is contact Apple support and request resetting your Apple ID password. It usually takes up to 72 hours for this process to complete. To make it quicker, you should avoid using the Apple iPhone 8 Plus device from where you made the request. Similarly, power off all devices where the targeted Apple ID is logged in.
You can further shorten the process by using the verification code sent to your primary email. As far as the progress of the procedure is concerned, you can view it on the iForgot website by adding your Apple ID.
Way 6: Make Apple ID Account Recovery Easy With Wondershare Dr.Fone
If you have been trying all the solutions and the Apple ID account has not yet recovered, then you need a more solid solution. Your Apple ID is the main aspect of your Apple devices to get your operations done smoothly. Without having access to it, you will be unable to utilize the services of the App Store, iCloud, and others.
That’s why it’s necessary to recover your Apple ID as soon as possible. Wondershare Dr.Fone provides a robust feature to unlock your Apple ID and resolve this problem permanently. This software can also bypass your Screen Time Passcode if you have forgotten your password. You will be able to use your Apple ID effectively after using this iOS screen unlock toolkit.
Key Features of Wondershare Dr.Fone
Dr.Fone - Screen Unlock (iOS)
Unlock iPhone/iPad Lock Screen Without Hassle.
- Simple, click-through, process.
- Unlock screen passwords from all iPhone and iPad.
- No tech knowledge required, everybody can handle it.
- Supports the latest iOS version fully!


4,395,216 people have downloaded it
- Wondershare Dr.Fone facilitates the Apple ID unlock process even for iOS 17 and iPadOS 17 users.
- Users can utilize the software’s advanced algorithms to remove the iTunes backup encryption without corrupting anything.
- It also permits users to unlock their iDevices screens, thereby restoring access to their iOS devices.
Steps Involved To Make Apple ID Account Recovery With Wondershare Dr.Fone
Its simple interface is specially designed to assist the users in implementing the essential steps regarding the Apple ID recovery process. Here is how to make the Apple ID account recovery with Wondershare Dr.Fone:
- Step 1: Choose the Remove Apple ID Tool
At first, you will have to launch Wondershare Dr.Fone on your system and access the “Toolbox” tab on the left side. Different options will appear in front of you, from which select the “Screen Unlock” tool and confirm the Apple iPhone 8 Plus device OS as “iOS.” After that, you need to choose the option of “Remove Apple ID” and connect your Apple iPhone 8 Plus to the computer.

- Step 2: Get Your Apple iPhone 8 Plus into the Recovery Mode
In the next step, proceed with unlocking your Apple iPhone 8 Plus and selecting the “Trust” option for system authentication. After doing this, you need to press the “Unlock Now” icon and follow the on-screen instructions to confirm the status of Screen Lock and Two-Factor Authentication. Next, you will be required to enable Recovery Mode on your iDevice.

- Step 3: Finalize the Apple ID Unlocking Process
When your Apple iPhone 8 Plus has entered Recovery Mode, Wondershare Dr.Fone will detect the model of your iDevice and choose the “System Version” for downloading the required iOS firmware. After verifying the iOS firmware, press the “Unlock Now” button and give the confirmation to initiate the unlock process of Apple ID.

Conclusion
In summary, the Apple ID serves as the fundamental key to unlocking a world of apps and services. Yet, the experience of forgetting the Apple ID password and email can be frustrating as it restricts users’ access to their cherished accounts and services. Throughout this guide, we have explored a range of solutions on how to retrieve the Apple ID.
It ensures that users regain control over their accounts within the Apple ecosystem. Furthermore, for more intricate and robust solutions, Wondershare Dr.Fone stands as the best choice. It offers a dedicated Unlock Apple ID feature. This presents an invaluable help to resolve Apple ID-related issues swiftly.
How To Unlink Apple ID From Apple iPhone 8 Plus
Apple devices are now an essential part of our daily lives. They provide access to a variety of services and apps. But there may come a time when you need to unlink your Apple ID from your device. It could be because you’re giving away or selling your device or facing device limits or download issues.
Either way, understanding how to do it is essential for maintaining control over one’s digital footprint. This article will walk you through the step-by-step process of how to unlink Apple ID from iPhone devices and Apple Watch. We’ll provide clear and concise instructions for every scenario, whether you have your Apple ID password, have lost or forgotten it, or are dealing with a lost device.

Part 1: How To Unlink Apple ID From Connected Devices With Password
Keeping track of where your Apple ID is being used is essential for maintaining control over your digital identity. Fortunately, using your Apple iPhone 8 Plus or Mac, you can easily identify all the Apple iPhone 8 Plus devices currently linked to your Apple ID. It is helpful for those who have shared their Apple ID with others or suspect unauthorized access.
Removing a device from your Apple ID with two-factor authentication activated will turn off verification code delivery on that device. Also, the Apple iPhone 8 Plus device will no longer be able to access iCloud content, such as your photos, contacts, and calendar.
How To Unlink Apple ID From iPhone?
Before you unlink an iPhone from Apple ID, it’s also essential to identify all the Apple iPhone 8 Plus devices currently signed in with your account. This crucial step ensures you don’t inadvertently lock yourself out of your Apple ID on other devices.
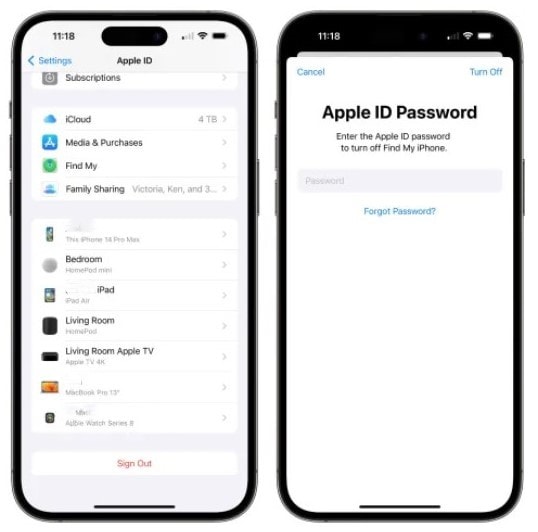
Step 1: Open the Settings app on your Apple iPhone 8 Plus.
Step 2: Tap on [your name] at the top of the screen and scroll down.
Step 3: Unpair an iPhone from Apple ID in two ways:
Tap Sign Out, then enter your Apple ID password. Next, tap Sign Out Tap Delete Apple IDfrom Apple iPhone 8 Plus to verify that you want to remove your Apple ID from the Apple iPhone 8 Plus you are currently using.
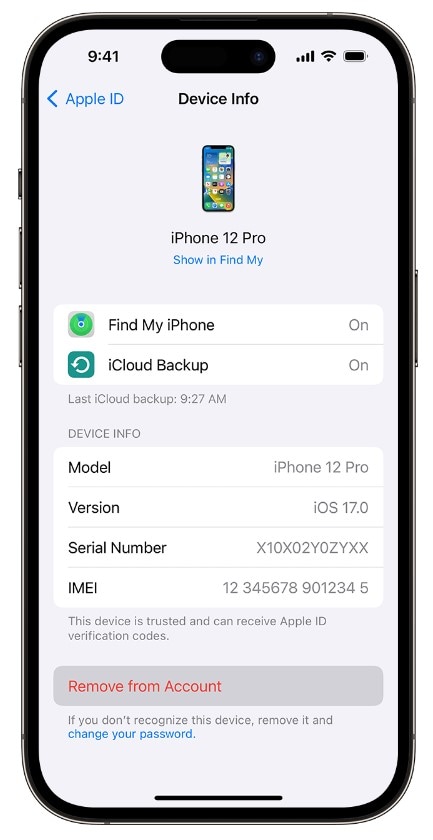
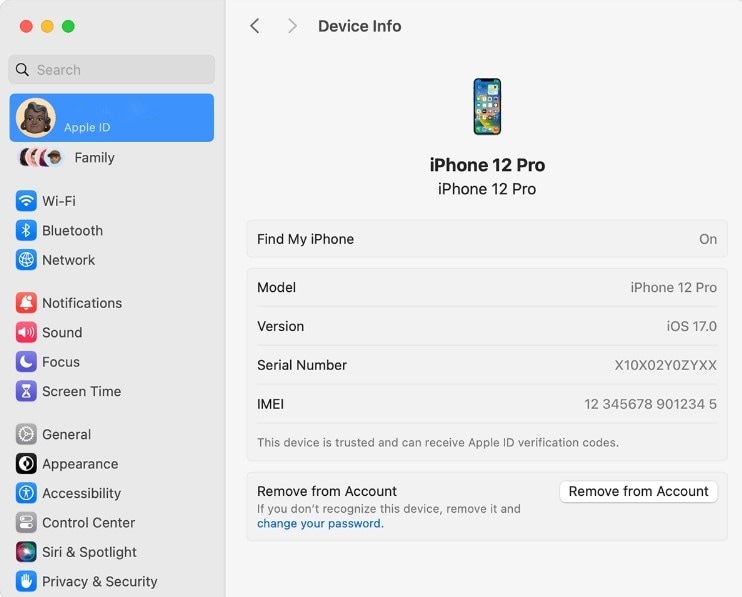
- Tap on any device name to see its details. If it is the one you trust, you can use it to receive Apple ID verification codes. Then, tap Remove from Account.
How To Unlink Apple ID Settings From Mac?
Follow these steps below to use your macOS to remove the connected devices from your Apple ID.
Step 1: Go to the Apple menu in the top left corner of the Apple iPhone 8 Plus device’s screen.
Step 2: Select System Settings or System Preferences, depending on the Apple iPhone 8 Plus device.
Step 3: Click [your name] or Apple ID for macOS Monterey or earlier.
Step 4: Scroll down and unpair the Apple ID on your Mac in two ways:
Click Sign Outto remove your Apple ID on the desktop you are currently using.
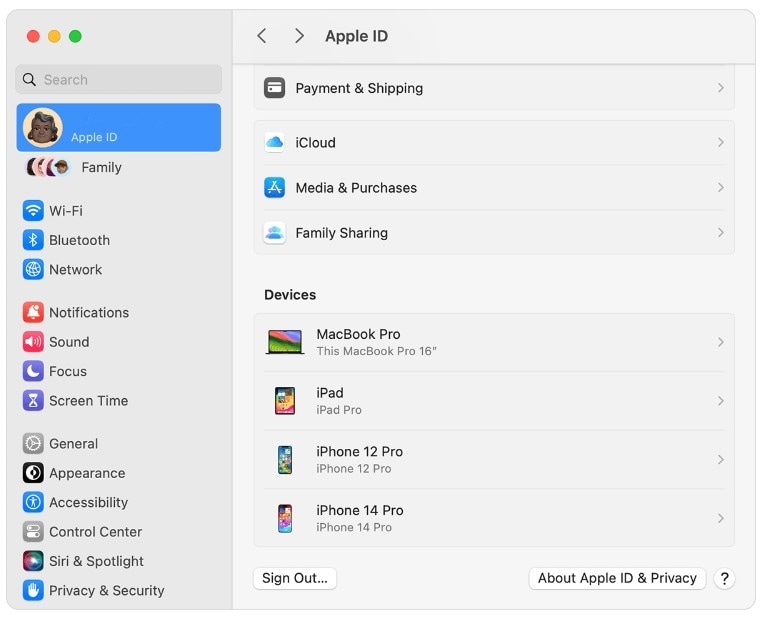
- From the Devicessection, click the connected device you want to unlink. Click Remove from Account.
Part 2: How To Unlink Apple ID From iOS Devices Without a Password?
In the previous section, we’ve explored the standard method to remove an Apple ID from an iPhone, which requires the Apple ID password. However, what if you’ve forgotten your Apple iPhone 8 Plus’s passcode or don’t have the Apple ID password? In such situations, Wondershare Dr.Fone - Screen Unlock can help you unpair your Apple ID on iOS devices without hassle. Even without an Apple ID password, Dr.Fone can help you:
- Bypass the Activation Lock
- Unpair Apple ID and erase the iPhone’s content, even if the Find My feature is enabled
- Remove the iOS lock screen
The tool guides you through the process, ensuring a seamless experience with a user-friendly interface and intuitive design. Let’s delve into the step-by-step guide to discover how to unlink Apple ID from iPhone devices using Dr. Fone’s - Screen Unlock tool.
Step 1: Download, set up, then launch Dr.Fone on your desktop. Use a USB cable to establish a connection between your Apple iPhone 8 Plus and desktop.
Step 2: From the Toolbox homepage, select Screen Unlock and choose iOS.

- Step 3: Select Remove AppleID to unpair the existing Apple ID from your Apple iPhone 8 Plus without an Apple ID password.
- Step 4: Click Unlock Now to continue.

- Step 5: Click Yes to confirm you have a screen lock on your Apple iPhone 8 Plus.

- Step 6: Click Yes to confirm you have enabled the two-factor authentication on your Apple iPhone 8 Plus.

- Step 7: Follow the steps on the screen to put your Apple iPhone 8 Plus into Recovery Mode. If you are having trouble, click DFU Mode in the bottom left corner.
- Step 8: Select an option in the System Version drop-down menu and click Start.

- Step 9: Wait while the respective iOS firmware downloads. Alternatively, click Copy to do it yourself.

- Step 10: Once the firmware is ready, click Unlock Now.
- Step 11: Read the note in the dialogue box and enter the code in the confirmation box. Then, click Unlock to continue.

- Step 12: Wait while the app is unlocking the Apple ID. Refrain from using your device while connected to your desktop.

- Step 13: Click Done, then check your Apple iPhone 8 Plus to see if the Apple ID has been removed.

Part 3: How To Unlink iPhone From Apple ID if the Apple iPhone 8 Plus device Was Lost?
You already know the methods to unlink iPhone from Apple ID, both with and without a password, assuming the Apple iPhone 8 Plus device is accessible. However, what if your Apple iPhone 8 Plus or Apple Watch is lost, stolen, or you already gave away? Fortunately, there’s still a way to unpair your Apple ID from your iOS device.
Unlink iPhone From Apple ID Remotely
Follow these steps and explore how to unlink Apple ID from iPhone and other iOS devices online:
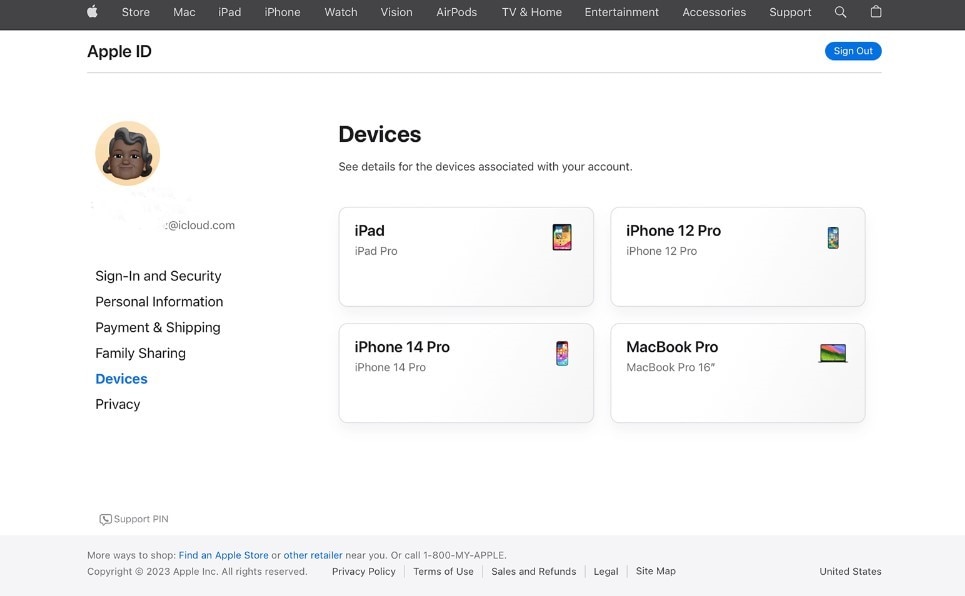
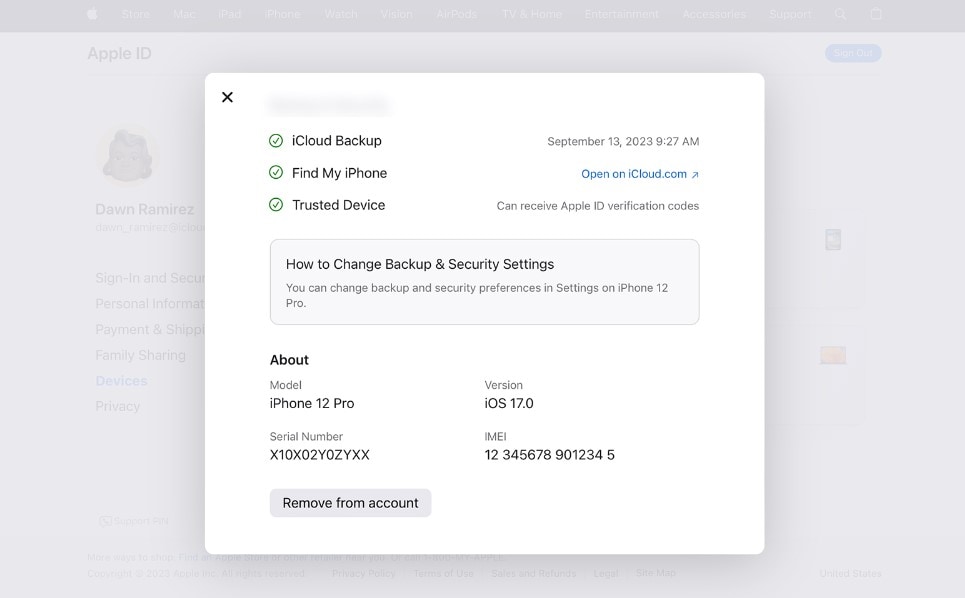
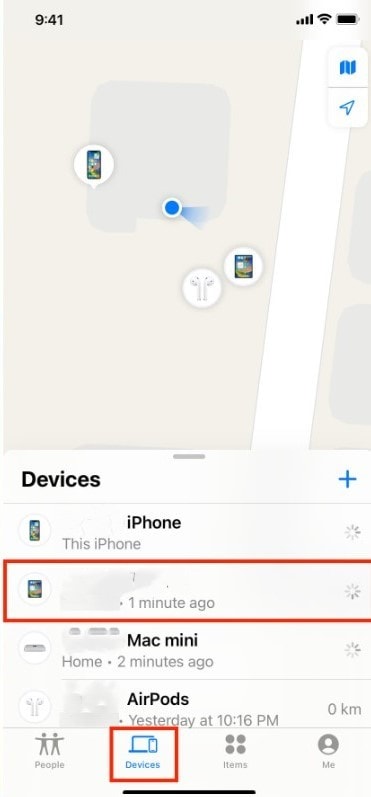
- Step 1: Navigate to appleid.apple.com on a web browser.
- Step 2: Click Devices on the right-side navigation pane.
- Step 3: Choose your iOS device from the list in the Devices section.
- Step 4: Click Remove from account and click Remove again to confirm.
Unlink iPhone From Apple ID Using the Find My App
Here is how to unpair your Apple ID on a device you sold or gave away via the Find My app.
- Step 1: Open the Find My app and go to the Devices tab at the lower navigation pane. Next, select the name of your Apple iPhone 8 Plus you want to unpair.
- Step 2: Tap Erase This Device, then tap Continue.

Note:
Indicate if the Apple iPhone 8 Plus device was stolen.
- Step 3: Tap Erase, enter your Apple ID password, and then tap Erase again.
Bonus Part: How To Unlink Apple Watch From Apple ID?
There are several reasons to unpair an Apple Watch from an Apple ID. Perhaps you’re selling or giving away your Apple Watch or trading it in for a new one. Or maybe you only want to remove your Apple Watch from your Apple ID altogether.
No matter what your reason, removing an Apple Watch from an Apple ID is a simple process. Here, we’ll walk you through the steps to restore your Apple Watch to its factory settings.
How To Unlink Apple Watch From Apple ID if You Have Your Apple iPhone 8 Plus?
Follow the unpairing process on the paired Apple iPhone 8 Plus to remove the Activation Lock and erase your Apple Watch’s content and settings.
- Step 1: Check to ensure your Apple Watch and iPhone are close.
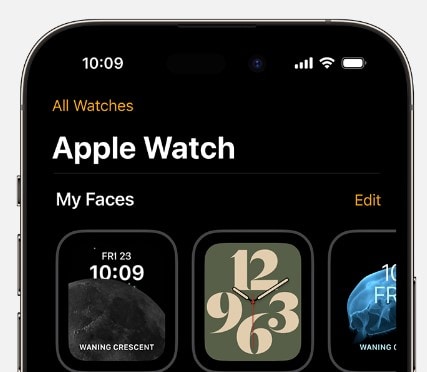
- Step 2: Launch the Watch application on your Apple iPhone 8 Plus and go to the My Watch tab.
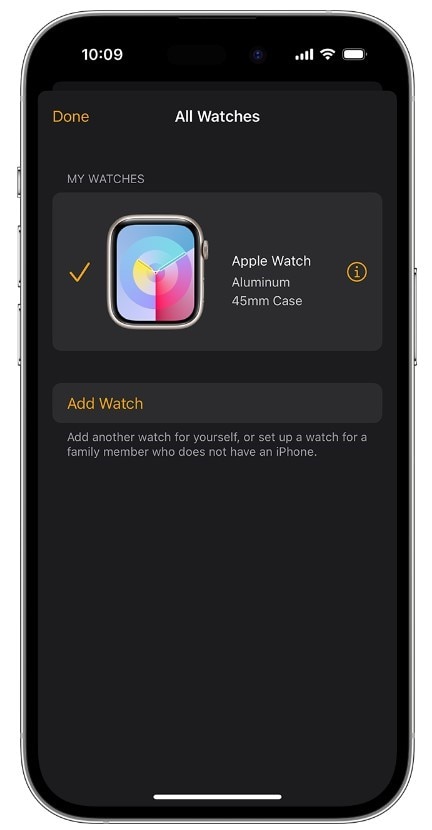
- Step 3: Tap All Watches in the upper left corner.
- Step 4: Locate and tap the information icon adjacent to the name of your Apple Watch.
- Step 5: Tap Unpair Apple Watch, then tap Unpair Apple Watch.
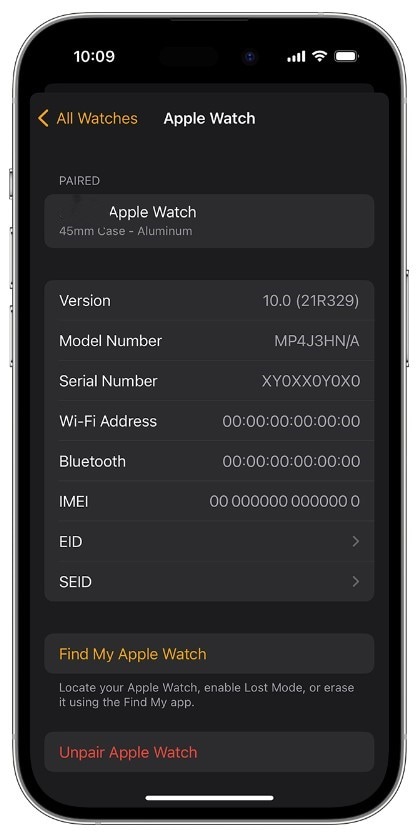
- Step 6: If you have a cellular Apple Watch, tap Remove Cellular Plan, and remember to reach your carrier to cancel your subscription.
- Step 7: Provide your Apple ID password to deactivate the Activation Lock.
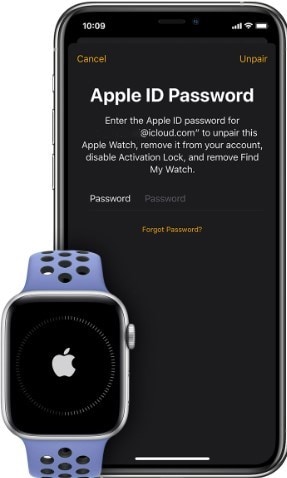
- Step 8: Tap Unpair to confirm your action.
How To Unlink Apple Watch From Apple ID Without Your Apple iPhone 8 Plus?
You can erase your Apple Watch without the paired iPhone, but the Activation Lock will still be active. But, if you give away your Apple Watch without turning off the Activation Lock, the person you give it to cannot use it. They’ll have to enter your Apple ID and password to turn off the Activation Lock and use it with a new iPhone.
- Step 1: Open the Settings app on your Apple Watch.
- Step 2: Go to General > Reset, tap Erase All Content and Settings. Then, enter your password, if needed.
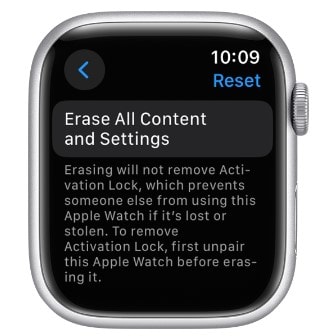
- Step 3: Tap Erase All to restore your Apple Watch to its factory settings.
Conclusion
There are several ways to unlink your Apple ID from your Apple iPhone 8 Plus or iPad. The best way to do it depends on your situation and available iOS device. Whichever your reason is, understanding how to unlink Apple ID from iPhone and other iOS devices is crucial.
If you unfortunately encounter any challenges during the process, you can seek assistance from Apple Support. Consider using Dr.Fone for a quick and easy solution, which can unlink your Apple iPhone 8 Plus from your Apple ID within minutes, even without an Apple ID password.
How To Fix Apple ID Verification Code Not Working On Apple iPhone 8 Plus
In smartphones, the Apple ID stands out as a cornerstone of security for iPhone users and the broader iOS ecosystem. Its robust verification features are a key reason why many people choose iPhones. Thus, its heightened security is highly valued. However, even extremely reliable systems can encounter hiccups.
Sometimes, you might need help with the issue of the Apple ID verification code not working. This leads to frustration, especially if you need to remember your Apple iPhone 8 Plus ID details. This 2024 guide will delve into practical solutions to fix issues with Apple ID verification codes, helping you regain access to Apple ID and peace of mind.

Part 1: When Does the Apple Verification ID Failed Prompt Appear?
Before diving into solutions, it’s essential to understand the various scenarios that can trigger the “Apple Verification ID Failed” prompt. Recognizing the cause of the problem is the first step toward the right fix. Let’s explore the common reasons you might encounter this issue:
Wrong Password Input
One of the most straightforward reasons for a failed verification is entering the wrong password. This could be a simple typing error or misremembering your password. Repeated wrong attempts can also lead to your account being temporarily disabled as a security measure.
Apple Server Issues
At times, the problem may not be on your end. Apple’s servers can experience downtime or technical glitches like any other online service. During such instances, verification processes might fail, as the server cannot authenticate your credentials.

Slow Internet or Intermittent Connection
A stable and reliable internet connection is improtant for the verification process. If your internet is slow or experiencing intermittent connectivity, it can disrupt the communication between your device and Apple’s servers, leading to verification failure.
Two-Factor Authentication (2FA) Issues
Apple’s two-factor authentication provides an extra layer of security. However, it can also be a source of problems. If there’s a delay in receiving the 2FA code or if 2FA fails to work, you won’t be able to complete the verification process. This could be due to network issues or, sometimes, glitches within the 2FA system itself.
Suspicious Activity
Apple takes your security seriously. If there’s any unusual activity detected on your account, such as login attempts from unfamiliar locations or devices, Apple might lock your account as a precaution. This can trigger the verification failed prompt as the system seeks to protect your account from potential unauthorized access.
By understanding these scenarios, you can diagnose better why you’re facing the issue of Apple verification ID not working. In the following sections, we will explore solutions tailored to these specific problems, helping you regain access to your account efficiently.
Part 2: How To Fix Apple ID Verification Failed
Encountering an “Apple ID Verification Failed” error can be frustrating. Here are some practical solutions that correspond to the common reasons for this issue. These steps should help you regain access to your Apple ID.
Method 1: Connecting to a Stabler Internet Connection
A stable internet connection is crucial. If you’re encountering issues, switch to a more reliable Wi-Fi network. Alternatively, toggling your Wi-Fi or mobile data off and back on can refresh your connection.
Method 2: Changing Password/2FA Device Using Apple ID Account
If you’re facing troubles due to password errors or 2FA issues, resetting your password or updating 2FA settings may help. Visit Settings > Apple ID account page > Sign In & Security and follow the instructions to Change Password or update your Two-Factor Authentication settings.

Method 3: Check iPhone’s Date & Time Settings
Incorrect date and time settings can influence Apple ID verification. Go to Settings, select General, and tap on Date & Time. Ensure Set Automatically is enabled, allowing your Apple iPhone 8 Plus to adjust these settings according to your time zone.

Method 4: Signing Out/In Your Apple ID
Sometimes, simply signing out and back into your Apple ID can resolve verification issues. Navigate to Settings, tap your name at the top, scroll down, and select Sign Out. After signing out, sign back in and check if the issue persists.
Method 5: Disabling VPN
If you’re using a VPN, it can sometimes cause issues with Apple ID verification. Try disabling your VPN from the Settings or the VPN app you’re using, and then attempt the verification process again.
Method 6: Updating to the Latest iOS
Running an outdated iOS version can cause compatibility issues. Go to Settings, select General, and tap on Software Update. If an update is available, download and install it to ensure your device is up-to-date.
Method 7: Checking Apple Server Status and Trying Again Later
Sometimes, the problem is on Apple’s end. Check the Apple System Status page to see if there are any issues with their servers. If there are, it’s best to wait and try the verification process later.
By following these methods, you should be able to resolve the “Apple ID Verification Failed” issue and regain full access to your Apple ID functionalities.
Part 3: How To Remove Apple ID Account From iOS Device
If the above fixes have proven unsuccessful, it might be time to consider removing the Apple ID directly from your device using a third-party tool. This can often resolve the failed verification of Apple ID on new or old phones when other methods fail.
Thankfully, Wondershare Dr.Fone offers a solution with its Screen Unlock (iOS) feature, which includes a Remove Apple ID/iCloud account removal function. It’s a very handy tool for reviewing verification requirements, especially when you forget your Apple ID credentials.
Removing Apple ID Account With Dr.Fone - Screen Unlock (iOS)
Here’s how to use powerful Dr.Fone’s - Screen Unlock (iOS) to remove Apple ID.
Step 1: Download, install, and launch Wondershare Dr.Fone.
Step 2: Go to Toolbox > Screen Unlock > iOS.
- Step 3: Select Remove Apple ID to proceed.
- Step 4: Choose Unlock Now once the connectivity status is confirmed.
- Step 5: Ensure you have a screen lock and the two-factor authentication enabled. Follow the on-screen instructions.
- Step 6: Put your device into Recovery Mode or DFU Mode by following the on-screen instructions. Then, confirm the correct system version of your device.
- Step 7: Wait for the download to finish on your software.
- Step 8: After the firmware is confirmed, click Unlock Now. Then, type in “000000” on the appearing text box and click Unlock.
- Step 9: After the process is completed, click Done. If it still doesn’t work, then click Try again.
Conclusion
Navigating the Apple ID Verification Code not working issue can be a source of significant frustration. This guide aimed to alleviate that by detailing common triggers, such as password errors, server issues, and connectivity problems, and providing targeted solutions like ensuring stable internet, updating iOS, and checking server status.
For those rare instances where conventional methods fall short, Dr.Fone emerges as a reliable ally. Its Screen Unlock feature effectively addresses Apple ID-related hurdles. Whether you’re grappling with verification failures or other phone-related challenges, Dr.Fone - Screen Unlock (iOS) stands out as a dependable tool, ready to assist in simplifying your digital life.
Tips: Are you searching for a powerful Screen Unlock tool? No worries as Dr.Fone is here to help you. Download it and start a seamless unlock experience!
Also read:
- [New] Avoiding YouTube Copyright Claims Understanding the Rules
- [New] In 2024, Unveiling the Secrets to Effective Video Capturing with VSDC & Others
- [New] Unlocking the Potential of Slug Line Formats in Screenplays
- [Updated] Crafting Hashtags that Capture Attention and Drive Engagement on FB for 2024
- 1. Can You Safely Charge Your iPhone While Driving? Top Picks & Reviews for the Best Car Chargers Based on Rigorous Testing - ZDNet
- All You Need to Know About the New Tesla Robotaxi – Price Speculations and Debut Date
- Expert Tips for Superior 4K Visual Quality with Gear
- How to Change Credit Card from Your iPhone SE Apple ID and Apple Pay
- How to Reset Apple ID and Apple Password From Apple iPhone 14 Pro
- In 2024, Apple ID Unlock On iPhone 14 Pro? How to Fix it?
- In 2024, Can I Remove the Apple Watch Activation Lock By Apple iPhone X without the Previous Owner?
- In 2024, How to Fix when Apple Account Locked From iPhone 6s Plus?
- In 2024, How to Fix when Apple Account Locked On Apple iPhone 12 Pro Max?
- In 2024, How to Remove iPhone 15 Pro Device from iCloud
- In 2024, Turning Off Two Factor Authentication From iPhone 12 mini? 5 Tips You Must Know
- In 2024, Will iSpoofer update On Apple iPhone 12 Pro Max | Dr.fone
- The Ultimate Amazon Prime Series Most Liked & Watched on Twitter for 2024
- Turning Off Two Factor Authentication On Apple iPhone 15 Plus? 5 Tips You Must Know
- Understanding ChatGPT's Shared Link Functionality: A Detailed Guide
- Title: In 2024, Forgot Your Apple ID Password and Email From iPhone 8 Plus? Heres the Best Fixes
- Author: Alma
- Created at : 2025-01-16 20:44:44
- Updated at : 2025-01-18 00:10:27
- Link: https://apple-account.techidaily.com/in-2024-forgot-your-apple-id-password-and-email-from-iphone-8-plus-heres-the-best-fixes-by-drfone-ios/
- License: This work is licensed under CC BY-NC-SA 4.0.