
In 2024, Guide on How To Remove Apple ID From Apple iPhone 12
Guide on How To Remove Apple ID From Apple iPhone 12
Apple products are considered one of the most secure devices, and it is difficult for any second person to breach their system. The Apple ID is the reason behind it, which serves as the main controlling system of Apple products. Apple ID gives access to various functionalities such as the App Store, iCloud, and more. These services ensure the seamless and proper functioning of the Apple iPhone 12 operating system.
However, you may want to remove Apple ID from iOS devices for any reason. Don’t worry; this article has got you covered in this context. It will provide you with an effective guide to how to remove Apple ID from an iPad.
Part 1: What Are the Possibilities That a User Wants To Remove Apple ID From Their iPad?
When it comes to removing an Apple ID from an iPad, the reasons behind such a decision can be pretty straightforward. These are crucial in maintaining privacy and managing one’s digital presence. Some of the key possibilities that lead users to remove their Apple ID from an iPad include:
1. Device Sale or Transfer
When preparing to sell or transfer ownership of an iPad, removing the associated Apple ID becomes essential. This ensures that the new owner can set up their own Apple ID and prevents any data or privacy issues from arising.
2. Privacy Concerns
There are situations where users feel the need to safeguard their personal information or maintain privacy. In this regard, removing the Apple ID from the iPad can be a crucial step. This ensures that no personal data is accessible to others who might gain access to the Apple iPhone 12 device.
3. Switching to a New Apple ID
For a variety of reasons, including changes within an organization or a desire for a clean slate, individuals may opt to transition to a new Apple ID. By deleting the previous Apple ID from the iPad, the transition to the fresh account can occur smoothly, minimizing any potential conflicts or overlaps.
4. Resolving Apple ID-Related Issues
There are instances where an Apple ID is causing technical issues. It can prevent the smooth operation of the iPad, requiring the removal of the existing Apple ID. This can serve as a troubleshooting measure to resolve any persistent problems.
5. Upgrading to a New iPad
When acquiring a new iPad, individuals may wish to transfer their data and settings from their previous device. By removing the Apple ID from the former iPad, users can streamline the data transfer procedure.
Part 2: Primary Ways of Removing Apple ID From the iPad (With Password)
When dealing with the removal of an Apple ID from an iPad, there are multiple approaches available. Each method is designed to accommodate different situations and user choices. Whether you possess the Apple ID password or require a password reset, this guide will lead you through the diverse methods. Summarized below are the top 5 ways for how to remove Apple ID from an iPad:
Way 1: From the Settings
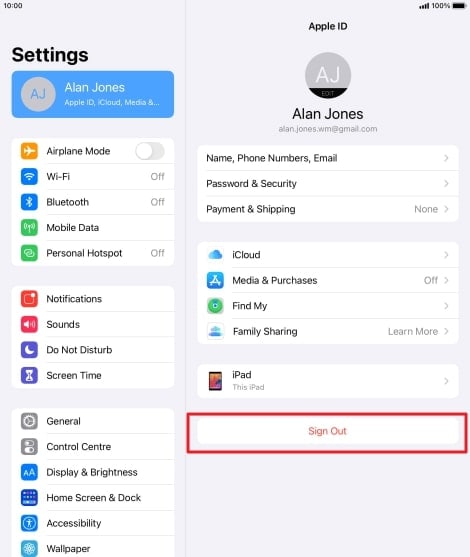
A simple way to eliminate your Apple ID from your iPad involves accessing the Apple ID settings and logging out. This technique works well for individuals who remember their Apple ID password and wish to unlink their account from the Apple iPhone 12 device. Below is a detailed walkthrough to assist you in executing this process:
Instructions: Access the “Settings” application on your iPad and select the Apple ID option. Proceed by scrolling down and choosing the “Sign Out” function. You will then receive a prompt to input your Apple ID password. Upon entering the password, tap “Turn Off” to finalize the procedure by disabling Find my iPad.
Way 2: From the iCloud Website
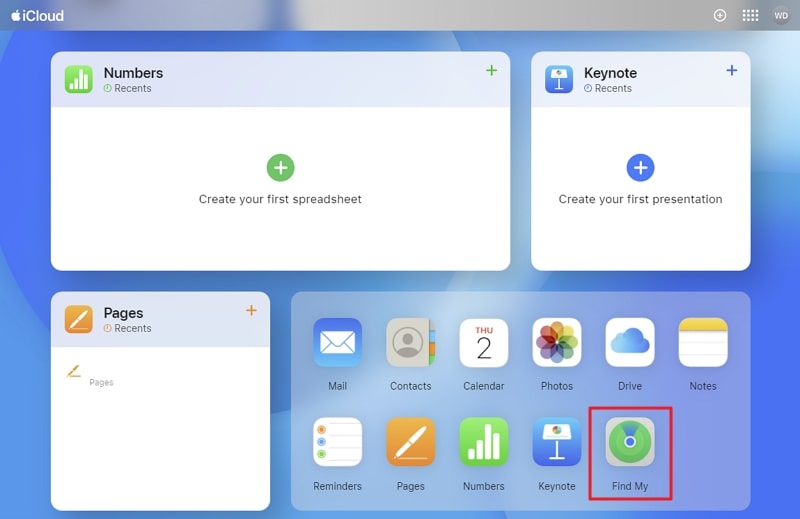
Another effective method to remove your Apple ID from your iPad is by accessing the iCloud website. This method allows you to manage your devices remotely, making it convenient if your iPad is unavailable or lost. Follow these steps on how to remove Apple ID from an iPad using iCloud:
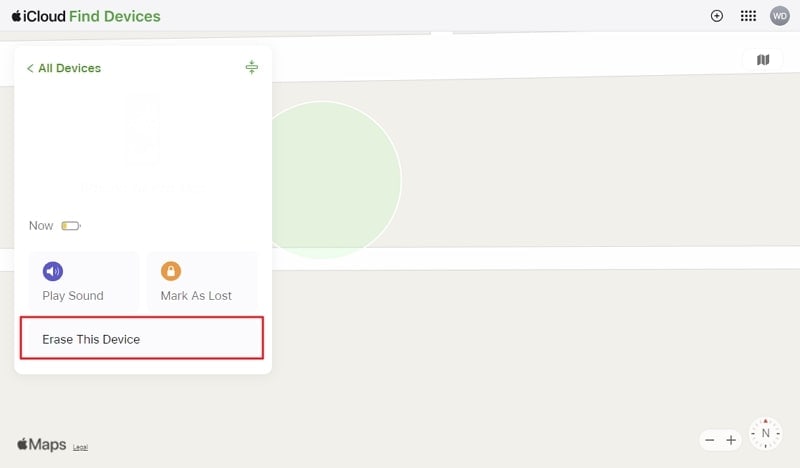
- Step 1: After logging into the iCloud website using the same Apple ID associated with the iPad, tap “Find My.” It will take you to a screen with a map where all devices linked to the Apple ID are shown.
- Step 2: Here, select the targeted iPad and click “Erase This Device” from the available three options. It will prompt a confirmation message where you will need to press “Next” and provide the Apple ID password to initiate the process of removing the Apple ID from the iPad.
Way 3: From the App Store
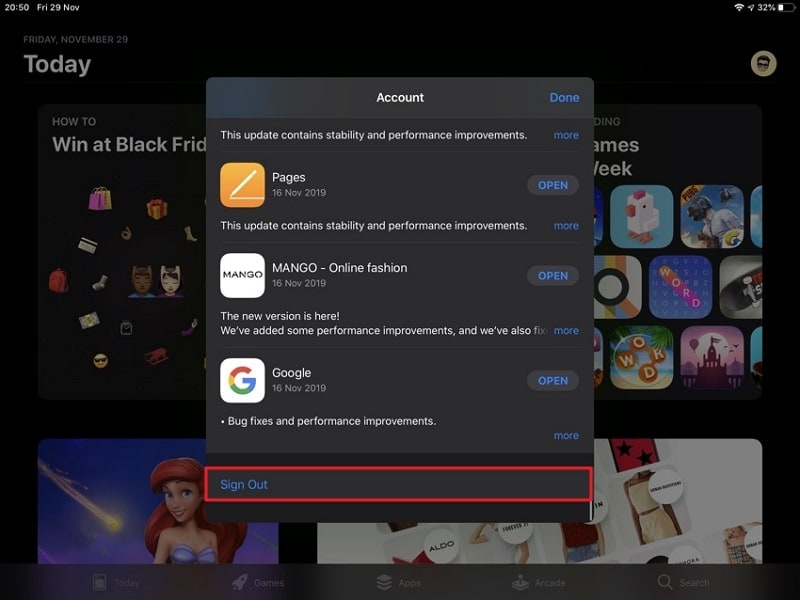
You can also eliminate an Apple ID from your iPad by utilizing the App Store. This technique permits you to directly remove your Apple ID from a particular iPadOS device through the settings of the App Store. You can use the following steps to remove Apple ID via the App Store:
Instructions: Access the App Store on your iPad and tap on the “Profile” image from the top right corner to access the updates and settings options. Then, scroll down to the end of the options and choose the “Sign Out” option to remove the Apple ID from the iPad.
Way 4: From iTunes
To remove an Apple ID from your iPad, you can also utilize iTunes. By facilitating a complete restoration, you can effectively refresh the software on the Apple iPhone 12 device. This approach proves especially beneficial when seeking to thoroughly erase the Apple iPhone 12 device’s content and initiate anew. Here are the steps to be followed for how to remove Apple ID from iPad without a password via iTunes:
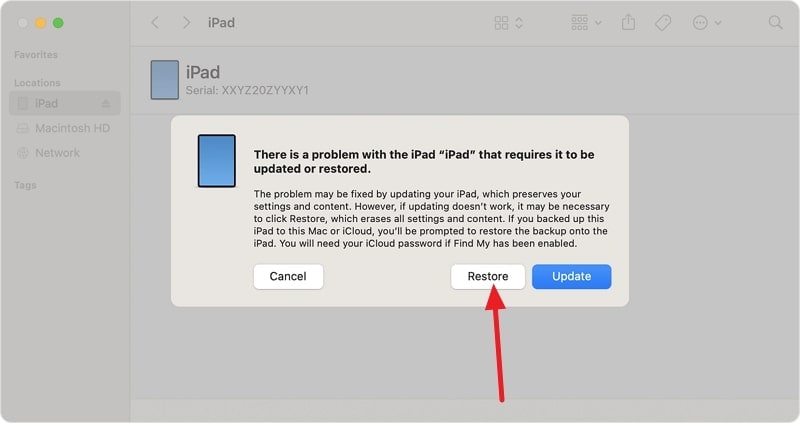
Step 1: Turn off your iPad and connect it to a computer that has the latest version of iTunes. Launch iTunes and put your iPad into Recovery Mode using one of these guidelines:
**For iPads with Face ID.**You will first have to press and release the “Volume Up” button. Then repeat the process with the “Volume Down” button and afterward press and hold the “Top” button. Release the button when the Recovery Mode screen appears on your iPad.
For iPad with Home Button. At the same time, press and hold the “Home” and “Top” buttons. Keep holding them until you see the Recovery Mode screen, and then release them.

- Step 2: When your iPad enters Recovery Mode, iTunes will recognize it and offer the options to “Update” or “Restore” it. Select “Restore” and then follow the on-screen instructions to finalize the procedure of removing the Apple ID.
Way 5: From Find My App on Other Device
In case your Apple ID is currently in use on other devices, the Find My service enables you to detach it from the specific iPad. By employing this approach, you can conveniently oversee your linked devices via the Find My application on an alternate Apple device. To facilitate this procedure, here is a detailed, step-by-step walkthrough:
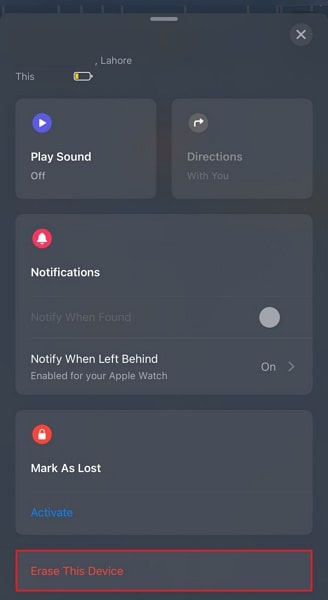
- Step 1: Launch the “Find My” app on the other trusted iPad or iPhone and tap the “Devices” option. From all the Apple iPhone 12 devices connected to the Apple ID, find and select the targeted iPad.
- Step 2: After finding the iPad, tap “Erase This Device” and follow it by pressing “Continue.” Finally, confirm your action by tapping “Erase” and providing the Apple ID password.
Part 3: Remove Apple ID Without Password by a Powerful Tool - Wondershare Dr.Fone
If the problem of removing Apple ID from your iPad is not resolved, your iPad is not of particular use. This is because an Apple ID is responsible for all the basic functions, and you don’t even know the password. There is a need for a more effective and powerful solution in order to maximally utilize your iPad. This is where the feature of Wondershare Dr.Fone – Screen Unlock (iOS) comes out with its extraordinary ability to resolve such issues.
This software is an easy-to-implement solution in answer to the nonfunctioning of all the remedies mentioned above. It removes screen passcodes face ID and bypasses the iCloud activation lock effectively in no time.
Dr.Fone - Screen Unlock (iOS)
Unlock iPhone/iPad Lock Screen Without Hassle.
- Simple, click-through, process.
- Unlock screen passwords from all iPhone and iPad.
- No tech knowledge required, everybody can handle it.
- Supports the latest iOS version fully!


4,395,216 people have downloaded it
Key Features of Wondershare Dr.Fone
- Wondershare Dr.Fone – Screen Unlock removes all types of locks like Apple ID, Face ID, Touch ID, Screen Time Passcode, etc.
- This tool can bypass the iPhone/iPad iCloud activation lock in a matter of a few seconds.
- With Wondershare Dr.Fone, you don’t have to worry about security risks as it provides full-time security with advanced encryption.
- It also removes the MDM if you have forgotten your username and password of your Apple iPhone 12/iPad.
Step-by-Step Guide Involved To Unlock and Remove Apple ID From iPad
Wondershare Dr.Fone provides you with simple steps to remove Apple ID effectively from your iPad without any effort. Here is the step-by-step guide on the process of how to remove Apple ID from an iPad without a password:
- Step 1: Move To Remove Apple ID in Wondershare Dr.Fone
The first thing you need to do is download and install Wondershare Dr.Fone on your computer from the official site. Then, launch it, click “Toolbox” from the left side, and choose “Screen Unlock” from the available options. The next part includes identifying your device as “iOS” and moving on to tap “Remove Apple ID.”

- Step 2: Enable Screen Lock and Two-Factor Authentication
At this point, you need to connect your iPad to the computer and tap the “Unlock Now” button. Now, Wondershare Dr.Fone will ask you whether you have enabled a screen lock and 2FA on your iPad or not. The answer needs to be affirmative for the process to work. So, if you haven’t done so already, go on to set up a screen lock and enable 2FA.

- Step 3: Download the Right iPadOS Firmware
Now is the time to put your iPadOS device into Recovery Mode, a process made easier by the given detailed instructions. Wondershare Dr.Fone will detect your iPad model and ask you to pick the right “System Version.” Afterward, tap “Start” to download the firmware and wait for the process to complete.

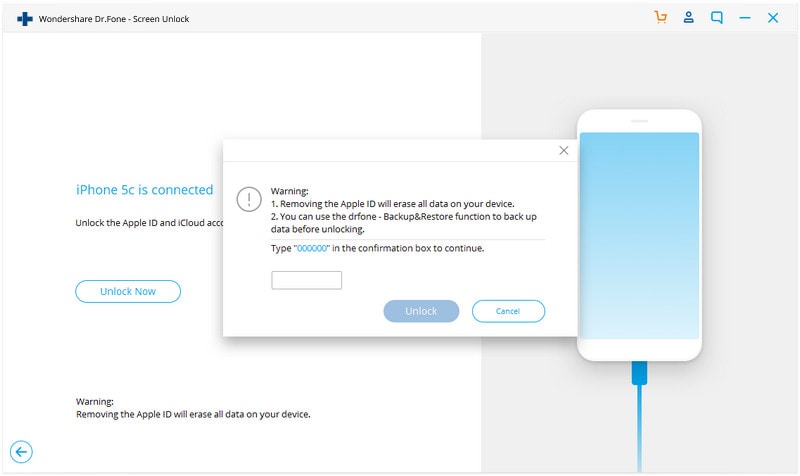
- Step 4: Complete the Unlocking of the Apple ID
Once the iPadOS firmware is downloaded and verified, click “Unlock Now.” This will initiate a confirmation prompt where you need to enter the code “000000” to confirm you agree to the procedure. Enter the code and click “Unlock” to kickstart the Apple ID removal process, which will take a few moments to complete.

Conclusion
In conclusion, this comprehensive guide has provided users with various effective methods for removing an Apple ID from an iPad. Recognizing the importance of this process for privacy, device transfer, and account management, the guide has addressed common scenarios and offered step-by-step instructions for each approach. From the simple settings adjustments and iCloud website methods to utilizing the App Store and iTunes, users have a range of options to choose from.
The provided solutions cater to most scenarios. Yet, for users encountering persistent issues, the use of Wondershare Dr.Fone is recommended. This powerful tool serves as a reliable and efficient means to unlock Apple ID and addresses complex Apple ID removal issues. By following the steps outlined in this guide, users can confidently navigate the process to remove Apple ID from their iPad without a password.
Apple ID Locked or Disabled On Apple iPhone 12? 7 Mehtods You Can’t-Miss
Apple ID refers to the authentication method available for the Apple iPhone 12 device to compromise users’ personal information and settings. The Apple iPhone 12 Apple ID will allow you to store and control data available on the Apple iPhone 12 device; however, you need to re-generate the Apple iPhone 12 passcode if you have forgotten the Apple iPhone 12 passcode. Suppose, if you have forgotten the passcode and entered the wrong passcode six times, your Apple iPhone 12 gets locked or has been disabled. According to your settings, if you have entered the wrong passcode too much time could even make your Apple iPhone 12 delete all the data available.
This article will discuss how you can unlock Apple ID and remain secure. If you receive a message that you have entered the wrong passcode or forgotten your passcode, you have to follow some steps to regain access to your Apple Id.
Why Is Your Apple ID Locked or Disabled?
Some of the reasons causing your Apple ID locked or disabled are listed below:
- If you have entered the wrong passcode or security question too many times in a row, Apple ID gets locked. (Avoid entering the incorrect password more than 3 times)
- If you haven’t used your Apple ID for an extended period, possibly making your Apple ID disabled or locked. When Apple modifies the requirement for passcode and security questions, you have not updated the information.
If you frequently change your Apple ID or passcode on the Apple iPhone 12 device, Apple possibly considers that your Apple iPhone 12 faces a security threat and might lock your Apple ID.
Method 1: Professional iPhone Apple ID Lock Removal Tool [Recommended]
If you have forgotten your Apple ID password, you are suggested not to enter the wrong passcode in a row. That may lead to data loss. You can download the Dr.Fone– Screen Unlock, which is compatible with different lock screens and will unlock Apple ID easily. Dr.Fone - Screen Unlock helps remove almost all sorts of iPhone passwords without the requirement of technical knowledge.
Dr.Fone - Screen Unlock (iOS)
Unlock iPhone ID.
- Remove the screen password, face id, and Touch ID.
- Don’t need to have any technical knowledge.
- Bypass the Apple ID and iCloud activation lock in a quick way.
- Compatible with both Android and iOS devices.
3981454 people have downloaded it
Steps to Follow:
**Step 1:**Click on the “Screen Unlock” module and a new interface will appear.
To unlock your Apple ID, you have to click on the “Unlock Apple ID” option.

Step 2: You must know the passcode of the Apple iPhone 12 to unlock the phone screen, which trusts the computer system for scanning the data available in the phone.

Note: This process determines that all data will be erased when you initiate to unlock the Apple ID. (If your device didn’t activate dual authentication, then you can unlock Apple ID without data loss.) It is recommended to create a backup of your data before proceeding to the next step.
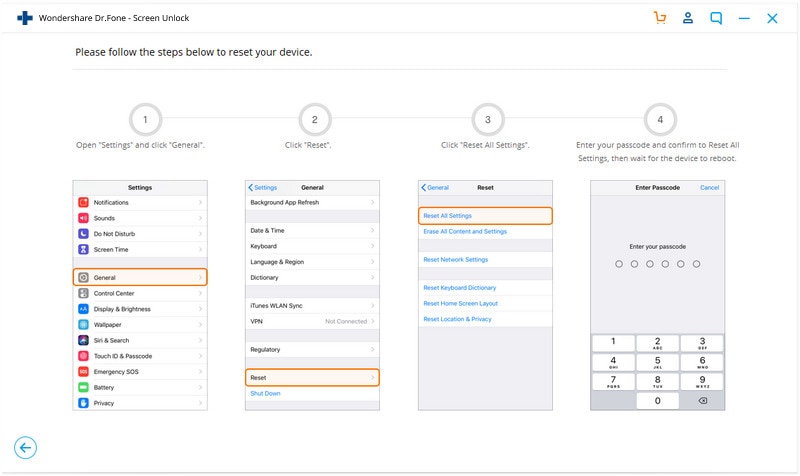
Step 3: Before unlocking your Apple ID, you have to reset iPhone settings by following the instruction available on the screen. When you have reset all the settings, restart your device, and the process of unlocking will start automatically.
Step 4: Once the restart process gets completed, Dr. Fone will automatically kick off the unlocking process of Apple ID and get it ended in a few seconds.

Step 5: When the Apple ID is unlocked successfully, the following window will indicate that you have to check if your Apple ID gets unlocked.

Method 2: Reset Password to Unlock Your Apple ID
In order to unlock iPhone 13 Apple ID, you can reset the password to your Apple ID. If you want to do this, you need to follow the below steps.
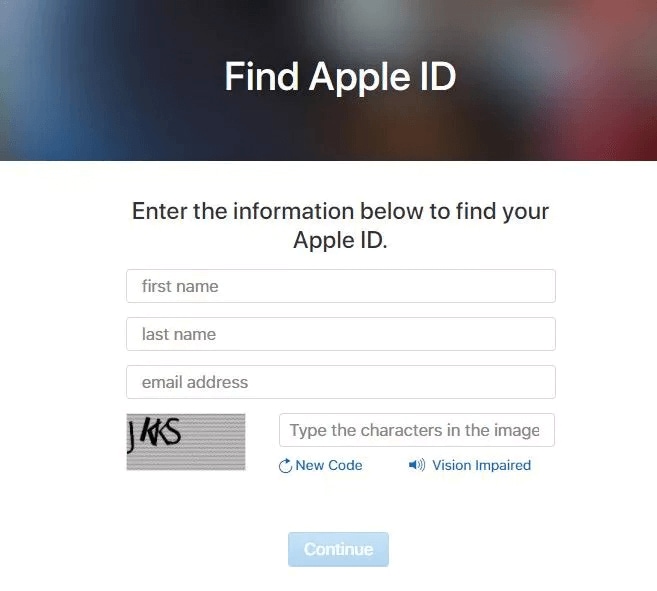
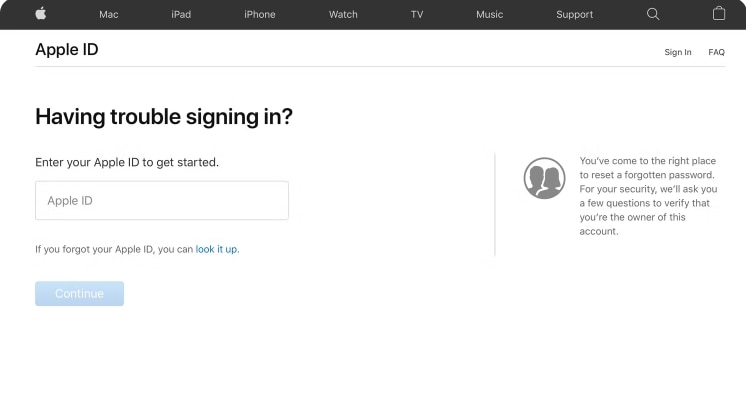
Step 1: Head to the Apple account recovery page and enter the desired details like your first and last name. Also, enter your email address. When done, click on the “Continue” button.
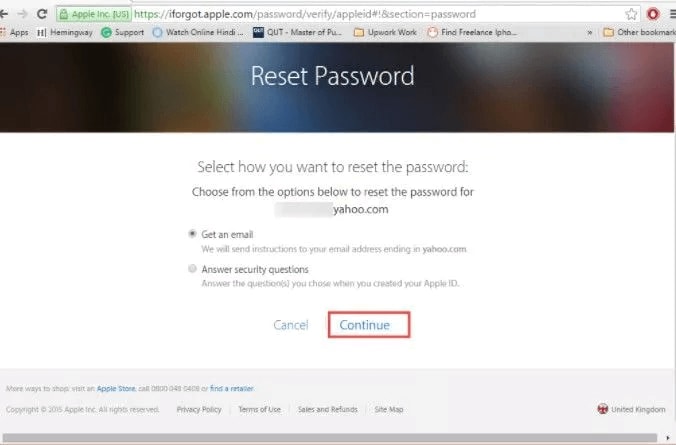
Step 2: When the next screen appears, you will see two options to choose from. Whether you wish to receive a password through email or answer a security question, choose it. Click “Continue”.
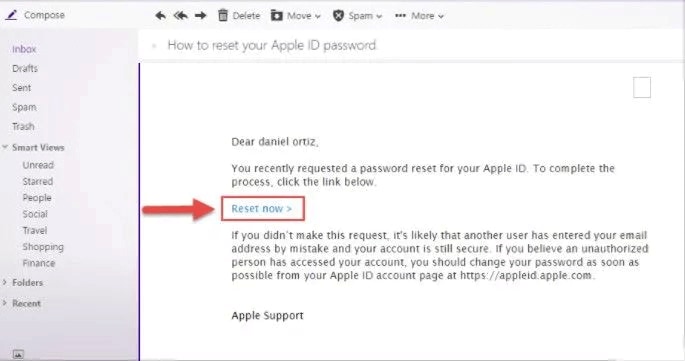
Step 3: Reset the password now. Write down the password and follow the prompts. Your password will be reset now!
Method 3: Fix Apple ID Locked Via iforgot
If your Apple ID is disabled, follow these simple steps listed below:
Step 1: Enter “https://iforgot.apple.com “ in the web browser of your computer, iPhone or Tablet.
Step 2: You have to enter the registered E-mail address in the box available on the screen.
Step 3: Enter the captcha available on the screen and click on the “Continue “option to proceed further. (If you have set up the two-factor authentication, you will receive a code that you need to enter on your device.)
Step 4: Enter the code you have received on your device and confirm it to unlock your account and allow resetting the password. (You will be asked to answer the security question to confirm your identity).

Step 5: Successfully, you have unlocked your Apple ID.
Method 4: Unlock Apple ID Using Two-Factor Authentication
This next method only works if you’ve already enabled the Two-Factor Authentication before getting locked out of your Apple ID. In case you’ve already enabled it, follow the below-mentioned steps to unlock your Apple ID.
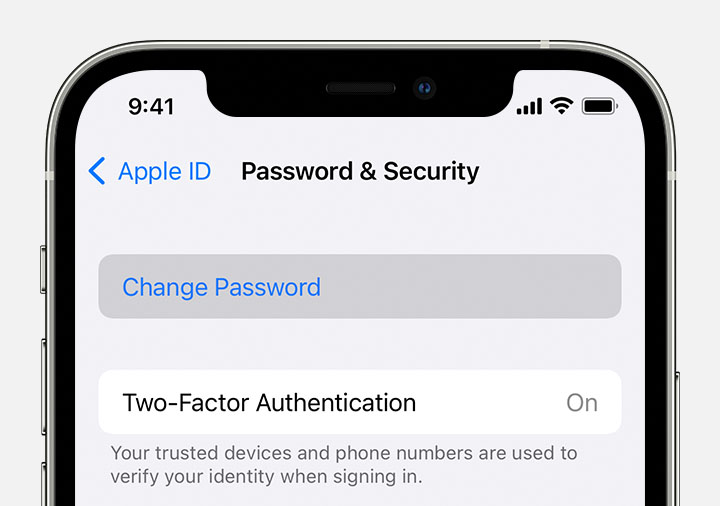
Step 1: Launch the “Settings” App on your Apple iPhone 12 and then hit “your name” at the top.
Step 2: Now, select the “Password & Security” option, followed by tapping on “Change Password.”
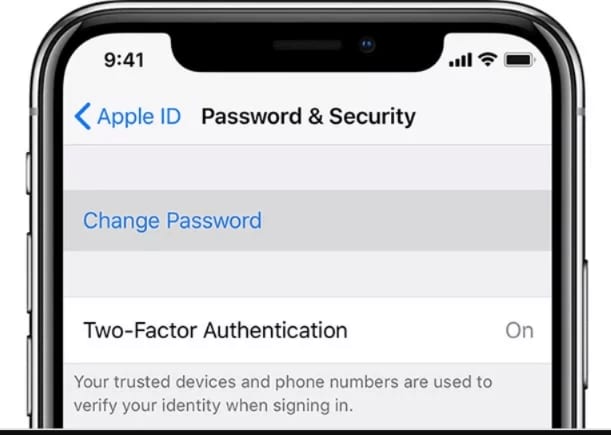
Step 3: Then you need to follow the instructions displayed over your screen carefully.
If you perform the instructions properly, you will eventually get your Apple ID unlocked.
Method 5: Remove Locked Apple ID Using Recovery Key
There are high chances that you might have protected your Apple ID with a Two-Factor Authentication. In such a case, you need to use your Recovery Key to unlock your Apple ID. Here’s how you can get it done.
Step 1: You need to first visit iforgot.apple.com and then punch in your Apple ID in the text field provided.
Step 2: You’ll then be required to enter the Recovery Key, key it in and hit “Continue”.
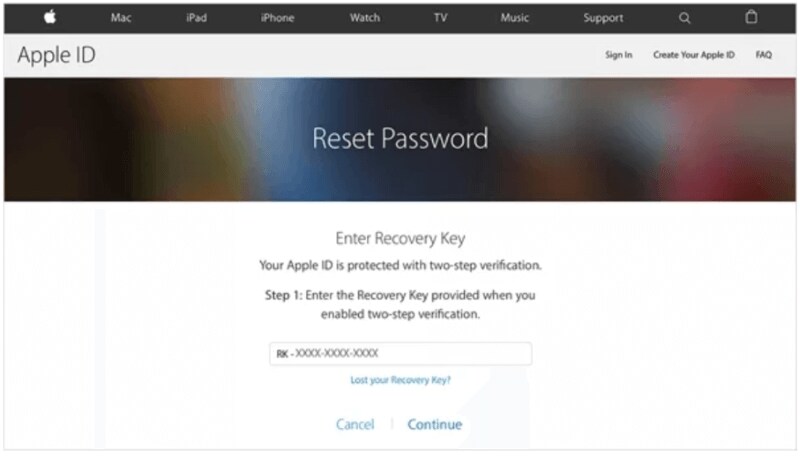
Note: Recovery Key is a security code provided to you when the Two-Factor Authentication is first enabled.
Step 3: Now, one of your trusted devices will receive a verification code. Enter it on your screen and hit “Next”.
Step 4: Upon successful verification, you will be asked to create a new password. Please make a new password now and then make sure to remember it.
That’s it you can now make use of this new password to unlock your Apple ID.
Method 6: A Loophole: DNS Bypass
If you want to unlock iPhone 13 Apple ID and don’t remember the password**,** you can use this DNS bypass method. But to make use of this method, you need to first factory reset your device and gain access to the “Hello” screen. Here’s how you can make use of this method.
Step 1: Firstly, you need to reboot your device into Recovery Mode. Then, launch iTunes and plug it in the computer. Now, iTunes will detect your device in recovery mode. Hit on Restore iPhone and wait for the process to complete.
Step 2: Your device will restart to the “Hello” screen upon completion. From the menu, choose language and country.
Step 3: Tap on “Proceed” to get into the Wi-Fi settings page.
Step 4: Now click on the “i” icon bonded by a circle next to Wi-Fi.
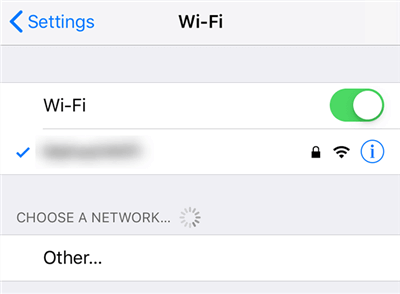
Note: In case, you are already connected to a Wi-Fi network, ensure to click on it first and then tap on “Forget This Network” to have the “i” icon visible.
Step 5: Now, when you tap on the “i” icon next to any Wi-Fi network (not connected), you need to look for the “Configure DNS” server option. Click on it and then select “Manual”, then click “Add Server.”

You have to select the DNS from the option available according to your region.
- USA/North America: 104.154.51.7
- Europe: 104.155.28.90
- Asia: 104.155.220.58
- Other areas: 78.109.17.60
Step 6: Now, save the settings, return to the connection page and connect to your Wi-Fi.
Step 7: You need to wait for your device to get connected with the iCloud DNS bypass server automatically.

Step 8: Once you are connected to the DNS server successfully, you can then use apps and features available on your Apple iPhone 12 in an alternative way.

Note: This method is just a hack to use your device without the need for Apple ID. This method doesn’t unlock your Apple ID.
Method 7: Ask Apple Support
We are positive that the solutions above will get your issue resolved. However, just in case, if you’re still stuck with the same issue and are unable to unlock Apple ID on iPhone, then we would suggest you get in touch with Apple Customer Support to help you with the best. You can either directly walk into your nearest Apple Support Center or simply visit https://support.apple.com/ to get in touch with one of the customer support executives.
Conclusion
From this article, you can know how to unlock your Apple ID and reset your password. There are different ways available that will resolve your unlock iPhone issue. However, Dr.Fone is the most recommended tool as it provides a screen lock solution and recognizes it as a one-stop solution for all iPhone problems. You can also share the effective methods in this article with your families and friends.
Your Account Has Been Disabled in the App Store and iTunes On Apple iPhone 12?
You may see the error message, “Your account has been disabled in the App Store and iTunes” when you try to log in. This is often an indication that for some reason your Apple ID is not working as it should. When you consider that you will not be able to download or update apps or even make a purchase using Apple Pay without your Apple ID, it is easy to see why this error message can be a problem.
Why is my account disabled in the App store? Here, we take a look at the reasons why you may see the error messages and what you can do to fix them.
Part 1. Why has my account been disabled in the App Store and iTunes?
The following are some reasons why you may see this error message popup on your screen:
- Entering the incorrect Apple ID and password multiple times
- Not using your Apple ID for an extended period of time
- Any billing issues such as unpaid iTunes and App Store orders
- Safety and security reasons like when Apple suspects your account may be hacked
- When there are charging disputes on your credit card
Part 2. How to fix “Your account has been disabled in App store and iTunes”?
There are numerous methods to tackle this issue and regain access to your device. For a quick and concise understanding, you can watch our informative video tutorial. If you prefer a more in-depth, step-by-step explanation, continue reading this article for detailed instructions on each method.
Tips: Did you forget your Apple ID password or are you struggling to remove your Apple ID account? Worry not, as Dr.Fone is here to help you remove your Apple ID without password in a matter of seconds. By logging into a new account, you can fully restore access to all your iCloud services and Apple ID features, ensuring a seamless user experience.
Method 1. Wait 24 hours and Try Again
This method will prove useful to you if you have entered the wrong password several times. If this is the reason your account has been disabled, leave it alone for about 24 hours. When the time has elapsed, try entering the correct password to see if this fixes the issue.
If you just forget the password and cannot remember it, you can follow the steps below to reset the password on your own iOS device:
- Step 1: Open Settings.
- Step 2: Tap [your name] on top of the screen> Password & Security > Change Password.
- Step 3: Enter the passcode for your device.
- Step 4: Follow the onscreen steps to reset your password.
If the above steps were unable to change or reset the password, follow the steps below:
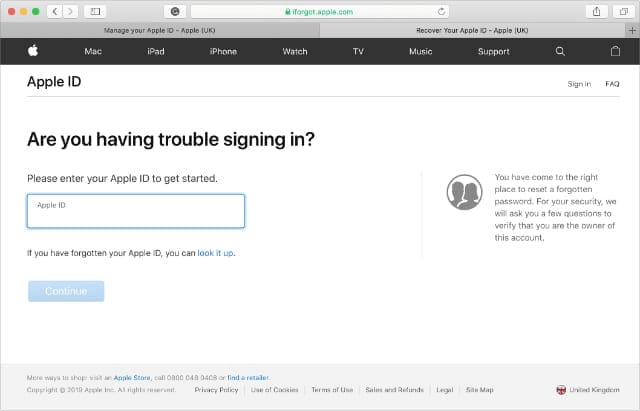
- Step 1: Go to https://iforgot.apple.com/ .
- Step 2: Put your Apple ID (email) in the box and click “Continue”.
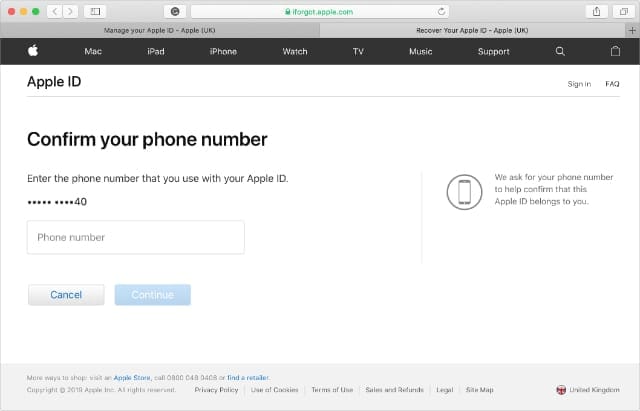
- Step 3 Enter the phone number that you use with your Apple ID.
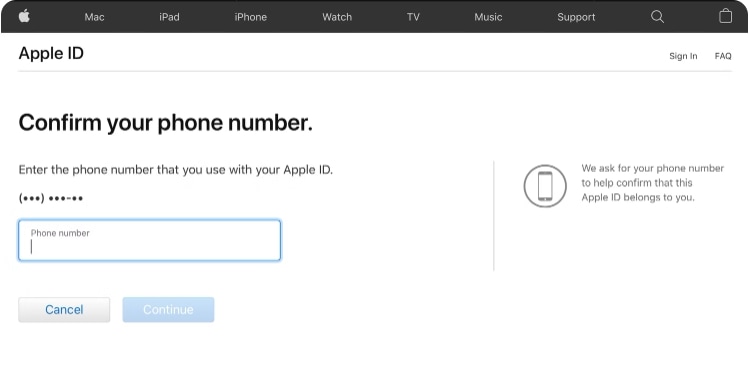
- Step 4: Look for the notification on iPhone, Mac, or iPad and follow the instructions to reset the password.

Note that if you are changing your Apple ID password on an iPhone or iPad, you will need to enter your device’s six-digit passcode, then reset a new password.
Forgetting the password is particularly troublesome, but there is good news. That is, you can use Password Manager to find your passwords on your Apple iPhone 12/iPad without spending too much time remembering them!
Dr.Fone - Password Manager (iOS)
Recover and keep all your passwords in one place
- Unlock and manage various passcodes, PINs, Face IDs, Apple ID, WhatsApp password reset, and touch ID without limitations.
- To find your password on an iOS device, it effectively functions without harming or leaking your information.
- Ease your job by finding any strong password across various platforms to manage multiple email accounts.
- The installation of Dr.Fone on your device won’t take much space, without any disturbing ads.
3981454 people have downloaded it
Method 2. View Your Payment Methods and Update Them
If you think that your account has been disabled because of a payment issue, it is necessary to check your payment methods and update them. Follow these simple steps to do it:
- Step 1: Open the Settings and then tap on your name at the top.
- Step 2: Select “iTunes & App Store” and then choose your Apple ID.
- Step 3: Tap “View Apple ID” and then select “Manage Payments”.
- Step 4: Tap “Add Payment Method” to add a new payment method.
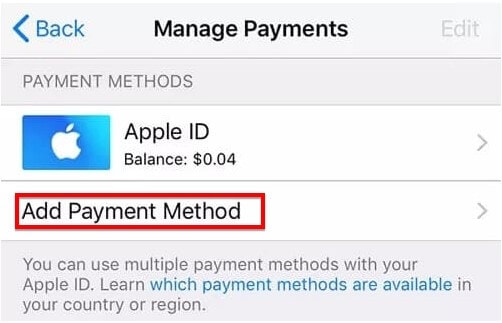
If the payment method was the issue, your account will be re-enabled after these steps.
Method 3. Settle Any Unpaid Charges
Do you have any unpaid purchases or subscriptions?
It is important to keep track of any purchases or subscriptions that you have signed up for and ensure that you pay for them on time. This not only helps you avoid late fees and penalties, but it also ensures that your account remains active and accessible. If you do have any unpaid charges, it is recommended that you settle them as soon as possible in order to reinstate your account and prevent any further issues. Keep a record of all your expenses and regularly review your bills to avoid missing any payments and keep your accounts in good standing.
Method 4. Sign Out and Sign in Again
Signing out of your account and then signing back in may help if this issue is caused by a software glitch.
- On your iOS device, go to Settings > [Your Name] > iTunes & App Store and Sign Out. Then sign in again.
- On your Mac, open the App Store (Store > Sign Out) and iTunes (Account > Sign Out. Then sign in again.
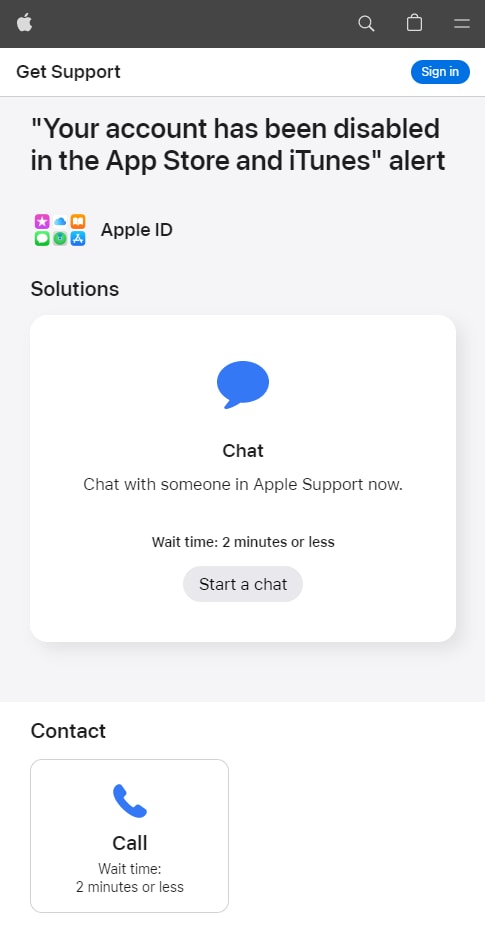
Method 5. Try Contacting Apple Support Directly
If you see a message that says, “Your account has been disabled in the App Store and iTunes,” contact Apple Support for help. You can follow these simple steps to contact Apple support:
- Step 1: Go to https://getsupport.apple.com/solutions .
- Step 2: Then click “Start a chat” to chat with someone in Apple Support now.
- Step 3: Or schedule a call with Apple Support, and they should be able to help you fix your account disabled in App store.
Part 3. What does it influence when “Your account has been disabled in the App Store and iTunes”?
When you see the error message “Your account has been disabled in the App Store and iTunes” it often means the following:
- You cannot access Apple Books, App Store purchases, and even iTunes purchases.
- You may not have access to your iCloud account or any of the data stored in the account until you fix the problem.
- Furthermore, you may not be able to access Apple services and any Apple Store orders and repairs may need to be rescheduled.
- Until you can fix the issue, you will not be able to receive iMessage, FaceTime, and iCloud Mail.
Part 4. Is “Your account has been disabled in the App Store and iTunes” the same as “Apple ID disabled”?
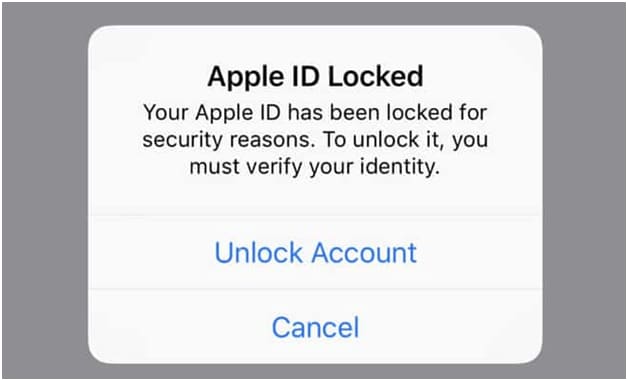
No. The error message “Your account has been disabled in the App Store and iTunes” differs from “Apple ID disabled”. You will primarily see the “Your account has been disabled in the App Store and iTunes” when you try to access content in the App Store. On the other hand, you may see the message “Apple ID disabled” when you enter the Apple ID and password to bypass the iCloud Activation Lock screen .
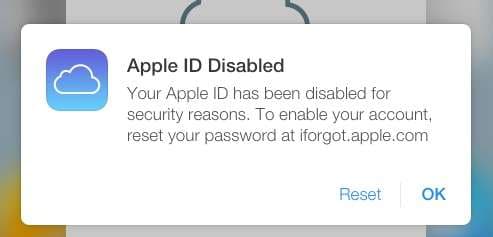
After you see these errors, you will not be able to access some of the features and apps that require your Apple ID for access.
Part 5. How to fix Apple ID disabled by removing Apple ID?
Sometimes the only way to fix “Apple ID Disabled” is to remove the Apple ID from the Apple iPhone 12 device. This may become a viable solution if you lost or forgot the Apple ID password or ID and you have no way to recover them. It is also one of the best solutions when you purchased a second-hand device, and you don’t know the Apple ID password for the account associated with the Apple iPhone 12 device.
One of the best ways to remove the Apple ID from an iOS device is to use Dr.Fone - Screen Unlock (iOS) . This third-party unlocking software is designed to easily and effectively remove the Apple ID password from any device. The following are some things it can do;
Dr.Fone - Screen Unlock (iOS)
Remove iCloud Account without Password in Minutes
- Remove Apple ID/iCloud Account efficiently.
- Save your Apple iPhone 12 quickly from the disabled state.
- Free your sim out of any carrier worldwide.
- Bypass iCloud activation lock and enjoy all iCloud services.
- Works for all models of iPhone, iPad, and iPod touch.
4,008,669 people have downloaded it
Here’s how to use Dr.Fone Screen Unlock to remove the Apple ID from the Apple iPhone 12 device;
- Step 1: Install the Program
To begin, download the Dr.Fone Toolkit from the program’s main website. Install the toolkit onto your computer. Open it after successful installation and then choose “Screen Unlock” from the main screen.
- Step 2: Choose to Remove Apple ID
On the next screen, you should see three options. Choose “Remove Apple ID” since we want to remove the Apple ID from the Apple iPhone 12 device.

- Step 3: Connect the iOS Device
Connect the iOS device to the computer using its lightning cable. Then enter the Apple iPhone 12 device’s passcode and, when prompted, tap “Trust” to allow the computer to detect the Apple iPhone 12 device. The program should detect the Apple iPhone 12 device and display information about it. Then click “Unlock Now”.
- Step 4: Apple ID Removal will Begin
Dr.Fone will immediately begin removing the Apple ID from the Apple iPhone 12 device. You should see a progress bar indicating how long the process will take. Ordinarily, the removal should take just a few seconds. When the process is complete, you will see a notification on the screen letting you know that the Apple ID has been removed.
You should then be able to sign in to another Apple ID or create a new Apple ID and password to use on the Apple iPhone 12 device.
Conclusion
In conclusion, encountering a disabled Apple account in the App Store and iTunes can be a frustrating experience. However, by understanding the reasons behind it, following the recommended steps to resolve the issue, and considering the broader impact on your digital life, you can navigate this situation effectively. Remember, prompt action and patience are key to restoring your account and getting back to enjoying the Apple ecosystem hassle-free.
Also read:
- [New] 2024 Approved Navigating the Social Wave Share Your Viewpoint
- [New] In 2024, Insights Into Crafting Responses to YouTube Comments
- [New] Thorough Scrutiny Bublcam's Panoramic Innovation
- [Updated] Capture Your Best Side Tips for Effective Talking-Head Shots for 2024
- 無料変換技術🔄 MKV to MP4: 4つの最適手法を紹介する
- Apple ID is Greyed Out From Apple iPhone 8 How to Bypass?
- Free & Purchased Color Tools for the Discerning Canon User for 2024
- How to Change your Tecno Pop 8 Location on Twitter | Dr.fone
- How To Delete iCloud Account Remove Your Apple ID Permanently From iPhone 13 Pro
- How to Fetch and Enhance Your Internet Experience with the Latest Intel Wireless AC Ve AC 9560 Drivers
- How to Unlock iPhone 6 Plus When We Dont Have Apple ID or Password?
- Improving Box Pull-Back Pleasure
- In 2024, Apple ID is Greyed Out On iPhone 14 Pro Max How to Bypass?
- In 2024, How To Delete iCloud Account Remove Your Apple ID Permanently From iPhone 13
- In 2024, How to Remove iPhone 6s Device from iCloud
- In 2024, The Easy Way to Remove an Apple ID from Your MacBook For your iPhone 14 Plus
- In 2024, Turning Off Two Factor Authentication From Apple iPhone 13 mini? 5 Tips You Must Know
- Title: In 2024, Guide on How To Remove Apple ID From Apple iPhone 12
- Author: Alma
- Created at : 2024-12-13 20:03:39
- Updated at : 2024-12-20 00:54:16
- Link: https://apple-account.techidaily.com/in-2024-guide-on-how-to-remove-apple-id-from-apple-iphone-12-by-drfone-ios/
- License: This work is licensed under CC BY-NC-SA 4.0.