
In 2024, Guide on How To Remove Apple ID From Apple iPhone 13
Guide on How To Remove Apple ID From Apple iPhone 13
Apple products are considered one of the most secure devices, and it is difficult for any second person to breach their system. The Apple ID is the reason behind it, which serves as the main controlling system of Apple products. Apple ID gives access to various functionalities such as the App Store, iCloud, and more. These services ensure the seamless and proper functioning of the Apple iPhone 13 operating system.
However, you may want to remove Apple ID from iOS devices for any reason. Don’t worry; this article has got you covered in this context. It will provide you with an effective guide to how to remove Apple ID from an iPad.
Part 1: What Are the Possibilities That a User Wants To Remove Apple ID From Their iPad?
When it comes to removing an Apple ID from an iPad, the reasons behind such a decision can be pretty straightforward. These are crucial in maintaining privacy and managing one’s digital presence. Some of the key possibilities that lead users to remove their Apple ID from an iPad include:
1. Device Sale or Transfer
When preparing to sell or transfer ownership of an iPad, removing the associated Apple ID becomes essential. This ensures that the new owner can set up their own Apple ID and prevents any data or privacy issues from arising.
2. Privacy Concerns
There are situations where users feel the need to safeguard their personal information or maintain privacy. In this regard, removing the Apple ID from the iPad can be a crucial step. This ensures that no personal data is accessible to others who might gain access to the Apple iPhone 13 device.
3. Switching to a New Apple ID
For a variety of reasons, including changes within an organization or a desire for a clean slate, individuals may opt to transition to a new Apple ID. By deleting the previous Apple ID from the iPad, the transition to the fresh account can occur smoothly, minimizing any potential conflicts or overlaps.
4. Resolving Apple ID-Related Issues
There are instances where an Apple ID is causing technical issues. It can prevent the smooth operation of the iPad, requiring the removal of the existing Apple ID. This can serve as a troubleshooting measure to resolve any persistent problems.
5. Upgrading to a New iPad
When acquiring a new iPad, individuals may wish to transfer their data and settings from their previous device. By removing the Apple ID from the former iPad, users can streamline the data transfer procedure.
Part 2: Primary Ways of Removing Apple ID From the iPad (With Password)
When dealing with the removal of an Apple ID from an iPad, there are multiple approaches available. Each method is designed to accommodate different situations and user choices. Whether you possess the Apple ID password or require a password reset, this guide will lead you through the diverse methods. Summarized below are the top 5 ways for how to remove Apple ID from an iPad:
Way 1: From the Settings
A simple way to eliminate your Apple ID from your iPad involves accessing the Apple ID settings and logging out. This technique works well for individuals who remember their Apple ID password and wish to unlink their account from the Apple iPhone 13 device. Below is a detailed walkthrough to assist you in executing this process:
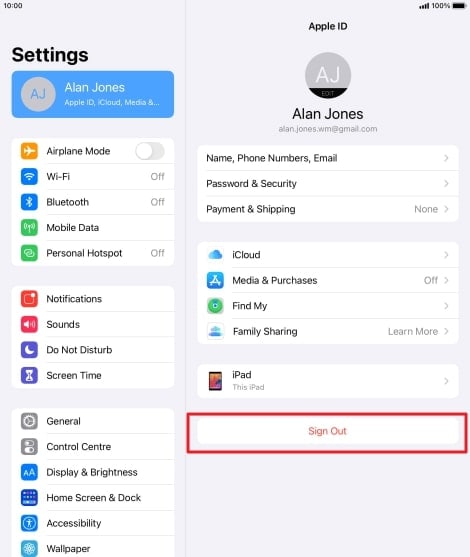
Instructions: Access the “Settings” application on your iPad and select the Apple ID option. Proceed by scrolling down and choosing the “Sign Out” function. You will then receive a prompt to input your Apple ID password. Upon entering the password, tap “Turn Off” to finalize the procedure by disabling Find my iPad.
Way 2: From the iCloud Website
Another effective method to remove your Apple ID from your iPad is by accessing the iCloud website. This method allows you to manage your devices remotely, making it convenient if your iPad is unavailable or lost. Follow these steps on how to remove Apple ID from an iPad using iCloud:
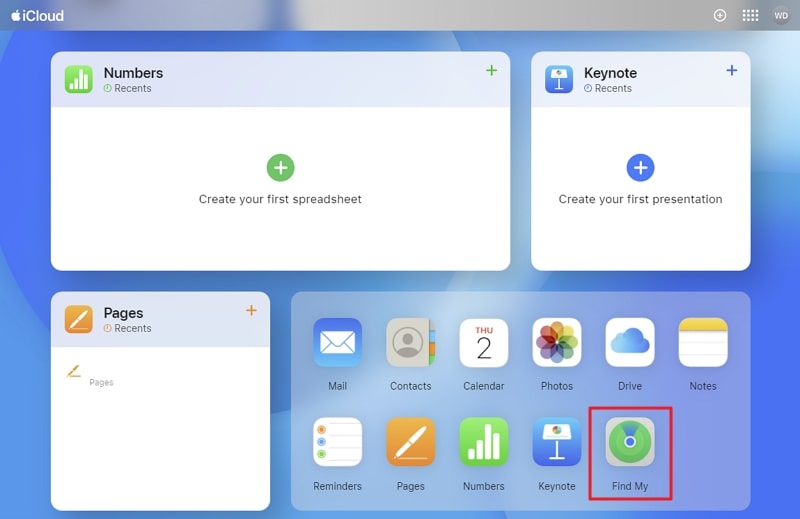
- Step 1: After logging into the iCloud website using the same Apple ID associated with the iPad, tap “Find My.” It will take you to a screen with a map where all devices linked to the Apple ID are shown.
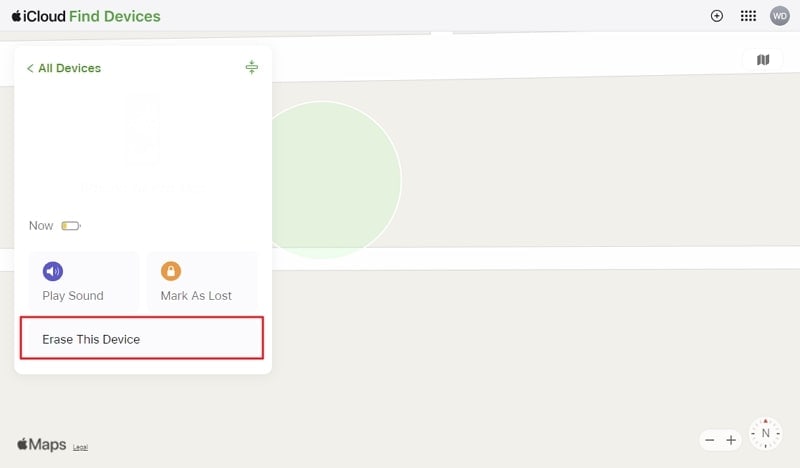
- Step 2: Here, select the targeted iPad and click “Erase This Device” from the available three options. It will prompt a confirmation message where you will need to press “Next” and provide the Apple ID password to initiate the process of removing the Apple ID from the iPad.
Way 3: From the App Store
You can also eliminate an Apple ID from your iPad by utilizing the App Store. This technique permits you to directly remove your Apple ID from a particular iPadOS device through the settings of the App Store. You can use the following steps to remove Apple ID via the App Store:
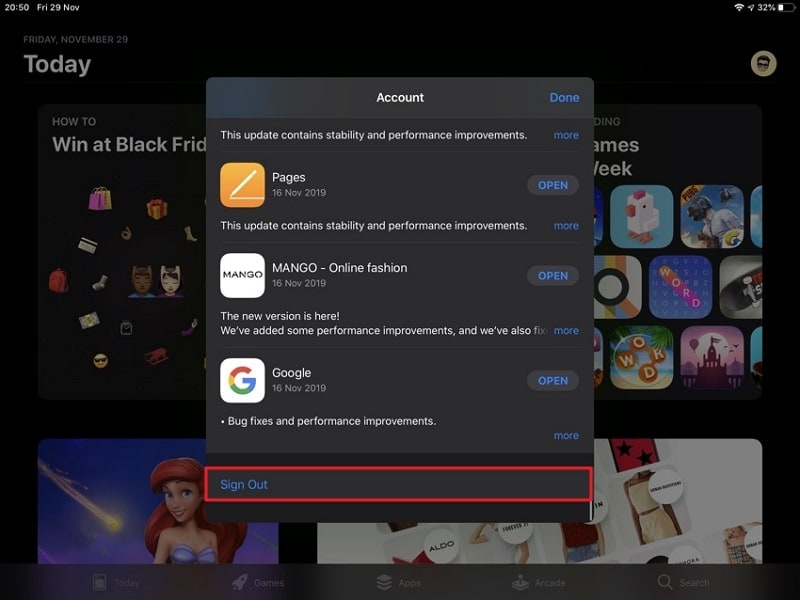
Instructions: Access the App Store on your iPad and tap on the “Profile” image from the top right corner to access the updates and settings options. Then, scroll down to the end of the options and choose the “Sign Out” option to remove the Apple ID from the iPad.
Way 4: From iTunes
To remove an Apple ID from your iPad, you can also utilize iTunes. By facilitating a complete restoration, you can effectively refresh the software on the Apple iPhone 13 device. This approach proves especially beneficial when seeking to thoroughly erase the Apple iPhone 13 device’s content and initiate anew. Here are the steps to be followed for how to remove Apple ID from iPad without a password via iTunes:
Step 1: Turn off your iPad and connect it to a computer that has the latest version of iTunes. Launch iTunes and put your iPad into Recovery Mode using one of these guidelines:
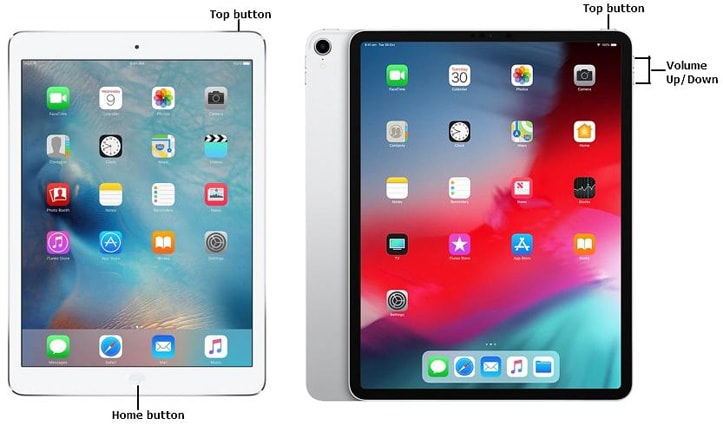
**For iPads with Face ID.**You will first have to press and release the “Volume Up” button. Then repeat the process with the “Volume Down” button and afterward press and hold the “Top” button. Release the button when the Recovery Mode screen appears on your iPad.
For iPad with Home Button. At the same time, press and hold the “Home” and “Top” buttons. Keep holding them until you see the Recovery Mode screen, and then release them.
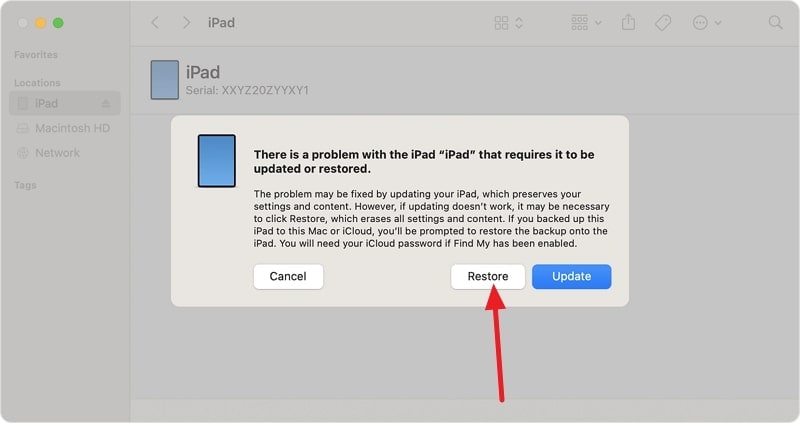
- Step 2: When your iPad enters Recovery Mode, iTunes will recognize it and offer the options to “Update” or “Restore” it. Select “Restore” and then follow the on-screen instructions to finalize the procedure of removing the Apple ID.
Way 5: From Find My App on Other Device
In case your Apple ID is currently in use on other devices, the Find My service enables you to detach it from the specific iPad. By employing this approach, you can conveniently oversee your linked devices via the Find My application on an alternate Apple device. To facilitate this procedure, here is a detailed, step-by-step walkthrough:
- Step 1: Launch the “Find My” app on the other trusted iPad or iPhone and tap the “Devices” option. From all the Apple iPhone 13 devices connected to the Apple ID, find and select the targeted iPad.
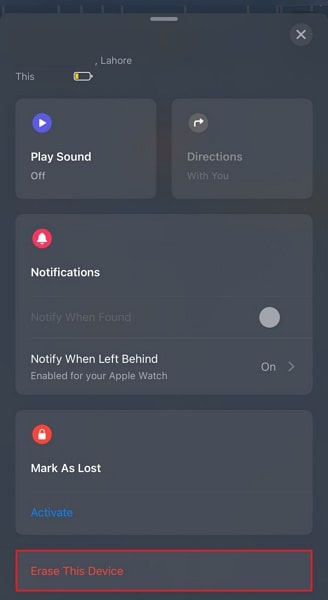
- Step 2: After finding the iPad, tap “Erase This Device” and follow it by pressing “Continue.” Finally, confirm your action by tapping “Erase” and providing the Apple ID password.
Part 3: Remove Apple ID Without Password by a Powerful Tool - Wondershare Dr.Fone
If the problem of removing Apple ID from your iPad is not resolved, your iPad is not of particular use. This is because an Apple ID is responsible for all the basic functions, and you don’t even know the password. There is a need for a more effective and powerful solution in order to maximally utilize your iPad. This is where the feature of Wondershare Dr.Fone – Screen Unlock (iOS) comes out with its extraordinary ability to resolve such issues.
This software is an easy-to-implement solution in answer to the nonfunctioning of all the remedies mentioned above. It removes screen passcodes face ID and bypasses the iCloud activation lock effectively in no time.
Dr.Fone - Screen Unlock (iOS)
Unlock iPhone/iPad Lock Screen Without Hassle.
- Simple, click-through, process.
- Unlock screen passwords from all iPhone and iPad.
- No tech knowledge required, everybody can handle it.
- Supports the latest iOS version fully!


4,395,216 people have downloaded it
Key Features of Wondershare Dr.Fone
- Wondershare Dr.Fone – Screen Unlock removes all types of locks like Apple ID, Face ID, Touch ID, Screen Time Passcode, etc.
- This tool can bypass the iPhone/iPad iCloud activation lock in a matter of a few seconds.
- With Wondershare Dr.Fone, you don’t have to worry about security risks as it provides full-time security with advanced encryption.
- It also removes the MDM if you have forgotten your username and password of your Apple iPhone 13/iPad.
Step-by-Step Guide Involved To Unlock and Remove Apple ID From iPad
Wondershare Dr.Fone provides you with simple steps to remove Apple ID effectively from your iPad without any effort. Here is the step-by-step guide on the process of how to remove Apple ID from an iPad without a password:
- Step 1: Move To Remove Apple ID in Wondershare Dr.Fone
The first thing you need to do is download and install Wondershare Dr.Fone on your computer from the official site. Then, launch it, click “Toolbox” from the left side, and choose “Screen Unlock” from the available options. The next part includes identifying your device as “iOS” and moving on to tap “Remove Apple ID.”

- Step 2: Enable Screen Lock and Two-Factor Authentication
At this point, you need to connect your iPad to the computer and tap the “Unlock Now” button. Now, Wondershare Dr.Fone will ask you whether you have enabled a screen lock and 2FA on your iPad or not. The answer needs to be affirmative for the process to work. So, if you haven’t done so already, go on to set up a screen lock and enable 2FA.

- Step 3: Download the Right iPadOS Firmware
Now is the time to put your iPadOS device into Recovery Mode, a process made easier by the given detailed instructions. Wondershare Dr.Fone will detect your iPad model and ask you to pick the right “System Version.” Afterward, tap “Start” to download the firmware and wait for the process to complete.

- Step 4: Complete the Unlocking of the Apple ID
Once the iPadOS firmware is downloaded and verified, click “Unlock Now.” This will initiate a confirmation prompt where you need to enter the code “000000” to confirm you agree to the procedure. Enter the code and click “Unlock” to kickstart the Apple ID removal process, which will take a few moments to complete.

Conclusion
In conclusion, this comprehensive guide has provided users with various effective methods for removing an Apple ID from an iPad. Recognizing the importance of this process for privacy, device transfer, and account management, the guide has addressed common scenarios and offered step-by-step instructions for each approach. From the simple settings adjustments and iCloud website methods to utilizing the App Store and iTunes, users have a range of options to choose from.
The provided solutions cater to most scenarios. Yet, for users encountering persistent issues, the use of Wondershare Dr.Fone is recommended. This powerful tool serves as a reliable and efficient means to unlock Apple ID and addresses complex Apple ID removal issues. By following the steps outlined in this guide, users can confidently navigate the process to remove Apple ID from their iPad without a password.
Removing Device From Apple ID For your Apple iPhone 13
Has the latest iPhone taken your attention lately? With a new Apple device in use, you might have cluttered a lot of devices under a single Apple ID. You can face multiple issues when you turn to backup content or save it on your Apple ID. It might be possible that the data of some other Apple device gets restored onto your new Apple device, which is never your priority.
This leads to removing unwanted devices from the Apple ID. If you are about to sell out or close down a device in the future, it is best to remove the Apple iPhone 13 device from Apple ID. This will help you save yourselves from the complicated conditions created by having multiple devices on the same Apple ID.

Part 1: Should I Remove Old Devices From My Apple ID?
Why should one look to remove their old devices from the Apple ID? There are multiple reasons involving the methods of removing devices from Apple ID. Before we get to the methods, let us first review why this is needed:
- Managing Devices on Apple ID: If you consider removing the Apple iPhone 13 devices from the Apple ID, this will help you keep track of all the associated devices with your credentials. Devices that have been sold and are not linked are not your responsibility to manage.
- Avoid Notifications and Updates: For devices that are old and will be sold out by you, you might receive notifications and updates. To avoid them, it is best to remove the Apple iPhone 13 device from your Apple ID to stop all notifications and updates.
- Protection of Privacy: When a device is sold out, it is best to remove it from your Apple ID to avoid breaching personal information. Someone else might try accessing or receiving your data.
Part 2: 4 Ways to Remove a Device From Apple ID
You would’ve surely understood the reasons for removing a device from the Apple ID. This can help you propagate into understanding the multiple techniques of performing this action. We have outlined some unique methods for removing Apple devices. To know how to remove the Apple iPhone 13 device from Apple ID, find out more about these methods below:
Method 1: Using an iPhone, iPad, or iPod Touch
The first and most straightforward technique of removing devices from Apple ID is through iPhone, iPad, or iPod Touch. If you wish to remove a device from your Apple ID, use any of the available Apple iOS devices and continue with these steps:
Step 1: Start by opening the “Settings” application on your iOS device and select your name displayed on the top.
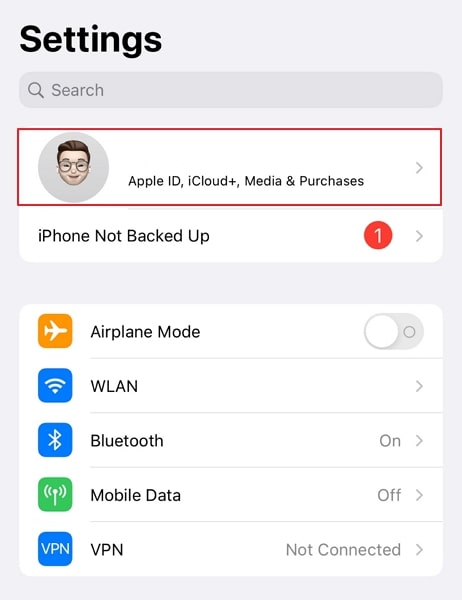
Step 2: On the next screen, find the Apple iPhone 13 devices connected to the same Apple ID. Select the particular device that you wish to remove from the ID.
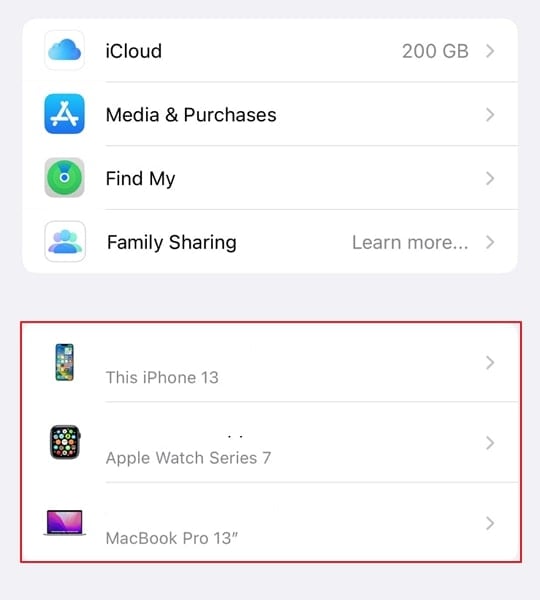
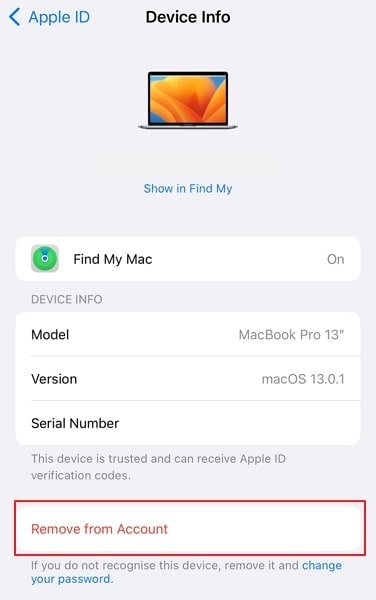
Step 3: As you proceed into the next window, find the “Remove from Account” option for executing the task. Once selected, you will be prompted again, where you have to select “Remove” to confirm the actions.
Method 2: Using a Mac
You can also try using your Mac to remove a particular device from your Apple ID. To do that perfectly, it is best to use the following steps as a guide for removing the Apple iPhone 13 device:
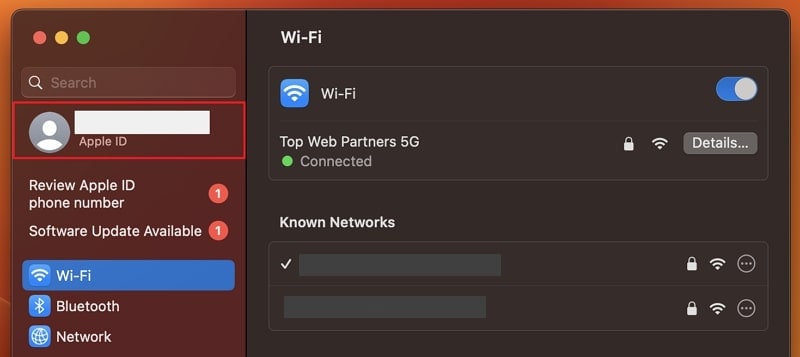
Step 1: Launch your Mac and click on the “Apple” icon displayed on the top-left of the screen. Next, you have to tap on the “System Settings” option from the drop-down menu.

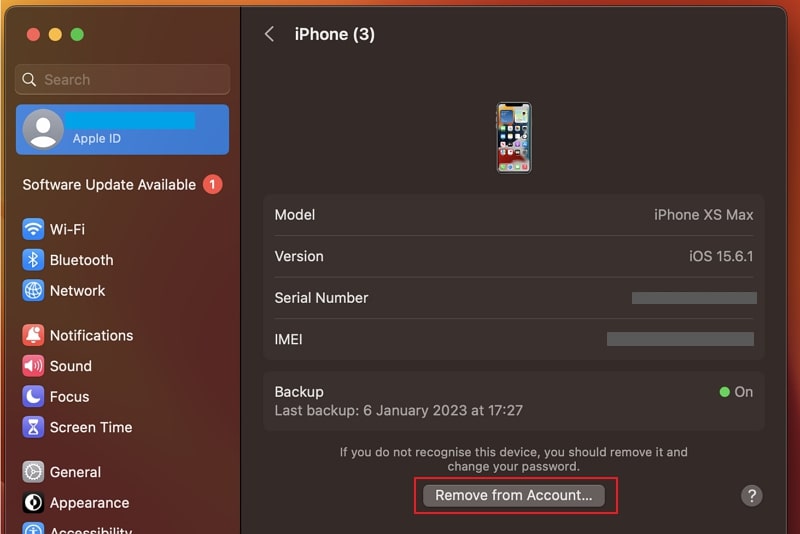
Step 2: As a new window opens, continue by clicking on your name to access your Apple ID details. With the screen displaying all options, scroll down to find the respective device.
Step 3: Once you continue to the next screen, find the “Remove from Account” button on the bottom of the options and lead to the following prompt. You will have to tap on “Remove” to execute the process.
Method 3: Using the Apple ID Account Page on the Web
This process can also be performed using the Apple ID account page from the web browser. For that, you will have to access the webpage from this link .
Step 1: As you access the webpage and log into it with your Apple ID, continue to the homepage. Lead to the “Devices” section on the left panel to open a new screen.
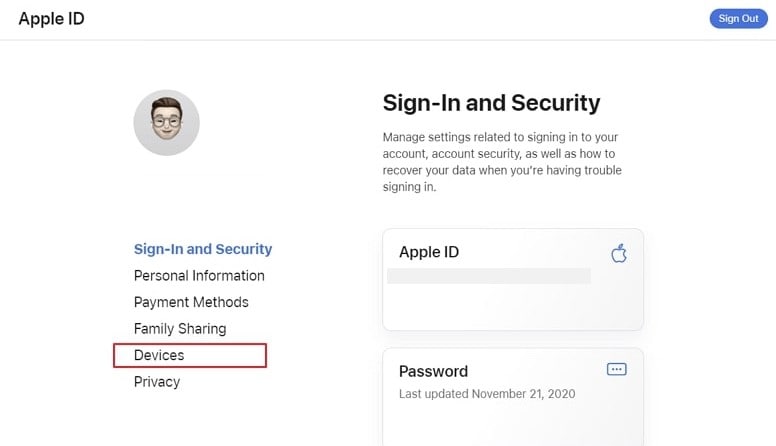
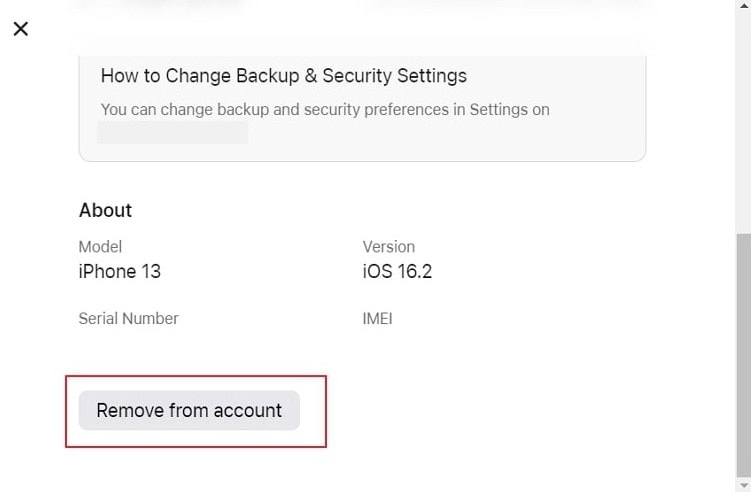
Step 2: Following this, select the Apple iPhone 13 device that you want to remove from the Apple ID. As a new window opens, select “Remove from Account” and continue to execute this process.
Method 4: Using the iCloud
iCloud can be another source to remove devices from Apple ID. To know how this method can be used to remove the Apple iPhone 13 device from Apple ID, look into the provided steps:
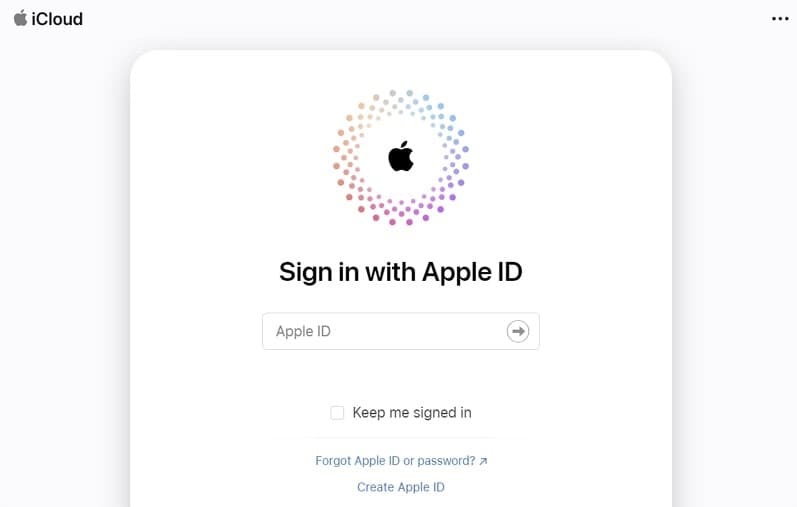
Step 1: Launch iCloud.com on your computer from a web browser and continue to log in with your Apple ID.
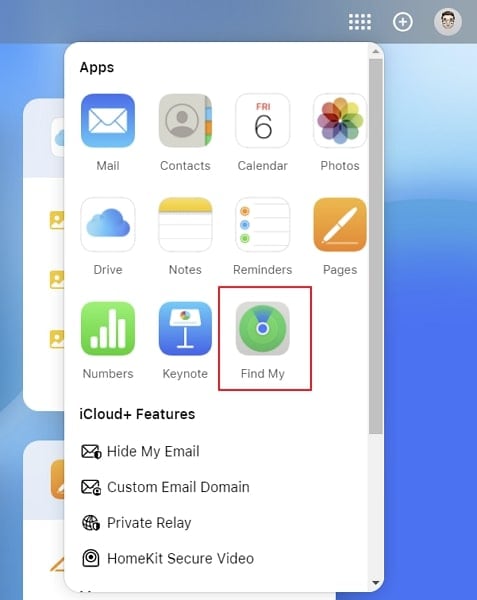
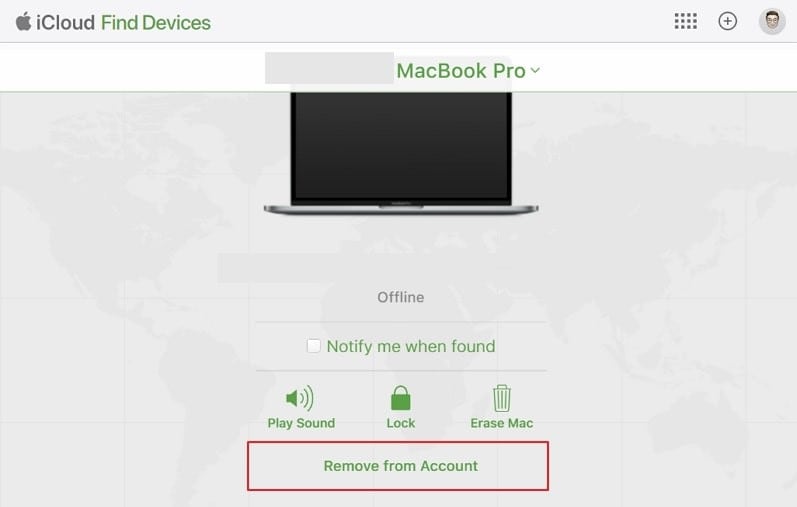
Step 2: As you get into the homepage of your iCloud, select the “Thumbnail” button on the top-right of the screen. After that, choose the “Find My” feature from the available options in the list.
Step 3: You will find yourselves on a new screen where you have to click the “All Devices” option. Select the Apple iPhone 13 device that you wish to remove to open a new screen. Select the “Remove from Account” option to remove the Apple iPhone 13 device from the Apple ID.
Part 3: Bonus Tips: Forgot Your Apple ID Password? Here’s What To Do
While you can remove a device from the Apple ID, you might come into re-using it again for some purpose. If it comes to such a condition and you have forgotten your Apple ID password, the Apple iPhone 13 device would be useless. The best thing to do in such a situation is to go with Dr.Fone - Screen Unlock (iOS) for unlocking your device.
Dr.Fone - Screen Unlock (iOS) is designed to provide confused iOS users with a proper direction to easily unlock their locked Apple devices. The tool is built to provide solutions in situations where you can bypass Activation Lock or easily unlock your Apple ID. It is an excellent tool serving Apple users with the option of removing all kinds of locks.
Key Features of Having Dr.Fone - Screen Unlock (iOS)
It is great to learn more about the tool to process the method perfectly. For that, look into the features presented next for a better understanding of Dr.Fone - Screen Unlock (iOS):
- It provides support for the latest iOS version and Apple devices.
- The tool supports removing all kinds of locks, including Face ID, Touch ID, screen time passcode, etc.
- It can also remove Apple ID from the Apple iPhone 13 device without requiring iTunes.
Steps For Unlocking Apple ID From Apple Device with Dr.Fone - Screen Unlock (iOS)
We will now shift to knowing more about how to bypass Apple ID from a device whose password is forgotten:
Step 1: Launch Dr.Fone and Open Screen Unlock
To start the process, it is best to download and install the latest version of Wondershare Dr.Fone on your computer. As it launches, continue to select “Screen Unlock” from the options.
Step 2: Proceed to Remove the Apple ID
You will have to continue to the option of “Remove Apple ID” from the list to unlock the Apple ID.

Step 3: Trust Computer and Start Unlocking
Turn on your Apple device and continue to trust the Apple iPhone 13 device it is connected to. After tapping on “Trust,” you can continue with the process. On your computer’s screen, click on “Unlock Now” to proceed next.
Step 4: Enter Recovery Mode and Start
Put your Apple device into the Recovery Mode by following the on-screen instructions on the computer’s screen. As it is done, the unlocking process starts automatically. The process will be completed in a few seconds, and the prompt will display the completion of the method.

Part 4: FAQs about Apple ID
- How to create a new Apple ID on an iPhone?
Open the “App Store” and click the “Profile” icon on the top-right. You must continue clicking on the “Create New Apple ID” button after you have signed out of iCloud of your previous ID. Provide all required details for creating the Apple ID and confirm the process.
- How do I add a device to My Apple ID?
To add a device to your Apple ID, you have to configure it first and log in with your existing ID from there. This is how it can be added to the Apple ID list of devices.
- How many devices can I add to My Apple ID?
Apple ID allows you to connect ten devices under the same account. In these ten devices, there cannot be more than five computers associated with the Apple ID.
- Why can’t I create a new Apple ID?
If you are unable to create a new Apple ID, it is possible that you would have exceeded the maximum number of Apple IDs that can be set up with iCloud on one device.
- How can I Find My Apple ID password?
There is no way to find your Apple ID password on your devices. If that is the case, you will have to reset the password or remember it so that you can use it for a purpose.
Conclusion
You have learned proper techniques for removing devices from your Apple ID in this article. With all these methods, you can remove any device from Apple ID without requiring additional tasks. This article has also helped you with a tool to help you in situations where you have forgotten your Apple ID password. Dr.Fone - Screen Unlock (iOS) is an excellent option for removing security locks from iOS devices.
How to Remove an AirTag from Your Apple ID Account On Apple iPhone 13?
Apple provides many exciting features in its products, including the AirTag feature on iPhone devices. However, after enabling the function, many iPhone users forget to remove it from the FindMy app ahead of time. Therefore, if you are selling or resetting the Apple iPhone 13 device, you need to remove AirTag from Apple ID to be usable later.
If someone removes the AirTag without resetting it while operating in the Bluetooth range, deleting AirTag ownership will require manually breaking the Apple iPhone 13 device apart and further configuration.
Remove this connection from the Apple ID account with simple steps first-hand to avoid that. Read on to know the steps involved in this process directly or with the best software alternative.

Part 1. What Exactly Does an AirTag Do?
Before discussing how to remove AirTag from Apple ID, you should know better about the function itself. The AirTag feature is available for iOS devices. Therefore, one can register the AirTag process with the Apple ID you are utilizing on your smartphone.
Apple users can attach the AirTag to different objects like backpacks or keychains. This makes it simple to find these objects later in case they get misplaced or lost through the Find My app on the iPhone.
Users can add their AirTag to one Apple ID account, so you cannot access this from the Find My app via other accounts. In case of loss, you must remove the AirTag from your device entirely.

Part 2. How to Remove an AirTag from Your Apple ID onApple iPhone 13 & iPad?
After adding the AirTag to any object, it instantly syncs with the Apple ID of the user. So, only the primary Apple ID user can use or monitor the AirTagged item. Other users can use it only after resetting the AirTag. So, learn how to remove AirTag from Apple ID via the Find My app on different iOS device types.
Version 1: Removing AirTag on iPhone
Step 1: Access the Apple iPhone 13 homepage and access the Find My app.
Step 2: From the bottom menu bar, tap on the Items option.
Step 3: The information about which AirTag is associated with your chosen item will appear in the next page list.

Step 4: Choose the selected items and swipe upwards on the screen. Then, find the Remove Item button and press it.

Step 5: Following this, select and press the Remove button. Repeat for confirmation.
Version 2: Removing AirTag on iPad
Step 1: Access the Find My app from the home screen on your iPad device.
Step 2: When the app opens, click on the Items icon at the bottom part of the screen.

Step 3: Choose the items you want to delete by tapping them.
Step 4: Swipe up and choose the “Remove Item” option.
Step 5: On the next confirmation prompt that comes up, click Remove.

Part 3. Bonus Tips: How to Unlock an Apple ID That’s Locked?
Typically, it is impossible to use a PC or Mac to access and remove AirTag from Apple ID. One has to use the Apple iPhone 13 or iPad device only. But what if the smartphone screen or Apple ID is locked?
You need to unlock the Apple iPhone 13 device using capable software like Dr.Fone - Screen Unlock (iOS) to remove the blockage. This software can remove many different Apple screen lock types, like Black Screen of Death, Face ID Lock, Screen Time Passcode, and more.
The process of bypassing Apple ID as a feature is available for iOS 14.0 or its previous conversions. It does not require extremely complex jailbreaking or configuration steps- all is complete in some clicks only.
Top Features:
- Users get at least ten retries for the password or lock removal attempt.
- Suitable for removing various screen locks, Apple ID locks, etc.
- Works to bypass Apple ID account locking without a password within seconds.
- It allows Apple ID lock removal even with the active Find My iPhone feature on the smartphone.
How to use it?
Step 1: Install the Dr.Fone app and launch it on the computer. Choose Screen Unlock.
Step 2: On the next page, tap the Remove Apple ID option. Then enter the necessary passcode to verify that you trust the PC. Then, do further scanning.
Step 3: Back up all devices before the procedure. Then, visit the Settings page > user profile > Password & Security. Then, toggle the Two Factor Authentication feature to the ON part. Then, press Unlock Now.
Step 4: Put the smartphone into recovery mode with on-screen instructions. Then, restart the phone. Complete the resetting steps and press the Restart button. It will unlock the Apple iPhone 13 device automatically.
Step 5: Verify on your device that the Apple ID is unlocked. Then, go to the Find My app and remove the AirTag feature as detailed previously.

Part 4. FAQs about AirTag
- How to Set Up and Add an AirTag on Your Apple iPhone 13?
Firstly, get your device ready to get set up. Remove the wrap around the AirTag and pull the tab out to start the battery. After it plays a tiny sound, hold the Apple iPhone 13 device near the iPhone/iPad and press Connect. Next, change the name of the AirTag on your list, give an emoji to it, and press Continue. Register it with the Apple ID in the next prompt and then choose Done.
- How to Rename AirTag and Change Its Emoji?
You can access the Items tab on the Find My application and choose the AirTagged item. Then, scroll downward and choose Rename item to change the name. Finally, create a customized name and add an emoji as well.
- How Far Can You Track an Apple AirTag?
With the Bluetooth connection switched on, one can track Apple AirTag for approximately 100 feet.
Conclusion
The added AirTag stays connected with one Apple ID account until you reset it. So, use the process mentioned to remove the AirTag via iPhone or iPad. If the iPad or iPhone you are using has locked the Apple ID, you can use another software Dr.Fone - Screen Unlock (iOS) , to access it without data loss securely. Then, follow the steps mentioned to reset the AirTag here.
Also read:
- [Updated] 2024 Approved ShareX Examined Evaluations & Alternatives
- 2024 Approved Mastering the Art of FreeFire A Gaming Youtuber’s Guide
- 2024 Approved Streaming to the Max Top 5 Headset Picks
- ChatGPT New Plugins Feature: A Comprehensive Signup Process Explained
- Demystifying Ray Tracing: A Comprehensive Guide
- From Creation to Apple Your Podcast's Journey for 2024
- Getting Up Close with the Cutting-Edge Technology in the Apple iPhone 15 Pro
- How to Change Credit Card on Your iPhone 12 Apple ID and Apple Pay
- In 2024, How to Fix Locked Apple ID from iPhone 7
- In 2024, Your Account Has Been Disabled in the App Store and iTunes On Apple iPhone XS?
- In 2024, Your Account Has Been Disabled in the App Store and iTunes On iPhone 6?
- The Complete Walkthrough: Integrating Subtitles and Descriptive Text Onto Your Insta-Stories
- Turning Off Two Factor Authentication On Apple iPhone 11? 5 Tips You Must Know
- Why Apple Account Disabled From your iPhone 8? How to Fix
- Why Apple Account Disabled On your Apple iPhone 8? How to Fix
- Title: In 2024, Guide on How To Remove Apple ID From Apple iPhone 13
- Author: Alma
- Created at : 2024-12-02 16:05:12
- Updated at : 2024-12-06 16:02:28
- Link: https://apple-account.techidaily.com/in-2024-guide-on-how-to-remove-apple-id-from-apple-iphone-13-by-drfone-ios/
- License: This work is licensed under CC BY-NC-SA 4.0.