
In 2024, Guide on How To Remove Apple ID From iPhone 8 Plus
Guide on How To Remove Apple ID From Apple iPhone 8 Plus
Apple products are considered one of the most secure devices, and it is difficult for any second person to breach their system. The Apple ID is the reason behind it, which serves as the main controlling system of Apple products. Apple ID gives access to various functionalities such as the App Store, iCloud, and more. These services ensure the seamless and proper functioning of the Apple iPhone 8 Plus operating system.
However, you may want to remove Apple ID from iOS devices for any reason. Don’t worry; this article has got you covered in this context. It will provide you with an effective guide to how to remove Apple ID from an iPad.
Part 1: What Are the Possibilities That a User Wants To Remove Apple ID From Their iPad?
When it comes to removing an Apple ID from an iPad, the reasons behind such a decision can be pretty straightforward. These are crucial in maintaining privacy and managing one’s digital presence. Some of the key possibilities that lead users to remove their Apple ID from an iPad include:
1. Device Sale or Transfer
When preparing to sell or transfer ownership of an iPad, removing the associated Apple ID becomes essential. This ensures that the new owner can set up their own Apple ID and prevents any data or privacy issues from arising.
2. Privacy Concerns
There are situations where users feel the need to safeguard their personal information or maintain privacy. In this regard, removing the Apple ID from the iPad can be a crucial step. This ensures that no personal data is accessible to others who might gain access to the Apple iPhone 8 Plus device.
3. Switching to a New Apple ID
For a variety of reasons, including changes within an organization or a desire for a clean slate, individuals may opt to transition to a new Apple ID. By deleting the previous Apple ID from the iPad, the transition to the fresh account can occur smoothly, minimizing any potential conflicts or overlaps.
4. Resolving Apple ID-Related Issues
There are instances where an Apple ID is causing technical issues. It can prevent the smooth operation of the iPad, requiring the removal of the existing Apple ID. This can serve as a troubleshooting measure to resolve any persistent problems.
5. Upgrading to a New iPad
When acquiring a new iPad, individuals may wish to transfer their data and settings from their previous device. By removing the Apple ID from the former iPad, users can streamline the data transfer procedure.
Part 2: Primary Ways of Removing Apple ID From the iPad (With Password)
When dealing with the removal of an Apple ID from an iPad, there are multiple approaches available. Each method is designed to accommodate different situations and user choices. Whether you possess the Apple ID password or require a password reset, this guide will lead you through the diverse methods. Summarized below are the top 5 ways for how to remove Apple ID from an iPad:
Way 1: From the Settings
A simple way to eliminate your Apple ID from your iPad involves accessing the Apple ID settings and logging out. This technique works well for individuals who remember their Apple ID password and wish to unlink their account from the Apple iPhone 8 Plus device. Below is a detailed walkthrough to assist you in executing this process:
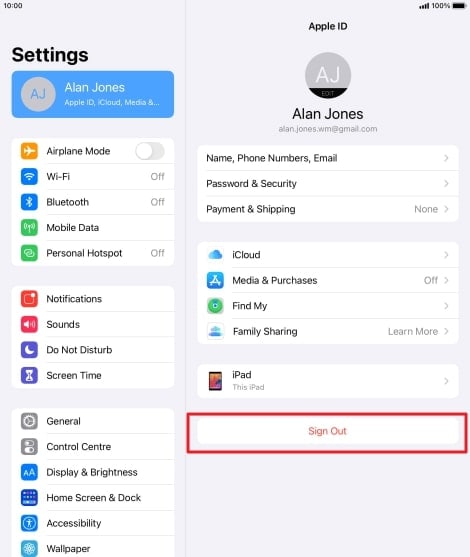
Instructions: Access the “Settings” application on your iPad and select the Apple ID option. Proceed by scrolling down and choosing the “Sign Out” function. You will then receive a prompt to input your Apple ID password. Upon entering the password, tap “Turn Off” to finalize the procedure by disabling Find my iPad.
Way 2: From the iCloud Website
Another effective method to remove your Apple ID from your iPad is by accessing the iCloud website. This method allows you to manage your devices remotely, making it convenient if your iPad is unavailable or lost. Follow these steps on how to remove Apple ID from an iPad using iCloud:
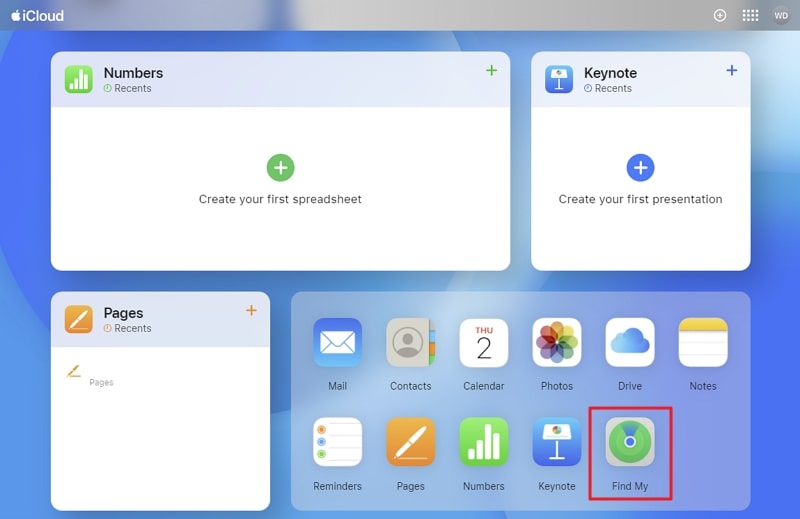
- Step 1: After logging into the iCloud website using the same Apple ID associated with the iPad, tap “Find My.” It will take you to a screen with a map where all devices linked to the Apple ID are shown.
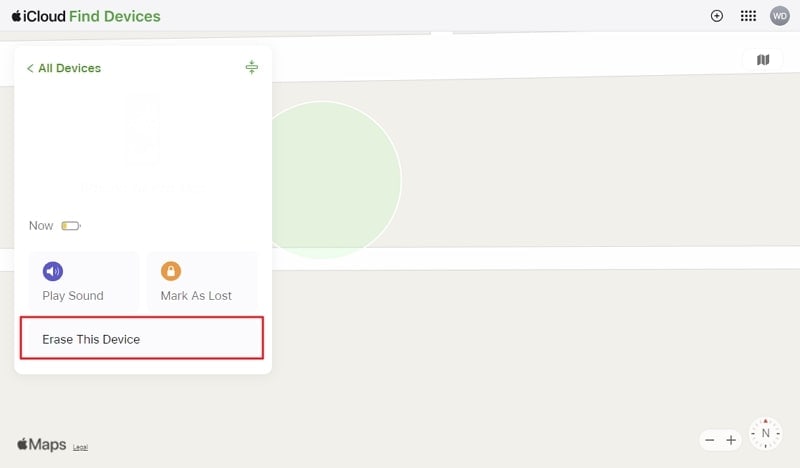
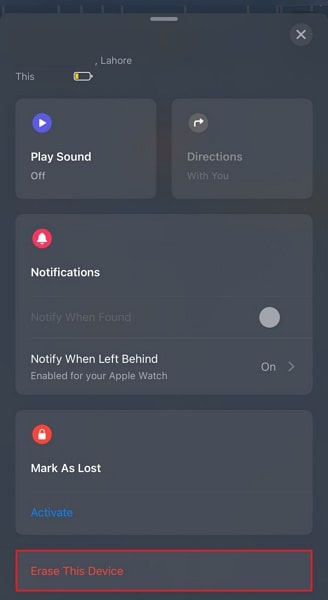
- Step 2: Here, select the targeted iPad and click “Erase This Device” from the available three options. It will prompt a confirmation message where you will need to press “Next” and provide the Apple ID password to initiate the process of removing the Apple ID from the iPad.
Way 3: From the App Store
You can also eliminate an Apple ID from your iPad by utilizing the App Store. This technique permits you to directly remove your Apple ID from a particular iPadOS device through the settings of the App Store. You can use the following steps to remove Apple ID via the App Store:
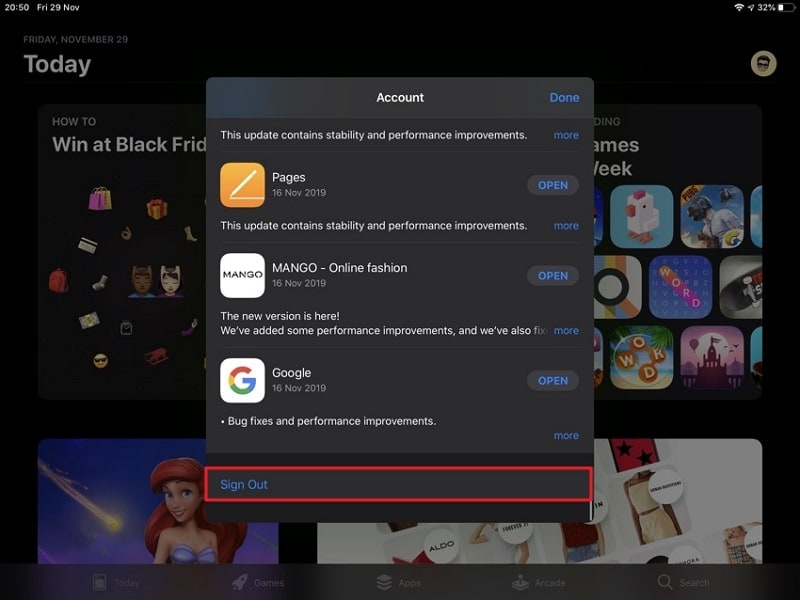
Instructions: Access the App Store on your iPad and tap on the “Profile” image from the top right corner to access the updates and settings options. Then, scroll down to the end of the options and choose the “Sign Out” option to remove the Apple ID from the iPad.
Way 4: From iTunes
To remove an Apple ID from your iPad, you can also utilize iTunes. By facilitating a complete restoration, you can effectively refresh the software on the Apple iPhone 8 Plus device. This approach proves especially beneficial when seeking to thoroughly erase the Apple iPhone 8 Plus device’s content and initiate anew. Here are the steps to be followed for how to remove Apple ID from iPad without a password via iTunes:
Step 1: Turn off your iPad and connect it to a computer that has the latest version of iTunes. Launch iTunes and put your iPad into Recovery Mode using one of these guidelines:
**For iPads with Face ID.**You will first have to press and release the “Volume Up” button. Then repeat the process with the “Volume Down” button and afterward press and hold the “Top” button. Release the button when the Recovery Mode screen appears on your iPad.
For iPad with Home Button. At the same time, press and hold the “Home” and “Top” buttons. Keep holding them until you see the Recovery Mode screen, and then release them.

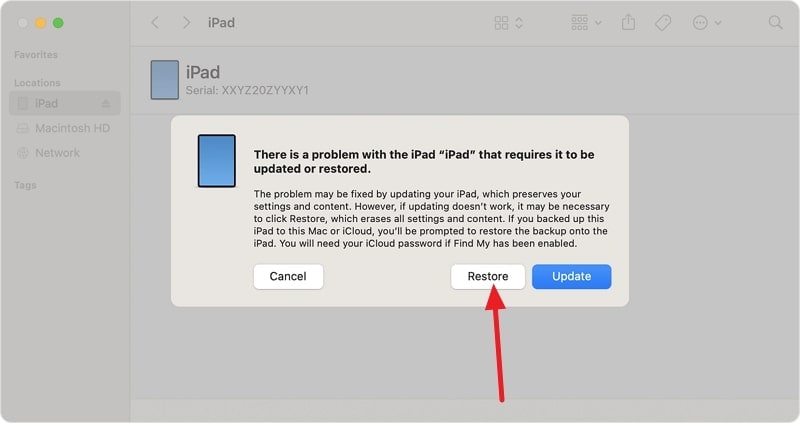
- Step 2: When your iPad enters Recovery Mode, iTunes will recognize it and offer the options to “Update” or “Restore” it. Select “Restore” and then follow the on-screen instructions to finalize the procedure of removing the Apple ID.
Way 5: From Find My App on Other Device
In case your Apple ID is currently in use on other devices, the Find My service enables you to detach it from the specific iPad. By employing this approach, you can conveniently oversee your linked devices via the Find My application on an alternate Apple device. To facilitate this procedure, here is a detailed, step-by-step walkthrough:
- Step 1: Launch the “Find My” app on the other trusted iPad or iPhone and tap the “Devices” option. From all the Apple iPhone 8 Plus devices connected to the Apple ID, find and select the targeted iPad.
- Step 2: After finding the iPad, tap “Erase This Device” and follow it by pressing “Continue.” Finally, confirm your action by tapping “Erase” and providing the Apple ID password.
Part 3: Remove Apple ID Without Password by a Powerful Tool - Wondershare Dr.Fone
If the problem of removing Apple ID from your iPad is not resolved, your iPad is not of particular use. This is because an Apple ID is responsible for all the basic functions, and you don’t even know the password. There is a need for a more effective and powerful solution in order to maximally utilize your iPad. This is where the feature of Wondershare Dr.Fone – Screen Unlock (iOS) comes out with its extraordinary ability to resolve such issues.
This software is an easy-to-implement solution in answer to the nonfunctioning of all the remedies mentioned above. It removes screen passcodes face ID and bypasses the iCloud activation lock effectively in no time.
Dr.Fone - Screen Unlock (iOS)
Unlock iPhone/iPad Lock Screen Without Hassle.
- Simple, click-through, process.
- Unlock screen passwords from all iPhone and iPad.
- No tech knowledge required, everybody can handle it.
- Supports the latest iOS version fully!


4,395,216 people have downloaded it
Key Features of Wondershare Dr.Fone
- Wondershare Dr.Fone – Screen Unlock removes all types of locks like Apple ID, Face ID, Touch ID, Screen Time Passcode, etc.
- This tool can bypass the iPhone/iPad iCloud activation lock in a matter of a few seconds.
- With Wondershare Dr.Fone, you don’t have to worry about security risks as it provides full-time security with advanced encryption.
- It also removes the MDM if you have forgotten your username and password of your Apple iPhone 8 Plus/iPad.
Step-by-Step Guide Involved To Unlock and Remove Apple ID From iPad
Wondershare Dr.Fone provides you with simple steps to remove Apple ID effectively from your iPad without any effort. Here is the step-by-step guide on the process of how to remove Apple ID from an iPad without a password:
- Step 1: Move To Remove Apple ID in Wondershare Dr.Fone
The first thing you need to do is download and install Wondershare Dr.Fone on your computer from the official site. Then, launch it, click “Toolbox” from the left side, and choose “Screen Unlock” from the available options. The next part includes identifying your device as “iOS” and moving on to tap “Remove Apple ID.”

- Step 2: Enable Screen Lock and Two-Factor Authentication
At this point, you need to connect your iPad to the computer and tap the “Unlock Now” button. Now, Wondershare Dr.Fone will ask you whether you have enabled a screen lock and 2FA on your iPad or not. The answer needs to be affirmative for the process to work. So, if you haven’t done so already, go on to set up a screen lock and enable 2FA.

- Step 3: Download the Right iPadOS Firmware
Now is the time to put your iPadOS device into Recovery Mode, a process made easier by the given detailed instructions. Wondershare Dr.Fone will detect your iPad model and ask you to pick the right “System Version.” Afterward, tap “Start” to download the firmware and wait for the process to complete.

- Step 4: Complete the Unlocking of the Apple ID
Once the iPadOS firmware is downloaded and verified, click “Unlock Now.” This will initiate a confirmation prompt where you need to enter the code “000000” to confirm you agree to the procedure. Enter the code and click “Unlock” to kickstart the Apple ID removal process, which will take a few moments to complete.

Conclusion
In conclusion, this comprehensive guide has provided users with various effective methods for removing an Apple ID from an iPad. Recognizing the importance of this process for privacy, device transfer, and account management, the guide has addressed common scenarios and offered step-by-step instructions for each approach. From the simple settings adjustments and iCloud website methods to utilizing the App Store and iTunes, users have a range of options to choose from.
The provided solutions cater to most scenarios. Yet, for users encountering persistent issues, the use of Wondershare Dr.Fone is recommended. This powerful tool serves as a reliable and efficient means to unlock Apple ID and addresses complex Apple ID removal issues. By following the steps outlined in this guide, users can confidently navigate the process to remove Apple ID from their iPad without a password.
How To Delete iCloud Account: Remove Your Apple ID Permanently On Apple iPhone 8 Plus
Searching “How to delete iCloud account?” If you want to delete an iCloud account, you must delete an Apple ID account. And before you take this irreversible step, it’s crucial to understand the implications. Deleting your Apple ID account means permanently erasing all contents stored in your iCloud, such as media and documents. You’ll also lose access to essential Apple services such as the App Store, iMessage, and iTunes.
Deleting your Apple ID is a significant decision that should not be taken lightly. Proceeding with Apple ID deletion is a final decision. Once initiated, there’s no turning back. If you’re certain about it, refer to this article for a step-by-step guide on how to delete iCloud account and explore alternative options if you need it.

Part 1: Deleting iCloud Account? Essential Preparations Before You Proceed
Before you learn the steps on “how to delete icloud account,” take steps to ensure a smooth transition and prevent the loss of valuable data. Before you permanently remove an iCloud account, ensure you’ve completed the following:
Backup Your Data
Create a local copy of your files, photos, videos, and documents on your computer or an external hard drive. You can use cloud storage services or third-party apps like Wondershare Dr.Fone to selectively restore it later.
Request a Copy of Your Data
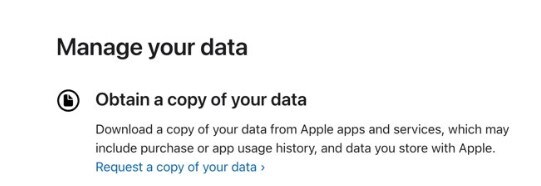
Apple provides a service on selected regions that allows you to request a copy of data associated with your Apple ID before deleting your account. It includes records of your sign-in, account details, iCloud contents, and Apple retail store transactions. Having a copy of this data can be useful if you need to access it in the future.
To request a copy of your data, go to Privacy Apple on your web browser. Under the Obtain a copy of your data section, click Request a copy of your data. Next, select the data you need and click Continue.
Review Your Active Subscriptions
Also, to “delete iCloud account,” first review any active subscriptions you may have, such as Apple Music, Apple TV+, or iCloud+ storage. If you don’t want to continue these subscriptions, cancel them before deleting your account.

Download Backups of Your Apps, Games, Music, Movies, TV Shows, Books, and Audiobooks
Your iCloud account may contain backups of your apps, games, and media purchases. Before deleting your Apple ID account, download them to your device or a computer to ensure you don’t lose access to your favorite content.
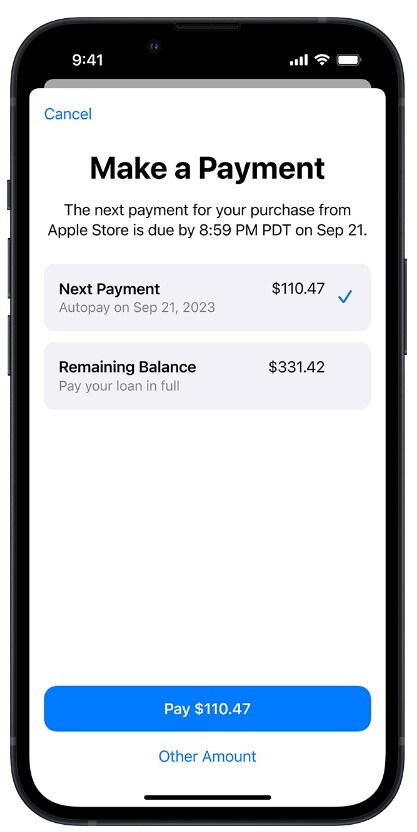
Pay Loan Installments You Have With Apple Pay Later
If you have an outstanding loan with Apple Pay Later, pay off any remaining installments before you delete your iCloud account. Otherwise, you may incur late fees or other penalties.
Sign Out of Your Devices and Web Browser
Before deleting your iCloud account, ensure you sign out of your account on all devices, including iPhones, iPads, Macs, and web browsers. Failure to sign out of an account can lead to several potential risks and inconveniences, including:
- Restricted device access
- App malfunctioning
- Constant Sign-in errors
- Web browsers retain your Apple ID information
Part 2: Remove iCloud Account Without Deleting: Maintaining Your Apple ID
Removing an iCloud account from your device doesn’t necessarily mean deleting the account itself. It simply means signing out of your iCloud account on that device. Your iCloud data remains intact and accessible from other devices.
However, when you sign out of iCloud on your device, you will be signed out of all Apple services that use your iCloud account. It includes Apple Pay, Find My, iCloud Mail, Siri Shortcuts, and others. You need to sign in with your Apple ID to use these services again.
Remove iCloud Account on iPhone
Here’s “how to remove iCloud account“ from your Apple iPhone 8 Plus without deleting the account:
- Step 1: Open the Settings app, then tap the Apple ID at the top of the Apple iPhone 8 Plus screen.
- Step 2: Scroll down, tap on Sign Out, enter your Apple ID password, and tap on Turn Off.
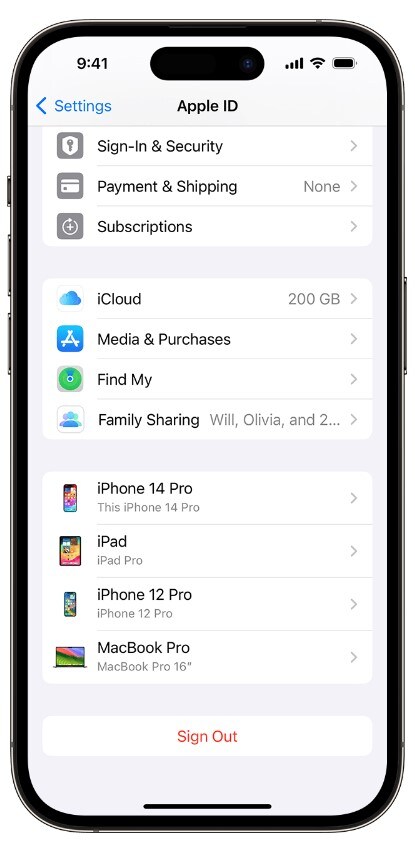
- Step 3: Tap on Sign Out to verify.
Remove iCloud Account on Mac Device
Follow these steps below to remove an iCloud account from your macOS Ventura or later:
- Step 1: Click on the Apple logo in the top left corner of your screen, then choose System Settings.
- Step 2: Click on the Apple ID icon and click Sign Out.
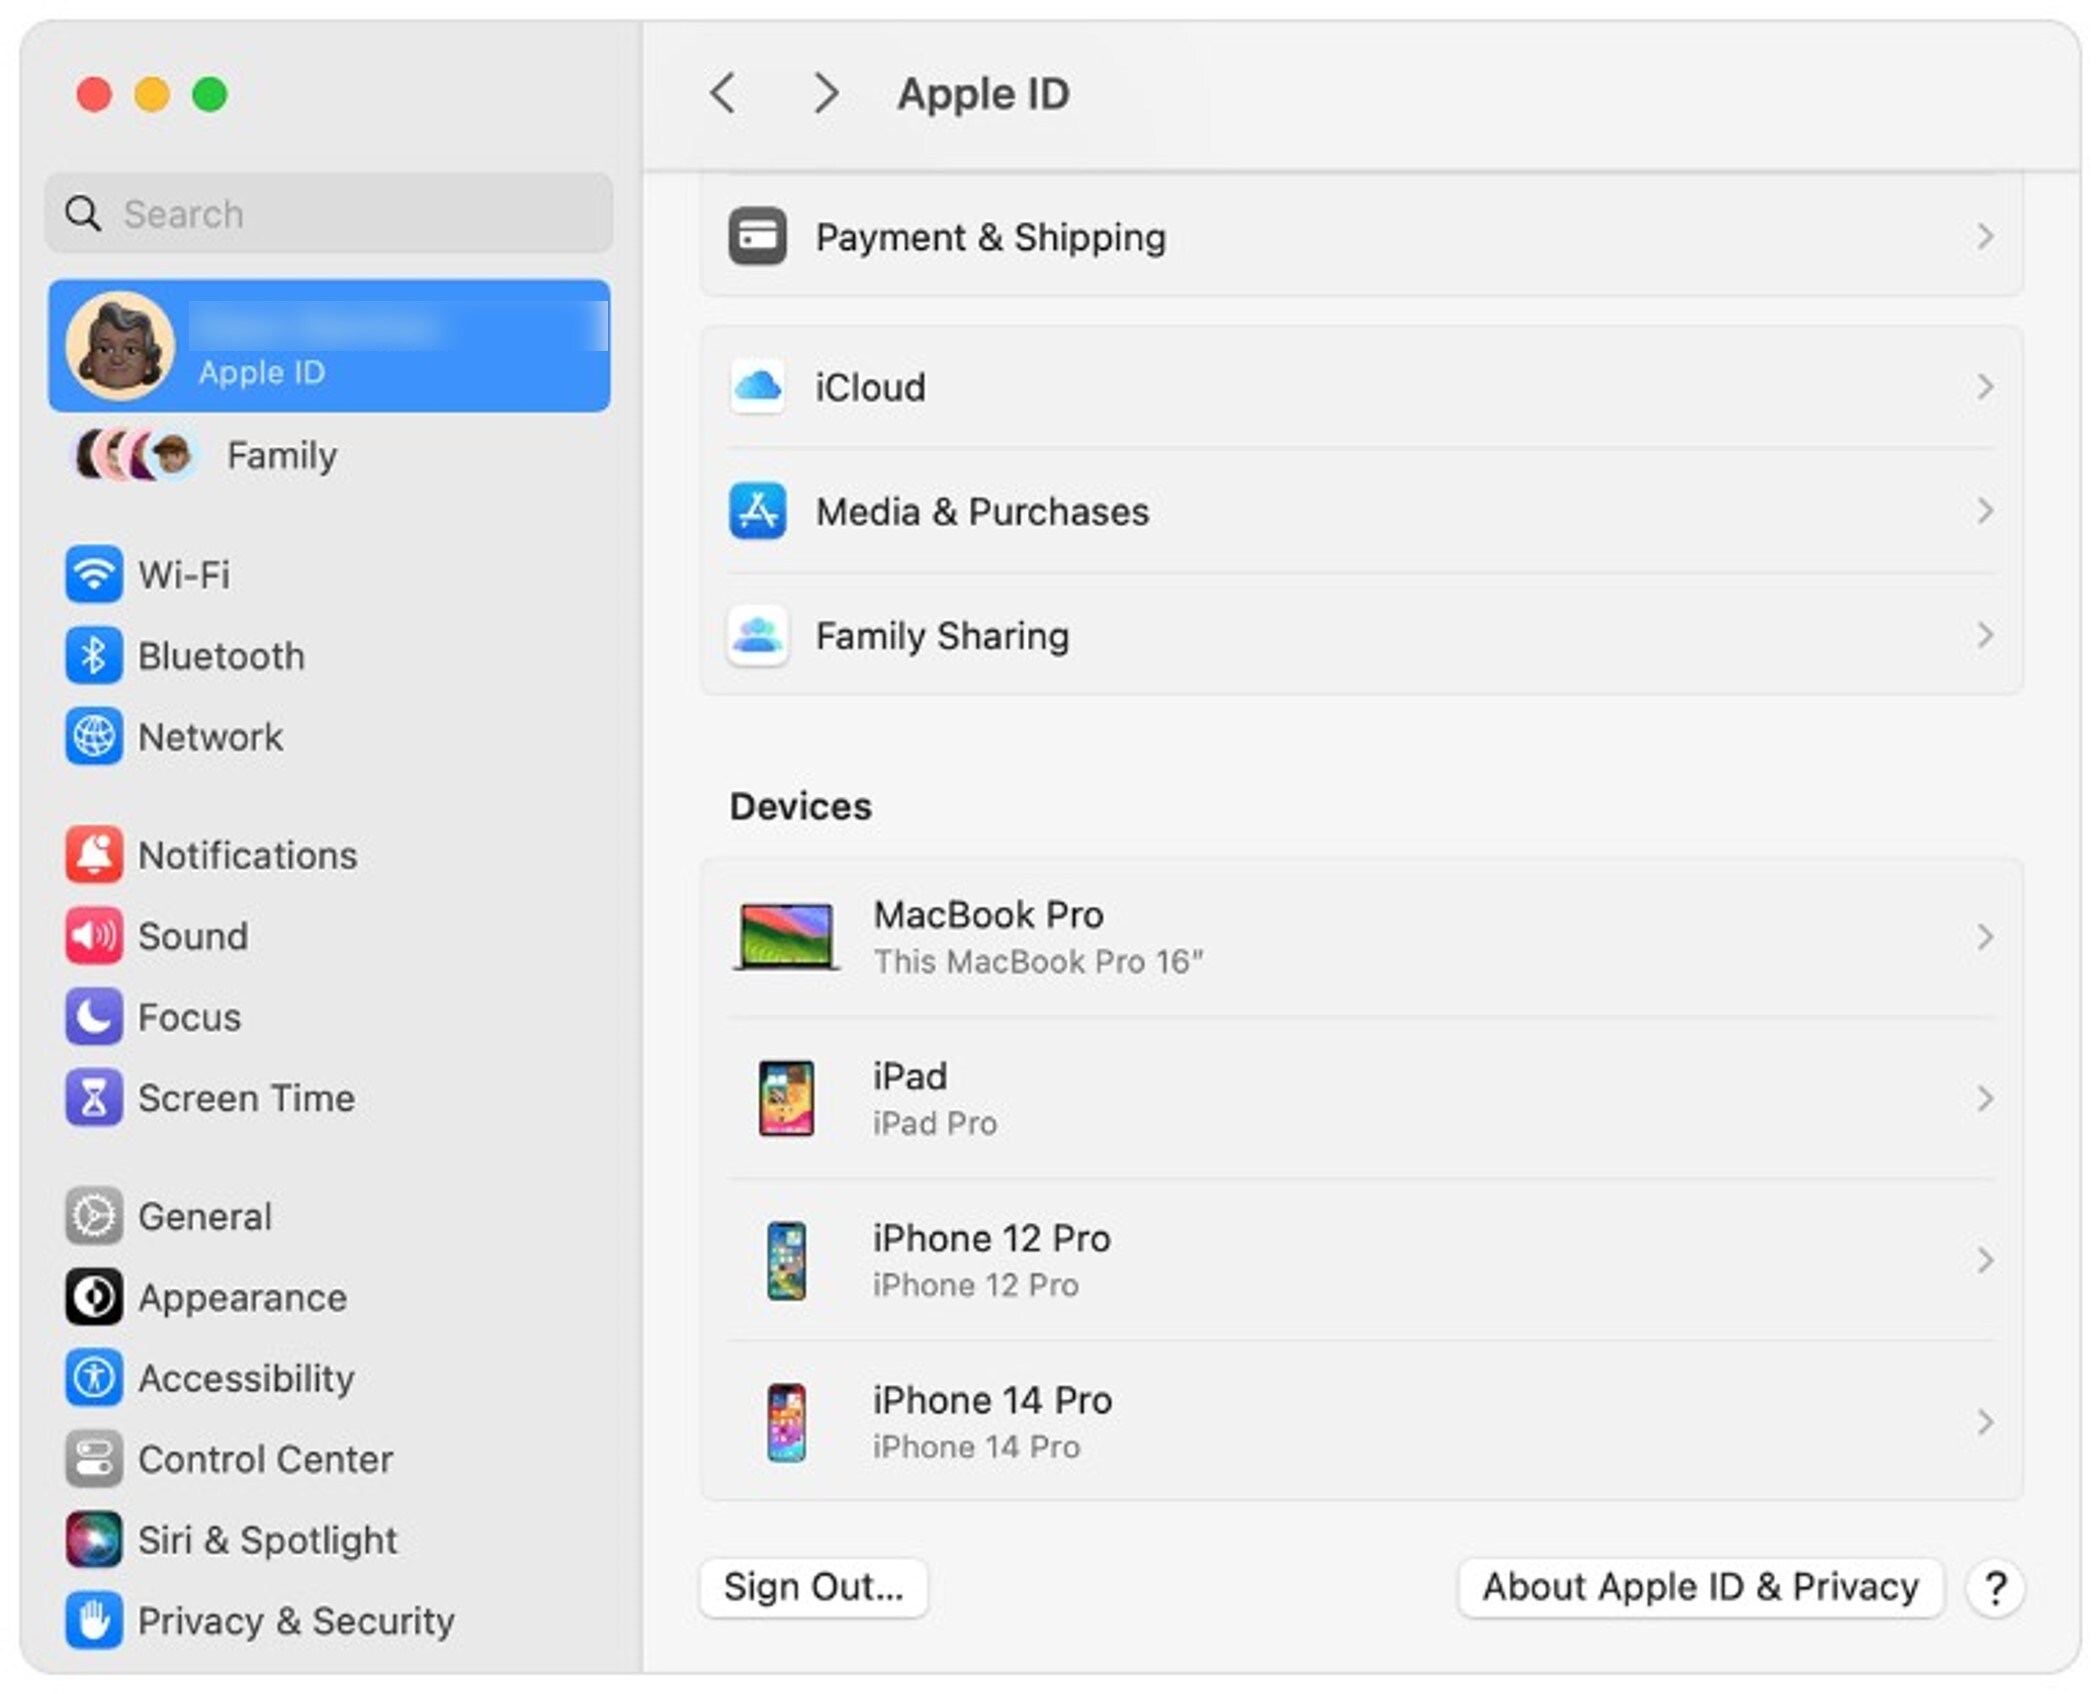
- Step 3: Select the data files you want to save, then click Keep a Copy.
Part 3: How To Delete iCloud Account Permanently?
Deleting your Apple ID has effects beyond the loss of data and services. These include:
- Apple will not be able to recover your Apple ID or any associated data once deleted.
- After deleting your iCloud account, any messages sent to you via iCloud Mail or iMessage will not be delivered.
- If you have any unused credit balance in your iCloud account, you cannot redeem or refund it upon deletion.
- The email address associated with your deleted Apple ID becomes unavailable for creating a new Apple ID.
If you are sure of your decision and have prepared for the consequences, here’s how to permanently delete your iCloud account:
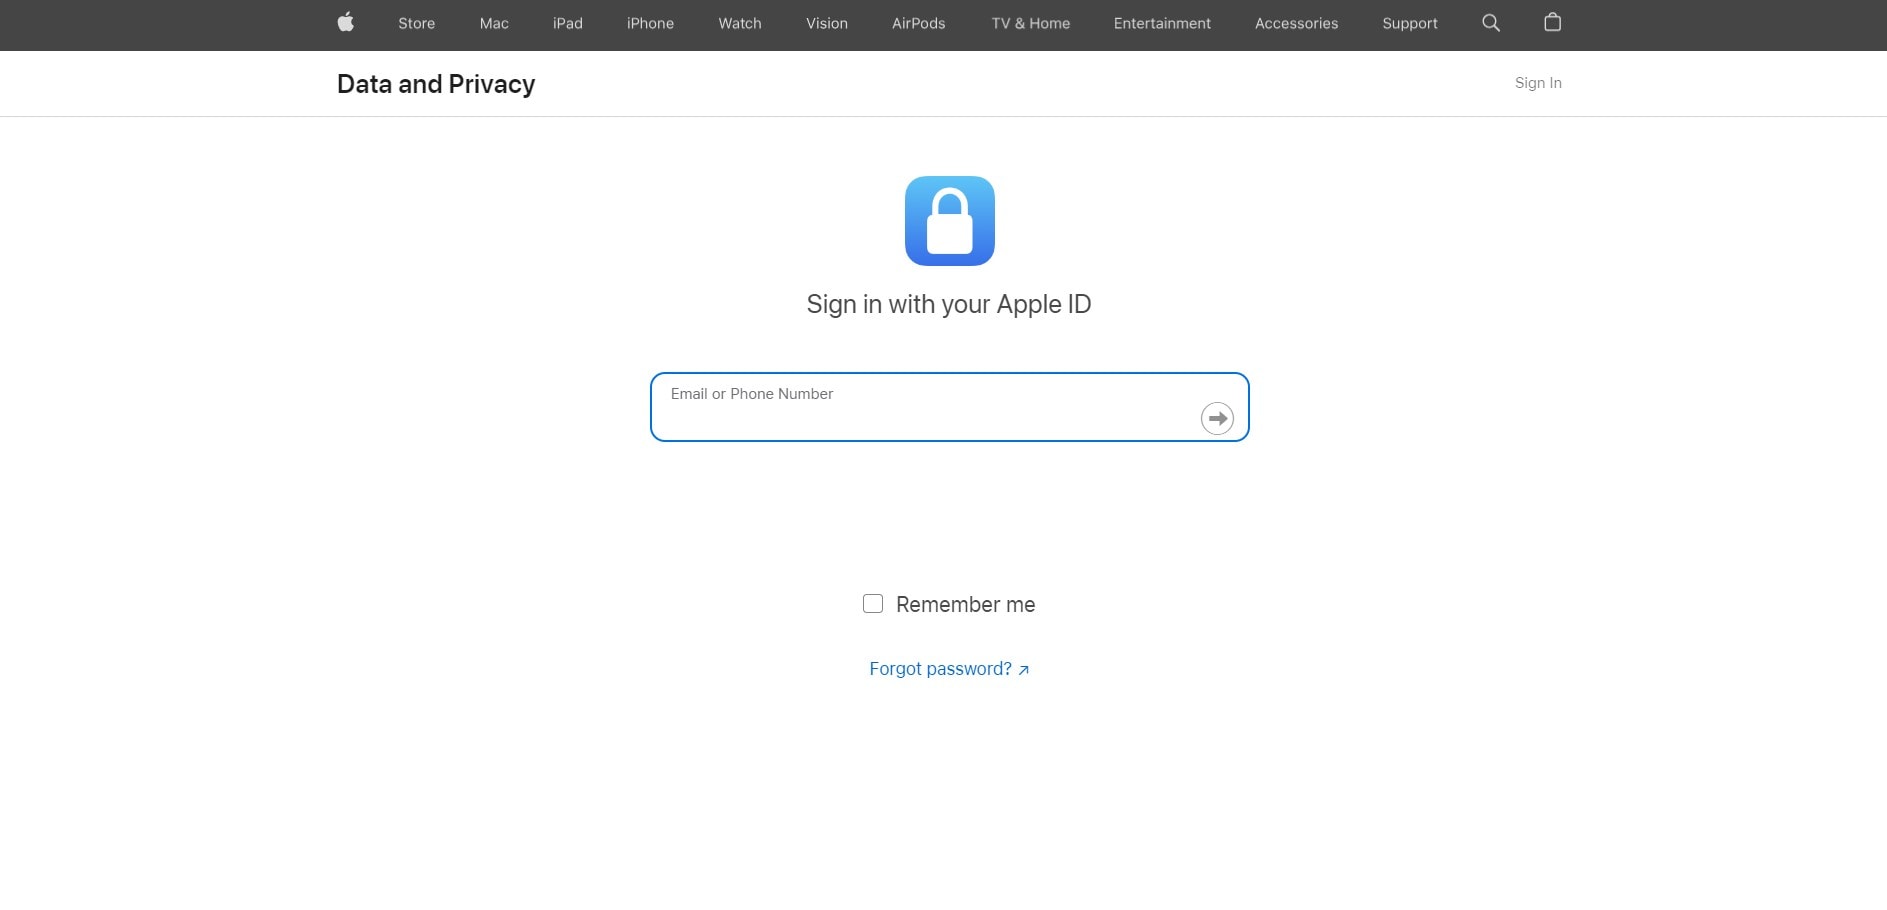
- Step 1: Open a web browser and visit Apple’s privacy website: privacy.apple.com. Sign in using the Apple ID associated with the iCloud account you want to delete.
- Step 2: From Delete your account section, click Request to delete your account.
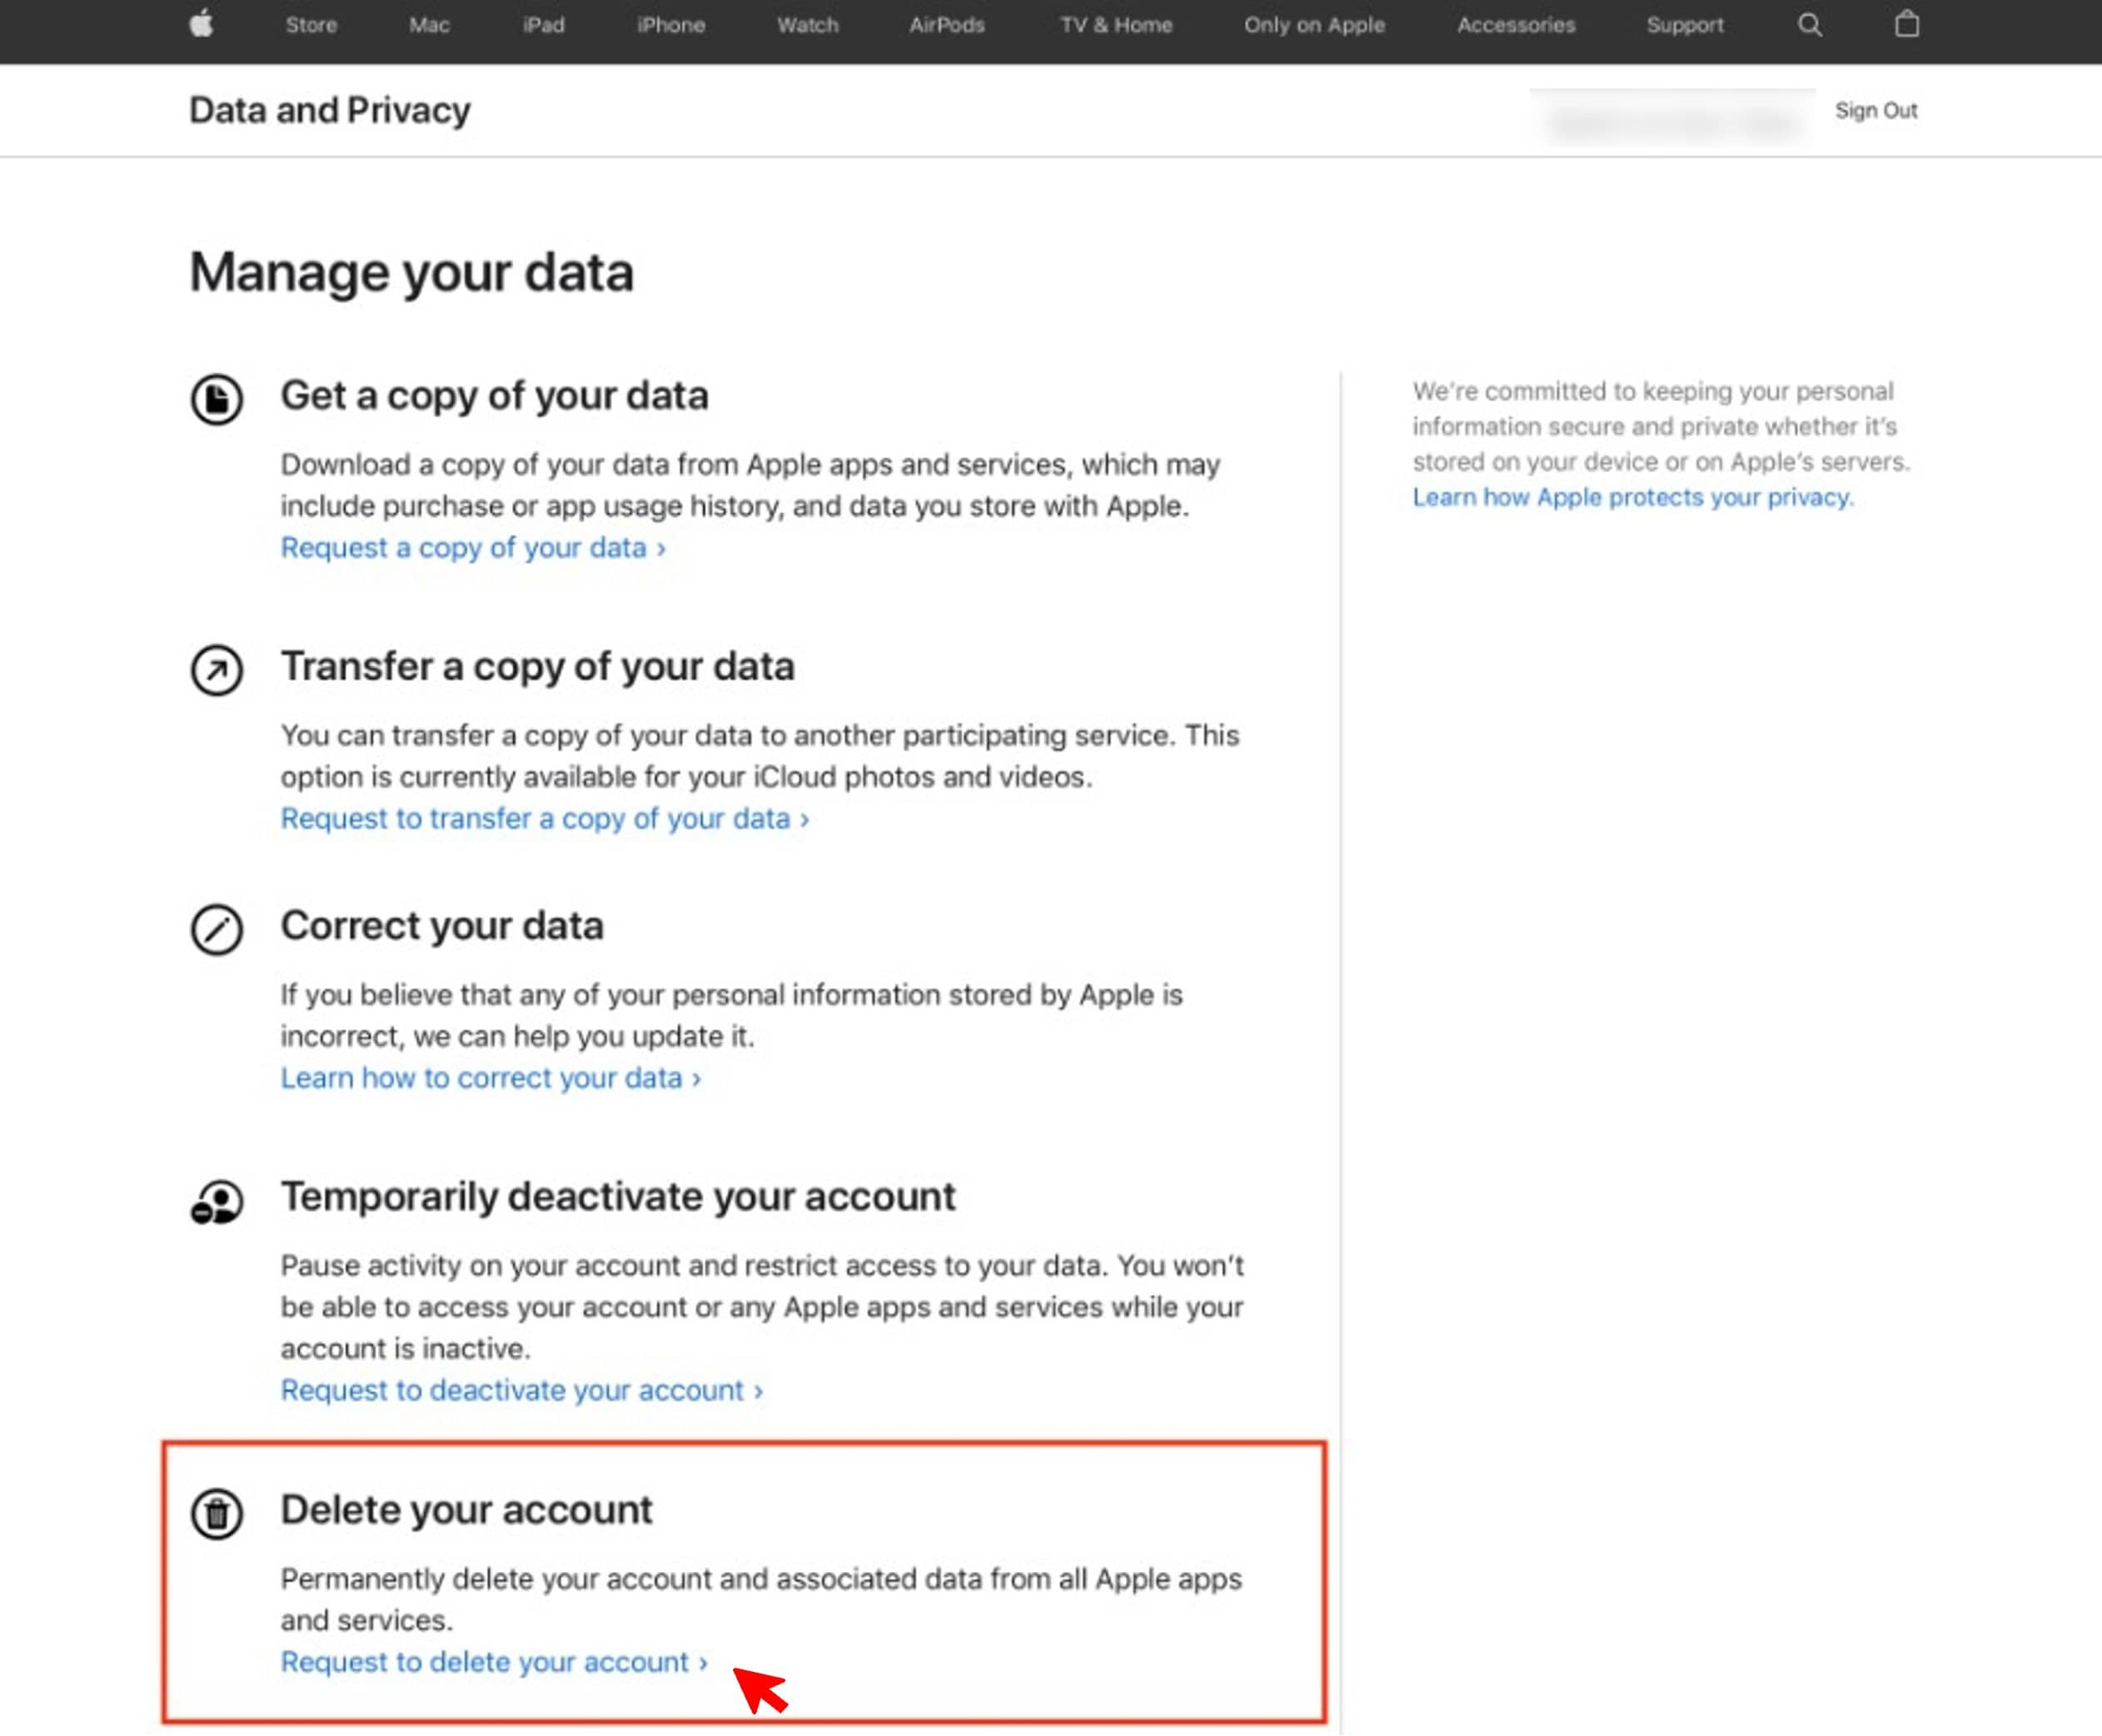
- Step 3: Choose a reason from the provided options in the drop-down menu for deleting your iCloud account, then click Continue.
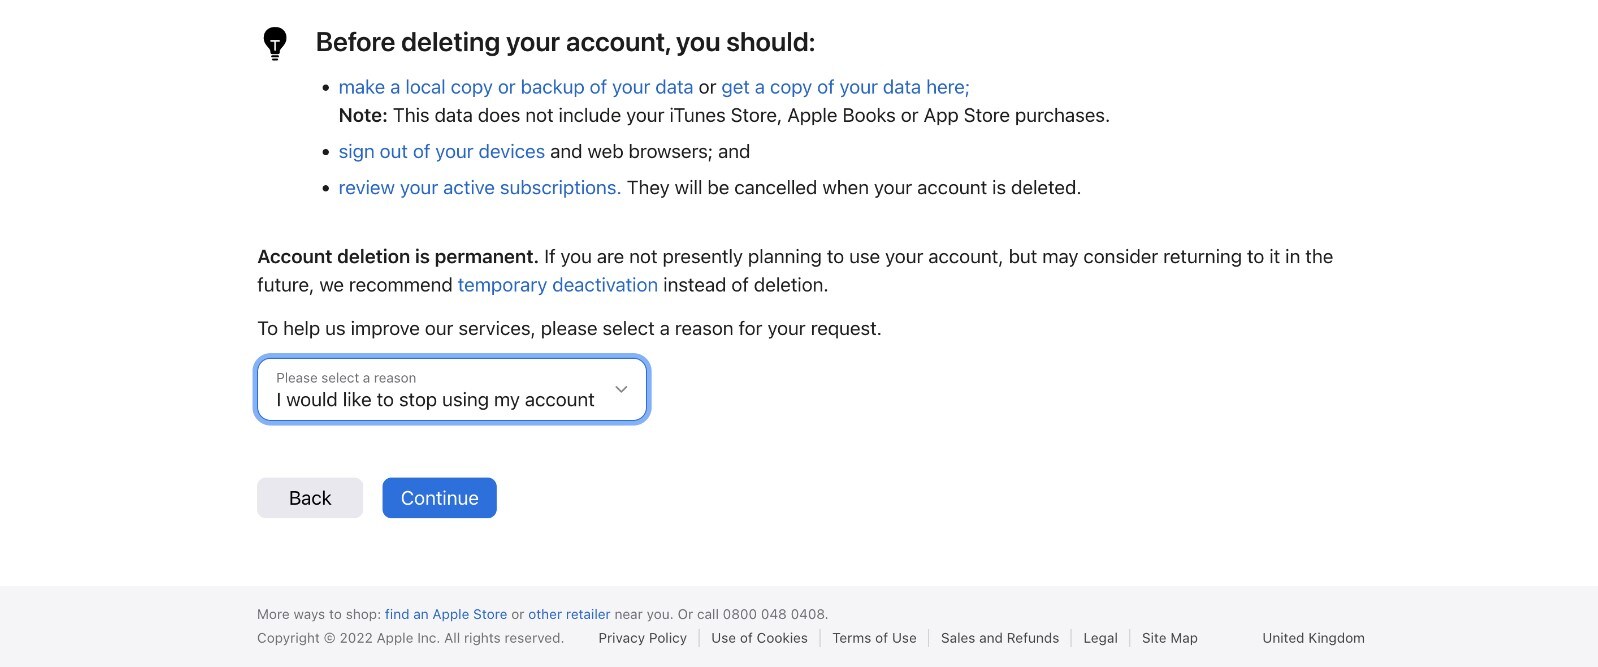
- Step 4: Review the information displayed, ensuring you want to proceed with deleting your iCloud account. Click Continue.
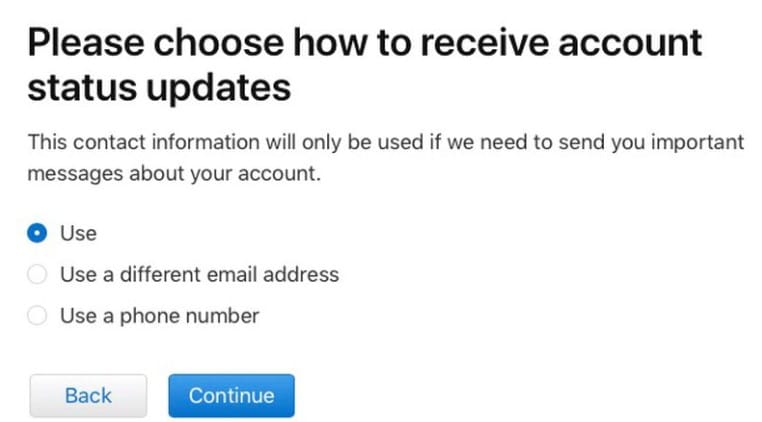
- Step 5: Choose where Apple can send you updates regarding your deletion request. Click Continue.
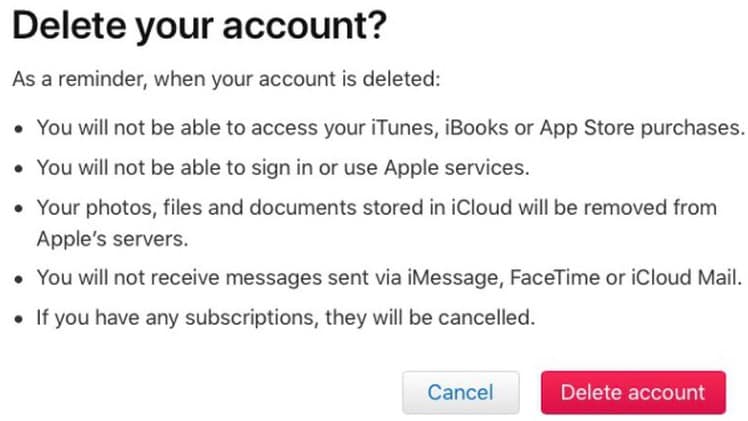
- Step 6: Follow the instructions provided to verify your identity. It may involve entering a code sent to your trusted device or answering security questions.

- Step 7: Review the summary of your deletion request, ensuring all details are accurate. Next, click Delete Account to finalize the deletion process.
Part 4: How To Remove an iCloud Account Without a Password?
You’re not alone if you’ve forgotten your Apple ID password or bought a used iPhone with the previous owner’s Apple ID still on it. Many people find themselves in this situation, and it can be frustrating not being able to remove the iCloud account without the password. Fortunately, there is a way to do this using Dr. Fone’s iOS Screen Unlock tool:
- Compatible with all versions of iOS, including the latest iOS 17.
- Unlock different iPhone locks, such as screen locks and SIM locks.
- Bypass iCloud Activation lock
- Remove Apple ID even if the iOS device has enabled Find My service
Here’s a step-by-step guide on how to use Dr.Fone to remove an iCloud account without a password:
Step 1: Download and install Dr.Fone on your desktop.
Step 2: Launch the software and go to My Device. Follow the in-app instructions to connect your Apple iPhone 8 Plus to your computer using a USB cable.
Image name: how-to-delete-icloud-account-13.png
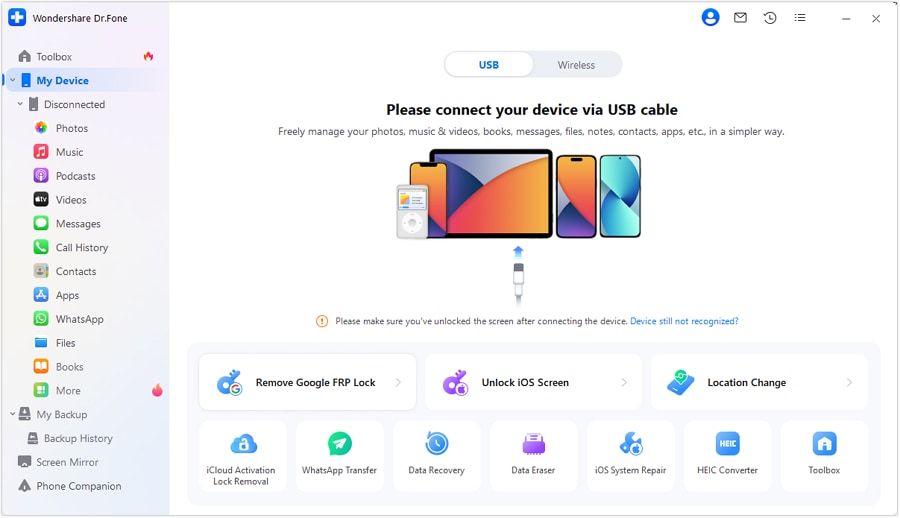
- Step 3: Go to Toolbox from the left navigation pane and select Screen Unlock > iOS.
- Step 4: Select Remove AppleID on the next window.

- Step 5: Click Unlock Now to proceed.
Note:
If you continue to “remove iCloud account“, this will erase all data from your Apple iPhone 8 Plus.
- Step 6: Click Yes if you have set up a screen lock.

- Step 7: Click Yes if you have already enabled Two-Factor Authentication on your Apple iPhone 8 Plus.

- Step 8: Follow the on-screen instructions to put your device into Recovery Mode.

- Step 9: Dr.Fone will recognize your device in the Device Model. Choose an option from the System Version drop-down list and click Start.
- Step 10: The latest iOS firmware is being downloaded.

- Step 11: Click Unlock Now to proceed.
- Step 12: Enter the code given in the dialogue box and click Unlock to continue.

- Step 13: Dr.Fone will then begin removing the iCloud account. Do not disconnect or use your device while the process is ongoing to avoid device issues.

- Step 14: To finalize the Apple ID removal process, please check your device and click Done once you’ve verified it.

Part 5: How To Remove an iCloud Account Without Deleting an Apple ID Account?
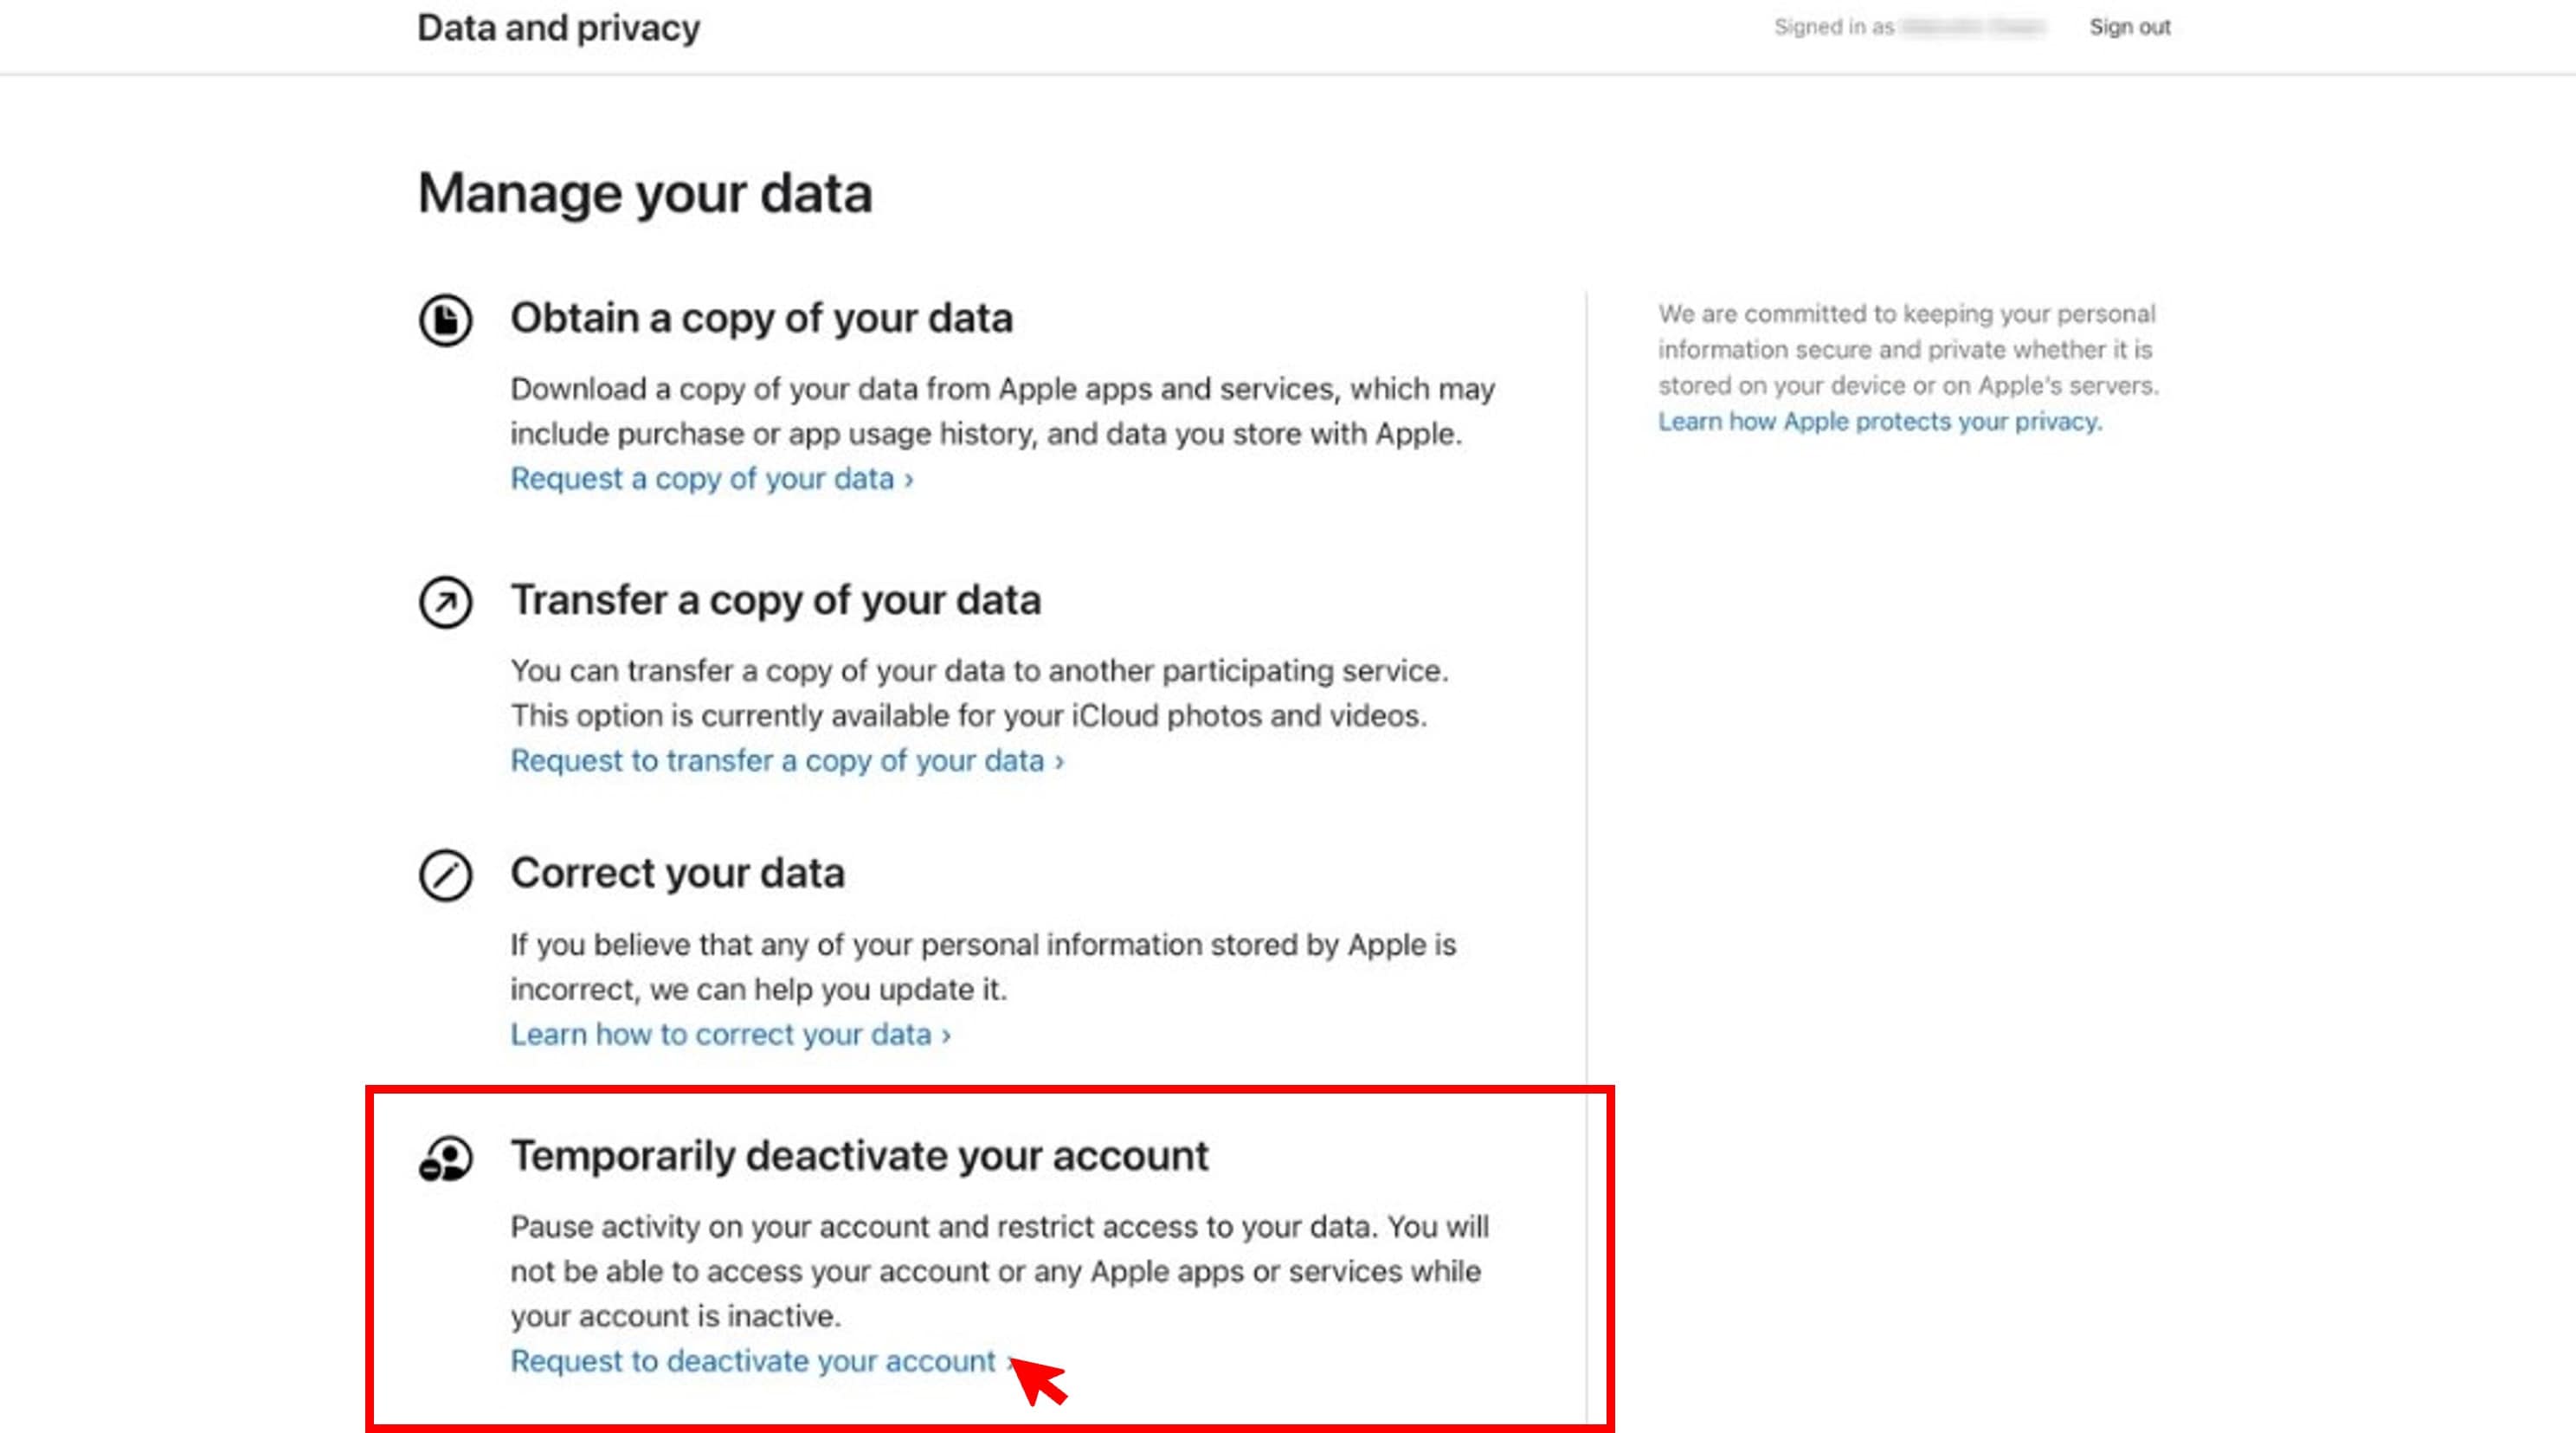
Deciding to permanently “delete iCloud account“ or Apple ID is a significant step. If you’re unsure about this irreversible action, consider deactivating your account. Deactivating your Apple ID temporarily suspends it. However, this feature may depend on your location.
Once you deactivate your Apple ID, you can no longer use it to sign into any Apple services, including iCloud, the App Store, iTunes, Apple Books, FaceTime, and Apple Pay. Even so, deactivating your Apple ID does not delete your account. You can reactivate your account anytime to regain access to all your Apple services and data.
Here’s how to temporarily deactivate your Apple ID account:
- Step 1: Go to Apple’s Data and Privacy website. Sign in using your Apple ID.
- Step 2: Scroll down to the Temporarily deactivate your account section and click Request to deactivate your account.
- Step 3: Select a reason for deactivating your account from the drop-down menu, then click Continue.
- Step 4: Review the information and follow the on-screen instructions to complete deactivation.
Note:
Keep the unique alphanumeric access code you’ll receive. You’ll need it to reactivate your Apple ID account.
More Article About iCloud Account:
Ways to Restore from iCloud Backup Without Reset
3 Ways to Recover iCloud Password
iOS 16: Best Ways to Bypass iCloud Activation Lock on iPhone/iPad
Conclusion
As you’ve learned, deleting an iCloud account is a permanent decision you cannot reverse. Once deleted, your account and all associated data will be permanently erased from Apple’s servers. Thus, it’s crucial to back up your data before proceeding.
Apps like Dr.Fone provide a comprehensive solution for backing up your data and removing an iCloud account without a password. Its user-friendly interface and streamlined processes make it an ideal choice for those seeking a quick and hassle-free experience. Whether you’re looking for an answer on “how to delete iCloud account“ or “remove iCloud account,” Dr.Fone is the ultimate tool to guide you through the process.
Everything To Know About Apple ID Password Requirements For Apple iPhone 8 Plus
In the digital realm, your Apple ID is the guardian of your haven. Understanding the importance of a potent shield, this article delves into the essential realm of Apple ID password requirements.
A strong password is the key to safeguarding your digital kingdom. Dive in and unravel the significance of robust Apple ID passwords. Learn everything about the Apple ID password criteria and rules to secure your device. Fortify your Apple ID with simple yet effective measures because your device deserves the best defense!

Part I. Apple ID Password Requirements: What You Need To Know
Your Apple ID is the gatekeeper to a world of digital wonders, and a sturdy password is your first line of defense. Let’s unravel the secrets of crafting unbreakable Apple ID passwords with requirements examples that keep your account secure and your mind at ease.
- Length and Complexity
When it comes to passwords, size matters! Apple recommends a minimum of eight characters, but why stop there? Aim for a longer passphrase to add an extra layer of security. Mix it up with a blend of uppercase and lowercase letters, numbers, and sprinkle in some special characters for good measure.
- Variety is Key
To truly fortify your Apple ID, embrace diversity in your password creation. Incorporate a variety of characters, avoiding predictable sequences or easily guessable choices. This diversity acts as a shield against unauthorized access, making your password a robust fortress.
- Avoid Common Pitfalls
Beware of the password pitfalls! Apple urges users to steer clear of common patterns and dictionary words. Craft a password that is uniquely yours, steering away from easily guessable choices. You create a password that stands tall against potential threats by dodging the usual suspects.

Apple ID Password Criteria
Below are the Apple ID password rules for constructing a fortress-like password:
- Your password must not be your Apple ID or a minor variation.
- Avoid using the same password across multiple accounts.
- Regularly update your password for an added layer of security.
- Enabling two-factor authentication is your ally in the quest for an impenetrable Apple ID.
Understanding and implementing these guidelines isn’t just a security measure; it’s a digital necessity. In the next part of this series, you’ll explore practical tips for crafting a strong Apple ID password effortlessly. Stay tuned and continue your journey to fortify your digital world!
Part II. Best Practices for Creating a Strong Apple ID Password
Now that you’ve understood the Apple account password requirements, let’s embark on crafting a password that not only meets the criteria but also stands as a beacon of impenetrable security. Here are some simple yet effective best practices to guide you:

- Create Uniquely Memorable Passwords
Crafting a strong yet memorable password might seem challenging, but fear not! Blend words, add some numbers or special characters, and create a combination that is uniquely yours. This way, you ensure a password that’s strong and easy for you to recall.
- Embrace Password Managers
Why juggle multiple passwords in your mind when technology can lend a hand? Password managers are your digital sidekick, securely storing and organizing your passwords. They generate complex passwords for you, taking the hassle out of password creation and ensuring each account gets its unique shield.
- Regular Updates and Two-factor Authentication
Keep your digital fortress up to date by regularly refreshing your password. Set a reminder to change it periodically, adding an extra layer of security. And don’t forget the superhero of digital protection – two-factor authentication. Enabling this feature ensures that even if your password is known, an additional step is needed for access, making your Apple ID virtually impervious to unauthorized entry.
By incorporating these Apple account password requirements, you’re not just following rules but fortifying your Apple ID against potential threats. In the next part, you’ll see a couple of examples of strong Apple ID passwords. It will provide you with practical insights to elevate your digital security game.
Part III. Example of Strong Apple ID Passwords
Now that you know the groundwork for crafting a robust Apple ID password, let’s bring those concepts to life with practical examples. Remember, the key is to strike a balance between uniqueness and complexity. Here are a few examples to inspire your digital shield:

- Code 1: Sunrise$Pineapple42
Uniqueness: The combination of “Sunrise” and “Pineapple” adds a personal touch.
Complexity: Adding “$” and “42” meets Apple’s special character and number requirements.
- Code 2: Dance!Rainbow@73
Uniqueness: The pairing of “Dance” and “Rainbow” creates a memorable combination.
Complexity: Including “!” and “@73” adds the essential complexity.
- Code3: Adventure$4EverYolo
Uniqueness: Merging “Adventure” and “4EverYolo” gives a distinct touch.
Complexity: The presence of “$” and numbers meets the criteria for complexity.
These examples showcase the creativity and strength you can infuse into your Apple ID password with criteria. Remember, the goal is to make it yours, ensuring it’s easy to remember while providing a robust defense against unauthorized access. In the final segment, you’ll be introduced to a tool that extends this security mindset beyond Apple devices. Stay tuned for the exciting conclusion of this journey to fortify your digital presence!
Bonus: A Professional Solution for Bypassing Apple ID
As you navigate the digital security landscape, it’s crucial to extend your focus beyond Apple devices and explore solutions catering to the broader spectrum. Imagine this scenario: you’ve diligently followed the guidelines for creating a robust Apple ID password, but what if you find yourself locked out of your Android device due to a forgotten password? Fear not; here’s a reliable solution: Wondershare Dr.Fone - Screen Unlock (iOS).
Dr.Fone - Screen Unlock (iOS) isn’t just a tool confined to Apple’s realm; it’s your trusted ally in managing and securing Android devices’ passwords. If you ever find yourself unable to access your Android device, this professional solution steps in to efficiently unlock it, ensuring you regain control effortlessly.
Key Features and Benefits
Dr.Fone - Screen Unlock (iOS) is a user-friendly and efficient tool that goes beyond simple unlocking. Check out its key features and benefits below:
- **Effortless Unlocking.**Fone makes unlocking your iOS device a breeze. Regain access to your Apple iPhone 8 Plus or iPad without any hassle, even if you forget your password.
- **Versatile Password Management.**Beyond unlocking, Dr.Fone manages various password types (PIN, pattern, password). Ensure your preferred method of device security is both convenient and secure.
- **Wide Device Compatibility.**Compatible with various iOS devices like iPhones and iPads. No matter which Apple device you have, Dr.Fone is ready to assist in unlocking and securing it.
- User-friendly Interface. Intuitive and easy-to-use interface. No technical expertise is required; effortlessly navigate and use the tool to unlock your device.
- **Secure Data Protection.**Protecting your data during the unlocking process. Your private information remains secure while regaining access to your device.
- **No Data Loss.**Unlock your device without losing any data. Regain access without sacrificing your photos, messages, or other important information.
- **Time-efficient Solution.**Fone swiftly unlocks your device. Regain access to your iOS device quickly, minimizing downtime.
- **Reliable Support.**Accessible customer support. Assistance is available if you encounter any issues or have questions during the unlocking process.
Step-by-Step Guide
The easy-to-follow steps provided below will make the unlocking process stress-free and straightforward.
- Step 1: Launch the iOS tool in a new window after downloading and installing Wondershare Dr.Fone on your PC. You may do this by navigating to Toolbox > Screen Unlock > iOS.
- Step 2: To unlock the iOS device screen, click the Unlock iOS Screen button in the popup that appears.

- Step 3: Click Start on the following screen to begin unlocking the iOS device. It is imperative that you check the battery life of your gadget before you proceed so the operation won’t get interrupted.
- Step 4: After that, you should switch your Apple iPhone 8 Plus into Recovery mode. Just follow the on-screen prompts to switch your iOS device into the appropriate mode for your specific model. To get the instructions for entering DFU mode on the iDevice, click the Try DFU Mode button on the bottom if Recovery mode does not solve the problem.

- Step 5: The platform automatically detects the Device Model and shows it in the corresponding section after the user successfully puts their iDevice into Recovery Mode. Adjust the model and choose the System Version to meet your needs. After that, hit Start to unlock your phone’s screen.
- Step 6: The following screen shows how far along the iOS firmware download is. To cancel out of it all, just hit the Stop button. If the platform’s iOS firmware download is taking too long, you can manually copy the URL to download the firmware by clicking the Copy button.
- Step 7: The next page will show the verification and installation of the iOS firmware if the download is successful. Press the Unlock Now button again to initiate the unlocking procedure.
- Step 8: A confirmation window pops up on the screen to confirm the action. To proceed, enter the code and hit Unlock. You can see the iOS device’s progress bar on the following screen as it unlocks. Remember that the gadget must remain connected; otherwise, it will brick.

- Step 9: Once the iDevice has been successfully unlocked, click the Done button to complete the process. If you still have a locked iDevice, select Try Again to restart the process.
In essence, Dr.Fone - Screen Unlock (iOS) extends the principles of secure password management beyond the Apple ecosystem. It becomes a valuable asset in scenarios where accessing your iOS device becomes a challenge, ensuring you regain control without compromising security.
Conclusion
As this article wraps up the exploration of Apple ID password requirements, remember that protecting your information goes beyond a single device. Remember, strong passwords are your digital armor, shielding not only Apple devices but all corners of your digital world. Prioritize security across every device.
Dr.Fone - Screen Unlock (iOS) is the bridge that connects your commitment to security seamlessly. In the dynamic landscape of digital living, having a reliable companion like Dr.Fone - Screen Unlock (iOS) ensures you’re always in control, effortlessly managing and securing your passwords across various platforms.
Tips: Are you searching for a powerful Screen Unlock tool? No worries as Dr.Fone is here to help you. Download it and start a seamless unlock experience!
Also read:
- 2024 Approved Innovative Tactics to Amplify Game Vids via Hashtags
- A Step-by-Step Approach to Cultivating Emotional Intelligence with ChatGPT
- Can I Remove the Apple Watch Activation Lock By Apple iPhone 6s without the Previous Owner?
- Exploring Apple's Innovative Game Mode - A Look at How It Might Revolutionize Gaming | Powered
- How To Reset the Security Questions of Your Apple ID From Your Apple iPhone 12 Pro Max
- iCloud Separation How To Disconnect Apple iPhone 14 Plus and iPad
- In 2024, Guide on How To Remove Apple ID From iPhone 14 Pro Max
- In 2024, How to Delete iCloud Account From iPhone XS without Password?
- In 2024, The Easy Way to Remove an Apple ID from Your MacBook For your iPhone 12 mini
- Prime Locations for Obtaining GoT Mobile Melodies
- The Art of Photo Refreshment How to Tidy Up Images on Canva
- Unraveling the Mystery: How to Diagnose and Fix Your Sluggish Internet Connection
- Windows 10 重新启动时利用命令行解决方案的详细指南
- Title: In 2024, Guide on How To Remove Apple ID From iPhone 8 Plus
- Author: Alma
- Created at : 2025-01-21 01:47:11
- Updated at : 2025-01-24 02:22:31
- Link: https://apple-account.techidaily.com/in-2024-guide-on-how-to-remove-apple-id-from-iphone-8-plus-by-drfone-ios/
- License: This work is licensed under CC BY-NC-SA 4.0.