
In 2024, How to Change Credit Card on Your iPhone 14 Plus Apple ID and Apple Pay
How to Change Credit Card on Your Apple iPhone 14 Plus Apple ID and Apple Pay
Apple’s ecosystem offers convenience with services like Apple ID and Apple Pay. Managing your digital life has never been more convenient. In this interconnected system, your credit card plays a crucial role. It’s essential to understand that your credit card details can be associated with both your Apple ID and Apple Pay, each serving unique functions.
In this comprehensive guide, we’ll learn how to change the credit card on Apple ID and Apple Pay. Additionally, we will introduce you to a helpful tool for unlocking your Apple ID if you ever encounter access issues.
Part 1: 3 Ways To Change the Credit Card on Apple ID
We’ll explore 3 different methods to change the credit card details associated with your Apple ID in this section. These methods allow you to update your payment information effortlessly, ensuring uninterrupted access to Apple services.
Way 1: Update Credit Card on iPhone/iPad
The first method involves updating your payment information directly from your Apple iPhone 14 Plus or iPad’s settings. This method is convenient for those who prefer managing their Apple ID details on their iOS devices. Here is how to change your credit card on Apple ID via iPhone or iPad:
- Step 1: Begin by launching the Settings app on your device and then touch your name to enter your Apple ID settings. Afterward, choose the “Payment & Shipping” option to move ahead. In addition, log in using your Apple ID credentials if necessary.

- Step 2: Next, press “Add Payment Method” and provide information for your new payment method. Once you’ve entered all the required details, tap “Done” to confirm and save your updates.

- Step 3: To remove the old payment method, tap “Edit.” Now, locate the old payment method you want to delete and tap the “Red Delete” button next to it. Confirm the deletion by tapping “Delete.”

Way 2: Change Credit Card on Mac
Now, we shift our focus to those who prefer managing their payment information on their Mac. Changing your credit card details from Mac’s settings is a straightforward and easy process. Therefore, using the following steps, you can learn how to change your credit card on Apple ID without any errors:
- Step 1: Start by opening the App Store on your device. Then, in the bottom-left corner of the App Store, tap on your name and proceed to access “Account Settings.”

- Step 2: Locate the “Apple ID Summary” section in the “Account Settings” menu and select the “Manage Payments” option next to it. After this, introduce a fresh payment method by opting for the “Add Payment” option.

- Step 3: This action will prompt you to input the details of your new payment method, including credit card information. After you’ve provided the required information, select “Done” to save your newly added payment method.

- Step 4: If you want to remove the old method linked to your Apple ID, click “Delete” in front of it. Now, tap “Delete” to remove this payment method from your Apple account.

Way 3: Update the Credit Card Details on Windows PC
To update the credit card information linked to your Apple ID, we’ll now provide instructions specifically tailored for Windows PC users. This approach offers flexibility for individuals looking to maintain accurate payment details. With the help of the simplified steps given below, you can easily change the credit card on the Apple account:
- Step 1: Access iTunes on your computer and click on “Account” from the menu bar that is given at the top. Afterward, a drop-down menu will appear on which you need to select “View My Account.”

- Step 2: Following this, click on “Manage Payments,” and your current payment methods that are listed will be shown to you. There, click on “Add Payment” to add a new payment method quickly.

- Step 3: After clicking on this option, you can enter details of your new payment method. Once the details are entered successfully, click “Done” to save the changes, and you are good to go. Tap the “Edit” option in front of the old credit card and choose “Remove Payment Method” to remove it from your Apple ID.

Pro Tip: Locked Out Your Apple ID? Get It Unlocked Instantly
While learning how to change a credit card on your Apple Account, you encounter an unexpected hurdle - your Apple ID has become locked. This can undoubtedly be a frustrating and troublesome scenario, considering the crucial role your Apple ID plays within the Apple ecosystem. Nevertheless, there’s no cause for alarm, as we’ve got a solution ready to promptly unlock your Apple ID and have you back on course.
The solution is Wondershare Dr.Fone, a tool that is able to remove Apple ID from your iOS devices without needing the password. It is a comprehensive tool that has the ability to remove your Apple ID from your device permanently. This tool works its magic in removing Apple ID, whereas other tools fail when the Find My feature is enabled.
Dr.Fone - Screen Unlock (iOS)
Unlock iPhone/iPad Lock Screen Without Hassle.
- Simple, click-through, process.
- Unlock screen passwords from all iPhone and iPad.
- No tech knowledge required, everybody can handle it.
- Supports the latest iOS version fully!


4,395,218 people have downloaded it
Key Features of Wondershare Dr.Fone
- Unlock iPhone, iPad, and iPod touch by removing various types of lock screens, ensuring access to your device.
- Gain access to your Apple device by bypassing the iCloud activation lock and Apple ID verification without requiring the password.
- Safely bypass Mobile Device Management (MDM) restrictions and Screen Time limitations without the risk of losing any data.
Simplified Steps To Remove Apple ID on Your iOS Device via Wondershare Dr.Fone
Following are the steps to unlock and remove old Apple ID from your iOS device using Wondershare Dr.Fone:
- Step 1: Access the Screen Unlock Tool
To initiate the Apple ID unlocking process, you will need to install and launch Wondershare Dr.Fone. Then, choose “Toolbox” from the left bar and go on to click “Screen Unlock.” Select “iPhone” as your device type, and since we are removing Apple ID, click “Remove Apple ID.”

- Step 2: Proceed to Activate Recovery Mode
Now is the time to connect your iOS device to the computer using a respective cable and click “Unlock Now.” Now, Wondershare Dr.Fone will ask you about having a screen lock and 2FA on the iOS device. The answer needs to be affirmative to proceed further. When done with it, enable Recovery Mode on your iOS device with the help of on-screen instructions.

- Step 3: Remove the Apple ID From Your iOS Device
Wondershare Dr.Fone will detect your device model once it is in Recovery Mode. Choose a system version to download by clicking “Start.” Once it has been downloaded and verified, tap “Unlock Now.” It will lead to a prompt warning about data loss. Here, enter “000000” to confirm your choice and click “Unlock.” Dr.Fone will go on to remove Apple ID from your device.

Part 2: 3 Methods To Change the Default Credit Card on Apple Pay
In our exploration of managing your credit card within the Apple ecosystem, we now focus on changing the default credit card linked to your Apple Pay. Apple Pay stands as a robust digital wallet solution, and understanding the process of updating your payment details is crucial for ensuring a secure user experience. Here, we will explore three approaches on how to change credit card on Apple Pay:
Method 1: Change the Default Card on the iPhone
We start by exploring how to change the default credit card on Apple Pay using your Apple iPhone 14 Plus. This method is particularly handy for iPhone users who want to ensure their preferred payment card is set as the default option. These are the instructions for setting a card as the default card for Apple Pay:
Instructions: On your Apple iPhone 14 Plus, access and open the Wallet app. Inside the app, locate the payment card you wish to set as your default. Touch and hold the selected payment card. Drag the card to the forefront, positioning it ahead of your other cards.

Method 2: Set New Card as Default on iPad or Mac
Whether you prefer using your iPad for managing your payment methods or you’re on your Mac, you can easily set a new card as the default option. Use the following instructions to set a credit card as the default card on Apple Pay:
For Mac
Instructions: Access System Settings through the Dock or Apple menu and move to Wallet & Apple Pay. Afterward, once you’re in Wallet & Apple Pay, choose a card from the “Default Card” settings and set it as the default card.

For iPad
Instructions: Navigate to Settings on your iPad and move to “Wallet & Apple Pay.” Here, scroll down to “Transaction Defaults” and press “Default Card.” Then, choose a card from the list to set it as your default card.

Method 3: Use Apple Watch to Change Default Card
The last stop on our journey to manage your default credit card on Apple Pay is the Apple Watch. If you are an Apple Watch user, then these instructions can assist you in how to change your credit card on Apple Pay:
Instructions: Access and launch the Apple Watch app on your Apple iPhone 14 Plus and navigate the “My Watch” tab. There, tap on “Wallet & Apple Pay” within My Watch tab and scroll down in it to find the section labeled “Transaction Defaults.” In this section, you’ll find the “Default Card” option. Simply tap on it to select the card you wish to set as the default.

Conclusion
To summarize, we’ve navigated the complex world of how to change the credit card on Apple account. We’ve explored two critical aspects: changing the credit card on your Apple ID and altering the default credit card on Apple Pay. It’s important to understand that your credit card details for Apple ID and Apple Pay are distinct. Thus, it’s crucial to know how to update both to ensure a secure digital experience.
We explored many methods to change the credit card on Apple ID and Apple Pay, depending on your device and preference. Furthermore, there are unfortunate instances where you find yourself locked out of your Apple ID. For these, we introduced a valuable tool: Wondershare Dr.Fone - iOS Screen Unlock. This tool can efficiently unlock your Apple ID without causing any data loss, ensuring you can regain access to your account promptly.
Detailed Guide on Removing Apple iPhone 14 Plus Activation Lock without Previous Owner?
Today, many individuals will purchase a utilized iPad or a recycled iOS phone instead of a fresh, box new one. However, they are often disturbed by the Activation Lock screen showing up on the screen once they buy them. This case will probably happen because the iPad is associated with the past user’s iCloud account and will be an iPad locked to the owner.
It becomes a difficult issue as removing a connected iCloud account without the past user is almost difficult. However, sit back and relax. We’ve discovered a few potential ways. This guide will show you the iPad locked to owner bypass. Furthermore, you can use our expert tool, i.e., Dr.Fone-Screen Unlock, to bypass the lock.
After reading this guide, you will understand how to erase the Activation Lock without a past user. How about we get everything started?
Method 1. Dr.Fone - Screen Unlock
Rather than making our readers wait about how to remove Activation Lock without Apple ID or past user, we suggest you with Wondershare Dr.Fone-Screen Unlock.
It is an expert iCloud activation lock bypass program that can remove the activation lock on your iPad. It is the best possible solution when you fail to remember your Mac ID or password. Download the application on your Windows or Macintosh and follow the steps to remove the activation lock without a previous user.
Steps to Follow:
Step 1. Install and launch the Dr.Fone program and choose the Screen Unlock tool.
Step 2. Pick the “iCloud Activation Lock Removal” option.

Step 3. Now you can start to bypass the lock.

Step 4. Begin to remove and wait briefly. The phone will be in a typical state with practically no lock after removing the activation lock.
Step 5. The program will remove the activation lock like a flash. Your iPad will begin with no activation lock. You can access and utilize the iPad now. However, you must know that you can’t call or use cellular data and iCloud of your new Apple ID after bypassing the lock.

Method 2. Remove it from iCloud
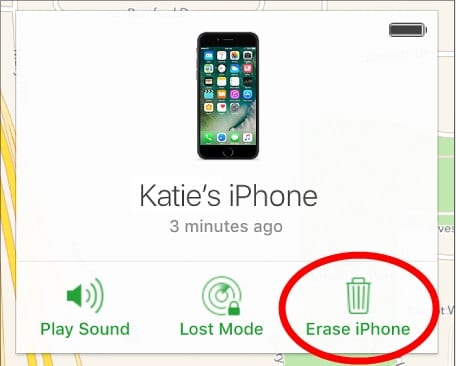
If you cannot reach the past user but rather you are still in contact with them, they can unlock your iPad. Here are the step-by-step guidelines on eliminating the iPad activation lock through the iCloud web:
- Open the iCloud site in a browser.
- Sign in to the current iCloud account being used with the locked iPhone.
- When you sign in, click on the choice that says Find iPhone.
- Presently, you can remotely perform activities on your phone.
- Click on the drop-down named All Gadgets and pick your iPad.
- Click on Erase iPhone.
Method 3. Use DNS bypass
Bypassing DNS Server is one more way for you if you’re searching for simple methods for eliminating Activation Lock without the past user. Note that this DNS strategy can bypass the iCloud lock for a brief time. Here’s how:
Step 1. Open your iPad and explore the “Choose a Wi-Fi Network” page.
Step 2. Presently, press the Home button and select Wi-Fi settings. Presently, tap the “I” symbol right behind your Wi-Fi network. It will show the properties of the Wi-Fi.
Step 3. Select “Configure DNS” and set it as indicated by your region:
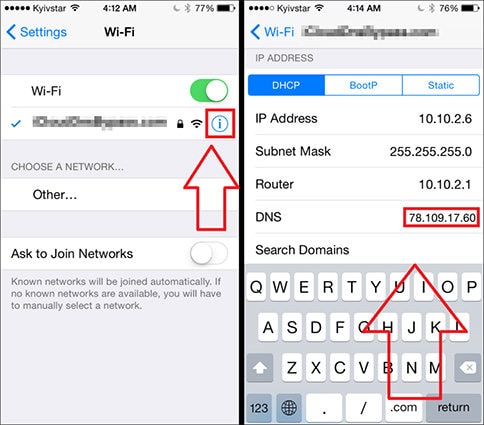
- USA: 104.154.51.7
- South America: 35.199.88.219
- Europe: 104.155.28.90
- Asia: 104.155.220.58
- Australia and Oceania: 35.189.47.23
- Other Continents: 78.100.17.60
Step 4. From that point forward, return to the Wi-Fi page.
Step 5. Presently, click over and again on “Next” and “Back” and hold on until the iPad connects with your area’s iCloud DNS bypass server.
Method 4. Local Apple Support
Following the techniques above, you can try reaching Apple’s local service when you can’t remove the Activation Lock. However, you need to provide the following things:
- iPad serial number
- Buying receipt
When they confirm you own the iOS iPad legitimately, they will help you further by unlocking your iPad.
Part 2: How to Reset iPad without Passcode?
1. Reset iPad by Computer
- Connect your iPad to a computer. Press and hold the Power button + Home button (if your iPad has a Home button). Otherwise, press and hold the Power button + either Volume button (if your iPad doesn’t have a Home button) until you see the Recovery Mode screen.
- On your Macintosh, find the connected iPad.
- Tap Restore and trust that the process will end.
- Set up your iPad and restore the factory default settings without a password.
2. Reset it by Find My
- Go to iCloud.com, and sign in with your Apple ID and password.
- Click on the Find [device] symbol in the menu.
- Select your iPad from the list of all the connected devices.
- Select Erase iPad.
- Follow the prompts for iPad locked to owner reset.
3. Reset with iTunes
- Open the iTunes application or website.
- Connect your iPad to your PC with a connector. Enter your password whenever required.
- Click on the iPad symbol in the upper-left corner.
- Select Summary in the left section.
- Click Restore iPad and then click the Restore button to confirm and reset the iPad locked to the owner.
Conclusion
This iPad locked to owner bypass guide explains how to remove the activation lock. We have mentioned a list of helpful methods to remove the lock from your device. However, if you are still looking for a quick and efficient answer, we suggest you install Dr.Fone - Screen Unlock (iOS) . Dr.Fone is a safe and effective tool for all your unlocking needs.
Apple ID Unlock On Apple iPhone 14 Plus? How to Fix it?
Apple follows a strict set of rules when it comes to security. If someone tries to hack into your Apple ID or account by entering the wrong password for too many times, it will disable your account. Well, this can create a hassle for you and we are to help you out of this.
There are various ways that you can use to fix your disable Apple ID. You can follow whatever suits you or whatever works with your Apple iPhone 14 Plus. If you are still wondering about ‘How to unlock apple id’, here is a guide for you. As a whole, locking of your account is good than releasing your data to a hacker.
Part 1: Reasons why Apple ID locked?
So, you have your apple id locked out of the blue? Well, there can be various reasons behind that. It can also be you if you put in a wrong password too many times. To fix it, you can always select forgot password and reset it using a few steps.
However, if someone uses an unusual way to get into you Apple ID, it will be disables to prevent any attack. Anyone can try to hack inside your account but due to high security provided by apple, they disable the account.
Part 2: Is there a way to break Apple ID lock?
You can find a lot of new features to break in an Apple ID. This will help you unlock a lot of features in an iPhone by deactivating the Apple ID. Here is a list of things you can do to find the answer to How to unlock apple id –
1) Bypass Using DNS
Well, DNS can be used to unlock a few features on your Apple iPhone 14 Plus or iPad. DNS basically stands for Domain Name Service and it can help bypass the iCloud on temporary basis. By doing the DNS method you will be doing a tweak with the Apple iPhone 14 Plus settings making it believe that it is connected with the fake activation server. This can be done by simply choosing the Wi-Fi network while you setup your device. You need to manually change the DNS server.
2) Ask Apple to Remove Lock
Apple support can help you Apple id unlock on any of your Apple device. You have to follow as few guidelines and steps in order to get your phone back. Here is what you have to do –
- Show them the receipt if you are the owner of the phone. This will let them know that you are authentic.
- If you are not the original user, show them your ownership transfer certificate. This will help them determine your authenticity and original ownership.
3) Ask the Owner to Remove Activation Lock
If you are not the original owner, you can reach out to the old owner. This will let you download the files from old owner or you can ask them to provide the OTP sent on their email. You have to follow a few steps to unlock is from iCloud –
- Log on to www.iCloud.com
- Type the email address of the account you want to unlock
- Click on settings
- Remove the Apple iPhone 14 Plus devices as per your need
- Go on to remove the Apple iPhone 14 Plus device from apple id.
- Enjoy!
This is all you need to do. It will open new doors to your device. You can now enjoy amazing features on Your Apple iPhone 14 Plus without any hassle.
Part 3: How to unlock Apple ID if you forgot the password?
Dr. fone is a software available for all platforms. The main use of dr. fone is to remove your question of How to unlock apple id and the iCloud lock on iPhone and other various apple devices. Be it a touch id, 6 digit password, 4 digit password, or face id. This tool will help you remove it all in some simple steps. You can also get advanced features and support with the premium version of dr.fone.
Key Features:
Dr. fone comes with a lot of amazing features to unlock any kind of locks in Apple devices. Let’s know more about these features –
- Unlock in a few clicks – This tool enables you to use your locked Apple device in a few clicks. This is all it takes to unlock your device with dr.fone.
- Bypass iCloud – The tool allows for bypassing the iCloud lock to access files and videos online.
- Easy to Use Interface – The tool is very easy to use even for a beginner. You can easily unlock your Apple iPhone 14 Plus or iPad using Dr.Fone on your system.
Step by Step Tutorial:
Here is a step by step guide to solve the issue of your locked apple id using Dr. Fone. Make sure you have it installed on your system. Let’s get started with the guide after installation –
Step 1: Connect your Phone/iPad
Open the application and connect your Apple iPhone 14 Plus using a USB cable. Once you’ve connected it, click on the “Screen Unlock” option from Wondershare Dr. Fone beforehand.
On the new screen, click on “Unlock Apple ID” to get started.

Step 2: Enter Screen Password
After that step, you will be asked to unlock your Apple iPhone 14 Plus. Once you do it, a new pop up message will appear. Click on “trust” and move on to the next step. With accepting, your data on your phone will be removed permanently.

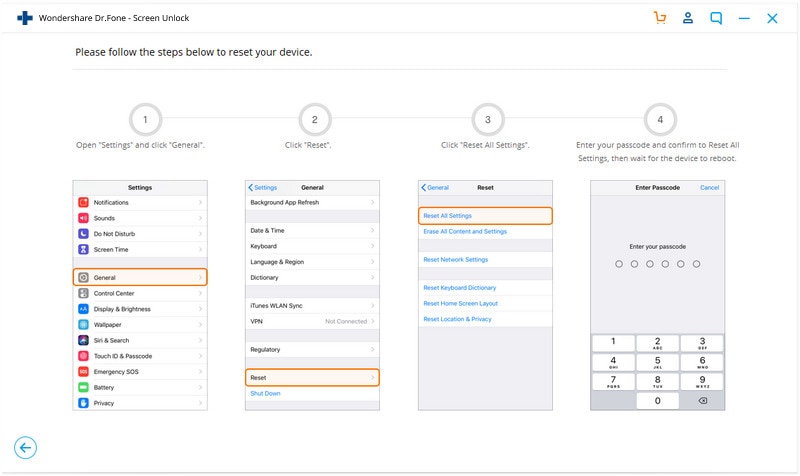
Step 3: Reset Settings and Reboot your Device
Go to the “Settings”, open “General” and search for “Reset”. Enter your passcode and it will clear all your data and reset your device. Create a backup of all your data in your PC or MAC if there is anything important you want to save.
Step 4: Continue unlocking Apple ID
After this step, you will see a new pop up starting the unlocking of Apple ID. Continue with the same and let it unlock the Apple ID with the help of Wondershare Dr. Fone.

Step 5: Check your Apple ID
After this process, you will come across a new popup showing you the screen as mentioned below. Enjoy your unlocked iPhone or iPad.

Part 4: Apple ID unlock by iTunes
Whenever your ID gets locked in your Apple iPhone 14 Plus or iPad, you can also unlock it using iTunes. You will need to restore your device with iTunes and this will unlock an Apple ID. Here are the steps you need to follow to get your apple id to unlock.
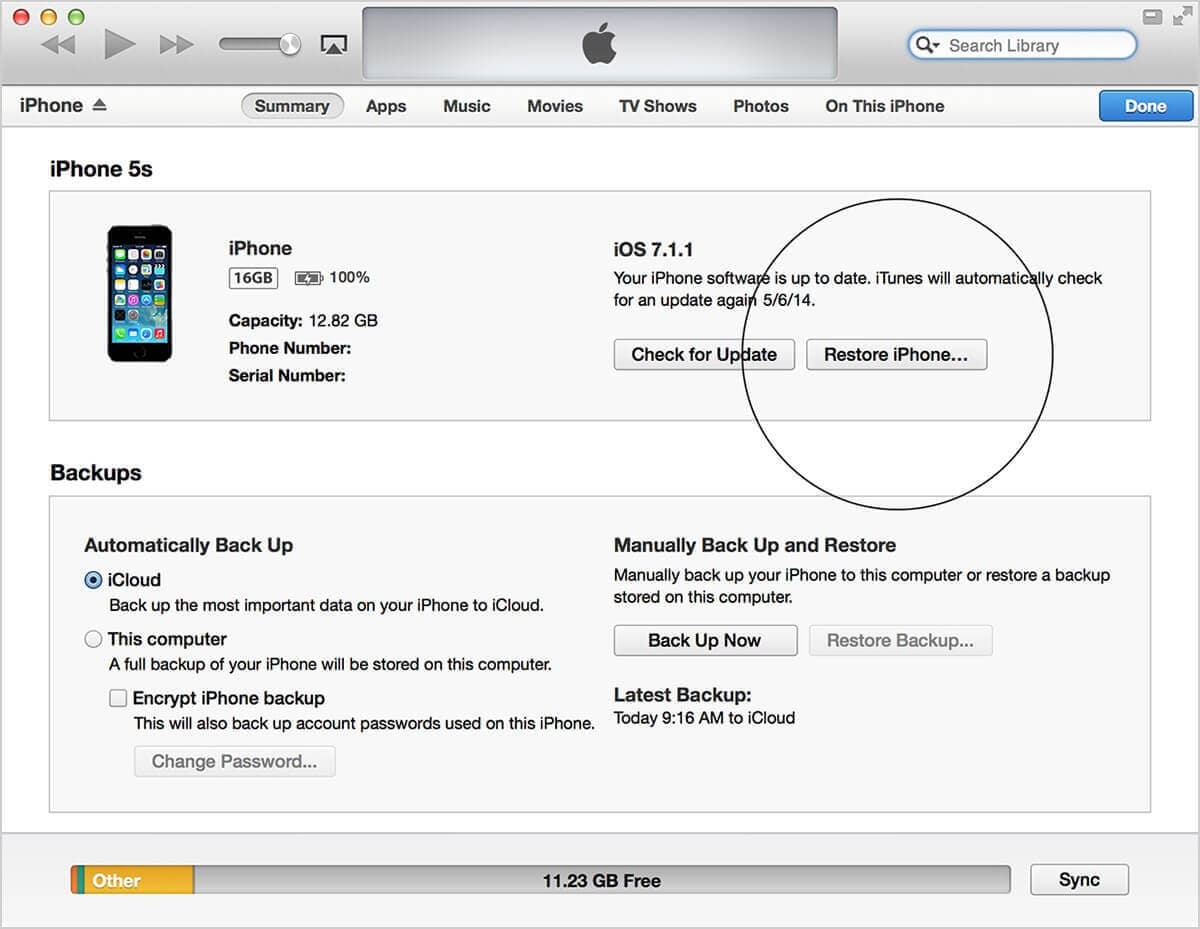
Step 1: Launch iTunes on your PC and then get your device connected with the PC.
Step 2: Click on the Apple iPhone 14 Plus device icon at the top and then head to “Summary”.
Step 3: Now, click on the “Restore iPhone” button given on the screen.
Step 4: Click “Restore” again n confirm the actions.
Part 5: Apple ID unlock by finding it back
If you end up getting your Apple id locked, then this is the best way to get it back. Iforgot is an online tool by Apple to provide some best ways to unlock Apple ID. All you have to do is log into the website using the email id.
However, you can always look out for the Apple ID using the first and last name of the owner. This is all you need to know to use this tool. However, for two-factor authentication, you should have the ID logged into another phone. This will allow you to proceed to further steps to get apple id to unlock in seconds.
Step 1: Visit the iforgot.apple.com
Step 2: Enter your Apple ID to log in or you can also look for Apple ID if you don’t remember it from the homepage. Use the first or last name of the owner to look up for Apple ID.
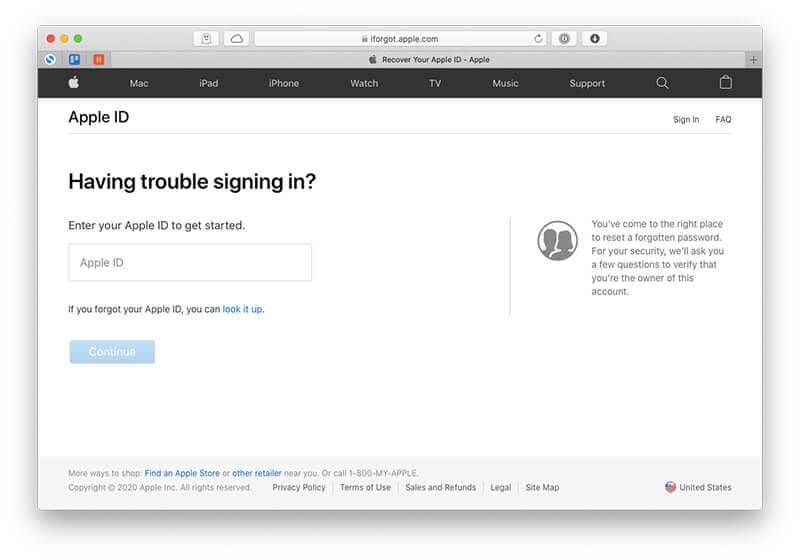
Step 3: Click on “Continue” after solving the CAPTCHA code.
Step 4: Enter the OTP and other instructions as mentioned by the website to remove Apple id locked from your phone.
Conclusion
This is all you need to know about unlocking your Apple ID in some easy steps. If you can get help from any professional, that would be much safe as, it will prevent any damage to your phone. If this is something new to you, you need someone who knows about it all. Unlocking your smartphone is easy with all these tools as mentioned above. Make sure you use them as per their terms and conditions for the betterment.
Also read:
- [New] In 2024, High-End Downloads Best 10 Apps for Extracting Vimeo Videos
- [New] Ultimate 2024 Lists - High-Quality Unboxers on YouTube
- [Updated] 2024 Approved Planting Prowess in Valheim Uncovering Premium Saplings
- Apple ID Locked for Security Reasons From iPhone 6? Find the Best Solution Here
- Best Virtual Background for Google Meet Video Call for 2024
- Flavorful Filmmaking Top 7 Strategies for Culinary Videos for 2024
- How to Fix when Apple Account Locked From iPhone 14?
- In 2024, Can Life360 Track You When Your Honor 100 is off? | Dr.fone
- In 2024, How to Delete iCloud Account From iPhone SE (2020) without Password?
- In 2024, How To Delete iCloud Account Remove Your Apple ID Permanently From iPhone 14 Plus
- In 2024, How To Delete iCloud Account Remove Your Apple ID Permanently On Apple iPhone 6s Plus
- In 2024, How to Reset Apple ID and Apple Password On Apple iPhone 13
- Protecting Your Privacy How To Remove Apple ID From iPhone 6s Plus
- Unlock Old Facebook Memories with a Click for 2024
- Updated 2024 Approved Transform Your Videos Into Animated Masterpieces A Step-by-Step Guide
- Title: In 2024, How to Change Credit Card on Your iPhone 14 Plus Apple ID and Apple Pay
- Author: Alma
- Created at : 2024-10-17 19:13:20
- Updated at : 2024-10-20 17:09:39
- Link: https://apple-account.techidaily.com/in-2024-how-to-change-credit-card-on-your-iphone-14-plus-apple-id-and-apple-pay-by-drfone-ios/
- License: This work is licensed under CC BY-NC-SA 4.0.