
In 2024, How To Erase an Apple iPhone 13 Without Apple ID Password?
How To Erase an Apple iPhone 13 Without Apple ID Password?
Have you ever wondered what happens when you erase the content of your Apple iPhone 13 storage? Erasing an iPhone means restoring it to its factory settings to install the latest iOS version. It also permanently removes all your data, including photos, videos, contacts, apps, and other information stored on the Apple iPhone 13 device.
This process is often necessary when you sell or give away your Apple iPhone 13 to ensure your personal information remains secure. But, you may encounter a situation where you should learn how to erase an iPhone without an Apple ID. While this may seem challenging, you can use a few methods to achieve this goal. This article will show you how to do it with or without an Apple ID password.
Part 1: A Checklist on What To Do Before Erasing an iPhone
If you’re looking at how to erase an iPhone without an Apple ID or account password, you’ve come to the right place. Before you begin, preparing your device and ensuring you have all the necessary information is crucial. Here’s a checklist of what to do before erasing your Apple iPhone 13:
Backup Your Apple iPhone 13
You can back up to iCloud or use Finder on macOS 10.15 or later. Remember that iCloud backups are stored on Apple’s servers and always encrypts backups. On the other hand, computer backups are stored on your computer’s hard drive and require a connection to the backup computer. Consider what your needs and preferences are when choosing between these two backup options.

Prepare Your Apple iPhone 13 Passcode
You’ll need your Apple iPhone 13 passcode to erase an iPhone. If you’ve forgotten your passcode, reset it using recovery mode.
Ready Your Apple ID Password
You may be asked to provide your Apple ID password to disable the Find My iPhone function and remove the Apple iPhone 13 device from your account. Have it handy to avoid any delays. It’s necessary for security verification during the erasure process.
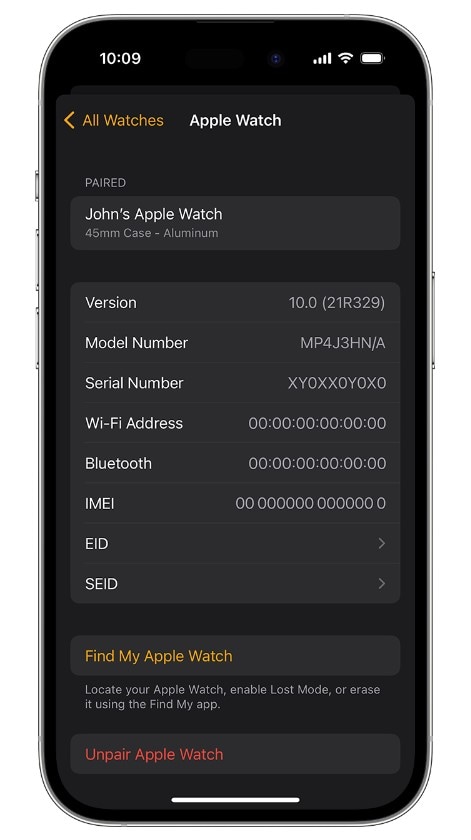
Unpair Apple Watch
If you own an Apple Watch, unpair it from your Apple iPhone 13. It ensures a smooth disconnection and prevents complications when erasing the Apple iPhone 13 device.
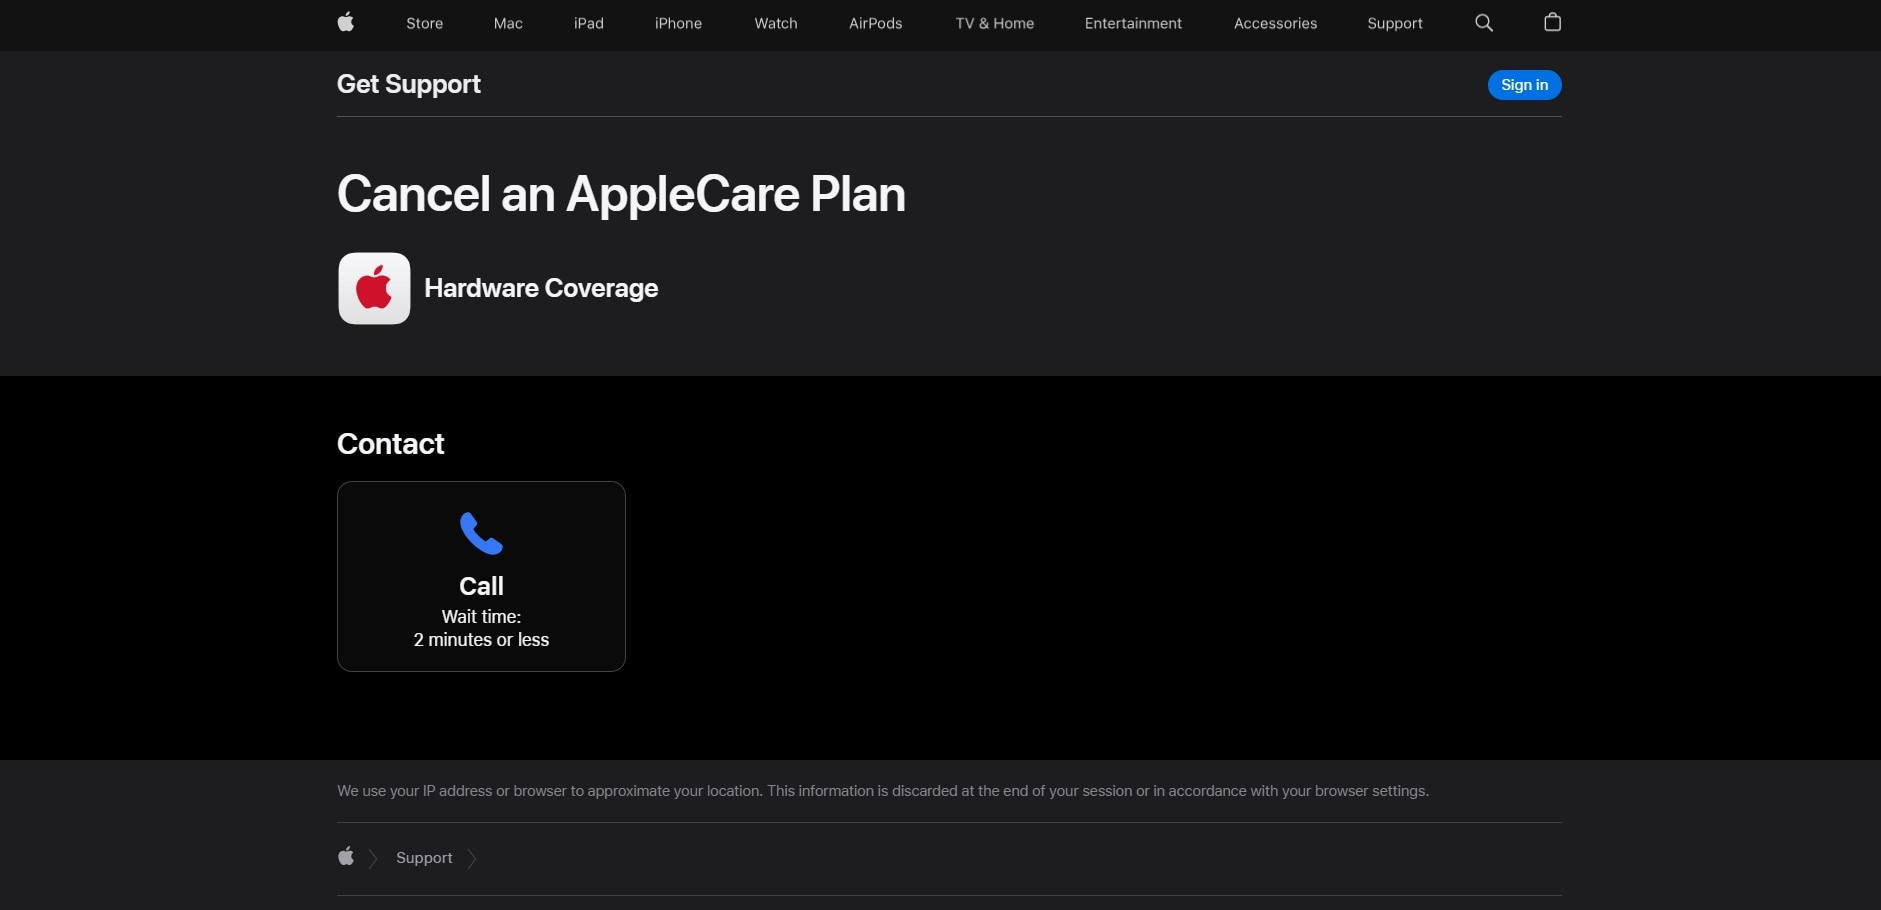
Cancel Your AppleCare Plan
If you have an active AppleCare plan for your Apple iPhone 13, cancel it on your Apple iPhone 13 before erasing the Apple iPhone 13 device. You can cancel your AppleCare plan by phone by calling AppleCare customer support. It will prevent any unnecessary charges after the erasing process.
Sign Out of iCloud
If your Apple iPhone 13 has iOS 10.3 or later, open the Settings app, then tap on your name at the top. Next, scroll down, tap Sign Out, enter your Apple ID password, and tap Turn Off.
Remove Your Apple iPhone 13 From Your List of Trusted Devices
Remove your old device from your list of trusted devices in your Apple ID settings for added security. This measure strengthens the defense against unauthorized access to your data.
Part 2: How To Erase iPhone Without Apple ID Password via Settings?
Erasing an iPhone and restoring it to factory settings is a straightforward process you can do in a few steps. Whether you’re preparing to sell or gift your device or troubleshooting persistent software issues, erasing your Apple iPhone 13 contents can enhance its performance. The process is easy if you have your Apple ID password readily available.
However, if you’ve forgotten your Apple ID password, don’t fret. Follow the guide below to reset your Apple ID password and erase all content and settings on your Apple iPhone 13:
- Step 1: Open the Settings application, then tap [name].
- Step 2: Go to Sign-In & Security > Change Password.
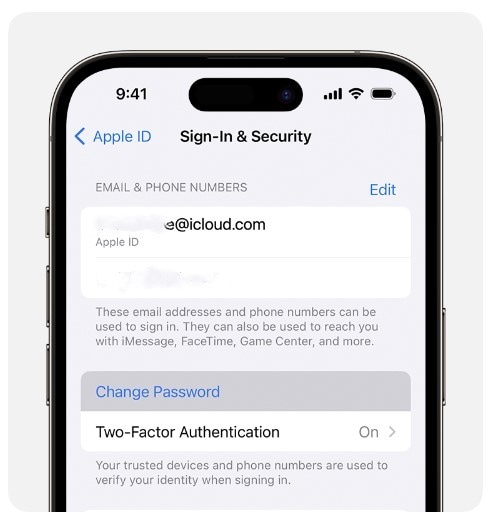
- Step 3: Follow the on-screen instructions to reset your Apple ID password.
- Step 4: Go to General > Reset from the Settings app, then tap Erase All Content and Settings.

- Step 5: Input your Apple ID password or your passcode when prompted.
- Step 6: Click Continue to confirm. Then, wait while the contents are being removed from your Apple iPhone 13 device.
Part 3: How To Erase iPhone Without Apple ID Password on Computer?
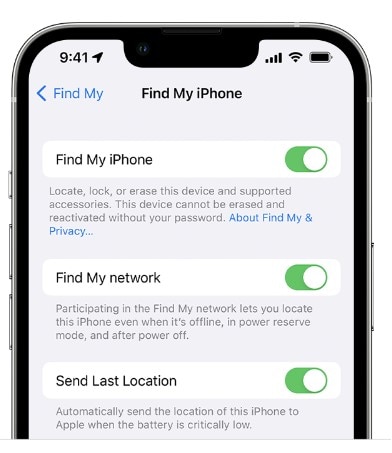
Activation lock is a security feature. It prevents anyone from activating an iPhone without your Apple ID password. If you try to factory reset your Apple iPhone 13 without turning off Find My iPhone, the activation lock will be in place. It means you need to enter your Apple ID password to activate the Apple iPhone 13 again. To turn it off, also ensure to turn off Find My on your device.
Go to Settings > [your name] > Find My or Find My iPhone to check.
If you want to erase an iPhone without Apple ID password on your computer, you can do so as long as you turn off the Find My. However, you’ll need to put your Apple iPhone 13 into Recovery Mode first.
- Step 1: Turn off your Apple iPhone 13, then put it into Recovery Mode.
- For iPhone 8 or later: Press and hold the Side button.
- For iPhone 7 or iPhone 7 Plus: Press and hold the Volume Down button.
- For iPhone 6s or earlier: Press and hold the Home button.
- Step 2: Connect your Apple iPhone 13 to the computer with the button held down.
- Step 3: Hold the buttons steadily until the Recovery Mode screen is visible.
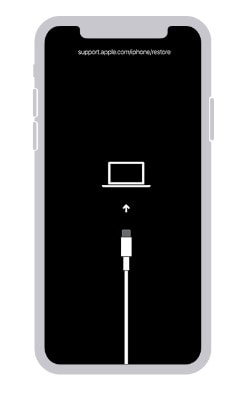
Step 4: Switch on your Apple iPhone 13. Then, connect it to a Mac or Windows computer using a USB cable.
Step 5: When prompted, follow the on-screen instructions to enter your device passcode or click Trust This Computer.
Step 6: Depending on your computer, open Finder or iTunes. Then, do either of the following:
For macOS 10.15 or later: Select your Apple iPhone 13 under the Locationssection, then click Restore iPhone.
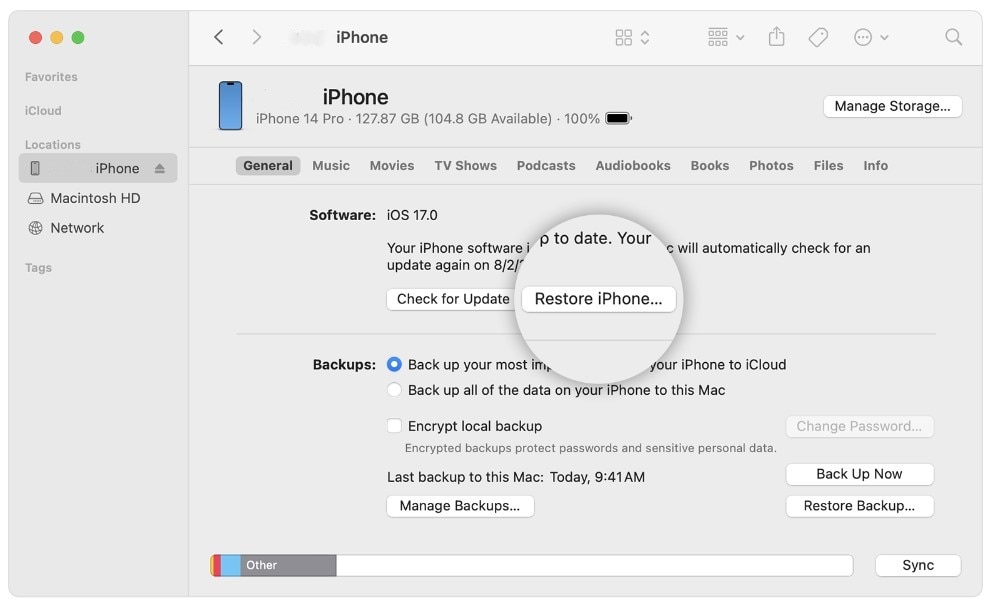
- For macOS 10.14 or earlier or Windows: Click the Apple iPhone 13 in the top left window, click Summary, then click Restore iPhone.
- Step 7: Click Restore in the dialogue box. iTunes or Finder will download your Apple iPhone 13’s latest iOS software and restore the Apple iPhone 13 to its factory settings.
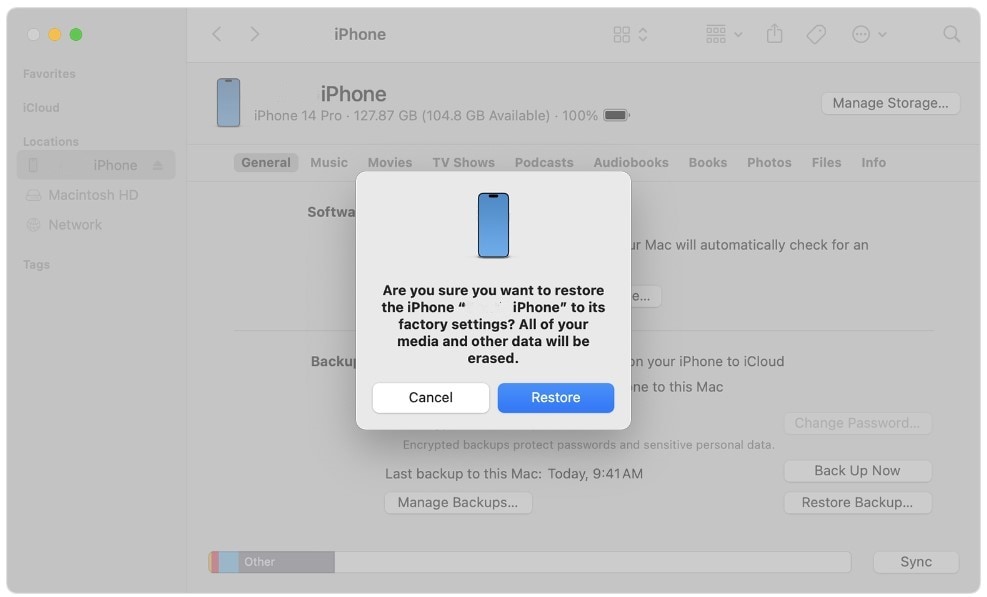
- Step 8: Once the restore is complete, the Apple iPhone 13 will restart.
Part 4: Erase an iPhone Without Apple ID via Activation Lock Support Request
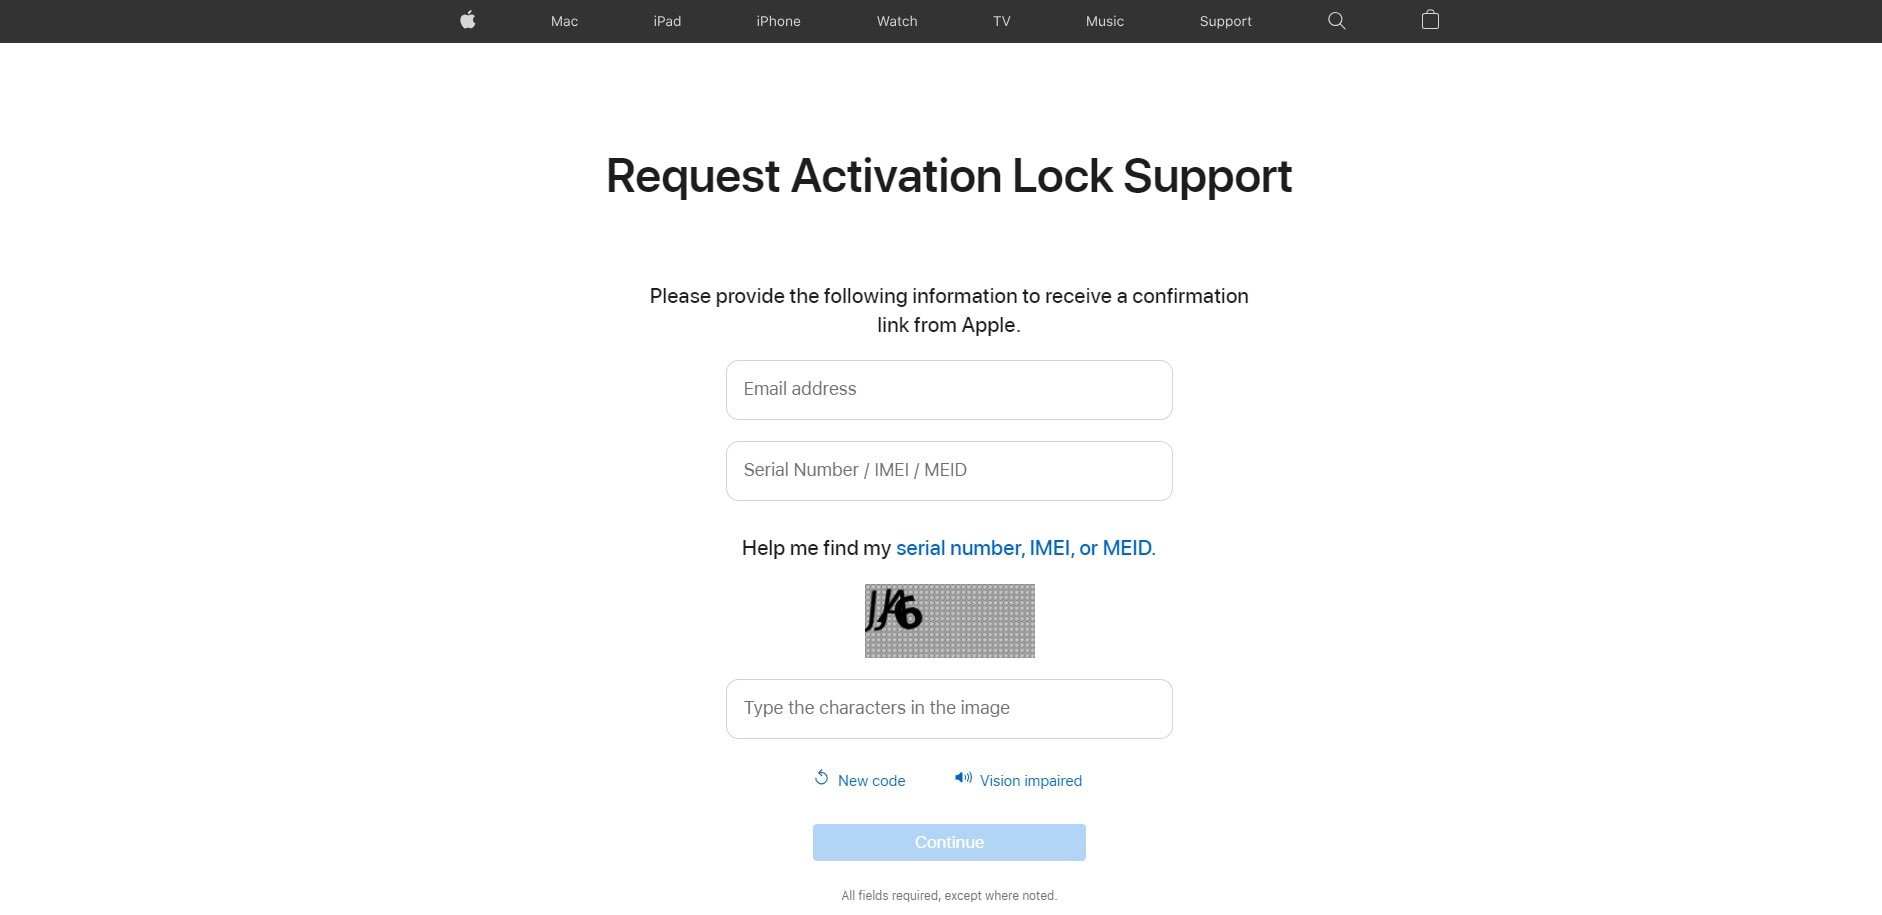
You can request to unlock Activation Lock support from Apple if your device is not in Lost Mode or if you need to erase an iPhone without an Apple ID password. To do this, you need to provide proof of purchase of the iPhone. It can be in the form of a receipt, invoice, or credit card statement.
The proof should show the serial number of the iPhone, IMEI, or MEID. Once Apple unlocks the Activation Lock on your Apple iPhone 13, your Apple iPhone 13 contents will be permanently erased. Also, note that if you restore your Apple iPhone 13 from a local backup, the Activation Lock will re-enable.
To start this request, follow these steps:
- Step 1: Head to Apple’s Activation Lock support page. (al-support.apple.com)
- Step 2: Scroll down the page, select the agreement checkbox, click Continue, and it will redirect you to a new page.

- Step 3: Enter your email address and other required information, then click Continue.
Part 5: How To Erase an iPhone Without an Apple ID Password in Minutes?
The time it takes to process an unlock Activation Lock support request can take days. If your device is erased as soon as possible, use the Wondershare Dr.Fone Screen Unlock tool. This third-party mobile solution can erase an iPhone without an Apple ID password, even if the Find My feature is enabled. Also, it can:
- Remove several iOS lock screens, such as passcode, Touch ID, and more.
- Remove the iCloud Activation Lock
- Bypass Apple ID from iPhone without a password
- Remove MDM restrictions
Dr.Fone Screen Unlock is a simple, easy-to-use tool compatible with the latest iOS models. Follow these steps to remove the Apple ID from your Apple iPhone 13 and erase all its contents within minutes:
Step 1: Download and install Dr.Fone on your desktop. Launch the app and connect your Apple iPhone 13 using a USB cable.
Step 2: From the Toolbox homepage, select Screen Unlock, then choose iOS.

- Step 3: Select Remove AppleID to delete iPhone contents, including the Apple ID.

- Step 4: The next screen shows the connected device. Click Unlock Now.

- Step 5: Click Yes to confirm you have set up a screen lock.

- Step 6: Click Yes to verify you have enabled two-factor authentication on your Apple iPhone 13.

- Step 7: Follow the in-app instructions to put your device in Recovery Mode.

- Step 8: Select an option from the System Version drop-down list, then click Start.

- Step 9: Wait while the iOS firmware downloads.

- Step 10: Once downloaded, click Unlock Now to proceed.

- Step 11: Enter the code in the dialogue box and click Unlock.

- Step 12: Keep your Apple iPhone 13 connected to your computer while the process progresses.

- Step 13: Click Done and check that your Apple iPhone 13’s data and Apple ID have been removed.

Conclusion
It can be challenging to erase an iPhone without an Apple ID password, but it’s achievable by following the right steps. Remember to weigh the security implications and back up your data beforehand.
If you’re seeking a straightforward method on “how to erase an iPhone without Apple ID,” Dr.Fone Screen Unlock tool is a good solution. With its user-friendly interface and efficient operation, Dr.Fone simplifies the process, making it accessible to users of all technical levels. Don’t let a forgotten Apple ID password hinder your device’s functionality. Try Dr.Fone Screen Unlock and reclaim control of your Apple iPhone 13.
Apple ID Locked for Security Reasons On Apple iPhone 13? Find the Best Solution Here
Apple ID is the main functional unit in the smooth and secure operation of Apple devices. This ID is the gateway towards many services, including iCloud, App Store, and more. In the context of these security concerns, Apple ID could get locked out for various reasons, like Apple ID locked for security reasons. This happens just because the security feature in the operating system detects some fictitious activity.
However, you don’t need to worry about your Apple ID locked for security reasons because solutions to these problems do exist. In this article, we will also provide one significant and effective solution to tackle such issues effortlessly.
Part 1. Exploring the Causes of Apple ID Locked Out for Security Purposes
Has your Apple ID been locked for security reasons, and is this problem creating some tension for you? Before we move further towards its solutions, it’s essential to know the reasons that lead to these problems. Some of them are explained below in a comprehensive manner:
1. Incorrect Attempts
Apple locks your Apple ID mainly when you or someone else has entered the password incorrectly multiple times. This is one of the most common reasons, and mostly, this happens by the original users themselves unintentionally.
2. Preventing Fraudulence
If there are unauthorized purchases or suspicious transactions on your ID, Apple may consider locking it to prevent that activity. It happens to protect the user’s financial information and to avoid any fraudulent activity from being done on that Apple ID.
3. Using Third-Party Tools
Sometimes, when using third-party tools based on open-source iCloud sources, the Apple ID could get locked. Developers can integrate iCloud features into their applications to provide users with improved accessibility to their iCloud data.
4. Security Breach Reasons
The ID can also get locked when Apple senses a potential security breach, which could lead to the exposure of your credentials. It may occur when someone tries to hack your ID to get some information, especially when it is being used in multiple areas.
5. Incorrect Security Questions
It may be due to the security questions you or someone else has entered incorrectly too many times. This is another common reason because, most often, the security questions are forgotten by the user. Ultimately, this leads to your Apple ID being locked for security reasons.
Part 2. Resolving the Apple ID Locked Out For Security Reasons by Resetting The Password
The basic solution to the Apple ID locked for security reasons is to reset the ID’s password. Apple also recommends adopting this method if you feel any suspicious activity. The password for your Apple ID can be reset from the iOS device itself or the Mac. We are providing a simple guide to reset your password either way.
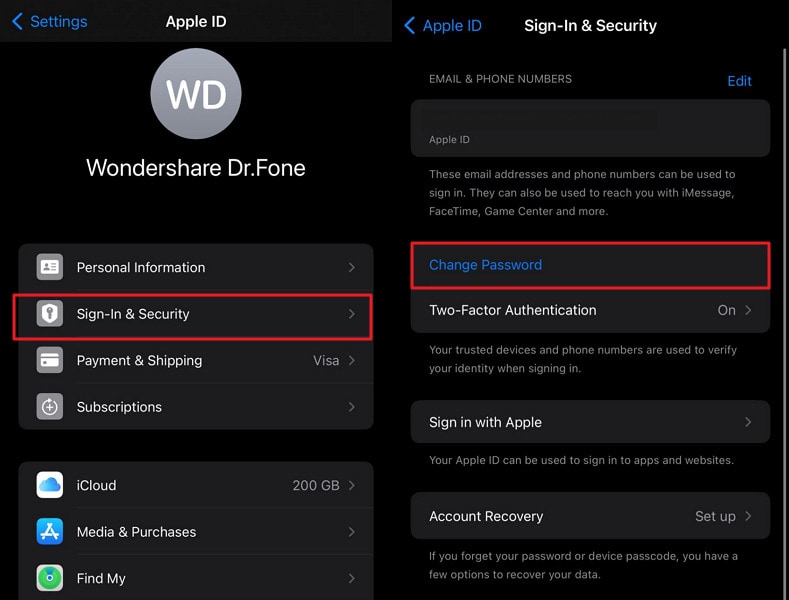
Resetting Password From iOS Device
Instructions: To reset your Apple ID password using your iOS device, open the “Settings” app and move ahead by tapping on your name in front of you. Then, continue to select the “Sign-In & Security” option and select “Change Password.” Follow the prompts on the screen to complete the Apple ID password change process.
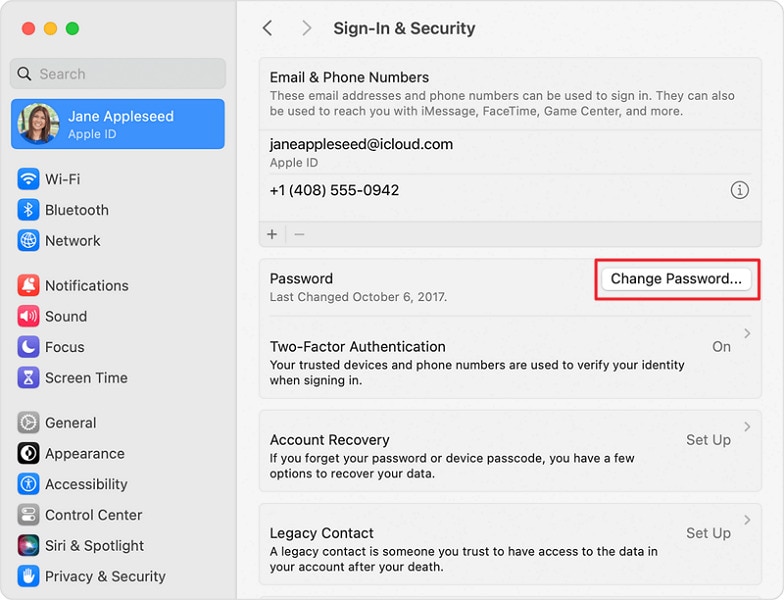
Resetting Password From Mac
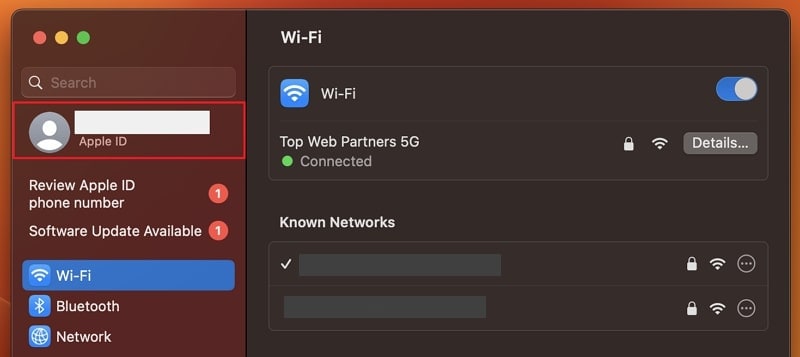
Instructions: Start by tapping the Apple logo in the top left corner of your screen and choosing the option “System Settings.” Upon completion of this step, you have to access your Apple ID settings and proceed by selecting the “Sign-In & Security” option. Subsequently, opt for the “Change Password” feature to modify your Apple ID password.
Part 3. Resolving the Apple ID Locked Out for Security Reasons by iForgot Website
You have tried to resolve the problematic message indicating, “This Apple ID has been locked,” but resetting the password is not helping. Then, you need to try iforgot.apple.com, which will help you tackle this issue quickly. Here is how to resolve your Apple ID, which has been locked for security reasons, using the iforgot.apple.com website.
- Step 1: To begin with, you will have to browse the website iforgot.apple.com on your computer. Once the website has loaded, move ahead by pressing the “Reset Password” and selecting the “Continue” option after entering the Apple ID.

- Step 2: In the next stage, you need to reset your password, and for that, you need to go through a verification process sent to your trusted device. You can reset the Apple ID password by tapping the “Allow” button. Following this, you must provide the trusted device passcode to initiate the password reset process.

Part 4. Resolving the Apple ID Locked Out for Security Reasons by Apple Support App
If your Apple ID is still inaccessible after implementing the methods, you can try the Apple Support app. This technique can be applied by arranging another device for downloading the Apple Support app. Users can regain access to their Apple ID and restore full device functionality through this app. The simple guide to perform this action is explained below step-wise:
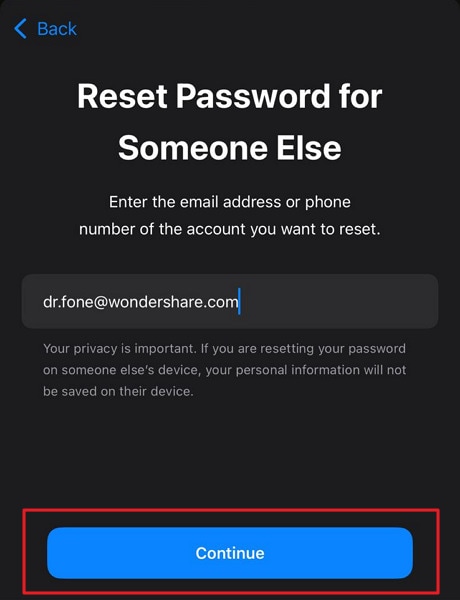
- Step 1: You need to download the Apple Support App on the borrowed device and proceed to open it. After that, navigate to the “Support Tools” section, find the “Reset Password” option, and tap on it.
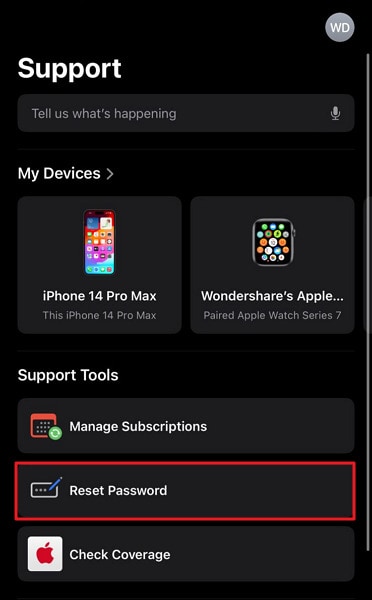
- Step 2: Choose the “Help Someone Else” option to continue. Then, give your Apple ID and hit the “Continue” button. There, you have to follow the on-screen instructions to reset your password and get access to it.
Part 5. No Solution Yet? Try Wondershare Dr.Fone – Screen Unlock (iOS) To Unlock Locked Apple ID for Security Reasons
When facing an Apple ID locked for security reasons, it becomes imperative to seek a reliable solution. All essential operations within iOS devices are intertwined with the functionality of the Apple ID. That’s why a viable resolution is crucial for seamless device usability. In such situations, Wondershare Dr.Fone emerges as a highly effective option.
It is specifically designed to tackle the intricacies of iOS device management. This tool offers a dedicated feature to unlock Apple IDs, making it the ultimate recourse. Additionally, it allows you to bypass the iCloud activation lock without requiring a password. This iOS screen unlock tool is fully compatible with the latest versions of iOS 17 and iPadOS 17.
Key Features of Wondershare Dr.Fone
- Using Wondershare Dr.Fone, you can also remove the Apple ID or screen lock from the latest iPhone 15 models.
- You can also manage your Apple iPhone 13 data transfer or fix iDevice system issues with the help of Wondershare Dr.Fone.
- This tool can also help its users to remove the Screen Time Passcode and SIM lock.
How To Use Wondershare Dr.Fone To Unlock Locked Apple ID for Security Reasons
Summarized below is the detailed step-by-step process of using Wondershare Dr.Fone to unlock your Apple ID:
- Step 1: Navigate to the Remove Apple ID Feature
With Wondershare Dr.Fone launched, move to the “Toolbox” tab and access “Screen Unlock.” Then choose “iOS” as your device type, and on the following screen, press “Remove Apple ID.” Now is the time to connect your Apple iPhone 13 to the computer and let Wondershare Dr.Fone detect it.
- Step 2: Enable 2FA on Your iOS Device
To proceed further, it is imperative to have screen lock and 2FA enabled on your iOS device. If it already isn’t, do it and move to put your device in Recovery Mode. Dr.Fone will guide you through the process of enabling Recovery Mode on your device. Once Wondershare Dr.Fone detects your device in Recovery Mode, it will display your device model.
- Step 3: Complete the Apple ID Unlocking Process
Now choose “System Version” and tap “Start” to let Dr.Fone download the firmware. Once it is downloaded and verified, tap “Unlock Now.” The last step involves putting the confirmation code in the confirmation prompt and pressing “Unlock.” In a few moments, Wondershare Dr.Fone will unlock your Apple ID.
Final Words
To conclude, there are scenarios that can lead to the Apple ID being locked for security reasons problem. Apple does this for your benefit. However, we have explained different methods to get you out of this situation. Although all of these methods possess the potential to resolve this problem, Wondershare Dr.Fone offers a powerful platform for more in-depth remedies.
This robust iOS toolkit feature performs this recovery in seconds, saving you time. Also, it has a simple interface for its users with various technical exposure. In short, it is the best solution if your Apple ID has been locked for security reasons.
The Easy Way to Remove an Apple ID from Your MacBook For your Apple iPhone 13
Apple has a great ecosystem of devices and services that can be controlled using a single key, your Apple ID. It can be used to login into every Apple service, from Apple Music to FaceTime. However, there are many reasons which can force you to remove your Apple ID from devices like MacBook, iPhone, etc. That makes it important for you to learn how to remove Apple ID from your MacBook safely.
Suppose you need to remove your Apple ID from your Mac but don’t know to do this, then this article is for you. You will also learn to remove Apple ID from iOS devices without a password.

Part 1: Why Delete Apple ID and iCloud Account?
There are as many reasons to leave the Apple ecosystem as why you should join it. Apple devices are known for security, but it also means that you have less control over their settings. It is also a closed ecosystem that forces you to limit yourself to a specific set of apps and services. Some of the reasons why people might want to remove their Apple ID from their MacBook are the following:
- Switching Platforms: If you intend to leave Apple devices and move to another platform like Android, it makes sense to delete the Apple ID. Deleting the ID will make it safer for you to sell your old Apple device to others.
- Privacy Concerns: While Apple is comparatively secure, your data is still stored on Apple servers. It means the company can still access your data. It will require deleting your Apple ID if you want to delete all personal data from Apple servers.
- Changing Account: Getting a new Apple ID means you need to delete your old Apple ID. It will save you the trouble of managing two different IDs with multiple accounts associated with each one.
- Shared Apple ID: It is possible that you were sharing your account with your partner or another family member and now want to get your own account. Removing the old account completely and using a new one can be the safest way.
Part 2: If I Delete Apple ID, Will I Lose Everything?
Deleting your Apple ID is not insignificant because it is your key to the Apple ecosystem, as mentioned above. Though it won’t affect your data storage in local device. However, you will no longer be able to access your data store across multiple Apple services like iCloud, Apple Music, FaceTime, iMessage, or other services that require an Apple ID can no longer be used.
You won’t be able to purchase or access purchased items from the App Store, iTunes Store, or other Apple services. Remember, deleting your Apple ID is a permanent action and cannot be undone.
Part 3: How to Remove Apple ID/iCloud Account from Mac with Password?
The process of removing Apple ID from a Mac is easy and quick. Before removing the Apple ID, you need to remember that all the services that require Apple ID will no longer work. To remove the Apple ID from your MacBook, follow these steps:
Step 1: Open your Mac and access the “System Settings” from the “Apple Logo” icon. Here, click on your Apple ID name from the top of the left sidebar. Scroll to the bottom of the Apple ID tab to locate the “Sign Out” button.
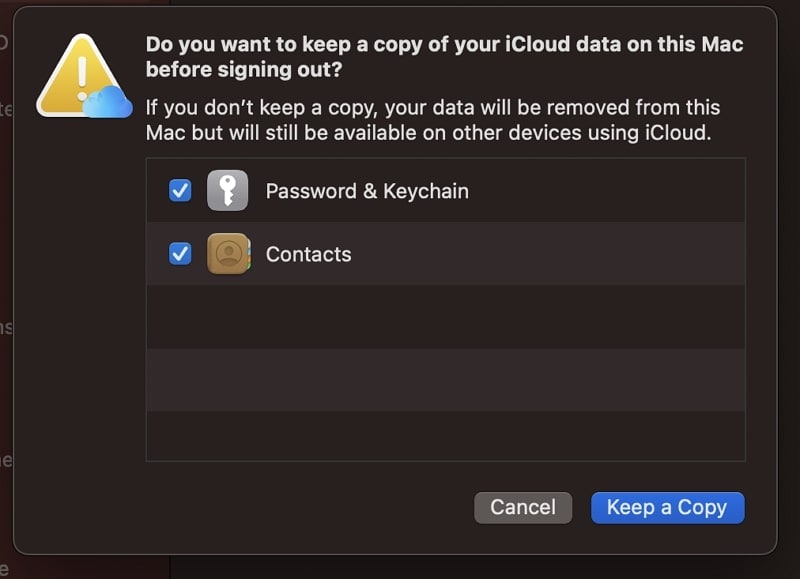
Step 2: Press the “Sign Out” button to remove your Apple ID from the Mac. A prompt will appear asking if you want to keep a copy of your passwords and contacts on your laptop. Select them according to your needs.
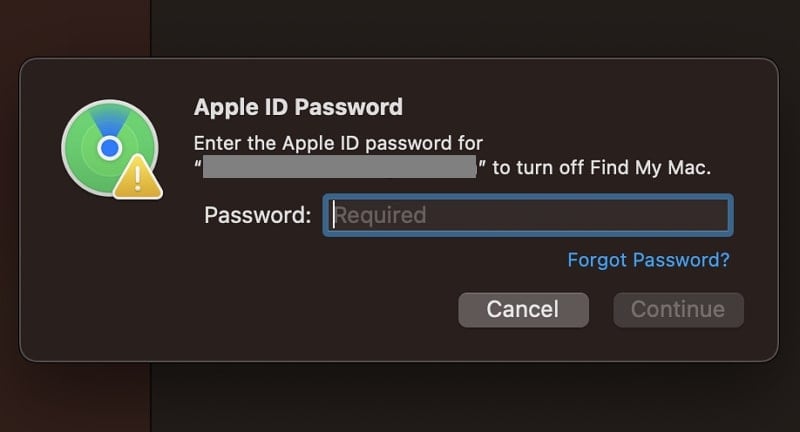
Step 3: On the next window, it will ask you to provide your Apple ID password. Provide the password to complete the process of removing your Apple ID from your Mac.
Bonus Tip: How to Remove Apple ID from iPhone/iPad Without Knowing the Password?
Forgetting your Apple ID credentials is also a common reason for wanting to remove your Apple ID from your Apple iPhone 13. Another such case is buying a second-hand iPhone with a logged-in Apple ID without knowing the password. You need a specialized tool like Dr.Fone - Screen Unlock (iOS) to remove Apple ID in these cases.
With Dr.Fone - Screen Unlock (iOS), you can remove the Apple ID from your Apple iPhone 13 or iPad and regain access to the Apple iPhone 13 device. This software can also remove the iCloud activation lock on an iOS device if you don’t know the login credentials of the previous owner. It is the best tool if your Apple iPhone 13 has become locked or disabled due to a forgotten passcode or other issues.
Key Features of Dr.Fone - Screen Unlock (iOS)
- Dr.Fone - Screen Unlock (iOS) can remove passcodes, pattern locks, fingerprint locks, and other types of locks from iOS devices.
- With the help of this tool, you can remove the encryption of your iTunes backup. It will also help you restore your iTunes backup to your new iPhone even if you changed your Apple ID.
- If you have forgotten the username or password of your Apple iPhone 13 MDM, this tool allows you to bypass or remove MDM to access the Apple iPhone 13 device.
- It can also unlock SM Lock or Carrier Lock on your Apple iPhone 13. That allows you to use your Apple iPhone 13 freely if you want to travel internationally.
Steps to use Dr.Fone - Screen Unlock (iOS) for Removing Apple ID
Dr.Fone - Screen Unlock (iOS) has a straightforward interface and provides clear instructions for removing Apple ID from your Apple iPhone 13. Your Apple iPhone 13 will be reset during the process, and you will lose the data. It is advised you create a backup before starting the procedure. To start the process of removing Apple ID from your Apple iPhone 13, follow the steps given below:
Step 1: Establish the Connection between iPhone and the Apple iPhone 13 device
Use a USB cable to connect your Apple iPhone 13 to your computer and launch Dr.Fone. Next, proceed with the “Screen Unlock” tool from the main interface and “Remove Apple ID” on the next screen. Now move to the iPhone, unlock it, and select “Trust” in the “Trust this Computer” pop-up.
Step 2: Put Your Apple iPhone 13 into the Recovery Mode
You are required to put your Apple iPhone 13 into Recovery Mode before you can remove the Apple ID. Follow the on-screen instructions to the letter to put your Apple iPhone 13 into Recovery Mode. Once the Apple iPhone 13 has entered the recovery mode, it will reset and restart. After restarting, the process of removal of the Apple ID will begin.
Step 3: Remove Your Apple ID from the iPhone
Wait for the program to complete the process of removing your Apple ID from your phone. Once it is completed, check if the old Apple ID is removed, and you can enter your new Apple ID. Otherwise, you can select “Try Again” to restart the process.
Conclusion
The answer to how to remove Apple ID from MacBook is a straightforward process that can be completed in just a few steps. By following the instructions outlined in this article, you can easily sign out of your account and remove it from your Mac.
Removing the Apple ID with forgotten credentials is complex, but Dr.Fone - Screen Unlock (iOS) has also made it easier. It is an excellent and must-have toolbox to deal with all password-related iPhone problems.
Also read:
- [Updated] 2024 Approved Building Brand Identity with Instagram Video Content
- [Updated] A Comprehensive Guide to Previewing Facebook's Hidden Activities
- [Updated] In 2024, Prime Venues for VR Entertainment
- [Updated] MovieMeld Editor Review – In-Depth Analysis
- 2024 Approved Choosing Between OBS Studio and Bandicam for Screen Capture
- 2024 Approved Solved Dead OBS Camera
- Demystifying the Purpose of Hugging Face
- Expert Advice to Resolve the Notorious ntdll.dll File Crash Problem on PCs with Win11/Win10
- How to Fix when Apple Account Locked On Apple iPhone 8?
- How To Reset the Security Questions of Your Apple ID On Your Apple iPhone 14 Pro
- How to Unlock Apple ID On your Apple iPhone 14 without Security Questions?
- In 2024, A Step-by-Step Guide to Finding Your Apple ID From Your iPhone 6
- In 2024, Forgot Your Apple ID Password and Email From Apple iPhone SE (2020)? Heres the Best Fixes
- In 2024, How To Create an Apple Developer Account From Apple iPhone 12 mini
- In 2024, How to Remove an AirTag from Your Apple ID Account On iPhone 14?
- Juntos | Free Book
- Your Account Has Been Disabled in the App Store and iTunes From Apple iPhone 6s Plus?
- Title: In 2024, How To Erase an Apple iPhone 13 Without Apple ID Password?
- Author: Alma
- Created at : 2024-11-30 16:11:38
- Updated at : 2024-12-06 16:04:54
- Link: https://apple-account.techidaily.com/in-2024-how-to-erase-an-apple-iphone-13-without-apple-id-password-by-drfone-ios/
- License: This work is licensed under CC BY-NC-SA 4.0.