
In 2024, How to Fix when Apple Account Locked On Apple iPhone XR?
How to Fix when Apple Account Locked On Apple iPhone XR?
You pick up your phone to perform a routine task, and your Apple iPhone XR gives you a surprise that you have gotten your Apple account locked. It will remain this way, and you will not be able to use the phone unless you follow the proper steps.
Several Apple device users face this problem, and one of these messages might be on your screen:
- “This Apple ID has been disabled for security reasons.”
- “You can’t sign in because your account was disabled for security reasons.”
- “This Apple ID has been locked for security reasons.”
Getting your Apple account locked can be frustrating and might hinder the performance of your phone. In this article, we will discuss the various tips to solve the Apple account locked issue.

Part 1. Why is Apple Account Locked?
Although annoying, Apple locks your Apple Account for a good reason. There might be various reasons, but the most common one is that your account’s integrity was in danger. Apple locks your account when it sees an “unusual activity” surrounding your account or device. It generally happens when some unauthorized person attempts to access your account.
Your activity can also lock your account. If you fail to log in to your Apple ID several times, Apple might lock it. Moreover, your account can even get locked when you answer the security questions incorrectly more than once. Furthermore, Apple tries to keep your ID dedicated to a few devices. Besides, it could shut it down when you aimlessly try to open the account on multiple Apple devices.
Part 2. 3 Tips to Unlock Apple Account
Well, now you know the reasons behind the Apple Account getting locked. The next step is to learn the best tips to unlock it. Here, we will share various tricks that will open the Apple account in no time. So let’s dive in!
Tip 1. Use Dr.Fone to Unlock Apple Account (without Password)
Wondershare’s Dr.Fone comes with a complete set of tools to help with a range of different and challenging problems related to your Android or iPhone. The software has an intuitive interface, making unlocking Apple account a lot easier than its competitors. The application Dr. Fone - Screen Unlock (iOS) has robust versions for both Windows and macOS.

Some of the top and vital features of Dr.Fone are as follows:
- It can repair the system of both Android and iOS devices.
- It can backup data available on your device.
- You can transfer WhatsApp, Line, and Kik chat history from one phone to another.
Download the tool on your respective system, and follow the guidelines stated below to unlock Apple account without the password:
Step 1: Run the Application
Once the download is complete, get your USB cable and connect your Apple iPhone XR/iPad to your computer.
Select the “Screen Unlock” tool, and a new interface will greet you. Select the “Unlock Apple ID” option to begin the process to unlock your Apple Account.

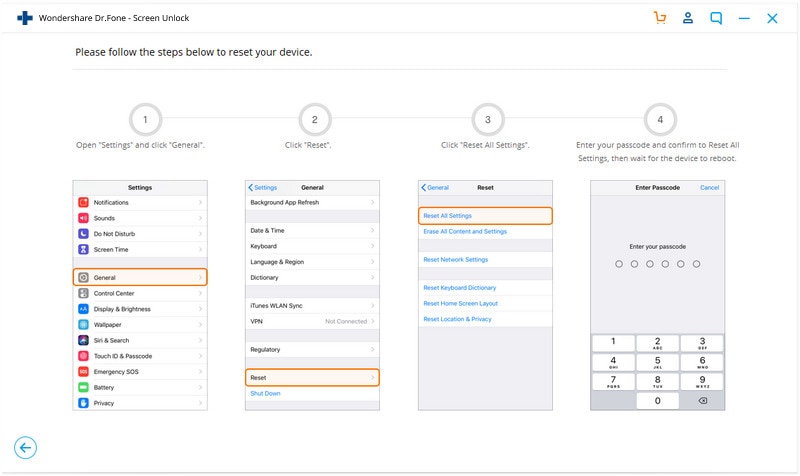
Step 2: Reset your Apple iPhone XR using Dr.Fone
Dr.Fone will present you with detailed on-screen instructions that show precisely how to reset your Apple iPhone XR Settings. Dr.Fone must unlock your Apple iPhone XR/iPad.
Step 3: Unlock the Phone
When your Apple device has been reset, Dr.Fone will get to work and will give you your unlocked iPhone/iPad in a matter of seconds.
When the process finishes, a pop-up message will notify you. It will point out that you can now unplug your Apple iPhone XR from the PC and check if the operation was successful.

Tip 2. Use iTunes to Unlock Apple Account
Apple also offers the services of its built-in utilities such as iTunes to unlock Apple account. Here before doing anything else, you will need to get your Apple iPhone XR into recovery mode. For added convenience, we have listed how to get into recovery mode with iPhone so you can smoothly proceed with the process.
Step 1. Power off your device.
Step 2. Once it’s powered off, press the side button and keep holding it while connecting your Apple iPhone XR to your computer.
Step 3. Once the recovery mode logo appears, leave the button.
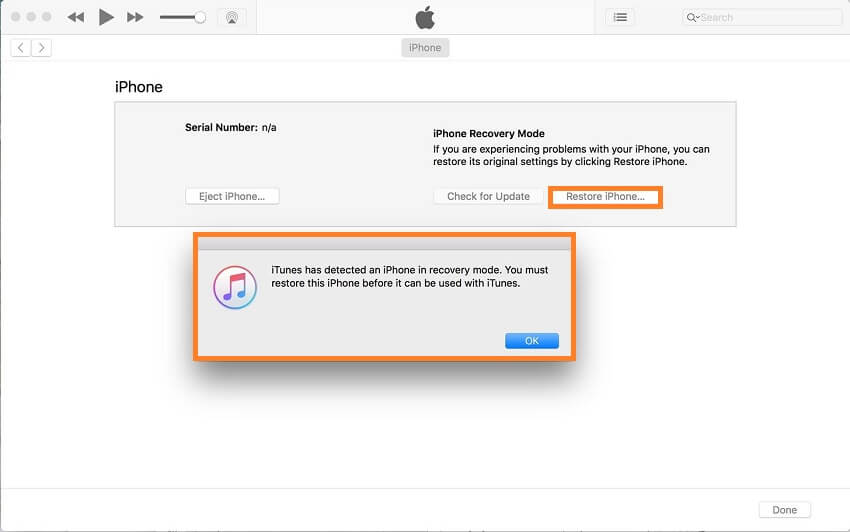
Now that you have entered into recovery mode, the next step is to restore the iPhone. The process is simple. You can learn it quickly by going through the steps listed below:
Step 1. After successfully getting your Apple iPhone XR into recovery mode, select the Restore or Update option from iTunes.
Step 2. iTunes will download the necessary files to restore your phone, which can take some time.
Step 3. After the download, you can press shift while clicking restore, which will let you select the firmware file.
Step 4. Wait for the firmware update to finish, and then you are done!
Step 5. Access your Apple iPhone XR, and you will find that the Apple account will be disabled.
Tip 3. Recover Your Apple ID via Apple (Reset Password)
If you have forgotten your Apple device’s password, it’s recommended not to input your password more than one time. It would lead to a 24-hour shutdown. It cannot be lifted even if you know your password, so proceed wisely. The recommended solution instead is to reset your password.
Here are the steps to reset the password for any of your Apple devices, provided they are in your trusted devices’ list.
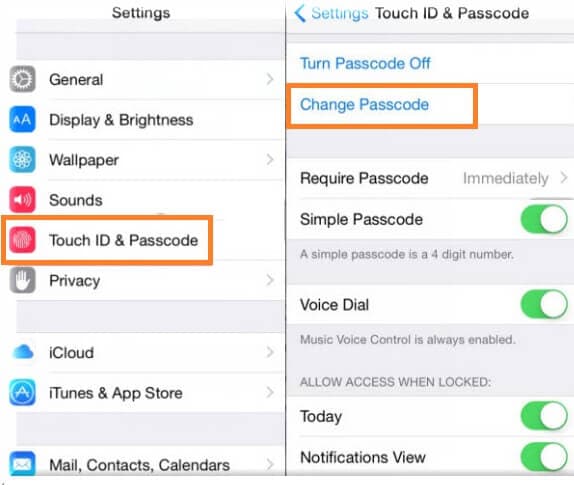
Step 1. Go to Settings on your Apple device and tap your name.
Step 2. Now, go to Password & Security and then Change passcode.
Step 3. If your Apple device is signed in to iCloud, you will be required to enter a password.
Step 4. Enter the iCloud password and then set a new code for your device.
Part 3. How to Change Apple ID on an iPhone?
If you have purchased a refurbished iPhone and the previous owner’s Apple ID added to it, it is wise to change the Apple ID. You can add your own or add the ID of someone you know. Apple provides simple steps for you to change your account on iPhone.
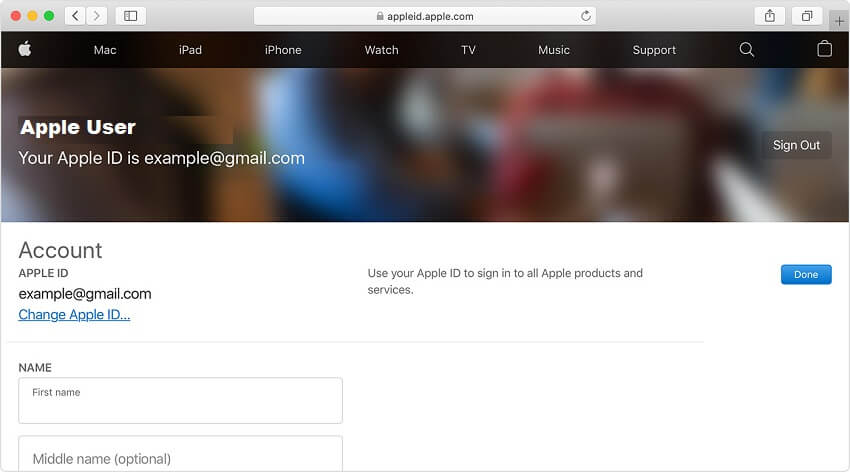
Step 1. Visit the relevant site of Apple to remove the ID and sign in with your account.
Step 2. Navigate to the Account section and choose Edit. From there, you will see a new list of options.
Step 3. Select Change Apple ID.
Step 4. Update your email address and click continue.
Step 5. That’s it!
Conclusion
Getting your Apple account can ruin your day and hinder your work. Luckily, there are suitable methods to fix the Apple Account Locked issue quickly and without any damage. Here, we have discussed the top techniques to unlock the Apple account. Hopefully, these tips have helped you can access the contents of your Apple iPhone XR.
How to Remove an AirTag from Your Apple ID Account On Apple iPhone XR?
Apple provides many exciting features in its products, including the AirTag feature on iPhone devices. However, after enabling the function, many iPhone users forget to remove it from the FindMy app ahead of time. Therefore, if you are selling or resetting the Apple iPhone XR device, you need to remove AirTag from Apple ID to be usable later.
If someone removes the AirTag without resetting it while operating in the Bluetooth range, deleting AirTag ownership will require manually breaking the Apple iPhone XR device apart and further configuration.
Remove this connection from the Apple ID account with simple steps first-hand to avoid that. Read on to know the steps involved in this process directly or with the best software alternative.

Part 1. What Exactly Does an AirTag Do?
Before discussing how to remove AirTag from Apple ID, you should know better about the function itself. The AirTag feature is available for iOS devices. Therefore, one can register the AirTag process with the Apple ID you are utilizing on your smartphone.
Apple users can attach the AirTag to different objects like backpacks or keychains. This makes it simple to find these objects later in case they get misplaced or lost through the Find My app on the iPhone.
Users can add their AirTag to one Apple ID account, so you cannot access this from the Find My app via other accounts. In case of loss, you must remove the AirTag from your device entirely.

Part 2. How to Remove an AirTag from Your Apple ID onApple iPhone XR & iPad?
After adding the AirTag to any object, it instantly syncs with the Apple ID of the user. So, only the primary Apple ID user can use or monitor the AirTagged item. Other users can use it only after resetting the AirTag. So, learn how to remove AirTag from Apple ID via the Find My app on different iOS device types.
Version 1: Removing AirTag on iPhone
Step 1: Access the Apple iPhone XR homepage and access the Find My app.
Step 2: From the bottom menu bar, tap on the Items option.
Step 3: The information about which AirTag is associated with your chosen item will appear in the next page list.

Step 4: Choose the selected items and swipe upwards on the screen. Then, find the Remove Item button and press it.

Step 5: Following this, select and press the Remove button. Repeat for confirmation.
Version 2: Removing AirTag on iPad
Step 1: Access the Find My app from the home screen on your iPad device.
Step 2: When the app opens, click on the Items icon at the bottom part of the screen.

Step 3: Choose the items you want to delete by tapping them.
Step 4: Swipe up and choose the “Remove Item” option.
Step 5: On the next confirmation prompt that comes up, click Remove.

Part 3. Bonus Tips: How to Unlock an Apple ID That’s Locked?
Typically, it is impossible to use a PC or Mac to access and remove AirTag from Apple ID. One has to use the Apple iPhone XR or iPad device only. But what if the smartphone screen or Apple ID is locked?
You need to unlock the Apple iPhone XR device using capable software like Dr.Fone - Screen Unlock (iOS) to remove the blockage. This software can remove many different Apple screen lock types, like Black Screen of Death, Face ID Lock, Screen Time Passcode, and more.
The process of bypassing Apple ID as a feature is available for iOS 14.0 or its previous conversions. It does not require extremely complex jailbreaking or configuration steps- all is complete in some clicks only.
Top Features:
- Users get at least ten retries for the password or lock removal attempt.
- Suitable for removing various screen locks, Apple ID locks, etc.
- Works to bypass Apple ID account locking without a password within seconds.
- It allows Apple ID lock removal even with the active Find My iPhone feature on the smartphone.
How to use it?
Step 1: Install the Dr.Fone app and launch it on the computer. Choose Screen Unlock.
Step 2: On the next page, tap the Remove Apple ID option. Then enter the necessary passcode to verify that you trust the PC. Then, do further scanning.
Step 3: Back up all devices before the procedure. Then, visit the Settings page > user profile > Password & Security. Then, toggle the Two Factor Authentication feature to the ON part. Then, press Unlock Now.

Step 4: Put the smartphone into recovery mode with on-screen instructions. Then, restart the phone. Complete the resetting steps and press the Restart button. It will unlock the Apple iPhone XR device automatically.

Step 5: Verify on your device that the Apple ID is unlocked. Then, go to the Find My app and remove the AirTag feature as detailed previously.
Part 4. FAQs about AirTag
- How to Set Up and Add an AirTag on Your Apple iPhone XR?
Firstly, get your device ready to get set up. Remove the wrap around the AirTag and pull the tab out to start the battery. After it plays a tiny sound, hold the Apple iPhone XR device near the iPhone/iPad and press Connect. Next, change the name of the AirTag on your list, give an emoji to it, and press Continue. Register it with the Apple ID in the next prompt and then choose Done.
- How to Rename AirTag and Change Its Emoji?
You can access the Items tab on the Find My application and choose the AirTagged item. Then, scroll downward and choose Rename item to change the name. Finally, create a customized name and add an emoji as well.
- How Far Can You Track an Apple AirTag?
With the Bluetooth connection switched on, one can track Apple AirTag for approximately 100 feet.
Conclusion
The added AirTag stays connected with one Apple ID account until you reset it. So, use the process mentioned to remove the AirTag via iPhone or iPad. If the iPad or iPhone you are using has locked the Apple ID, you can use another software Dr.Fone - Screen Unlock (iOS) , to access it without data loss securely. Then, follow the steps mentioned to reset the AirTag here.
Why Apple Account Disabled On your Apple iPhone XR? How to Fix
Apple is one of the leading smartphone developing enterprises that has introduced the world to a contemporary set of features that are not common among other leading smartphone companies. One of the major distinguishing characteristics of Apple has been displayed in its present security protocols. Apple Account is regarded as one of the most significant credentials of the Apple iPhone XR and iPad that is responsible for connecting and holding the applications and the assorted data. Many users have generally reported unusual situations that got their Apple Account disabled. There are several reasons that can be associated with the Apple account getting disabled. The major repercussion that is associated with it is unnecessary data loss following the suspension of all products that have been bought with the account over time. This article provides you an impressive overview of the major reasons that lead to your Apple Account getting disabled, followed by the associated mechanisms that can be tested to secure the account.
Part 1. Why is the Apple account disabled?
Apple iPhone, iPad, and other devices operate over a single Operating System, with its own protocols and unique mechanisms that distinguish it from other smartphone models in the market. Apple believes in securing the data and identification of its users with its state-of-the-art security measures. Under such circumstances, it usually gets possible for the user to have his Apple account disabled unnecessarily. Whenever you encounter such a situation, there are several messages that might be displayed on your device to prompt you over the disabling of the account. These messages usually appear in situations where you intend to sign in to some platform with your associated Apple ID. The most common messages that appear on the screen are:
- “This Apple ID has been disabled for security reasons.”
- “You can’t sign in because your account was disabled for security reasons.”
- “This Apple ID has been locked for security reasons.”
The messages that have been stated above are usually depicting a security anomaly that led to the disabling of the associated Apple ID. However, there can be several reasons that would have led to such circumstances, which are described as follows.
- There might be incorrect forced logging in into your Apple ID for multiple tries.
- Any user would have entered incorrect security questions multiple times.
- The other information associated with the Apple ID would have been entered incorrectly numerous times.
Part 2. Is “Your account has been disabled in the App Store and iTunes” the same as “This Apple ID has been disabled for security reasons”?
There are several instances where you encounter such prompt messages where you are restricted in using the App Store and iTunes. These messages can come in the form of “Your account has been disabled in the App Store and iTunes.” Over observing this prompt message, it has been discovered that the assorted message is not related to the other common message of “This Apple ID has been disabled for security reasons.” The dynamics of getting restricted from using the App Store and iTunes are related to remaining balances that have stuck around for a while over your Apple account. Normally, you may have some billing issues that are prevailing over an unpaid iTunes or App Store order. This problem can be countered through simplistic methods under such conditions where you are having access to the account information and can check for the basic billing information or update the payment method following other settings that are associated with paying bills. Over failure in accessing your account, you are required to contact Apple Support and look for the billing and payment statements to clear up all the remaining dues. Apple has considered covering all the security protocols to perfection, where you have any prevailing Apple charges on your connected credit card that would lead to direct disabling of your Apple Account.
Even though Apple accounts can be generally disabled overpayment issues, there are several security reasons that might restrict you in discovering and buying different products across the App Store and iTunes. It is necessary for you, as an Apple user, to remain prompt of all the issues that are relating to your Apple Account.
Part 3. 2 tips to Unlock Disabled Apple Account
As this article provides you a detailed overview of the reasons that lead to your Apple Account getting disabled, this article also considers providing you a few tips and tricks that would guide you in efficiently unlocking your Apple Account and use it with ease.
Unlock disabled Apple account with Dr. Fone
The first remedy that can be effectively tested across such situations that involve disabled Apple accounts is relating a third-party platform. Dedicated third-party tools are quite common in the market and provide users with adequate services that allow them to unlock their devices with ease. Out of this uncountable list of platforms, this article introduces you to a specific platform that offers you unique features with a user-interface that can be easily apprehended. Dr. Fone – Screen Unlock (iOS) offers you the perfect environment that would lead you in reversing the disabling of your Apple Account easily. There are several reasons that make this platform the first choice of users all around the globe, which are declared as follows:
- You can easily unlock your Apple iPhone XR if you accidentally forget the password at any time.
- The platform protects the Apple iPhone XR or iPad from the disabled state.
- It can work for any iPhone, iPad, or iPod Touch model.
- The platform is compatible across the latest iOS versions.
- You are not required to have iTunes for unlocking your device.
- A very user-friendly platform with no requirements of technical expertise.
While you understand the basic reasons that lead you to the fact that Dr. Fone is the most appropriate choice to unlock your disabled Apple Account, the following steps explain the guide that would help you in unlocking your device with ease.
Step 1: Connect Devices and Launch
Initially, it is significant to download the platform and install it by following all the on-screen instructions effectively. Following this, you need to launch the platform and connect your Apple device via a USB connection.
Step 2: Select Screen Unlock
With the home window on your front, you are required to tap on the ‘Screen Unlock’ tool from the list of options to open a new screen. On the new screen, you are required to select the last option of “Unlock Apple ID” to initiate the process.

Step 3: Trust the Computer and Access Device Settings
Over the Apple Device, you need to select the option of “Trust” over the prompt that is received on the phone. Following this, you need to open the “Settings” of your device and initiate a reboot of your Apple device.

Step 4: Device Unlocks
The unlocking process immediately starts, and the platform executes the complete process automatically. A prompt message appears on the desktop showing the completion of the task. The device is now unlocked successfully.
Unlock disabled Apple account using Apple’s verification
The other method that can be effectively tested is Apple’s verification that would allow us to easily topple off all barriers that are involved in the process. To effectively unlock your disabled Apple Account using Apple’s verification process, you need to follow the steps described in detail.
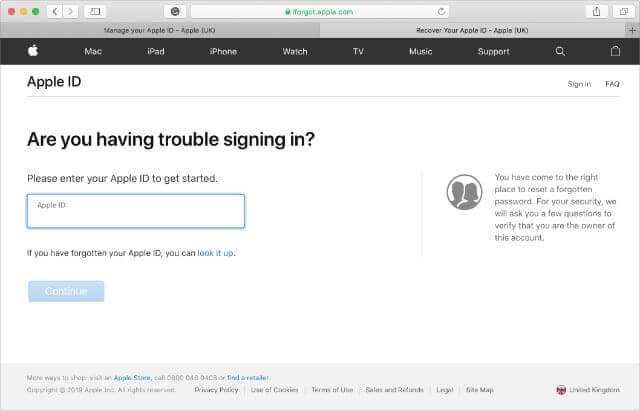
Step 1: Open iForgot Website
You need to open the iForgot website to test the verification process. As you open the platform, provide the appropriate credentials over which your Apple device is operating. This is referred to as your Apple ID that has been used for the Apple iPhone XR device.
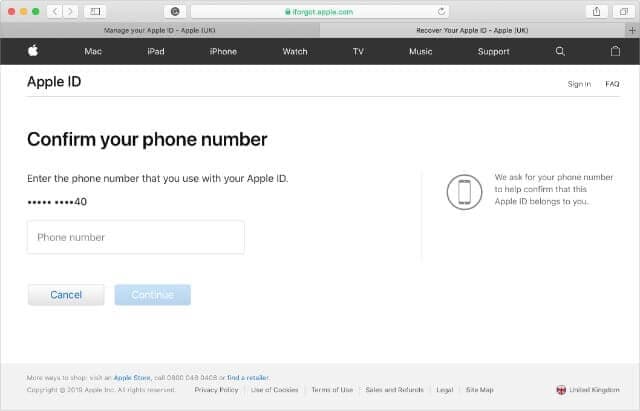
Step 2: Provide Personal Details
As you proceed with the verification, there are several personal details that are used to check the authenticity of the user. You are required to answer all security questions, provide all numbers if asked.
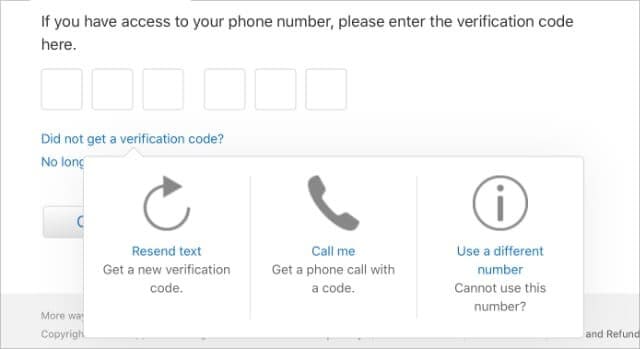
Step 3: Use the Verification Code
The platform will send a verification code that would allow you to unlock your device with the Recovery Key that is offered. Tap on “Unable to access your [device]“? to allow the platform to send a six-digit verification to the phone number that is attached to the Apple ID. You can simply use it along with the Apple ID password to unlock your account.
Conclusion
This article has provided you a detailed guide over the existing reasons that would have your Apple account disabled, followed by different tips that can be followed to cover your assorted problems efficiently.
Also read:
- [New] In 2024, Beat Bazaar Curation of Superior DJ Video Samples for Download
- [New] In 2024, Prolific Photography & Video App Selection IPhone vs Android
- [New] Royal Rivals Top 10 Ultimate Battle Royale Games for 2024
- 快速在線M4R/OGG間轉換,網路上免費服務 - Movavi音頻變更器
- Fixing THX Spatial Sound Woes on Windows Systems
- Flashback Filmmaking Essential Retro VHS Techniques for Modern Videos for 2024
- Get the Latest Lenovo Bluetooth Software for Windows 7/10 - Reliable and Updated Drivers Available Now
- How To Do Vivo Y36i Screen Sharing | Dr.fone
- How to Fix Locked Apple ID from Apple iPhone 11 Pro
- How to Remove an AirTag from Your Apple ID Account On Apple iPhone 15 Pro Max?
- How To Remove the Two Factor Authentication From iPhone 12 Pro
- How to Reset Apple ID and Apple Password On Apple iPhone 8
- In 2024, 3 Ways of How to Get Someones Apple ID Off Apple iPhone 7 Plus without Password
- In 2024, How To Create an Apple Developer Account On iPhone 11 Pro Max
- In 2024, Why Apple Account Disabled From your Apple iPhone 15 Pro Max? How to Fix
- Mastering Windows 11: A Step-by-Step Guide to Overcoming Hosted Network Issues
- Unlock Apple ID without Phone Number From iPhone 11 Pro
- Unlock Apple ID without Phone Number On Apple iPhone 12
- Updated Exploring the Best Voice Mimicry Applications of the Year
- Title: In 2024, How to Fix when Apple Account Locked On Apple iPhone XR?
- Author: Alma
- Created at : 2025-01-04 17:02:08
- Updated at : 2025-01-05 20:25:40
- Link: https://apple-account.techidaily.com/in-2024-how-to-fix-when-apple-account-locked-on-apple-iphone-xr-by-drfone-ios/
- License: This work is licensed under CC BY-NC-SA 4.0.