
In 2024, How To Get the Apple ID Verification Code On iPhone 11 in the Best Ways
How To Get the Apple ID Verification Code On Apple iPhone 11 in the Best Ways
Your digital identity serves as a vital safeguard for your personal information. This significance is particularly pronounced within the Apple ecosystem. A pivotal element of this digital identity is the Apple ID verification code. It might appear as a mere sequence of characters, but it carries immense significance. The verification code serves as a safeguard for your Apple account and all the Apple iPhone 11 devices linked to it.
Whether you’ve been an Apple user for years or are just starting out in the ecosystem, grasping the process of obtaining this code is essential. This article will take you through the importance of how to get an Apple ID verification codeand discover the most effective methods to acquire it.
Part 1: How Verification Code Helps Apple Users Keeping Their Devices and Account Safe
Apple has maintained a leading position in technological innovation. It also encompasses a steadfast commitment to security. This commitment is reinforced by the implementation of rigorous security protocols and encryption measures. It understands the critical need to fortify the security of its devices and accounts. One pivotal aspect of Apple’s safety is the use of verification codes. These codes serve as an extra level of protection.
The basic idea behind verification codes is to require users to provide a temporary code in addition to their regular password. This code is commonly dispatched to a trusted device, such as an iPhone. This is to introduce an additional layer of security that proves challenging for hackers to bypass. Apple users have several methods that will help them in how to get the Apple ID verification code scenario**.**
1. SMS or Text Messages
Apple can provide you with a verification code through SMS or text message on a trusted phone number. This offers a hassle-free option for users who wish to avoid using extra applications or devices.
2. Trusted Devices
Have you connected multiple Apple devices to your Apple ID, like an iPhone, iPad, Apple Watch, or Mac? If yes, you have the convenience of receiving verification codes on these trusted devices. This functionality guarantees a smooth and user-centric experience.
Part 2: How To Receive the Verification Code on a Trusted Phone Number?
One of the fundamental methods for obtaining a verification code involves utilizing a trusted phone number. This serves as a crucial step in bolstering the security of your Apple account, ensuring that exclusive access is granted solely to you. Obtaining a verification code via your trusted phone number holds significant importance for several key reasons.
In the first place, it acts as a safeguard against unauthorized access, even if someone possesses your Apple ID password. Furthermore, it streamlines the process of identity verification, facilitating a smoother account recovery in the event of a forgotten password or a security breach. Here’s a simple guide on how to get the Apple ID verification code via phone number.
- Step 1: When signing into your account, tap “Didn’t Get a Code” after entering your Apple ID credentials. Here, opt to receive the code on your trusted phone number.
- Step 2: Shortly, you’ll receive a text message or a call from Apple containing the verification code needed to finalize your sign-in process.

Part 3: How To Receive the Verification Code Directly From iPhone or iPad?
It is worth highlighting that Apple employs verification codes in numerous fundamental procedures. This emphasis on security ensures that your personal data and devices remain protected. Apple has designed its ecosystem to smoothly integrate security features into everyday tasks. Here’s how you can access the “Get Verification Code” feature for how to get an Apple ID verification code:
- Step 1. Open your device’s Settings, and select “Apple ID” from the top. On the following screen, press “Sign-in & Security.”
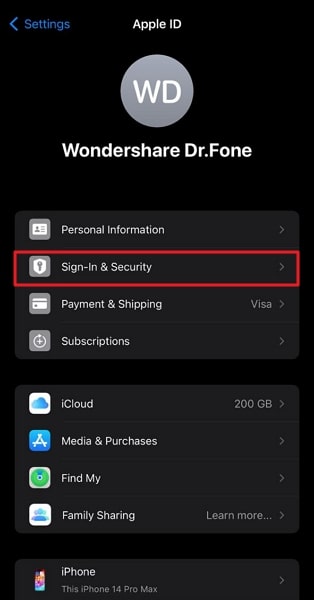
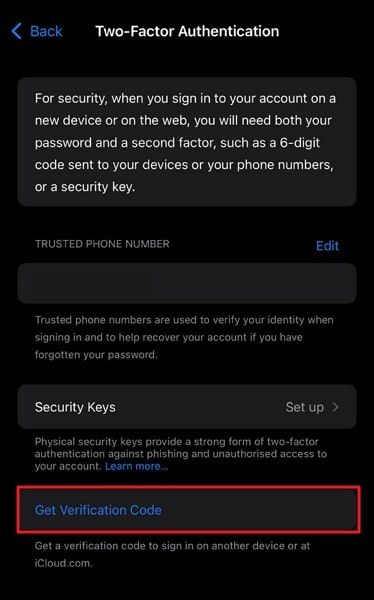
- Step 2. Here, tap “Two-Factor Authentication,” and on the ensuing screen, press “Get Verification Code.” You might be asked to log in using your Apple ID to receive the code.
Part 4: How To Get an Apple ID Verification Code Without a Phone?
Many users rely heavily on our trusted iPhones or iPads to receive Apple ID verification codes. Nonetheless, there may be situations in which you could be without your main device. Whether it’s due to misplacement or setting up a new one, Apple offers alternative methods to assist you. Here, we will explore two methods for how to get an Apple ID verification code without a phone:
Way 1: Take Help of Apple Watch
The Apple Watch serves as a versatile partner to complement your Apple iPhone 11. It offers a range of integrated features. One of its lesser-known capabilities is assisting you in situations where you need to receive an Apple ID verification code. Here is how you can use your Apple Watch for this purpose:
- Step 1. On your Apple Watch, open Settings and tap on your name/Apple ID. There, press “Sign-in & Security” and go on tap the option “Two-Factor Authentication.”
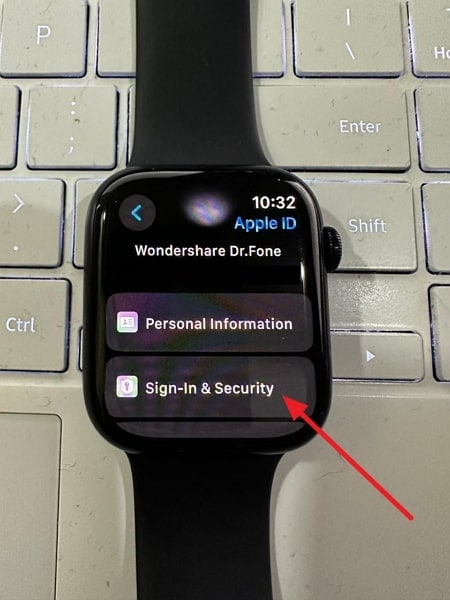
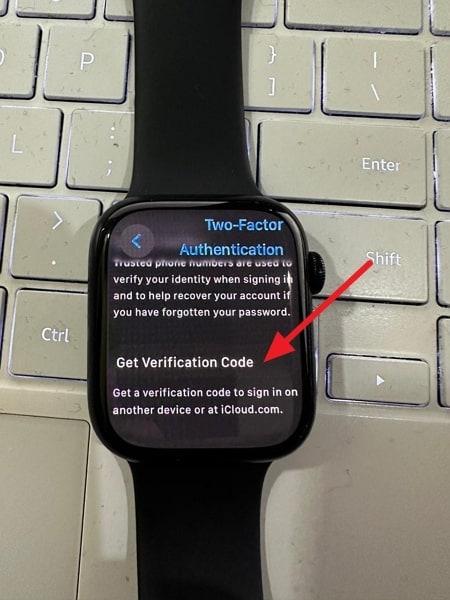
- Step 2. In the “Two-Factor Authentication” screen, press “Get Verification Code.” A 6-digit verification code will appear, which can be used for your targeted purpose.
Way 2: Use Get Verification Code on Mac
If you find yourself without your primary iPhone but have access to your Mac, you can still obtain an Apple ID verification code. Apple has integrated the “Get Verification Code” feature into the macOS system settings. That makes it easy to retrieve the code on your computer. Use the following guide to get the verification code from your Mac:
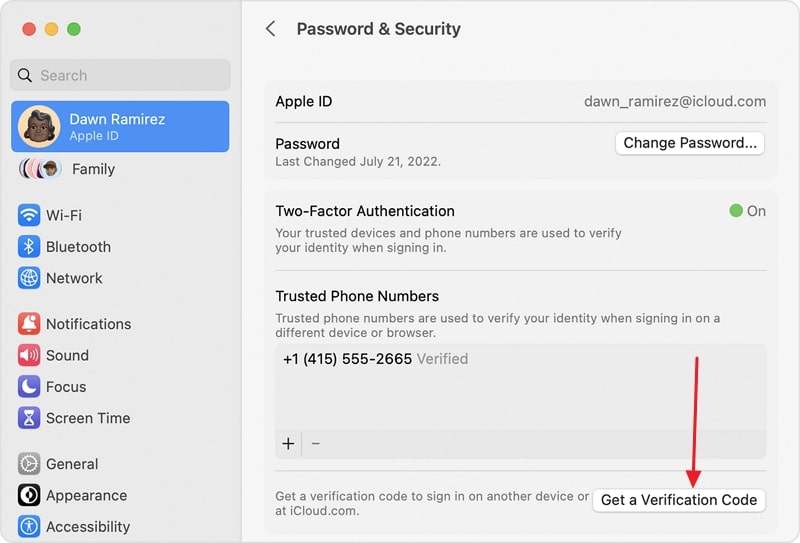
- Step 1. Navigate to “System Settings” on your Mac through the Dock or Apple menu. There, select Apple ID/your name from the left panel and click “Sign-In & Security.”
- Step 2. Within the Sign-In & Security settings, tap “Two-Factor Authentication.” Follow it by clicking “Get a Verification Code,” and a code will be displayed for your use.
Bonus Tip: The Best Screen Unlock Tool To Remove the Apple ID Without Password
Your Apple ID plays a pivotal role in the Apple ecosystem, and safeguarding its security is paramount. Nonetheless, there are instances where you might encounter the necessity of unlocking your Apple ID without the passcode. Common scenarios range from forgotten passwords to inheriting a device with an unknown Apple ID. In such cases, it’s crucial to have a reliable tool at your disposal, and one such tool is Wondershare Dr.Fone.
It provides a wide range of mobile management solutions for iOS devices. One of its standout features is the iOS screen unlock tool. This tool offers a streamlined and easy-to-use method for removing the Apple ID without a password. It permanently bypasses the previous Apple ID from your device, enabling you to sign in using a new Apple ID.
Dr.Fone - Screen Unlock (iOS)
Unlock iPhone/iPad Lock Screen Without Hassle.
- Simple, click-through, process.
- Unlock screen passwords from all iPhone and iPad.
- No tech knowledge required, everybody can handle it.
- Supports the latest iOS version fully!


4,395,218 people have downloaded it
Key Features of Wondershare Dr.Fone
- It empowers you to resolve carrier SIM problems in many situations, including issues like SIM Not Supported, SIM Not Valid, SIM Locked, etc.
- If you forgot your iTunes encrypted backup password, Wondershare Dr.Fone can remove the encryption without damaging your data.
- Wondershare Dr.Fone allows you to remove MDM profiles from your device without the risk of data loss or jailbreaking.
Steps To Unlock Apple ID From Your Apple iPhone 11/iPad via Wondershare Dr.Fone
With the help of the straightforward guidelines explained below, you can easily bypass Apple ID from your Apple iPhone 11 without needing the password:
- Step 1: Access Remove Apple ID in Wondershare Dr.Fone
Install and launch Wondershare Dr.Fone on your system and move to the “Toolbox” tab. Here, click “Screen Unlock” and choose “iPhone” as your device type. In the “Screen Unlock” menu, tap “Remove Apple ID” and connect your iOS device to the computer via USB cable.

- Step 2: Enable the Recovery Mode on Your Apple iPhone 11
Once the Apple iPhone 11 is connected, hit “Unlock Now” and proceed to confirm that your device has a screen lock configured and 2FA is enabled. These are necessary for the removal of Apple ID, so set them up if you haven’t already. Afterward, activate Recovery Mode following the on-screen instructions on your device.

- Step 3: Unlock the Apple ID From Your Apple iPhone 11
As your device is in Recovery Mode, Dr.Fone will detect its model. You need to choose the system version and click “Start” to download it. Once it has been downloaded and verified, hit “Unlock Now.” A warning prompt will appear about expected data loss. Put the “000000” PIN in the warning box and click “Unlock.” This will start the Apple ID unlock process.

Conclusion
In this comprehensive guide, we’ve explored the significance of Apple ID verification codes. We also explored various methods for getting an Apple ID verification code when your primary device is unavailable. From using trusted phone numbers to leveraging Apple Watch, we’ve covered a spectrum of scenarios to get the verification code of your Apple ID.
We’ve also delved into the importance of having a reliable tool like Wondershare Dr.Fone - iOS Screen Unlock at your disposal. This powerful mobile management solution aids in unlocking your Apple ID without a passcode. It also offers a wide array of features to address various iOS-related issues. Whether dealing with a forgotten password, managing a shared device, or inheriting one, Dr.Fone simplifies the process.
How to Fix when Apple Account Locked On Apple iPhone 11?
You pick up your phone to perform a routine task, and your Apple iPhone 11 gives you a surprise that you have gotten your Apple account locked. It will remain this way, and you will not be able to use the phone unless you follow the proper steps.
Several Apple device users face this problem, and one of these messages might be on your screen:
- “This Apple ID has been disabled for security reasons.”
- “You can’t sign in because your account was disabled for security reasons.”
- “This Apple ID has been locked for security reasons.”
Getting your Apple account locked can be frustrating and might hinder the performance of your phone. In this article, we will discuss the various tips to solve the Apple account locked issue.

Part 1. Why is Apple Account Locked?
Although annoying, Apple locks your Apple Account for a good reason. There might be various reasons, but the most common one is that your account’s integrity was in danger. Apple locks your account when it sees an “unusual activity” surrounding your account or device. It generally happens when some unauthorized person attempts to access your account.
Your activity can also lock your account. If you fail to log in to your Apple ID several times, Apple might lock it. Moreover, your account can even get locked when you answer the security questions incorrectly more than once. Furthermore, Apple tries to keep your ID dedicated to a few devices. Besides, it could shut it down when you aimlessly try to open the account on multiple Apple devices.
Part 2. 3 Tips to Unlock Apple Account
Well, now you know the reasons behind the Apple Account getting locked. The next step is to learn the best tips to unlock it. Here, we will share various tricks that will open the Apple account in no time. So let’s dive in!
Tip 1. Use Dr.Fone to Unlock Apple Account (without Password)
Wondershare’s Dr.Fone comes with a complete set of tools to help with a range of different and challenging problems related to your Android or iPhone. The software has an intuitive interface, making unlocking Apple account a lot easier than its competitors. The application Dr. Fone - Screen Unlock (iOS) has robust versions for both Windows and macOS.
Some of the top and vital features of Dr.Fone are as follows:
- It can repair the system of both Android and iOS devices.
- It can backup data available on your device.
- You can transfer WhatsApp, Line, and Kik chat history from one phone to another.
Download the tool on your respective system, and follow the guidelines stated below to unlock Apple account without the password:
Step 1: Run the Application
Once the download is complete, get your USB cable and connect your Apple iPhone 11/iPad to your computer.
Select the “Screen Unlock” tool, and a new interface will greet you. Select the “Unlock Apple ID” option to begin the process to unlock your Apple Account.

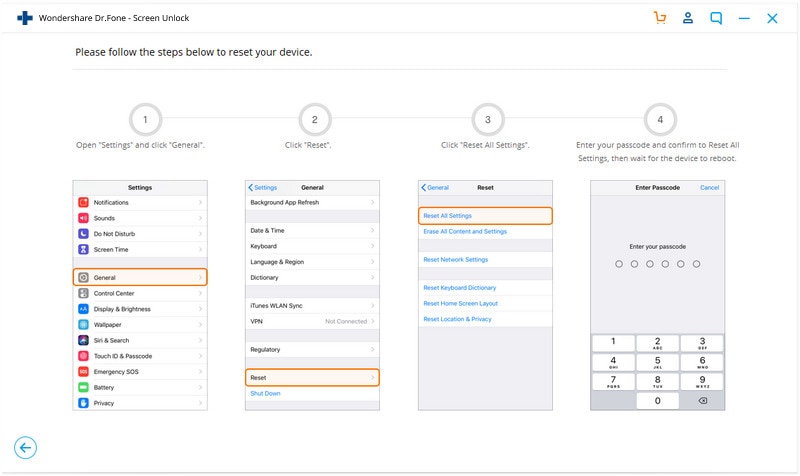
Step 2: Reset your Apple iPhone 11 using Dr.Fone
Dr.Fone will present you with detailed on-screen instructions that show precisely how to reset your Apple iPhone 11 Settings. Dr.Fone must unlock your Apple iPhone 11/iPad.
Step 3: Unlock the Phone
When your Apple device has been reset, Dr.Fone will get to work and will give you your unlocked iPhone/iPad in a matter of seconds.
When the process finishes, a pop-up message will notify you. It will point out that you can now unplug your Apple iPhone 11 from the PC and check if the operation was successful.

Tip 2. Use iTunes to Unlock Apple Account
Apple also offers the services of its built-in utilities such as iTunes to unlock Apple account. Here before doing anything else, you will need to get your Apple iPhone 11 into recovery mode. For added convenience, we have listed how to get into recovery mode with iPhone so you can smoothly proceed with the process.
Step 1. Power off your device.
Step 2. Once it’s powered off, press the side button and keep holding it while connecting your Apple iPhone 11 to your computer.
Step 3. Once the recovery mode logo appears, leave the button.
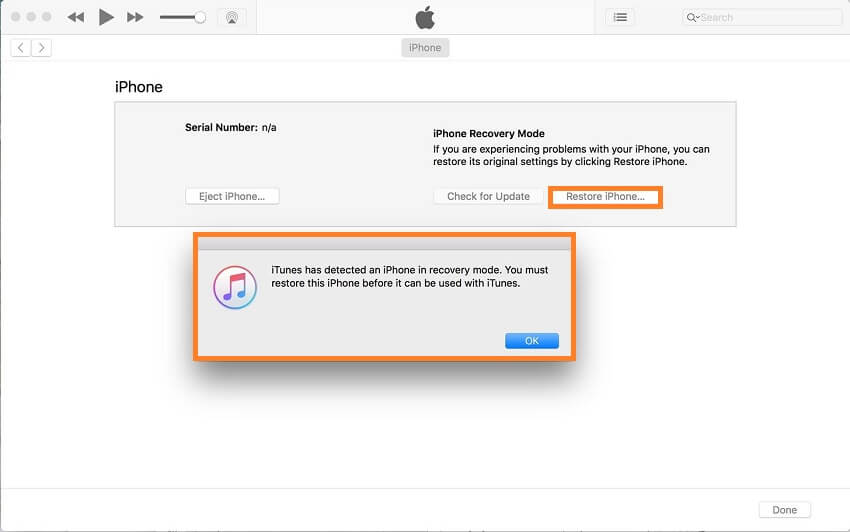
Now that you have entered into recovery mode, the next step is to restore the iPhone. The process is simple. You can learn it quickly by going through the steps listed below:
Step 1. After successfully getting your Apple iPhone 11 into recovery mode, select the Restore or Update option from iTunes.
Step 2. iTunes will download the necessary files to restore your phone, which can take some time.
Step 3. After the download, you can press shift while clicking restore, which will let you select the firmware file.
Step 4. Wait for the firmware update to finish, and then you are done!
Step 5. Access your Apple iPhone 11, and you will find that the Apple account will be disabled.
Tip 3. Recover Your Apple ID via Apple (Reset Password)
If you have forgotten your Apple device’s password, it’s recommended not to input your password more than one time. It would lead to a 24-hour shutdown. It cannot be lifted even if you know your password, so proceed wisely. The recommended solution instead is to reset your password.
Here are the steps to reset the password for any of your Apple devices, provided they are in your trusted devices’ list.
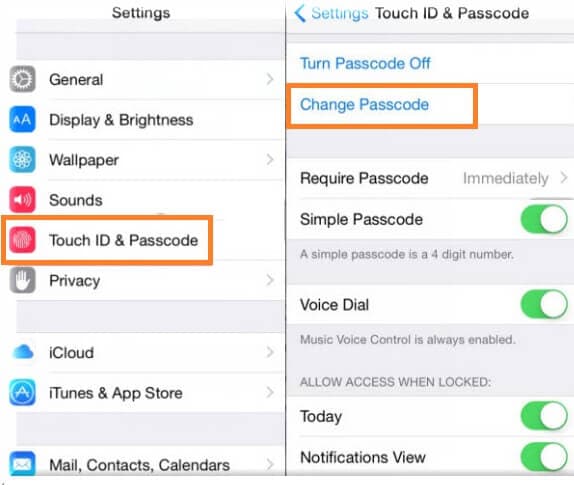
Step 1. Go to Settings on your Apple device and tap your name.
Step 2. Now, go to Password & Security and then Change passcode.
Step 3. If your Apple device is signed in to iCloud, you will be required to enter a password.
Step 4. Enter the iCloud password and then set a new code for your device.
Part 3. How to Change Apple ID on an iPhone?
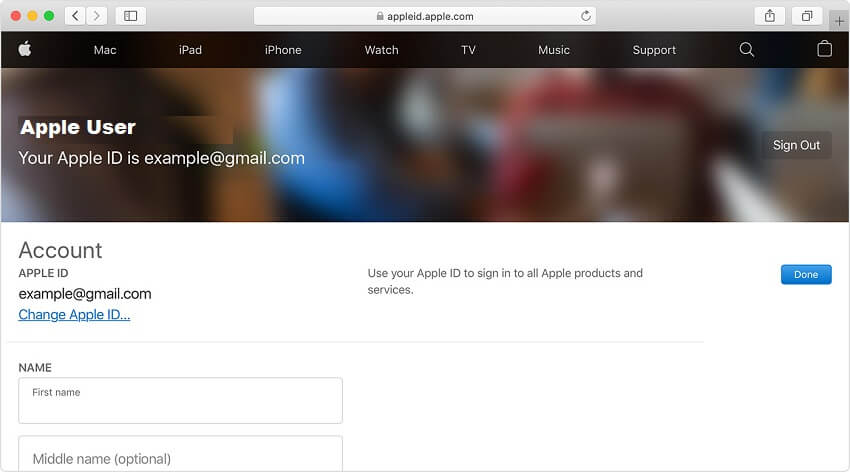
If you have purchased a refurbished iPhone and the previous owner’s Apple ID added to it, it is wise to change the Apple ID. You can add your own or add the ID of someone you know. Apple provides simple steps for you to change your account on iPhone.
Step 1. Visit the relevant site of Apple to remove the ID and sign in with your account.
Step 2. Navigate to the Account section and choose Edit. From there, you will see a new list of options.
Step 3. Select Change Apple ID.
Step 4. Update your email address and click continue.
Step 5. That’s it!
Conclusion
Getting your Apple account can ruin your day and hinder your work. Luckily, there are suitable methods to fix the Apple Account Locked issue quickly and without any damage. Here, we have discussed the top techniques to unlock the Apple account. Hopefully, these tips have helped you can access the contents of your Apple iPhone 11.
How To Unlink Apple ID From Apple iPhone 11
Apple devices are now an essential part of our daily lives. They provide access to a variety of services and apps. But there may come a time when you need to unlink your Apple ID from your device. It could be because you’re giving away or selling your device or facing device limits or download issues.
Either way, understanding how to do it is essential for maintaining control over one’s digital footprint. This article will walk you through the step-by-step process of how to unlink Apple ID from iPhone devices and Apple Watch. We’ll provide clear and concise instructions for every scenario, whether you have your Apple ID password, have lost or forgotten it, or are dealing with a lost device.
Part 1: How To Unlink Apple ID From Connected Devices With Password
Keeping track of where your Apple ID is being used is essential for maintaining control over your digital identity. Fortunately, using your Apple iPhone 11 or Mac, you can easily identify all the Apple iPhone 11 devices currently linked to your Apple ID. It is helpful for those who have shared their Apple ID with others or suspect unauthorized access.
Removing a device from your Apple ID with two-factor authentication activated will turn off verification code delivery on that device. Also, the Apple iPhone 11 device will no longer be able to access iCloud content, such as your photos, contacts, and calendar.
How To Unlink Apple ID From iPhone?
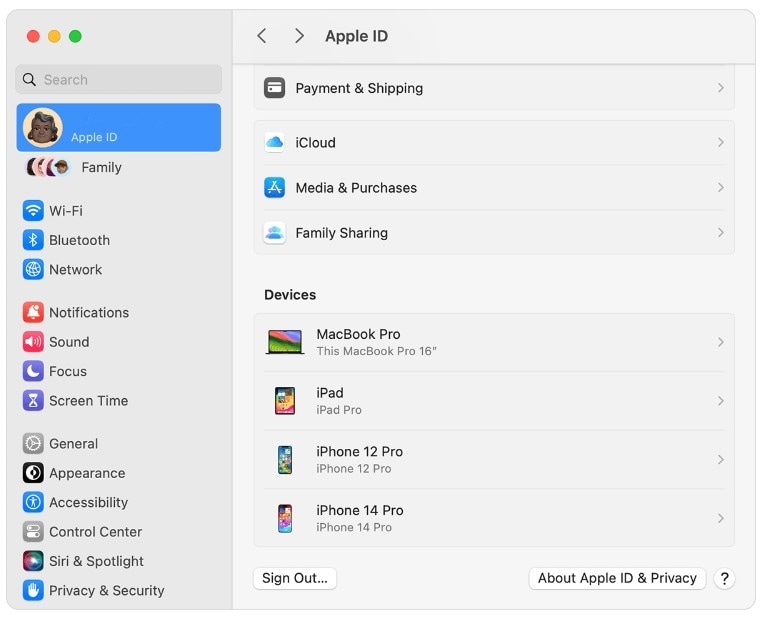
Before you unlink an iPhone from Apple ID, it’s also essential to identify all the Apple iPhone 11 devices currently signed in with your account. This crucial step ensures you don’t inadvertently lock yourself out of your Apple ID on other devices.
Step 1: Open the Settings app on your Apple iPhone 11.
Step 2: Tap on [your name] at the top of the screen and scroll down.
Step 3: Unpair an iPhone from Apple ID in two ways:
Tap Sign Out, then enter your Apple ID password. Next, tap Sign Out Tap Delete Apple IDfrom Apple iPhone 11 to verify that you want to remove your Apple ID from the Apple iPhone 11 you are currently using.
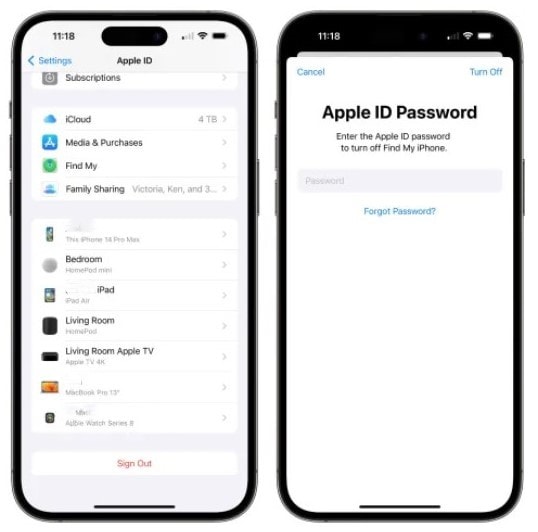
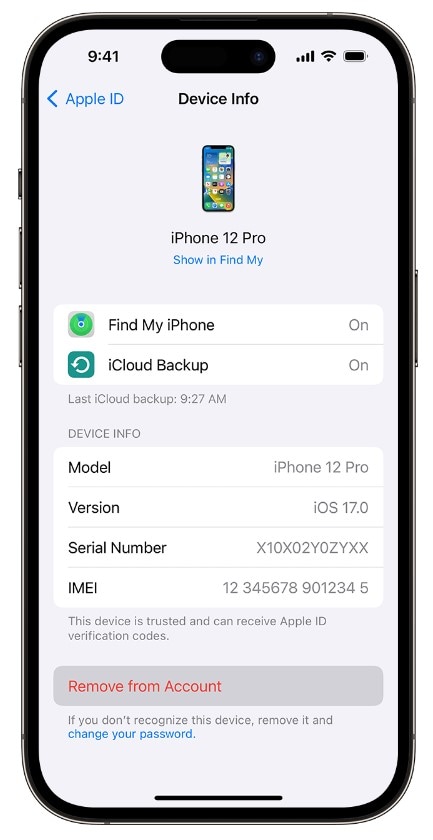
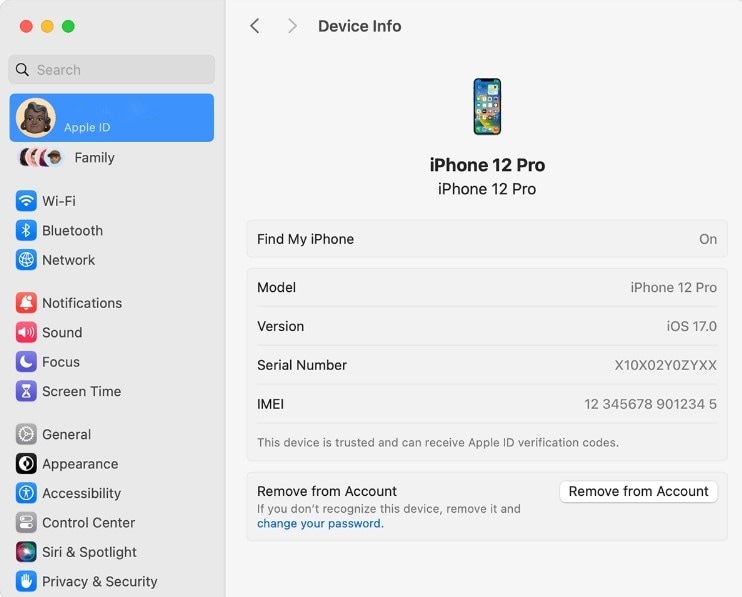
- Tap on any device name to see its details. If it is the one you trust, you can use it to receive Apple ID verification codes. Then, tap Remove from Account.
How To Unlink Apple ID Settings From Mac?
Follow these steps below to use your macOS to remove the connected devices from your Apple ID.
Step 1: Go to the Apple menu in the top left corner of the Apple iPhone 11 device’s screen.
Step 2: Select System Settings or System Preferences, depending on the Apple iPhone 11 device.
Step 3: Click [your name] or Apple ID for macOS Monterey or earlier.
Step 4: Scroll down and unpair the Apple ID on your Mac in two ways:
Click Sign Outto remove your Apple ID on the desktop you are currently using.
- From the Devicessection, click the connected device you want to unlink. Click Remove from Account.
Part 2: How To Unlink Apple ID From iOS Devices Without a Password?
In the previous section, we’ve explored the standard method to remove an Apple ID from an iPhone, which requires the Apple ID password. However, what if you’ve forgotten your Apple iPhone 11’s passcode or don’t have the Apple ID password? In such situations, Wondershare Dr.Fone - Screen Unlock can help you unpair your Apple ID on iOS devices without hassle. Even without an Apple ID password, Dr.Fone can help you:
- Bypass the Activation Lock
- Unpair Apple ID and erase the iPhone’s content, even if the Find My feature is enabled
- Remove the iOS lock screen
The tool guides you through the process, ensuring a seamless experience with a user-friendly interface and intuitive design. Let’s delve into the step-by-step guide to discover how to unlink Apple ID from iPhone devices using Dr. Fone’s - Screen Unlock tool.
Step 1: Download, set up, then launch Dr.Fone on your desktop. Use a USB cable to establish a connection between your Apple iPhone 11 and desktop.
Step 2: From the Toolbox homepage, select Screen Unlock and choose iOS.
- Step 3: Select Remove AppleID to unpair the existing Apple ID from your Apple iPhone 11 without an Apple ID password.

- Step 4: Click Unlock Now to continue.

- Step 5: Click Yes to confirm you have a screen lock on your Apple iPhone 11.
- Step 6: Click Yes to confirm you have enabled the two-factor authentication on your Apple iPhone 11.

- Step 7: Follow the steps on the screen to put your Apple iPhone 11 into Recovery Mode. If you are having trouble, click DFU Mode in the bottom left corner.

- Step 8: Select an option in the System Version drop-down menu and click Start.

- Step 9: Wait while the respective iOS firmware downloads. Alternatively, click Copy to do it yourself.

- Step 10: Once the firmware is ready, click Unlock Now.
- Step 11: Read the note in the dialogue box and enter the code in the confirmation box. Then, click Unlock to continue.

- Step 12: Wait while the app is unlocking the Apple ID. Refrain from using your device while connected to your desktop.

- Step 13: Click Done, then check your Apple iPhone 11 to see if the Apple ID has been removed.
Part 3: How To Unlink iPhone From Apple ID if the Apple iPhone 11 device Was Lost?
You already know the methods to unlink iPhone from Apple ID, both with and without a password, assuming the Apple iPhone 11 device is accessible. However, what if your Apple iPhone 11 or Apple Watch is lost, stolen, or you already gave away? Fortunately, there’s still a way to unpair your Apple ID from your iOS device.
Unlink iPhone From Apple ID Remotely
Follow these steps and explore how to unlink Apple ID from iPhone and other iOS devices online:
- Step 1: Navigate to appleid.apple.com on a web browser.
- Step 2: Click Devices on the right-side navigation pane.
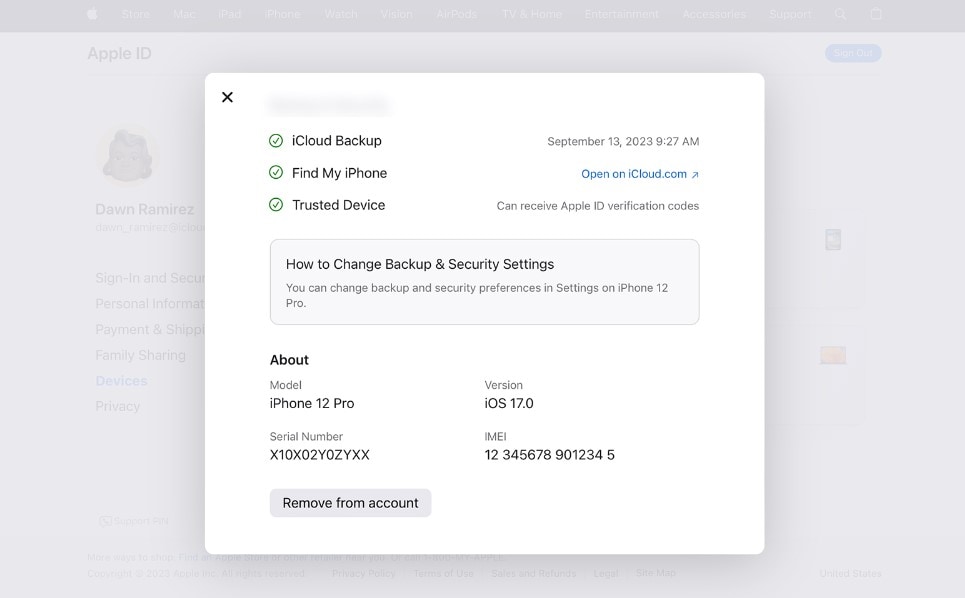
- Step 3: Choose your iOS device from the list in the Devices section.
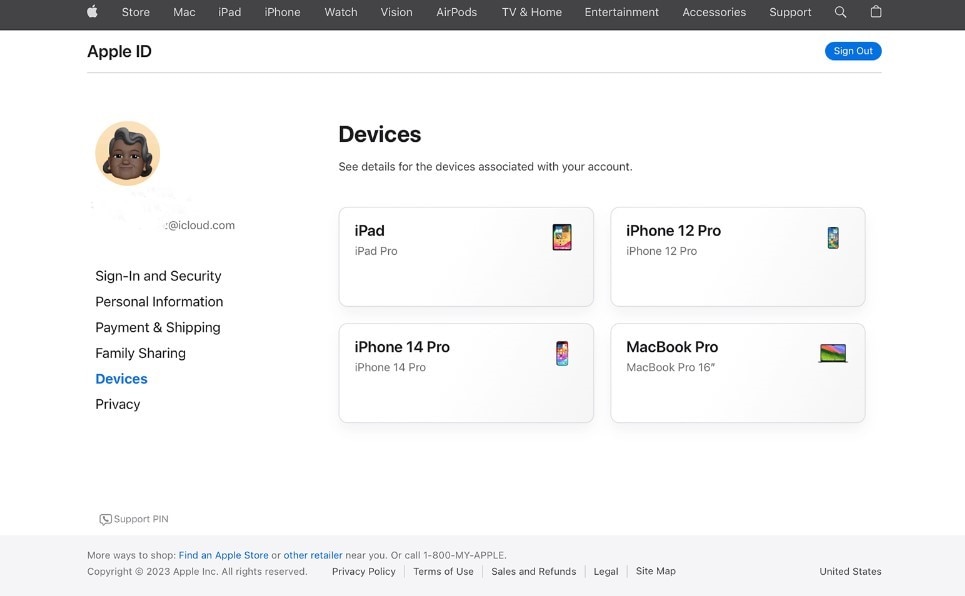
- Step 4: Click Remove from account and click Remove again to confirm.
Unlink iPhone From Apple ID Using the Find My App
Here is how to unpair your Apple ID on a device you sold or gave away via the Find My app.
- Step 1: Open the Find My app and go to the Devices tab at the lower navigation pane. Next, select the name of your Apple iPhone 11 you want to unpair.
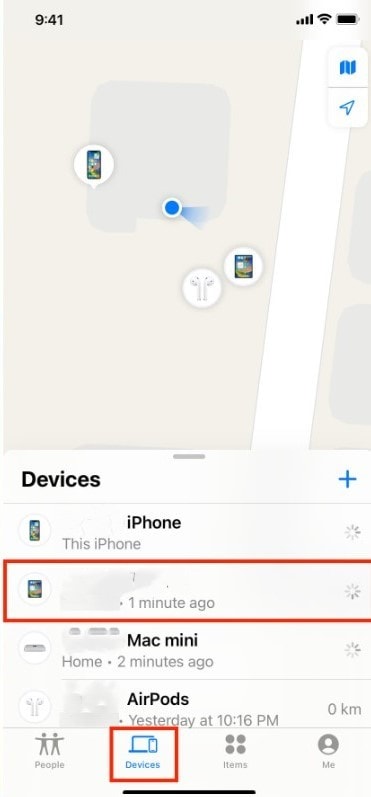
- Step 2: Tap Erase This Device, then tap Continue.

Note:
Indicate if the Apple iPhone 11 device was stolen.
- Step 3: Tap Erase, enter your Apple ID password, and then tap Erase again.
Bonus Part: How To Unlink Apple Watch From Apple ID?
There are several reasons to unpair an Apple Watch from an Apple ID. Perhaps you’re selling or giving away your Apple Watch or trading it in for a new one. Or maybe you only want to remove your Apple Watch from your Apple ID altogether.
No matter what your reason, removing an Apple Watch from an Apple ID is a simple process. Here, we’ll walk you through the steps to restore your Apple Watch to its factory settings.
How To Unlink Apple Watch From Apple ID if You Have Your Apple iPhone 11?
Follow the unpairing process on the paired Apple iPhone 11 to remove the Activation Lock and erase your Apple Watch’s content and settings.
- Step 1: Check to ensure your Apple Watch and iPhone are close.
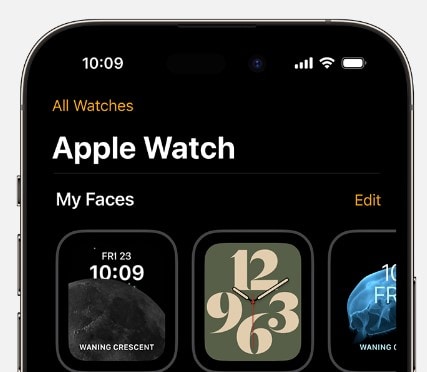
- Step 2: Launch the Watch application on your Apple iPhone 11 and go to the My Watch tab.
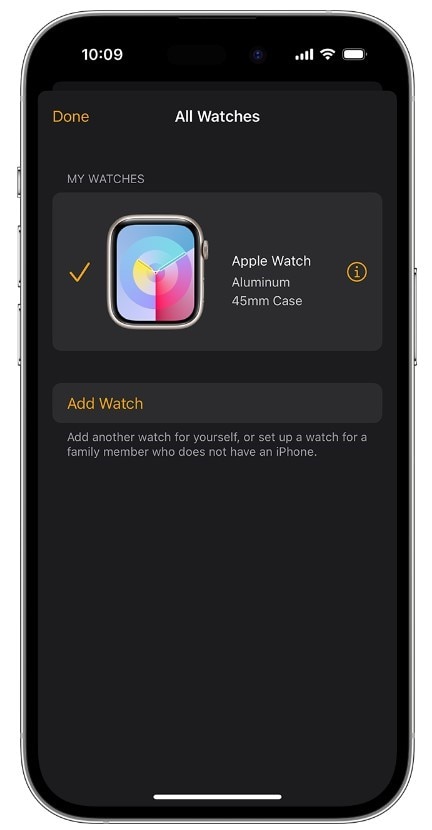
- Step 3: Tap All Watches in the upper left corner.
- Step 4: Locate and tap the information icon adjacent to the name of your Apple Watch.
- Step 5: Tap Unpair Apple Watch, then tap Unpair Apple Watch.
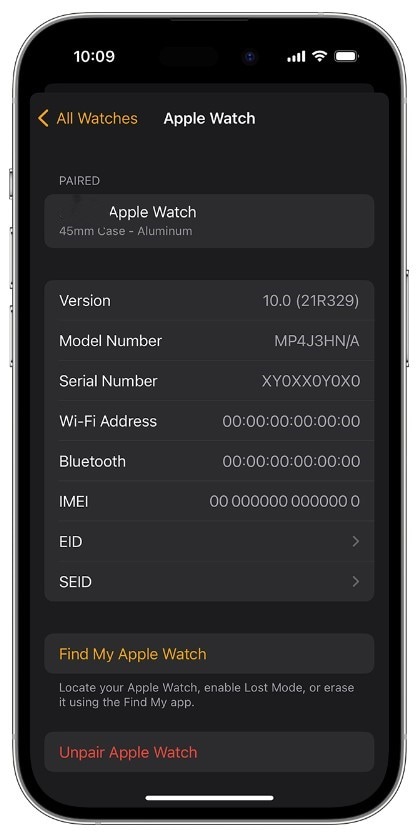
- Step 6: If you have a cellular Apple Watch, tap Remove Cellular Plan, and remember to reach your carrier to cancel your subscription.
- Step 7: Provide your Apple ID password to deactivate the Activation Lock.
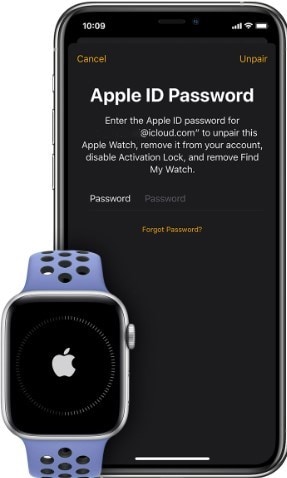
- Step 8: Tap Unpair to confirm your action.
How To Unlink Apple Watch From Apple ID Without Your Apple iPhone 11?
You can erase your Apple Watch without the paired iPhone, but the Activation Lock will still be active. But, if you give away your Apple Watch without turning off the Activation Lock, the person you give it to cannot use it. They’ll have to enter your Apple ID and password to turn off the Activation Lock and use it with a new iPhone.
- Step 1: Open the Settings app on your Apple Watch.
- Step 2: Go to General > Reset, tap Erase All Content and Settings. Then, enter your password, if needed.
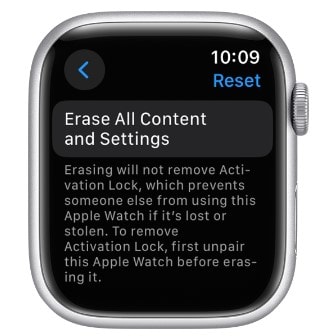
- Step 3: Tap Erase All to restore your Apple Watch to its factory settings.
Conclusion
There are several ways to unlink your Apple ID from your Apple iPhone 11 or iPad. The best way to do it depends on your situation and available iOS device. Whichever your reason is, understanding how to unlink Apple ID from iPhone and other iOS devices is crucial.
If you unfortunately encounter any challenges during the process, you can seek assistance from Apple Support. Consider using Dr.Fone for a quick and easy solution, which can unlink your Apple iPhone 11 from your Apple ID within minutes, even without an Apple ID password.
Also read:
- [New] Saving YouTube Videos A Legal Overview
- [Updated] In 2024, Streamline Creative Filmmaking with Instagram's Background Swap
- EarHearer Live Sound Critique for 2024
- Effortless Tips to Purge Your Android's Memory Storage
- How To Get the Apple ID Verification Code On Apple iPhone 8 Plus in the Best Ways
- How To Reset the Security Questions of Your Apple ID On Your Apple iPhone 12
- How to Sign Out of Apple ID From iPhone 12 without Password?
- In 2024, Apple ID Locked or Disabled From iPhone 6s? 7 Mehtods You Cant-Miss
- In 2024, Apple ID Locked or Disabled On iPhone SE? 7 Mehtods You Cant-Miss
- In 2024, How To Delete iCloud Account Remove Your Apple ID Permanently On Apple iPhone 14
- In 2024, How To Remove the Two Factor Authentication On Apple iPhone 7
- In 2024, iCloud Separation How To Disconnect Apple iPhone 6 and iPad
- In 2024, Read This Guide to Find a Reliable Alternative to Fake GPS On Lava Blaze Pro 5G | Dr.fone
- In 2024, Unlock Your Apple iPhone SE (2020) in Minutes with ICCID Code Everything You Need to Know
- Step-by-Step Guide: Updating Your Windows 10 Webcam Drivers
- Ultimate DVD Converter: Streamline Your Media Library by Ripping, Converting and Restoring Movies in All Formats Using WinX DVD Ripper Pro
- Updated Identify Acoustic Grunting Recordings for 2024
- Title: In 2024, How To Get the Apple ID Verification Code On iPhone 11 in the Best Ways
- Author: Alma
- Created at : 2024-12-23 02:10:02
- Updated at : 2024-12-27 04:57:39
- Link: https://apple-account.techidaily.com/in-2024-how-to-get-the-apple-id-verification-code-on-iphone-11-in-the-best-ways-by-drfone-ios/
- License: This work is licensed under CC BY-NC-SA 4.0.