
In 2024, How to Remove an AirTag from Your Apple ID Account From iPhone 14 Plus?
How to Remove an AirTag from Your Apple ID Account On Apple iPhone 14 Plus?
Apple provides many exciting features in its products, including the AirTag feature on iPhone devices. However, after enabling the function, many iPhone users forget to remove it from the FindMy app ahead of time. Therefore, if you are selling or resetting the Apple iPhone 14 Plus device, you need to remove AirTag from Apple ID to be usable later.
If someone removes the AirTag without resetting it while operating in the Bluetooth range, deleting AirTag ownership will require manually breaking the Apple iPhone 14 Plus device apart and further configuration.
Remove this connection from the Apple ID account with simple steps first-hand to avoid that. Read on to know the steps involved in this process directly or with the best software alternative.

Part 1. What Exactly Does an AirTag Do?
Before discussing how to remove AirTag from Apple ID, you should know better about the function itself. The AirTag feature is available for iOS devices. Therefore, one can register the AirTag process with the Apple ID you are utilizing on your smartphone.
Apple users can attach the AirTag to different objects like backpacks or keychains. This makes it simple to find these objects later in case they get misplaced or lost through the Find My app on the iPhone.
Users can add their AirTag to one Apple ID account, so you cannot access this from the Find My app via other accounts. In case of loss, you must remove the AirTag from your device entirely.

Part 2. How to Remove an AirTag from Your Apple ID onApple iPhone 14 Plus & iPad?
After adding the AirTag to any object, it instantly syncs with the Apple ID of the user. So, only the primary Apple ID user can use or monitor the AirTagged item. Other users can use it only after resetting the AirTag. So, learn how to remove AirTag from Apple ID via the Find My app on different iOS device types.
Version 1: Removing AirTag on iPhone
Step 1: Access the Apple iPhone 14 Plus homepage and access the Find My app.
Step 2: From the bottom menu bar, tap on the Items option.
Step 3: The information about which AirTag is associated with your chosen item will appear in the next page list.

Step 4: Choose the selected items and swipe upwards on the screen. Then, find the Remove Item button and press it.

Step 5: Following this, select and press the Remove button. Repeat for confirmation.
Version 2: Removing AirTag on iPad
Step 1: Access the Find My app from the home screen on your iPad device.
Step 2: When the app opens, click on the Items icon at the bottom part of the screen.

Step 3: Choose the items you want to delete by tapping them.
Step 4: Swipe up and choose the “Remove Item” option.
Step 5: On the next confirmation prompt that comes up, click Remove.

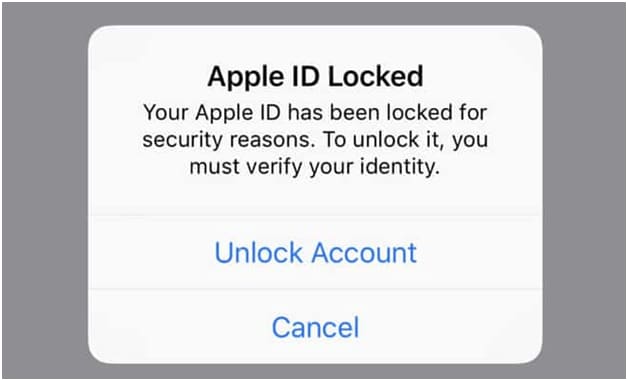
Part 3. Bonus Tips: How to Unlock an Apple ID That’s Locked?
Typically, it is impossible to use a PC or Mac to access and remove AirTag from Apple ID. One has to use the Apple iPhone 14 Plus or iPad device only. But what if the smartphone screen or Apple ID is locked?
You need to unlock the Apple iPhone 14 Plus device using capable software like Dr.Fone - Screen Unlock (iOS) to remove the blockage. This software can remove many different Apple screen lock types, like Black Screen of Death, Face ID Lock, Screen Time Passcode, and more.
The process of bypassing Apple ID as a feature is available for iOS 14.0 or its previous conversions. It does not require extremely complex jailbreaking or configuration steps- all is complete in some clicks only.
Top Features:
- Users get at least ten retries for the password or lock removal attempt.
- Suitable for removing various screen locks, Apple ID locks, etc.
- Works to bypass Apple ID account locking without a password within seconds.
- It allows Apple ID lock removal even with the active Find My iPhone feature on the smartphone.
How to use it?
Step 1: Install the Dr.Fone app and launch it on the computer. Choose Screen Unlock.

Step 2: On the next page, tap the Remove Apple ID option. Then enter the necessary passcode to verify that you trust the PC. Then, do further scanning.

Step 3: Back up all devices before the procedure. Then, visit the Settings page > user profile > Password & Security. Then, toggle the Two Factor Authentication feature to the ON part. Then, press Unlock Now.

Step 4: Put the smartphone into recovery mode with on-screen instructions. Then, restart the phone. Complete the resetting steps and press the Restart button. It will unlock the Apple iPhone 14 Plus device automatically.

Step 5: Verify on your device that the Apple ID is unlocked. Then, go to the Find My app and remove the AirTag feature as detailed previously.

Part 4. FAQs about AirTag
- How to Set Up and Add an AirTag on Your Apple iPhone 14 Plus?
Firstly, get your device ready to get set up. Remove the wrap around the AirTag and pull the tab out to start the battery. After it plays a tiny sound, hold the Apple iPhone 14 Plus device near the iPhone/iPad and press Connect. Next, change the name of the AirTag on your list, give an emoji to it, and press Continue. Register it with the Apple ID in the next prompt and then choose Done.
- How to Rename AirTag and Change Its Emoji?
You can access the Items tab on the Find My application and choose the AirTagged item. Then, scroll downward and choose Rename item to change the name. Finally, create a customized name and add an emoji as well.
- How Far Can You Track an Apple AirTag?
With the Bluetooth connection switched on, one can track Apple AirTag for approximately 100 feet.

Conclusion
The added AirTag stays connected with one Apple ID account until you reset it. So, use the process mentioned to remove the AirTag via iPhone or iPad. If the iPad or iPhone you are using has locked the Apple ID, you can use another software Dr.Fone - Screen Unlock (iOS) , to access it without data loss securely. Then, follow the steps mentioned to reset the AirTag here.
Unlock Apple ID without Phone Number On Apple iPhone 14 Plus
Introduction
Apple is well known for securing its customers’ data. Breaching Apple security is a bit far difficult than breaching Android ones. That means if you are using Apple phones then you are in the safe hand. If you are an iPhone user and someone is trying to get through your data or Apple account then Apple ID would be disabled automatically for security purposes. This way your data and account will remain safe and secure and you need to log in again to access your Apple id. To access your Apple id, you need the associated phone number. The task becomes easy when you have the phone number otherwise you need to explore alternative methods for how to unlock apple id without phone number.
1. How to unlock Apple ID without a trusted phone number?
Dr.Fone Screen Unlock (iOS) is a one-stop solution tool for multiple problems. It enables you to unlock Apple ID without phone number and unlock the screen of iPhone and iPad with a few clicks. The tool is easy to use and handle. Even a non-tech savvy person can learn how to unlock Apple ID without a trusted phone number at ease with the help of this tool. The tool is fully compatible with Windows as well as iOS.
Step by step tutorial:
In the world of technology, if you want to perform any task out of the box then you require software for the same. Similarly, unlocking Apple ID without phone number can be easily done with the help of a tool. If you are looking for the best tool to perform the task then Dr.Fone Screen Unlock (iOS) is made for you. This tool makes the tricky and handy task easy and simple for everyone.
Let’s dive into how to unlock Apple ID without a trusted phone number.
Step1: Connect your device to your system via USB
Install and open Dr.Fone software on your PC. The home interface of the software will open, click on “Screen Unlock”.
Afterward, a new screen will pop up on the screen of your system. Just click on the last option, “Unlock Apple ID” to begin the process.
Step 2: Enter the required credentials
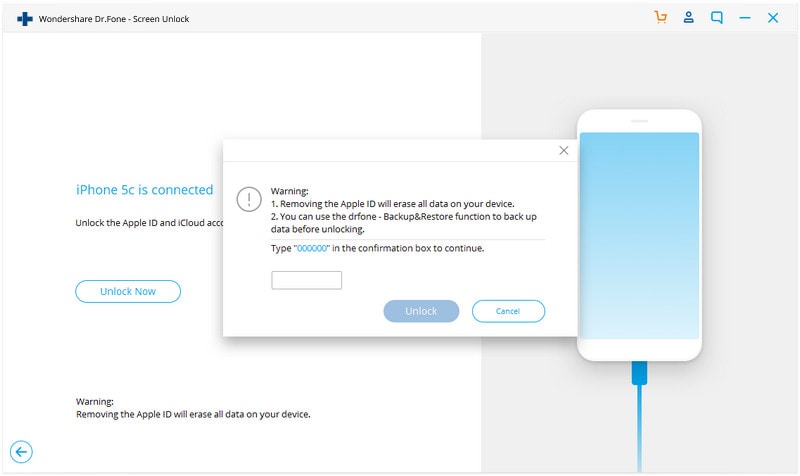
Enter the password of the connected device and then tap on the “Trust” button to continue the process.
Note- This process will wipe out all your data from the phone. Make sure you have backup all your data before commencing the process.

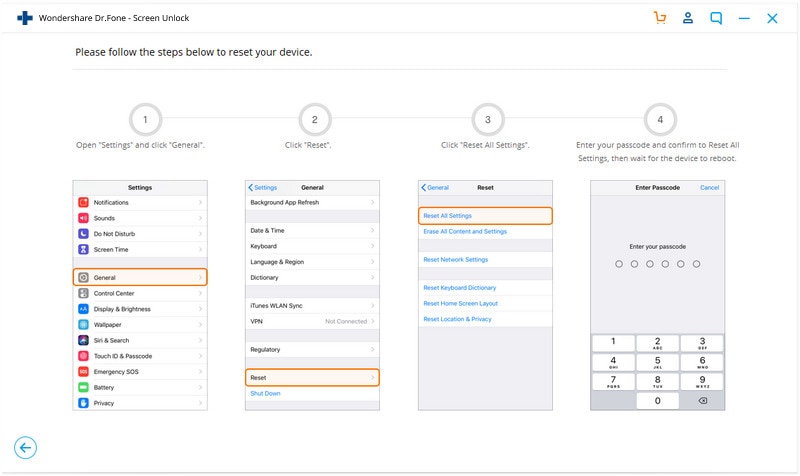
Step 3: Reset all settings
Before going ahead, you need to reset all settings of your Apple iPhone 14 Plus. For more help, follow the instructions shown in the below pictures. The unlocking of Apple ID process will begin automatically post the completion of resetting all your settings process.
Step 4: Unlocking will take place
The unlocking process will start and it will complete within few seconds.
Note: Don’t use the Apple iPhone 14 Plus device while the completion of the process.

Step 5: Process is accomplished
A new window will be appeared showing “Apple ID has been completely unlocked”. That means the process is accomplished and you can access your Apple ID seamlessly.
2. How to unlock Apple ID without phone number by recovery key?
The recovery key is a good option to unlock Apple ID without phone number. But you can use this feature if you had enabled it before and remember or save the recovery key. You can unlock your Apple ID on any iOS device or Apple’s website. That’s impressive! Let’s know how to do it using the recovery key.
Step 1: Click on the following link, https://appleid.apple.com/#!&page=signin , and tap on “Forgot Apple ID or Password” to commence the process.

Step 2: Enter your Apple ID and tap on “Continue”.

Step 3: You will be redirected to a new page where you need to select an option that lets you use the recovery key.
Step 4: Insert your recovery key. Then create a new password. Follow the further on-screen instructions to accomplish the process.
Step 5: Unlock Apple ID with a new password.
3. How to unlock Apple ID using iforgot.apple.com [Apple ID’s security questions needed]
If you don’t have a phone number or don’t have access to the trusted device then you can reset your account password using security questions to unlock your Apple ID. Prior to this process, recall the answers to Apple ID’s security questions because you need them while the completion of the process.
Let’s know how to unlock Apple ID without a trusted phone number using iforgot.apple.com.
Step 1: Click on the https://iforgot.apple.com/ and enter your Apple ID to begin the process.

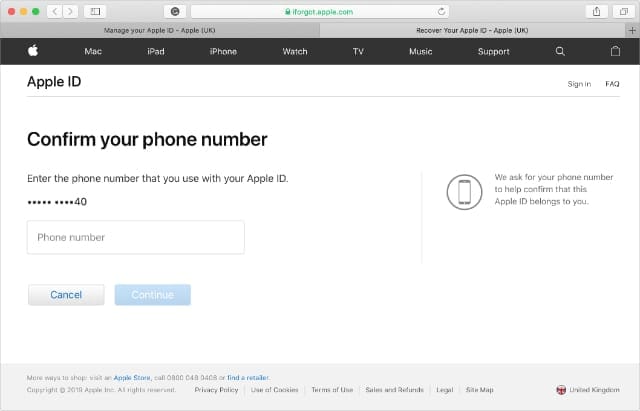
Step 2: Enter the registered phone number and tap on continue.

Step 3: A notification will be sent to your device now. Please note that we are talking about the Apple iPhone 14 Plus device that is linked with the same Apple ID. It should be Mac or iPhone or iPad. You need to tap on the “Allow” button on your device.

Step4: Follow the instructions and you will then unlock your Apple ID.
This is how you will access your Apple ID via iforgot.apple.com.
4. How to change Apple ID password on iPhone?
Your data is precious to you. You always want it to be secure and safe. To do so, you should create a strong password or should change it at a regular interval. Also, if you are suspicious that your friend gets hands on your password then you should change your account password instantly. If you are a new iOS user and don’t know how to change Apple ID password on iPhone then don’t bother. Here, we will tell you the process in an easy and simple way.
You need to follow few steps to change your Apple ID password.
Step1: Go to your Apple iPhone 14 Plus setting.
Step 2: Tap on your name.

Step 3: Select the “Password and Security” option.

Step 4: Opt for “Change Password” shown on the phone screen.

Step 5: Enter your phone’s passcode.

Step 6: Enter desired password and verify it by typing the same password again. Then, click on “Change Password”.

Step 7: Hurray! You have changed your password. Now, you can log in to your Apple ID with this new password.
Apple ID Locked or Disabled On Apple iPhone 14 Plus? 7 Mehtods You Can’t-Miss
Apple ID refers to the authentication method available for the Apple iPhone 14 Plus device to compromise users’ personal information and settings. The Apple iPhone 14 Plus Apple ID will allow you to store and control data available on the Apple iPhone 14 Plus device; however, you need to re-generate the Apple iPhone 14 Plus passcode if you have forgotten the Apple iPhone 14 Plus passcode. Suppose, if you have forgotten the passcode and entered the wrong passcode six times, your Apple iPhone 14 Plus gets locked or has been disabled. According to your settings, if you have entered the wrong passcode too much time could even make your Apple iPhone 14 Plus delete all the data available.
This article will discuss how you can unlock Apple ID and remain secure. If you receive a message that you have entered the wrong passcode or forgotten your passcode, you have to follow some steps to regain access to your Apple Id.
Why Is Your Apple ID Locked or Disabled?
Some of the reasons causing your Apple ID locked or disabled are listed below:
- If you have entered the wrong passcode or security question too many times in a row, Apple ID gets locked. (Avoid entering the incorrect password more than 3 times)
- If you haven’t used your Apple ID for an extended period, possibly making your Apple ID disabled or locked. When Apple modifies the requirement for passcode and security questions, you have not updated the information.
If you frequently change your Apple ID or passcode on the Apple iPhone 14 Plus device, Apple possibly considers that your Apple iPhone 14 Plus faces a security threat and might lock your Apple ID.
Method 1: Professional iPhone Apple ID Lock Removal Tool [Recommended]
If you have forgotten your Apple ID password, you are suggested not to enter the wrong passcode in a row. That may lead to data loss. You can download the Dr.Fone– Screen Unlock, which is compatible with different lock screens and will unlock Apple ID easily. Dr.Fone - Screen Unlock helps remove almost all sorts of iPhone passwords without the requirement of technical knowledge.
Dr.Fone - Screen Unlock (iOS)
Unlock iPhone ID.
- Remove the screen password, face id, and Touch ID.
- Don’t need to have any technical knowledge.
- Bypass the Apple ID and iCloud activation lock in a quick way.
- Compatible with both Android and iOS devices.
3981454 people have downloaded it
Steps to Follow:
**Step 1:**Click on the “Screen Unlock” module and a new interface will appear.
To unlock your Apple ID, you have to click on the “Unlock Apple ID” option.
Step 2: You must know the passcode of the Apple iPhone 14 Plus to unlock the phone screen, which trusts the computer system for scanning the data available in the phone.
Note: This process determines that all data will be erased when you initiate to unlock the Apple ID. (If your device didn’t activate dual authentication, then you can unlock Apple ID without data loss.) It is recommended to create a backup of your data before proceeding to the next step.
Step 3: Before unlocking your Apple ID, you have to reset iPhone settings by following the instruction available on the screen. When you have reset all the settings, restart your device, and the process of unlocking will start automatically.
Step 4: Once the restart process gets completed, Dr. Fone will automatically kick off the unlocking process of Apple ID and get it ended in a few seconds.
Step 5: When the Apple ID is unlocked successfully, the following window will indicate that you have to check if your Apple ID gets unlocked.
Method 2: Reset Password to Unlock Your Apple ID
In order to unlock iPhone 13 Apple ID, you can reset the password to your Apple ID. If you want to do this, you need to follow the below steps.
Step 1: Head to the Apple account recovery page and enter the desired details like your first and last name. Also, enter your email address. When done, click on the “Continue” button.
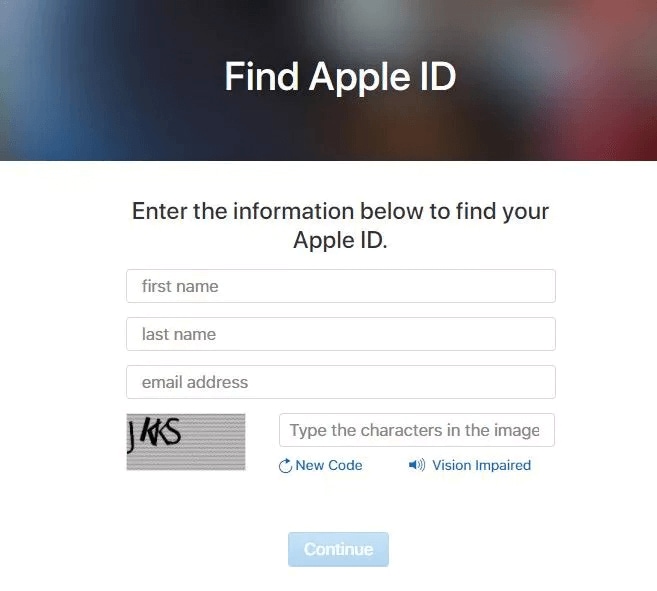
Step 2: When the next screen appears, you will see two options to choose from. Whether you wish to receive a password through email or answer a security question, choose it. Click “Continue”.
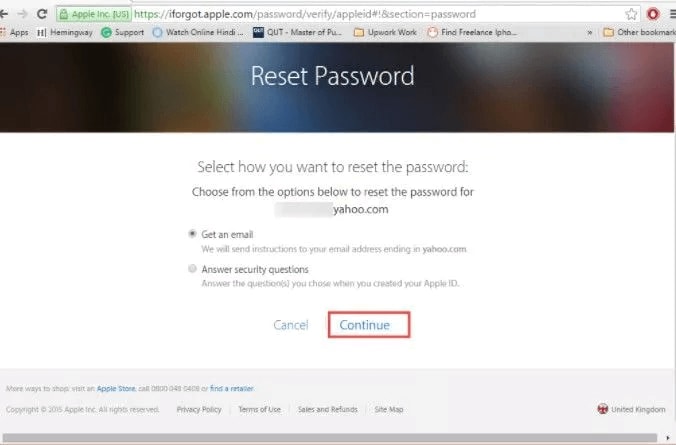
Step 3: Reset the password now. Write down the password and follow the prompts. Your password will be reset now!
Method 3: Fix Apple ID Locked Via iforgot
If your Apple ID is disabled, follow these simple steps listed below:
Step 1: Enter “https://iforgot.apple.com “ in the web browser of your computer, iPhone or Tablet.
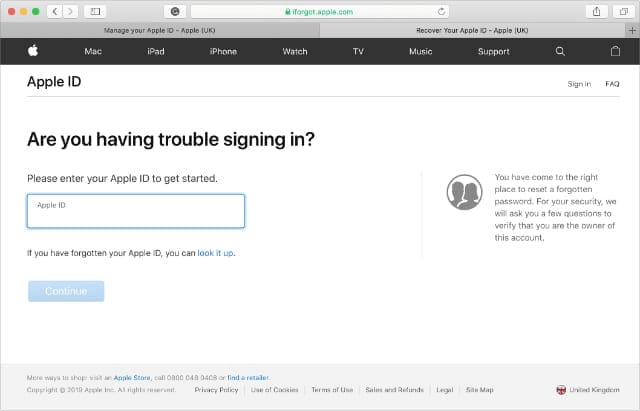
Step 2: You have to enter the registered E-mail address in the box available on the screen.
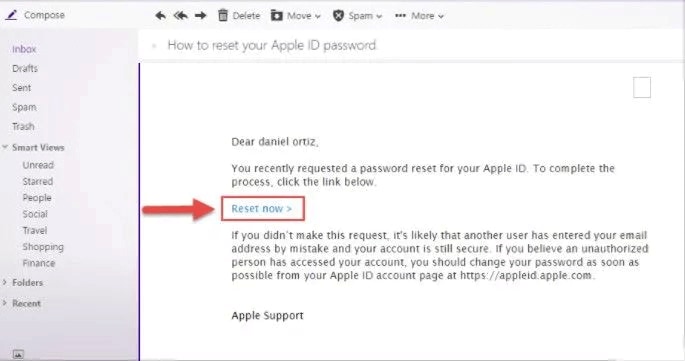
Step 3: Enter the captcha available on the screen and click on the “Continue “option to proceed further. (If you have set up the two-factor authentication, you will receive a code that you need to enter on your device.)
Step 4: Enter the code you have received on your device and confirm it to unlock your account and allow resetting the password. (You will be asked to answer the security question to confirm your identity).

Step 5: Successfully, you have unlocked your Apple ID.
Method 4: Unlock Apple ID Using Two-Factor Authentication
This next method only works if you’ve already enabled the Two-Factor Authentication before getting locked out of your Apple ID. In case you’ve already enabled it, follow the below-mentioned steps to unlock your Apple ID.
Step 1: Launch the “Settings” App on your Apple iPhone 14 Plus and then hit “your name” at the top.
Step 2: Now, select the “Password & Security” option, followed by tapping on “Change Password.”
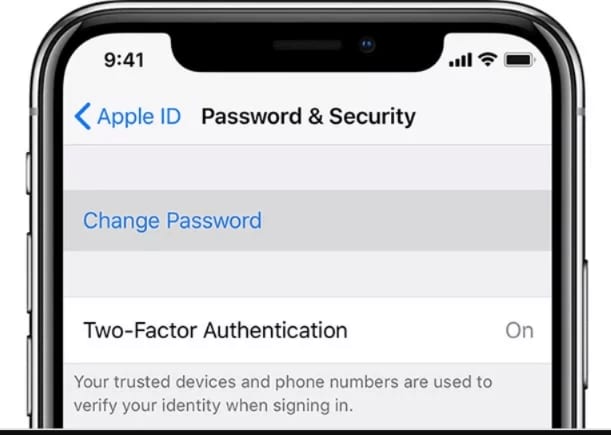
Step 3: Then you need to follow the instructions displayed over your screen carefully.
If you perform the instructions properly, you will eventually get your Apple ID unlocked.
Method 5: Remove Locked Apple ID Using Recovery Key
There are high chances that you might have protected your Apple ID with a Two-Factor Authentication. In such a case, you need to use your Recovery Key to unlock your Apple ID. Here’s how you can get it done.
Step 1: You need to first visit iforgot.apple.com and then punch in your Apple ID in the text field provided.
Step 2: You’ll then be required to enter the Recovery Key, key it in and hit “Continue”.
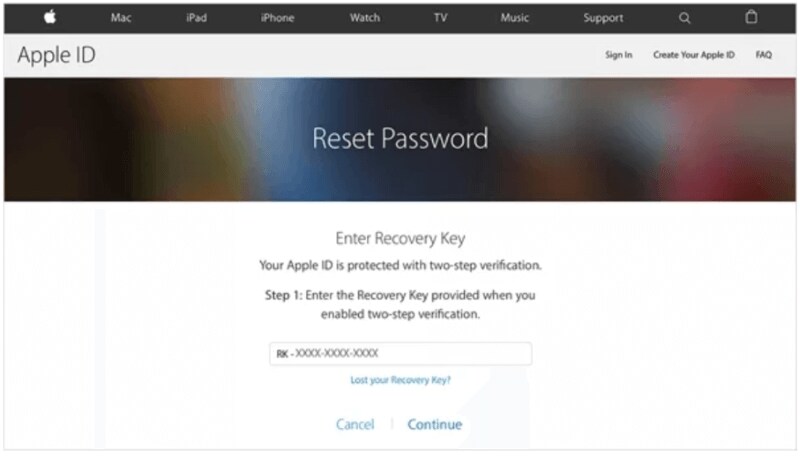
Note: Recovery Key is a security code provided to you when the Two-Factor Authentication is first enabled.
Step 3: Now, one of your trusted devices will receive a verification code. Enter it on your screen and hit “Next”.
Step 4: Upon successful verification, you will be asked to create a new password. Please make a new password now and then make sure to remember it.
That’s it you can now make use of this new password to unlock your Apple ID.
Method 6: A Loophole: DNS Bypass
If you want to unlock iPhone 13 Apple ID and don’t remember the password**,** you can use this DNS bypass method. But to make use of this method, you need to first factory reset your device and gain access to the “Hello” screen. Here’s how you can make use of this method.
Step 1: Firstly, you need to reboot your device into Recovery Mode. Then, launch iTunes and plug it in the computer. Now, iTunes will detect your device in recovery mode. Hit on Restore iPhone and wait for the process to complete.
Step 2: Your device will restart to the “Hello” screen upon completion. From the menu, choose language and country.
Step 3: Tap on “Proceed” to get into the Wi-Fi settings page.
Step 4: Now click on the “i” icon bonded by a circle next to Wi-Fi.
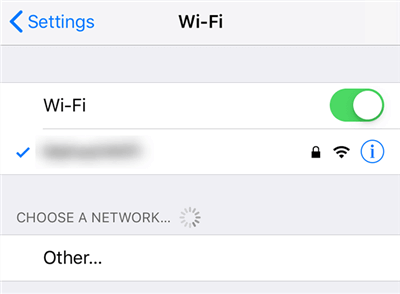
Note: In case, you are already connected to a Wi-Fi network, ensure to click on it first and then tap on “Forget This Network” to have the “i” icon visible.
Step 5: Now, when you tap on the “i” icon next to any Wi-Fi network (not connected), you need to look for the “Configure DNS” server option. Click on it and then select “Manual”, then click “Add Server.”

You have to select the DNS from the option available according to your region.
- USA/North America: 104.154.51.7
- Europe: 104.155.28.90
- Asia: 104.155.220.58
- Other areas: 78.109.17.60
Step 6: Now, save the settings, return to the connection page and connect to your Wi-Fi.
Step 7: You need to wait for your device to get connected with the iCloud DNS bypass server automatically.

Step 8: Once you are connected to the DNS server successfully, you can then use apps and features available on your Apple iPhone 14 Plus in an alternative way.

Note: This method is just a hack to use your device without the need for Apple ID. This method doesn’t unlock your Apple ID.
Method 7: Ask Apple Support
We are positive that the solutions above will get your issue resolved. However, just in case, if you’re still stuck with the same issue and are unable to unlock Apple ID on iPhone, then we would suggest you get in touch with Apple Customer Support to help you with the best. You can either directly walk into your nearest Apple Support Center or simply visit https://support.apple.com/ to get in touch with one of the customer support executives.
Conclusion
From this article, you can know how to unlock your Apple ID and reset your password. There are different ways available that will resolve your unlock iPhone issue. However, Dr.Fone is the most recommended tool as it provides a screen lock solution and recognizes it as a one-stop solution for all iPhone problems. You can also share the effective methods in this article with your families and friends.
Also read:
- [New] 2024 Approved Pop Culture with a Click Using KineMaster
- [New] In 2024, Elevate Your Content Strategies to Climb YouTube Ranks
- [New] Top-Notch AE Extensions Selection
- [New] Twitter's Viral Victory Hot Talk Highlights
- 2 Ways to Transfer Text Messages from Tecno Pova 5 to iPhone 15/14/13/12/11/X/8/ | Dr.fone
- 2024 Approved Protocols and Performance MacOS Meets Mixer
- A Step-by-Step Guide to Finding Your Apple ID On Your Apple iPhone 6 Plus
- Apple ID Unlock From Apple iPhone 13? How to Fix it?
- Forgot Your Apple ID Password and Email From Apple iPhone 15 Pro? Heres the Best Fixes
- How to Download the Official HP Thunderbolt Portable Dock G2 Drivers for Optimal Performance – 120W/230W Supported
- How To Erase an Apple iPhone 12 mini Without Apple ID Password?
- How to Remove an AirTag from Your Apple ID Account On Apple iPhone 14?
- How To Remove Phone Number From Your Apple ID on Your iPhone 12 Pro?
- In 2024, Your Account Has Been Disabled in the App Store and iTunes On iPhone 8 Plus?
- List of Pokémon Go Joysticks On Google Pixel 8 | Dr.fone
- Speedy Fixes for Slow-Mo Videos in a Flash
- Tips and Tricks for Apple ID Locked Issue From Apple iPhone XR
- Title: In 2024, How to Remove an AirTag from Your Apple ID Account From iPhone 14 Plus?
- Author: Alma
- Created at : 2024-10-15 17:51:55
- Updated at : 2024-10-20 16:55:42
- Link: https://apple-account.techidaily.com/in-2024-how-to-remove-an-airtag-from-your-apple-id-account-from-iphone-14-plus-by-drfone-ios/
- License: This work is licensed under CC BY-NC-SA 4.0.