
In 2024, How To Remove Phone Number From Your Apple ID from Your Apple iPhone X?
How To Remove Phone Number From Your Apple ID on Your Apple iPhone X?
After getting a new device, iPhone users must prepare a unique identification term for their Apple ID. Creating and setting up this ID is not different each time. Not to mention, one can use this one registered ID to access multiple Apple-based features like podcast subscriptions, apps, etc.
While the code is essential, it can become inactive if your registered phone number is no longer available or your change your number. You must remove the phone number from your Apple ID and add a new one.
Unsure about the steps, though? This post covers that, so read ahead.
Part 1. What is the Purpose of a Phone Number for Apple ID?
Typically, the email is not linked with Apple ID since the function is linked with phone numbers. Apple services-based communication is passed through the Messages app on the iPad, iPhone, iPod Touch, and the Apple ID.
Registering the phone number to Apple ID will allow you to get the necessary account-related messages on your device smoothly. If you do not sign in to iCloud with a SIM card, using Messages or the FaceTime app will become challenging. So, you need to know how to remove your phone number from iCloud or Apple ID when your registered number is inactive.
Part 2. Can You Remove the Trusted Phone Number from Apple ID?
If you want to learn how to remove the number from Apple ID and if possible, the answer is yes and quite quickly. Apple allows users switching to another carrier to remove their already authorized and linked phone number from the Apple ID. This is helpful for two-factor authentication phases so that the Apple iPhone X user can avoid getting fully locked out from the account.
Part 3. 3 Ways to Remove a Phone Number from Your Apple ID
If you are wondering about the steps for how to remove an old phone number from Apple ID, there are different styles available. Here are the main processes you can utilize.
Method 1. Remove Phone Number via iPhone/iPad’s Settings
In the matter of how to remove a phone number from an Apple ID, the most effortless process is to go into the Settings app and delete it from there. This is possible if you have your registered phone with you and the Apple ID. Simple access and remove the number.
Step 1: Access the Settings option on your iPad or iPhone device.
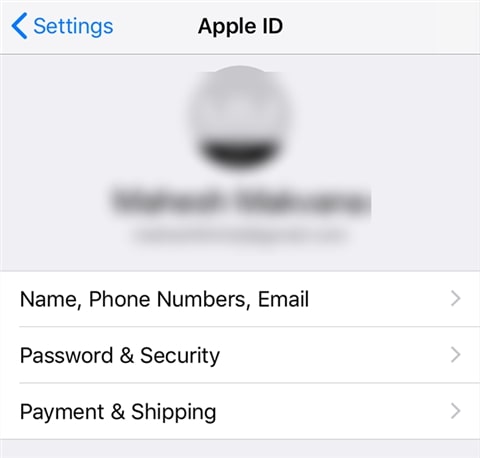
Step 2: Tap on the Apple account ID.
Step 3: Reach the Password & Security section.

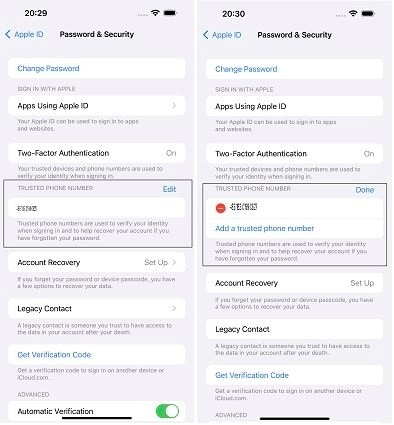
Step 4: You will see the Edit icon on the right-hand side. Click on it and then tap on the “Add a Trusted Phone Number” option.
Step 5: Add the Apple iPhone X Passcode > new phone number.
Step 6: Select Edit again to delete the old phone number. Press Done.
Method 2. Remove the Phone Number Using a Mac
Users can turn the phone number OFF that they registered to Apple ID through their Mac device. In this context, accessing the FaceTime or Messages app is essential in the context of how to remove phone number from Apple ID via Mac steps.
Step 1: Access the FaceTime or Messages app. Sign in using the same Apple ID you use for the apps on your Apple iPhone X.
Step 2: Go to Messages and tap on the Settings option. Then, choose the iMessage selection.
For Facetime, click on the FaceTime option and go to Preferences > General.
Step 3: From the list, choose the tickmark beside the phone number to uncheck it. That will deactivate the phone number for your account.

Method 3: Remove Phone Number via Change Apple ID Password
It is possible to change the password for Apple ID in the matter of how to remove a phone number from Apple ID. Adjusting the phone number is the natural next step when you carry out this step, so you can remove the number and use another at this stage.
Step 1: On your iPad and iPhone, tap on the Settings menu.
Step 2: Tap on the icon with your name and click on the Password & Security option.
Step 3: Select the Change Password option.

Step 4: The prompt to add the current Apple ID password, or the passcode, will appear. Add it to confirm, and then insert your new password.
Step 5: Hit the Change Password button.
Step 6: You will get logged out of the account. Sign in with the new password, and the phone number will get removed.
Part 4. How to Remove Apple ID without Password?
All the methods mentioned help remove phone numbers associated with the Apple ID but still require you to access the Apple iPhone X device. What if the Apple iPhone X device is locked and the necessary details are unavailable, like the password? You can use Dr.Fone - Screen Unlock (iOS) to remove the Apple ID by bypassing the passcode.
It is possible to remove phone number from Apple ID by accessing the Apple iPhone X device with simple taps through this app. You have to make the Find My iPhone feature active, and the app will bypass the Apple ID password within seconds.
Best Features:
- Supported on various iOS and iPadOS devices.
- Remove all types of lock screens, like Apple ID, Face ID, Touch ID, Screen Time Passcode, etc.
- Fast process of screen and password bypassing.
How to use it?
Step 1: Download/install/launch the app on Mac/Windows. Select Screen Unlock when the app opens on the interface.

Step 2: Choose the “Remove Apple ID” option and add the passcode, as instructed. Allow the system to trust the Apple iPhone X device for authentication through the following prompt.

Step 3: Put the Apple iPhone X device into recovery mode following the on-screen instructions. Then, restart the Apple iPhone X device. This will automatically kickstart the unlocking process and will take some seconds.

Step 4: Finally, see that Apple ID’s device has been unlocked on the next page.

Video Guide: How to Remove Apple ID without Password?
Part 5. FAQs about Apple ID Phone Number
- How to Add a Trusted Phone Number to Your Apple ID?
The steps for adding the trusted phone number to Apple ID are accessible through Settings > Apple ID icon/name > Password & Security > Edit icon beside the phone number already in use. Click on the “Add a trusted phone number” option and insert the new one. Confirm with your device passcode at the end.
- Why Isn’t My Apple ID Accepting My Apple iPhone X Number?
Apple ID accepts phone numbers for linking for two-factor authentication. The local number in the region is needed for pairing the number and Apple ID.
- Does Changing Apple ID affect Phone Number?
No, the Apple ID and phone number are not connected as features or codes. So, adjusting the Apple ID will not affect your device’s phone number.
Conclusion
Indeed, there are multiple methods you can take to remove the phone number registered to your Apple ID successfully. They are accessible in multiple ways through Mac, iPad, or iPhone settings. If you forgot the Apple ID, you could even remove it using Dr.Fone - Screen Unlock (iOS) . Ultimately, choose the process to trust based on your specific needs.
How to Unlock Apple ID On your Apple iPhone X without Security Questions?
Apple ID is known as a very strong security protocol that is consumed for the protection of the data and the applications of the Apple iPhone X device it is associated with. This security measure is primarily responsible for holding the data and assorted applications of the Apple iPhone X device. Thus, Apple ID can be regarded as a very ubiquitous protocol that promotes effortless protection and considers bringing the complete system in a single bubble. There are several instances where people report over their Apple ID for being locked. To counter this issue, this article provides you a detailed guide on how to unlock Apple ID without security questions and related barriers.
Part 1. A worry-free way to unlock Apple ID without security questions
You may have come across a series of different solutions that considered providing you efficient mechanisms to unlock your Apple ID without the aid of security questions. Over a detailed comparison, people have come across different third-party platforms that dedicated themselves to offering the users the perfect environment to have their devices unlocked. As you all are aware of the saturation that exists in the market, this article features Dr. Fone – Screen Unlock (iOS) , state-of-the-art software that efficiently resolves all problems related to a locked Apple device. There are several reasons that make it possible for users to prefer Dr. Fone above all other existing platforms.
- It helps you save your device from the disabled state.
- You can easily unlock your Apple iPhone X or iPad over forgetting its passcode.
- It can operate across all kinds of iPhones, iPads, and iPod Touch.
- It is compatible across the latest versions of iOS.
- It provides you a platform to work without iTunes.
- There are no pre-eminent skills required for using the platform.
Over the question of utilizing the platform efficiently, the following guide explains to you how to unlock Apple ID without email or security questions with the help of Dr. Fone – Screen Unlock.
Step 1: Connect Devices and Access Tool
After downloading and installing the platform on your desktop, you need to connect your Apple device with the desktop and launch the software. Select the “Screen Unlock” tool from the list of options provided on the home window of the application.
Step 2: Initiate Unlock
On the next screen, you are required to select the option of “Unlock Apple ID” from the list and proceed. Open up your Apple device and “Trust” the computer with the provided prompt message.

Step 3: Reboot Phone
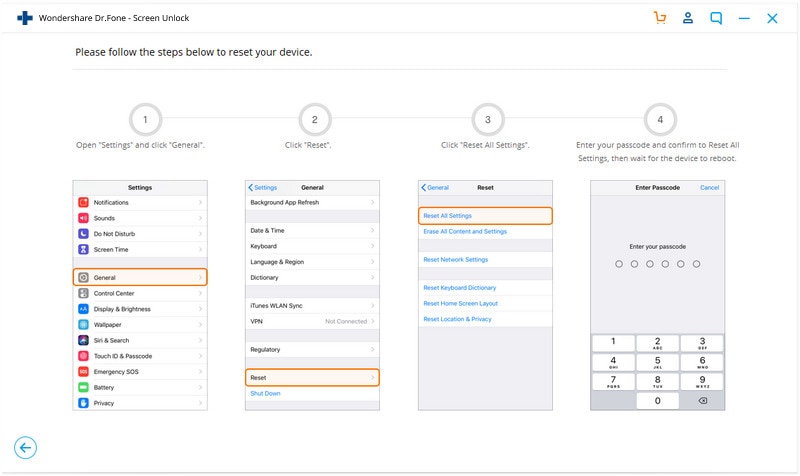
Approach the Settings of your device and initiate its reboot. As soon as the reboot starts, the procedure for unlocking the Apple ID initiates across the platform.
Step 4: Execution of the Process
As the process elapses successfully, you are provided with a prompt window on the desktop displaying the completion of the process.
Part 2. Unlock Apple ID with 2-factor authentication
There are multiple techniques that involve the method of unlocking an Apple ID without the aid of email addresses and security questions. As you all believe in the importance of third-party platforms, it is important to come across other mechanisms that can come quite handy in managing such issues. Two-factor authentication is another approach that can provide you robust and efficient solutions to this issue.
Step 1: Open the iForgot website and provide your Apple ID username to proceed. You need to provide the platform with the phone number that is associated with your Apple ID for verification.
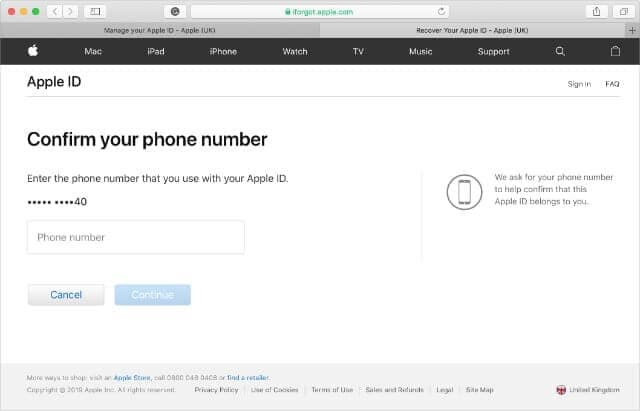
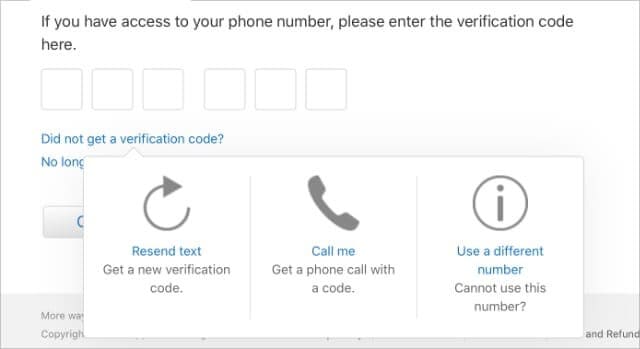
Step 2: Since you cannot use your Apple device or you have not received a notification yet, you need to tap on “Unable to access your [device]?” This would redirect a six-digit verification code to the phone number that you have provided.

Step 3: Add the code that is provided, followed by the Apple ID password, allowing you to unlock your device.
Part 3. Unlock Apple ID with the recovery key
While you understand the conventional methods that can be typically consumed for countering such issues, there are several other mechanisms that are associated across similar platforms and follow an identical protocol to cater to issues that involve unlocking Apple ID without security questions. Being an Apple user, you can efficiently unlock your Apple ID with the aid of a Recovery Key. For this, you need to follow the guidelines provided as follows.
Step 1: You are required to open the iForgot website on your browser. Initially, it is important for you to enter the Recovery Key that you utilized when enabling Two-Factor Authentication.
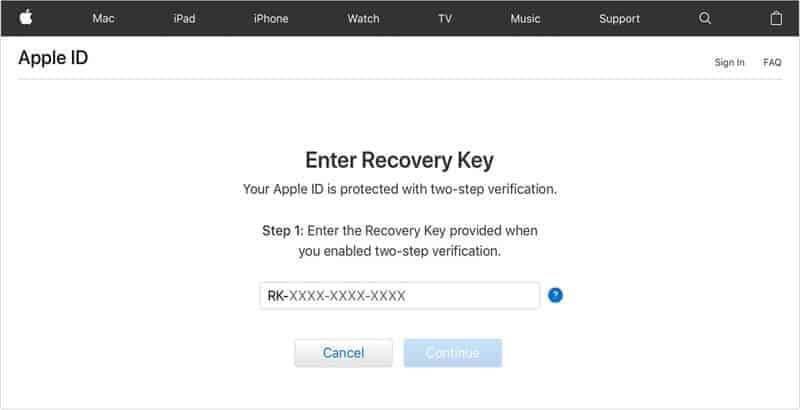
Step 2: Following this, you need to provide the platform with an Apple device to where you wish to send the verification code to.
Step 3: You need to retrieve the code from the Apple iPhone X device that you selected and enter it over the website. The website would lead you to enter a new password for your device.
Part 4. How to reset security questions after forgetting the answers?
Security questions are referred to as the extra protective layer that is responsible for keeping a profile secure. In such cases where you accidentally forget the basic security questions and their answers, you can consider following a very simple procedure to have them restored. In such Apple devices where you have no certain idea about the forgotten security question, you can contact AppleCare in such circumstances and have the assist you in catering to this issue within a matter of minutes. Contact the iTunes Store Support and choose the option of Password & Security Questions to lead towards calling the support for the remedy of the issue.
Conclusion
The article considered discussing various reasons and remedies to unlocking an Apple ID without the aid of security questions. You need to look over the guide to develop an understanding of the systems that are involved.
Apple ID Locked for Security Reasons On Apple iPhone X? Find the Best Solution Here
Apple ID is the main functional unit in the smooth and secure operation of Apple devices. This ID is the gateway towards many services, including iCloud, App Store, and more. In the context of these security concerns, Apple ID could get locked out for various reasons, like Apple ID locked for security reasons. This happens just because the security feature in the operating system detects some fictitious activity.
However, you don’t need to worry about your Apple ID locked for security reasons because solutions to these problems do exist. In this article, we will also provide one significant and effective solution to tackle such issues effortlessly.
Part 1. Exploring the Causes of Apple ID Locked Out for Security Purposes
Has your Apple ID been locked for security reasons, and is this problem creating some tension for you? Before we move further towards its solutions, it’s essential to know the reasons that lead to these problems. Some of them are explained below in a comprehensive manner:
1. Incorrect Attempts
Apple locks your Apple ID mainly when you or someone else has entered the password incorrectly multiple times. This is one of the most common reasons, and mostly, this happens by the original users themselves unintentionally.
2. Preventing Fraudulence
If there are unauthorized purchases or suspicious transactions on your ID, Apple may consider locking it to prevent that activity. It happens to protect the user’s financial information and to avoid any fraudulent activity from being done on that Apple ID.
3. Using Third-Party Tools
Sometimes, when using third-party tools based on open-source iCloud sources, the Apple ID could get locked. Developers can integrate iCloud features into their applications to provide users with improved accessibility to their iCloud data.
4. Security Breach Reasons
The ID can also get locked when Apple senses a potential security breach, which could lead to the exposure of your credentials. It may occur when someone tries to hack your ID to get some information, especially when it is being used in multiple areas.
5. Incorrect Security Questions
It may be due to the security questions you or someone else has entered incorrectly too many times. This is another common reason because, most often, the security questions are forgotten by the user. Ultimately, this leads to your Apple ID being locked for security reasons.
Part 2. Resolving the Apple ID Locked Out For Security Reasons by Resetting The Password
The basic solution to the Apple ID locked for security reasons is to reset the ID’s password. Apple also recommends adopting this method if you feel any suspicious activity. The password for your Apple ID can be reset from the iOS device itself or the Mac. We are providing a simple guide to reset your password either way.
Resetting Password From iOS Device
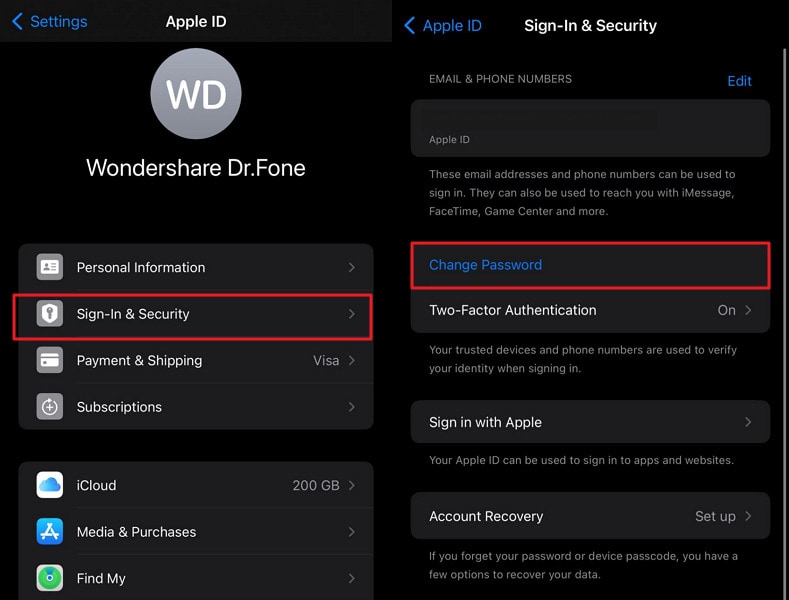
Instructions: To reset your Apple ID password using your iOS device, open the “Settings” app and move ahead by tapping on your name in front of you. Then, continue to select the “Sign-In & Security” option and select “Change Password.” Follow the prompts on the screen to complete the Apple ID password change process.
Resetting Password From Mac
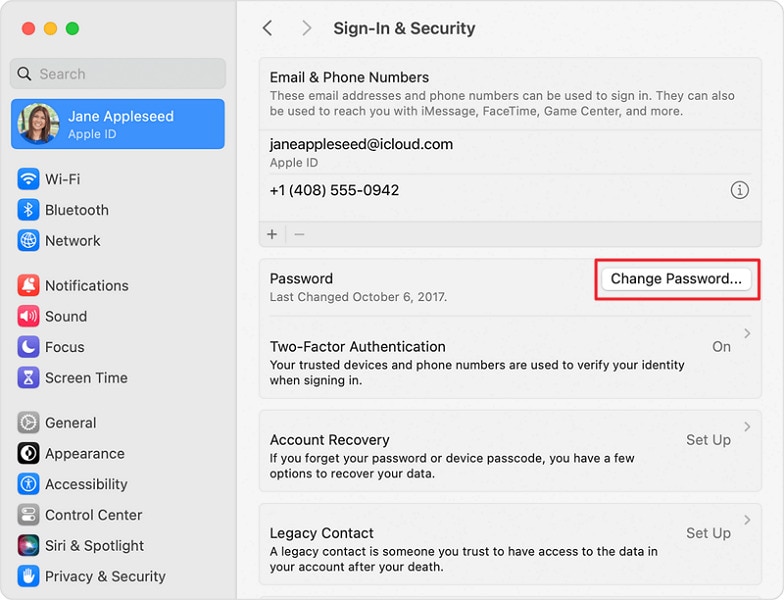
Instructions: Start by tapping the Apple logo in the top left corner of your screen and choosing the option “System Settings.” Upon completion of this step, you have to access your Apple ID settings and proceed by selecting the “Sign-In & Security” option. Subsequently, opt for the “Change Password” feature to modify your Apple ID password.
Part 3. Resolving the Apple ID Locked Out for Security Reasons by iForgot Website
You have tried to resolve the problematic message indicating, “This Apple ID has been locked,” but resetting the password is not helping. Then, you need to try iforgot.apple.com, which will help you tackle this issue quickly. Here is how to resolve your Apple ID, which has been locked for security reasons, using the iforgot.apple.com website.
- Step 1: To begin with, you will have to browse the website iforgot.apple.com on your computer. Once the website has loaded, move ahead by pressing the “Reset Password” and selecting the “Continue” option after entering the Apple ID.

- Step 2: In the next stage, you need to reset your password, and for that, you need to go through a verification process sent to your trusted device. You can reset the Apple ID password by tapping the “Allow” button. Following this, you must provide the trusted device passcode to initiate the password reset process.

Part 4. Resolving the Apple ID Locked Out for Security Reasons by Apple Support App
If your Apple ID is still inaccessible after implementing the methods, you can try the Apple Support app. This technique can be applied by arranging another device for downloading the Apple Support app. Users can regain access to their Apple ID and restore full device functionality through this app. The simple guide to perform this action is explained below step-wise:
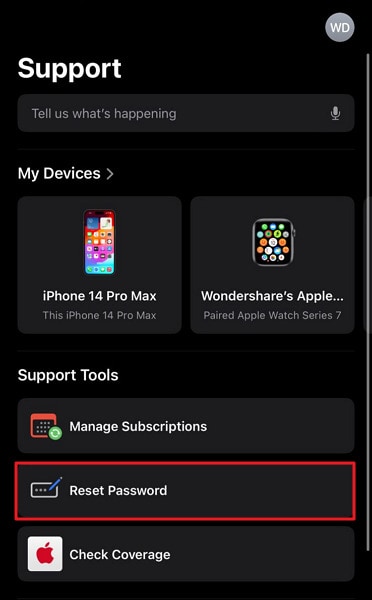
- Step 1: You need to download the Apple Support App on the borrowed device and proceed to open it. After that, navigate to the “Support Tools” section, find the “Reset Password” option, and tap on it.
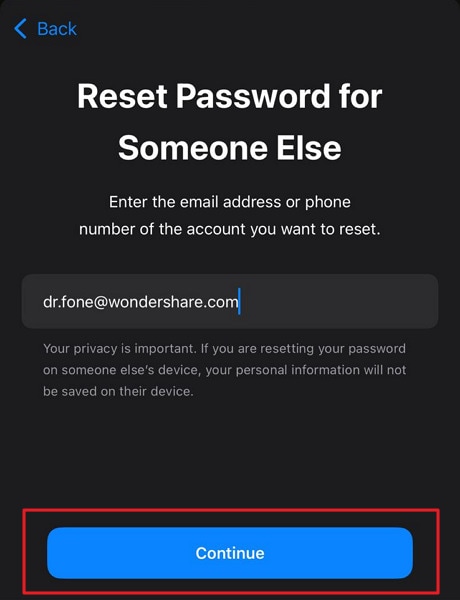
- Step 2: Choose the “Help Someone Else” option to continue. Then, give your Apple ID and hit the “Continue” button. There, you have to follow the on-screen instructions to reset your password and get access to it.
Part 5. No Solution Yet? Try Wondershare Dr.Fone – Screen Unlock (iOS) To Unlock Locked Apple ID for Security Reasons
When facing an Apple ID locked for security reasons, it becomes imperative to seek a reliable solution. All essential operations within iOS devices are intertwined with the functionality of the Apple ID. That’s why a viable resolution is crucial for seamless device usability. In such situations, Wondershare Dr.Fone emerges as a highly effective option.
It is specifically designed to tackle the intricacies of iOS device management. This tool offers a dedicated feature to unlock Apple IDs, making it the ultimate recourse. Additionally, it allows you to bypass the iCloud activation lock without requiring a password. This iOS screen unlock tool is fully compatible with the latest versions of iOS 17 and iPadOS 17.
Key Features of Wondershare Dr.Fone
- Using Wondershare Dr.Fone, you can also remove the Apple ID or screen lock from the latest iPhone 15 models.
- You can also manage your Apple iPhone X data transfer or fix iDevice system issues with the help of Wondershare Dr.Fone.
- This tool can also help its users to remove the Screen Time Passcode and SIM lock.
How To Use Wondershare Dr.Fone To Unlock Locked Apple ID for Security Reasons
Summarized below is the detailed step-by-step process of using Wondershare Dr.Fone to unlock your Apple ID:
- Step 1: Navigate to the Remove Apple ID Feature
With Wondershare Dr.Fone launched, move to the “Toolbox” tab and access “Screen Unlock.” Then choose “iOS” as your device type, and on the following screen, press “Remove Apple ID.” Now is the time to connect your Apple iPhone X to the computer and let Wondershare Dr.Fone detect it.
- Step 2: Enable 2FA on Your iOS Device
To proceed further, it is imperative to have screen lock and 2FA enabled on your iOS device. If it already isn’t, do it and move to put your device in Recovery Mode. Dr.Fone will guide you through the process of enabling Recovery Mode on your device. Once Wondershare Dr.Fone detects your device in Recovery Mode, it will display your device model.

- Step 3: Complete the Apple ID Unlocking Process
Now choose “System Version” and tap “Start” to let Dr.Fone download the firmware. Once it is downloaded and verified, tap “Unlock Now.” The last step involves putting the confirmation code in the confirmation prompt and pressing “Unlock.” In a few moments, Wondershare Dr.Fone will unlock your Apple ID.

Final Words
To conclude, there are scenarios that can lead to the Apple ID being locked for security reasons problem. Apple does this for your benefit. However, we have explained different methods to get you out of this situation. Although all of these methods possess the potential to resolve this problem, Wondershare Dr.Fone offers a powerful platform for more in-depth remedies.
This robust iOS toolkit feature performs this recovery in seconds, saving you time. Also, it has a simple interface for its users with various technical exposure. In short, it is the best solution if your Apple ID has been locked for security reasons.
Also read:
- [New] 2024 Approved Unveiling the Top 10 Timing Apps for Weddings on Smartphones
- [New] Soundscapes for Static Music in WhatsApp
- [Updated] Navigating Closer Views for Efficient Tech Meetings
- A Guide to Building Detailed User Personas with ChatGPT for Superior Performance
- Can I Remove the Apple Watch Activation Lock By iPhone XS without the Previous Owner?
- Effective Fixes: Overcoming Hurdles in Family Sharing of Subscriptions
- How To Change Your iPhone 12 Pro Max Apple ID on MacBook
- How to Successfully Bypass iCloud Activation Lock from iPhone SE (2022)
- Image Illumination The Essential List of Frame-Enhancing Apps
- In 2024, How Do You Get Sun Stone Evolutions in Pokémon For Motorola Defy 2? | Dr.fone
- In 2024, How To Get the Apple ID Verification Code On Apple iPhone 12 Pro in the Best Ways
- In 2024, How to Sign Out of Apple ID From iPhone 14 Pro without Password?
- In 2024, How to Unlock Apple ID From your iPhone 13 without Security Questions?
- In 2024, The Easy Way to Remove an Apple ID from Your MacBook For your Apple iPhone 12 Pro
- In 2024, Troubleshooting Error Connecting to the Apple ID Server On iPhone 6s
- In 2024, Turning Off Two Factor Authentication On iPhone SE? 5 Tips You Must Know
- Meta and OpenAI Under Fire: Artist Suits on Free Expression
- Title: In 2024, How To Remove Phone Number From Your Apple ID from Your Apple iPhone X?
- Author: Alma
- Created at : 2025-01-26 21:18:21
- Updated at : 2025-01-31 23:00:46
- Link: https://apple-account.techidaily.com/in-2024-how-to-remove-phone-number-from-your-apple-id-from-your-apple-iphone-x-by-drfone-ios/
- License: This work is licensed under CC BY-NC-SA 4.0.