
In 2024, How To Remove the Two Factor Authentication From Apple iPhone 14 Plus
How To Remove the Two Factor Authentication On Apple iPhone 14 Plus
Want To Remove the Two Factor Authentication? Check Out This Guide

Continuous technology innovation has introduced many advanced encryption and security methods to protect data from hackers. With these innovations, companies like Apple and Google have introduced the two-factor authentication process to protect user data.
But sometimes, this security method becomes a hassle to access your data daily, due to which many users try to remove it. That is why, in this article, we have discussed how you can remove iCloud two-factor authentication easily.
- Part 1: What Is Two-Factor Authentication and How Helpful It Is
- Part 2: Can You Remove the Two Factor Authentication iCloud at Anytime
- Part 3: How To Remove the Two-Factor Authentication Within 14 Days
- Part 4: iPhone Apple ID Got Locked? Here’s a Reliable Tool To Get It Unlocked Without Passcode

Part 1: What Is Two-Factor Authentication and How Helpful It Is
Protecting users’ devices and online accounts is one of the major responsibilities of tech companies like Apple. Due to this, they have added multiple security features, including two-factor authentication. Thus, if you create an Apple ID, you can see a two-factor authentication option that adds an extra layer of security.
2FA is activated when the user provides the password to log into the Apple ID or software through a new device, and it acts as a second layer for account security. Apple ID or any software containing sensitive data cannot be accessed without it. This method provides a higher security level than single-factor authentication. To understand more benefits of this security system in detail, check the following points:
- Protection From Password Theft: 2FA acts as an additional security level. It protects your accounts and devices in case your password is leaked.
- Migrations of Unauthorized Assets: Online banking applications use 2FA to protect users from unauthorized bank transfers. If someone accesses their app, this is a beneficial security measure.
- Protection on Multiple Services: Platforms, including social media, banks, and cloud storage, use 2FA. It means that 2FA can be used in various digital aspects.
Part 2: Can You Remove the Two Factor Authentication iCloud at Anytime
Many people use 2FA globally to protect their personal information and devices from hackers and unauthorized access. However, in some cases, users may want to remove two-factor authentication iCloud for multiple reasons. This includes scenarios in which their device is lost or damaged or if they have found a better security option than this one.
Moreover, there is one important key point to note: Apple has removed the feature of deactivating 2FA from the Apple ID. It means you need to think twice before activating this feature on your Apple ID because it cannot be reversed. For the following reasons, Apple has taken this initiative:
- Enhanced Security: By removing the deactivation option for 2FA, Apple is trying to strengthen its account security to ensure that no one can access its user’s data.
- Reducing Vulnerabilities: Allowing users to deactivate 2FA could cause vulnerabilities in the Apple ecosystem that can be a weak point for protecting users’ data. That is why Apple has removed the deactivation option to stop malicious actors from taking advantage of this vulnerability.
- Encouraging Security Awareness: To make Apple users more security conscious, Apple has made it difficult on purpose to remove 2FA. It helps users to be more confident in Apple services and products.
- Minimizing Mistakenly Steps: If users mistakenly remove the 2FA, their accounts and devices are at risk of being accessed without proper authentication. To avoid such an issue, the deactivation option of 2FA is removed.
Besides all these reasons, there is still some good news for those who want to remove the two-factor authentication iPhone to use other security options. The good news is that Apple allows users to remove 2FA for a limited time after activation.
Part 3: How To Remove the Two-Factor Authentication Within 14 Days
As explained in the last part, Apple has made removing the 2FA option from Apple ID challenging for several security reasons. Thus, if you want to remove 2FA from your Apple ID, you have only 14 days after activating this feature. To understand how to disable iCloud two-factor authentication within this given time, check the following steps:
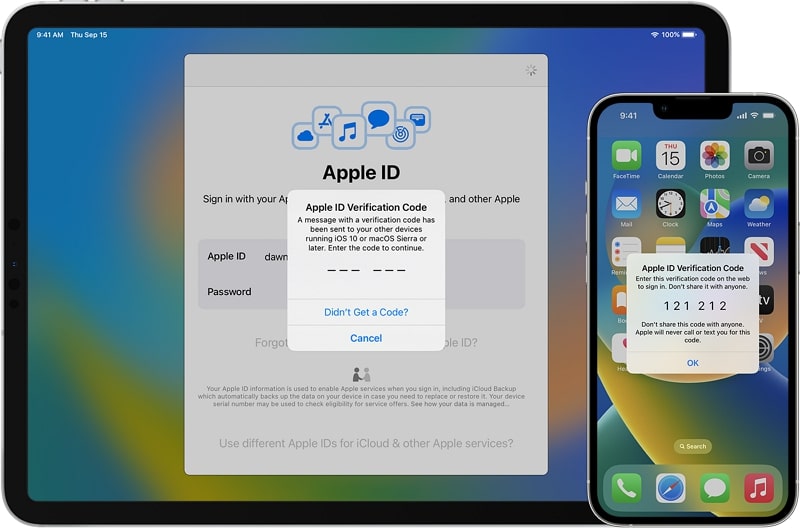
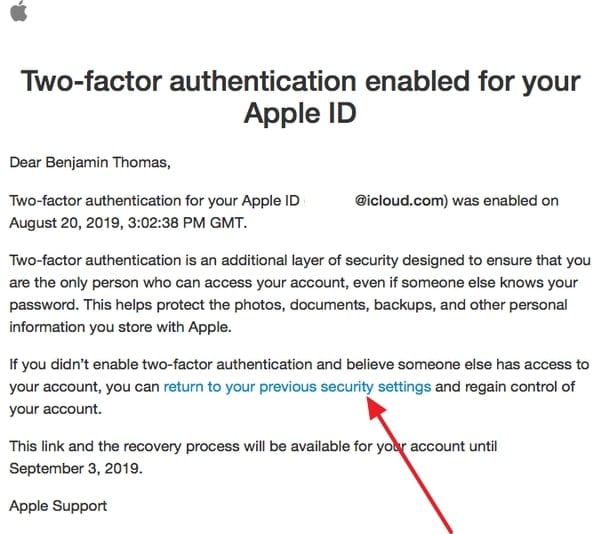
- Step 1. Once you have activated the 2FA feature, your 14-day grace period will start eventually. To deactivate this, open the enrollment email you received from Apple regarding 2FA on your Apple ID.
- Step 2. Scroll to the bottom of this email and select the link or button to return to your account security & settings section. There, follow the on-screen instructions to deactivate the 2FA of your Apple ID.
Part 4: iPhone Apple ID Got Locked? Here’s a Reliable Tool To Get It Unlocked Without Passcode
If you mistakenly got your Apple ID locked due to entering the wrong password multiple times, there is no need to stress it out. It is a common issue that many people forget their Apple ID password and cannot access it. Due to this, we have got you a perfect solution to unlock your Apple ID without a passcode.
This solution is the Wondershare Dr.Fone - Screen Unlock (iOS) tool specially designed to help users remove their iPhone and iPod lock screens. It is compatible with the latest iOS devices and assists in removing various types of lock screens, including Touch ID and Face ID.
Key Features
- This iOS screen unlock tool assists users in bypassing MDM without data loss and other technical errors.
- iCloud activation lock and iTunes backup encryption can be bypassed without a password in just a few steps.
- iPhone 15 and the latest versions of iOS 17/iPadOS 17 are supported by this tool to help users professionally.
Simplified Steps for Unlocking Apple ID With Wondershare Dr.Fone
To help you use this AI-powered screen unlock tool for unlocking the Apple ID without a password, follow the process we have mentioned below for your ease:
- Step 1. Access the Toolbox and Choose the Respective Option
Initiate the process by accessing Wondershare Dr.Fone’s latest version on your computer and tapping on the “Toolbox” option from its left side toolbar. Following this, choose “Screen Unlock” from the list of tools and tap “Remove Apple ID” in the next window.

- Step 2. Make Sure That the Apple iPhone 14 Plus Is Connected to the Computer
Then, connect your Apple iPhone 14 Plus to your computer using a USB cable so that you can see its connectivity status. Once the status is displayed on a new window, hit the “Unlock Now” button to proceed. Answer some questions that are asked by the platform, and with this, ensure that your device’s “Screen Lock” and “Two-Factor Authentication” are enabled or disabled.

- Step 3. Select the System Version and Proceed Ahead
In this step, enable Recovery Mode by following the on-screen instructions. It will help the platform detect the connected device model, with which you will need to select “System Version.” Afterward, you can hit the “Start” button to proceed ahead.

- Step 4. Start the Apple ID Unlocking Process
The respective iOS firmware will download according to the Apple iPhone 14 Plus device model and system version. After it is downloaded, the platform will verify it for you, based on which you can tap the “Unlock Now” option to get your Apple ID unlocked successfully.

Conclusion
With this, we hope you understand how to disable iCloud two-factor authentication. However, remember that doing this is only possible within 14 days of a grace period. If this period is over, you cannot remove 2FA from your Apple ID.
Moreover, if you have locked your Apple ID passcode, using Wondershare Dr.Fone to unlock it can be the perfect option. While using this tool, you also don’t have to worry about screen locks on different iOS devices. This is because the innovative algorithms integrated in this tool make it easier to use for unlocking the Apple ID or screen lock.
A Step-by-Step Guide to Finding Your Apple ID On Your Apple iPhone 14 Plus
In the world of Apple devices and services, your Apple ID is your key to unlocking a world of possibilities. The digital fingerprint connects you to your Apple iPhone 14 Plus, iPad, Mac, and all the apps and services you love. But if you’re asking, “How do I find my Apple ID?” you’ve come to the right place.
This article will take you on a journey to discover your Apple ID. The mission? To provide you with a clear guide, ensuring that finding your Apple ID is as easy as pie. So, dive in and unravel the secrets of your Apple ID!

Part I. A Brief Introduction to Apple ID?
At the heart of your Apple experience is an Apple ID. But what exactly is it, and why is it so important?

What Is My Apple ID?
Think of your Apple ID as your unique passkey to the entire Apple ecosystem. It’s a combination of your email address and a secure password that you use to sign in to all things Apple. Whether it’s your cherished iPhone, trusty iPad, or reliable Mac, your Apple ID ties them all together, making your digital life seamless.
Why Is Your Apple ID Significant?
Your Apple ID plays a crucial role in your digital journey. Here are some key points to highlight its significance:
- **Access to Apple Services.**Your ID is your golden ticket to various Apple services like the App Store, iTunes, and iCloud. It’s how you download apps, purchase music, and store your cherished photos and files in the cloud.
- **Device Linkage.**Your Apple ID serves as the glue that binds your devices. It ensures that your Apple iPhone 14 Plus, iPad, and Mac are in sync. When you change something on one device, it reflects across all your Apple gadgets.
- **Security and Privacy.**Apple places a high premium on security and privacy. Your ID helps keep your data safe and confidential, whether it’s your messages, emails, or personal information.
- **Find My.**If you ever misplace your Apple iPhone 14 Plus or other Apple devices, your Apple ID is your lifeline to track and recover them using the “Find My” feature.
- **App Purchases.**Your Apple ID remembers all the apps you’ve purchased, making it easy to reinstall them on a new device without repurchasing.
In a nutshell, your Apple ID is the gateway to a world of digital convenience and security. It makes your life easier, keeps your data safe, and ensures your Apple devices work seamlessly together. Now that you understand the importance of your Apple ID let’s move on to the exciting part: finding it!
Part II. How Do I Find My Apple ID on iPhone/iPad/Mac/Windows?
Knowing your Apple ID is the key to unlocking your Apple world. You’ll need your Apple ID if you’re an iPhone aficionado, a Mac enthusiast, or a Windows user dipping into the Apple ecosystem. Let’s explore how to find Apple ID on various devices.
On iPhone or iPad
The following steps are for finding your Apple ID on an iPhone or an iPad:
- Step 1: Begin by unlocking your Apple iPhone 14 Plus or iPad. Now, open the Settings app. It’s the one with the gearwheel icon – you can’t miss it!

- Step 2: Scroll down and tap “Sign in to your [Device].” If you’re already signed in, your name and Apple ID should be at the top.
- Step 3: There it is! Your Apple ID is displayed at the top of the screen, just beneath your name. Write it down or take a screenshot for safekeeping.

On Mac
Here’s how to locate your Apple ID on a Mac device:
- Step 1: If you’re on a Mac, click the “Apple logo” in the top-left corner of the screen. From the drop-down menu, select System Preferences.

- Step 3: In the System Preferences window, click on Apple ID.

- Step 4: Your Apple ID is now right in front of you, under your profile picture. Jot it down or take a screenshot – just in case.

On Windows PC
If you’ve lost your Apple ID and need to find it on your Windows device, follow these steps:
- Step 1: If you’re using a Windows PC, launch iCloud on your PC. Syncing your Apple device (such as an iPhone or iPad) to your computer is probably why you installed this.
Note: You can use iTunes instead of iCloud if you don’t have one on your Windows PC yet.

- Step 2: And that’s it! Your Apple ID should be there. Your Apple ID will be associated with your name as long as you are logged in.
Why It’s Important
Even on a Windows PC, your Apple ID is your gateway to Apple services, which means you can access your iCloud data and enjoy Apple Music and the iTunes Store.
Remember Knowing Your Apple ID Is Crucial
Your Apple ID is the key to a world of apps, services, and secure data. Knowing how to find it on your device is the first step in making the most of your Apple experience. So, take a moment to discover your Apple ID on your Apple iPhone 14 Plus, iPad, Mac, or Windows PC. It’s a small effort that brings you big benefits!
Part III. Want a Quicker Way To Unlock Your Apple Devices?
Have you ever found yourself locked out of your Apple device, desperately seeking a solution to regain access? If so, you’re not alone. For those times when you need a quick and reliable way to unlock your Apple device, Wondershare Dr.Fone - Screen Unlock is here to the rescue.
Introduction to Dr.Fone - Screen Unlock
So, what is Dr.Fone - Screen Unlock? It’s a nifty tool designed to simplify unlocking your Apple devices. Whether it’s a forgotten passcode, a locked screen, or an Apple ID issue, Dr.Fone - Screen Unlock is your go-to solution.
Key Features and Benefits
Let’s explore the key features and benefits of Dr.Fone - Screen Unlock:
- **Simplicity at Its Best.**One of the standout features of Dr.Fone - Screen Unlock is its simplicity. There is no need for technical expertise or hours of frustration. With a user-friendly interface, this tool makes the unlocking process a breeze, even for the less tech-savvy.
- Dr.Fone - Screen Unlock is designed to work swiftly, ensuring you regain access to your device in no time.
- It’s not limited to specific Apple devices – it supports various models, making it an all-in-one solution.
- **Data Protection.**The tool ensures your data remains intact during the unlocking process, so you don’t have to worry about losing precious information.
- Dr.Fone - Screen Unlock has a dedicated support team to assist you if you encounter any issues.
How To Use Dr.Fone - Screen Unlock
Unlocking your Apple device with Dr.Fone - Screen Unlock is as easy as 1-2-3. Here’s a step-by-step guide:
- Step 1: After Wondershare Dr.Fone has finished installing on your computer, go to Toolbox > Screen Unlock > iOS to open the relevant window.
- Step 2: Select the Unlock iOS Screen button repeatedly within the new window that has opened up so that you can proceed with unlocking the screen of your iOS device.

- Step 3: To begin unlocking the iOS device, tap Start on the following screen. Check to see if your gadget has adequate battery life.

- Step 4: The next step is to enter Recovery Mode on your iOS device. Put your iDevice into the appropriate mode by following the on-screen prompts. If you cannot get your iDevice to boot into Recovery Mode, you can attempt putting it into DFU mode by tapping the Try to enter DFU Mode button at the bottom.

- Step 5: The platform automatically recognizes the Device Model after users successfully enter Recovery Mode on their iDevice. Make any necessary adjustments to the model and pick the System Version. After that, tap the Start button to continue the screen unlocking process.
- Step 6: The next screen will show you where your device’s iOS firmware download stands. If you want to cancel the operation, just hit the Stop button. If the iOS firmware takes a long time to download on your platform, you can copy the download link by clicking the Copy option.

- Step 7: Once the iOS firmware has been downloaded and verified, it will be displayed on the following screen. Continue by clicking the Unlock Now button.
- Step 8: A dialog box asking for confirmation of the action will pop up on the screen. Enter the unlock code and select Unlock to continue.

- Step 9: On the following screen, you’ll see an iOS device’s unlocking status. Don’t forget to keep the Apple iPhone 14 Plus device plugged in, as doing otherwise will disrupt it.
- Step 10: To complete unlocking your iDevice, tap the Done button once you’re done. If you’re still stuck with a locked iOS device, tap the Try Again button to try again.

It’s important to note that Dr.Fone - Screen Unlock is a trusted solution that prioritizes data security and ease of use. So, if you ever find yourself locked out of your Apple device and need a quick and reliable way to unlock it, Dr.Fone - Screen Unlock should be your first choice.
Part IV. Additional Tips and Troubleshooting
While this guide has covered the basics of finding your Apple ID and using Dr.Fone - Screen Unlock, there are some common issues that Apple users might encounter. Here are some tips and troubleshooting solutions to help you navigate these problems:
Forgotten Apple ID Password
Issue: If you’ve forgotten your Apple ID password, don’t worry. You can reset it by following these steps:
- Visit the Forgot Apple ID or passwordlink on the Apple website.
- Enter your Apple ID and follow the prompts to reset your password.
Two-Factor Authentication Issues
Issue: Sometimes, two-factor authentication can cause access problems. Here’s what you can do:
- Ensure your trusted device is nearby when you sign in with your Apple ID.
- Verify that your device has an internet connection.
- Double-check your date and time settings.
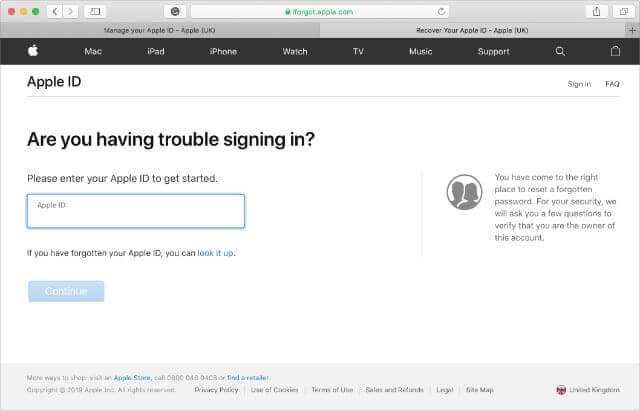
Account Locked for Security Reasons
Issue: If your Apple ID is locked for security reasons, follow these steps:
- Visit iforgot.apple.com and unlock your account using your Apple ID and password.
- You may need to answer security questions or use two-factor authentication.
Problems With Apple ID Verification
Issue: If you’re having trouble with Apple ID verification, try these tips:
- Ensure you’re using the correct Apple ID and password.
- Check your email for a verification link.
- Follow the on-screen prompts for verification.
Unable To Sign Into iCloud
Issue: If you can’t sign in to iCloud, follow these steps:
- Make sure your device is running the latest software.
- Verify your network connection.
- Try signing in using a different device.
With these additional tips and troubleshooting solutions, you’ll be better prepared to handle any hiccups related to your Apple ID and password. We hope this information helps you make the most of your Apple experience!
Conclusion
In the vast Apple universe, your Apple ID is your golden ticket to an array of services and endless convenience. Remember, it’s not just a passcode; it’s your passport to an easier digital life. This “How to find Apple ID“ journey has been even smoother with Dr.Fone - Screen Unlock. This trusted tool simplifies the process, making it accessible to everyone.
So, explore Dr.Fone - Screen Unlock and make your Apple experience hassle-free. And don’t forget to safeguard your Apple ID like the treasure it is. Because with your Apple ID secure, you’re ready to unlock a world of endless possibilities!
Why Apple Account Disabled On your Apple iPhone 14 Plus? How to Fix
Apple is one of the leading smartphone developing enterprises that has introduced the world to a contemporary set of features that are not common among other leading smartphone companies. One of the major distinguishing characteristics of Apple has been displayed in its present security protocols. Apple Account is regarded as one of the most significant credentials of the Apple iPhone 14 Plus and iPad that is responsible for connecting and holding the applications and the assorted data. Many users have generally reported unusual situations that got their Apple Account disabled. There are several reasons that can be associated with the Apple account getting disabled. The major repercussion that is associated with it is unnecessary data loss following the suspension of all products that have been bought with the account over time. This article provides you an impressive overview of the major reasons that lead to your Apple Account getting disabled, followed by the associated mechanisms that can be tested to secure the account.
Part 1. Why is the Apple account disabled?
Apple iPhone, iPad, and other devices operate over a single Operating System, with its own protocols and unique mechanisms that distinguish it from other smartphone models in the market. Apple believes in securing the data and identification of its users with its state-of-the-art security measures. Under such circumstances, it usually gets possible for the user to have his Apple account disabled unnecessarily. Whenever you encounter such a situation, there are several messages that might be displayed on your device to prompt you over the disabling of the account. These messages usually appear in situations where you intend to sign in to some platform with your associated Apple ID. The most common messages that appear on the screen are:
- “This Apple ID has been disabled for security reasons.”
- “You can’t sign in because your account was disabled for security reasons.”
- “This Apple ID has been locked for security reasons.”
The messages that have been stated above are usually depicting a security anomaly that led to the disabling of the associated Apple ID. However, there can be several reasons that would have led to such circumstances, which are described as follows.
- There might be incorrect forced logging in into your Apple ID for multiple tries.
- Any user would have entered incorrect security questions multiple times.
- The other information associated with the Apple ID would have been entered incorrectly numerous times.
Part 2. Is “Your account has been disabled in the App Store and iTunes” the same as “This Apple ID has been disabled for security reasons”?
There are several instances where you encounter such prompt messages where you are restricted in using the App Store and iTunes. These messages can come in the form of “Your account has been disabled in the App Store and iTunes.” Over observing this prompt message, it has been discovered that the assorted message is not related to the other common message of “This Apple ID has been disabled for security reasons.” The dynamics of getting restricted from using the App Store and iTunes are related to remaining balances that have stuck around for a while over your Apple account. Normally, you may have some billing issues that are prevailing over an unpaid iTunes or App Store order. This problem can be countered through simplistic methods under such conditions where you are having access to the account information and can check for the basic billing information or update the payment method following other settings that are associated with paying bills. Over failure in accessing your account, you are required to contact Apple Support and look for the billing and payment statements to clear up all the remaining dues. Apple has considered covering all the security protocols to perfection, where you have any prevailing Apple charges on your connected credit card that would lead to direct disabling of your Apple Account.
Even though Apple accounts can be generally disabled overpayment issues, there are several security reasons that might restrict you in discovering and buying different products across the App Store and iTunes. It is necessary for you, as an Apple user, to remain prompt of all the issues that are relating to your Apple Account.
Part 3. 2 tips to Unlock Disabled Apple Account
As this article provides you a detailed overview of the reasons that lead to your Apple Account getting disabled, this article also considers providing you a few tips and tricks that would guide you in efficiently unlocking your Apple Account and use it with ease.
Unlock disabled Apple account with Dr. Fone
The first remedy that can be effectively tested across such situations that involve disabled Apple accounts is relating a third-party platform. Dedicated third-party tools are quite common in the market and provide users with adequate services that allow them to unlock their devices with ease. Out of this uncountable list of platforms, this article introduces you to a specific platform that offers you unique features with a user-interface that can be easily apprehended. Dr. Fone – Screen Unlock (iOS) offers you the perfect environment that would lead you in reversing the disabling of your Apple Account easily. There are several reasons that make this platform the first choice of users all around the globe, which are declared as follows:
- You can easily unlock your Apple iPhone 14 Plus if you accidentally forget the password at any time.
- The platform protects the Apple iPhone 14 Plus or iPad from the disabled state.
- It can work for any iPhone, iPad, or iPod Touch model.
- The platform is compatible across the latest iOS versions.
- You are not required to have iTunes for unlocking your device.
- A very user-friendly platform with no requirements of technical expertise.
While you understand the basic reasons that lead you to the fact that Dr. Fone is the most appropriate choice to unlock your disabled Apple Account, the following steps explain the guide that would help you in unlocking your device with ease.
Step 1: Connect Devices and Launch
Initially, it is significant to download the platform and install it by following all the on-screen instructions effectively. Following this, you need to launch the platform and connect your Apple device via a USB connection.
Step 2: Select Screen Unlock
With the home window on your front, you are required to tap on the ‘Screen Unlock’ tool from the list of options to open a new screen. On the new screen, you are required to select the last option of “Unlock Apple ID” to initiate the process.

Step 3: Trust the Computer and Access Device Settings
Over the Apple Device, you need to select the option of “Trust” over the prompt that is received on the phone. Following this, you need to open the “Settings” of your device and initiate a reboot of your Apple device.

Step 4: Device Unlocks
The unlocking process immediately starts, and the platform executes the complete process automatically. A prompt message appears on the desktop showing the completion of the task. The device is now unlocked successfully.

Unlock disabled Apple account using Apple’s verification
The other method that can be effectively tested is Apple’s verification that would allow us to easily topple off all barriers that are involved in the process. To effectively unlock your disabled Apple Account using Apple’s verification process, you need to follow the steps described in detail.
Step 1: Open iForgot Website
You need to open the iForgot website to test the verification process. As you open the platform, provide the appropriate credentials over which your Apple device is operating. This is referred to as your Apple ID that has been used for the Apple iPhone 14 Plus device.
Step 2: Provide Personal Details
As you proceed with the verification, there are several personal details that are used to check the authenticity of the user. You are required to answer all security questions, provide all numbers if asked.
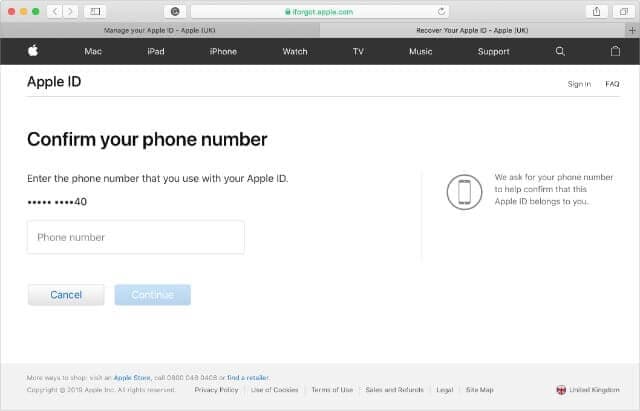
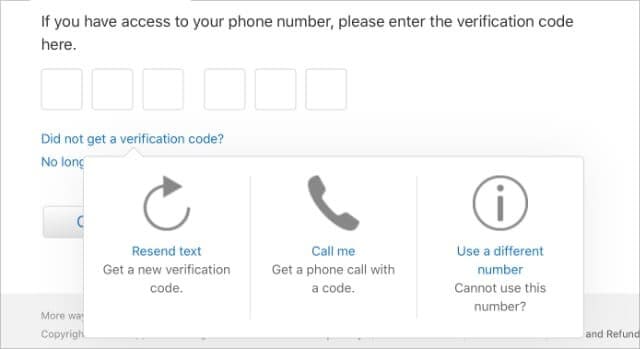
Step 3: Use the Verification Code
The platform will send a verification code that would allow you to unlock your device with the Recovery Key that is offered. Tap on “Unable to access your [device]“? to allow the platform to send a six-digit verification to the phone number that is attached to the Apple ID. You can simply use it along with the Apple ID password to unlock your account.
Conclusion
This article has provided you a detailed guide over the existing reasons that would have your Apple account disabled, followed by different tips that can be followed to cover your assorted problems efficiently.
Also read:
- [New] 2024 Approved __Purchasing Options__ Choosing Premium Vs. Standard Fixtures and Whether They Are Integrated or Retrofit Options Can Alter Costs
- [New] 2024 Approved Ranking the Finest Windows 11 Video Grabbers
- [New] Rhythmic Raptor Rumba
- [Updated] In 2024, Epicurean Entertainment Master the Craft with These 7 Food Film Techniques
- 16 Best Kickstart Videos on YouTube for Visibility Boost for 2024
- Discover The Leading Document and Photograph Scanning Devices of 2024
- Expert Advice on Solving Minecraft's Failure to Load Problems
- Exploring Politics & Paradise in Tropico #6'S Strategic Simulation
- How to Sign Out of Apple ID On Apple iPhone 12 Pro Max without Password?
- How to Unlock Apple ID On your Apple iPhone 6 Plus without Security Questions?
- In 2024, A Step-by-Step Guide to Finding Your Apple ID On Your Apple iPhone 6
- In 2024, Apple ID Locked or Disabled From iPhone XS? 7 Mehtods You Cant-Miss
- In 2024, How To Create an Apple Developer Account On Apple iPhone 7 Plus
- In 2024, How to Fix when Apple Account Locked On iPhone XR?
- In 2024, Turning Off Two Factor Authentication On Apple iPhone 14 Pro Max? 5 Tips You Must Know
- 무료 RW2 JPG 변환기 – 게스트비젼 이미지를 JavaSCRIPT을 사용하여 빠르고 신중한 방식으로 전환
- Title: In 2024, How To Remove the Two Factor Authentication From Apple iPhone 14 Plus
- Author: Alma
- Created at : 2024-10-19 16:19:44
- Updated at : 2024-10-20 18:34:23
- Link: https://apple-account.techidaily.com/in-2024-how-to-remove-the-two-factor-authentication-from-apple-iphone-14-plus-by-drfone-ios/
- License: This work is licensed under CC BY-NC-SA 4.0.