
In 2024, Protecting Your Privacy How To Remove Apple ID From Apple iPhone 11
Protecting Your Privacy: How To Remove Apple ID From Apple iPhone 11
Protecting your privacy is crucial in today’s digital age. Learning how to remove an Apple ID from an iPhone is necessary to safeguard your data. With easy access to emails, photos, and sensitive information, it’s a gateway to your private world. Aside from your Apple ID, read how to remove your iCloud account from your Apple iPhone 11.
Doing so ensures your device is no longer linked to your personal information. It reduces the risk of unauthorized access and data breaches. Don’t underestimate the importance of this security measure. Explore the article below to learn more.

Part I. When Consider to Remove an Apple ID From an iPhone
Removing an Apple ID from an iPhone is crucial for various reasons. Here are some important scenarios when removing an Apple ID is essential.

- Resale. Unlinking your Apple ID is essential to protect your personal data when selling or giving away your Apple iPhone 11. It prevents the new owner from accessing your photos, messages, and accounts. It safeguards your privacy and reduces the risk of data breaches.
- Switching Apple ID. Removing the old one ensures a smooth transition if you’re using a new Apple ID. If you use a different account, it also avoids confusion. That is vital for managing apps, media, and subscriptions associated with the new ID.
- Privacy and Security. Active Apple IDs on your device could lead to unauthorized access to your personal information. Removing them enhances the security of your Apple iPhone 11. It reduces the risk of data leaks, identity theft, and unwanted intrusion.
- **App Store and iTunes Changes.**Sometimes, App Store or iTunes changes may require you to reconfigure your Apple ID. Removing the old one can ease the process and prevent conflicts or errors.
- **Resolving Account Issues.**You’ll sometimes face account-related problems like forgotten passwords or locked accounts. Temporarily removing the Apple ID can aid in troubleshooting and resolving these issues.
- **Device Deactivation.**Removing the Apple ID is essential to prevent unauthorized usage or resale if your device is lost or stolen. This action adds an extra layer of security and peace of mind.
Part II. 7 Methods To Remove an Apple ID From Your Apple iPhone 11
If you need to remove an Apple ID from your Apple iPhone 11, there are several methods you can try. Below are seven common methods, including steps and options for when each method may be useful.
Using iPhone Settings To Sign Out
Signing out Apple ID via Settings is ideal if you can access the Apple ID password. It’s useful for personal account removal and if you want to keep your data intact.
- Step 1: Open Settings application on your Apple iPhone 11. Next, scroll down and tap your name at the top (Apple ID, iCloud, iTunes & App Store).

- Step 2: Scroll down and select Sign Out. Your’ll see your device asks you to enter your Apple ID password. Enter your credentials and tap Turn Off.
Restoring to Factory Settings
The method below erases all data on your Apple iPhone 11, including the Apple ID. Use this to start fresh, but be cautious, as all data will be lost. Therefore, ensure you’ve backed up your data to iCloud before starting.
- Step 1: Go to Settings on your Apple iPhone 11. Scroll down and tap General.

- Step 2: Go to Reset > Erase All Content and Settings. Then, enter your passcode and confirm.
Contact Apple Support
If you can’t access the Apple ID password and can’t sign out from the Apple iPhone 11 device, contact Apple Support. They may assist you in verifying your identity for account recovery or removal.

Contacting the Previous Owner (If Used or Given as a Gift)
If the Apple iPhone 11 was previously used or gifted, try contacting the previous owner. They can remove their Apple ID remotely from the Apple iPhone 11 device by signing in to their Apple account on iCloud.com.

Apple’s Account Recovery
Apple offers an account recovery process if you forget your Apple ID password. It involves verifying your identity and resetting your password. It can indirectly help in removing the Apple ID from your device. Here’s how:
- Step 1: Launch a web browser and visit the Apple ID account page (appleid.apple.com). Click Forgot password?.

- Step 2: Enter your Apple ID and click Continue. You’ll be presented with two options: Email authentication or Answer security questions. Choose the method you prefer or the one you have set up.

- Step 3: Follow the on-screen instructions to verify your identity. The step might involve answering security questions, providing a recovery email, or using two-factor authentication if set up.
Once your identity is verified, you can set a new Apple ID password. After resetting the password, use the new password to sign in on your Apple iPhone 11. This process indirectly helps in removing the Apple ID from the Apple iPhone 11 device.
Local Apple Store for In-Store Assistance
You can visit a local Apple Store for in-person assistance. They may help with Apple ID issues and guide you through removal.

Using a third-party tool is another option if all the common methods fail, or you want a user-friendly process. Using a reliable third-party tool can help safely remove an Apple ID from your Apple iPhone 11. The next section will show you how to remove an Apple ID from an iPhone using Wondershare Dr.Fone - Screen Unlock.
Part III. Final Solution to Removing Apple ID From iPhone
Dr.Fone - Screen Unlock is a reliable choice to help you remove an Apple ID. Here are the step-by-step instructions to help you through the process.
- Step 1: Download and install Dr.Fone Screen Unlock on your computer. Launch the app and click Toolbox > Screen Unlock.

- Step 2: Connect your Apple iPhone 11 to the computer using a USB cable. Next, choose Remove AppleID.

- Step 3: Follow the on-screen instructions provided by Dr.Fone - Screen Unlock. It will download the respective iOS firmware when the app starts the Apple ID removal process.

- Step 4: If the Apple ID is removed, there should be a screen prompt upon completion. Click Done to Try Again to repeat the process if unsuccessful.

Part IV. Pro Tip-Simplifying All Your Apple ID Concerns With a Reliable Solution
Dr.Fone Screen Unlock is a comprehensive tool that simplifies removing your Apple ID from your Apple iPhone 11. Below are some of the benefits of using the tool.
- Dr.Fone offers an intuitive and hassle-free solution. It’s suitable for users of all levels of technical expertise. The software streamlines the Apple ID removal process, saving you time and frustration.
- **Easy Process.**Just with the straightforward steps, you can effectively remove your Apple ID. Dr.Fone eliminates the complexity often associated with such tasks.
- **No Data Loss.**One of the most significant advantages of Dr.Fone Screen Unlock is that it allows you to remove the Apple ID without any data loss. Your apps, photos, and other valuable information remain intact, ensuring you don’t sacrifice your personal data for security.
Conclusion
Knowing how to remove your Apple ID from your Apple iPhone 11 is important in protecting your privacy and sensitive information. The article has outlined various methods, from standard procedures to advanced tools, to help you achieve that.
Whether you’re reselling your device, switching Apple IDs, or facing security concerns, taking action to remove your Apple ID from an iPhone is the key to safeguarding your data. For added convenience, consider Dr.Fone - Screen Unlock. It’s a great alternative when other methods fall short. Don’t wait; take control of your data security today.
How To Remove Phone Number From Your Apple ID on Your Apple iPhone 11?
After getting a new device, iPhone users must prepare a unique identification term for their Apple ID. Creating and setting up this ID is not different each time. Not to mention, one can use this one registered ID to access multiple Apple-based features like podcast subscriptions, apps, etc.
While the code is essential, it can become inactive if your registered phone number is no longer available or your change your number. You must remove the phone number from your Apple ID and add a new one.
Unsure about the steps, though? This post covers that, so read ahead.
Part 1. What is the Purpose of a Phone Number for Apple ID?
Typically, the email is not linked with Apple ID since the function is linked with phone numbers. Apple services-based communication is passed through the Messages app on the iPad, iPhone, iPod Touch, and the Apple ID.
Registering the phone number to Apple ID will allow you to get the necessary account-related messages on your device smoothly. If you do not sign in to iCloud with a SIM card, using Messages or the FaceTime app will become challenging. So, you need to know how to remove your phone number from iCloud or Apple ID when your registered number is inactive.
Part 2. Can You Remove the Trusted Phone Number from Apple ID?
If you want to learn how to remove the number from Apple ID and if possible, the answer is yes and quite quickly. Apple allows users switching to another carrier to remove their already authorized and linked phone number from the Apple ID. This is helpful for two-factor authentication phases so that the Apple iPhone 11 user can avoid getting fully locked out from the account.
Part 3. 3 Ways to Remove a Phone Number from Your Apple ID
If you are wondering about the steps for how to remove an old phone number from Apple ID, there are different styles available. Here are the main processes you can utilize.
Method 1. Remove Phone Number via iPhone/iPad’s Settings
In the matter of how to remove a phone number from an Apple ID, the most effortless process is to go into the Settings app and delete it from there. This is possible if you have your registered phone with you and the Apple ID. Simple access and remove the number.
Step 1: Access the Settings option on your iPad or iPhone device.
Step 2: Tap on the Apple account ID.
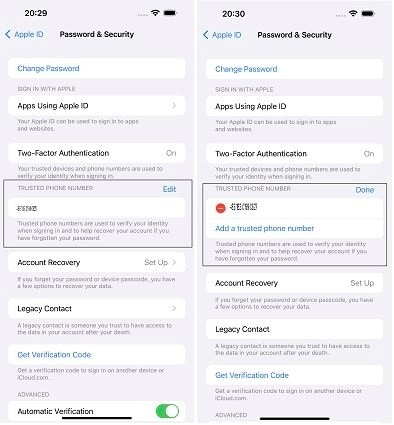
Step 3: Reach the Password & Security section.

Step 4: You will see the Edit icon on the right-hand side. Click on it and then tap on the “Add a Trusted Phone Number” option.
Step 5: Add the Apple iPhone 11 Passcode > new phone number.
Step 6: Select Edit again to delete the old phone number. Press Done.
Method 2. Remove the Phone Number Using a Mac
Users can turn the phone number OFF that they registered to Apple ID through their Mac device. In this context, accessing the FaceTime or Messages app is essential in the context of how to remove phone number from Apple ID via Mac steps.
Step 1: Access the FaceTime or Messages app. Sign in using the same Apple ID you use for the apps on your Apple iPhone 11.
Step 2: Go to Messages and tap on the Settings option. Then, choose the iMessage selection.
For Facetime, click on the FaceTime option and go to Preferences > General.
Step 3: From the list, choose the tickmark beside the phone number to uncheck it. That will deactivate the phone number for your account.

Method 3: Remove Phone Number via Change Apple ID Password
It is possible to change the password for Apple ID in the matter of how to remove a phone number from Apple ID. Adjusting the phone number is the natural next step when you carry out this step, so you can remove the number and use another at this stage.
Step 1: On your iPad and iPhone, tap on the Settings menu.
Step 2: Tap on the icon with your name and click on the Password & Security option.
Step 3: Select the Change Password option.

Step 4: The prompt to add the current Apple ID password, or the passcode, will appear. Add it to confirm, and then insert your new password.
Step 5: Hit the Change Password button.
Step 6: You will get logged out of the account. Sign in with the new password, and the phone number will get removed.
Part 4. How to Remove Apple ID without Password?
All the methods mentioned help remove phone numbers associated with the Apple ID but still require you to access the Apple iPhone 11 device. What if the Apple iPhone 11 device is locked and the necessary details are unavailable, like the password? You can use Dr.Fone - Screen Unlock (iOS) to remove the Apple ID by bypassing the passcode.
It is possible to remove phone number from Apple ID by accessing the Apple iPhone 11 device with simple taps through this app. You have to make the Find My iPhone feature active, and the app will bypass the Apple ID password within seconds.
Best Features:
- Supported on various iOS and iPadOS devices.
- Remove all types of lock screens, like Apple ID, Face ID, Touch ID, Screen Time Passcode, etc.
- Fast process of screen and password bypassing.
How to use it?
Step 1: Download/install/launch the app on Mac/Windows. Select Screen Unlock when the app opens on the interface.
Step 2: Choose the “Remove Apple ID” option and add the passcode, as instructed. Allow the system to trust the Apple iPhone 11 device for authentication through the following prompt.

Step 3: Put the Apple iPhone 11 device into recovery mode following the on-screen instructions. Then, restart the Apple iPhone 11 device. This will automatically kickstart the unlocking process and will take some seconds.

Step 4: Finally, see that Apple ID’s device has been unlocked on the next page.
Video Guide: How to Remove Apple ID without Password?
Part 5. FAQs about Apple ID Phone Number
- How to Add a Trusted Phone Number to Your Apple ID?
The steps for adding the trusted phone number to Apple ID are accessible through Settings > Apple ID icon/name > Password & Security > Edit icon beside the phone number already in use. Click on the “Add a trusted phone number” option and insert the new one. Confirm with your device passcode at the end.
- Why Isn’t My Apple ID Accepting My Apple iPhone 11 Number?
Apple ID accepts phone numbers for linking for two-factor authentication. The local number in the region is needed for pairing the number and Apple ID.
- Does Changing Apple ID affect Phone Number?
No, the Apple ID and phone number are not connected as features or codes. So, adjusting the Apple ID will not affect your device’s phone number.
Conclusion
Indeed, there are multiple methods you can take to remove the phone number registered to your Apple ID successfully. They are accessible in multiple ways through Mac, iPad, or iPhone settings. If you forgot the Apple ID, you could even remove it using Dr.Fone - Screen Unlock (iOS) . Ultimately, choose the process to trust based on your specific needs.
How to Change Credit Card on Your Apple iPhone 11 Apple ID and Apple Pay
Apple’s ecosystem offers convenience with services like Apple ID and Apple Pay. Managing your digital life has never been more convenient. In this interconnected system, your credit card plays a crucial role. It’s essential to understand that your credit card details can be associated with both your Apple ID and Apple Pay, each serving unique functions.
In this comprehensive guide, we’ll learn how to change the credit card on Apple ID and Apple Pay. Additionally, we will introduce you to a helpful tool for unlocking your Apple ID if you ever encounter access issues.
Part 1: 3 Ways To Change the Credit Card on Apple ID
We’ll explore 3 different methods to change the credit card details associated with your Apple ID in this section. These methods allow you to update your payment information effortlessly, ensuring uninterrupted access to Apple services.
Way 1: Update Credit Card on iPhone/iPad
The first method involves updating your payment information directly from your Apple iPhone 11 or iPad’s settings. This method is convenient for those who prefer managing their Apple ID details on their iOS devices. Here is how to change your credit card on Apple ID via iPhone or iPad:
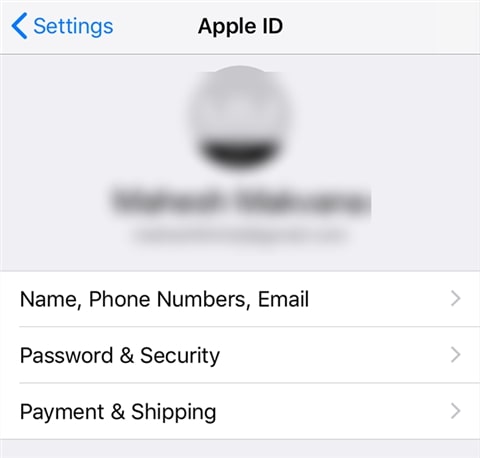
- Step 1: Begin by launching the Settings app on your device and then touch your name to enter your Apple ID settings. Afterward, choose the “Payment & Shipping” option to move ahead. In addition, log in using your Apple ID credentials if necessary.

- Step 2: Next, press “Add Payment Method” and provide information for your new payment method. Once you’ve entered all the required details, tap “Done” to confirm and save your updates.

- Step 3: To remove the old payment method, tap “Edit.” Now, locate the old payment method you want to delete and tap the “Red Delete” button next to it. Confirm the deletion by tapping “Delete.”

Way 2: Change Credit Card on Mac
Now, we shift our focus to those who prefer managing their payment information on their Mac. Changing your credit card details from Mac’s settings is a straightforward and easy process. Therefore, using the following steps, you can learn how to change your credit card on Apple ID without any errors:
- Step 1: Start by opening the App Store on your device. Then, in the bottom-left corner of the App Store, tap on your name and proceed to access “Account Settings.”

- Step 2: Locate the “Apple ID Summary” section in the “Account Settings” menu and select the “Manage Payments” option next to it. After this, introduce a fresh payment method by opting for the “Add Payment” option.

- Step 3: This action will prompt you to input the details of your new payment method, including credit card information. After you’ve provided the required information, select “Done” to save your newly added payment method.

- Step 4: If you want to remove the old method linked to your Apple ID, click “Delete” in front of it. Now, tap “Delete” to remove this payment method from your Apple account.

Way 3: Update the Credit Card Details on Windows PC
To update the credit card information linked to your Apple ID, we’ll now provide instructions specifically tailored for Windows PC users. This approach offers flexibility for individuals looking to maintain accurate payment details. With the help of the simplified steps given below, you can easily change the credit card on the Apple account:
- Step 1: Access iTunes on your computer and click on “Account” from the menu bar that is given at the top. Afterward, a drop-down menu will appear on which you need to select “View My Account.”

- Step 2: Following this, click on “Manage Payments,” and your current payment methods that are listed will be shown to you. There, click on “Add Payment” to add a new payment method quickly.

- Step 3: After clicking on this option, you can enter details of your new payment method. Once the details are entered successfully, click “Done” to save the changes, and you are good to go. Tap the “Edit” option in front of the old credit card and choose “Remove Payment Method” to remove it from your Apple ID.

Pro Tip: Locked Out Your Apple ID? Get It Unlocked Instantly
While learning how to change a credit card on your Apple Account, you encounter an unexpected hurdle - your Apple ID has become locked. This can undoubtedly be a frustrating and troublesome scenario, considering the crucial role your Apple ID plays within the Apple ecosystem. Nevertheless, there’s no cause for alarm, as we’ve got a solution ready to promptly unlock your Apple ID and have you back on course.
The solution is Wondershare Dr.Fone, a tool that is able to remove Apple ID from your iOS devices without needing the password. It is a comprehensive tool that has the ability to remove your Apple ID from your device permanently. This tool works its magic in removing Apple ID, whereas other tools fail when the Find My feature is enabled.
Dr.Fone - Screen Unlock (iOS)
Unlock iPhone/iPad Lock Screen Without Hassle.
- Simple, click-through, process.
- Unlock screen passwords from all iPhone and iPad.
- No tech knowledge required, everybody can handle it.
- Supports the latest iOS version fully!


4,395,218 people have downloaded it
Key Features of Wondershare Dr.Fone
- Unlock iPhone, iPad, and iPod touch by removing various types of lock screens, ensuring access to your device.
- Gain access to your Apple device by bypassing the iCloud activation lock and Apple ID verification without requiring the password.
- Safely bypass Mobile Device Management (MDM) restrictions and Screen Time limitations without the risk of losing any data.
Simplified Steps To Remove Apple ID on Your iOS Device via Wondershare Dr.Fone
Following are the steps to unlock and remove old Apple ID from your iOS device using Wondershare Dr.Fone:
- Step 1: Access the Screen Unlock Tool
To initiate the Apple ID unlocking process, you will need to install and launch Wondershare Dr.Fone. Then, choose “Toolbox” from the left bar and go on to click “Screen Unlock.” Select “iPhone” as your device type, and since we are removing Apple ID, click “Remove Apple ID.”
- Step 2: Proceed to Activate Recovery Mode
Now is the time to connect your iOS device to the computer using a respective cable and click “Unlock Now.” Now, Wondershare Dr.Fone will ask you about having a screen lock and 2FA on the iOS device. The answer needs to be affirmative to proceed further. When done with it, enable Recovery Mode on your iOS device with the help of on-screen instructions.

- Step 3: Remove the Apple ID From Your iOS Device
Wondershare Dr.Fone will detect your device model once it is in Recovery Mode. Choose a system version to download by clicking “Start.” Once it has been downloaded and verified, tap “Unlock Now.” It will lead to a prompt warning about data loss. Here, enter “000000” to confirm your choice and click “Unlock.” Dr.Fone will go on to remove Apple ID from your device.

Part 2: 3 Methods To Change the Default Credit Card on Apple Pay
In our exploration of managing your credit card within the Apple ecosystem, we now focus on changing the default credit card linked to your Apple Pay. Apple Pay stands as a robust digital wallet solution, and understanding the process of updating your payment details is crucial for ensuring a secure user experience. Here, we will explore three approaches on how to change credit card on Apple Pay:
Method 1: Change the Default Card on the iPhone
We start by exploring how to change the default credit card on Apple Pay using your Apple iPhone 11. This method is particularly handy for iPhone users who want to ensure their preferred payment card is set as the default option. These are the instructions for setting a card as the default card for Apple Pay:
Instructions: On your Apple iPhone 11, access and open the Wallet app. Inside the app, locate the payment card you wish to set as your default. Touch and hold the selected payment card. Drag the card to the forefront, positioning it ahead of your other cards.

Method 2: Set New Card as Default on iPad or Mac
Whether you prefer using your iPad for managing your payment methods or you’re on your Mac, you can easily set a new card as the default option. Use the following instructions to set a credit card as the default card on Apple Pay:
For Mac
Instructions: Access System Settings through the Dock or Apple menu and move to Wallet & Apple Pay. Afterward, once you’re in Wallet & Apple Pay, choose a card from the “Default Card” settings and set it as the default card.

For iPad
Instructions: Navigate to Settings on your iPad and move to “Wallet & Apple Pay.” Here, scroll down to “Transaction Defaults” and press “Default Card.” Then, choose a card from the list to set it as your default card.

Method 3: Use Apple Watch to Change Default Card
The last stop on our journey to manage your default credit card on Apple Pay is the Apple Watch. If you are an Apple Watch user, then these instructions can assist you in how to change your credit card on Apple Pay:
Instructions: Access and launch the Apple Watch app on your Apple iPhone 11 and navigate the “My Watch” tab. There, tap on “Wallet & Apple Pay” within My Watch tab and scroll down in it to find the section labeled “Transaction Defaults.” In this section, you’ll find the “Default Card” option. Simply tap on it to select the card you wish to set as the default.

Conclusion
To summarize, we’ve navigated the complex world of how to change the credit card on Apple account. We’ve explored two critical aspects: changing the credit card on your Apple ID and altering the default credit card on Apple Pay. It’s important to understand that your credit card details for Apple ID and Apple Pay are distinct. Thus, it’s crucial to know how to update both to ensure a secure digital experience.
We explored many methods to change the credit card on Apple ID and Apple Pay, depending on your device and preference. Furthermore, there are unfortunate instances where you find yourself locked out of your Apple ID. For these, we introduced a valuable tool: Wondershare Dr.Fone - iOS Screen Unlock. This tool can efficiently unlock your Apple ID without causing any data loss, ensuring you can regain access to your account promptly.
Also read:
- [New] 2024 Approved Building Impressive Instagram Story Bookmarks
- [New] 2024 Approved The Essential Toolkit for YouTube Video Editors Everywhere
- [New] Finding Your Next Big Idea in Iconography at These 6 Places
- [Updated] In 2024, Embedding Audio in Instant Storytelling Platforms
- 1. Complete Guide: Streaming the Best of Olympic Aquatics
- 2 Ways to Monitor Vivo Y36i Activity | Dr.fone
- 2024 Approved Explore These 12 Websites Offering Free Stock Photo Collections
- Apple ID Unlock On iPhone 12 Pro Max? How to Fix it?
- How to Fix Enter Key Not Working on Windows
- How to Unlock Apple ID From your Apple iPhone 13 Pro without Security Questions?
- In 2024, Apple ID Locked or Disabled From Apple iPhone 7 Plus? 7 Mehtods You Cant-Miss
- In 2024, How to Change Credit Card on Your Apple iPhone 11 Pro Max Apple ID and Apple Pay
- In 2024, How to Change Credit Card on Your Apple iPhone 6s Plus Apple ID and Apple Pay
- In 2024, Top-Notch Solutions for Disabled Apple ID From Apple iPhone XS Max Making It Possible
- In 2024, Troubleshooting Error Connecting to the Apple ID Server From Apple iPhone X
- In 2024, Why Apple Account Disabled From your iPhone 8? How to Fix
- Overcoming the Blue Screen Challenge in HellDivers 2 - Top Troubleshooting Tips
- Title: In 2024, Protecting Your Privacy How To Remove Apple ID From Apple iPhone 11
- Author: Alma
- Created at : 2024-12-21 03:31:15
- Updated at : 2024-12-27 00:11:46
- Link: https://apple-account.techidaily.com/in-2024-protecting-your-privacy-how-to-remove-apple-id-from-apple-iphone-11-by-drfone-ios/
- License: This work is licensed under CC BY-NC-SA 4.0.