
In 2024, Protecting Your Privacy How To Remove Apple ID From iPhone SE
Protecting Your Privacy: How To Remove Apple ID From Apple iPhone SE
Protecting your privacy is crucial in today’s digital age. Learning how to remove an Apple ID from an iPhone is necessary to safeguard your data. With easy access to emails, photos, and sensitive information, it’s a gateway to your private world. Aside from your Apple ID, read how to remove your iCloud account from your Apple iPhone SE.
Doing so ensures your device is no longer linked to your personal information. It reduces the risk of unauthorized access and data breaches. Don’t underestimate the importance of this security measure. Explore the article below to learn more.

Part I. When Consider to Remove an Apple ID From an iPhone
Removing an Apple ID from an iPhone is crucial for various reasons. Here are some important scenarios when removing an Apple ID is essential.

- Resale. Unlinking your Apple ID is essential to protect your personal data when selling or giving away your Apple iPhone SE. It prevents the new owner from accessing your photos, messages, and accounts. It safeguards your privacy and reduces the risk of data breaches.
- Switching Apple ID. Removing the old one ensures a smooth transition if you’re using a new Apple ID. If you use a different account, it also avoids confusion. That is vital for managing apps, media, and subscriptions associated with the new ID.
- Privacy and Security. Active Apple IDs on your device could lead to unauthorized access to your personal information. Removing them enhances the security of your Apple iPhone SE. It reduces the risk of data leaks, identity theft, and unwanted intrusion.
- **App Store and iTunes Changes.**Sometimes, App Store or iTunes changes may require you to reconfigure your Apple ID. Removing the old one can ease the process and prevent conflicts or errors.
- **Resolving Account Issues.**You’ll sometimes face account-related problems like forgotten passwords or locked accounts. Temporarily removing the Apple ID can aid in troubleshooting and resolving these issues.
- **Device Deactivation.**Removing the Apple ID is essential to prevent unauthorized usage or resale if your device is lost or stolen. This action adds an extra layer of security and peace of mind.
Part II. 7 Methods To Remove an Apple ID From Your Apple iPhone SE
If you need to remove an Apple ID from your Apple iPhone SE, there are several methods you can try. Below are seven common methods, including steps and options for when each method may be useful.
Using iPhone Settings To Sign Out
Signing out Apple ID via Settings is ideal if you can access the Apple ID password. It’s useful for personal account removal and if you want to keep your data intact.
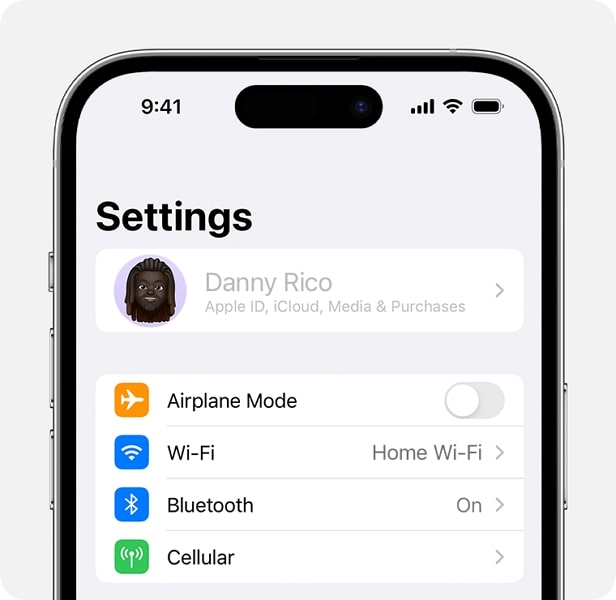
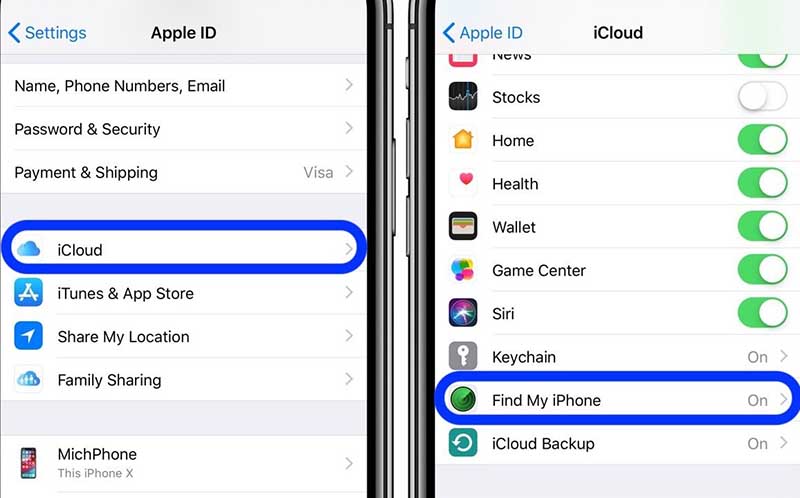
- Step 1: Open Settings application on your Apple iPhone SE. Next, scroll down and tap your name at the top (Apple ID, iCloud, iTunes & App Store).

- Step 2: Scroll down and select Sign Out. Your’ll see your device asks you to enter your Apple ID password. Enter your credentials and tap Turn Off.
Restoring to Factory Settings
The method below erases all data on your Apple iPhone SE, including the Apple ID. Use this to start fresh, but be cautious, as all data will be lost. Therefore, ensure you’ve backed up your data to iCloud before starting.
- Step 1: Go to Settings on your Apple iPhone SE. Scroll down and tap General.

- Step 2: Go to Reset > Erase All Content and Settings. Then, enter your passcode and confirm.
Contact Apple Support
If you can’t access the Apple ID password and can’t sign out from the Apple iPhone SE device, contact Apple Support. They may assist you in verifying your identity for account recovery or removal.

Contacting the Previous Owner (If Used or Given as a Gift)
If the Apple iPhone SE was previously used or gifted, try contacting the previous owner. They can remove their Apple ID remotely from the Apple iPhone SE device by signing in to their Apple account on iCloud.com.

Apple’s Account Recovery
Apple offers an account recovery process if you forget your Apple ID password. It involves verifying your identity and resetting your password. It can indirectly help in removing the Apple ID from your device. Here’s how:
- Step 1: Launch a web browser and visit the Apple ID account page (appleid.apple.com). Click Forgot password?.

- Step 2: Enter your Apple ID and click Continue. You’ll be presented with two options: Email authentication or Answer security questions. Choose the method you prefer or the one you have set up.

- Step 3: Follow the on-screen instructions to verify your identity. The step might involve answering security questions, providing a recovery email, or using two-factor authentication if set up.
Once your identity is verified, you can set a new Apple ID password. After resetting the password, use the new password to sign in on your Apple iPhone SE. This process indirectly helps in removing the Apple ID from the Apple iPhone SE device.
Local Apple Store for In-Store Assistance
You can visit a local Apple Store for in-person assistance. They may help with Apple ID issues and guide you through removal.

Using a third-party tool is another option if all the common methods fail, or you want a user-friendly process. Using a reliable third-party tool can help safely remove an Apple ID from your Apple iPhone SE. The next section will show you how to remove an Apple ID from an iPhone using Wondershare Dr.Fone - Screen Unlock.
Part III. Final Solution to Removing Apple ID From iPhone
Dr.Fone - Screen Unlock is a reliable choice to help you remove an Apple ID. Here are the step-by-step instructions to help you through the process.
- Step 1: Download and install Dr.Fone Screen Unlock on your computer. Launch the app and click Toolbox > Screen Unlock.

- Step 2: Connect your Apple iPhone SE to the computer using a USB cable. Next, choose Remove AppleID.

- Step 3: Follow the on-screen instructions provided by Dr.Fone - Screen Unlock. It will download the respective iOS firmware when the app starts the Apple ID removal process.

- Step 4: If the Apple ID is removed, there should be a screen prompt upon completion. Click Done to Try Again to repeat the process if unsuccessful.

Part IV. Pro Tip-Simplifying All Your Apple ID Concerns With a Reliable Solution
Dr.Fone Screen Unlock is a comprehensive tool that simplifies removing your Apple ID from your Apple iPhone SE. Below are some of the benefits of using the tool.
- Dr.Fone offers an intuitive and hassle-free solution. It’s suitable for users of all levels of technical expertise. The software streamlines the Apple ID removal process, saving you time and frustration.
- **Easy Process.**Just with the straightforward steps, you can effectively remove your Apple ID. Dr.Fone eliminates the complexity often associated with such tasks.
- **No Data Loss.**One of the most significant advantages of Dr.Fone Screen Unlock is that it allows you to remove the Apple ID without any data loss. Your apps, photos, and other valuable information remain intact, ensuring you don’t sacrifice your personal data for security.
Conclusion
Knowing how to remove your Apple ID from your Apple iPhone SE is important in protecting your privacy and sensitive information. The article has outlined various methods, from standard procedures to advanced tools, to help you achieve that.
Whether you’re reselling your device, switching Apple IDs, or facing security concerns, taking action to remove your Apple ID from an iPhone is the key to safeguarding your data. For added convenience, consider Dr.Fone - Screen Unlock. It’s a great alternative when other methods fall short. Don’t wait; take control of your data security today.
Apple ID is Greyed Out On Apple iPhone SE: How to Bypass?
An Apple ID functions as a vital passageway to a diverse array of Apple services. These encompass iCloud, the App Store, iTunes, and other offerings. It serves as a unified account that enables users to connect with different Apple products and services. Yet, even with its significance, Apple ID users can encounter various issues that may disrupt their experience.
One such problem is the daunting phenomenon of the Apple ID being greyed out. It also prevents users from accessing essential features and services. Thankfully, solutions to these issues do exist. Understanding the root cause and implementing the appropriate solution is crucial. This article aims to delve into one of the most effective methods to tackle the troubling problem of the Apple ID greyed-out issue.
Part 1: Why Did the Apple ID Greyed Out? Coming to the Reasons
Dealing with a greyed-out Apple ID can undoubtedly lead to a frustrating experience. It also hinders your access to essential Apple services. Before delving into the solutions, understanding why Apple ID is grayed out is essential. Several factors can contribute to the greying out of your Apple ID, and some of these are given below:
1. Apple ID Signed In on Another Device
One common reason for the Apple ID to appear greyed out is when it is actively signed in on another device. This often happens when users forget to log out of their account on a different Apple device. It leads to a conflict that prevents the smooth functioning of the Apple ID.
2. Incorrect Password Attempts
Multiple failed attempts at entering the Apple ID password can trigger security measures. It can temporarily disable the account, causing it to grey out. This security measure is created to safeguard the account against unauthorized entry. Nevertheless, it may limit access to the Apple ID in the event of multiple incorrect password entries.
3. Network Connection Issues
Fluctuating or unstable network connections can also contribute to the Apple ID greying out. When the Apple iPhone SE device is unable to establish a stable connection with Apple’s servers, it may manifest as an unresponsive or greyed-out Apple ID. Thus restricting access to various Apple services and features.
4. Software Glitches or Bugs
Software inconsistencies within the Apple iPhone SE device’s operating system can lead to temporary malfunctions. That results in the greying out of the Apple ID. Such glitches can arise due to software updates or incomplete installations. It can also happen due to conflicts between different applications.
5. Apple Server Maintenance or Outage
Periodic maintenance or unexpected server outages on Apple’s end can disrupt the functionality of the Apple ID. As a result, you experience temporary Apple ID grey-out issues. During such occurrences, users may experience difficulties accessing their Apple ID.
Part 2: Finding the Proper Solutions to Apple ID Greyed Out [Highly Effective]
Encountering a greyed-out Apple ID can be a daunting experience. However, there exist many resolutions to this issue that can be implemented. This article aims to guide you through several effective remedies that can help resolve the problem. By following the solution outlined below, you can fix the Apple ID greyed out on iPad:
Solution 1: Checking Screen Time Passcode Settings
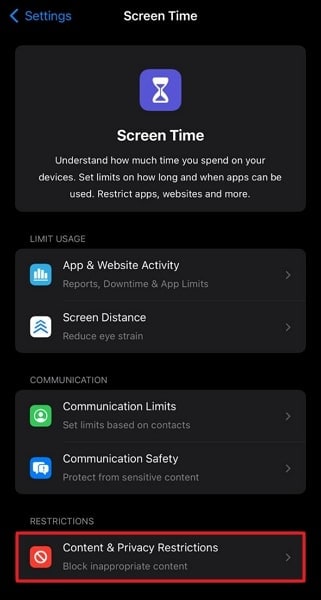
In some instances, the greying out of the Apple ID can be attributed to specific settings, such as the Screen Time passcode. Checking and adjusting the Screen Time passcode settings can help ensure your Apple ID is not inadvertently restricted. Follow the steps below to check and manage your Screen Time passcode settings for fixing the Apple ID that is greyed out in the settings option:
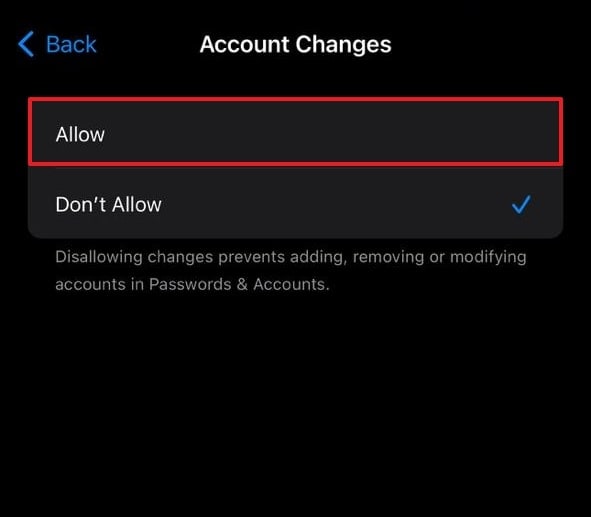
- Step 1: Access the Settings app on your Apple iPhone SE and tap “Screen Time.” Here, select “Content & Privacy Restrictions” and move down to the “Allow Changes” section.
- Step 2: Now, navigate to “Account Changes” and ensure it is set to “Allow.” Afterward, check if the Apple ID is working normally again.
Solution 2: Checking Apple System Status Page
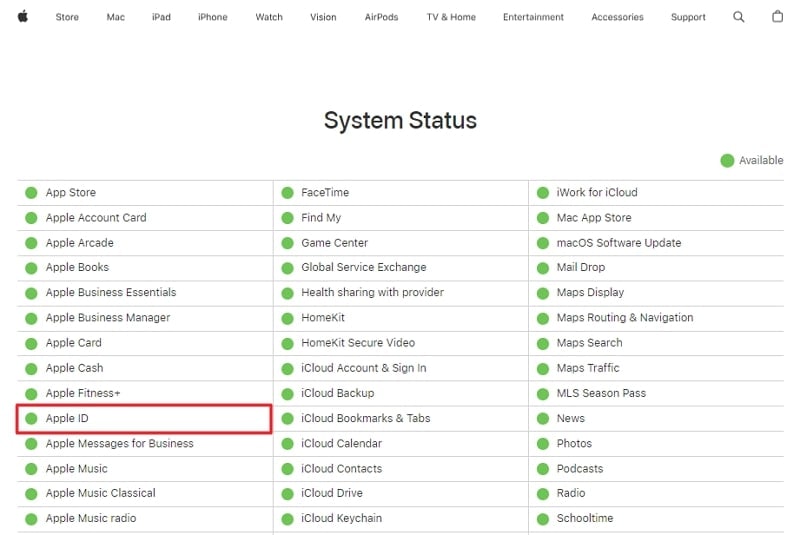
Checking the Apple System Status page can help determine if the problem lies at Apple’s end. The greying-out issue can be related to any ongoing server maintenance or outage. By staying informed about the status of Apple services, you can ensure that you can take the necessary steps. Follow these steps to check the Apple System Status page to check the Apple ID greyed-out status:
- Step 1: Start by accessing a web browser and opening the Apple System Status page. Here, look for the entry named “Apple ID.”
Step 2: When the indicator is green, there are no issues at the server’s end. Yet, if it turns orange or red, it signifies a server problem, and you’ll need to be patient until it’s resolved.
Solution 3: By Turning Off Screen Time
If the greying out issue persists and is related to Screen Time settings, disabling Screen Time can serve as a potential solution. By turning off Screen Time, you can potentially resolve any conflicts or restrictions that might be causing the greying out of your Apple ID.
This simple solution can help restore full access to your Apple ID and associated services. To disable Screen Time and fix Apple ID greyed out on iPad, follow these simplified step-by-step instructions:
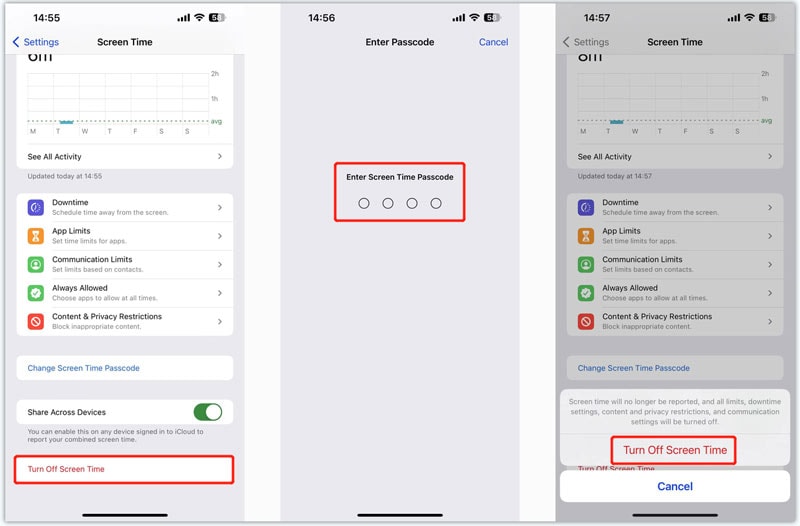
- Step 1: From the Settings of your Apple iPhone SE, access “Screen Time.” On the following screen, scroll to the last option, “Turn Off Screen Time.”
- Step 2: Now tap “Turn Off Screen Time” and provide the screen time passcode for confirmation. Finally, confirm the action by selecting “Turn Off Screen Time” in the pop-up confirmation message.
Solution 4: Restarting the iOS Device
Performing a simple restart on your iOS device can resolve various software-related glitches. It also includes glitches behind the greying out of the Apple ID. By restarting your iOS device, you can refresh the system’s processes. This simple yet effective solution can help restore normal functionality to your device. Follow these steps to restart your iOS device to fix the Apple ID grayed-out problem:
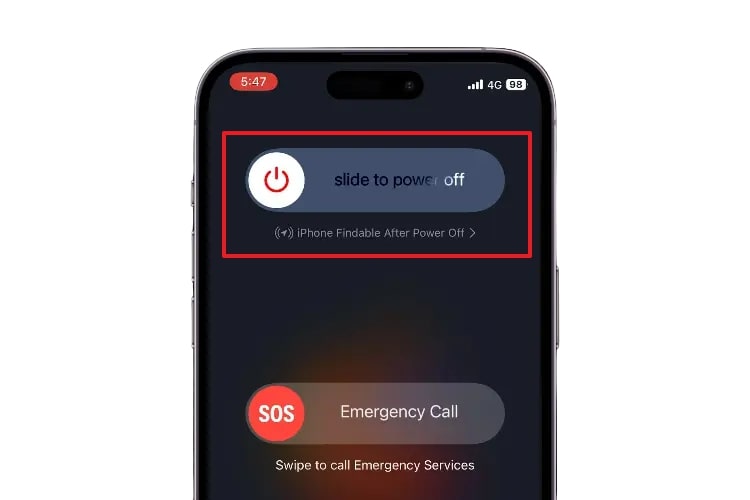
- Step 1: Press and hold the Power button and either the Volume Up or Volume Down button simultaneously. Keep holding these two iDevice buttons until the “Slide to Power Off” slider appears.
- Step 2: Drag the slider towards the right to power off your device. Allow a few moments to pass before using the “Side” button to switch on your Apple iPhone SE.
Solution 5: Checking Internet Connectivity Status on Device
Ensuring a consistent and reliable internet connection is crucial for the optimal performance of your Apple ID. If you’re utilizing Wi-Fi, be sure to connect to a dependable network to guarantee seamless functionality. When utilizing cellular data, verify your signal strength and confirm the availability of an active data plan. A stable internet connection is of utmost importance for the effective operation of your Apple ID.
Solution 6: Reset All Settings Within iOS Device
Resetting all settings on your iOS device can effectively resolve persistent software-related issues. This means if conflicts in settings where the root of Apple ID is grayed out, the problem would be resolved. Be aware that initiating this action will restore all settings to their original defaults while preserving your data. Follow the steps outlined below to reset all settings on your iOS device:
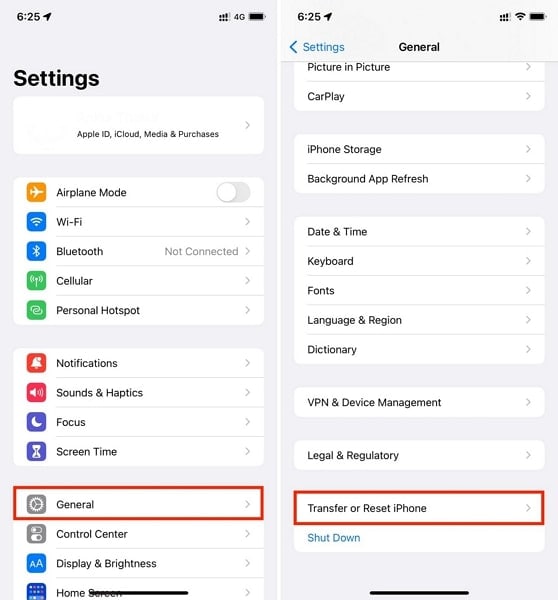
- Step 1: To start, you access the Settings app and navigate to the “General” settings tab. There, scroll to the bottom till the last option and tap on “Transfer or Reset iPhone.”
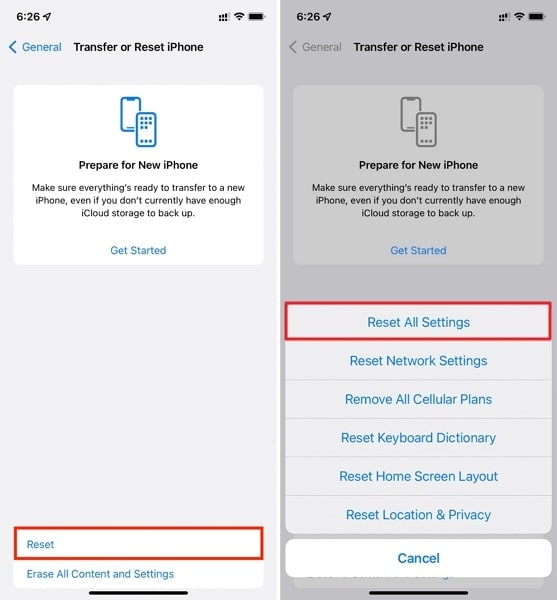
- Step 2: Navigate to the next screen and tap “Reset.” From there, choose the option for “Reset All Settings.” A prompt will appear, requesting your device passcode for verification. Once entered, proceed with the “Reset All Settings” to finalize the process.
Solution 7: Contact Apple Customer Support
If the previous solutions have not resolved the issue of your Apple ID greying out. It may be necessary to seek help from Apple’s customer support. Apple’s support team can provide personalized guidance and troubleshooting steps.
By contacting Apple’s customer support, you can receive expert help. The support team can offer tailored solutions and further guidance. This can help you regain access to your Apple ID and associated services.
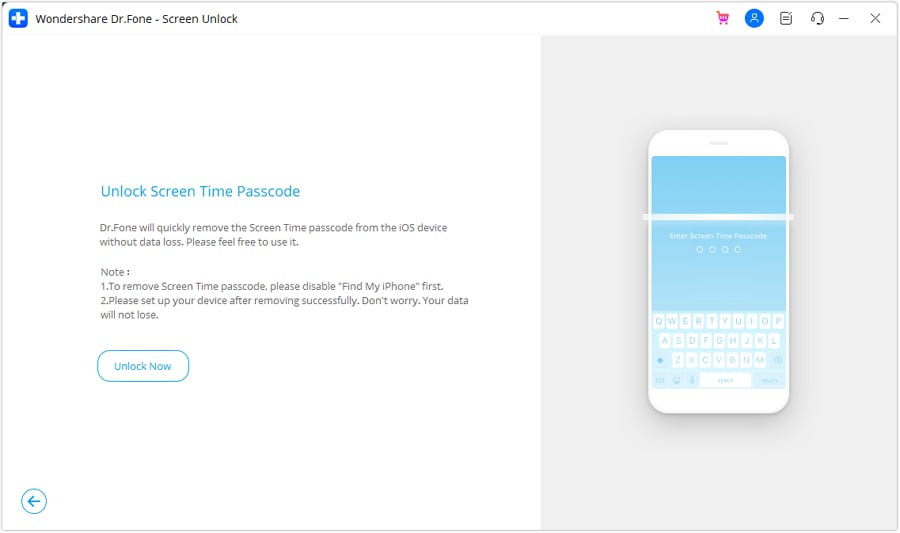
Part 3: Advanced Solution: Try Wondershare Dr.Fone Screen Unlock if the Previous Solutions Are Ineffective
You have implemented all the methods mentioned above, and your Apple ID greyed-out issue is not resolved. It means you need a more efficient solution. Wondershare Dr.Fone is one of the most effective and solid solutions to fix the Apple ID greyed-out issue. Without resolving this problem, your Apple ID would be of no use; that is the main functional unit in your iOS devices.
Dr.Fone does this resolving procedure through its powerful Screen Time Passcode unlock feature. It is also a primary remedy to unlock the locked screen of your Apple devices. Moreover, this tool can bypass the iCloud activation lock and Apple ID without any password requirement. Through this Screen Unlock tool, you will be able to resolve your issue quickly and without any technical knowledge.
Key Features of Wondershare Dr.Fone
Dr.Fone - Screen Unlock (iOS)
Unlock iPhone/iPad Lock Screen Without Hassle.
- Simple, click-through, process.
- Unlock screen passwords from all iPhone and iPad.
- No tech knowledge required, everybody can handle it.
- Supports the latest iOS version fully!


4,395,217 people have downloaded it
- This enhanced and powerful iDevice toolkit can also help unlock Apple ID for iOS 17 devices.
- It can also bypass the MDM or remove the MDM profiles to allow you to use your Apple iPhone SE normally.
- You can unlock your Apple iPhone SE or iPad screen lock without a password if you can’t remember it.
Fix Apple ID Greyed Out Issues by Unlocking Forgotten Screen Time Passcode
Wondershare Dr.Fone is an easy-to-use software with a simple guide to fix your Apple device issues. Here is how to fix Apple ID greyed-out issues with Wondershare Dr.Fone - Screen Unlock (iOS):
- Step 1: Access the Screen Unlock Tool
You need to start the process by opening Wondershare Dr.Fone and moving towards the “Toolbox” section. At that location, select “Screen Unlock” from the options provided. Then, select the “iOS” option from the window to define the type of your device.
- Step 2: Start the Unlocking Process and Connect Your iDevice
You will find yourself in a list of options from where you need to continue with the “Unlock Screen Time Passcode” option. Next, connect your iOS device to the computer via a USB cable. Then, wait for Wondershare Dr.Fone to detect your Apple iPhone SE.

- Step 3: Unlock Your iDevice and Toggle off Find My Feature
After the connection, select the “Unlock Now” button to unlock your screen time passcode, and turn off the “Find My iPhone” feature by following the on-screen instructions. Completion of the screen time passcode unlocking process will start to display after clicking the “OK” button. Finally, after the completion message, hit “Done” to end the entire operation.
Final Words
Throughout this article, we have explored the perplexing issue of the Apple ID grayed out in settings. It can hinder the smooth functioning of your iOS device and access to various Apple services. By going through the root causes behind this problem, we have outlined several solutions. These can help users address the issue and regain access to their Apple ID.
We recommend that users diligently follow the steps provided in each solution. So that they can identify and rectify the specific cause of the problem. However, in cases where the issue persists, we highlighted the significance of using Wondershare Dr.Fone. It offers a specialized Screen Time Passcode Unlock feature. Moreover, this ensures the smooth operation of Apple ID and associated services.
How to Delete iCloud Account On Apple iPhone SE without Password?
If you own various Apple products, you must be familiar with the significance of iCloud service. iCloud is a cloud storage service that allows Apple users to sync their data and access it across different Apple devices, be it iPhone, iPad, or Macbook.
Now, there are several situations where a user might want to delete their iCloud account, especially when one has created too many iCloud accounts and don’t remember the passwords to all of them.
So, in this guide, we’re going to share some insight into how to delete iCloud account without password so that you can get rid of all the unnecessary accounts and use a single one across all your iDevices.
Part 1: How to delete iCloud account without password on iPhone?
If you have an iPhone at the moment, here are three different ways to delete an iCloud account using your phone itself.
1.1 Remove iCloud from settings on iPhone
Follow these instructions to delete the iCloud account from the “Settings” menu on your Apple iPhone SE.
Step 1: Open “Settings” and scroll down to click on “iCloud”.
Step 2: You’ll be asked to enter your password. Here enter any random number and click “Done”.
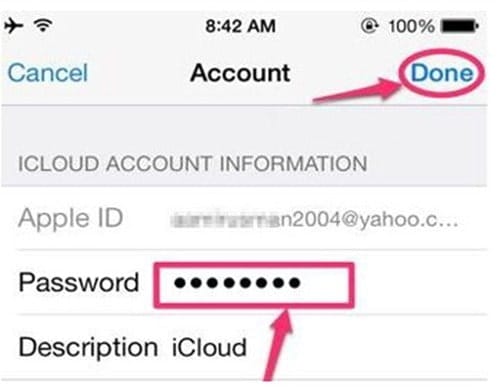
Step 3: iCloud will tell you the password is incorrect. Tap “Ok” and you’ll be prompted back to the iCloud screen.
Step 4: Now, click on “Account” and erase everything from “Description”. Click “Done” and you’ll again go back to the iCloud screen. This will disable the “Find My iPhone” feature and you’ll be able to remove the iCloud account easily.
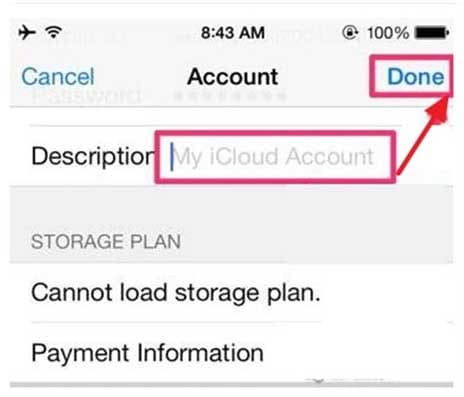
Step 5: Again, tap on iCloud and scroll down till the end. Tap “Delete Account” and again click “Delete” to confirm your action.

That’s how to delete iCloud account without password directly from “Settings” on your Apple iPhone SE.
1.2 Delete iCloud account via iTunes
Another convenient way to delete the iCloud account is to use iTunes on your Apple iPhone SE. Let’s walk you through the process of deleting an iCloud account using iTunes.
Step 1: First of all, make sure to disable the “Find My iPhone” feature. Navigate to “Settings” > “iCloud” > “Find My iPhone” and toggle the switch off to turn off the feature.
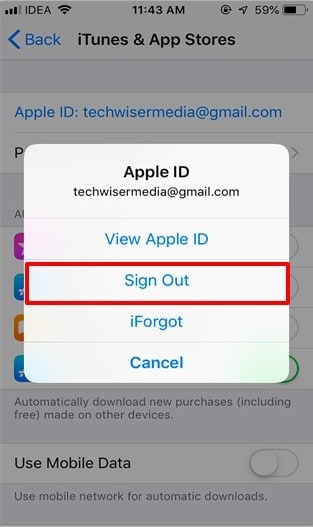
Step 2: Now, go back to the “Settings” window and click “iTunes & App Store”.

Step 3: Tap on your “Account” at the top. A pop-up will appear on your screen. Here, click “Sign Out” and the iCloud account will be removed from your iDevice.
1.3 Create a new password
If you have enabled two-way verification on your Apple iPhone SE, you can also delete the iCloud account by resetting the password. In this case, however, you’ll have to visit the Apple ID Account Page and use it to reset the password.
Here’s how to delete iCloud account without password by creating a new password.
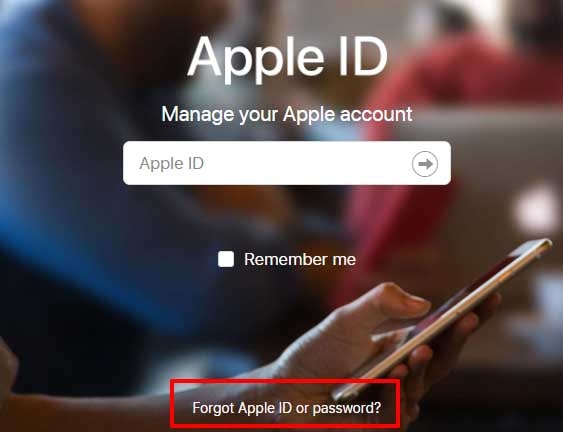
Step 1: Visit the Apple ID Account page and select “Forgot Apple ID or Password”.
Step 2: Now, enter your Apple ID and tap “Continue”. Select “I Need to Reset My Password” to initiate the password resetting process.
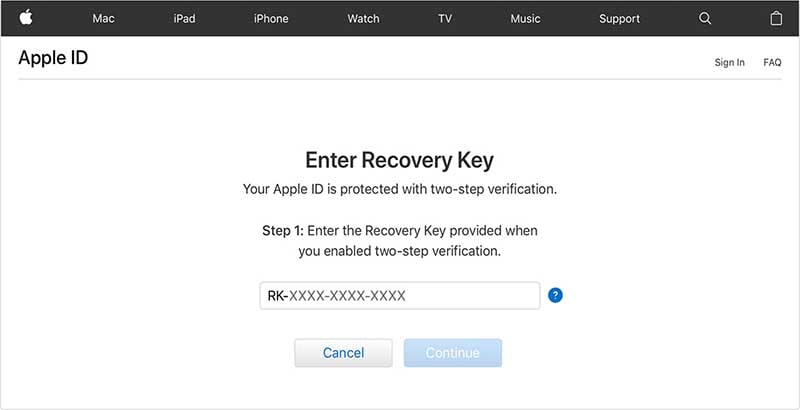
Step 3: You’ll be prompted to a new window where you’ll have to enter the “Recover Key”. This key is an exclusive that’s generated when a user enables two-way verification for their iCloud account.
Step 4: Enter the recovery key and tap “Continue”. Now, select a trusted device where you want to receive the verification code. Enter this verification code to continue with the process.
Step 5: In the next window, you can reset the password. Simply, add the new password and click the “Reset Password” button.
Once the password is changed, you can easily delete your iCloud account by going to “Settings” > “iCloud” > “Delete Account”. Enter the new password and your iCloud account will be deleted permanently.
In case you haven’t enabled two-way verification for your iCloud account, there’s still a way to reset the password. However, you must remember the security questions that you answered or the recovery e-mail you had added while setting up your iCloud account.
Step 1: Open the Apple ID Account page and tap “Forgot Apple ID or Password”. Enter your Apple ID and select “I need to reset my password”.
Step 2: You’ll be redirected to a new window displaying two different methods, i.e., “Answer Security Questions” an “Get an Email.” Choose a suitable method and follow the further steps to reset your password.

Part 2: How to delete iCloud account without password on computer using Dr.Fone - Screen Unlock (iOS)?
If you find all the above methods slightly challenging, we have a simpler solution for you. Wondershare Dr.Fone Screen Unlock (iOS) is an exclusive tool for iOS users that’ll help them remove screen locks and delete iCloud accounts from an iDevice, even if you don’t remember the password or even if the “Find My iPhone” feature is enabled.
Thanks to its user-friendly interface, it’ll become a hassle-free task to delete the iCloud account using Dr.Fone Screen Unlock. Since the software is available for Windows as well as Mac, one can easily use it to bypass Apple ID sign-in, irrespective of the OS one’s using on their PC.
So, let’s quickly discuss how to delete iCloud account without password using Dr.Fone Screen Unlock.
Note: Before moving further, make sure to back up the entire data as this will erase everything from your Apple iPhone SE.
Step 1: Launch Dr.Fone Screen Unlock
Install Dr.Fone Screen Unlock on your PC and double-tap its icon to launch the software. Now, connect your iDevice to the computer using a USB cable.
Step 2: Select Screen Unlock
Now, in the main interface of Dr. Fone Screen Unlock, select “Screen Unlock”.
Step 3: Choose the Option
In the next window, you’ll see three different options. Select “Remove Apple ID” as we want to delete the iCloud account.

Step 4: Trust the Apple iPhone SE device
Now, to successfully establish the connection between the two devices, enter the passcode on your iDevice and tap the “Trust” button to confirm the connection.

Step 5: Reset Your Apple iPhone SE
Once the two devices are successfully connected, tap “Unlock Now” on your computer screen. This will trigger a warning message. Click “Unlock” to continue with the process.
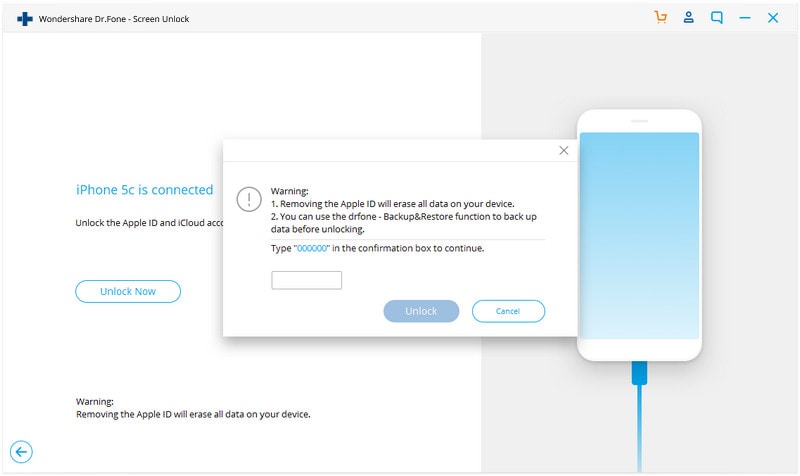
At this point, you’ll be asked to enter recovery mode. You can follow the on-screen instructions to successfully enter recovery mode.

Step 6: Unlock Apple ID
After entering the recovery mode, Dr.Fone will automatically initiate the unlocking process. Do not disconnect the iDevice from your computer as this can cause damage to the Apple iPhone SE device itself.

As soon as your Apple ID gets unlocked, a confirmation message will pop up on your screen. Simply reboot your smartphone and you’ll be able to sign in with a new Apple ID without any hassle.
It doesn’t matter if you’re using Windows or Mac, Dr.Fone – Screen Unlock for iOS will make it extremely easy to delete the iCloud account without the password. So, if you are looking for a reliable and convenient way to remove an iCloud account, make sure to use Dr.Fone – Screen Unlock.
Conclusion
That’s the entire guide on how to delete iCloud account without password. Even though iCloud is an exceptional feature, one is likely to forget the password to his iCloud account. If you’re stuck in a similar situation and want to create a new iCloud account, make sure to use the above tactics to delete the previous iCloud account, even if you don’t remember the password.
Also read:
- [New] 2024 Approved Color Reversal Making Blacks From Whites
- [New] Ten Steps to Keeping VR Healthy
- 2024 Approved Instagram’s Algorithm Unlocked Optimizing Your Reels
- 5 Top Free & Secure Public DNS Options to Improve Your Internet Experience
- Apple ID Locked for Security Reasons From Apple iPhone 13 Pro? Find the Best Solution Here
- Detailed Guide on Removing iPhone 15 Pro Activation Lock without Previous Owner?
- How to Fix when Apple Account Locked From Apple iPhone 8 Plus?
- How to Unlock Apple ID From your Apple iPhone 6s without Security Questions?
- In 2024, Apple ID Locked or Disabled On Apple iPhone SE? 7 Mehtods You Cant-Miss
- In 2024, Apple ID Locked or Disabled On iPhone 11 Pro Max? 7 Mehtods You Cant-Miss
- In 2024, How to Fix when Apple Account Locked From Apple iPhone 15 Pro?
- Mastering the Process of Fresh Device Drivers for Your Windows 11 Setup
- Overcoming the No Fingerprint Detection Error on Windows
- Small Size, Mighty Power: Unveiling the Robot Vacuum That Dominates Disaster Zones | ZDNET
- Why does the pokemon go battle league not available On Realme V30 | Dr.fone
- Windows 11上でASUSセキュアブートを有効にするための容易な修正手順
- Title: In 2024, Protecting Your Privacy How To Remove Apple ID From iPhone SE
- Author: Alma
- Created at : 2025-03-03 11:07:03
- Updated at : 2025-03-04 07:02:47
- Link: https://apple-account.techidaily.com/in-2024-protecting-your-privacy-how-to-remove-apple-id-from-iphone-se-by-drfone-ios/
- License: This work is licensed under CC BY-NC-SA 4.0.