
In 2024, Top-Notch Solutions for Disabled Apple ID From Apple iPhone SE Making It Possible
Top-Notch Solutions for Disabled Apple ID On Apple iPhone SE: Making It Possible
The Apple ID serves as the cornerstone of an iOS user’s digital identity. It grants access to a multitude of essential services and applications. This unique identifier is crucial for accessing the App Store, iTunes, iCloud, and other Apple services. However, the security of this pivotal account is paramount. Any security breaches or suspicious activities can prompt Apple ID to be disabled.
To avoid the potential consequences of a disabled Apple ID, it is imperative to explore effective solutions. This guide seeks to furnish users with a range of excellent strategies to address the issue at hand. So, if you are wondering why is my Apple ID disabled, continue to read the article.
Part 1. Discussing the Reasons for Apple ID Getting Disabled
Wondering why your Apple ID has been disabled? Experiencing intense frustration is not uncommon in this scenario. Nonetheless, understanding the potential triggers behind this issue is crucial. For Apple users, learning the factors leading to the Apple ID disabled problem is essential. The following are some typical reasons that can account for this predicament:
1. Security Questions
Failing to answer security questions accurately during the account recovery process can trigger Apple’s security protocols. It can lead to the temporary or permanent disabling of the Apple ID. Inaccurate or forgotten responses to these critical security measures can raise red flags. This eventually results in restricted access to the account.
2. Unauthorized Access Attempts
Apple’s strict security measures are designed to identify and prevent unauthorized access attempts. If the system detects unusual login activities or repeated failed login attempts, it may automatically disable the ID. Moreover, it is done to protect the user’s personal information and sensitive data.
3. Suspicious Account Activities
Any suspicious activities associated with the Apple ID can prompt Apple’s security algorithms to disable the ID. These include unusual purchase patterns, unauthorized transactions, or reports of account misuse. Furthermore, it usually results in temporary disabling as a precautionary measure.
4. Breach of Terms of Service
Not adhering to Apple’s terms and conditions may result in the prompt Apple ID being disabled. Examples include engaging in fraudulent activities or using unauthorized software or tools. In addition, manipulating Apple’s services or violating the company’s usage policies can also cause disablement. It is often accompanied by a permanent suspension from Apple’s ecosystem.
5. Unresolved Billing Issues
Unresolved billing disputes or outstanding payment issues can trigger the disabled problem. Moreover, declined transactions linked to the Apple ID can also be a cause. It restricts the user’s access to various Apple services until the payment concerns are rectified.
Part 2. Reset the Password: Solve Apple ID Disabled Issues
With Apple ID disabled, one of its primary solutions involves resetting the password. Fortunately, this can be achieved directly from an iOS device or a Mac. Users are offered convenient choices to regain authority over their accounts quickly. Here, you’ll find detailed, sequential instructions for each approach:
Resetting Password From iOS Device
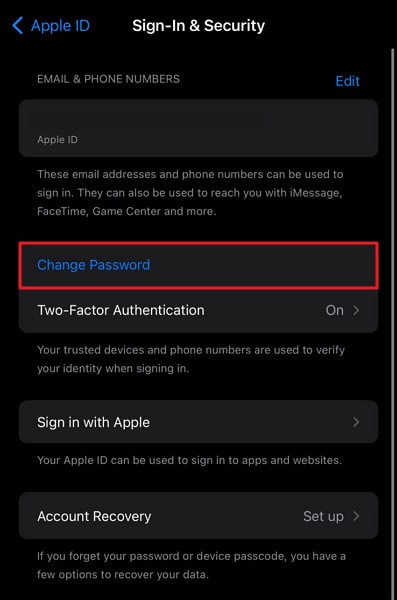
- Step 1: To access the Settings app on your iOS device, locate and open the application with the “Gear” icon. Once inside, select your name and proceed to the subsequent screen, where you should tap “Sign-In & Security.”
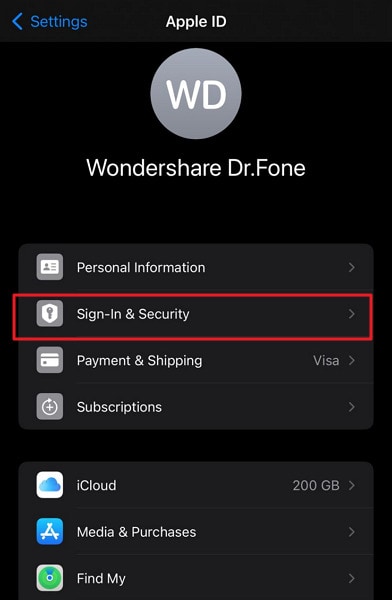
- Step 2: Now, tap the “Change Password” option and follow it by entering your iOS device passcode. Then, enter and confirm the new password and press “Change Password” to finalize it.
Resetting Password From Mac
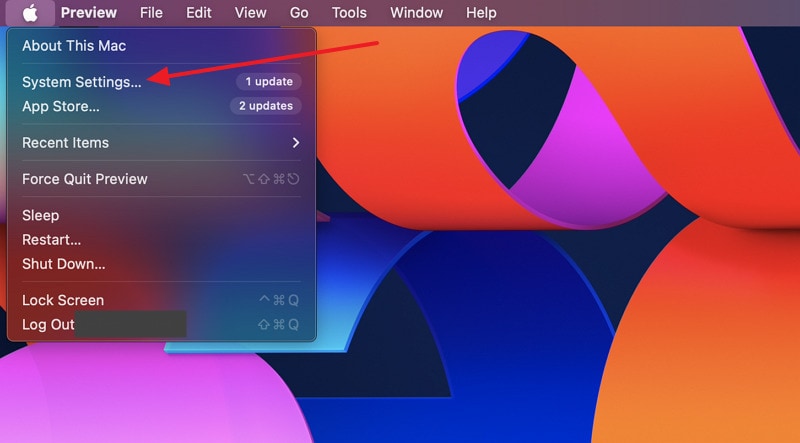
- Step 1: On your MacBook, navigate to the “Apple” menu from the top left side and choose the “System Settings” option. Next, tap on your name and press “Sign-In & Security” on the following screen.
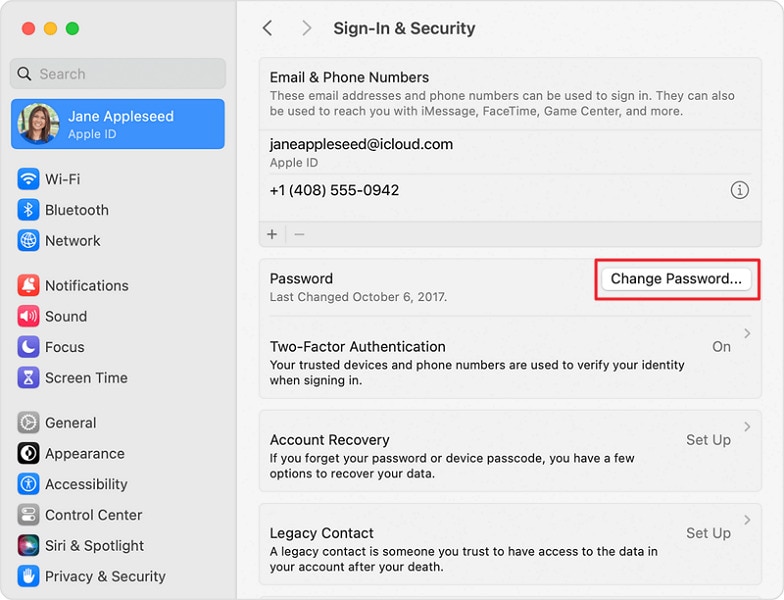
- Step 2: Move to the “Password” option and click “Change Password.” Now, follow the on-screen prompts to complete the password resetting process by providing your MacBook passcode.
Part 3. Use Apple Support App: Solve Apple ID Disabled Issues
If you lack access to a dependable device for resetting your password, there’s no cause for concern. Apple provides to reset your Apple ID password using an alternative device. This can be accomplished through the official Apple Support app. The following procedures offer a thorough walkthrough:
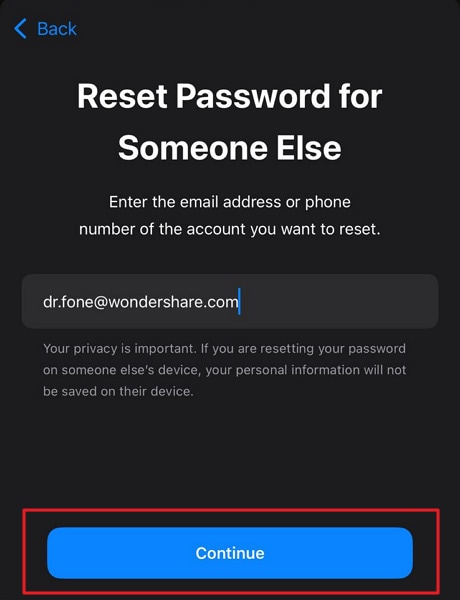
- Step 1: On a device you’ve borrowed, download the official Apple Support app and launch it. Scroll down within the app to “Support Tools” and select “Reset Password.”
Image name: fix-apple-id-disabled-5.jpg
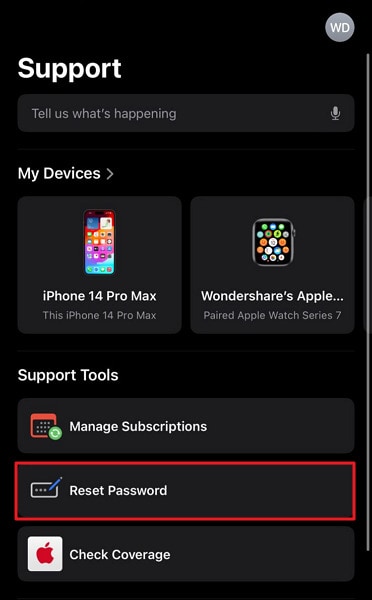
- Step 2: Following this, choose “Help Someone Else,” input your Apple ID, and tap “Continue.” Follow the on-screen prompts to complete the password reset process.
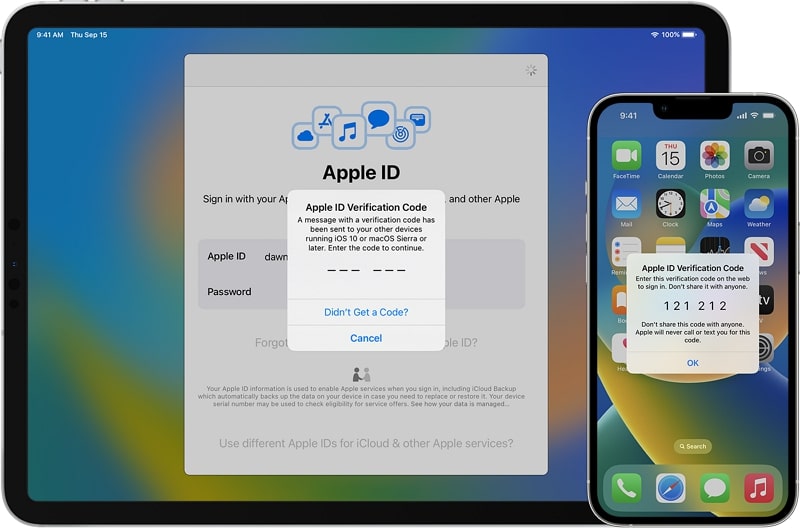
Part 4. Using iForgot Website: Solve Apple ID Disabled Issues
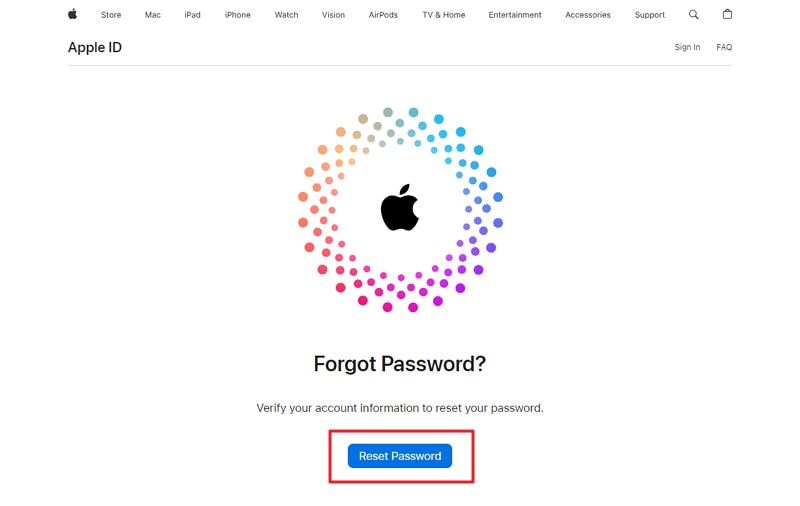
In instances where conventional methods fail, using the iForgot website can offer an alternative route. The platform provides an extensive range of tools and resources. It is tailored to aid users in the process of resetting their Apple ID credentials. Follow these step-by-step instructions to use the iForgot website effectively to fix the “Why is My Apple ID Disabled” problem:
- Step 1: Launch a web browser, visit iforgot.apple.com, and select the “Reset Password” option. It will give you access to the Apple ID password reset page. Here, provide your Apple ID, usually your email address linked to your Apple account, and proceed by clicking “Continue.”
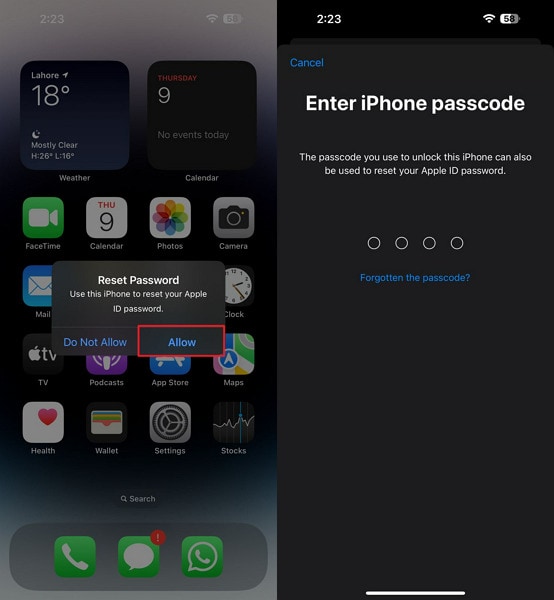
- Step 2: On the next screen, Apple will inform you that they have sent a confirmation message to your trusted devices for resetting the password. Tap “Allow” on one of your trusted devices and provide your iDevice passcode to reset the Apple ID password.
Part 5. Wondershare Dr.Fone - Screen Unlock (iOS): A Comprehensive Solution To Solve Apple ID Disabled Issues
No need to worry if you’re experiencing difficulties accessing iCloud and other Apple services due to a forgotten Apple ID password. Wondershare Dr.Fone can bypass the Apple ID lock completely. This tool allows users to regain access to their iCloud services and other Apple ID features. Otherwise, your Apple ID would lose its functionality within your iOS devices.
Furthermore, this capability of Wondershare Dr.Fone remains effective even if the Find My iPhone feature is activated on the Apple iPhone SE device. This tool can also bypass the Screen Time Passcode if you have forgotten your password. By utilizing this feature, you will be able to resolve your disabled Apple ID issue.
Dr.Fone - Screen Unlock (iOS)
Unlock iPhone/iPad Lock Screen Without Hassle.
- Simple, click-through, process.
- Unlock screen passwords from all iPhone and iPad.
- No tech knowledge required, everybody can handle it.
- Supports the latest iOS version fully!


4,395,217 people have downloaded it
Key Features of Wondershare Dr.Fone
- Wondershare Dr.Fone allows users to unlock their iDevices screen, which enables them to regain access to their devices.
- You can also use this robust iPhone unlock tool to remove the SIM carrier lock to use your device internationally.
- This iDevice screen unlock software provides multiple tools like data eraser, data recovery, phone transfer, WhatsApp transfer, system repair, etc.
Instructions Involved To Solve Apple ID Disabled Issues via Wondershare Dr.Fone
Wondershare Dr.Fone is specially designed for users with various technical experiences. It presents an easy-to-follow guide with its user-friendly interface to assist its users in every way possible. Here is how to Solve Apple ID disabled issues via Wondershare Dr.Fone - Screen Unlock (iOS):
- Step 1. Access the Robust Screen Unlock Tool
You will have to start by opening Wondershare Dr.Fone on your system and accessing the “Toolbox” section present in the left panel. Then, continue with the “Screen Unlock” feature and select the “iOS” device. Proceed with the “Remove Apple ID” option among different options from the next window.

- Step 2. Begin Unlocking the Apple ID
After connecting your iDevice to the system, you need to move forward with the “Unlock Now” button. Before moving forward, it’s essential to ensure you have Screen Lock and Two-Factor Authentication enabled on your Apple iPhone SE. After that confirmation, carry on with the on-screen instructions.

- Step 3. Put iPhone in the Recovery Mode and Recognize the Model
You need to put your Apple iPhone SE in Recovery Mode by following the on-screen instructions to initiate the Apple ID unlocking process. The software will recognize the “Device Model” in a self-controlling way. After that, you will have to go ahead with the “System Version” selection and hit the “Start” button.

- Step 4. Download the Firmware and Provide Confirmation
The relevant firmware will start downloading, and you will have to proceed with the “Unlock Now” button after the downloading. You will have to enter a code for confirmation, and after that, you can view the removal progress. Move forward by hitting the “Done” button if the Apple ID gets unlocked.

Conclusion
In conclusion, this article aims to address the critical issue of Apple ID disabled. It can significantly disrupt the smooth operation of iOS devices. We have offered a thorough examination of the different elements that may result in the deactivation of an Apple ID. Moreover, we have introduced several effective measures to assist you in addressing this matter. It allows you to regain access to your Apple ID.
Furthermore, the article has highlighted the comprehensive capabilities of Wondershare Dr.Fone. It is for users encountering persistent challenges in resolving their disabled Apple ID. Moreover, Dr.Fone is a robust and reliable solution that can offer a more in-depth remedy to the problem.
How To Remove the Two Factor Authentication On Apple iPhone SE
Want To Remove the Two Factor Authentication? Check Out This Guide

Continuous technology innovation has introduced many advanced encryption and security methods to protect data from hackers. With these innovations, companies like Apple and Google have introduced the two-factor authentication process to protect user data.
But sometimes, this security method becomes a hassle to access your data daily, due to which many users try to remove it. That is why, in this article, we have discussed how you can remove iCloud two-factor authentication easily.
- Part 1: What Is Two-Factor Authentication and How Helpful It Is
- Part 2: Can You Remove the Two Factor Authentication iCloud at Anytime
- Part 3: How To Remove the Two-Factor Authentication Within 14 Days
- Part 4: iPhone Apple ID Got Locked? Here’s a Reliable Tool To Get It Unlocked Without Passcode
Part 1: What Is Two-Factor Authentication and How Helpful It Is
Protecting users’ devices and online accounts is one of the major responsibilities of tech companies like Apple. Due to this, they have added multiple security features, including two-factor authentication. Thus, if you create an Apple ID, you can see a two-factor authentication option that adds an extra layer of security.
2FA is activated when the user provides the password to log into the Apple ID or software through a new device, and it acts as a second layer for account security. Apple ID or any software containing sensitive data cannot be accessed without it. This method provides a higher security level than single-factor authentication. To understand more benefits of this security system in detail, check the following points:
- Protection From Password Theft: 2FA acts as an additional security level. It protects your accounts and devices in case your password is leaked.
- Migrations of Unauthorized Assets: Online banking applications use 2FA to protect users from unauthorized bank transfers. If someone accesses their app, this is a beneficial security measure.
- Protection on Multiple Services: Platforms, including social media, banks, and cloud storage, use 2FA. It means that 2FA can be used in various digital aspects.
Part 2: Can You Remove the Two Factor Authentication iCloud at Anytime
Many people use 2FA globally to protect their personal information and devices from hackers and unauthorized access. However, in some cases, users may want to remove two-factor authentication iCloud for multiple reasons. This includes scenarios in which their device is lost or damaged or if they have found a better security option than this one.
Moreover, there is one important key point to note: Apple has removed the feature of deactivating 2FA from the Apple ID. It means you need to think twice before activating this feature on your Apple ID because it cannot be reversed. For the following reasons, Apple has taken this initiative:
- Enhanced Security: By removing the deactivation option for 2FA, Apple is trying to strengthen its account security to ensure that no one can access its user’s data.
- Reducing Vulnerabilities: Allowing users to deactivate 2FA could cause vulnerabilities in the Apple ecosystem that can be a weak point for protecting users’ data. That is why Apple has removed the deactivation option to stop malicious actors from taking advantage of this vulnerability.
- Encouraging Security Awareness: To make Apple users more security conscious, Apple has made it difficult on purpose to remove 2FA. It helps users to be more confident in Apple services and products.
- Minimizing Mistakenly Steps: If users mistakenly remove the 2FA, their accounts and devices are at risk of being accessed without proper authentication. To avoid such an issue, the deactivation option of 2FA is removed.
Besides all these reasons, there is still some good news for those who want to remove the two-factor authentication iPhone to use other security options. The good news is that Apple allows users to remove 2FA for a limited time after activation.
Part 3: How To Remove the Two-Factor Authentication Within 14 Days
As explained in the last part, Apple has made removing the 2FA option from Apple ID challenging for several security reasons. Thus, if you want to remove 2FA from your Apple ID, you have only 14 days after activating this feature. To understand how to disable iCloud two-factor authentication within this given time, check the following steps:
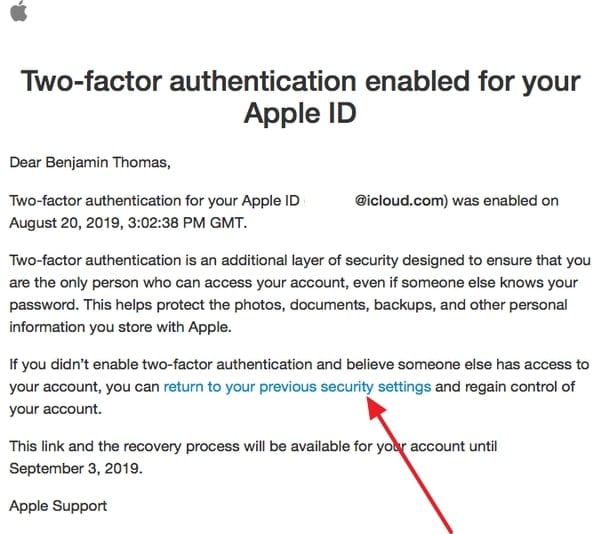
- Step 1. Once you have activated the 2FA feature, your 14-day grace period will start eventually. To deactivate this, open the enrollment email you received from Apple regarding 2FA on your Apple ID.
- Step 2. Scroll to the bottom of this email and select the link or button to return to your account security & settings section. There, follow the on-screen instructions to deactivate the 2FA of your Apple ID.
Part 4: iPhone Apple ID Got Locked? Here’s a Reliable Tool To Get It Unlocked Without Passcode
If you mistakenly got your Apple ID locked due to entering the wrong password multiple times, there is no need to stress it out. It is a common issue that many people forget their Apple ID password and cannot access it. Due to this, we have got you a perfect solution to unlock your Apple ID without a passcode.
This solution is the Wondershare Dr.Fone - Screen Unlock (iOS) tool specially designed to help users remove their iPhone and iPod lock screens. It is compatible with the latest iOS devices and assists in removing various types of lock screens, including Touch ID and Face ID.
Key Features
- This iOS screen unlock tool assists users in bypassing MDM without data loss and other technical errors.
- iCloud activation lock and iTunes backup encryption can be bypassed without a password in just a few steps.
- iPhone 15 and the latest versions of iOS 17/iPadOS 17 are supported by this tool to help users professionally.
Simplified Steps for Unlocking Apple ID With Wondershare Dr.Fone
To help you use this AI-powered screen unlock tool for unlocking the Apple ID without a password, follow the process we have mentioned below for your ease:
- Step 1. Access the Toolbox and Choose the Respective Option
Initiate the process by accessing Wondershare Dr.Fone’s latest version on your computer and tapping on the “Toolbox” option from its left side toolbar. Following this, choose “Screen Unlock” from the list of tools and tap “Remove Apple ID” in the next window.

- Step 2. Make Sure That the Apple iPhone SE Is Connected to the Computer
Then, connect your Apple iPhone SE to your computer using a USB cable so that you can see its connectivity status. Once the status is displayed on a new window, hit the “Unlock Now” button to proceed. Answer some questions that are asked by the platform, and with this, ensure that your device’s “Screen Lock” and “Two-Factor Authentication” are enabled or disabled.
- Step 3. Select the System Version and Proceed Ahead
In this step, enable Recovery Mode by following the on-screen instructions. It will help the platform detect the connected device model, with which you will need to select “System Version.” Afterward, you can hit the “Start” button to proceed ahead.

- Step 4. Start the Apple ID Unlocking Process
The respective iOS firmware will download according to the Apple iPhone SE device model and system version. After it is downloaded, the platform will verify it for you, based on which you can tap the “Unlock Now” option to get your Apple ID unlocked successfully.
Conclusion
With this, we hope you understand how to disable iCloud two-factor authentication. However, remember that doing this is only possible within 14 days of a grace period. If this period is over, you cannot remove 2FA from your Apple ID.
Moreover, if you have locked your Apple ID passcode, using Wondershare Dr.Fone to unlock it can be the perfect option. While using this tool, you also don’t have to worry about screen locks on different iOS devices. This is because the innovative algorithms integrated in this tool make it easier to use for unlocking the Apple ID or screen lock.
How to Change Credit Card on Your Apple iPhone SE Apple ID and Apple Pay
Apple’s ecosystem offers convenience with services like Apple ID and Apple Pay. Managing your digital life has never been more convenient. In this interconnected system, your credit card plays a crucial role. It’s essential to understand that your credit card details can be associated with both your Apple ID and Apple Pay, each serving unique functions.
In this comprehensive guide, we’ll learn how to change the credit card on Apple ID and Apple Pay. Additionally, we will introduce you to a helpful tool for unlocking your Apple ID if you ever encounter access issues.
Part 1: 3 Ways To Change the Credit Card on Apple ID
We’ll explore 3 different methods to change the credit card details associated with your Apple ID in this section. These methods allow you to update your payment information effortlessly, ensuring uninterrupted access to Apple services.
Way 1: Update Credit Card on iPhone/iPad
The first method involves updating your payment information directly from your Apple iPhone SE or iPad’s settings. This method is convenient for those who prefer managing their Apple ID details on their iOS devices. Here is how to change your credit card on Apple ID via iPhone or iPad:
- Step 1: Begin by launching the Settings app on your device and then touch your name to enter your Apple ID settings. Afterward, choose the “Payment & Shipping” option to move ahead. In addition, log in using your Apple ID credentials if necessary.

- Step 2: Next, press “Add Payment Method” and provide information for your new payment method. Once you’ve entered all the required details, tap “Done” to confirm and save your updates.

- Step 3: To remove the old payment method, tap “Edit.” Now, locate the old payment method you want to delete and tap the “Red Delete” button next to it. Confirm the deletion by tapping “Delete.”

Way 2: Change Credit Card on Mac
Now, we shift our focus to those who prefer managing their payment information on their Mac. Changing your credit card details from Mac’s settings is a straightforward and easy process. Therefore, using the following steps, you can learn how to change your credit card on Apple ID without any errors:
- Step 1: Start by opening the App Store on your device. Then, in the bottom-left corner of the App Store, tap on your name and proceed to access “Account Settings.”

- Step 2: Locate the “Apple ID Summary” section in the “Account Settings” menu and select the “Manage Payments” option next to it. After this, introduce a fresh payment method by opting for the “Add Payment” option.

- Step 3: This action will prompt you to input the details of your new payment method, including credit card information. After you’ve provided the required information, select “Done” to save your newly added payment method.

- Step 4: If you want to remove the old method linked to your Apple ID, click “Delete” in front of it. Now, tap “Delete” to remove this payment method from your Apple account.

Way 3: Update the Credit Card Details on Windows PC
To update the credit card information linked to your Apple ID, we’ll now provide instructions specifically tailored for Windows PC users. This approach offers flexibility for individuals looking to maintain accurate payment details. With the help of the simplified steps given below, you can easily change the credit card on the Apple account:
- Step 1: Access iTunes on your computer and click on “Account” from the menu bar that is given at the top. Afterward, a drop-down menu will appear on which you need to select “View My Account.”

- Step 2: Following this, click on “Manage Payments,” and your current payment methods that are listed will be shown to you. There, click on “Add Payment” to add a new payment method quickly.

- Step 3: After clicking on this option, you can enter details of your new payment method. Once the details are entered successfully, click “Done” to save the changes, and you are good to go. Tap the “Edit” option in front of the old credit card and choose “Remove Payment Method” to remove it from your Apple ID.

Pro Tip: Locked Out Your Apple ID? Get It Unlocked Instantly
While learning how to change a credit card on your Apple Account, you encounter an unexpected hurdle - your Apple ID has become locked. This can undoubtedly be a frustrating and troublesome scenario, considering the crucial role your Apple ID plays within the Apple ecosystem. Nevertheless, there’s no cause for alarm, as we’ve got a solution ready to promptly unlock your Apple ID and have you back on course.
The solution is Wondershare Dr.Fone, a tool that is able to remove Apple ID from your iOS devices without needing the password. It is a comprehensive tool that has the ability to remove your Apple ID from your device permanently. This tool works its magic in removing Apple ID, whereas other tools fail when the Find My feature is enabled.
Dr.Fone - Screen Unlock (iOS)
Unlock iPhone/iPad Lock Screen Without Hassle.
- Simple, click-through, process.
- Unlock screen passwords from all iPhone and iPad.
- No tech knowledge required, everybody can handle it.
- Supports the latest iOS version fully!
4,395,218 people have downloaded it
Key Features of Wondershare Dr.Fone
- Unlock iPhone, iPad, and iPod touch by removing various types of lock screens, ensuring access to your device.
- Gain access to your Apple device by bypassing the iCloud activation lock and Apple ID verification without requiring the password.
- Safely bypass Mobile Device Management (MDM) restrictions and Screen Time limitations without the risk of losing any data.
Simplified Steps To Remove Apple ID on Your iOS Device via Wondershare Dr.Fone
Following are the steps to unlock and remove old Apple ID from your iOS device using Wondershare Dr.Fone:
- Step 1: Access the Screen Unlock Tool
To initiate the Apple ID unlocking process, you will need to install and launch Wondershare Dr.Fone. Then, choose “Toolbox” from the left bar and go on to click “Screen Unlock.” Select “iPhone” as your device type, and since we are removing Apple ID, click “Remove Apple ID.”
- Step 2: Proceed to Activate Recovery Mode
Now is the time to connect your iOS device to the computer using a respective cable and click “Unlock Now.” Now, Wondershare Dr.Fone will ask you about having a screen lock and 2FA on the iOS device. The answer needs to be affirmative to proceed further. When done with it, enable Recovery Mode on your iOS device with the help of on-screen instructions.
- Step 3: Remove the Apple ID From Your iOS Device
Wondershare Dr.Fone will detect your device model once it is in Recovery Mode. Choose a system version to download by clicking “Start.” Once it has been downloaded and verified, tap “Unlock Now.” It will lead to a prompt warning about data loss. Here, enter “000000” to confirm your choice and click “Unlock.” Dr.Fone will go on to remove Apple ID from your device.

Part 2: 3 Methods To Change the Default Credit Card on Apple Pay
In our exploration of managing your credit card within the Apple ecosystem, we now focus on changing the default credit card linked to your Apple Pay. Apple Pay stands as a robust digital wallet solution, and understanding the process of updating your payment details is crucial for ensuring a secure user experience. Here, we will explore three approaches on how to change credit card on Apple Pay:
Method 1: Change the Default Card on the iPhone
We start by exploring how to change the default credit card on Apple Pay using your Apple iPhone SE. This method is particularly handy for iPhone users who want to ensure their preferred payment card is set as the default option. These are the instructions for setting a card as the default card for Apple Pay:
Instructions: On your Apple iPhone SE, access and open the Wallet app. Inside the app, locate the payment card you wish to set as your default. Touch and hold the selected payment card. Drag the card to the forefront, positioning it ahead of your other cards.

Method 2: Set New Card as Default on iPad or Mac
Whether you prefer using your iPad for managing your payment methods or you’re on your Mac, you can easily set a new card as the default option. Use the following instructions to set a credit card as the default card on Apple Pay:
For Mac
Instructions: Access System Settings through the Dock or Apple menu and move to Wallet & Apple Pay. Afterward, once you’re in Wallet & Apple Pay, choose a card from the “Default Card” settings and set it as the default card.

For iPad
Instructions: Navigate to Settings on your iPad and move to “Wallet & Apple Pay.” Here, scroll down to “Transaction Defaults” and press “Default Card.” Then, choose a card from the list to set it as your default card.

Method 3: Use Apple Watch to Change Default Card
The last stop on our journey to manage your default credit card on Apple Pay is the Apple Watch. If you are an Apple Watch user, then these instructions can assist you in how to change your credit card on Apple Pay:
Instructions: Access and launch the Apple Watch app on your Apple iPhone SE and navigate the “My Watch” tab. There, tap on “Wallet & Apple Pay” within My Watch tab and scroll down in it to find the section labeled “Transaction Defaults.” In this section, you’ll find the “Default Card” option. Simply tap on it to select the card you wish to set as the default.

Conclusion
To summarize, we’ve navigated the complex world of how to change the credit card on Apple account. We’ve explored two critical aspects: changing the credit card on your Apple ID and altering the default credit card on Apple Pay. It’s important to understand that your credit card details for Apple ID and Apple Pay are distinct. Thus, it’s crucial to know how to update both to ensure a secure digital experience.
We explored many methods to change the credit card on Apple ID and Apple Pay, depending on your device and preference. Furthermore, there are unfortunate instances where you find yourself locked out of your Apple ID. For these, we introduced a valuable tool: Wondershare Dr.Fone - iOS Screen Unlock. This tool can efficiently unlock your Apple ID without causing any data loss, ensuring you can regain access to your account promptly.
Also read:
- [New] In 2024, Beyond Beats 8 Free MP3 Downloaders Transforming Android Into a Spiritual Haven
- [Updated] 2024 Approved The Beauty Bard In-Depth Gear & Tutorial Roundups
- 3 Ways to Track Vivo Y02T without Them Knowing | Dr.fone
- Apple ID Locked or Disabled On iPhone 11 Pro Max? 7 Mehtods You Cant-Miss
- Avoiding Connectivity Hiccups: Top Wireless Travel Routers of 2024 Reviewed
- How To Create an Apple Developer Account On iPhone 13 Pro Max
- How to Delete iCloud Account On iPhone 14 Pro Max without Password?
- In 2024, A Step-by-Step Guide to Finding Your Apple ID From Your iPhone 15 Pro Max
- In 2024, Breaking Down Techniques for Recording Google Meet Participants
- In 2024, Forgot Your Apple ID Password and Email On iPhone SE (2022)? Heres the Best Fixes
- In 2024, How to Fix when Apple Account Locked From iPhone SE (2022)?
- In 2024, How to Remove an AirTag from Your Apple ID Account From iPhone 14 Pro Max?
- In 2024, How to Stop Google Chrome from Tracking Your Location On Oppo Reno 8T 5G? | Dr.fone
- Redefining Window 11 Interface: Top 6 Upgrades for the Taskbar
- Top Apps Perfezionare Le Fotografie Dell'Album Digitale: Guida Completa
- Title: In 2024, Top-Notch Solutions for Disabled Apple ID From Apple iPhone SE Making It Possible
- Author: Alma
- Created at : 2025-02-26 19:03:33
- Updated at : 2025-03-03 23:51:24
- Link: https://apple-account.techidaily.com/in-2024-top-notch-solutions-for-disabled-apple-id-from-apple-iphone-se-making-it-possible-by-drfone-ios/
- License: This work is licensed under CC BY-NC-SA 4.0.