
:max_bytes(150000):strip_icc():format(webp)/sofya-NomETWcv2Fo-unsplash-be3fc2855a7e477db0273993fd22e822.jpg)
In 2024, Turning Off Two Factor Authentication From iPhone XS? 5 Tips You Must Know
Turning Off Two Factor Authentication On Apple iPhone XS? 5 Tips You Must Know
Apple has produced one of the most consumed, acknowledged, and preferred smartphones that allowed them to rule the industry for a considerably long period of time. Their style and presentation were not the only reason that made people look forward to buying an iPhone. Apple created its own operating system and presented their own versions of security and protection. One of the most recognized and impeccable features offered by Apple in its innovative structure was the security and safety through Apple ID and Apple Account. Every important feature that operated throughout the Apple iPhone XS or iPad was focused over a single entity, the Apple ID. However, apart from the Apple ID, there were several other layers of authentications and verifications that were added throughout the protocol structure. A couple of them are renowned as Two Factor Verification and Two Factor Authentication. This article produces a very generous set of advice that should be looked over while handing these layers of protection. To get a better understanding of the procedures involved, you need to look over the guide to gain better knowledge on how to turn off Two Factor Authentication on your Apple.

Part 1. Is two-step verification the same as two-factor authentication?
There might be a few differences involved in these two security models; however, it should be kept in mind that they focus their purpose on securing the Apple ID of the user. Two Factor Verification is a security protocol that protects access to the various activities performed through the Apple ID. It attenuates an extra verification step across the Apple iPhone XS device in addition to the password for the Apple ID. The device receives a verification code from an authentication factor that allows the authorities to confirm the credibility of the user.
The Two Factor Authentication is considered as an upgrade to the Two Factor Verification, which was released two years after the Two Factor Verification, in 2015. This authentication method exempted the offline recovery keys and application-specific passcodes. They added a six-digit authentication code onto the original password and produced an offline, time-dependent code that is to be generated through the Settings of the trusted device of the user. This feature was appended into the iOS 9 and OS X El Capitan with a region-specific target.
Part 2. How to turn off two-step verification?
As you are aware of the Two-Step Verification process, it is quite easy and typical in configuring. However, when it comes to turning the settings off, it is also a simple and straightforward procedure that can be easily covered by following the steps provided below.
Step 1: You are required to open the Apple ID Account web page on your browser and sign in with your Apple ID credentials.
Step 2: As you log into the website, access the “Security” section, and tap “Edit” from the options provided on the list.
Step 3: Tap on the “Two-Step Verification” option and turn it off. Confirm to conclude the process. You may be required to select the new security questions and verify the data of birth in the process. As you would be done with it, an email would be received across your connected address for confirmation.
Part 3. How to turn off two-factor authentication? (lower than iOS 10.3)
Two Factor Authentication cannot be turned off in a few cases and accounts for iOS versions greater than 10.3. However, if you have activated Two Factor Authentication across the iOS versions lower than 10.3, you can deactivate the feature through a series of simple steps. The exemption of this security feature across your device leaves it protected only through a password and a few security questions. For turning off the Two Factor Authentication from your Apple device, you need to follow the steps provided as follows:
Step 1: Open your browser and access your Apple ID Account website. Provide the details of your Apple ID and log in.
Step 2: Tap on “Edit” in the “Security” section and turn off the “Two Factor Authentication” option.
Step 3: This would lead you to set new security questions for the Apple ID account, followed by a verification of your date of birth. The successful execution of the process would lead to turning it off.
Part 4. Why can’t you turn off two-factor authentication if you already use it? (iOS 10.3 and later)
For users who have an Apple device with an iOS 10.3 or later version, they cannot turn the Two Factor Authentication off after it is accessed. The latest iOS and macOS included extra layers of security in their features, which led towards a better security foundation and protection of information. Users who have updated their account information can unenroll in two weeks after updating. For this, you are required to simply access the confirmation email that you have received and tap on the link to approach the previous security settings. Thus, it makes it far more than impossible for users to turn their Two Factor Authentication off if they consider it unnecessary for their device. This feature is something that would always remain intact with their device as an extra layer of security. Its absence does leave a chance of illegal access to the Apple iPhone XS device and an increased risk of a security breach. Since it is directly built across the Apple iPhone XS device and its settings, this makes it a very hard-to-approach characteristic.
Part 5. How to turn off two-factor authentication by removing Apple ID
Users who are very reluctant to remove the two-factor authentication off their device can consider removing the Apple ID itself for fulfilling the purpose. However, when it comes to executing such tasks, the need for a third-party platform gets evident. Third-party platforms provided dedicated services in providing users with a unique platform of operation with an environment that suits their purpose perfectly. Many platforms provide such impressive services, yet the selection gets quite difficult for a series of reasons. The following pointers explain the reasons to the users over why they should focus on selecting a platform such as Dr. Fone – Screen Unlock (iOS) for this purpose.
- You need to have no excessive knowledge of handling the platform.
- You can cover all the dynamics of unlocking the Apple iPhone XS device without the use of iTunes.
- The platform provides you with the ability to unlock the passcode of your Apple device with ease.
- It offers you to protect your device from the disabled state.
- Works across all models of iPhone, iPad, and iPod Touch.
- Provides services to the latest version of iOS.
Dr. Fone – Screen Unlock (iOS) makes it easy for the users to control and remove their Apple ID and disable the two-factor authentication across their device. However, when it comes to controlling the platform, it follows a few simple and efficient steps that would guide you in executing the task successfully.
Step 1: Connect your Device and Launch Application
You need to connect your Apple device with the desktop and launch Dr. Fone across the computer. Tap on the “Screen Unlock” tool present on the home window and proceed with the removal of two-factor authentication.

Step 2: Access Appropriate Option
On the next screen that opens, you are required to select “Unlock Apple ID” from the three options. Proceed to your Apple device to take the process further.

Step 3: Trust the Computer
Open the Apple iPhone XS device and tap on “Trust” over the prompt that appears on the screen. Following this, you need to navigate to the Settings of your device to initiate a reboot.

Step 4: Execution of Process
Once you are done with initiating a reboot, the platform automatically detects the update in the process and initiates removing the Apple ID from the Apple iPhone XS device. Once the platform is done with the process, it provides a prompt message in the next window displaying the execution of the removal of Apple ID from your device. This also removes the Two Factor Authentication off your device.

Conclusion
The article has presented a very detailed comparison of the Two Factor Verification and Two Factor Authentication and provided an elaborated discussion over how to turn these security features off their devices. The article also discussed a third-party platform that would guide in removing such security features of the Apple iPhone XS devices over the requirement of the user. You need to go through this article to get a better knowledge of the execution of the mechanism.
How To Remove Phone Number From Your Apple ID on Your Apple iPhone XS?
After getting a new device, iPhone users must prepare a unique identification term for their Apple ID. Creating and setting up this ID is not different each time. Not to mention, one can use this one registered ID to access multiple Apple-based features like podcast subscriptions, apps, etc.
While the code is essential, it can become inactive if your registered phone number is no longer available or your change your number. You must remove the phone number from your Apple ID and add a new one.
Unsure about the steps, though? This post covers that, so read ahead.
Part 1. What is the Purpose of a Phone Number for Apple ID?
Typically, the email is not linked with Apple ID since the function is linked with phone numbers. Apple services-based communication is passed through the Messages app on the iPad, iPhone, iPod Touch, and the Apple ID.
Registering the phone number to Apple ID will allow you to get the necessary account-related messages on your device smoothly. If you do not sign in to iCloud with a SIM card, using Messages or the FaceTime app will become challenging. So, you need to know how to remove your phone number from iCloud or Apple ID when your registered number is inactive.
Part 2. Can You Remove the Trusted Phone Number from Apple ID?
If you want to learn how to remove the number from Apple ID and if possible, the answer is yes and quite quickly. Apple allows users switching to another carrier to remove their already authorized and linked phone number from the Apple ID. This is helpful for two-factor authentication phases so that the Apple iPhone XS user can avoid getting fully locked out from the account.
Part 3. 3 Ways to Remove a Phone Number from Your Apple ID
If you are wondering about the steps for how to remove an old phone number from Apple ID, there are different styles available. Here are the main processes you can utilize.
Method 1. Remove Phone Number via iPhone/iPad’s Settings
In the matter of how to remove a phone number from an Apple ID, the most effortless process is to go into the Settings app and delete it from there. This is possible if you have your registered phone with you and the Apple ID. Simple access and remove the number.
Step 1: Access the Settings option on your iPad or iPhone device.
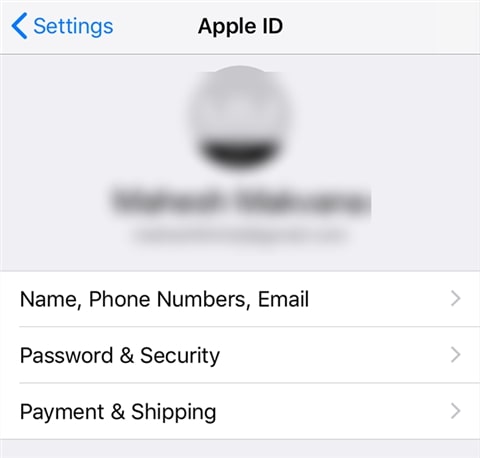
Step 2: Tap on the Apple account ID.
Step 3: Reach the Password & Security section.

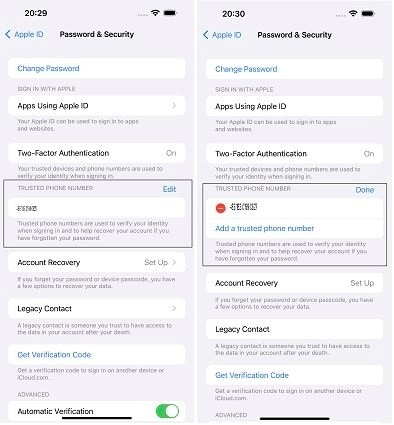
Step 4: You will see the Edit icon on the right-hand side. Click on it and then tap on the “Add a Trusted Phone Number” option.
Step 5: Add the Apple iPhone XS Passcode > new phone number.
Step 6: Select Edit again to delete the old phone number. Press Done.
Method 2. Remove the Phone Number Using a Mac
Users can turn the phone number OFF that they registered to Apple ID through their Mac device. In this context, accessing the FaceTime or Messages app is essential in the context of how to remove phone number from Apple ID via Mac steps.
Step 1: Access the FaceTime or Messages app. Sign in using the same Apple ID you use for the apps on your Apple iPhone XS.
Step 2: Go to Messages and tap on the Settings option. Then, choose the iMessage selection.
For Facetime, click on the FaceTime option and go to Preferences > General.
Step 3: From the list, choose the tickmark beside the phone number to uncheck it. That will deactivate the phone number for your account.

Method 3: Remove Phone Number via Change Apple ID Password
It is possible to change the password for Apple ID in the matter of how to remove a phone number from Apple ID. Adjusting the phone number is the natural next step when you carry out this step, so you can remove the number and use another at this stage.
Step 1: On your iPad and iPhone, tap on the Settings menu.
Step 2: Tap on the icon with your name and click on the Password & Security option.
Step 3: Select the Change Password option.

Step 4: The prompt to add the current Apple ID password, or the passcode, will appear. Add it to confirm, and then insert your new password.
Step 5: Hit the Change Password button.
Step 6: You will get logged out of the account. Sign in with the new password, and the phone number will get removed.
Part 4. How to Remove Apple ID without Password?
All the methods mentioned help remove phone numbers associated with the Apple ID but still require you to access the Apple iPhone XS device. What if the Apple iPhone XS device is locked and the necessary details are unavailable, like the password? You can use Dr.Fone - Screen Unlock (iOS) to remove the Apple ID by bypassing the passcode.
It is possible to remove phone number from Apple ID by accessing the Apple iPhone XS device with simple taps through this app. You have to make the Find My iPhone feature active, and the app will bypass the Apple ID password within seconds.
Best Features:
- Supported on various iOS and iPadOS devices.
- Remove all types of lock screens, like Apple ID, Face ID, Touch ID, Screen Time Passcode, etc.
- Fast process of screen and password bypassing.
How to use it?
Step 1: Download/install/launch the app on Mac/Windows. Select Screen Unlock when the app opens on the interface.
Step 2: Choose the “Remove Apple ID” option and add the passcode, as instructed. Allow the system to trust the Apple iPhone XS device for authentication through the following prompt.

Step 3: Put the Apple iPhone XS device into recovery mode following the on-screen instructions. Then, restart the Apple iPhone XS device. This will automatically kickstart the unlocking process and will take some seconds.

Step 4: Finally, see that Apple ID’s device has been unlocked on the next page.
Video Guide: How to Remove Apple ID without Password?
Part 5. FAQs about Apple ID Phone Number
- How to Add a Trusted Phone Number to Your Apple ID?
The steps for adding the trusted phone number to Apple ID are accessible through Settings > Apple ID icon/name > Password & Security > Edit icon beside the phone number already in use. Click on the “Add a trusted phone number” option and insert the new one. Confirm with your device passcode at the end.
- Why Isn’t My Apple ID Accepting My Apple iPhone XS Number?
Apple ID accepts phone numbers for linking for two-factor authentication. The local number in the region is needed for pairing the number and Apple ID.
- Does Changing Apple ID affect Phone Number?
No, the Apple ID and phone number are not connected as features or codes. So, adjusting the Apple ID will not affect your device’s phone number.
Conclusion
Indeed, there are multiple methods you can take to remove the phone number registered to your Apple ID successfully. They are accessible in multiple ways through Mac, iPad, or iPhone settings. If you forgot the Apple ID, you could even remove it using Dr.Fone - Screen Unlock (iOS) . Ultimately, choose the process to trust based on your specific needs.
How To Fix Apple ID Verification Code Not Working On Apple iPhone XS
In smartphones, the Apple ID stands out as a cornerstone of security for iPhone users and the broader iOS ecosystem. Its robust verification features are a key reason why many people choose iPhones. Thus, its heightened security is highly valued. However, even extremely reliable systems can encounter hiccups.
Sometimes, you might need help with the issue of the Apple ID verification code not working. This leads to frustration, especially if you need to remember your Apple iPhone XS ID details. This 2024 guide will delve into practical solutions to fix issues with Apple ID verification codes, helping you regain access to Apple ID and peace of mind.

Part 1: When Does the Apple Verification ID Failed Prompt Appear?
Before diving into solutions, it’s essential to understand the various scenarios that can trigger the “Apple Verification ID Failed” prompt. Recognizing the cause of the problem is the first step toward the right fix. Let’s explore the common reasons you might encounter this issue:
Wrong Password Input
One of the most straightforward reasons for a failed verification is entering the wrong password. This could be a simple typing error or misremembering your password. Repeated wrong attempts can also lead to your account being temporarily disabled as a security measure.
Apple Server Issues
At times, the problem may not be on your end. Apple’s servers can experience downtime or technical glitches like any other online service. During such instances, verification processes might fail, as the server cannot authenticate your credentials.

Slow Internet or Intermittent Connection
A stable and reliable internet connection is improtant for the verification process. If your internet is slow or experiencing intermittent connectivity, it can disrupt the communication between your device and Apple’s servers, leading to verification failure.
Two-Factor Authentication (2FA) Issues
Apple’s two-factor authentication provides an extra layer of security. However, it can also be a source of problems. If there’s a delay in receiving the 2FA code or if 2FA fails to work, you won’t be able to complete the verification process. This could be due to network issues or, sometimes, glitches within the 2FA system itself.
Suspicious Activity
Apple takes your security seriously. If there’s any unusual activity detected on your account, such as login attempts from unfamiliar locations or devices, Apple might lock your account as a precaution. This can trigger the verification failed prompt as the system seeks to protect your account from potential unauthorized access.
By understanding these scenarios, you can diagnose better why you’re facing the issue of Apple verification ID not working. In the following sections, we will explore solutions tailored to these specific problems, helping you regain access to your account efficiently.
Part 2: How To Fix Apple ID Verification Failed
Encountering an “Apple ID Verification Failed” error can be frustrating. Here are some practical solutions that correspond to the common reasons for this issue. These steps should help you regain access to your Apple ID.
Method 1: Connecting to a Stabler Internet Connection
A stable internet connection is crucial. If you’re encountering issues, switch to a more reliable Wi-Fi network. Alternatively, toggling your Wi-Fi or mobile data off and back on can refresh your connection.
Method 2: Changing Password/2FA Device Using Apple ID Account
If you’re facing troubles due to password errors or 2FA issues, resetting your password or updating 2FA settings may help. Visit Settings > Apple ID account page > Sign In & Security and follow the instructions to Change Password or update your Two-Factor Authentication settings.

Method 3: Check iPhone’s Date & Time Settings
Incorrect date and time settings can influence Apple ID verification. Go to Settings, select General, and tap on Date & Time. Ensure Set Automatically is enabled, allowing your Apple iPhone XS to adjust these settings according to your time zone.

Method 4: Signing Out/In Your Apple ID
Sometimes, simply signing out and back into your Apple ID can resolve verification issues. Navigate to Settings, tap your name at the top, scroll down, and select Sign Out. After signing out, sign back in and check if the issue persists.
Method 5: Disabling VPN
If you’re using a VPN, it can sometimes cause issues with Apple ID verification. Try disabling your VPN from the Settings or the VPN app you’re using, and then attempt the verification process again.
Method 6: Updating to the Latest iOS
Running an outdated iOS version can cause compatibility issues. Go to Settings, select General, and tap on Software Update. If an update is available, download and install it to ensure your device is up-to-date.
Method 7: Checking Apple Server Status and Trying Again Later
Sometimes, the problem is on Apple’s end. Check the Apple System Status page to see if there are any issues with their servers. If there are, it’s best to wait and try the verification process later.
By following these methods, you should be able to resolve the “Apple ID Verification Failed” issue and regain full access to your Apple ID functionalities.
Part 3: How To Remove Apple ID Account From iOS Device
If the above fixes have proven unsuccessful, it might be time to consider removing the Apple ID directly from your device using a third-party tool. This can often resolve the failed verification of Apple ID on new or old phones when other methods fail.
Thankfully, Wondershare Dr.Fone offers a solution with its Screen Unlock (iOS) feature, which includes a Remove Apple ID/iCloud account removal function. It’s a very handy tool for reviewing verification requirements, especially when you forget your Apple ID credentials.
Removing Apple ID Account With Dr.Fone - Screen Unlock (iOS)
Here’s how to use powerful Dr.Fone’s - Screen Unlock (iOS) to remove Apple ID.
Step 1: Download, install, and launch Wondershare Dr.Fone.
Step 2: Go to Toolbox > Screen Unlock > iOS.
- Step 3: Select Remove Apple ID to proceed.
- Step 4: Choose Unlock Now once the connectivity status is confirmed.

- Step 5: Ensure you have a screen lock and the two-factor authentication enabled. Follow the on-screen instructions.

- Step 6: Put your device into Recovery Mode or DFU Mode by following the on-screen instructions. Then, confirm the correct system version of your device.

- Step 7: Wait for the download to finish on your software.

- Step 8: After the firmware is confirmed, click Unlock Now. Then, type in “000000” on the appearing text box and click Unlock.

- Step 9: After the process is completed, click Done. If it still doesn’t work, then click Try again.
Conclusion
Navigating the Apple ID Verification Code not working issue can be a source of significant frustration. This guide aimed to alleviate that by detailing common triggers, such as password errors, server issues, and connectivity problems, and providing targeted solutions like ensuring stable internet, updating iOS, and checking server status.
For those rare instances where conventional methods fall short, Dr.Fone emerges as a reliable ally. Its Screen Unlock feature effectively addresses Apple ID-related hurdles. Whether you’re grappling with verification failures or other phone-related challenges, Dr.Fone - Screen Unlock (iOS) stands out as a dependable tool, ready to assist in simplifying your digital life.
Tips: Are you searching for a powerful Screen Unlock tool? No worries as Dr.Fone is here to help you. Download it and start a seamless unlock experience!
Also read:
- How To Unlink Apple ID From iPhone 6s Plus
- In 2024, Forgot Your Apple ID Password and Email From Apple iPhone SE (2020)? Heres the Best Fixes
- In 2024, Troubleshooting Error Connecting to the Apple ID Server On iPhone SE (2022)
- In 2024, How To Fix Apple ID Verification Code Not Working From iPhone 14 Plus
- In 2024, How to Change Credit Card from Your Apple iPhone XS Apple ID and Apple Pay
- Turning Off Two Factor Authentication On Apple iPhone XS Max? 5 Tips You Must Know
- In 2024, iCloud Separation How To Disconnect Apple iPhone 8 Plus and iPad
- In 2024, How to Change Credit Card from Your iPhone 7 Apple ID and Apple Pay
- How To Get the Apple ID Verification Code On iPhone 15 Pro in the Best Ways
- A Step-by-Step Guide to Finding Your Apple ID From Your iPhone 6s
- In 2024, Top-Notch Solutions for Disabled Apple ID From Apple iPhone 12 Making It Possible
- Top-Notch Solutions for Disabled Apple ID From iPhone 7 Making It Possible
- In 2024, How to Fix Locked Apple ID on Apple iPhone 7
- In 2024, How To Reset the Security Questions of Your Apple ID From Your Apple iPhone 13 mini
- In 2024, How To Delete iCloud Account Remove Your Apple ID Permanently From Apple iPhone 7
- How To Get the Apple ID Verification Code From Apple iPhone XR in the Best Ways
- In 2024, Turning Off Two Factor Authentication From iPhone 13 mini? 5 Tips You Must Know
- How To Remove the Two Factor Authentication On Apple iPhone 6 Plus
- Top 10 Best Spy Watches For your Nokia C12 Pro | Dr.fone
- Disabled iPhone 12 How to Unlock a Disabled iPhone 12? | Dr.fone
- In 2024, How to Mirror PC Screen to Itel A60s Phones? | Dr.fone
- 3 Facts You Need to Know about Screen Mirroring Vivo S18e | Dr.fone
- How to Simulate GPS Movement in AR games On Xiaomi Redmi 12 5G? | Dr.fone
- How does the stardust trade cost In pokemon go On Nokia C12 Plus? | Dr.fone
- In 2024, Unlocking iPhone 12 Pro Max Lock Screen 3 Foolproof Methods that Actually Work | Dr.fone
- How To Upgrade or Downgrade Apple iPhone 7 Plus? | Dr.fone
- How to Upgrade Apple iPhone 14 Plus without Data Loss? | Dr.fone
- In 2024, Top 15 Apps To Hack WiFi Password On Xiaomi Redmi 12
- Can Life360 Track Or See Text Messages? What Can You Do with Life360 On Motorola G24 Power? | Dr.fone
- The Ultimate Guide to ZTE Nubia Flip 5G Pattern Lock Screen Everything You Need to Know
- Forgot Pattern Lock? Heres How You Can Unlock Itel P55T Pattern Lock Screen
- In 2024, Fake the Location to Get Around the MLB Blackouts on Google Pixel 8 | Dr.fone
- Top 6 Apps/Services to Trace Any Apple iPhone 6 Location By Mobile Number | Dr.fone
- In 2024, Top 12 Prominent Vivo Y27s Fingerprint Not Working Solutions
- How to recover deleted photos from Android Gallery after format on Vivo Y77t
- Title: In 2024, Turning Off Two Factor Authentication From iPhone XS? 5 Tips You Must Know
- Author: Alma
- Created at : 2024-05-19 04:38:04
- Updated at : 2024-05-20 04:38:04
- Link: https://apple-account.techidaily.com/in-2024-turning-off-two-factor-authentication-from-iphone-xs-5-tips-you-must-know-by-drfone-ios/
- License: This work is licensed under CC BY-NC-SA 4.0.
