
In 2024, Turning Off Two Factor Authentication On Apple iPhone 14? 5 Tips You Must Know
Turning Off Two Factor Authentication On Apple iPhone 14? 5 Tips You Must Know
Apple has produced one of the most consumed, acknowledged, and preferred smartphones that allowed them to rule the industry for a considerably long period of time. Their style and presentation were not the only reason that made people look forward to buying an iPhone. Apple created its own operating system and presented their own versions of security and protection. One of the most recognized and impeccable features offered by Apple in its innovative structure was the security and safety through Apple ID and Apple Account. Every important feature that operated throughout the Apple iPhone 14 or iPad was focused over a single entity, the Apple ID. However, apart from the Apple ID, there were several other layers of authentications and verifications that were added throughout the protocol structure. A couple of them are renowned as Two Factor Verification and Two Factor Authentication. This article produces a very generous set of advice that should be looked over while handing these layers of protection. To get a better understanding of the procedures involved, you need to look over the guide to gain better knowledge on how to turn off Two Factor Authentication on your Apple.

Part 1. Is two-step verification the same as two-factor authentication?
There might be a few differences involved in these two security models; however, it should be kept in mind that they focus their purpose on securing the Apple ID of the user. Two Factor Verification is a security protocol that protects access to the various activities performed through the Apple ID. It attenuates an extra verification step across the Apple iPhone 14 device in addition to the password for the Apple ID. The device receives a verification code from an authentication factor that allows the authorities to confirm the credibility of the user.
The Two Factor Authentication is considered as an upgrade to the Two Factor Verification, which was released two years after the Two Factor Verification, in 2015. This authentication method exempted the offline recovery keys and application-specific passcodes. They added a six-digit authentication code onto the original password and produced an offline, time-dependent code that is to be generated through the Settings of the trusted device of the user. This feature was appended into the iOS 9 and OS X El Capitan with a region-specific target.
Part 2. How to turn off two-step verification?
As you are aware of the Two-Step Verification process, it is quite easy and typical in configuring. However, when it comes to turning the settings off, it is also a simple and straightforward procedure that can be easily covered by following the steps provided below.
Step 1: You are required to open the Apple ID Account web page on your browser and sign in with your Apple ID credentials.
Step 2: As you log into the website, access the “Security” section, and tap “Edit” from the options provided on the list.
Step 3: Tap on the “Two-Step Verification” option and turn it off. Confirm to conclude the process. You may be required to select the new security questions and verify the data of birth in the process. As you would be done with it, an email would be received across your connected address for confirmation.
Part 3. How to turn off two-factor authentication? (lower than iOS 10.3)
Two Factor Authentication cannot be turned off in a few cases and accounts for iOS versions greater than 10.3. However, if you have activated Two Factor Authentication across the iOS versions lower than 10.3, you can deactivate the feature through a series of simple steps. The exemption of this security feature across your device leaves it protected only through a password and a few security questions. For turning off the Two Factor Authentication from your Apple device, you need to follow the steps provided as follows:
Step 1: Open your browser and access your Apple ID Account website. Provide the details of your Apple ID and log in.
Step 2: Tap on “Edit” in the “Security” section and turn off the “Two Factor Authentication” option.
Step 3: This would lead you to set new security questions for the Apple ID account, followed by a verification of your date of birth. The successful execution of the process would lead to turning it off.
Part 4. Why can’t you turn off two-factor authentication if you already use it? (iOS 10.3 and later)
For users who have an Apple device with an iOS 10.3 or later version, they cannot turn the Two Factor Authentication off after it is accessed. The latest iOS and macOS included extra layers of security in their features, which led towards a better security foundation and protection of information. Users who have updated their account information can unenroll in two weeks after updating. For this, you are required to simply access the confirmation email that you have received and tap on the link to approach the previous security settings. Thus, it makes it far more than impossible for users to turn their Two Factor Authentication off if they consider it unnecessary for their device. This feature is something that would always remain intact with their device as an extra layer of security. Its absence does leave a chance of illegal access to the Apple iPhone 14 device and an increased risk of a security breach. Since it is directly built across the Apple iPhone 14 device and its settings, this makes it a very hard-to-approach characteristic.
Part 5. How to turn off two-factor authentication by removing Apple ID
Users who are very reluctant to remove the two-factor authentication off their device can consider removing the Apple ID itself for fulfilling the purpose. However, when it comes to executing such tasks, the need for a third-party platform gets evident. Third-party platforms provided dedicated services in providing users with a unique platform of operation with an environment that suits their purpose perfectly. Many platforms provide such impressive services, yet the selection gets quite difficult for a series of reasons. The following pointers explain the reasons to the users over why they should focus on selecting a platform such as Dr. Fone – Screen Unlock (iOS) for this purpose.
- You need to have no excessive knowledge of handling the platform.
- You can cover all the dynamics of unlocking the Apple iPhone 14 device without the use of iTunes.
- The platform provides you with the ability to unlock the passcode of your Apple device with ease.
- It offers you to protect your device from the disabled state.
- Works across all models of iPhone, iPad, and iPod Touch.
- Provides services to the latest version of iOS.
Dr. Fone – Screen Unlock (iOS) makes it easy for the users to control and remove their Apple ID and disable the two-factor authentication across their device. However, when it comes to controlling the platform, it follows a few simple and efficient steps that would guide you in executing the task successfully.
Step 1: Connect your Device and Launch Application
You need to connect your Apple device with the desktop and launch Dr. Fone across the computer. Tap on the “Screen Unlock” tool present on the home window and proceed with the removal of two-factor authentication.

Step 2: Access Appropriate Option
On the next screen that opens, you are required to select “Unlock Apple ID” from the three options. Proceed to your Apple device to take the process further.

Step 3: Trust the Computer
Open the Apple iPhone 14 device and tap on “Trust” over the prompt that appears on the screen. Following this, you need to navigate to the Settings of your device to initiate a reboot.

Step 4: Execution of Process
Once you are done with initiating a reboot, the platform automatically detects the update in the process and initiates removing the Apple ID from the Apple iPhone 14 device. Once the platform is done with the process, it provides a prompt message in the next window displaying the execution of the removal of Apple ID from your device. This also removes the Two Factor Authentication off your device.

Conclusion
The article has presented a very detailed comparison of the Two Factor Verification and Two Factor Authentication and provided an elaborated discussion over how to turn these security features off their devices. The article also discussed a third-party platform that would guide in removing such security features of the Apple iPhone 14 devices over the requirement of the user. You need to go through this article to get a better knowledge of the execution of the mechanism.
How To Erase an Apple iPhone 14 Without Apple ID Password?
Have you ever wondered what happens when you erase the content of your Apple iPhone 14 storage? Erasing an iPhone means restoring it to its factory settings to install the latest iOS version. It also permanently removes all your data, including photos, videos, contacts, apps, and other information stored on the Apple iPhone 14 device.
This process is often necessary when you sell or give away your Apple iPhone 14 to ensure your personal information remains secure. But, you may encounter a situation where you should learn how to erase an iPhone without an Apple ID. While this may seem challenging, you can use a few methods to achieve this goal. This article will show you how to do it with or without an Apple ID password.


Part 1: A Checklist on What To Do Before Erasing an iPhone
If you’re looking at how to erase an iPhone without an Apple ID or account password, you’ve come to the right place. Before you begin, preparing your device and ensuring you have all the necessary information is crucial. Here’s a checklist of what to do before erasing your Apple iPhone 14:
Backup Your Apple iPhone 14
You can back up to iCloud or use Finder on macOS 10.15 or later. Remember that iCloud backups are stored on Apple’s servers and always encrypts backups. On the other hand, computer backups are stored on your computer’s hard drive and require a connection to the backup computer. Consider what your needs and preferences are when choosing between these two backup options.

Prepare Your Apple iPhone 14 Passcode
You’ll need your Apple iPhone 14 passcode to erase an iPhone. If you’ve forgotten your passcode, reset it using recovery mode.
Ready Your Apple ID Password
You may be asked to provide your Apple ID password to disable the Find My iPhone function and remove the Apple iPhone 14 device from your account. Have it handy to avoid any delays. It’s necessary for security verification during the erasure process.
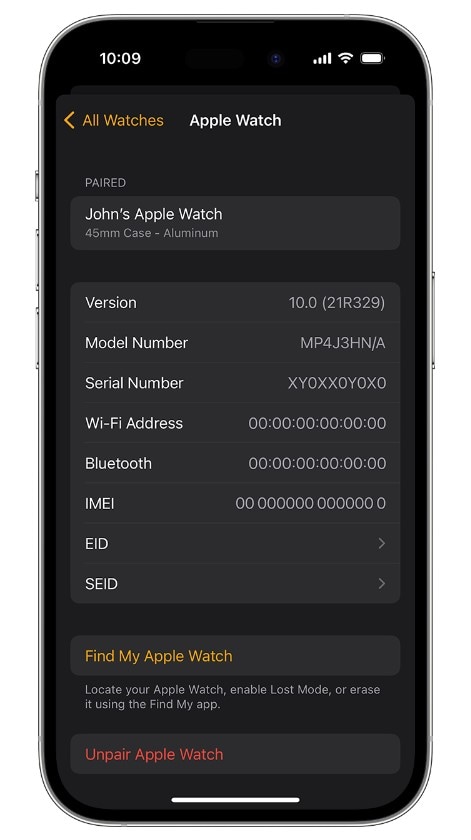
Unpair Apple Watch
If you own an Apple Watch, unpair it from your Apple iPhone 14. It ensures a smooth disconnection and prevents complications when erasing the Apple iPhone 14 device.
Cancel Your AppleCare Plan
If you have an active AppleCare plan for your Apple iPhone 14, cancel it on your Apple iPhone 14 before erasing the Apple iPhone 14 device. You can cancel your AppleCare plan by phone by calling AppleCare customer support. It will prevent any unnecessary charges after the erasing process.

Sign Out of iCloud
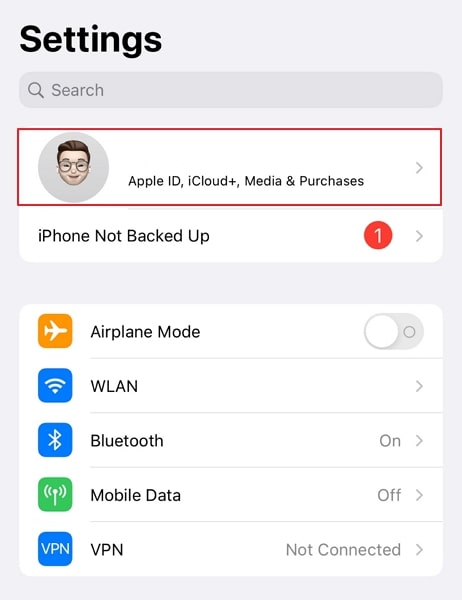
If your Apple iPhone 14 has iOS 10.3 or later, open the Settings app, then tap on your name at the top. Next, scroll down, tap Sign Out, enter your Apple ID password, and tap Turn Off.
Remove Your Apple iPhone 14 From Your List of Trusted Devices
Remove your old device from your list of trusted devices in your Apple ID settings for added security. This measure strengthens the defense against unauthorized access to your data.
Part 2: How To Erase iPhone Without Apple ID Password via Settings?
Erasing an iPhone and restoring it to factory settings is a straightforward process you can do in a few steps. Whether you’re preparing to sell or gift your device or troubleshooting persistent software issues, erasing your Apple iPhone 14 contents can enhance its performance. The process is easy if you have your Apple ID password readily available.
However, if you’ve forgotten your Apple ID password, don’t fret. Follow the guide below to reset your Apple ID password and erase all content and settings on your Apple iPhone 14:
- Step 1: Open the Settings application, then tap [name].
- Step 2: Go to Sign-In & Security > Change Password.
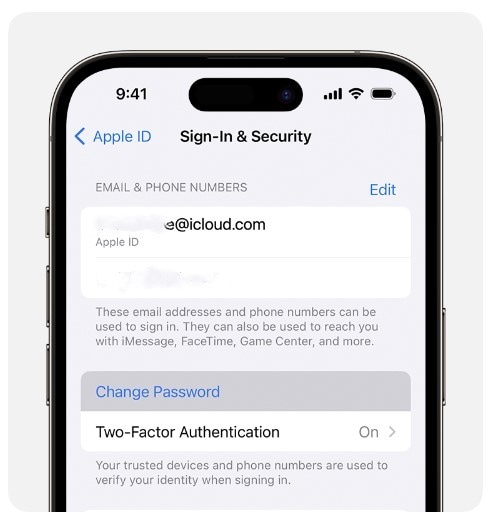
- Step 3: Follow the on-screen instructions to reset your Apple ID password.
- Step 4: Go to General > Reset from the Settings app, then tap Erase All Content and Settings.

- Step 5: Input your Apple ID password or your passcode when prompted.
- Step 6: Click Continue to confirm. Then, wait while the contents are being removed from your Apple iPhone 14 device.
Part 3: How To Erase iPhone Without Apple ID Password on Computer?
Activation lock is a security feature. It prevents anyone from activating an iPhone without your Apple ID password. If you try to factory reset your Apple iPhone 14 without turning off Find My iPhone, the activation lock will be in place. It means you need to enter your Apple ID password to activate the Apple iPhone 14 again. To turn it off, also ensure to turn off Find My on your device.
Go to Settings > [your name] > Find My or Find My iPhone to check.
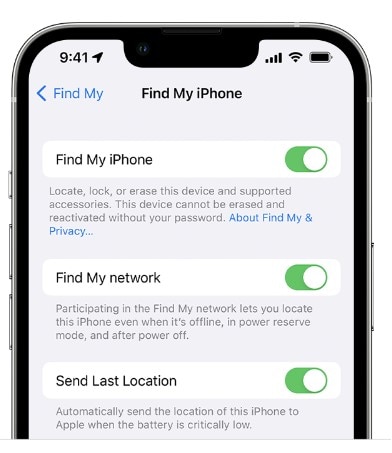
If you want to erase an iPhone without Apple ID password on your computer, you can do so as long as you turn off the Find My. However, you’ll need to put your Apple iPhone 14 into Recovery Mode first.
- Step 1: Turn off your Apple iPhone 14, then put it into Recovery Mode.
- For iPhone 8 or later: Press and hold the Side button.
- For iPhone 7 or iPhone 7 Plus: Press and hold the Volume Down button.
- For iPhone 6s or earlier: Press and hold the Home button.
- Step 2: Connect your Apple iPhone 14 to the computer with the button held down.
- Step 3: Hold the buttons steadily until the Recovery Mode screen is visible.
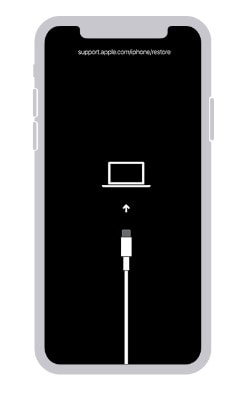
Step 4: Switch on your Apple iPhone 14. Then, connect it to a Mac or Windows computer using a USB cable.
Step 5: When prompted, follow the on-screen instructions to enter your device passcode or click Trust This Computer.
Step 6: Depending on your computer, open Finder or iTunes. Then, do either of the following:
For macOS 10.15 or later: Select your Apple iPhone 14 under the Locationssection, then click Restore iPhone.
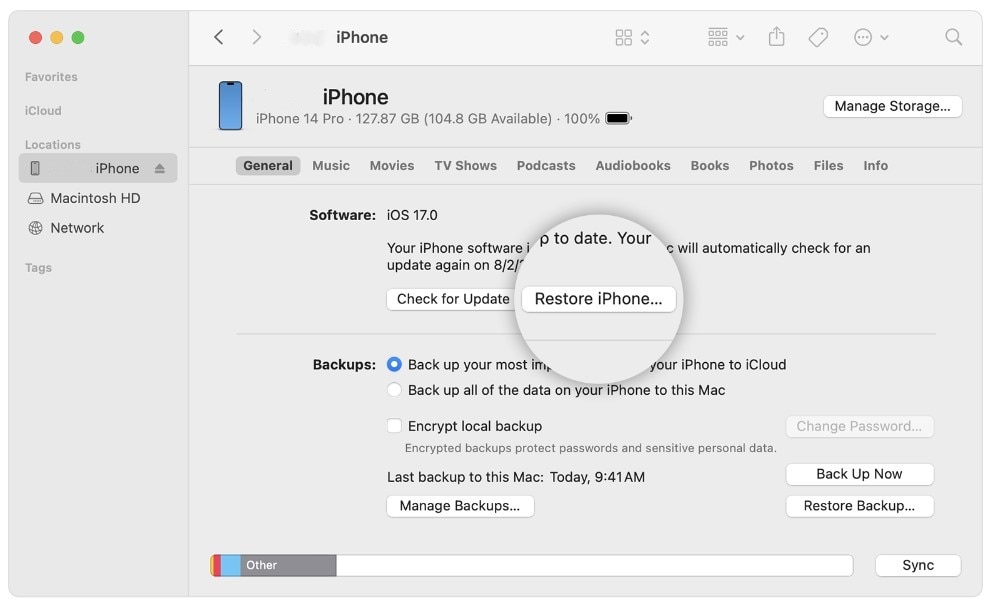
- For macOS 10.14 or earlier or Windows: Click the Apple iPhone 14 in the top left window, click Summary, then click Restore iPhone.
- Step 7: Click Restore in the dialogue box. iTunes or Finder will download your Apple iPhone 14’s latest iOS software and restore the Apple iPhone 14 to its factory settings.
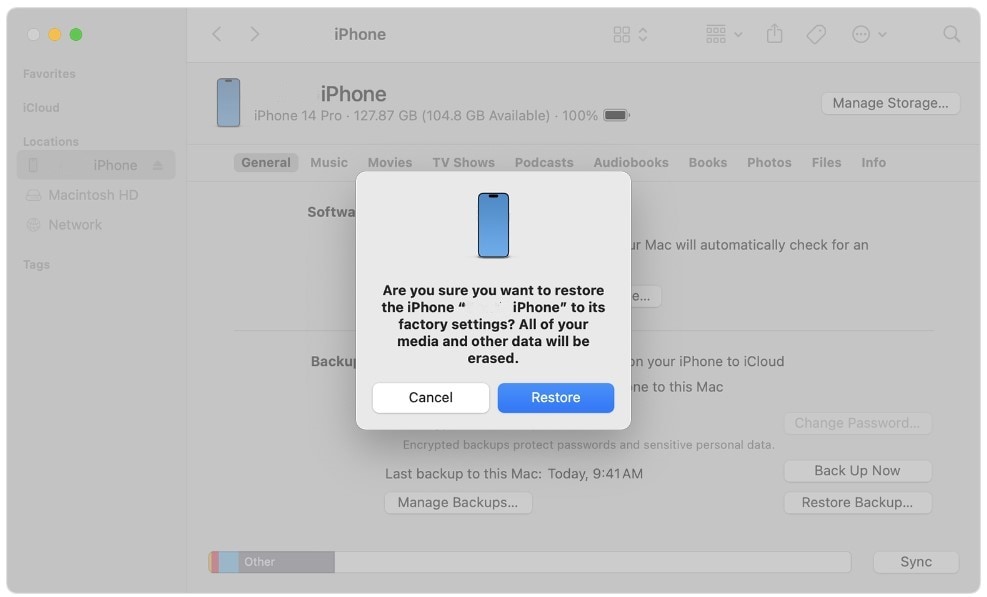
- Step 8: Once the restore is complete, the Apple iPhone 14 will restart.
Part 4: Erase an iPhone Without Apple ID via Activation Lock Support Request
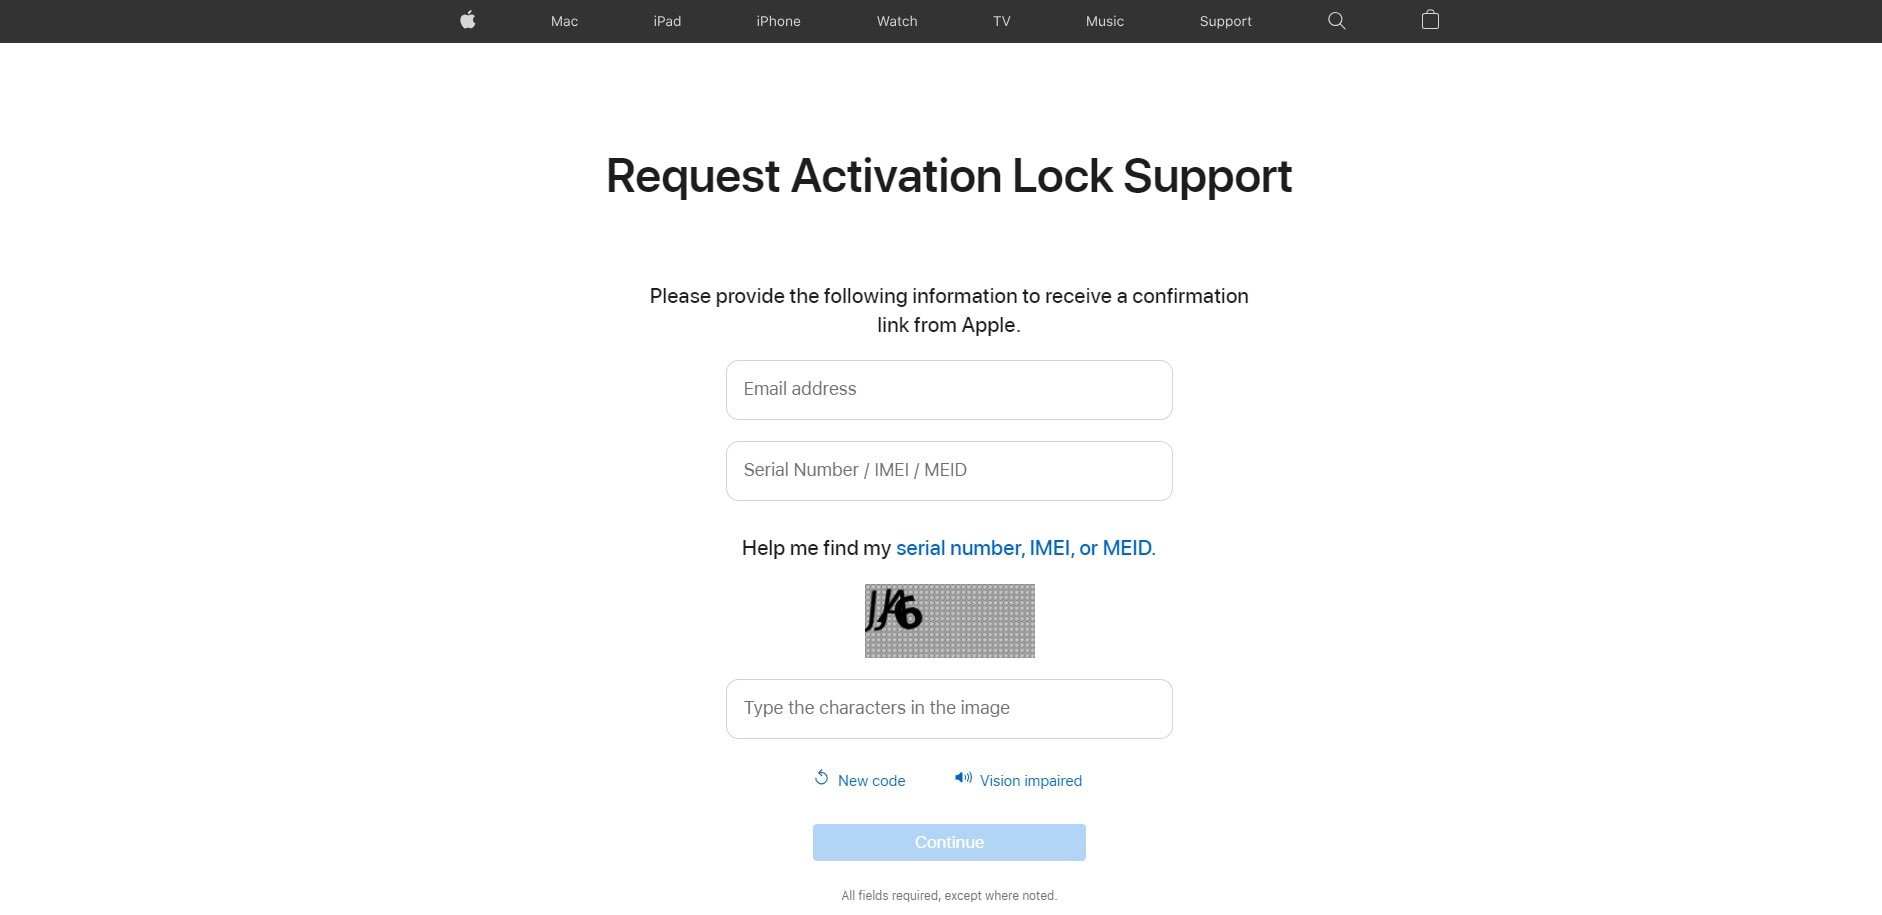
You can request to unlock Activation Lock support from Apple if your device is not in Lost Mode or if you need to erase an iPhone without an Apple ID password. To do this, you need to provide proof of purchase of the iPhone. It can be in the form of a receipt, invoice, or credit card statement.
The proof should show the serial number of the iPhone, IMEI, or MEID. Once Apple unlocks the Activation Lock on your Apple iPhone 14, your Apple iPhone 14 contents will be permanently erased. Also, note that if you restore your Apple iPhone 14 from a local backup, the Activation Lock will re-enable.
To start this request, follow these steps:
- Step 1: Head to Apple’s Activation Lock support page. (al-support.apple.com)
- Step 2: Scroll down the page, select the agreement checkbox, click Continue, and it will redirect you to a new page.

- Step 3: Enter your email address and other required information, then click Continue.
Part 5: How To Erase an iPhone Without an Apple ID Password in Minutes?
The time it takes to process an unlock Activation Lock support request can take days. If your device is erased as soon as possible, use the Wondershare Dr.Fone Screen Unlock tool. This third-party mobile solution can erase an iPhone without an Apple ID password, even if the Find My feature is enabled. Also, it can:
- Remove several iOS lock screens, such as passcode, Touch ID, and more.
- Remove the iCloud Activation Lock
- Bypass Apple ID from iPhone without a password
- Remove MDM restrictions
Dr.Fone Screen Unlock is a simple, easy-to-use tool compatible with the latest iOS models. Follow these steps to remove the Apple ID from your Apple iPhone 14 and erase all its contents within minutes:
Step 1: Download and install Dr.Fone on your desktop. Launch the app and connect your Apple iPhone 14 using a USB cable.
Step 2: From the Toolbox homepage, select Screen Unlock, then choose iOS.
- Step 3: Select Remove AppleID to delete iPhone contents, including the Apple ID.

- Step 4: The next screen shows the connected device. Click Unlock Now.

- Step 5: Click Yes to confirm you have set up a screen lock.

- Step 6: Click Yes to verify you have enabled two-factor authentication on your Apple iPhone 14.

- Step 7: Follow the in-app instructions to put your device in Recovery Mode.

- Step 8: Select an option from the System Version drop-down list, then click Start.

- Step 9: Wait while the iOS firmware downloads.

- Step 10: Once downloaded, click Unlock Now to proceed.

- Step 11: Enter the code in the dialogue box and click Unlock.

- Step 12: Keep your Apple iPhone 14 connected to your computer while the process progresses.

- Step 13: Click Done and check that your Apple iPhone 14’s data and Apple ID have been removed.
Conclusion
It can be challenging to erase an iPhone without an Apple ID password, but it’s achievable by following the right steps. Remember to weigh the security implications and back up your data beforehand.
If you’re seeking a straightforward method on “how to erase an iPhone without Apple ID,” Dr.Fone Screen Unlock tool is a good solution. With its user-friendly interface and efficient operation, Dr.Fone simplifies the process, making it accessible to users of all technical levels. Don’t let a forgotten Apple ID password hinder your device’s functionality. Try Dr.Fone Screen Unlock and reclaim control of your Apple iPhone 14.
Removing Device From Apple ID For your Apple iPhone 14
Has the latest iPhone taken your attention lately? With a new Apple device in use, you might have cluttered a lot of devices under a single Apple ID. You can face multiple issues when you turn to backup content or save it on your Apple ID. It might be possible that the data of some other Apple device gets restored onto your new Apple device, which is never your priority.
This leads to removing unwanted devices from the Apple ID. If you are about to sell out or close down a device in the future, it is best to remove the Apple iPhone 14 device from Apple ID. This will help you save yourselves from the complicated conditions created by having multiple devices on the same Apple ID.

Part 1: Should I Remove Old Devices From My Apple ID?
Why should one look to remove their old devices from the Apple ID? There are multiple reasons involving the methods of removing devices from Apple ID. Before we get to the methods, let us first review why this is needed:
- Managing Devices on Apple ID: If you consider removing the Apple iPhone 14 devices from the Apple ID, this will help you keep track of all the associated devices with your credentials. Devices that have been sold and are not linked are not your responsibility to manage.
- Avoid Notifications and Updates: For devices that are old and will be sold out by you, you might receive notifications and updates. To avoid them, it is best to remove the Apple iPhone 14 device from your Apple ID to stop all notifications and updates.
- Protection of Privacy: When a device is sold out, it is best to remove it from your Apple ID to avoid breaching personal information. Someone else might try accessing or receiving your data.
Part 2: 4 Ways to Remove a Device From Apple ID
You would’ve surely understood the reasons for removing a device from the Apple ID. This can help you propagate into understanding the multiple techniques of performing this action. We have outlined some unique methods for removing Apple devices. To know how to remove the Apple iPhone 14 device from Apple ID, find out more about these methods below:
Method 1: Using an iPhone, iPad, or iPod Touch
The first and most straightforward technique of removing devices from Apple ID is through iPhone, iPad, or iPod Touch. If you wish to remove a device from your Apple ID, use any of the available Apple iOS devices and continue with these steps:
Step 1: Start by opening the “Settings” application on your iOS device and select your name displayed on the top.
Step 2: On the next screen, find the Apple iPhone 14 devices connected to the same Apple ID. Select the particular device that you wish to remove from the ID.
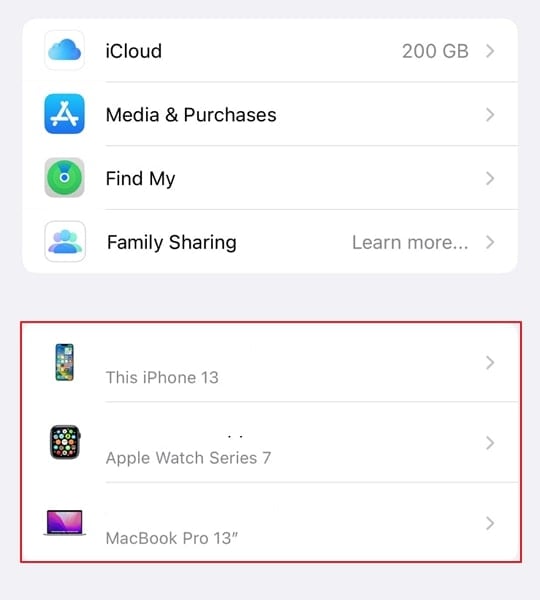
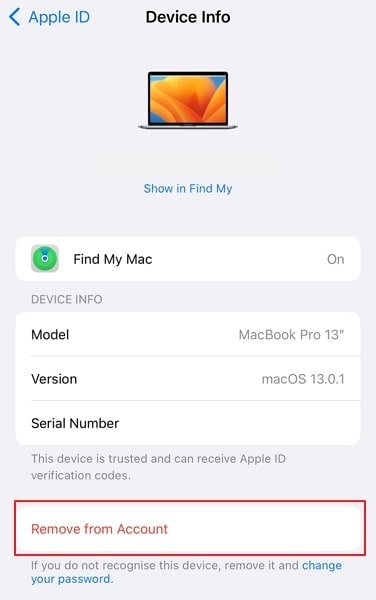
Step 3: As you proceed into the next window, find the “Remove from Account” option for executing the task. Once selected, you will be prompted again, where you have to select “Remove” to confirm the actions.
Method 2: Using a Mac
You can also try using your Mac to remove a particular device from your Apple ID. To do that perfectly, it is best to use the following steps as a guide for removing the Apple iPhone 14 device:
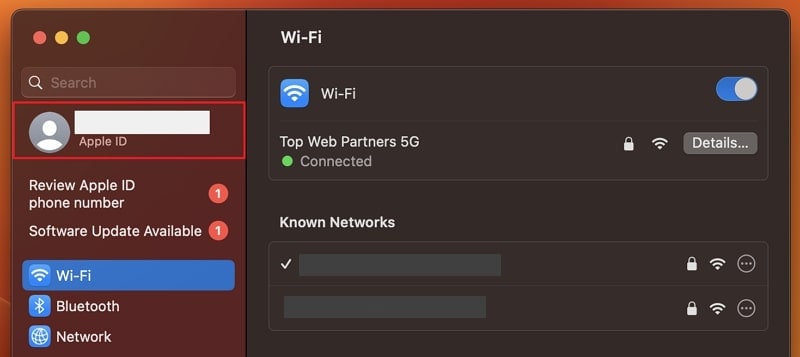
Step 1: Launch your Mac and click on the “Apple” icon displayed on the top-left of the screen. Next, you have to tap on the “System Settings” option from the drop-down menu.

Step 2: As a new window opens, continue by clicking on your name to access your Apple ID details. With the screen displaying all options, scroll down to find the respective device.
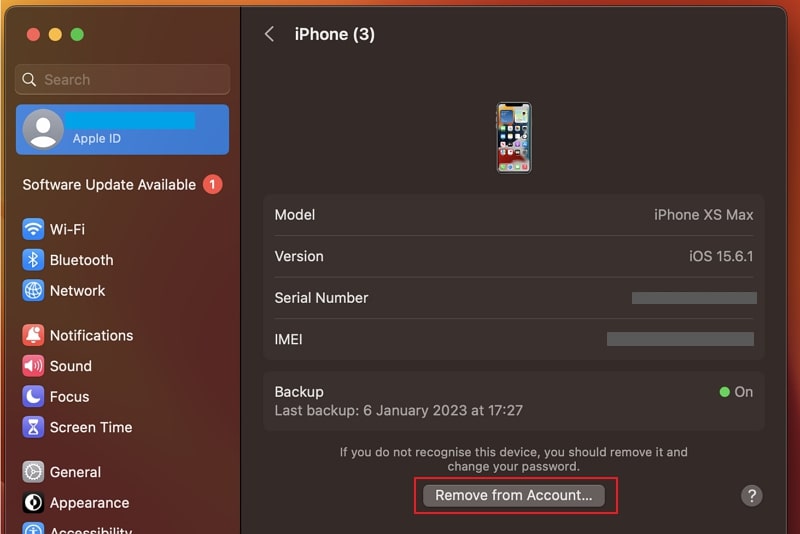
Step 3: Once you continue to the next screen, find the “Remove from Account” button on the bottom of the options and lead to the following prompt. You will have to tap on “Remove” to execute the process.
Method 3: Using the Apple ID Account Page on the Web
This process can also be performed using the Apple ID account page from the web browser. For that, you will have to access the webpage from this link .
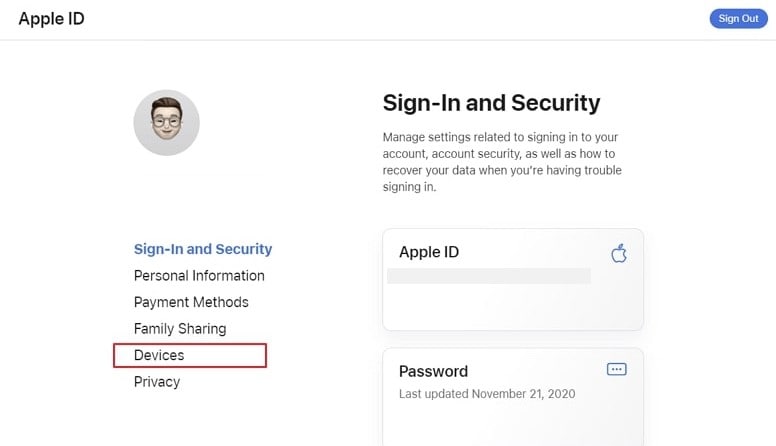
Step 1: As you access the webpage and log into it with your Apple ID, continue to the homepage. Lead to the “Devices” section on the left panel to open a new screen.
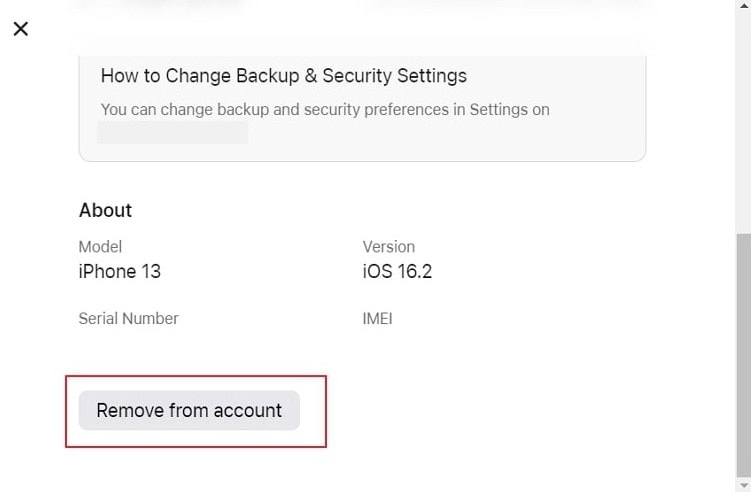
Step 2: Following this, select the Apple iPhone 14 device that you want to remove from the Apple ID. As a new window opens, select “Remove from Account” and continue to execute this process.
Method 4: Using the iCloud
iCloud can be another source to remove devices from Apple ID. To know how this method can be used to remove the Apple iPhone 14 device from Apple ID, look into the provided steps:
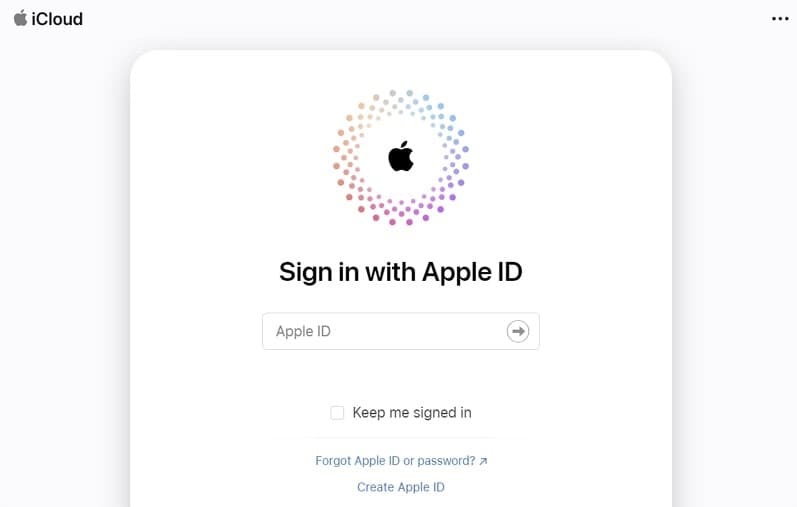
Step 1: Launch iCloud.com on your computer from a web browser and continue to log in with your Apple ID.
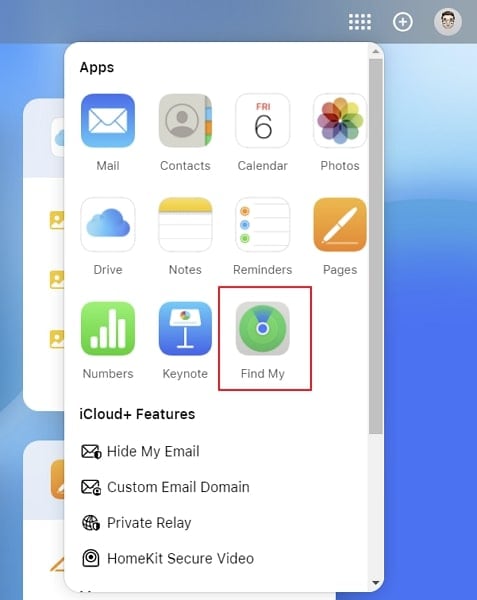
Step 2: As you get into the homepage of your iCloud, select the “Thumbnail” button on the top-right of the screen. After that, choose the “Find My” feature from the available options in the list.
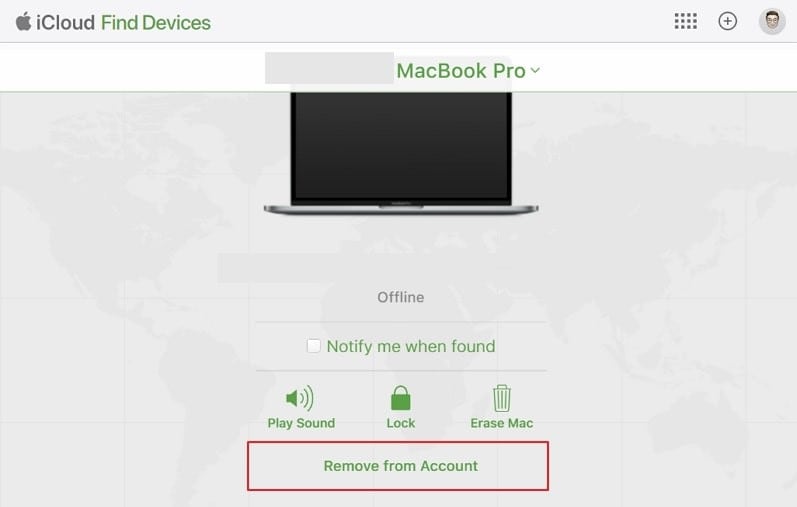
Step 3: You will find yourselves on a new screen where you have to click the “All Devices” option. Select the Apple iPhone 14 device that you wish to remove to open a new screen. Select the “Remove from Account” option to remove the Apple iPhone 14 device from the Apple ID.
Part 3: Bonus Tips: Forgot Your Apple ID Password? Here’s What To Do
While you can remove a device from the Apple ID, you might come into re-using it again for some purpose. If it comes to such a condition and you have forgotten your Apple ID password, the Apple iPhone 14 device would be useless. The best thing to do in such a situation is to go with Dr.Fone - Screen Unlock (iOS) for unlocking your device.
Dr.Fone - Screen Unlock (iOS) is designed to provide confused iOS users with a proper direction to easily unlock their locked Apple devices. The tool is built to provide solutions in situations where you can bypass Activation Lock or easily unlock your Apple ID. It is an excellent tool serving Apple users with the option of removing all kinds of locks.
Key Features of Having Dr.Fone - Screen Unlock (iOS)
It is great to learn more about the tool to process the method perfectly. For that, look into the features presented next for a better understanding of Dr.Fone - Screen Unlock (iOS):
- It provides support for the latest iOS version and Apple devices.
- The tool supports removing all kinds of locks, including Face ID, Touch ID, screen time passcode, etc.
- It can also remove Apple ID from the Apple iPhone 14 device without requiring iTunes.
Steps For Unlocking Apple ID From Apple Device with Dr.Fone - Screen Unlock (iOS)
We will now shift to knowing more about how to bypass Apple ID from a device whose password is forgotten:
Step 1: Launch Dr.Fone and Open Screen Unlock
To start the process, it is best to download and install the latest version of Wondershare Dr.Fone on your computer. As it launches, continue to select “Screen Unlock” from the options.
Step 2: Proceed to Remove the Apple ID
You will have to continue to the option of “Remove Apple ID” from the list to unlock the Apple ID.
Step 3: Trust Computer and Start Unlocking
Turn on your Apple device and continue to trust the Apple iPhone 14 device it is connected to. After tapping on “Trust,” you can continue with the process. On your computer’s screen, click on “Unlock Now” to proceed next.
Step 4: Enter Recovery Mode and Start
Put your Apple device into the Recovery Mode by following the on-screen instructions on the computer’s screen. As it is done, the unlocking process starts automatically. The process will be completed in a few seconds, and the prompt will display the completion of the method.
Part 4: FAQs about Apple ID
- How to create a new Apple ID on an iPhone?
Open the “App Store” and click the “Profile” icon on the top-right. You must continue clicking on the “Create New Apple ID” button after you have signed out of iCloud of your previous ID. Provide all required details for creating the Apple ID and confirm the process.
- How do I add a device to My Apple ID?
To add a device to your Apple ID, you have to configure it first and log in with your existing ID from there. This is how it can be added to the Apple ID list of devices.
- How many devices can I add to My Apple ID?
Apple ID allows you to connect ten devices under the same account. In these ten devices, there cannot be more than five computers associated with the Apple ID.
- Why can’t I create a new Apple ID?
If you are unable to create a new Apple ID, it is possible that you would have exceeded the maximum number of Apple IDs that can be set up with iCloud on one device.
- How can I Find My Apple ID password?
There is no way to find your Apple ID password on your devices. If that is the case, you will have to reset the password or remember it so that you can use it for a purpose.
Conclusion
You have learned proper techniques for removing devices from your Apple ID in this article. With all these methods, you can remove any device from Apple ID without requiring additional tasks. This article has also helped you with a tool to help you in situations where you have forgotten your Apple ID password. Dr.Fone - Screen Unlock (iOS) is an excellent option for removing security locks from iOS devices.
Also read:
- [New] Pro Tools 2021 Elevating Your TikTok Footage on Mac
- [New] Visualizing Tweet Reactions - A Complete Twitch-Tale for '23
- [Updated] Concealed Chronicle Watchers 5 Premier Application Choices for 2024
- [Updated] Innovative Approaches to Network Broadcast with VLC
- 2024 Approved Top 5 PS1 Games Emulators - Resurrecting Console Legends on PC
- How to Delete iCloud Account From Apple iPhone 11 Pro Max without Password?
- How to Erase an Apple iPhone 13 mini without Apple ID?
- How to Unlock Apple iPhone X When We Dont Have Apple ID or Password?
- In 2024, Enhancing Videos with Camtasia's Ken Burns Trick
- In 2024, Everything To Know About Apple ID Password Requirements For iPhone 8
- In 2024, Top-Notch Solutions for Disabled Apple ID On Apple iPhone 14 Pro Making It Possible
- Overcoming Auto-GPT Snags: Solutions for Top 6 Hurdles
- Title: In 2024, Turning Off Two Factor Authentication On Apple iPhone 14? 5 Tips You Must Know
- Author: Alma
- Created at : 2024-10-16 16:23:11
- Updated at : 2024-10-20 16:31:33
- Link: https://apple-account.techidaily.com/in-2024-turning-off-two-factor-authentication-on-apple-iphone-14-5-tips-you-must-know-by-drfone-ios/
- License: This work is licensed under CC BY-NC-SA 4.0.