
Protecting Your Privacy How To Remove Apple ID From Apple iPhone 7 Plus
Protecting Your Privacy: How To Remove Apple ID From Apple iPhone 7 Plus
Protecting your privacy is crucial in today’s digital age. Learning how to remove an Apple ID from an iPhone is necessary to safeguard your data. With easy access to emails, photos, and sensitive information, it’s a gateway to your private world. Aside from your Apple ID, read how to remove your iCloud account from your Apple iPhone 7 Plus.
Doing so ensures your device is no longer linked to your personal information. It reduces the risk of unauthorized access and data breaches. Don’t underestimate the importance of this security measure. Explore the article below to learn more.

Part I. When Consider to Remove an Apple ID From an iPhone
Removing an Apple ID from an iPhone is crucial for various reasons. Here are some important scenarios when removing an Apple ID is essential.

- Resale. Unlinking your Apple ID is essential to protect your personal data when selling or giving away your Apple iPhone 7 Plus. It prevents the new owner from accessing your photos, messages, and accounts. It safeguards your privacy and reduces the risk of data breaches.
- Switching Apple ID. Removing the old one ensures a smooth transition if you’re using a new Apple ID. If you use a different account, it also avoids confusion. That is vital for managing apps, media, and subscriptions associated with the new ID.
- Privacy and Security. Active Apple IDs on your device could lead to unauthorized access to your personal information. Removing them enhances the security of your Apple iPhone 7 Plus. It reduces the risk of data leaks, identity theft, and unwanted intrusion.
- **App Store and iTunes Changes.**Sometimes, App Store or iTunes changes may require you to reconfigure your Apple ID. Removing the old one can ease the process and prevent conflicts or errors.
- **Resolving Account Issues.**You’ll sometimes face account-related problems like forgotten passwords or locked accounts. Temporarily removing the Apple ID can aid in troubleshooting and resolving these issues.
- **Device Deactivation.**Removing the Apple ID is essential to prevent unauthorized usage or resale if your device is lost or stolen. This action adds an extra layer of security and peace of mind.
Part II. 7 Methods To Remove an Apple ID From Your Apple iPhone 7 Plus
If you need to remove an Apple ID from your Apple iPhone 7 Plus, there are several methods you can try. Below are seven common methods, including steps and options for when each method may be useful.
Using iPhone Settings To Sign Out
Signing out Apple ID via Settings is ideal if you can access the Apple ID password. It’s useful for personal account removal and if you want to keep your data intact.
- Step 1: Open Settings application on your Apple iPhone 7 Plus. Next, scroll down and tap your name at the top (Apple ID, iCloud, iTunes & App Store).

- Step 2: Scroll down and select Sign Out. Your’ll see your device asks you to enter your Apple ID password. Enter your credentials and tap Turn Off.
Restoring to Factory Settings
The method below erases all data on your Apple iPhone 7 Plus, including the Apple ID. Use this to start fresh, but be cautious, as all data will be lost. Therefore, ensure you’ve backed up your data to iCloud before starting.
- Step 1: Go to Settings on your Apple iPhone 7 Plus. Scroll down and tap General.

- Step 2: Go to Reset > Erase All Content and Settings. Then, enter your passcode and confirm.
Contact Apple Support
If you can’t access the Apple ID password and can’t sign out from the Apple iPhone 7 Plus device, contact Apple Support. They may assist you in verifying your identity for account recovery or removal.

Contacting the Previous Owner (If Used or Given as a Gift)
If the Apple iPhone 7 Plus was previously used or gifted, try contacting the previous owner. They can remove their Apple ID remotely from the Apple iPhone 7 Plus device by signing in to their Apple account on iCloud.com.

Apple’s Account Recovery
Apple offers an account recovery process if you forget your Apple ID password. It involves verifying your identity and resetting your password. It can indirectly help in removing the Apple ID from your device. Here’s how:
- Step 1: Launch a web browser and visit the Apple ID account page (appleid.apple.com). Click Forgot password?.

- Step 2: Enter your Apple ID and click Continue. You’ll be presented with two options: Email authentication or Answer security questions. Choose the method you prefer or the one you have set up.

- Step 3: Follow the on-screen instructions to verify your identity. The step might involve answering security questions, providing a recovery email, or using two-factor authentication if set up.
Once your identity is verified, you can set a new Apple ID password. After resetting the password, use the new password to sign in on your Apple iPhone 7 Plus. This process indirectly helps in removing the Apple ID from the Apple iPhone 7 Plus device.
Local Apple Store for In-Store Assistance
You can visit a local Apple Store for in-person assistance. They may help with Apple ID issues and guide you through removal.

Using a third-party tool is another option if all the common methods fail, or you want a user-friendly process. Using a reliable third-party tool can help safely remove an Apple ID from your Apple iPhone 7 Plus. The next section will show you how to remove an Apple ID from an iPhone using Wondershare Dr.Fone - Screen Unlock.
Part III. Final Solution to Removing Apple ID From iPhone
Dr.Fone - Screen Unlock is a reliable choice to help you remove an Apple ID. Here are the step-by-step instructions to help you through the process.
- Step 1: Download and install Dr.Fone Screen Unlock on your computer. Launch the app and click Toolbox > Screen Unlock.

- Step 2: Connect your Apple iPhone 7 Plus to the computer using a USB cable. Next, choose Remove AppleID.

- Step 3: Follow the on-screen instructions provided by Dr.Fone - Screen Unlock. It will download the respective iOS firmware when the app starts the Apple ID removal process.

- Step 4: If the Apple ID is removed, there should be a screen prompt upon completion. Click Done to Try Again to repeat the process if unsuccessful.

Part IV. Pro Tip-Simplifying All Your Apple ID Concerns With a Reliable Solution
Dr.Fone Screen Unlock is a comprehensive tool that simplifies removing your Apple ID from your Apple iPhone 7 Plus. Below are some of the benefits of using the tool.
- Dr.Fone offers an intuitive and hassle-free solution. It’s suitable for users of all levels of technical expertise. The software streamlines the Apple ID removal process, saving you time and frustration.
- **Easy Process.**Just with the straightforward steps, you can effectively remove your Apple ID. Dr.Fone eliminates the complexity often associated with such tasks.
- **No Data Loss.**One of the most significant advantages of Dr.Fone Screen Unlock is that it allows you to remove the Apple ID without any data loss. Your apps, photos, and other valuable information remain intact, ensuring you don’t sacrifice your personal data for security.
Conclusion
Knowing how to remove your Apple ID from your Apple iPhone 7 Plus is important in protecting your privacy and sensitive information. The article has outlined various methods, from standard procedures to advanced tools, to help you achieve that.
Whether you’re reselling your device, switching Apple IDs, or facing security concerns, taking action to remove your Apple ID from an iPhone is the key to safeguarding your data. For added convenience, consider Dr.Fone - Screen Unlock. It’s a great alternative when other methods fall short. Don’t wait; take control of your data security today.
The Easy Way to Remove an Apple ID from Your MacBook For your Apple iPhone 7 Plus
Apple has a great ecosystem of devices and services that can be controlled using a single key, your Apple ID. It can be used to login into every Apple service, from Apple Music to FaceTime. However, there are many reasons which can force you to remove your Apple ID from devices like MacBook, iPhone, etc. That makes it important for you to learn how to remove Apple ID from your MacBook safely.
Suppose you need to remove your Apple ID from your Mac but don’t know to do this, then this article is for you. You will also learn to remove Apple ID from iOS devices without a password.

Part 1: Why Delete Apple ID and iCloud Account?
There are as many reasons to leave the Apple ecosystem as why you should join it. Apple devices are known for security, but it also means that you have less control over their settings. It is also a closed ecosystem that forces you to limit yourself to a specific set of apps and services. Some of the reasons why people might want to remove their Apple ID from their MacBook are the following:
- Switching Platforms: If you intend to leave Apple devices and move to another platform like Android, it makes sense to delete the Apple ID. Deleting the ID will make it safer for you to sell your old Apple device to others.
- Privacy Concerns: While Apple is comparatively secure, your data is still stored on Apple servers. It means the company can still access your data. It will require deleting your Apple ID if you want to delete all personal data from Apple servers.
- Changing Account: Getting a new Apple ID means you need to delete your old Apple ID. It will save you the trouble of managing two different IDs with multiple accounts associated with each one.
- Shared Apple ID: It is possible that you were sharing your account with your partner or another family member and now want to get your own account. Removing the old account completely and using a new one can be the safest way.
Part 2: If I Delete Apple ID, Will I Lose Everything?
Deleting your Apple ID is not insignificant because it is your key to the Apple ecosystem, as mentioned above. Though it won’t affect your data storage in local device. However, you will no longer be able to access your data store across multiple Apple services like iCloud, Apple Music, FaceTime, iMessage, or other services that require an Apple ID can no longer be used.
You won’t be able to purchase or access purchased items from the App Store, iTunes Store, or other Apple services. Remember, deleting your Apple ID is a permanent action and cannot be undone.
Part 3: How to Remove Apple ID/iCloud Account from Mac with Password?
The process of removing Apple ID from a Mac is easy and quick. Before removing the Apple ID, you need to remember that all the services that require Apple ID will no longer work. To remove the Apple ID from your MacBook, follow these steps:
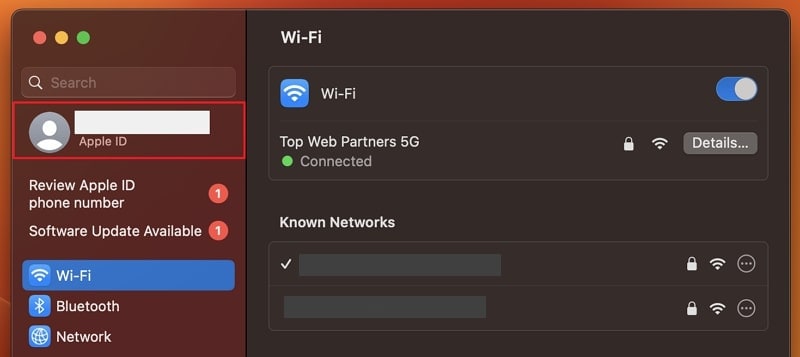
Step 1: Open your Mac and access the “System Settings” from the “Apple Logo” icon. Here, click on your Apple ID name from the top of the left sidebar. Scroll to the bottom of the Apple ID tab to locate the “Sign Out” button.
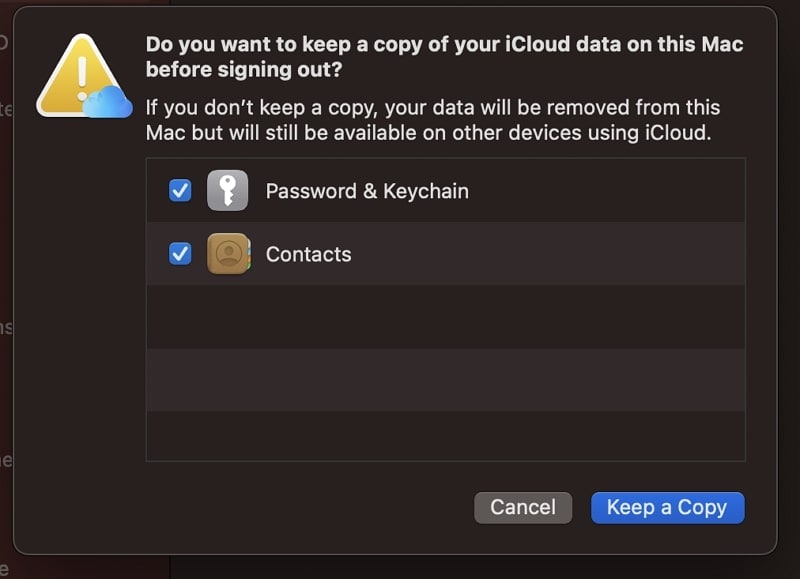
Step 2: Press the “Sign Out” button to remove your Apple ID from the Mac. A prompt will appear asking if you want to keep a copy of your passwords and contacts on your laptop. Select them according to your needs.
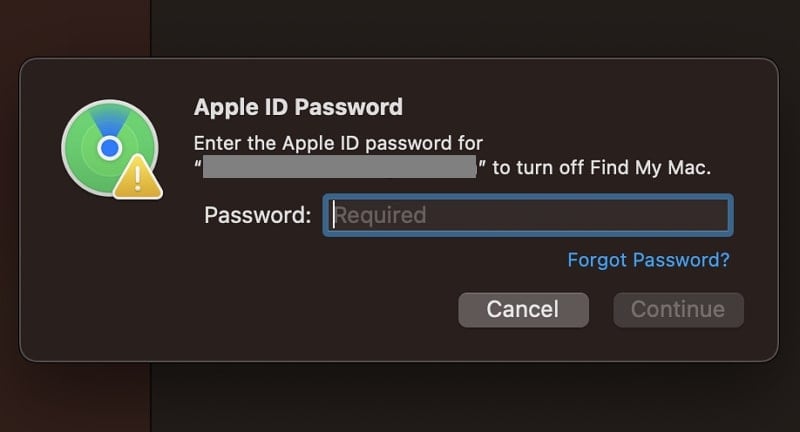
Step 3: On the next window, it will ask you to provide your Apple ID password. Provide the password to complete the process of removing your Apple ID from your Mac.
Bonus Tip: How to Remove Apple ID from iPhone/iPad Without Knowing the Password?
Forgetting your Apple ID credentials is also a common reason for wanting to remove your Apple ID from your Apple iPhone 7 Plus. Another such case is buying a second-hand iPhone with a logged-in Apple ID without knowing the password. You need a specialized tool like Dr.Fone - Screen Unlock (iOS) to remove Apple ID in these cases.
With Dr.Fone - Screen Unlock (iOS), you can remove the Apple ID from your Apple iPhone 7 Plus or iPad and regain access to the Apple iPhone 7 Plus device. This software can also remove the iCloud activation lock on an iOS device if you don’t know the login credentials of the previous owner. It is the best tool if your Apple iPhone 7 Plus has become locked or disabled due to a forgotten passcode or other issues.
Key Features of Dr.Fone - Screen Unlock (iOS)
- Dr.Fone - Screen Unlock (iOS) can remove passcodes, pattern locks, fingerprint locks, and other types of locks from iOS devices.
- With the help of this tool, you can remove the encryption of your iTunes backup. It will also help you restore your iTunes backup to your new iPhone even if you changed your Apple ID.
- If you have forgotten the username or password of your Apple iPhone 7 Plus MDM, this tool allows you to bypass or remove MDM to access the Apple iPhone 7 Plus device.
- It can also unlock SM Lock or Carrier Lock on your Apple iPhone 7 Plus. That allows you to use your Apple iPhone 7 Plus freely if you want to travel internationally.
Steps to use Dr.Fone - Screen Unlock (iOS) for Removing Apple ID
Dr.Fone - Screen Unlock (iOS) has a straightforward interface and provides clear instructions for removing Apple ID from your Apple iPhone 7 Plus. Your Apple iPhone 7 Plus will be reset during the process, and you will lose the data. It is advised you create a backup before starting the procedure. To start the process of removing Apple ID from your Apple iPhone 7 Plus, follow the steps given below:
Step 1: Establish the Connection between iPhone and the Apple iPhone 7 Plus device
Use a USB cable to connect your Apple iPhone 7 Plus to your computer and launch Dr.Fone. Next, proceed with the “Screen Unlock” tool from the main interface and “Remove Apple ID” on the next screen. Now move to the iPhone, unlock it, and select “Trust” in the “Trust this Computer” pop-up.
Step 2: Put Your Apple iPhone 7 Plus into the Recovery Mode
You are required to put your Apple iPhone 7 Plus into Recovery Mode before you can remove the Apple ID. Follow the on-screen instructions to the letter to put your Apple iPhone 7 Plus into Recovery Mode. Once the Apple iPhone 7 Plus has entered the recovery mode, it will reset and restart. After restarting, the process of removal of the Apple ID will begin.

Step 3: Remove Your Apple ID from the iPhone
Wait for the program to complete the process of removing your Apple ID from your phone. Once it is completed, check if the old Apple ID is removed, and you can enter your new Apple ID. Otherwise, you can select “Try Again” to restart the process.
Conclusion
The answer to how to remove Apple ID from MacBook is a straightforward process that can be completed in just a few steps. By following the instructions outlined in this article, you can easily sign out of your account and remove it from your Mac.
Removing the Apple ID with forgotten credentials is complex, but Dr.Fone - Screen Unlock (iOS) has also made it easier. It is an excellent and must-have toolbox to deal with all password-related iPhone problems.
How to Remove an AirTag from Your Apple ID Account On Apple iPhone 7 Plus?
Apple provides many exciting features in its products, including the AirTag feature on iPhone devices. However, after enabling the function, many iPhone users forget to remove it from the FindMy app ahead of time. Therefore, if you are selling or resetting the Apple iPhone 7 Plus device, you need to remove AirTag from Apple ID to be usable later.
If someone removes the AirTag without resetting it while operating in the Bluetooth range, deleting AirTag ownership will require manually breaking the Apple iPhone 7 Plus device apart and further configuration.
Remove this connection from the Apple ID account with simple steps first-hand to avoid that. Read on to know the steps involved in this process directly or with the best software alternative.

Part 1. What Exactly Does an AirTag Do?
Before discussing how to remove AirTag from Apple ID, you should know better about the function itself. The AirTag feature is available for iOS devices. Therefore, one can register the AirTag process with the Apple ID you are utilizing on your smartphone.
Apple users can attach the AirTag to different objects like backpacks or keychains. This makes it simple to find these objects later in case they get misplaced or lost through the Find My app on the iPhone.
Users can add their AirTag to one Apple ID account, so you cannot access this from the Find My app via other accounts. In case of loss, you must remove the AirTag from your device entirely.

Part 2. How to Remove an AirTag from Your Apple ID onApple iPhone 7 Plus & iPad?
After adding the AirTag to any object, it instantly syncs with the Apple ID of the user. So, only the primary Apple ID user can use or monitor the AirTagged item. Other users can use it only after resetting the AirTag. So, learn how to remove AirTag from Apple ID via the Find My app on different iOS device types.
Version 1: Removing AirTag on iPhone
Step 1: Access the Apple iPhone 7 Plus homepage and access the Find My app.
Step 2: From the bottom menu bar, tap on the Items option.
Step 3: The information about which AirTag is associated with your chosen item will appear in the next page list.

Step 4: Choose the selected items and swipe upwards on the screen. Then, find the Remove Item button and press it.

Step 5: Following this, select and press the Remove button. Repeat for confirmation.
Version 2: Removing AirTag on iPad
Step 1: Access the Find My app from the home screen on your iPad device.
Step 2: When the app opens, click on the Items icon at the bottom part of the screen.

Step 3: Choose the items you want to delete by tapping them.
Step 4: Swipe up and choose the “Remove Item” option.
Step 5: On the next confirmation prompt that comes up, click Remove.

Part 3. Bonus Tips: How to Unlock an Apple ID That’s Locked?
Typically, it is impossible to use a PC or Mac to access and remove AirTag from Apple ID. One has to use the Apple iPhone 7 Plus or iPad device only. But what if the smartphone screen or Apple ID is locked?
You need to unlock the Apple iPhone 7 Plus device using capable software like Dr.Fone - Screen Unlock (iOS) to remove the blockage. This software can remove many different Apple screen lock types, like Black Screen of Death, Face ID Lock, Screen Time Passcode, and more.
The process of bypassing Apple ID as a feature is available for iOS 14.0 or its previous conversions. It does not require extremely complex jailbreaking or configuration steps- all is complete in some clicks only.
Top Features:
- Users get at least ten retries for the password or lock removal attempt.
- Suitable for removing various screen locks, Apple ID locks, etc.
- Works to bypass Apple ID account locking without a password within seconds.
- It allows Apple ID lock removal even with the active Find My iPhone feature on the smartphone.
How to use it?
Step 1: Install the Dr.Fone app and launch it on the computer. Choose Screen Unlock.
Step 2: On the next page, tap the Remove Apple ID option. Then enter the necessary passcode to verify that you trust the PC. Then, do further scanning.

Step 3: Back up all devices before the procedure. Then, visit the Settings page > user profile > Password & Security. Then, toggle the Two Factor Authentication feature to the ON part. Then, press Unlock Now.

Step 4: Put the smartphone into recovery mode with on-screen instructions. Then, restart the phone. Complete the resetting steps and press the Restart button. It will unlock the Apple iPhone 7 Plus device automatically.
Step 5: Verify on your device that the Apple ID is unlocked. Then, go to the Find My app and remove the AirTag feature as detailed previously.
Part 4. FAQs about AirTag
- How to Set Up and Add an AirTag on Your Apple iPhone 7 Plus?
Firstly, get your device ready to get set up. Remove the wrap around the AirTag and pull the tab out to start the battery. After it plays a tiny sound, hold the Apple iPhone 7 Plus device near the iPhone/iPad and press Connect. Next, change the name of the AirTag on your list, give an emoji to it, and press Continue. Register it with the Apple ID in the next prompt and then choose Done.
- How to Rename AirTag and Change Its Emoji?
You can access the Items tab on the Find My application and choose the AirTagged item. Then, scroll downward and choose Rename item to change the name. Finally, create a customized name and add an emoji as well.
- How Far Can You Track an Apple AirTag?
With the Bluetooth connection switched on, one can track Apple AirTag for approximately 100 feet.
Conclusion
The added AirTag stays connected with one Apple ID account until you reset it. So, use the process mentioned to remove the AirTag via iPhone or iPad. If the iPad or iPhone you are using has locked the Apple ID, you can use another software Dr.Fone - Screen Unlock (iOS) , to access it without data loss securely. Then, follow the steps mentioned to reset the AirTag here.
Also read:
- [New] In 2024, Seamless Social Media Execution with The Top 8 iPhone & Android Apps
- [New] In 2024, Unlock Your Creativity with Top Title Methods
- [New] Master VLC Tips Revealing Unknown Features for 2024
- [Updated] Full Review of PicsArt App - A Step-by-Step Guide for 2024
- How to Sign Out of Apple ID From iPhone 6 without Password?
- In 2024, How To Remove Phone Number From Your Apple ID from Your Apple iPhone 6?
- In 2024, The Easy Way to Remove an Apple ID from Your MacBook For your Apple iPhone 14
- IPhone Image Transfer Methods Explained for 2024
- The Easy Way to Remove an Apple ID from Your MacBook For your Apple iPhone 14 Plus
- The way to get back lost videos from Vivo Y36
- Top 11 Free Apps to Check IMEI on Apple iPhone 14
- Turning Off Two Factor Authentication From Apple iPhone 6s Plus? 5 Tips You Must Know
- Title: Protecting Your Privacy How To Remove Apple ID From Apple iPhone 7 Plus
- Author: Alma
- Created at : 2025-02-12 01:05:33
- Updated at : 2025-02-14 19:34:48
- Link: https://apple-account.techidaily.com/protecting-your-privacy-how-to-remove-apple-id-from-apple-iphone-7-plus-by-drfone-ios/
- License: This work is licensed under CC BY-NC-SA 4.0.