
Protecting Your Privacy How To Remove Apple ID From iPhone X
Protecting Your Privacy: How To Remove Apple ID From Apple iPhone X
Protecting your privacy is crucial in today’s digital age. Learning how to remove an Apple ID from an iPhone is necessary to safeguard your data. With easy access to emails, photos, and sensitive information, it’s a gateway to your private world. Aside from your Apple ID, read how to remove your iCloud account from your Apple iPhone X.
Doing so ensures your device is no longer linked to your personal information. It reduces the risk of unauthorized access and data breaches. Don’t underestimate the importance of this security measure. Explore the article below to learn more.

Part I. When Consider to Remove an Apple ID From an iPhone
Removing an Apple ID from an iPhone is crucial for various reasons. Here are some important scenarios when removing an Apple ID is essential.

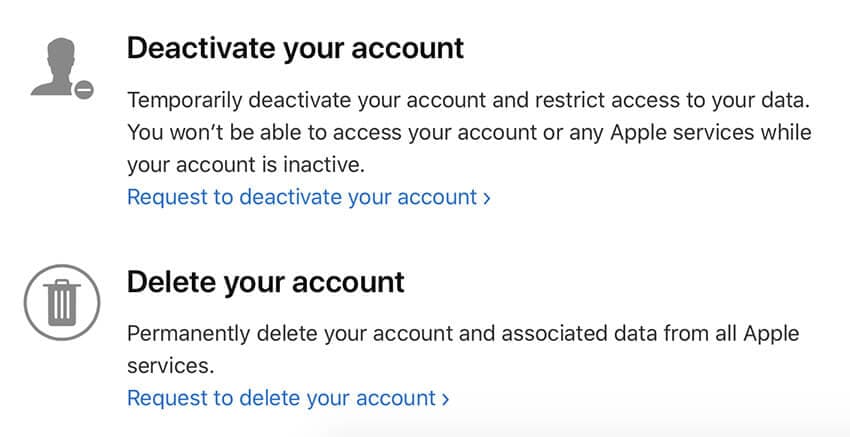
- Resale. Unlinking your Apple ID is essential to protect your personal data when selling or giving away your Apple iPhone X. It prevents the new owner from accessing your photos, messages, and accounts. It safeguards your privacy and reduces the risk of data breaches.
- Switching Apple ID. Removing the old one ensures a smooth transition if you’re using a new Apple ID. If you use a different account, it also avoids confusion. That is vital for managing apps, media, and subscriptions associated with the new ID.
- Privacy and Security. Active Apple IDs on your device could lead to unauthorized access to your personal information. Removing them enhances the security of your Apple iPhone X. It reduces the risk of data leaks, identity theft, and unwanted intrusion.
- **App Store and iTunes Changes.**Sometimes, App Store or iTunes changes may require you to reconfigure your Apple ID. Removing the old one can ease the process and prevent conflicts or errors.
- **Resolving Account Issues.**You’ll sometimes face account-related problems like forgotten passwords or locked accounts. Temporarily removing the Apple ID can aid in troubleshooting and resolving these issues.
- **Device Deactivation.**Removing the Apple ID is essential to prevent unauthorized usage or resale if your device is lost or stolen. This action adds an extra layer of security and peace of mind.
Part II. 7 Methods To Remove an Apple ID From Your Apple iPhone X
If you need to remove an Apple ID from your Apple iPhone X, there are several methods you can try. Below are seven common methods, including steps and options for when each method may be useful.
Using iPhone Settings To Sign Out
Signing out Apple ID via Settings is ideal if you can access the Apple ID password. It’s useful for personal account removal and if you want to keep your data intact.
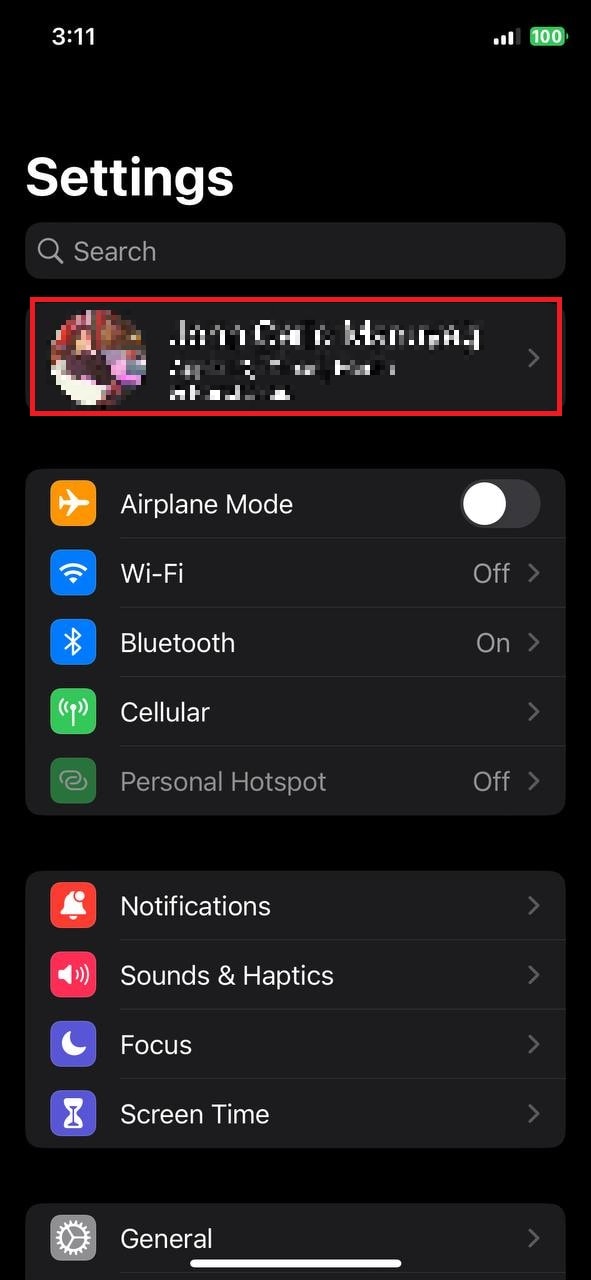
- Step 1: Open Settings application on your Apple iPhone X. Next, scroll down and tap your name at the top (Apple ID, iCloud, iTunes & App Store).

- Step 2: Scroll down and select Sign Out. Your’ll see your device asks you to enter your Apple ID password. Enter your credentials and tap Turn Off.
Restoring to Factory Settings
The method below erases all data on your Apple iPhone X, including the Apple ID. Use this to start fresh, but be cautious, as all data will be lost. Therefore, ensure you’ve backed up your data to iCloud before starting.
- Step 1: Go to Settings on your Apple iPhone X. Scroll down and tap General.

- Step 2: Go to Reset > Erase All Content and Settings. Then, enter your passcode and confirm.
Contact Apple Support
If you can’t access the Apple ID password and can’t sign out from the Apple iPhone X device, contact Apple Support. They may assist you in verifying your identity for account recovery or removal.

Contacting the Previous Owner (If Used or Given as a Gift)
If the Apple iPhone X was previously used or gifted, try contacting the previous owner. They can remove their Apple ID remotely from the Apple iPhone X device by signing in to their Apple account on iCloud.com.

Apple’s Account Recovery
Apple offers an account recovery process if you forget your Apple ID password. It involves verifying your identity and resetting your password. It can indirectly help in removing the Apple ID from your device. Here’s how:
- Step 1: Launch a web browser and visit the Apple ID account page (appleid.apple.com). Click Forgot password?.

- Step 2: Enter your Apple ID and click Continue. You’ll be presented with two options: Email authentication or Answer security questions. Choose the method you prefer or the one you have set up.

- Step 3: Follow the on-screen instructions to verify your identity. The step might involve answering security questions, providing a recovery email, or using two-factor authentication if set up.
Once your identity is verified, you can set a new Apple ID password. After resetting the password, use the new password to sign in on your Apple iPhone X. This process indirectly helps in removing the Apple ID from the Apple iPhone X device.
Local Apple Store for In-Store Assistance
You can visit a local Apple Store for in-person assistance. They may help with Apple ID issues and guide you through removal.

Using a third-party tool is another option if all the common methods fail, or you want a user-friendly process. Using a reliable third-party tool can help safely remove an Apple ID from your Apple iPhone X. The next section will show you how to remove an Apple ID from an iPhone using Wondershare Dr.Fone - Screen Unlock.
Part III. Final Solution to Removing Apple ID From iPhone
Dr.Fone - Screen Unlock is a reliable choice to help you remove an Apple ID. Here are the step-by-step instructions to help you through the process.
- Step 1: Download and install Dr.Fone Screen Unlock on your computer. Launch the app and click Toolbox > Screen Unlock.

- Step 2: Connect your Apple iPhone X to the computer using a USB cable. Next, choose Remove AppleID.

- Step 3: Follow the on-screen instructions provided by Dr.Fone - Screen Unlock. It will download the respective iOS firmware when the app starts the Apple ID removal process.

- Step 4: If the Apple ID is removed, there should be a screen prompt upon completion. Click Done to Try Again to repeat the process if unsuccessful.

Part IV. Pro Tip-Simplifying All Your Apple ID Concerns With a Reliable Solution
Dr.Fone Screen Unlock is a comprehensive tool that simplifies removing your Apple ID from your Apple iPhone X. Below are some of the benefits of using the tool.
- Dr.Fone offers an intuitive and hassle-free solution. It’s suitable for users of all levels of technical expertise. The software streamlines the Apple ID removal process, saving you time and frustration.
- **Easy Process.**Just with the straightforward steps, you can effectively remove your Apple ID. Dr.Fone eliminates the complexity often associated with such tasks.
- **No Data Loss.**One of the most significant advantages of Dr.Fone Screen Unlock is that it allows you to remove the Apple ID without any data loss. Your apps, photos, and other valuable information remain intact, ensuring you don’t sacrifice your personal data for security.
Conclusion
Knowing how to remove your Apple ID from your Apple iPhone X is important in protecting your privacy and sensitive information. The article has outlined various methods, from standard procedures to advanced tools, to help you achieve that.
Whether you’re reselling your device, switching Apple IDs, or facing security concerns, taking action to remove your Apple ID from an iPhone is the key to safeguarding your data. For added convenience, consider Dr.Fone - Screen Unlock. It’s a great alternative when other methods fall short. Don’t wait; take control of your data security today.
How to Erase an Apple iPhone X without Apple ID?
Our generation is all about high-performance gadgets and, a phone is one of the most important of it all. But with the concept of a smartphone, things have changed. iPhone/iPad has emerged as an important fashion quotient for a long now.
We often end up buying second-hand iPhones/iPads or sell our old version of the phones/pads to an unknown person and buy a new version of other brands, like Samsung S22. At times, be it after-sale/purchase or old iPhone, or if you may have yourself forgotten the password to your Apple ID, we often come across a big challenge, and that is how to erase an iPhone without an Apple ID password. Well, if that’s the case with you, then you’ve reached the right place. We’re about to discuss the most effective ways to erase an iPhone without an Apple ID password. Let’s discover them.
Part 1. How to erase an iPhone without Apple ID and iTunes
When it comes to taking care of all your Apple iPhone X recovery solutions, Dr. Fone has effectively managed to make a mark in the field. Especially when it comes to erasing an iPhone without an Apple ID password, the Dr.Fone – Screen Unlock (iOS) can help you get it done without a hitch. Not only can you erase an iPhone without an Apple ID password, but you can also get the Apple ID/iCloud lock removed too with much ease. With over 5 million-plus users, the tool is the most recommended in the market, serving every customer to their content.
Key Features:
The key features of Dr.Fone – Screen Unlock (iOS) are –
- It can unlock an iPhone/iPad by erasing an iPhone without an Apple ID password.
- Even when your screen is damaged and you cannot enter a passcode, Dr. Fone – Screen Unlock (iOS) can effortlessly get it done.
- If the passcode is wrongly set by your kids or an unknown, this software can help unlock the same.
- Works efficiently with almost all iOS devices and supports even the latest iOS version 14.
Step by Step Tutorial:
Let’s get to understand how to erase an iPhone without an Apple ID password:
Step 1: Connecting the iPhone/iPad
The first thing to do is download and install the Dr.Fone – Screen Unlock (iOS) software on your computer/laptop. Before you move on to any other step, connect your affected iPhone/iPad to your computer or laptop with the help of a USB.
Step 2: Select the correct Mode.
After the installation is done completely, launch the tool and select the “Screen Unlock” option on the software’s home interface. A new screen interface will appear, you will have three different options. You need to select the “Unlock iOS Screen” option and, this will start the entire process of unlocking.

Step 3: Boot your device into Recovery/DFU Mode
You now have to boot your Apple iPhone X or iPad device into Recovery mode or DFU mode so that the software can recognize your device for further process. For your convenience, Dr. Fone Screen Unlock (iOS) has a built-in instruction facility that helps you to follow the steps.

Step 4: Confirm the information and download firmware
After a successful reboot into Recovery mode, the tool will automatically detect your device’s information and the most compatible iOS firmware. To start the process of downloading the firmware, you need to hit on “Start” button.

Step 5: Erase an iPhone without an Apple ID password.
Once the download is complete, you can get started with erasing an iPhone without an Apple ID password. Hit the “Unlock Now” button, and voila! In no time, you’ve successfully erased an iPhone without an Apple ID password.
Part 2. Erase an iPhone without Apple ID via iTunes
Sometimes your phone might ask for an Apple ID and password to confirm your authority. In such cases, you may get stuck as either you have forgotten the password to it, or you don’t remember the Apple ID in the first place. For that matter, where it needs immediate help, we have listed down a set of steps that can help you erase an iPhone without Apple ID via iTunes –
Step 1: Connect your Apple iPhone X to the computer with the help of a USB and then open your iTunes.
Step 2: The best way to start the process is to move your phone to recovery mode. For this, you need to:
In iPhone 8 or later: Tap the Volume Up, then quickly tap Volume Down and hold down the Power key afterward.

In the case of iPhone 7/7Plus: Press the “Sleep/Power” and “Volume Down” keys together.
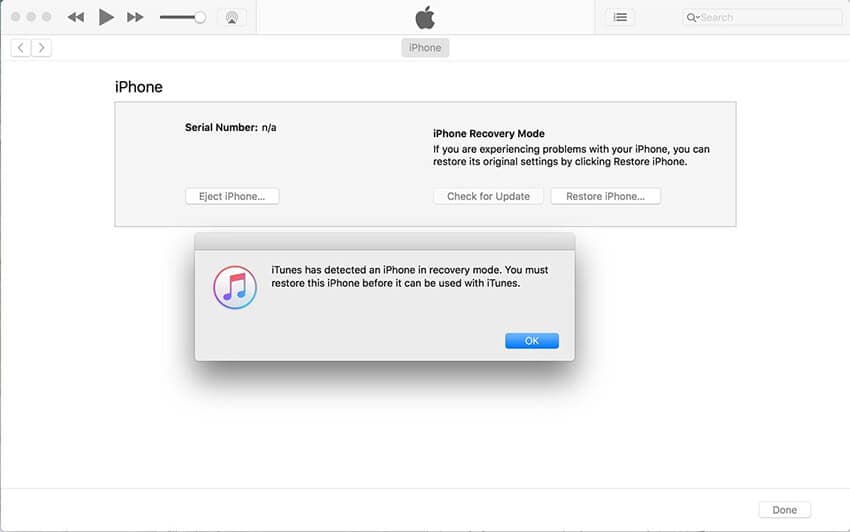
Hold down the keys until you see the message on your iTunes screen about “your iPhone has been detected in recovery mode.”
Step 3: Once done, click on “Ok” and choose the “Restore iPhone” option. Confirm your actions, and you’re done.
Part 3. How to erase an iPhone without Apple ID via Settings
Erasing an iPhone without Apple ID becomes necessary when we happen to use a second-hand phone or when we share a phone with someone. It is indeed a hard task to overcome these issues as we constantly strive to change our phone or replace it with a second-hand one. We have jotted a few steps that can help you erase an iPhone without Apple ID via settings for your ease.
Step 1: On your Apple iPhone X, press the “Settings” icon on your App drawer.
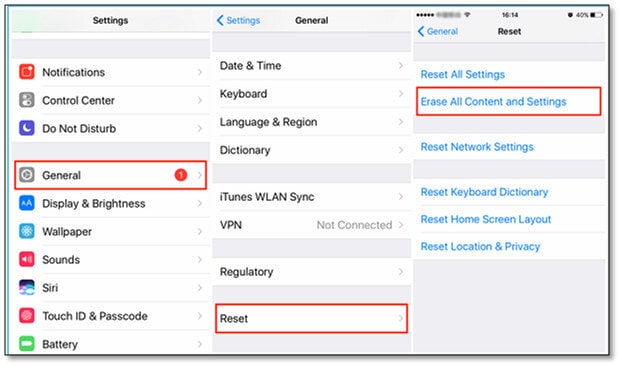
Step 2: Under the Settings, scroll down and click on the “General” option.
Step 3: Now, you need to scroll all the way down to the “Reset” button and click on it. Then, look for “Erase All Content and Settings” and tap on the same.
Step 4: Enter your passcode to confirm. This action will pop up a screen where you need to select Erase iPhone again, and boom, you are done now.
Part 4. Tip you may need to erase Apple ID
Now, just in case you wish to delete your Apple ID completely, you need to perform a simple practice of removing any devices associated with your Apple ID.
Step 1: One can simply visit appleid.apple.com and log in with the Apple ID credentials already allotted to the user.
Note: You might get a prompt of a two-factor authentication code while being on this page.
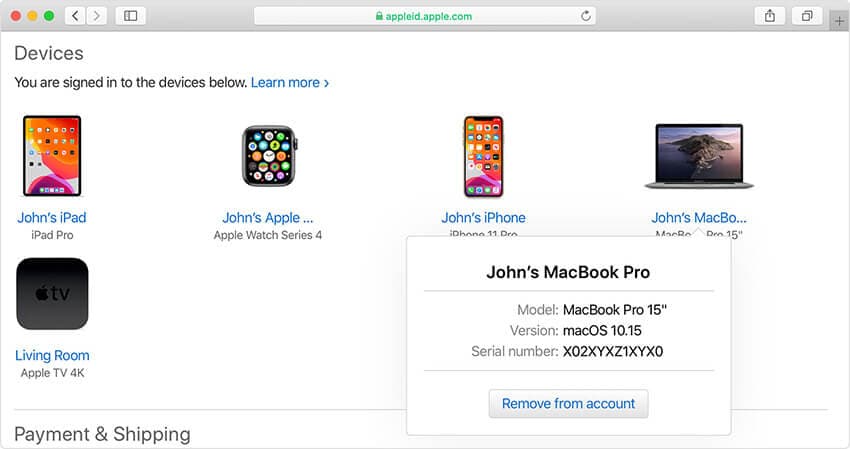
Step 2: Once you scroll down the line, choose, and click on the “Device” option.
Step 3: Choose the desired device and click on the “Remove from account” option followed by a “Remove this – Device Name” to confirm the action. Perform this step for all other devices.
How to erase an Apple ID via Apple’s Data and Privacy website
Now let’s get started with erasing an Apple ID via Apple’s Data and Privacy website are simple and, we have mentioned a simple way to take care of the same:
Step 1: Once you’re done removing the Apple iPhone X devices linked to your Apple ID, visit privacy.apple.com and log in with the same Apple ID and password credentials.
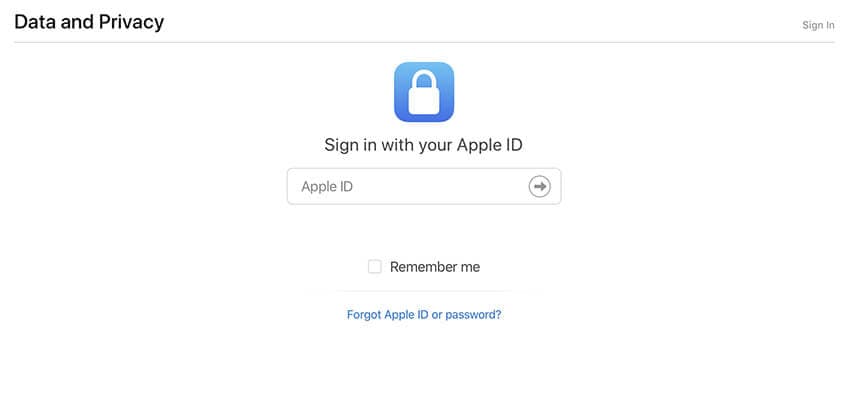
Step 2: Once you authenticate, click on the prompt indicating the option to “Continue.”
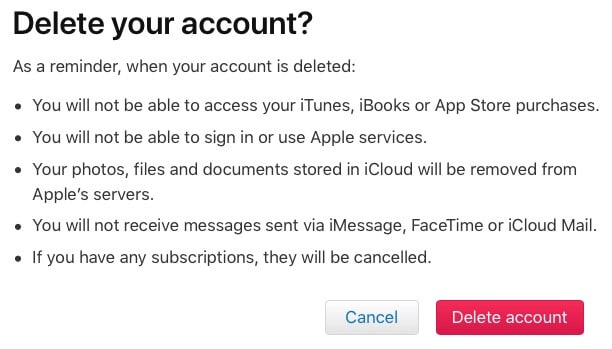
Step 3: Once you click on the “Get started” prompt on the screen, you will get a tab to “Delete your account.” This will prompt you with an Apple message indicating the information regarding the deletion process time.
Step 4: Before everything, make sure you back up your data and follow the instructions steps prompted by Apple’s website. This will lead you to choose a reason for deletion from the click-down option and click “Continue.”
Message – You will get the details of the entire process for a quick review before you can submit for the final deletion of the policies
Step 5: Click on “Delete terms and conditions” by checking the read and agreed on the box. Make sure to provide a good call-back number to finalize the process.
Step 6: This submission will give you your access code which you can later use for clarification and, now you can click on the “Delete Account” option
Conclusion
Coming towards the end of the topic, we now are fully sure that you fully understand how to erase an iPhone without an Apple ID. Just in case you have any doubts, please feel free to comment below. And do remember to share this with your friends and family if you find it useful.
iCloud Separation: How To Disconnect Apple iPhone X and iPad
Managing your iCloud is important to maintain the security of your Apple devices. Your iCloud account is the central hub for your photos, documents, contacts, and more. It’s essential to ensure that your devices are safe and secure. However, there are scenarios when you might want to remove it.
The page below will guide you on how to disconnect your Apple iPhone X from iCloud. It highlights the benefits of having full control over your data. Below, you can learn how to disconnect from iCloud,keeping your data organized and secure. Explore the article to learn more.

Part 1. Why Disconnect From iCloud?
iCloud is one of the most integral parts of the Apple ecosystem. It syncs your data across devices and ensures a connected digital experience. Yet, there are times when disconnecting from iCloud is necessary. Below are some specific reasons why you should learn how to disconnect your iPad/iPhone from iCloud.
Privacy Concerns
Privacy is an important concern in today’s digital age. Disconnecting from iCloud can provide a layer of security. It prevents sensitive information like photos, contacts, and documents from being stored in the cloud. This is important if you prefer to maintain complete control over your data.
Selling or Giving Away Your Device
When you decide to sell or give away your Apple iPhone X or iPad, it’s essential to disconnect it from iCloud. Failing to do so could allow the new owner access to your data. Disconnecting ensures your device is wiped clean of your iCloud information, protecting your privacy.
Limited Storage Space
Apple offers a limited amount of free iCloud storage. If you’ve reached or exceeded your storage quota, disconnecting certain devices can help free up space. It can also prevent annoying notifications about running out of storage and keep your backups and documents accessible.
Changing Apple ID
If you decide to change your Apple ID for any reason, disconnecting from iCloud is necessary. This operation allows you to reconnect your old ID to a new one if necessary. It ensures that all purchases, app downloads, and data are linked to the new ID.
The benefits of disconnecting from iCloud include enhanced security and privacy. Disconnecting your iCloud account can also lead to reduced usage. It’s great for users who want more control over their data or prefer to keep their devices offline.
Part 2. Disconnect iPhone/iPad From iCloud Through 6 Manners
Learning how to disconnect aniPhone or iPad from iCloudcan be necessary for various reasons. To guide you through the process, here are six methods to do so.
Use Settings To Access iCloud
- Step 1: Open the Settings app on your Apple iPhone X/iPad. Next, tap your name at the top, where your Apple ID is listed.
- Step 2: Scroll down and tap Sign Out. When prompted, type in your Apple ID and password. Next, choose TurnOff for the data you want to keep on your device. Afterwards, your Apple iPhone X or iPad is now disconnected from iCloud.
Visit iCloud.com
You can also remove your iCloud account on your Apple iPhone X/iPad by visiting the iCloud.com website. Here’s how.
- Step 1: Launch a web browser on your computer or another device. Visit iCloud.com and sign in with your Apple ID.

- Step 2: Click AccountSettingsin the interface and scroll down. Choose the option to Sign Out of All Browsers. Next, confirm your choice to disconnect your iCloud from your Apple iPhone X or iPad.
Factory Reset
Performing a factory reset can cause all data on your device erased, effectively disconnecting it from iCloud. Here’s how.
- Step 1:Go to your device’s Settings. Next, tap on General> Reset. ChooseErase All Content and Settings.

- Step 2: You’ll be prompted to enter your passcode and Apple ID password. Enter your details and confirm the reset.
Note
Be cautious with this method, as it will erase all data on your device.
Use the Find My App (iOS 13 and later)
You can use the Find My app to remove an iCloud account from a specific device. Here are the steps below.
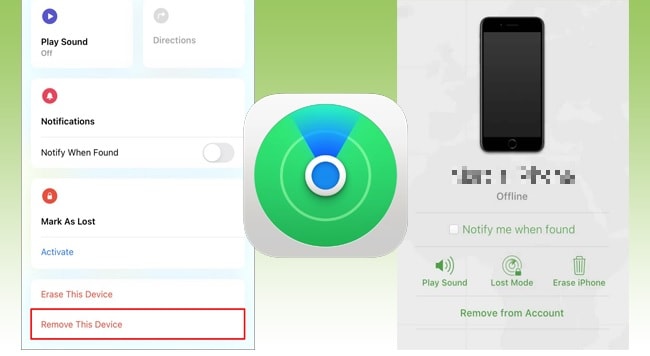
- Step 1: Open the Find Myapp on your device. Next, tap the Devicestab at the bottom.
- Step 2: Select the Apple iPhone X device you want to disconnect. Afterwards, tap Remove This Device. Once you confirm your choice, it will disconnect the Apple iPhone X device from an iCloud account.
Contact Apple Support
If you encounter issues disconnecting your device from iCloud, contacting Apple support is a wise choice. It’s a good option if you have difficulties using the previous methods. They can guide you through the process and offer personalized assistance.

Use a Third-Party Tool
If you’ve tried all the options and even contacted Apple support but still face persistent issues, it might indicate more serious problems. If it detects unusual activity, your Apple iPhone X or iPad might trigger iCloud’s Activation Lock. A trusted third-party tool like Wondershare Dr.Fone- Screen Unlock can work wonders in such cases.
Part 3. Steps To Remove iCloud From iPhone/iPad With a Flexible Alternative-Wondershare Dr.Fone
Dr.Fone is a flexible alternative tool that can remove iCloud from your Apple iPhone X or iPad. Your Apple iPhone X or iPad will most likely trigger iCloud’s Activation Lock if all the steps above do not solve your issue. In that case, Dr.Fone - Screen Unlock can help you bypass it, allowing you to regain control of your device. The steps below show you how to disconnect from iCloudin 3 simple steps.
- Step 1: Start by downloading and installing Dr.Fone on your computer. Once installed, launch the program. Click Toolbox> ScreenUnlock> iOSto move on to the next process.
- Step 2: On the next window, select iCloud Activation Lock Removal to initiate the process. Next, connect your Apple iPhone X/iPad to the computer with a USB cable. Wait for Dr.Fone to recognize your device, and it will lead to the next screen.
- Step 3: Follow the next on-screen instructions. Afterwards, Dr.Fone will automatically remove the ActivationLockdisplayed under the progress bar.
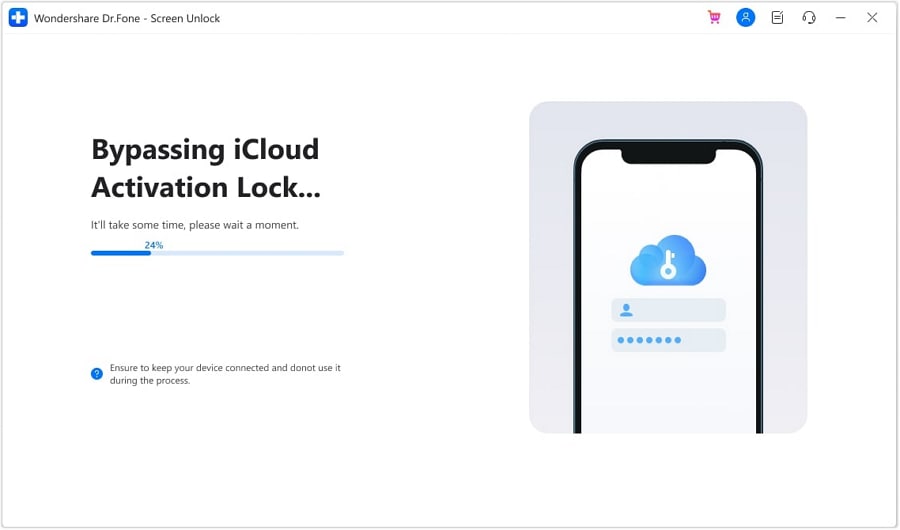
Once the process is completed, you should see the completion message below. Select Done to finish the removal of the iCloud Activation Lock on your Apple iPhone X or iPad. A successful process will automatically remove the iCloud on your device.

Part 4. How Dr.Fone Can Benefit You in Other Aspect
Dr.Fone goes beyond bypassing the iCloud activation lock. It offers a wide range of essential features that can enhance your device management and data recovery capabilities. Below are some key features that make Wondershare Dr.Fone a reliable tool.

- Unlock Apple ID without a Password. Dr.Fone allows you to unlock your Apple ID without needing a password. The feature is helpful if you’ve been locked out of your account or face authentication issues.
- **Remove SIM Lock/Phone Carrier.**The tool can also remove SIM locks and phone carrier restrictions. This feature allows you to use your device with any carrier or SIM card.
- **No Data Loss.**A crucial advantage of Dr.Fone is its ability to perform all these operations without causing data loss. Your precious data, apps, and settings remain intact throughout the process.
Apart from its iCloud-related capabilities, Dr.Fone offers a comprehensive set of tools for managing your iOS device.
Data Recovery
Dr.Fone can help you recover lost or deleted data. Retrieve your messages, photos, videos, contacts, and more. The feature is a lifesaver when accidental data loss occurs.
Phone Manager
You can manage your device’s data directly on your computer. Transfer files and easily perform tasks like importing, exporting, or deleting content.
Phone Backup
Dr.Fone provides robust backup solutions. The platform allows you to create backups of your device and restore them when needed. It’s an essential part of maintaining the integrity of your data.
Conclusion
Managing your iCloud is essential for maintaining privacy and control over your Apple devices. The various methods on how to disconnect your Apple iPhone X from iCloudcater to different scenarios. Whether you disconnect using device settings or the flexibility of third-party tools like Dr.Fone, the choice is yours.
With these options at your disposal, you can tailor your data to meet your specific needs. Always remember that having a handy third-party tool like Dr.Fone can put your data worries at ease. It ensures you have another method of how to disconnect from iCloudfor any iCloud-related concerns.
Also read:
- [Updated] In 2024, Quick-Fix Valorant Thumbnails Professionally Done Now!
- [Updated] Sky's Dynamic Range Masterpieces - Website Roundup
- [Updated] Streamlined Video Tools for Twitter Sharing
- Beat-Infused Imagery Mobile Video Making on iPhone for 2024
- Discover the Ultimate Top 5 iPhone Applications for Podcasts
- Easy Step-by-Step Guide: Transforming MPDP Files Into MP3 Format Quickly
- Forgot Your Apple ID Password and Email From Apple iPhone 14 Pro? Heres the Best Fixes
- Harness the Web to Preserve and Share Live Music Sounds
- How to Change GPS Location on Vivo Y28 5G Easily & Safely | Dr.fone
- How To Create an Apple Developer Account On Apple iPhone SE (2022)
- How to Fix Locked Apple ID from iPhone 12 Pro Max
- How to Unlock Apple ID On your iPhone 13 mini without Security Questions?
- iCloud Separation How To Disconnect iPhone 11 and iPad
- In 2024, Apple ID Locked or Disabled From Apple iPhone 14? 7 Mehtods You Cant-Miss
- In 2024, How to Unlock iPhone SE (2020) When We Dont Have Apple ID or Password?
- In 2024, Removing Device From Apple ID For your Apple iPhone 14 Plus
- Top 7 Solutions for Overcoming the Stuck Loader in Forza Horizon 5
- Title: Protecting Your Privacy How To Remove Apple ID From iPhone X
- Author: Alma
- Created at : 2025-01-30 21:39:34
- Updated at : 2025-01-31 20:31:07
- Link: https://apple-account.techidaily.com/protecting-your-privacy-how-to-remove-apple-id-from-iphone-x-by-drfone-ios/
- License: This work is licensed under CC BY-NC-SA 4.0.