
The Easy Way to Remove an Apple ID from Your MacBook For your Apple iPhone 13
The Easy Way to Remove an Apple ID from Your MacBook For your Apple iPhone 13
Apple has a great ecosystem of devices and services that can be controlled using a single key, your Apple ID. It can be used to login into every Apple service, from Apple Music to FaceTime. However, there are many reasons which can force you to remove your Apple ID from devices like MacBook, iPhone, etc. That makes it important for you to learn how to remove Apple ID from your MacBook safely.
Suppose you need to remove your Apple ID from your Mac but don’t know to do this, then this article is for you. You will also learn to remove Apple ID from iOS devices without a password.

Part 1: Why Delete Apple ID and iCloud Account?
There are as many reasons to leave the Apple ecosystem as why you should join it. Apple devices are known for security, but it also means that you have less control over their settings. It is also a closed ecosystem that forces you to limit yourself to a specific set of apps and services. Some of the reasons why people might want to remove their Apple ID from their MacBook are the following:
- Switching Platforms: If you intend to leave Apple devices and move to another platform like Android, it makes sense to delete the Apple ID. Deleting the ID will make it safer for you to sell your old Apple device to others.
- Privacy Concerns: While Apple is comparatively secure, your data is still stored on Apple servers. It means the company can still access your data. It will require deleting your Apple ID if you want to delete all personal data from Apple servers.
- Changing Account: Getting a new Apple ID means you need to delete your old Apple ID. It will save you the trouble of managing two different IDs with multiple accounts associated with each one.
- Shared Apple ID: It is possible that you were sharing your account with your partner or another family member and now want to get your own account. Removing the old account completely and using a new one can be the safest way.
Part 2: If I Delete Apple ID, Will I Lose Everything?
Deleting your Apple ID is not insignificant because it is your key to the Apple ecosystem, as mentioned above. Though it won’t affect your data storage in local device. However, you will no longer be able to access your data store across multiple Apple services like iCloud, Apple Music, FaceTime, iMessage, or other services that require an Apple ID can no longer be used.
You won’t be able to purchase or access purchased items from the App Store, iTunes Store, or other Apple services. Remember, deleting your Apple ID is a permanent action and cannot be undone.
Part 3: How to Remove Apple ID/iCloud Account from Mac with Password?
The process of removing Apple ID from a Mac is easy and quick. Before removing the Apple ID, you need to remember that all the services that require Apple ID will no longer work. To remove the Apple ID from your MacBook, follow these steps:
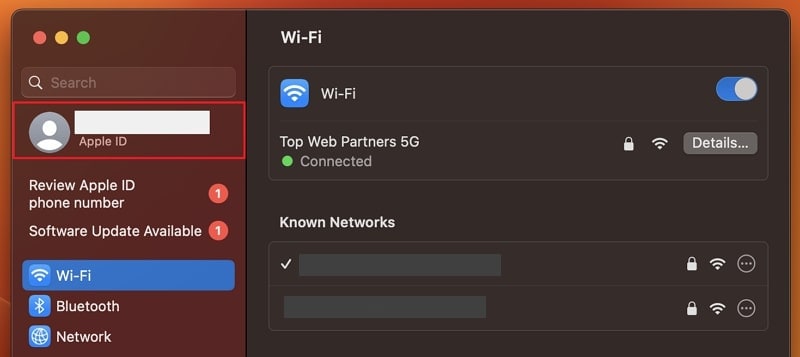
Step 1: Open your Mac and access the “System Settings” from the “Apple Logo” icon. Here, click on your Apple ID name from the top of the left sidebar. Scroll to the bottom of the Apple ID tab to locate the “Sign Out” button.
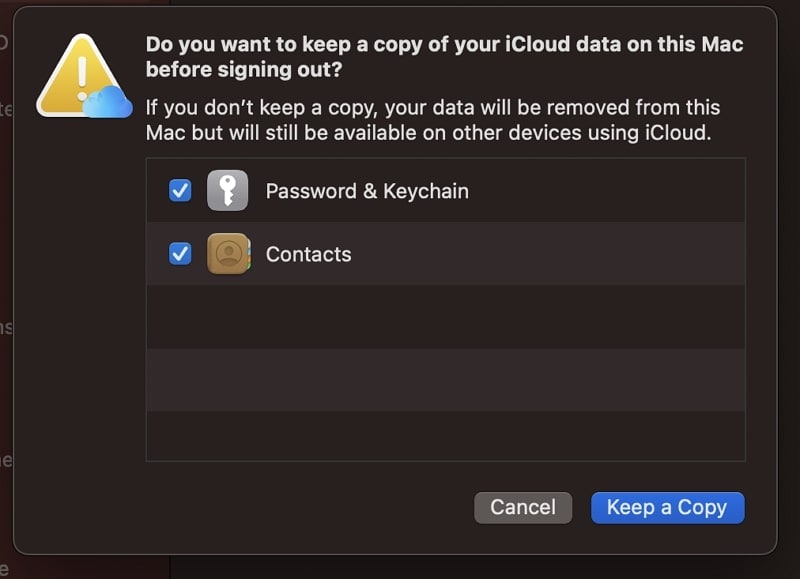
Step 2: Press the “Sign Out” button to remove your Apple ID from the Mac. A prompt will appear asking if you want to keep a copy of your passwords and contacts on your laptop. Select them according to your needs.
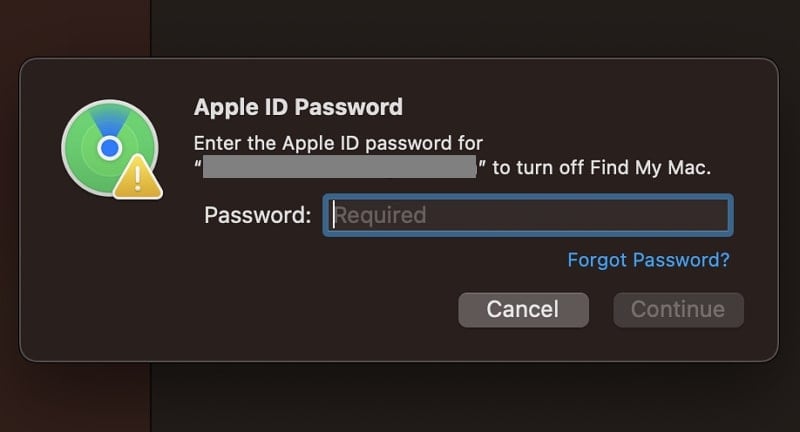
Step 3: On the next window, it will ask you to provide your Apple ID password. Provide the password to complete the process of removing your Apple ID from your Mac.
Bonus Tip: How to Remove Apple ID from iPhone/iPad Without Knowing the Password?
Forgetting your Apple ID credentials is also a common reason for wanting to remove your Apple ID from your Apple iPhone 13. Another such case is buying a second-hand iPhone with a logged-in Apple ID without knowing the password. You need a specialized tool like Dr.Fone - Screen Unlock (iOS) to remove Apple ID in these cases.
With Dr.Fone - Screen Unlock (iOS), you can remove the Apple ID from your Apple iPhone 13 or iPad and regain access to the Apple iPhone 13 device. This software can also remove the iCloud activation lock on an iOS device if you don’t know the login credentials of the previous owner. It is the best tool if your Apple iPhone 13 has become locked or disabled due to a forgotten passcode or other issues.
Key Features of Dr.Fone - Screen Unlock (iOS)
- Dr.Fone - Screen Unlock (iOS) can remove passcodes, pattern locks, fingerprint locks, and other types of locks from iOS devices.
- With the help of this tool, you can remove the encryption of your iTunes backup. It will also help you restore your iTunes backup to your new iPhone even if you changed your Apple ID.
- If you have forgotten the username or password of your Apple iPhone 13 MDM, this tool allows you to bypass or remove MDM to access the Apple iPhone 13 device.
- It can also unlock SM Lock or Carrier Lock on your Apple iPhone 13. That allows you to use your Apple iPhone 13 freely if you want to travel internationally.
Steps to use Dr.Fone - Screen Unlock (iOS) for Removing Apple ID
Dr.Fone - Screen Unlock (iOS) has a straightforward interface and provides clear instructions for removing Apple ID from your Apple iPhone 13. Your Apple iPhone 13 will be reset during the process, and you will lose the data. It is advised you create a backup before starting the procedure. To start the process of removing Apple ID from your Apple iPhone 13, follow the steps given below:
Step 1: Establish the Connection between iPhone and the Apple iPhone 13 device
Use a USB cable to connect your Apple iPhone 13 to your computer and launch Dr.Fone. Next, proceed with the “Screen Unlock” tool from the main interface and “Remove Apple ID” on the next screen. Now move to the iPhone, unlock it, and select “Trust” in the “Trust this Computer” pop-up.

Step 2: Put Your Apple iPhone 13 into the Recovery Mode
You are required to put your Apple iPhone 13 into Recovery Mode before you can remove the Apple ID. Follow the on-screen instructions to the letter to put your Apple iPhone 13 into Recovery Mode. Once the Apple iPhone 13 has entered the recovery mode, it will reset and restart. After restarting, the process of removal of the Apple ID will begin.

Step 3: Remove Your Apple ID from the iPhone
Wait for the program to complete the process of removing your Apple ID from your phone. Once it is completed, check if the old Apple ID is removed, and you can enter your new Apple ID. Otherwise, you can select “Try Again” to restart the process.

Conclusion
The answer to how to remove Apple ID from MacBook is a straightforward process that can be completed in just a few steps. By following the instructions outlined in this article, you can easily sign out of your account and remove it from your Mac.
Removing the Apple ID with forgotten credentials is complex, but Dr.Fone - Screen Unlock (iOS) has also made it easier. It is an excellent and must-have toolbox to deal with all password-related iPhone problems.
Why Apple Account Disabled On your Apple iPhone 13? How to Fix
Apple is one of the leading smartphone developing enterprises that has introduced the world to a contemporary set of features that are not common among other leading smartphone companies. One of the major distinguishing characteristics of Apple has been displayed in its present security protocols. Apple Account is regarded as one of the most significant credentials of the Apple iPhone 13 and iPad that is responsible for connecting and holding the applications and the assorted data. Many users have generally reported unusual situations that got their Apple Account disabled. There are several reasons that can be associated with the Apple account getting disabled. The major repercussion that is associated with it is unnecessary data loss following the suspension of all products that have been bought with the account over time. This article provides you an impressive overview of the major reasons that lead to your Apple Account getting disabled, followed by the associated mechanisms that can be tested to secure the account.
Part 1. Why is the Apple account disabled?
Apple iPhone, iPad, and other devices operate over a single Operating System, with its own protocols and unique mechanisms that distinguish it from other smartphone models in the market. Apple believes in securing the data and identification of its users with its state-of-the-art security measures. Under such circumstances, it usually gets possible for the user to have his Apple account disabled unnecessarily. Whenever you encounter such a situation, there are several messages that might be displayed on your device to prompt you over the disabling of the account. These messages usually appear in situations where you intend to sign in to some platform with your associated Apple ID. The most common messages that appear on the screen are:
- “This Apple ID has been disabled for security reasons.”
- “You can’t sign in because your account was disabled for security reasons.”
- “This Apple ID has been locked for security reasons.”
The messages that have been stated above are usually depicting a security anomaly that led to the disabling of the associated Apple ID. However, there can be several reasons that would have led to such circumstances, which are described as follows.
- There might be incorrect forced logging in into your Apple ID for multiple tries.
- Any user would have entered incorrect security questions multiple times.
- The other information associated with the Apple ID would have been entered incorrectly numerous times.
Part 2. Is “Your account has been disabled in the App Store and iTunes” the same as “This Apple ID has been disabled for security reasons”?
There are several instances where you encounter such prompt messages where you are restricted in using the App Store and iTunes. These messages can come in the form of “Your account has been disabled in the App Store and iTunes.” Over observing this prompt message, it has been discovered that the assorted message is not related to the other common message of “This Apple ID has been disabled for security reasons.” The dynamics of getting restricted from using the App Store and iTunes are related to remaining balances that have stuck around for a while over your Apple account. Normally, you may have some billing issues that are prevailing over an unpaid iTunes or App Store order. This problem can be countered through simplistic methods under such conditions where you are having access to the account information and can check for the basic billing information or update the payment method following other settings that are associated with paying bills. Over failure in accessing your account, you are required to contact Apple Support and look for the billing and payment statements to clear up all the remaining dues. Apple has considered covering all the security protocols to perfection, where you have any prevailing Apple charges on your connected credit card that would lead to direct disabling of your Apple Account.
Even though Apple accounts can be generally disabled overpayment issues, there are several security reasons that might restrict you in discovering and buying different products across the App Store and iTunes. It is necessary for you, as an Apple user, to remain prompt of all the issues that are relating to your Apple Account.
Part 3. 2 tips to Unlock Disabled Apple Account
As this article provides you a detailed overview of the reasons that lead to your Apple Account getting disabled, this article also considers providing you a few tips and tricks that would guide you in efficiently unlocking your Apple Account and use it with ease.
Unlock disabled Apple account with Dr. Fone
The first remedy that can be effectively tested across such situations that involve disabled Apple accounts is relating a third-party platform. Dedicated third-party tools are quite common in the market and provide users with adequate services that allow them to unlock their devices with ease. Out of this uncountable list of platforms, this article introduces you to a specific platform that offers you unique features with a user-interface that can be easily apprehended. Dr. Fone – Screen Unlock (iOS) offers you the perfect environment that would lead you in reversing the disabling of your Apple Account easily. There are several reasons that make this platform the first choice of users all around the globe, which are declared as follows:
- You can easily unlock your Apple iPhone 13 if you accidentally forget the password at any time.
- The platform protects the Apple iPhone 13 or iPad from the disabled state.
- It can work for any iPhone, iPad, or iPod Touch model.
- The platform is compatible across the latest iOS versions.
- You are not required to have iTunes for unlocking your device.
- A very user-friendly platform with no requirements of technical expertise.
While you understand the basic reasons that lead you to the fact that Dr. Fone is the most appropriate choice to unlock your disabled Apple Account, the following steps explain the guide that would help you in unlocking your device with ease.
Step 1: Connect Devices and Launch
Initially, it is significant to download the platform and install it by following all the on-screen instructions effectively. Following this, you need to launch the platform and connect your Apple device via a USB connection.
Step 2: Select Screen Unlock
With the home window on your front, you are required to tap on the ‘Screen Unlock’ tool from the list of options to open a new screen. On the new screen, you are required to select the last option of “Unlock Apple ID” to initiate the process.

Step 3: Trust the Computer and Access Device Settings
Over the Apple Device, you need to select the option of “Trust” over the prompt that is received on the phone. Following this, you need to open the “Settings” of your device and initiate a reboot of your Apple device.

Step 4: Device Unlocks
The unlocking process immediately starts, and the platform executes the complete process automatically. A prompt message appears on the desktop showing the completion of the task. The device is now unlocked successfully.
Unlock disabled Apple account using Apple’s verification
The other method that can be effectively tested is Apple’s verification that would allow us to easily topple off all barriers that are involved in the process. To effectively unlock your disabled Apple Account using Apple’s verification process, you need to follow the steps described in detail.
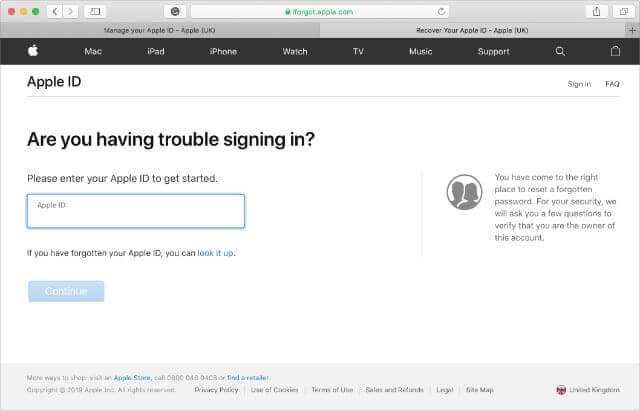
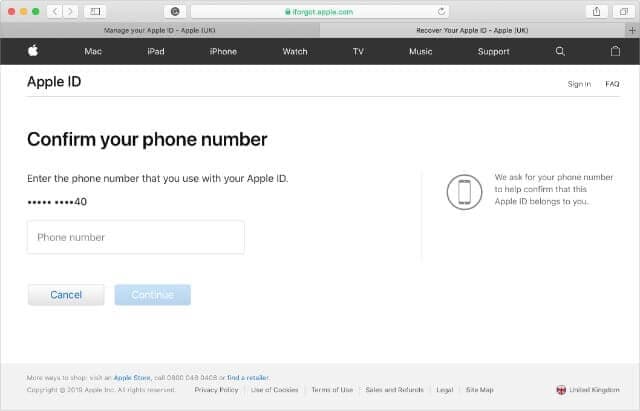
Step 1: Open iForgot Website
You need to open the iForgot website to test the verification process. As you open the platform, provide the appropriate credentials over which your Apple device is operating. This is referred to as your Apple ID that has been used for the Apple iPhone 13 device.
Step 2: Provide Personal Details
As you proceed with the verification, there are several personal details that are used to check the authenticity of the user. You are required to answer all security questions, provide all numbers if asked.
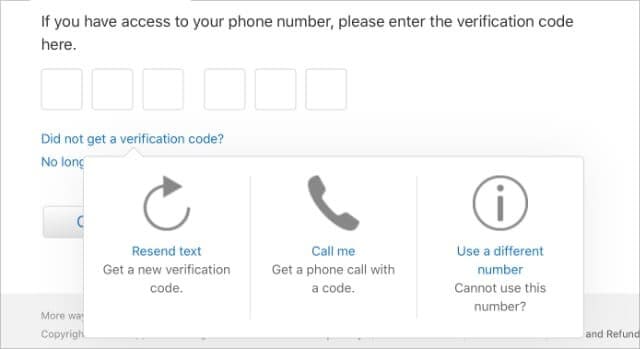
Step 3: Use the Verification Code
The platform will send a verification code that would allow you to unlock your device with the Recovery Key that is offered. Tap on “Unable to access your [device]“? to allow the platform to send a six-digit verification to the phone number that is attached to the Apple ID. You can simply use it along with the Apple ID password to unlock your account.
Conclusion
This article has provided you a detailed guide over the existing reasons that would have your Apple account disabled, followed by different tips that can be followed to cover your assorted problems efficiently.
Turning Off Two Factor Authentication On Apple iPhone 13? 5 Tips You Must Know
Apple has produced one of the most consumed, acknowledged, and preferred smartphones that allowed them to rule the industry for a considerably long period of time. Their style and presentation were not the only reason that made people look forward to buying an iPhone. Apple created its own operating system and presented their own versions of security and protection. One of the most recognized and impeccable features offered by Apple in its innovative structure was the security and safety through Apple ID and Apple Account. Every important feature that operated throughout the Apple iPhone 13 or iPad was focused over a single entity, the Apple ID. However, apart from the Apple ID, there were several other layers of authentications and verifications that were added throughout the protocol structure. A couple of them are renowned as Two Factor Verification and Two Factor Authentication. This article produces a very generous set of advice that should be looked over while handing these layers of protection. To get a better understanding of the procedures involved, you need to look over the guide to gain better knowledge on how to turn off Two Factor Authentication on your Apple.

Part 1. Is two-step verification the same as two-factor authentication?
There might be a few differences involved in these two security models; however, it should be kept in mind that they focus their purpose on securing the Apple ID of the user. Two Factor Verification is a security protocol that protects access to the various activities performed through the Apple ID. It attenuates an extra verification step across the Apple iPhone 13 device in addition to the password for the Apple ID. The device receives a verification code from an authentication factor that allows the authorities to confirm the credibility of the user.
The Two Factor Authentication is considered as an upgrade to the Two Factor Verification, which was released two years after the Two Factor Verification, in 2015. This authentication method exempted the offline recovery keys and application-specific passcodes. They added a six-digit authentication code onto the original password and produced an offline, time-dependent code that is to be generated through the Settings of the trusted device of the user. This feature was appended into the iOS 9 and OS X El Capitan with a region-specific target.
Part 2. How to turn off two-step verification?
As you are aware of the Two-Step Verification process, it is quite easy and typical in configuring. However, when it comes to turning the settings off, it is also a simple and straightforward procedure that can be easily covered by following the steps provided below.
Step 1: You are required to open the Apple ID Account web page on your browser and sign in with your Apple ID credentials.
Step 2: As you log into the website, access the “Security” section, and tap “Edit” from the options provided on the list.
Step 3: Tap on the “Two-Step Verification” option and turn it off. Confirm to conclude the process. You may be required to select the new security questions and verify the data of birth in the process. As you would be done with it, an email would be received across your connected address for confirmation.
Part 3. How to turn off two-factor authentication? (lower than iOS 10.3)
Two Factor Authentication cannot be turned off in a few cases and accounts for iOS versions greater than 10.3. However, if you have activated Two Factor Authentication across the iOS versions lower than 10.3, you can deactivate the feature through a series of simple steps. The exemption of this security feature across your device leaves it protected only through a password and a few security questions. For turning off the Two Factor Authentication from your Apple device, you need to follow the steps provided as follows:
Step 1: Open your browser and access your Apple ID Account website. Provide the details of your Apple ID and log in.
Step 2: Tap on “Edit” in the “Security” section and turn off the “Two Factor Authentication” option.
Step 3: This would lead you to set new security questions for the Apple ID account, followed by a verification of your date of birth. The successful execution of the process would lead to turning it off.
Part 4. Why can’t you turn off two-factor authentication if you already use it? (iOS 10.3 and later)
For users who have an Apple device with an iOS 10.3 or later version, they cannot turn the Two Factor Authentication off after it is accessed. The latest iOS and macOS included extra layers of security in their features, which led towards a better security foundation and protection of information. Users who have updated their account information can unenroll in two weeks after updating. For this, you are required to simply access the confirmation email that you have received and tap on the link to approach the previous security settings. Thus, it makes it far more than impossible for users to turn their Two Factor Authentication off if they consider it unnecessary for their device. This feature is something that would always remain intact with their device as an extra layer of security. Its absence does leave a chance of illegal access to the Apple iPhone 13 device and an increased risk of a security breach. Since it is directly built across the Apple iPhone 13 device and its settings, this makes it a very hard-to-approach characteristic.
Part 5. How to turn off two-factor authentication by removing Apple ID
Users who are very reluctant to remove the two-factor authentication off their device can consider removing the Apple ID itself for fulfilling the purpose. However, when it comes to executing such tasks, the need for a third-party platform gets evident. Third-party platforms provided dedicated services in providing users with a unique platform of operation with an environment that suits their purpose perfectly. Many platforms provide such impressive services, yet the selection gets quite difficult for a series of reasons. The following pointers explain the reasons to the users over why they should focus on selecting a platform such as Dr. Fone – Screen Unlock (iOS) for this purpose.
- You need to have no excessive knowledge of handling the platform.
- You can cover all the dynamics of unlocking the Apple iPhone 13 device without the use of iTunes.
- The platform provides you with the ability to unlock the passcode of your Apple device with ease.
- It offers you to protect your device from the disabled state.
- Works across all models of iPhone, iPad, and iPod Touch.
- Provides services to the latest version of iOS.
Dr. Fone – Screen Unlock (iOS) makes it easy for the users to control and remove their Apple ID and disable the two-factor authentication across their device. However, when it comes to controlling the platform, it follows a few simple and efficient steps that would guide you in executing the task successfully.
Step 1: Connect your Device and Launch Application
You need to connect your Apple device with the desktop and launch Dr. Fone across the computer. Tap on the “Screen Unlock” tool present on the home window and proceed with the removal of two-factor authentication.
Step 2: Access Appropriate Option
On the next screen that opens, you are required to select “Unlock Apple ID” from the three options. Proceed to your Apple device to take the process further.

Step 3: Trust the Computer
Open the Apple iPhone 13 device and tap on “Trust” over the prompt that appears on the screen. Following this, you need to navigate to the Settings of your device to initiate a reboot.

Step 4: Execution of Process
Once you are done with initiating a reboot, the platform automatically detects the update in the process and initiates removing the Apple ID from the Apple iPhone 13 device. Once the platform is done with the process, it provides a prompt message in the next window displaying the execution of the removal of Apple ID from your device. This also removes the Two Factor Authentication off your device.
Conclusion
The article has presented a very detailed comparison of the Two Factor Verification and Two Factor Authentication and provided an elaborated discussion over how to turn these security features off their devices. The article also discussed a third-party platform that would guide in removing such security features of the Apple iPhone 13 devices over the requirement of the user. You need to go through this article to get a better knowledge of the execution of the mechanism.
Also read:
- [New] 2024 Approved Avoid Blandness in Your Vids Top Recommended YouTube Thumbnail Heights
- [New] Boosting Social Reach Share TikToks with a Twist of Twitter
- [Updated] In 2024, Restore Lost Airdrop Functionality with Easy Solutions for iOS/macOS
- 2024 Approved Apocalypse Alert The Ultimate List of Thrilling Zombie Games
- 2024 Approved Flip the Script Instagram's Video Trick
- 3 Effective Methods to Fake GPS location on Android For your Realme GT Neo 5 SE | Dr.fone
- Forgot Your Apple ID Password and Email From iPhone XS? Heres the Best Fixes
- Guide on How To Remove Apple ID From iPhone SE (2020)
- How To Reset the Security Questions of Your Apple ID From Your iPhone 7
- How to Sign Out of Apple ID On iPhone SE (2020) without Password?
- In 2024, Brainless Beats Continue Selecting Top 8 Zombie Masterpieces
- In 2024, Forgot Your Apple ID Password and Email From Apple iPhone 14 Pro? Heres the Best Fixes
- In 2024, iCloud Separation How To Disconnect iPhone 6 Plus and iPad
- In 2024, Social Simulacrum Sketches Designing Distorted Digital Selves
- In 2024, Top-Notch Solutions for Disabled Apple ID On Apple iPhone SE Making It Possible
- In 2024, Turning Off Two Factor Authentication From iPhone 15? 5 Tips You Must Know
- In 2024, Your Account Has Been Disabled in the App Store and iTunes From Apple iPhone 15 Plus?
- Wacom Troubleshooting: Key Strategies for Restoring Full Functionality
- What's Behind These 7 Apps’ GPT-4 Capabilities?
- Title: The Easy Way to Remove an Apple ID from Your MacBook For your Apple iPhone 13
- Author: Alma
- Created at : 2024-12-05 16:00:46
- Updated at : 2024-12-12 16:00:51
- Link: https://apple-account.techidaily.com/the-easy-way-to-remove-an-apple-id-from-your-macbook-for-your-apple-iphone-13-by-drfone-ios/
- License: This work is licensed under CC BY-NC-SA 4.0.