
Turning Off Two Factor Authentication From Apple iPhone 12? 5 Tips You Must Know
Turning Off Two Factor Authentication On Apple iPhone 12? 5 Tips You Must Know
Apple has produced one of the most consumed, acknowledged, and preferred smartphones that allowed them to rule the industry for a considerably long period of time. Their style and presentation were not the only reason that made people look forward to buying an iPhone. Apple created its own operating system and presented their own versions of security and protection. One of the most recognized and impeccable features offered by Apple in its innovative structure was the security and safety through Apple ID and Apple Account. Every important feature that operated throughout the Apple iPhone 12 or iPad was focused over a single entity, the Apple ID. However, apart from the Apple ID, there were several other layers of authentications and verifications that were added throughout the protocol structure. A couple of them are renowned as Two Factor Verification and Two Factor Authentication. This article produces a very generous set of advice that should be looked over while handing these layers of protection. To get a better understanding of the procedures involved, you need to look over the guide to gain better knowledge on how to turn off Two Factor Authentication on your Apple.

Part 1. Is two-step verification the same as two-factor authentication?
There might be a few differences involved in these two security models; however, it should be kept in mind that they focus their purpose on securing the Apple ID of the user. Two Factor Verification is a security protocol that protects access to the various activities performed through the Apple ID. It attenuates an extra verification step across the Apple iPhone 12 device in addition to the password for the Apple ID. The device receives a verification code from an authentication factor that allows the authorities to confirm the credibility of the user.
The Two Factor Authentication is considered as an upgrade to the Two Factor Verification, which was released two years after the Two Factor Verification, in 2015. This authentication method exempted the offline recovery keys and application-specific passcodes. They added a six-digit authentication code onto the original password and produced an offline, time-dependent code that is to be generated through the Settings of the trusted device of the user. This feature was appended into the iOS 9 and OS X El Capitan with a region-specific target.
Part 2. How to turn off two-step verification?
As you are aware of the Two-Step Verification process, it is quite easy and typical in configuring. However, when it comes to turning the settings off, it is also a simple and straightforward procedure that can be easily covered by following the steps provided below.
Step 1: You are required to open the Apple ID Account web page on your browser and sign in with your Apple ID credentials.
Step 2: As you log into the website, access the “Security” section, and tap “Edit” from the options provided on the list.
Step 3: Tap on the “Two-Step Verification” option and turn it off. Confirm to conclude the process. You may be required to select the new security questions and verify the data of birth in the process. As you would be done with it, an email would be received across your connected address for confirmation.
Part 3. How to turn off two-factor authentication? (lower than iOS 10.3)
Two Factor Authentication cannot be turned off in a few cases and accounts for iOS versions greater than 10.3. However, if you have activated Two Factor Authentication across the iOS versions lower than 10.3, you can deactivate the feature through a series of simple steps. The exemption of this security feature across your device leaves it protected only through a password and a few security questions. For turning off the Two Factor Authentication from your Apple device, you need to follow the steps provided as follows:
Step 1: Open your browser and access your Apple ID Account website. Provide the details of your Apple ID and log in.
Step 2: Tap on “Edit” in the “Security” section and turn off the “Two Factor Authentication” option.
Step 3: This would lead you to set new security questions for the Apple ID account, followed by a verification of your date of birth. The successful execution of the process would lead to turning it off.
Part 4. Why can’t you turn off two-factor authentication if you already use it? (iOS 10.3 and later)
For users who have an Apple device with an iOS 10.3 or later version, they cannot turn the Two Factor Authentication off after it is accessed. The latest iOS and macOS included extra layers of security in their features, which led towards a better security foundation and protection of information. Users who have updated their account information can unenroll in two weeks after updating. For this, you are required to simply access the confirmation email that you have received and tap on the link to approach the previous security settings. Thus, it makes it far more than impossible for users to turn their Two Factor Authentication off if they consider it unnecessary for their device. This feature is something that would always remain intact with their device as an extra layer of security. Its absence does leave a chance of illegal access to the Apple iPhone 12 device and an increased risk of a security breach. Since it is directly built across the Apple iPhone 12 device and its settings, this makes it a very hard-to-approach characteristic.
Part 5. How to turn off two-factor authentication by removing Apple ID
Users who are very reluctant to remove the two-factor authentication off their device can consider removing the Apple ID itself for fulfilling the purpose. However, when it comes to executing such tasks, the need for a third-party platform gets evident. Third-party platforms provided dedicated services in providing users with a unique platform of operation with an environment that suits their purpose perfectly. Many platforms provide such impressive services, yet the selection gets quite difficult for a series of reasons. The following pointers explain the reasons to the users over why they should focus on selecting a platform such as Dr. Fone – Screen Unlock (iOS) for this purpose.
- You need to have no excessive knowledge of handling the platform.
- You can cover all the dynamics of unlocking the Apple iPhone 12 device without the use of iTunes.
- The platform provides you with the ability to unlock the passcode of your Apple device with ease.
- It offers you to protect your device from the disabled state.
- Works across all models of iPhone, iPad, and iPod Touch.
- Provides services to the latest version of iOS.
Dr. Fone – Screen Unlock (iOS) makes it easy for the users to control and remove their Apple ID and disable the two-factor authentication across their device. However, when it comes to controlling the platform, it follows a few simple and efficient steps that would guide you in executing the task successfully.
Step 1: Connect your Device and Launch Application
You need to connect your Apple device with the desktop and launch Dr. Fone across the computer. Tap on the “Screen Unlock” tool present on the home window and proceed with the removal of two-factor authentication.

Step 2: Access Appropriate Option
On the next screen that opens, you are required to select “Unlock Apple ID” from the three options. Proceed to your Apple device to take the process further.

Step 3: Trust the Computer
Open the Apple iPhone 12 device and tap on “Trust” over the prompt that appears on the screen. Following this, you need to navigate to the Settings of your device to initiate a reboot.

Step 4: Execution of Process
Once you are done with initiating a reboot, the platform automatically detects the update in the process and initiates removing the Apple ID from the Apple iPhone 12 device. Once the platform is done with the process, it provides a prompt message in the next window displaying the execution of the removal of Apple ID from your device. This also removes the Two Factor Authentication off your device.

Conclusion
The article has presented a very detailed comparison of the Two Factor Verification and Two Factor Authentication and provided an elaborated discussion over how to turn these security features off their devices. The article also discussed a third-party platform that would guide in removing such security features of the Apple iPhone 12 devices over the requirement of the user. You need to go through this article to get a better knowledge of the execution of the mechanism.
Apple ID Locked for Security Reasons On Apple iPhone 12? Find the Best Solution Here
Apple ID is the main functional unit in the smooth and secure operation of Apple devices. This ID is the gateway towards many services, including iCloud, App Store, and more. In the context of these security concerns, Apple ID could get locked out for various reasons, like Apple ID locked for security reasons. This happens just because the security feature in the operating system detects some fictitious activity.
However, you don’t need to worry about your Apple ID locked for security reasons because solutions to these problems do exist. In this article, we will also provide one significant and effective solution to tackle such issues effortlessly.
Part 1. Exploring the Causes of Apple ID Locked Out for Security Purposes
Has your Apple ID been locked for security reasons, and is this problem creating some tension for you? Before we move further towards its solutions, it’s essential to know the reasons that lead to these problems. Some of them are explained below in a comprehensive manner:
1. Incorrect Attempts
Apple locks your Apple ID mainly when you or someone else has entered the password incorrectly multiple times. This is one of the most common reasons, and mostly, this happens by the original users themselves unintentionally.
2. Preventing Fraudulence
If there are unauthorized purchases or suspicious transactions on your ID, Apple may consider locking it to prevent that activity. It happens to protect the user’s financial information and to avoid any fraudulent activity from being done on that Apple ID.
3. Using Third-Party Tools
Sometimes, when using third-party tools based on open-source iCloud sources, the Apple ID could get locked. Developers can integrate iCloud features into their applications to provide users with improved accessibility to their iCloud data.
4. Security Breach Reasons
The ID can also get locked when Apple senses a potential security breach, which could lead to the exposure of your credentials. It may occur when someone tries to hack your ID to get some information, especially when it is being used in multiple areas.
5. Incorrect Security Questions
It may be due to the security questions you or someone else has entered incorrectly too many times. This is another common reason because, most often, the security questions are forgotten by the user. Ultimately, this leads to your Apple ID being locked for security reasons.
Part 2. Resolving the Apple ID Locked Out For Security Reasons by Resetting The Password
The basic solution to the Apple ID locked for security reasons is to reset the ID’s password. Apple also recommends adopting this method if you feel any suspicious activity. The password for your Apple ID can be reset from the iOS device itself or the Mac. We are providing a simple guide to reset your password either way.
Resetting Password From iOS Device
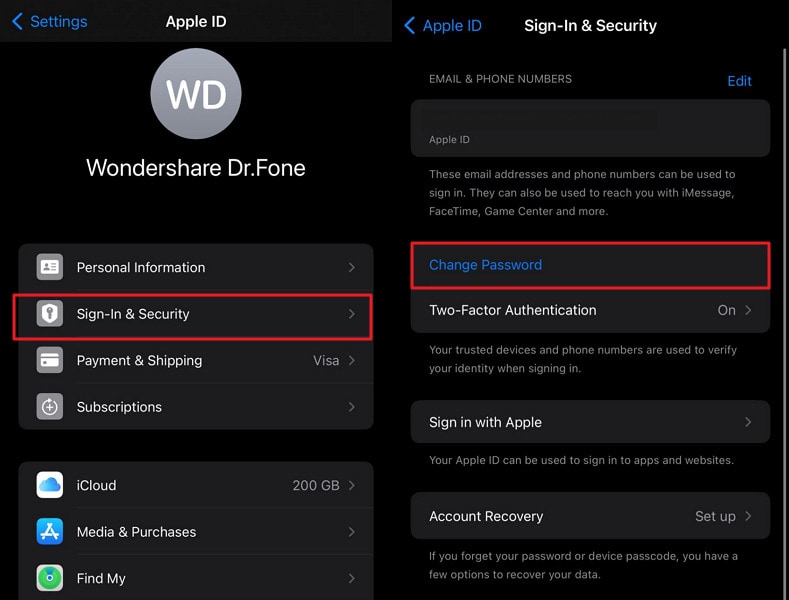
Instructions: To reset your Apple ID password using your iOS device, open the “Settings” app and move ahead by tapping on your name in front of you. Then, continue to select the “Sign-In & Security” option and select “Change Password.” Follow the prompts on the screen to complete the Apple ID password change process.
Resetting Password From Mac
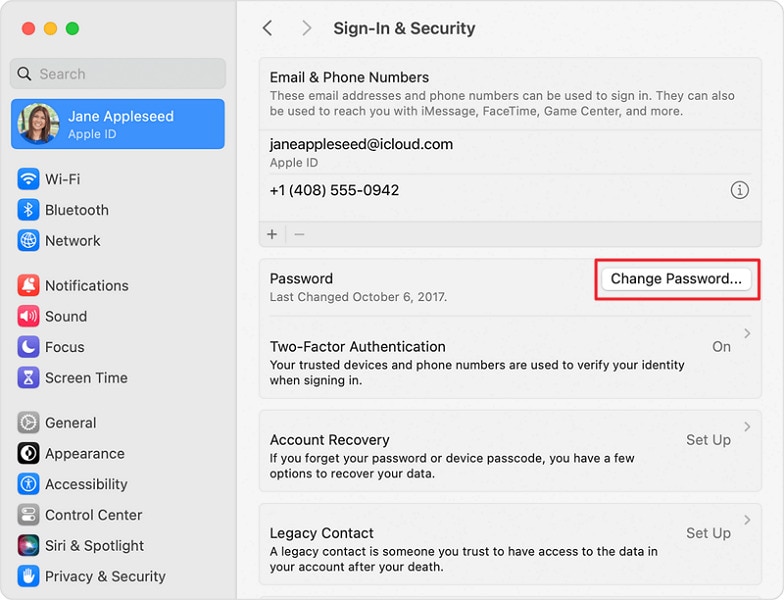
Instructions: Start by tapping the Apple logo in the top left corner of your screen and choosing the option “System Settings.” Upon completion of this step, you have to access your Apple ID settings and proceed by selecting the “Sign-In & Security” option. Subsequently, opt for the “Change Password” feature to modify your Apple ID password.
Part 3. Resolving the Apple ID Locked Out for Security Reasons by iForgot Website
You have tried to resolve the problematic message indicating, “This Apple ID has been locked,” but resetting the password is not helping. Then, you need to try iforgot.apple.com, which will help you tackle this issue quickly. Here is how to resolve your Apple ID, which has been locked for security reasons, using the iforgot.apple.com website.
- Step 1: To begin with, you will have to browse the website iforgot.apple.com on your computer. Once the website has loaded, move ahead by pressing the “Reset Password” and selecting the “Continue” option after entering the Apple ID.

- Step 2: In the next stage, you need to reset your password, and for that, you need to go through a verification process sent to your trusted device. You can reset the Apple ID password by tapping the “Allow” button. Following this, you must provide the trusted device passcode to initiate the password reset process.

Part 4. Resolving the Apple ID Locked Out for Security Reasons by Apple Support App
If your Apple ID is still inaccessible after implementing the methods, you can try the Apple Support app. This technique can be applied by arranging another device for downloading the Apple Support app. Users can regain access to their Apple ID and restore full device functionality through this app. The simple guide to perform this action is explained below step-wise:
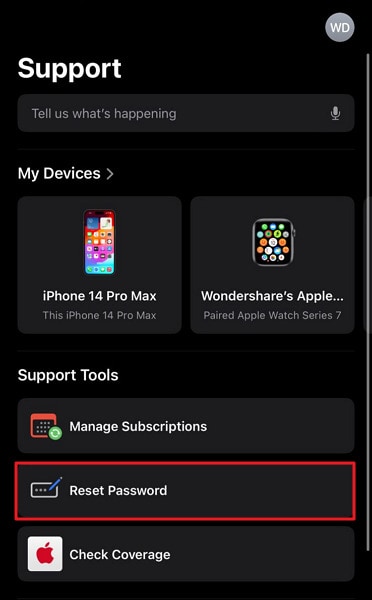
- Step 1: You need to download the Apple Support App on the borrowed device and proceed to open it. After that, navigate to the “Support Tools” section, find the “Reset Password” option, and tap on it.
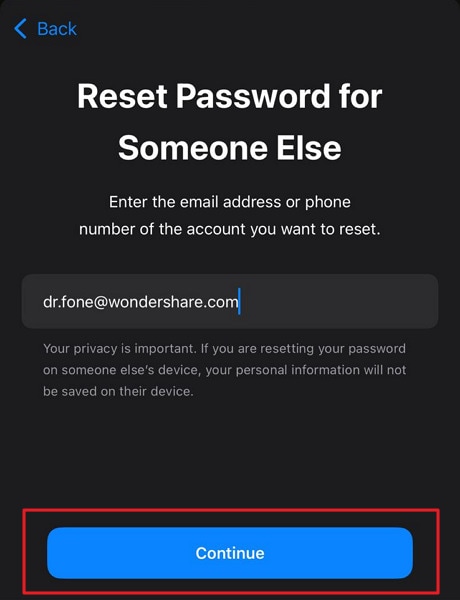
- Step 2: Choose the “Help Someone Else” option to continue. Then, give your Apple ID and hit the “Continue” button. There, you have to follow the on-screen instructions to reset your password and get access to it.
Part 5. No Solution Yet? Try Wondershare Dr.Fone – Screen Unlock (iOS) To Unlock Locked Apple ID for Security Reasons
When facing an Apple ID locked for security reasons, it becomes imperative to seek a reliable solution. All essential operations within iOS devices are intertwined with the functionality of the Apple ID. That’s why a viable resolution is crucial for seamless device usability. In such situations, Wondershare Dr.Fone emerges as a highly effective option.
It is specifically designed to tackle the intricacies of iOS device management. This tool offers a dedicated feature to unlock Apple IDs, making it the ultimate recourse. Additionally, it allows you to bypass the iCloud activation lock without requiring a password. This iOS screen unlock tool is fully compatible with the latest versions of iOS 17 and iPadOS 17.
Key Features of Wondershare Dr.Fone
- Using Wondershare Dr.Fone, you can also remove the Apple ID or screen lock from the latest iPhone 15 models.
- You can also manage your Apple iPhone 12 data transfer or fix iDevice system issues with the help of Wondershare Dr.Fone.
- This tool can also help its users to remove the Screen Time Passcode and SIM lock.
How To Use Wondershare Dr.Fone To Unlock Locked Apple ID for Security Reasons
Summarized below is the detailed step-by-step process of using Wondershare Dr.Fone to unlock your Apple ID:
- Step 1: Navigate to the Remove Apple ID Feature
With Wondershare Dr.Fone launched, move to the “Toolbox” tab and access “Screen Unlock.” Then choose “iOS” as your device type, and on the following screen, press “Remove Apple ID.” Now is the time to connect your Apple iPhone 12 to the computer and let Wondershare Dr.Fone detect it.

- Step 2: Enable 2FA on Your iOS Device
To proceed further, it is imperative to have screen lock and 2FA enabled on your iOS device. If it already isn’t, do it and move to put your device in Recovery Mode. Dr.Fone will guide you through the process of enabling Recovery Mode on your device. Once Wondershare Dr.Fone detects your device in Recovery Mode, it will display your device model.

- Step 3: Complete the Apple ID Unlocking Process
Now choose “System Version” and tap “Start” to let Dr.Fone download the firmware. Once it is downloaded and verified, tap “Unlock Now.” The last step involves putting the confirmation code in the confirmation prompt and pressing “Unlock.” In a few moments, Wondershare Dr.Fone will unlock your Apple ID.

Final Words
To conclude, there are scenarios that can lead to the Apple ID being locked for security reasons problem. Apple does this for your benefit. However, we have explained different methods to get you out of this situation. Although all of these methods possess the potential to resolve this problem, Wondershare Dr.Fone offers a powerful platform for more in-depth remedies.
This robust iOS toolkit feature performs this recovery in seconds, saving you time. Also, it has a simple interface for its users with various technical exposure. In short, it is the best solution if your Apple ID has been locked for security reasons.
How To Change Your Apple iPhone 12 Apple ID on MacBook
Your Apple ID is a key component of your Apple ecosystem. It serves as your digital identity across all Apple devices. Whether you have an Intel-based MacBook or one with Apple Silicon, understanding how to change your Apple ID is crucial. Therefore, in this detailed guide, we will walk you through the process of how to change your Apple ID on your MacBookwithout facing any issues.
Besides this, it will also assist you in exploring the significance of your Apple ID and the services it enables on your MacBook. The article will ensure that you make the most of this essential account.
Part 1: What Are the Benefits of Changing the Apple ID on MacBook
Apple ID is the cornerstone that simplifies the management of your Apple devices. It’s more than just a username; it’s your passport to a world of smooth integration and services. Changing your Apple ID on your MacBook can yield several significant benefits. It enhances your overall user experience. Here are some of the key advantages of learning how to change your Apple ID MacBook:
1. Personalization
Changing your Apple ID allows you to customize your MacBook according to your preferences. You can sync your contacts, calendars, and settings. This ensures a personalized and consistent experience across all your Apple devices.
2. App Store and iTunes Purchases
You can access a distinct collection of applications, music, films, and books by creating or logging in with a different Apple ID. This proves especially beneficial when considering a change of region. It also helps when sharing your MacBook with family members, each of whom has their individual Apple ID.
3. iCloud Storage
Your Apple ID is closely linked with iCloud, Apple’s cloud storage service. Changing your Apple ID allows you to gain access to an alternative iCloud account with its dedicated storage capacity. This can be advantageous when you require additional storage or wish to keep your data separate from a previous account.
4. Privacy and Security Settings
Frequently updating your Apple ID can enhance your online privacy and security. It enhances the challenge for unauthorized parties to acquire your personal information. This, consequently, reduces the risk of accessing your MacBook’s sensitive information.
5. Family Sharing
If you’re part of a Family Sharing group, changing your Apple ID can simplify sharing purchases, subscriptions, and iCloud storage with family members. Each family member can have their own Apple ID while still enjoying the benefits of shared content.
Part 2: How To Change the Apple ID on MacBook Through the Settings
In summary, there are many advantages to updating your Apple ID on your MacBook. Let’s now proceed to the actionable steps for accomplishing this task. Below is a comprehensive, step-by-step tutorial on how to change your Apple ID on a MacBookwith the help of System Settings:
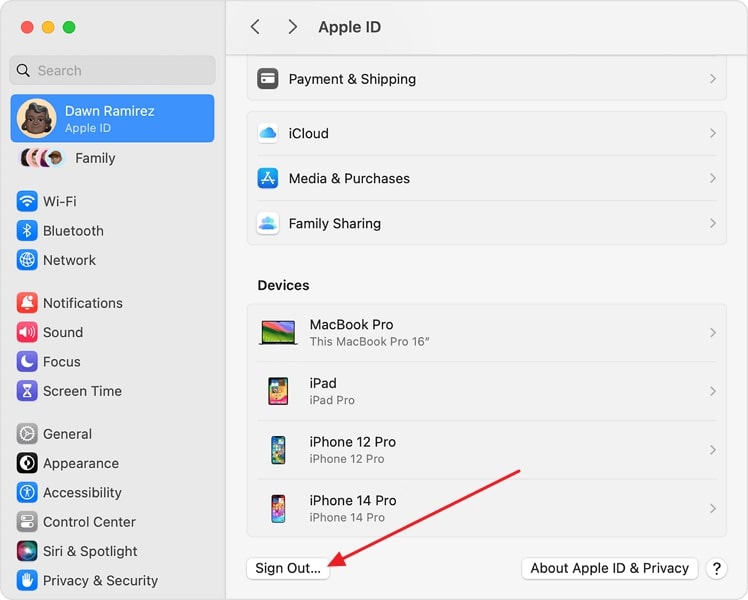
- **Step 1:**Access your Mac’s System Setting through the Dock. Tap the Apple ID icon from the left sidebar within the “System Settings.”
- **Step 2:**Here, scroll down to find and tap “Sign Out.” The option is located at the bottom near the left corner. Afterward, tap “Sign Out” again to confirm your choice, and then, if your device asks, provide your Apple ID password to move ahead.
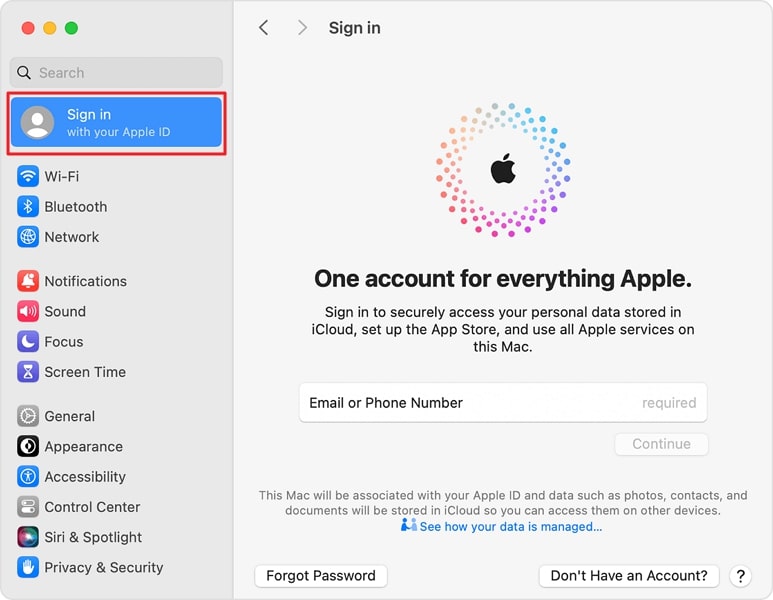
- **Step 3:**After logging out of your Apple ID, reboot your device, and when it is done, go back to System Settings. From there, hit the “Sign in to with your Apple ID” option so that you can quickly log in with a new Apple ID.
Part 3: Other Ways To Change the Apple ID With Ease
Changing your Apple ID on your MacBook through Settings is a straightforward process. There are scenarios where some adjustments may be necessary and some may not. For instance, in the case of purchasing a used MacBook, it’s conceivable that the prior owner’s Apple ID could still be linked to the Apple iPhone 12 device.
In such instances, you’ll need to contact the previous owner and request them to disassociate their Apple ID. Here are two practical methods for how to change Apple ID on MacBook Air:
Way 1: Using the iPhone
The first way the previous owner can remove the Apple ID from your MacBook is by using his iPhone. You can ask the previous owner to follow these steps on their iPhone:
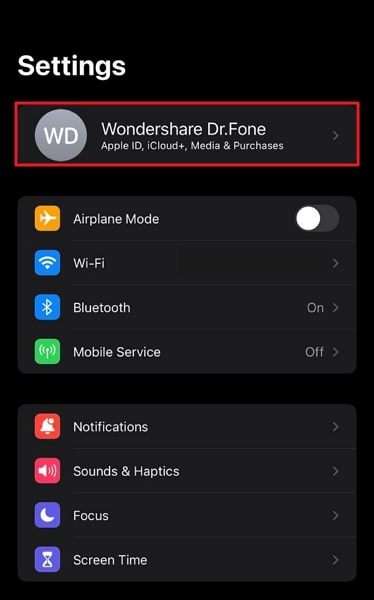
- **Step 1:**Start the process by accessing the Settings app on your Apple iPhone 12. From there, click on Apple ID on top of the main settings page.
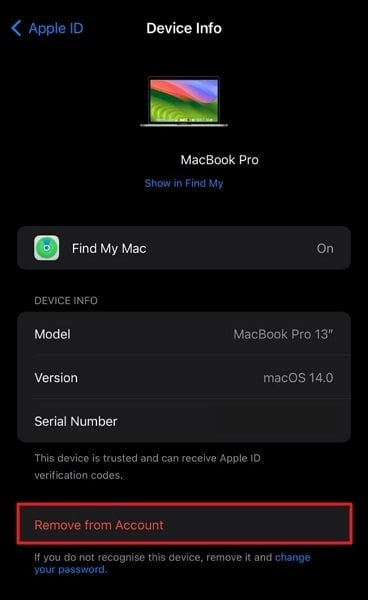
- **Step 2:**Scroll down on the screen to devices that are connected with the Apple ID. Tap on the MacBook and use the “Remove from Account” option to remove Apple ID from MacBook.
Way 2: Using Find My App
Another way to remove the Apple ID is by asking the previous owner to use the Find My service. The steps for removing Apple ID using the Find My app are given below:
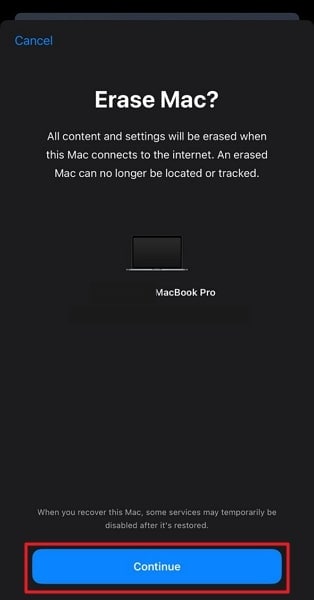
- **Step 1:**Begin by opening the Find My app on the iPhone. There, select the MacBook from the Apple iPhone 12 devices section. On the following screen, scroll to the last option, “Erase This Device.”
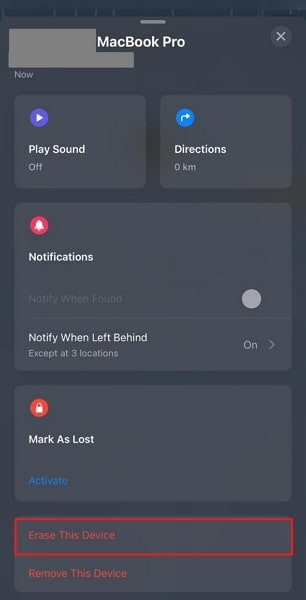
- **Step 2:**Here, select “Continue” to confirm your choice, and follow on-screen instructions to erase the Apple iPhone 12 device. After this, provide your Apple ID password to complete the process, and when the Apple iPhone 12 device eraser is done, the Apple ID will be removed from your MacBook.
Bonus Part: How To Fix Unable To Logout (Change) the Old Apple ID on Mac
Although changing your Apple ID on your Mac is usually a swift procedure, there may be instances where you find it challenging. It’s essential to resolve this matter promptly. The reason is that many essential procedures and services are directly linked to your Apple ID. Here are some common reasons why you might face difficulty logging out of the old Apple ID and their solutions:
1. Ongoing iCloud Backup
While the data is backed up on the iCloud from your Mac, you cannot log out from the Apple ID. It is because, while the data is being uploaded, logging out of Apple ID is restricted to ensure that data is not lost during the process.
Solution
Wait for the iCloud backup to complete before attempting to log out. You can access the backup information through “iCloud” within your Apple ID settings of System Settings. Here, tap “iCloud Drive” and stop syncing to stop the ongoing iCloud backup process.

2. Bug in macOS
Occasionally, macOS may encounter bugs or glitches that prevent you from logging out of your Apple ID. These issues can usually be resolved with software updates or troubleshooting steps.
Solution
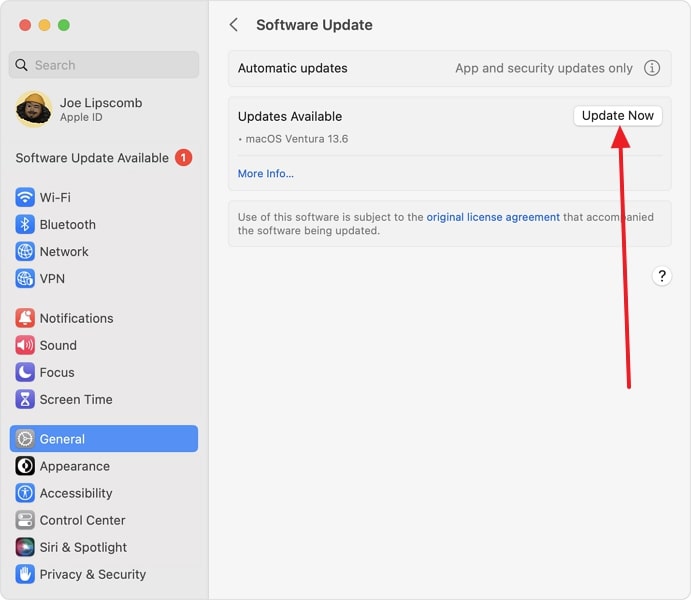
To resolve the bugs and glitches within the MacBook, the best option is to update macOS to its latest version. For that, access “System Settings” through Dock and move to the “General” tab. Here, select “Software Update“ to verify if an update is available and if an update is available, use “Update Now” to update the macOS.
3. Apple Server Inactivity
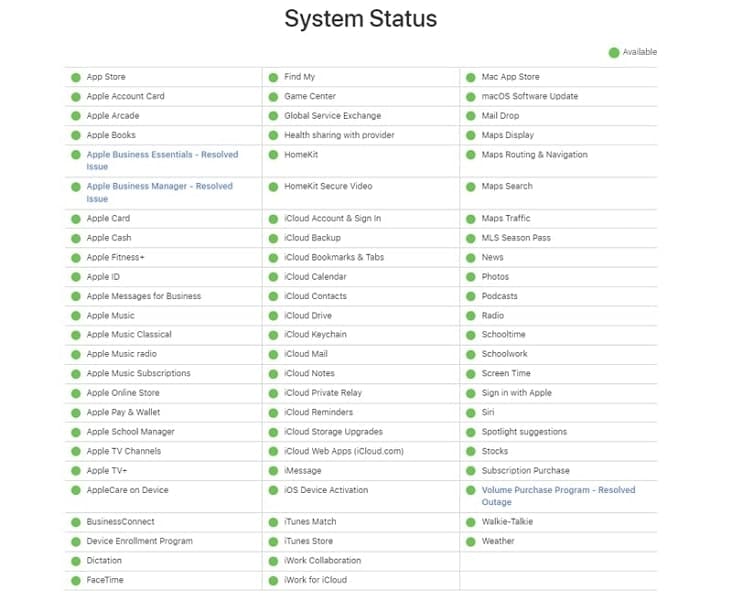
Sometimes, issues on Apple’s servers can disrupt the log-out process. It’s recommended to visit Apple’s System Status page to ascertain the presence of any ongoing server issues.
Solution
You will need to check the official Apple System Status page at https://www.apple.com/support/systemstatus/. Here, you can find out if the problem behind your inability to log out lies with the Apple servers.
Forgetting a password to your Apple ID is a nightmare for Apple users. Considering the pivotal role of Apple ID in the Apple ecosystem, it’s not surprising that forgetting your Apple ID password can be a concern. Nevertheless, the real question is how to proceed if you find yourself in this predicament. While it may initially appear impossible, rest assured there are solutions available. Where there’s determination, there’s a path forward.
If it is an iOS device where your Apple ID is locked, we have the best tool for you in the form of Wondershare Dr.Fone. This tool enables you to remove Apple ID from the Apple iPhone 12 device without needing a password. Dr.Fone’s iPhone unlocker has the capability to bypass the Apple ID lock permanently. It even works when the Find My/Find My iPhone feature is active on the Apple iPhone 12 device.
You can fully restore access to all your iCloud services and Apple ID features by signing in with a new account. Following are the steps you need to adhere to remove the locked Apple ID from your iOS device using Wondershare Dr.Fone:
- Step 1: Navigate To Remove Apple ID in Wondershare Dr.Fone
Click “Toolbox” from the left sidebar after launching Wondershare Dr.Fone. From the available options on the screen, choose “Screen Unlock” and select “iPhone” as your device type. Now connect your Apple iPhone 12 to the computer using a USB cable and click “Remove Apple ID“ in Dr.Fone.
- Step 2: Enable Recovery Mode on Your Device
Tap “Unlock Now” and proceed to confirm that your device has setup screen lock and 2FA is enabled. These are necessary steps for the removal process of Apple ID. Next, put your device into Recovery Mode following the guidelines available on-screen.
- Step 3: Remove the Locked Apple ID
Once your device is in Recovery Mode, Wondershare Dr.Fone will detect its model. You need to choose the iOS version and click “Start” to download the firmware. When it is downloaded and verified, tap “Unlock Now” to initiate the process. The last step involves confirming that you agree to the procedure by typing “000000” into the warning prompt and clicking “Unlock.”
Conclusion
In conclusion, this article has provided you with valuable insights into the process of how to change Apple ID on MacBook. We began by highlighting the primary purpose of the Apple ID and discussing the countless benefits it offers. We’ve walked you through two main methods for changing your Apple ID. The first one is using the Settings on your MacBook.
The other included alternative approaches for scenarios like purchasing a second-hand MacBook. We also addressed the issue of forgetting your Apple ID password on iOS devices. For it, we used the specialized software Wondershare Dr.Fone to remove Apple ID without needing a password.
Also read:
- [Solved] Display Not Compatible with Windows 11
- [Updated] 2024 Approved Unmarked Eyes Facebook Story Viewer
- [Updated] Canva's Magic How to Banish the Unwanted Backdrop
- [Updated] In 2024, From Creator to Business Transforming Your YouTube Experience
- [Updated] In 2024, Top MP4-to-Facebook Video Converter 2023 Edition
- A Comprehve Solutions to Overcome the 504 Gateway Timeout Hurdle
- Apple ID Locked or Disabled From iPhone 8? 7 Mehtods You Cant-Miss
- Forgot Your Apple ID Password and Email From Apple iPhone XS? Heres the Best Fixes
- Gratuit Online Verwerpt WEBP-Images Naar JPEG - Professionele Service Door Movavi
- How To Get the Apple ID Verification Code From iPhone 7 in the Best Ways
- In 2024, How to Delete iCloud Account On iPhone 12 mini without Password?
- In 2024, How to Sign Out of Apple ID From Apple iPhone 7 without Password?
- In 2024, Why Apple Account Disabled On your iPhone 14 Pro? How to Fix
- Top 9 Best No-Cost Language Education Sites on the Internet
- Your Account Has Been Disabled in the App Store and iTunes On Apple iPhone 11?
- Title: Turning Off Two Factor Authentication From Apple iPhone 12? 5 Tips You Must Know
- Author: Alma
- Created at : 2024-12-17 01:38:20
- Updated at : 2024-12-20 02:26:06
- Link: https://apple-account.techidaily.com/turning-off-two-factor-authentication-from-apple-iphone-12-5-tips-you-must-know-by-drfone-ios/
- License: This work is licensed under CC BY-NC-SA 4.0.