
Turning Off Two Factor Authentication On Apple iPhone 15 Pro Max? 5 Tips You Must Know
Turning Off Two Factor Authentication On Apple iPhone 15 Pro Max? 5 Tips You Must Know
Apple has produced one of the most consumed, acknowledged, and preferred smartphones that allowed them to rule the industry for a considerably long period of time. Their style and presentation were not the only reason that made people look forward to buying an iPhone. Apple created its own operating system and presented their own versions of security and protection. One of the most recognized and impeccable features offered by Apple in its innovative structure was the security and safety through Apple ID and Apple Account. Every important feature that operated throughout the Apple iPhone 15 Pro Max or iPad was focused over a single entity, the Apple ID. However, apart from the Apple ID, there were several other layers of authentications and verifications that were added throughout the protocol structure. A couple of them are renowned as Two Factor Verification and Two Factor Authentication. This article produces a very generous set of advice that should be looked over while handing these layers of protection. To get a better understanding of the procedures involved, you need to look over the guide to gain better knowledge on how to turn off Two Factor Authentication on your Apple.

Part 1. Is two-step verification the same as two-factor authentication?
There might be a few differences involved in these two security models; however, it should be kept in mind that they focus their purpose on securing the Apple ID of the user. Two Factor Verification is a security protocol that protects access to the various activities performed through the Apple ID. It attenuates an extra verification step across the Apple iPhone 15 Pro Max device in addition to the password for the Apple ID. The device receives a verification code from an authentication factor that allows the authorities to confirm the credibility of the user.
The Two Factor Authentication is considered as an upgrade to the Two Factor Verification, which was released two years after the Two Factor Verification, in 2015. This authentication method exempted the offline recovery keys and application-specific passcodes. They added a six-digit authentication code onto the original password and produced an offline, time-dependent code that is to be generated through the Settings of the trusted device of the user. This feature was appended into the iOS 9 and OS X El Capitan with a region-specific target.
Part 2. How to turn off two-step verification?
As you are aware of the Two-Step Verification process, it is quite easy and typical in configuring. However, when it comes to turning the settings off, it is also a simple and straightforward procedure that can be easily covered by following the steps provided below.
Step 1: You are required to open the Apple ID Account web page on your browser and sign in with your Apple ID credentials.
Step 2: As you log into the website, access the “Security” section, and tap “Edit” from the options provided on the list.
Step 3: Tap on the “Two-Step Verification” option and turn it off. Confirm to conclude the process. You may be required to select the new security questions and verify the data of birth in the process. As you would be done with it, an email would be received across your connected address for confirmation.
Part 3. How to turn off two-factor authentication? (lower than iOS 10.3)
Two Factor Authentication cannot be turned off in a few cases and accounts for iOS versions greater than 10.3. However, if you have activated Two Factor Authentication across the iOS versions lower than 10.3, you can deactivate the feature through a series of simple steps. The exemption of this security feature across your device leaves it protected only through a password and a few security questions. For turning off the Two Factor Authentication from your Apple device, you need to follow the steps provided as follows:
Step 1: Open your browser and access your Apple ID Account website. Provide the details of your Apple ID and log in.
Step 2: Tap on “Edit” in the “Security” section and turn off the “Two Factor Authentication” option.
Step 3: This would lead you to set new security questions for the Apple ID account, followed by a verification of your date of birth. The successful execution of the process would lead to turning it off.
Part 4. Why can’t you turn off two-factor authentication if you already use it? (iOS 10.3 and later)
For users who have an Apple device with an iOS 10.3 or later version, they cannot turn the Two Factor Authentication off after it is accessed. The latest iOS and macOS included extra layers of security in their features, which led towards a better security foundation and protection of information. Users who have updated their account information can unenroll in two weeks after updating. For this, you are required to simply access the confirmation email that you have received and tap on the link to approach the previous security settings. Thus, it makes it far more than impossible for users to turn their Two Factor Authentication off if they consider it unnecessary for their device. This feature is something that would always remain intact with their device as an extra layer of security. Its absence does leave a chance of illegal access to the Apple iPhone 15 Pro Max device and an increased risk of a security breach. Since it is directly built across the Apple iPhone 15 Pro Max device and its settings, this makes it a very hard-to-approach characteristic.
Part 5. How to turn off two-factor authentication by removing Apple ID
Users who are very reluctant to remove the two-factor authentication off their device can consider removing the Apple ID itself for fulfilling the purpose. However, when it comes to executing such tasks, the need for a third-party platform gets evident. Third-party platforms provided dedicated services in providing users with a unique platform of operation with an environment that suits their purpose perfectly. Many platforms provide such impressive services, yet the selection gets quite difficult for a series of reasons. The following pointers explain the reasons to the users over why they should focus on selecting a platform such as Dr. Fone – Screen Unlock (iOS) for this purpose.
- You need to have no excessive knowledge of handling the platform.
- You can cover all the dynamics of unlocking the Apple iPhone 15 Pro Max device without the use of iTunes.
- The platform provides you with the ability to unlock the passcode of your Apple device with ease.
- It offers you to protect your device from the disabled state.
- Works across all models of iPhone, iPad, and iPod Touch.
- Provides services to the latest version of iOS.
Dr. Fone – Screen Unlock (iOS) makes it easy for the users to control and remove their Apple ID and disable the two-factor authentication across their device. However, when it comes to controlling the platform, it follows a few simple and efficient steps that would guide you in executing the task successfully.
Step 1: Connect your Device and Launch Application
You need to connect your Apple device with the desktop and launch Dr. Fone across the computer. Tap on the “Screen Unlock” tool present on the home window and proceed with the removal of two-factor authentication.

Step 2: Access Appropriate Option
On the next screen that opens, you are required to select “Unlock Apple ID” from the three options. Proceed to your Apple device to take the process further.

Step 3: Trust the Computer
Open the Apple iPhone 15 Pro Max device and tap on “Trust” over the prompt that appears on the screen. Following this, you need to navigate to the Settings of your device to initiate a reboot.

Step 4: Execution of Process
Once you are done with initiating a reboot, the platform automatically detects the update in the process and initiates removing the Apple ID from the Apple iPhone 15 Pro Max device. Once the platform is done with the process, it provides a prompt message in the next window displaying the execution of the removal of Apple ID from your device. This also removes the Two Factor Authentication off your device.

Conclusion
The article has presented a very detailed comparison of the Two Factor Verification and Two Factor Authentication and provided an elaborated discussion over how to turn these security features off their devices. The article also discussed a third-party platform that would guide in removing such security features of the Apple iPhone 15 Pro Max devices over the requirement of the user. You need to go through this article to get a better knowledge of the execution of the mechanism.
Forgot Your Apple ID Password and Email On Apple iPhone 15 Pro Max? Here’s the Best Fixes
For Apple users, the Apple ID stands as the gateway to its services. It connects users to a universe of innovative apps, music, and more. So, I forgot my Apple ID password, and email is not a situation many Apple users want to be in. However, the moment of forgetting the Apple ID password and email can turn into a nightmare.
It can leave users worried and locked out of their cherished accounts. That’s why the need for swift and effective solutions to regain access to Apple ID accounts has become vital. In this comprehensive guide, we unveil the best solutions available. The aim is to empower users to regain control over their Apple system.
Way 1: Reset Apple ID Password From The Settings [Immediate Solution]
One of the quickest remedies for a misplaced Apple ID password involves starting the password reset procedure. This can be conveniently carried out from the settings on your iOS device or Mac. This approach offers a rapid and convenient pathway to regain entry to your Apple ID. To reset your Apple ID password on Mac and iOS devices, please adhere to the steps provided below:
For iOS Devices
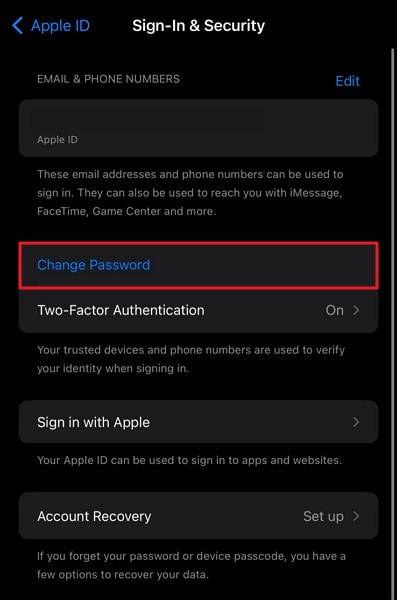
- Step 1. Locate and launch the Settings app on your iDevice by swiping left and right through the installed apps. After entering, select your name and proceed to tap “Sign-In & Security” in the subsequent window.
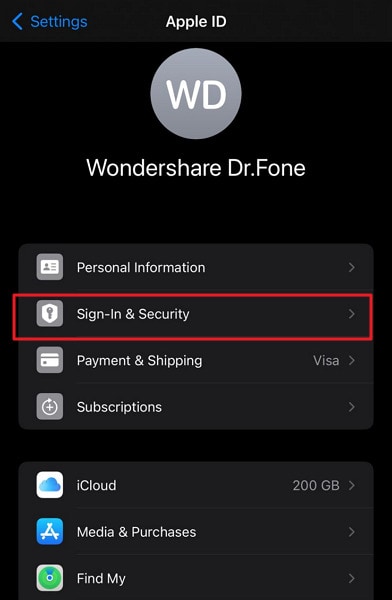
- Step 2. Opt for “Change Password,” input your current iDevice password, and enter your new Apple ID password. Confirm the new password and finalize the process by tapping “Change Password.”
For MacBook
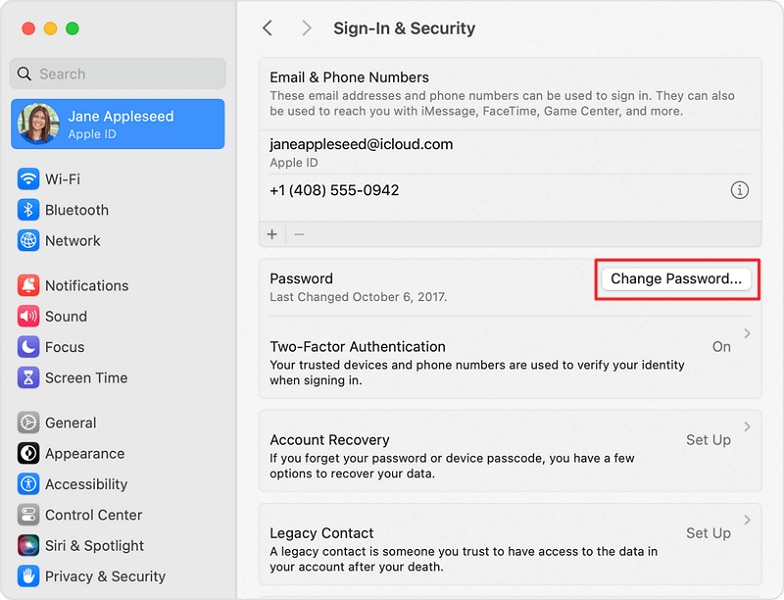
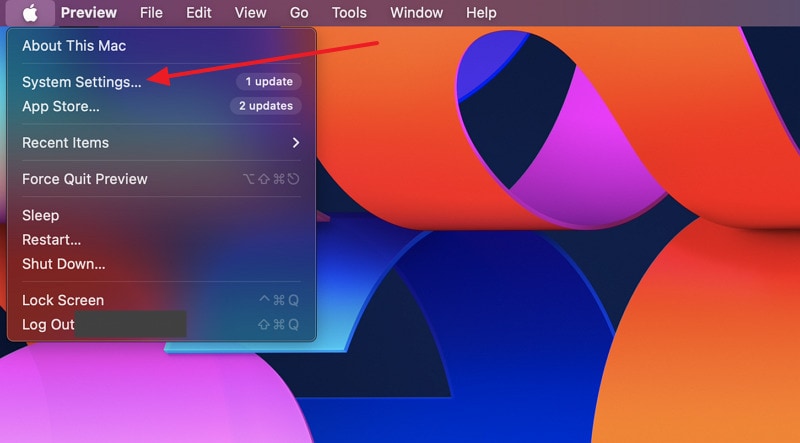
- Step 1. Navigate to the top left corner of your Mac and select the Apple logo. From the dropdown menu, choose “System Settings.” Inside “System Settings,” click on your name and select “Sign-in & Security.”

- Step 2. Within the “Sign-In & Security” tab, locate “Password” and click on “Change Password.” Enter your Mac passcode and follow the on-screen instructions to reset your Apple ID password.
Way 2: Reset Apple ID Password From Website
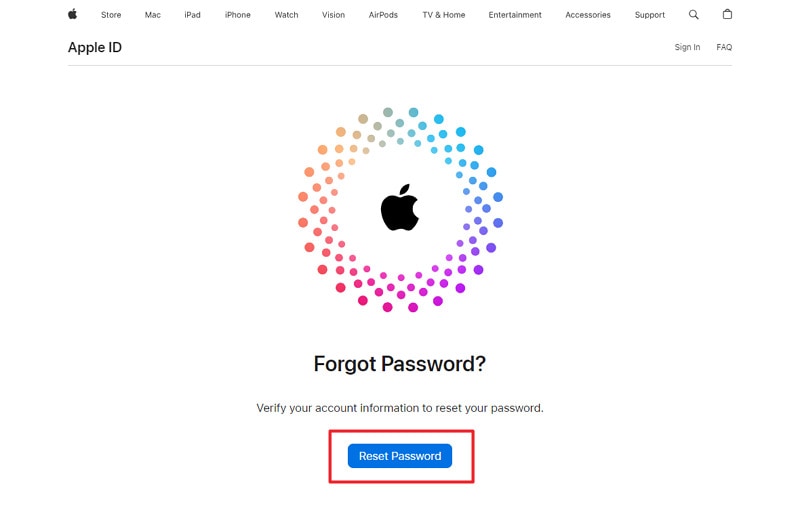
Have resetting the Apple ID password from the settings on your iOS device or Mac proved unsuccessful? An alternative approach lies in using the official Apple “iForgot” website. This online solution functions as a dependable platform. It enables users to recover access to their Apple ID while ensuring password resets are conducted securely. The following steps outline the process:
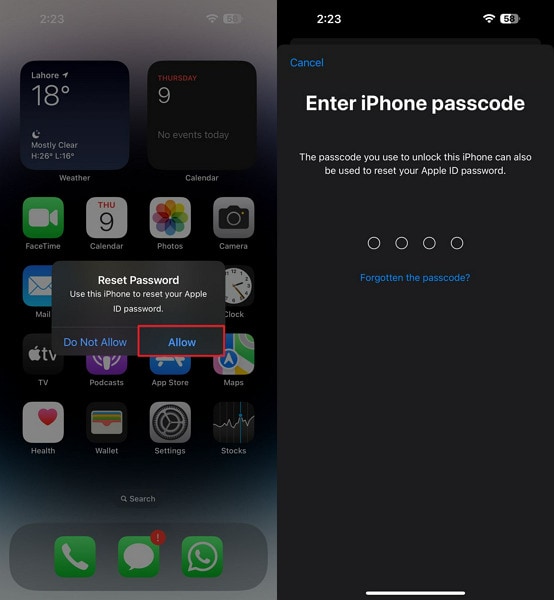
- Step 1. To begin, launch a web browser and navigate to iforgot.apple.com. Afterward, opt for the “Reset Password” option, leading you to the page dedicated to changing your Apple ID password. Provide your Apple ID, usually the email address linked to your Apple account, and proceed by clicking “Continue.”
- Step 2. You will receive a confirmation code on one of your trusted Apple devices by proceeding to the next screen. Tap “Allow” on the confirmation pop-up, and you will be redirected to enter your trusted Apple device passcode. This will allow you to set a new password for your Apple ID.
Way 3: Reset Apple ID Password Using the Apple Support App
The official Apple Support app is another way to reset your Apple ID password. It is a blessing in disguise for those who don’t have access to trusted devices or recovery email/phone numbers. This method can be easily accessed from another iOS device. Below are the necessary procedures you must follow to reset your Apple ID password with email using the Apple Support app:
- Step 1. Start by accessing an iOS device, then continue by installing Apple’s official Support App. After installation, launch the application and navigate to the “Support Tools” category. Find the “Reset Password” option and click on it to commence the password reset process.
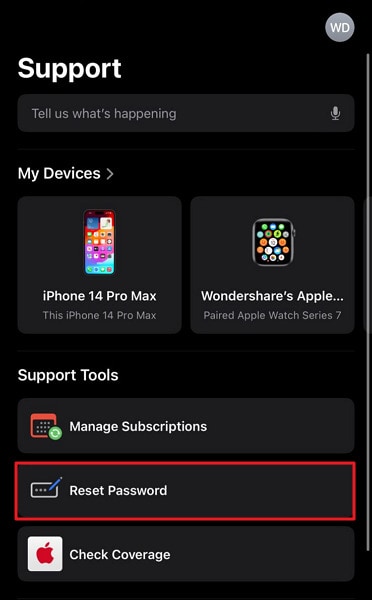
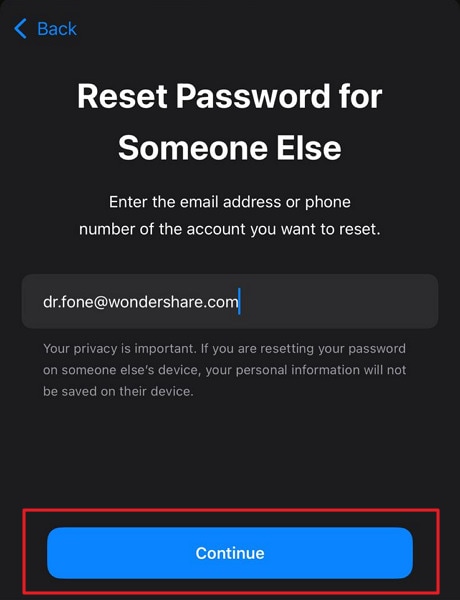
- Step 2. When it comes to selecting the Apple ID, tap “Help Someone Else.” Then, enter your Apple ID, press “Continue,” and follow the on-screen instructions to complete the process.
Way 4: Reset Apple ID Password Using Account Recovery Contact
You are in luck if you have added an account recovery contact before losing your Apple ID password. To guarantee that you never face lockouts on your Apple ID or devices, Apple permits the addition of up to 5 recovery contacts. Simply contact your account recovery contact for assistance. Here are the steps they can follow to aid you:
On iOS Devices
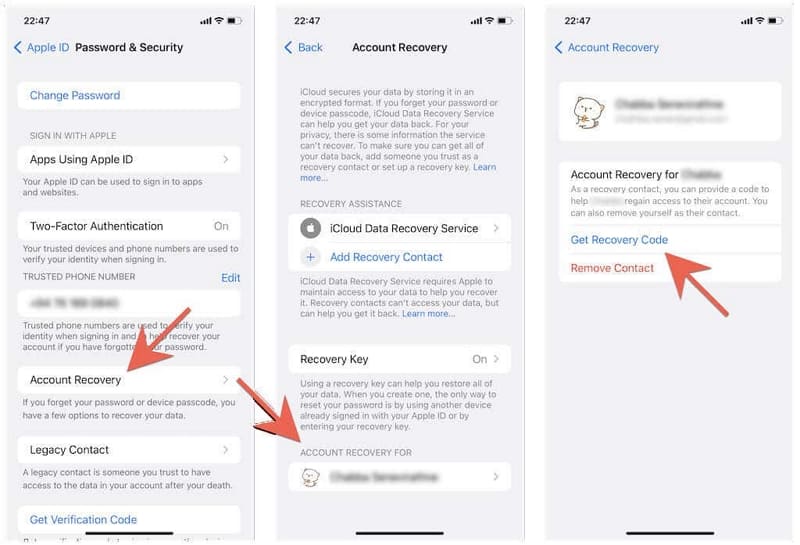
- Step 1: You can begin by accessing the iOS device’s Settings and tapping the Apple ID. On the following screen, press “Sign-In & Security” and go on to “Account Recovery.”

- Step 2: Here, press the account’s name that has added them as recovery contact. Press “Get Recovery Code” on the following screen and share it with the person who needs to regain access to his devices.
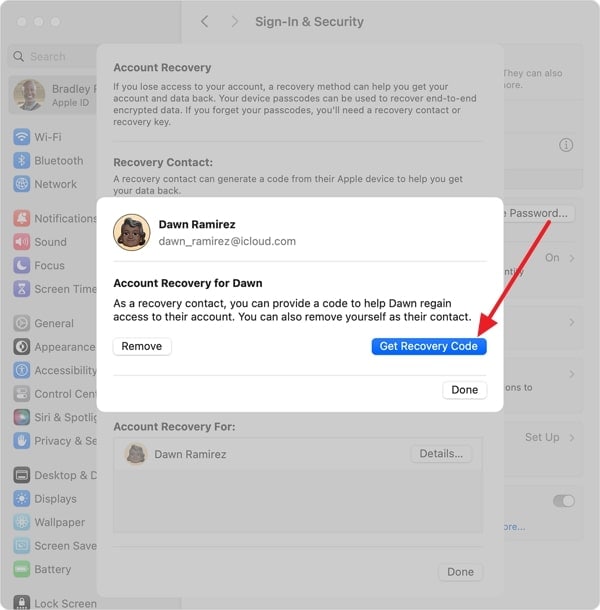
On Mac
- Step 1: Start by accessing “System Settings” using the Finder and click on your name from the top left corner. Following this, access the “Sign-In & Security” settings and tap “Account Recovery.”
- Step 2: Select the contact who has asked you for help recovering their account. Then, tap “Get Recovery Code” to receive a code that you need to share with the targeted person.
Way 5: Reset Apple ID Password Through Requesting Account Recovery
Did all previous methods fail to yield the desired outcome? You can request an account recovery through the official Apple iForgot website. This process facilitates a comprehensive account recovery procedure. It enables users to regain access to their Apple ID account with the help of Apple’s support team.
All you need to do is contact Apple support and request resetting your Apple ID password. It usually takes up to 72 hours for this process to complete. To make it quicker, you should avoid using the Apple iPhone 15 Pro Max device from where you made the request. Similarly, power off all devices where the targeted Apple ID is logged in.
You can further shorten the process by using the verification code sent to your primary email. As far as the progress of the procedure is concerned, you can view it on the iForgot website by adding your Apple ID.
Way 6: Make Apple ID Account Recovery Easy With Wondershare Dr.Fone
If you have been trying all the solutions and the Apple ID account has not yet recovered, then you need a more solid solution. Your Apple ID is the main aspect of your Apple devices to get your operations done smoothly. Without having access to it, you will be unable to utilize the services of the App Store, iCloud, and others.
That’s why it’s necessary to recover your Apple ID as soon as possible. Wondershare Dr.Fone provides a robust feature to unlock your Apple ID and resolve this problem permanently. This software can also bypass your Screen Time Passcode if you have forgotten your password. You will be able to use your Apple ID effectively after using this iOS screen unlock toolkit.
Key Features of Wondershare Dr.Fone
Dr.Fone - Screen Unlock (iOS)
Unlock iPhone/iPad Lock Screen Without Hassle.
- Simple, click-through, process.
- Unlock screen passwords from all iPhone and iPad.
- No tech knowledge required, everybody can handle it.
- Supports the latest iOS version fully!


4,395,216 people have downloaded it
- Wondershare Dr.Fone facilitates the Apple ID unlock process even for iOS 17 and iPadOS 17 users.
- Users can utilize the software’s advanced algorithms to remove the iTunes backup encryption without corrupting anything.
- It also permits users to unlock their iDevices screens, thereby restoring access to their iOS devices.
Steps Involved To Make Apple ID Account Recovery With Wondershare Dr.Fone
Its simple interface is specially designed to assist the users in implementing the essential steps regarding the Apple ID recovery process. Here is how to make the Apple ID account recovery with Wondershare Dr.Fone:
- Step 1: Choose the Remove Apple ID Tool
At first, you will have to launch Wondershare Dr.Fone on your system and access the “Toolbox” tab on the left side. Different options will appear in front of you, from which select the “Screen Unlock” tool and confirm the Apple iPhone 15 Pro Max device OS as “iOS.” After that, you need to choose the option of “Remove Apple ID” and connect your Apple iPhone 15 Pro Max to the computer.

- Step 2: Get Your Apple iPhone 15 Pro Max into the Recovery Mode
In the next step, proceed with unlocking your Apple iPhone 15 Pro Max and selecting the “Trust” option for system authentication. After doing this, you need to press the “Unlock Now” icon and follow the on-screen instructions to confirm the status of Screen Lock and Two-Factor Authentication. Next, you will be required to enable Recovery Mode on your iDevice.

- Step 3: Finalize the Apple ID Unlocking Process
When your Apple iPhone 15 Pro Max has entered Recovery Mode, Wondershare Dr.Fone will detect the model of your iDevice and choose the “System Version” for downloading the required iOS firmware. After verifying the iOS firmware, press the “Unlock Now” button and give the confirmation to initiate the unlock process of Apple ID.

Conclusion
In summary, the Apple ID serves as the fundamental key to unlocking a world of apps and services. Yet, the experience of forgetting the Apple ID password and email can be frustrating as it restricts users’ access to their cherished accounts and services. Throughout this guide, we have explored a range of solutions on how to retrieve the Apple ID.
It ensures that users regain control over their accounts within the Apple ecosystem. Furthermore, for more intricate and robust solutions, Wondershare Dr.Fone stands as the best choice. It offers a dedicated Unlock Apple ID feature. This presents an invaluable help to resolve Apple ID-related issues swiftly.
How to Erase an Apple iPhone 15 Pro Max without Apple ID?
Our generation is all about high-performance gadgets and, a phone is one of the most important of it all. But with the concept of a smartphone, things have changed. iPhone/iPad has emerged as an important fashion quotient for a long now.
We often end up buying second-hand iPhones/iPads or sell our old version of the phones/pads to an unknown person and buy a new version of other brands, like Samsung S22. At times, be it after-sale/purchase or old iPhone, or if you may have yourself forgotten the password to your Apple ID, we often come across a big challenge, and that is how to erase an iPhone without an Apple ID password. Well, if that’s the case with you, then you’ve reached the right place. We’re about to discuss the most effective ways to erase an iPhone without an Apple ID password. Let’s discover them.
Part 1. How to erase an iPhone without Apple ID and iTunes
When it comes to taking care of all your Apple iPhone 15 Pro Max recovery solutions, Dr. Fone has effectively managed to make a mark in the field. Especially when it comes to erasing an iPhone without an Apple ID password, the Dr.Fone – Screen Unlock (iOS) can help you get it done without a hitch. Not only can you erase an iPhone without an Apple ID password, but you can also get the Apple ID/iCloud lock removed too with much ease. With over 5 million-plus users, the tool is the most recommended in the market, serving every customer to their content.
Key Features:
The key features of Dr.Fone – Screen Unlock (iOS) are –
- It can unlock an iPhone/iPad by erasing an iPhone without an Apple ID password.
- Even when your screen is damaged and you cannot enter a passcode, Dr. Fone – Screen Unlock (iOS) can effortlessly get it done.
- If the passcode is wrongly set by your kids or an unknown, this software can help unlock the same.
- Works efficiently with almost all iOS devices and supports even the latest iOS version 14.
Step by Step Tutorial:
Let’s get to understand how to erase an iPhone without an Apple ID password:
Step 1: Connecting the iPhone/iPad
The first thing to do is download and install the Dr.Fone – Screen Unlock (iOS) software on your computer/laptop. Before you move on to any other step, connect your affected iPhone/iPad to your computer or laptop with the help of a USB.
Step 2: Select the correct Mode.
After the installation is done completely, launch the tool and select the “Screen Unlock” option on the software’s home interface. A new screen interface will appear, you will have three different options. You need to select the “Unlock iOS Screen” option and, this will start the entire process of unlocking.
Step 3: Boot your device into Recovery/DFU Mode
You now have to boot your Apple iPhone 15 Pro Max or iPad device into Recovery mode or DFU mode so that the software can recognize your device for further process. For your convenience, Dr. Fone Screen Unlock (iOS) has a built-in instruction facility that helps you to follow the steps.

Step 4: Confirm the information and download firmware
After a successful reboot into Recovery mode, the tool will automatically detect your device’s information and the most compatible iOS firmware. To start the process of downloading the firmware, you need to hit on “Start” button.

Step 5: Erase an iPhone without an Apple ID password.
Once the download is complete, you can get started with erasing an iPhone without an Apple ID password. Hit the “Unlock Now” button, and voila! In no time, you’ve successfully erased an iPhone without an Apple ID password.
Part 2. Erase an iPhone without Apple ID via iTunes
Sometimes your phone might ask for an Apple ID and password to confirm your authority. In such cases, you may get stuck as either you have forgotten the password to it, or you don’t remember the Apple ID in the first place. For that matter, where it needs immediate help, we have listed down a set of steps that can help you erase an iPhone without Apple ID via iTunes –
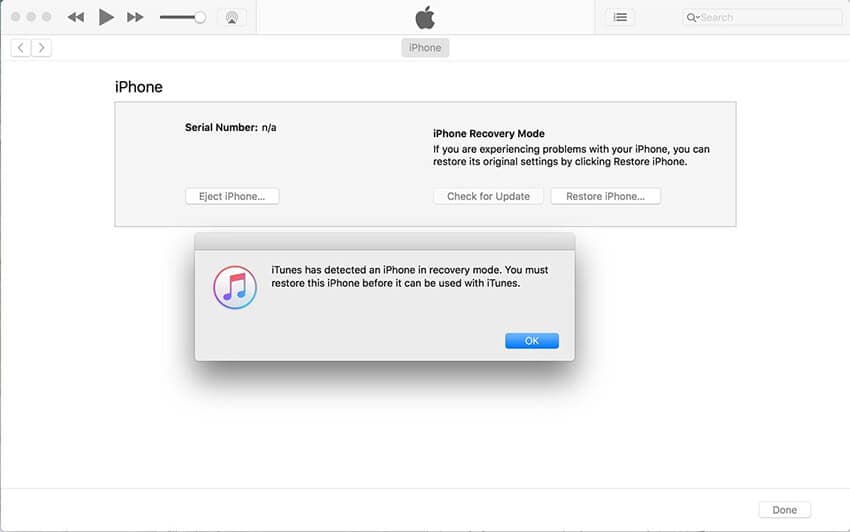
Step 1: Connect your Apple iPhone 15 Pro Max to the computer with the help of a USB and then open your iTunes.
Step 2: The best way to start the process is to move your phone to recovery mode. For this, you need to:
In iPhone 8 or later: Tap the Volume Up, then quickly tap Volume Down and hold down the Power key afterward.

In the case of iPhone 7/7Plus: Press the “Sleep/Power” and “Volume Down” keys together.
Hold down the keys until you see the message on your iTunes screen about “your iPhone has been detected in recovery mode.”
Step 3: Once done, click on “Ok” and choose the “Restore iPhone” option. Confirm your actions, and you’re done.
Part 3. How to erase an iPhone without Apple ID via Settings
Erasing an iPhone without Apple ID becomes necessary when we happen to use a second-hand phone or when we share a phone with someone. It is indeed a hard task to overcome these issues as we constantly strive to change our phone or replace it with a second-hand one. We have jotted a few steps that can help you erase an iPhone without Apple ID via settings for your ease.
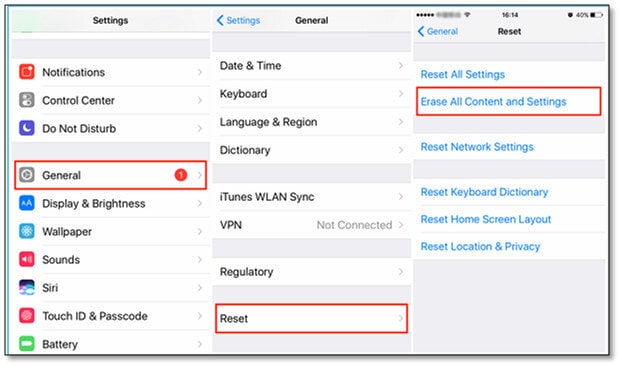
Step 1: On your Apple iPhone 15 Pro Max, press the “Settings” icon on your App drawer.
Step 2: Under the Settings, scroll down and click on the “General” option.
Step 3: Now, you need to scroll all the way down to the “Reset” button and click on it. Then, look for “Erase All Content and Settings” and tap on the same.
Step 4: Enter your passcode to confirm. This action will pop up a screen where you need to select Erase iPhone again, and boom, you are done now.
Part 4. Tip you may need to erase Apple ID
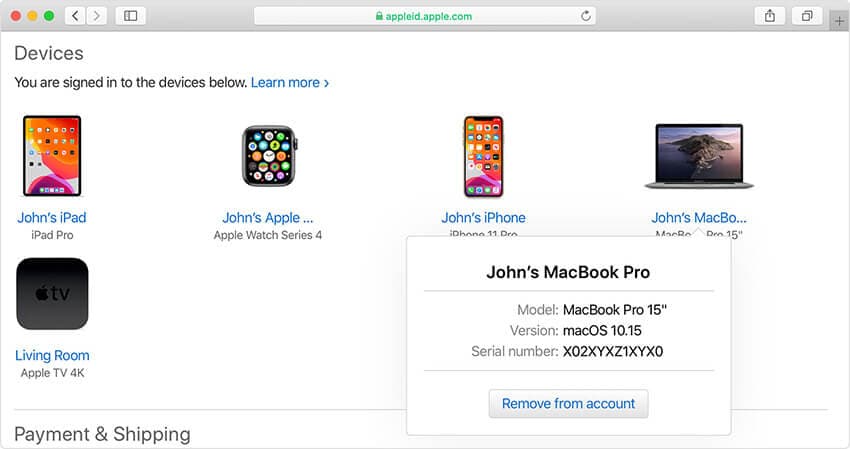
Now, just in case you wish to delete your Apple ID completely, you need to perform a simple practice of removing any devices associated with your Apple ID.
Step 1: One can simply visit appleid.apple.com and log in with the Apple ID credentials already allotted to the user.
Note: You might get a prompt of a two-factor authentication code while being on this page.
Step 2: Once you scroll down the line, choose, and click on the “Device” option.
Step 3: Choose the desired device and click on the “Remove from account” option followed by a “Remove this – Device Name” to confirm the action. Perform this step for all other devices.
How to erase an Apple ID via Apple’s Data and Privacy website
Now let’s get started with erasing an Apple ID via Apple’s Data and Privacy website are simple and, we have mentioned a simple way to take care of the same:
Step 1: Once you’re done removing the Apple iPhone 15 Pro Max devices linked to your Apple ID, visit privacy.apple.com and log in with the same Apple ID and password credentials.
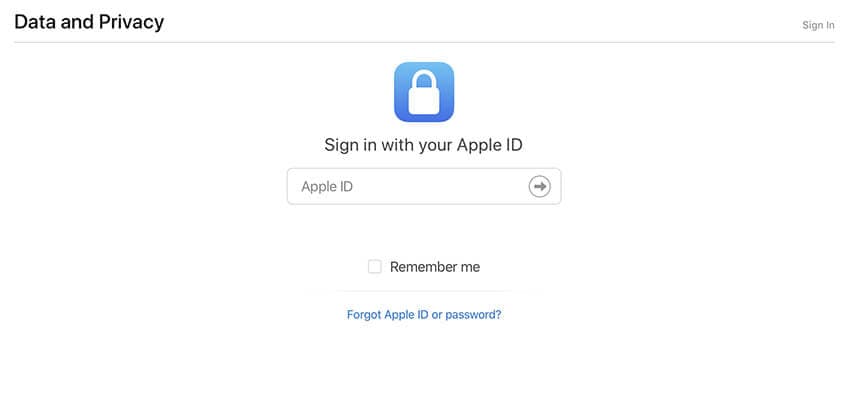
Step 2: Once you authenticate, click on the prompt indicating the option to “Continue.”
Step 3: Once you click on the “Get started” prompt on the screen, you will get a tab to “Delete your account.” This will prompt you with an Apple message indicating the information regarding the deletion process time.
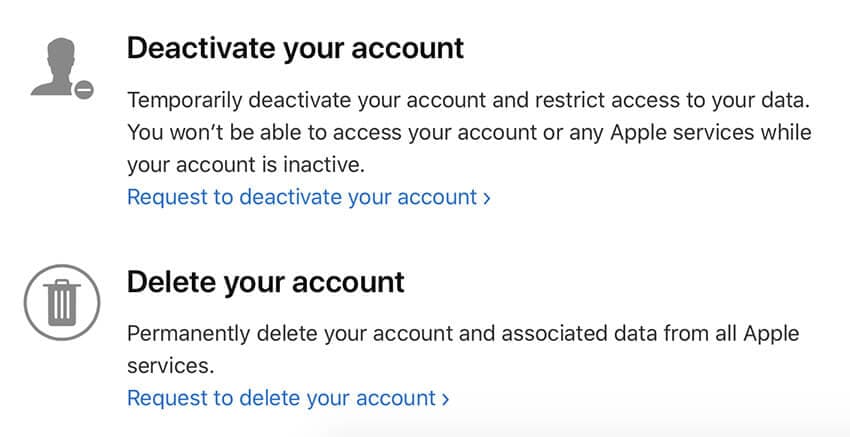
Step 4: Before everything, make sure you back up your data and follow the instructions steps prompted by Apple’s website. This will lead you to choose a reason for deletion from the click-down option and click “Continue.”
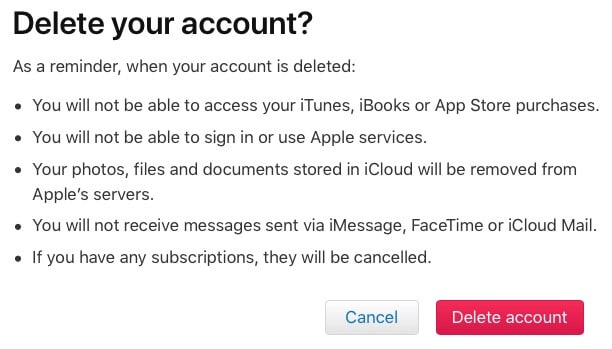
Message – You will get the details of the entire process for a quick review before you can submit for the final deletion of the policies
Step 5: Click on “Delete terms and conditions” by checking the read and agreed on the box. Make sure to provide a good call-back number to finalize the process.
Step 6: This submission will give you your access code which you can later use for clarification and, now you can click on the “Delete Account” option
Conclusion
Coming towards the end of the topic, we now are fully sure that you fully understand how to erase an iPhone without an Apple ID. Just in case you have any doubts, please feel free to comment below. And do remember to share this with your friends and family if you find it useful.
Also read:
- [New] 2024 Approved Best Practices for YouTube to IGTV Transformation
- [New] 2024 Approved Navigating Gameplay Preservation in Windows 10
- [Updated] 2024 Approved Essential Insights Best Instagram Editors for Mobile and PC
- 2024 Approved Project Management Fees
- 2024 Approved Taming the Audio in Your Canva Videos Step by Step
- Apple ID Locked or Disabled On Apple iPhone 14 Plus? 7 Mehtods You Cant-Miss
- How To Delete iCloud Account Remove Your Apple ID Permanently From iPhone 15
- How to get back lost contacts from Motorola Moto G04.
- How To Get the Apple ID Verification Code From iPhone 13 Pro in the Best Ways
- How To Remove Phone Number From Your Apple ID on Your iPhone 15 Pro Max?
- In 2024, Best 10 Mock Location Apps Worth Trying On Xiaomi Redmi Note 13 Pro 5G | Dr.fone
- In 2024, How to Delete iCloud Account From Apple iPhone 13 Pro Max without Password?
- Master Hashtag Dynamics on IGTV for Follower Surge for 2024
- Troubleshooting Error Connecting to the Apple ID Server On iPhone 15 Pro Max
- Windows 11 & 10 Fix: Reduce Oversized System Files
- Your Account Has Been Disabled in the App Store and iTunes On iPhone XS?
- Title: Turning Off Two Factor Authentication On Apple iPhone 15 Pro Max? 5 Tips You Must Know
- Author: Alma
- Created at : 2025-01-29 02:23:54
- Updated at : 2025-01-31 23:01:40
- Link: https://apple-account.techidaily.com/turning-off-two-factor-authentication-on-apple-iphone-15-pro-max-5-tips-you-must-know-by-drfone-ios/
- License: This work is licensed under CC BY-NC-SA 4.0.