
Turning Off Two Factor Authentication On iPhone 14? 5 Tips You Must Know
Turning Off Two Factor Authentication On Apple iPhone 14? 5 Tips You Must Know
Apple has produced one of the most consumed, acknowledged, and preferred smartphones that allowed them to rule the industry for a considerably long period of time. Their style and presentation were not the only reason that made people look forward to buying an iPhone. Apple created its own operating system and presented their own versions of security and protection. One of the most recognized and impeccable features offered by Apple in its innovative structure was the security and safety through Apple ID and Apple Account. Every important feature that operated throughout the Apple iPhone 14 or iPad was focused over a single entity, the Apple ID. However, apart from the Apple ID, there were several other layers of authentications and verifications that were added throughout the protocol structure. A couple of them are renowned as Two Factor Verification and Two Factor Authentication. This article produces a very generous set of advice that should be looked over while handing these layers of protection. To get a better understanding of the procedures involved, you need to look over the guide to gain better knowledge on how to turn off Two Factor Authentication on your Apple.

Part 1. Is two-step verification the same as two-factor authentication?
There might be a few differences involved in these two security models; however, it should be kept in mind that they focus their purpose on securing the Apple ID of the user. Two Factor Verification is a security protocol that protects access to the various activities performed through the Apple ID. It attenuates an extra verification step across the Apple iPhone 14 device in addition to the password for the Apple ID. The device receives a verification code from an authentication factor that allows the authorities to confirm the credibility of the user.
The Two Factor Authentication is considered as an upgrade to the Two Factor Verification, which was released two years after the Two Factor Verification, in 2015. This authentication method exempted the offline recovery keys and application-specific passcodes. They added a six-digit authentication code onto the original password and produced an offline, time-dependent code that is to be generated through the Settings of the trusted device of the user. This feature was appended into the iOS 9 and OS X El Capitan with a region-specific target.
Part 2. How to turn off two-step verification?
As you are aware of the Two-Step Verification process, it is quite easy and typical in configuring. However, when it comes to turning the settings off, it is also a simple and straightforward procedure that can be easily covered by following the steps provided below.
Step 1: You are required to open the Apple ID Account web page on your browser and sign in with your Apple ID credentials.
Step 2: As you log into the website, access the “Security” section, and tap “Edit” from the options provided on the list.
Step 3: Tap on the “Two-Step Verification” option and turn it off. Confirm to conclude the process. You may be required to select the new security questions and verify the data of birth in the process. As you would be done with it, an email would be received across your connected address for confirmation.
Part 3. How to turn off two-factor authentication? (lower than iOS 10.3)
Two Factor Authentication cannot be turned off in a few cases and accounts for iOS versions greater than 10.3. However, if you have activated Two Factor Authentication across the iOS versions lower than 10.3, you can deactivate the feature through a series of simple steps. The exemption of this security feature across your device leaves it protected only through a password and a few security questions. For turning off the Two Factor Authentication from your Apple device, you need to follow the steps provided as follows:
Step 1: Open your browser and access your Apple ID Account website. Provide the details of your Apple ID and log in.
Step 2: Tap on “Edit” in the “Security” section and turn off the “Two Factor Authentication” option.
Step 3: This would lead you to set new security questions for the Apple ID account, followed by a verification of your date of birth. The successful execution of the process would lead to turning it off.
Part 4. Why can’t you turn off two-factor authentication if you already use it? (iOS 10.3 and later)
For users who have an Apple device with an iOS 10.3 or later version, they cannot turn the Two Factor Authentication off after it is accessed. The latest iOS and macOS included extra layers of security in their features, which led towards a better security foundation and protection of information. Users who have updated their account information can unenroll in two weeks after updating. For this, you are required to simply access the confirmation email that you have received and tap on the link to approach the previous security settings. Thus, it makes it far more than impossible for users to turn their Two Factor Authentication off if they consider it unnecessary for their device. This feature is something that would always remain intact with their device as an extra layer of security. Its absence does leave a chance of illegal access to the Apple iPhone 14 device and an increased risk of a security breach. Since it is directly built across the Apple iPhone 14 device and its settings, this makes it a very hard-to-approach characteristic.
Part 5. How to turn off two-factor authentication by removing Apple ID
Users who are very reluctant to remove the two-factor authentication off their device can consider removing the Apple ID itself for fulfilling the purpose. However, when it comes to executing such tasks, the need for a third-party platform gets evident. Third-party platforms provided dedicated services in providing users with a unique platform of operation with an environment that suits their purpose perfectly. Many platforms provide such impressive services, yet the selection gets quite difficult for a series of reasons. The following pointers explain the reasons to the users over why they should focus on selecting a platform such as Dr. Fone – Screen Unlock (iOS) for this purpose.
- You need to have no excessive knowledge of handling the platform.
- You can cover all the dynamics of unlocking the Apple iPhone 14 device without the use of iTunes.
- The platform provides you with the ability to unlock the passcode of your Apple device with ease.
- It offers you to protect your device from the disabled state.
- Works across all models of iPhone, iPad, and iPod Touch.
- Provides services to the latest version of iOS.
Dr. Fone – Screen Unlock (iOS) makes it easy for the users to control and remove their Apple ID and disable the two-factor authentication across their device. However, when it comes to controlling the platform, it follows a few simple and efficient steps that would guide you in executing the task successfully.
Step 1: Connect your Device and Launch Application
You need to connect your Apple device with the desktop and launch Dr. Fone across the computer. Tap on the “Screen Unlock” tool present on the home window and proceed with the removal of two-factor authentication.

Step 2: Access Appropriate Option
On the next screen that opens, you are required to select “Unlock Apple ID” from the three options. Proceed to your Apple device to take the process further.

Step 3: Trust the Computer
Open the Apple iPhone 14 device and tap on “Trust” over the prompt that appears on the screen. Following this, you need to navigate to the Settings of your device to initiate a reboot.

Step 4: Execution of Process
Once you are done with initiating a reboot, the platform automatically detects the update in the process and initiates removing the Apple ID from the Apple iPhone 14 device. Once the platform is done with the process, it provides a prompt message in the next window displaying the execution of the removal of Apple ID from your device. This also removes the Two Factor Authentication off your device.

Conclusion
The article has presented a very detailed comparison of the Two Factor Verification and Two Factor Authentication and provided an elaborated discussion over how to turn these security features off their devices. The article also discussed a third-party platform that would guide in removing such security features of the Apple iPhone 14 devices over the requirement of the user. You need to go through this article to get a better knowledge of the execution of the mechanism.
How To Create an Apple Developer Account On Apple iPhone 14
The world of technology undergoes continuous evolution. This emphasizes the crucial need for developers to stay on the cutting edge of innovation. Specifically, the Apple ecosystem continues to assert its significant influence in mobile applications. Are you aiming to make your mark in the thriving iOS and macOS app market? There’s a crucial requirement you must meet, which is obtaining an Apple Developer Account.
This thorough guide is designed to lead you step by step through the process of how to create an Apple Developer account. It aims to equip you with the essential knowledge needed to complete this entire Apple Developer account creation process smoothly.
Part 1: What Is an Apple Developer Account?
In the realm of technology, Apple emerges as an undeniable powerhouse. It is renowned for its pioneering advancements in both software and hardware. From the iconic Apple iPhone 14 to the powerful Mac computers, Apple has influenced the tech world greatly. It has prompted developers to craft applications that integrate with Apple’s ecosystem. This is why learning how to make an Apple Developer Account is pivotal.
The Apple Developer Account or Apple Developer ID is the gateway to the Apple ecosystem. It is the key that opens the doors to creating, distributing, and managing apps for Apple devices. If you aspire to develop apps for Apple devices, acquiring an Apple Developer account is your crucial initial step. This account is not limited to individual developers.
It is also essential for companies and organizations to develop their software solutions. By obtaining an Apple Developer Account, you unlock many valuable resources. These include the essential SDKs, tools, and documentation. Moreover, it grants you entry into the Apple Developer Program. It is the premium tier of developer membership that offers exclusive benefits. Some benefits are beta software access, advanced app capabilities, and the ability to distribute apps.
Part 2: What Items Are Included in Apple Developer Account
If you are wondering what this membership encompasses, your Apple Developer account isn’t just a card that grants you entry. It is a comprehensive toolkit you need to succeed in the Apple ecosystem. Following are some of the benefits you get after learning how to get an Apple Developer Account:
1. Software Tools
At the heart of your Apple Developer Account lies access to powerful software tools. An essential inclusion is Xcode. It’s a full-fledged integrated development environment (IDE) tailored for Apple’s platforms. With its help, you can streamline the development process. It provides debugging, testing, and design tools, simplifying app creation.
You can build user interfaces with Interface Builder and visualize your app’s flow with Storyboards. Moreover, you will be provided with MapKit JS Dashboard for tracking the use of Apple Maps services on your website and SF Symbols to configure symbols in your iDevice apps. Besides this, it contains many other tools such as Reality Converter, Snapshots Studio (beta), Classroom and Schoolwork, Create ML, and many more.
2. Services and Capabilities
Creating an Apple Developer account grants you access to various services you can embed in your apps to make them easier to use. It enables you to fully leverage Apple’s technology stack. You can leverage services like iCloud or Core ML. These two services and capabilities will help you with data synchronization and integration of machine learning into your apps.
Additionally, you gain access to Apple’s ARKit for augmented reality development. Moreover, you also get SiriKit for voice interaction and Apple Pay for accepting payments for your services, packages, or goods on your developed apps or websites. These services and capabilities don’t end here because you also get HomeKit, CarPlay, CloudKit, PassKit, AirPrint, AirPlay, GameKit, Handoff, etc.
3. Beta Testing and Feedback
As an Apple Developer Program member, you can engage in beta testing. This includes forthcoming releases of iOS, iPadOS, macOS, watchOS, and tvOS. It gives you the privilege of accessing new features and APIs ahead of the general public.
This will help guarantee that your applications remain updated and well-prepared for the latest advancements. Moreover, you can conveniently provide feedback and report bugs directly to Apple. It can also help you test your application on the new beta version so you can fix the bugs on time and give users a smooth experience.
4. Developer Resources and Support
Apple understands that developers are at the core of its ecosystem’s growth. That’s why it provides access to extensive documentation, tutorials, and resources. These cover everything from app design principles to API references.
It also enables you to refine your expertise while staying updated with cutting-edge technologies. Furthermore, it allows you to connect with Apple’s developer community. You can also seek assistance, share your knowledge, and collaborate with fellow developers.
5. App Distribution
Having an Apple Developer account confers a significant benefit. It grants you the capability to distribute your applications to a worldwide audience. This opportunity allows you to debut your apps on the App Store and reach millions of Apple users in 175 regions.
For testing and internal use, you can distribute apps privately to specific individuals. In addition, Ad Hoc distribution allows you to share apps with a limited number of devices. The most significant advantage of an Apple Developer account is that it doesn’t cost any hosting fee for distributing the app.
Part 3: What Are the Enrollment Requirements of Apple Developer Program
Obtaining an Apple Developer account isn’t merely a formality. It involves key steps and criteria to ensure the platform’s integrity. You can register as an individual developer or represent an organization. Here’s a breakdown of what’s needed to join the Apple Developer Program:
Requirements for Individuals
The following are the requirements needed to enroll in the Apple Developer Program as an individual:
- You will need an iPhone, iPad, or Mac equipped with either Touch ID, Face ID, or a passcode. Or a Mac featuring the T2 Security Chip or Apple Silicon will also work. It is essential to use the same device throughout the entire enrollment process.
- Confirm that your Apple ID has two-factor authentication enabled. Moreover, all your Apple ID information is current and precise. This includes your first name (given name), last name (family name), address, phone number, trusted phone number, and trusted devices.
- Ensure you’ve installed the latest version of the Apple Developer app on your device.
- The last requirement you have to ensure is thatyou will need to log in to iCloud on your iDevice.
Requirements for Organizations
To create an Apple developer account as an organization, you need the following information along with the requirements mentioned above for individuals:
- You must provide the entity type, such asnonprofit, educational, or government.
- The legal entity name is required. It is used for the “seller” designation for the apps you distribute.
- Your organization is required to possess a unique nine-digit D‑U‑N‑S Number assigned by Dun & Bradstreet.
- You will need to provide your organization’s headquarters address and contact number.
- Your organization’s website must be publicly accessible. Moreover, the domain name should be linked to your organization.
- Verify that you possess the legal authority to enter into agreements on behalf of your organization.
Part 4: How To Make an Apple Developer Account With the Most Simplified Steps
After completing all the requirements, let’s start the process of how to get an Apple Developer account for free with the help of the following detailed steps:
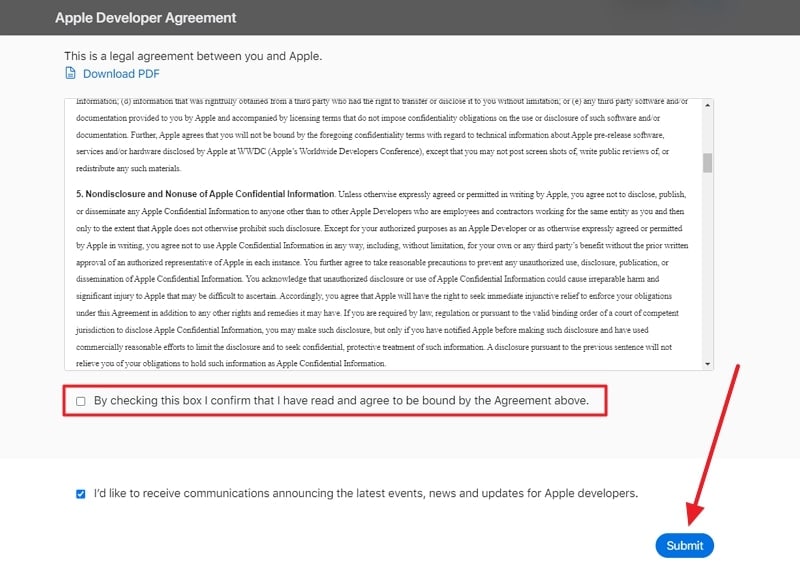
- Step 1. Head towards the Apple Developer official website on your Apple iPhone 14, iPad, or Mac browser and tap the “Account” option. This will take you to a new window where you can log in with your Apple ID. After successful login, you will see a page with an agreement between you and Apple. Read the agreement carefully, agree to it, and press the “Submit” button to continue the process.
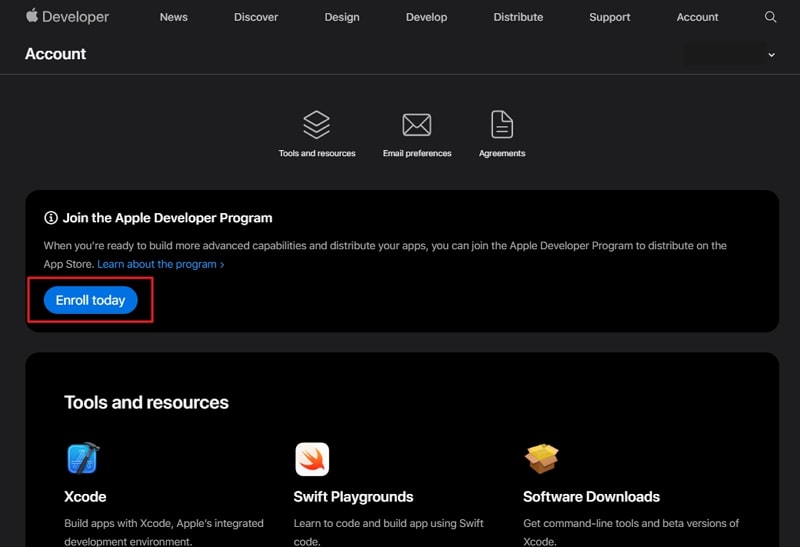
- Step 2. A new page will appear, from which you need to choose the “Enroll Today” button and choose the “Continue enrollment on the web” option if you are using a web browser. This will take you to the form where you need to fill in the basic information such as your legal name, phone number, address, Zip code, and other details.
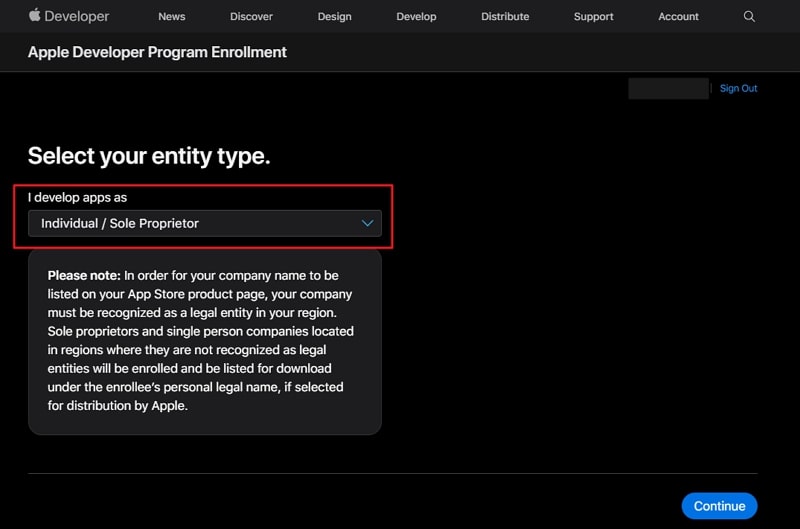
- Step 3. After filling in the basic information, click the “Continue” button. A new page will appear where you can choose whether to proceed as an individual or an organization. Once the selection is made, follow the on-screen instructions to proceed. In the end, you will be asked to complete the purchase of an Apple Developer Program subscription, which is $99 for 1 year.
Bonus Tip: The Most Efficient Tool To Unlock the Apple ID Without Passcode in 2023
The key requirement to create an Apple Developer Account is having an Apple ID. It’s undeniable that the entire Apple ecosystem centers around the Apple account. What should you do if you discover that you’ve forgotten your password? Forgetting your password can lead to various challenges. Fortunately, there’s no need to be concerned because we have a solution for you.
Thus, in such situations, when the user finds no option to unlock their Apple ID without a passcode, we recommend you use Wondershare Dr.Fone - Screen Unlock (iOS) to unlock your device easily. Furthermore, this tool enables you to remove all types of lock screens of various iOS devices, including iPhones, iPad, and iPods.
Dr.Fone - Screen Unlock (iOS)
Unlock iPhone/iPad Lock Screen Without Hassle.
- Simple, click-through, process.
- Unlock screen passwords from all iPhone and iPad.
- No tech knowledge required, everybody can handle it.
- Supports the latest iOS version fully!


4,395,217 people have downloaded it
Key Features of Wondershare Dr.Fone
- Using Wondershare Dr.Fone, you can bypass and remove the MDM profile from your iOS device without data loss.
- Users don’t need technical skills to use this unlock Apple ID tool because it resolves issues within three steps.
- This iOS screen unlock tool can also help you bypass the iCloud activation lock and remove iTunes backup encryption.
Simplified Steps To Unlock iPhone Using Wondershare Dr.Fone – Screen Unlock (iOS)
Having an unlocked Apple ID is crucial before you learn how to make an Apple Developer Account. Following are the straightforward instructions to unlock Apple ID with Wondershare Dr.Fone:
- Step 1: Choose the Remove Apple ID Tool
Begin the process by installing Wondershare Dr.Fone on your computer and accessing its main interface. After this, tap on the “Toolbox” from the left side toolbar and choose the “Screen Unlock” option. This will take you to a new window where you need to select “iOS” as your device’s nature. From the new window, tap on the “Remove Apple ID” to proceed with the Apple ID unlocking process.

- Step 2: Proceed Further by Choosing the Respective Options
Ensure that your iOS device whose lock you are trying to remove is connected to your computer and tap “Unlock Now.” Moving ahead, the platform will ask you whether screen lock and 2FA are enabled. This needs to be enabled for the Apple ID removal process. After this, put your device in Recovery Mode with the help of on-screen instructions.

- Step 3: Select the iOS Firmware Version
Once the platform detects your device model, choose your system version and then click the “Start” button. The respective iOS firmware will start downloading, and Wondershare Dr.Fone will verify it once it is downloaded. Following this, click “Unlock Now,” which will lead to a warning popup.

- Step 4: Conclude the Process To Unlock Your Apple ID
The warning informs you about the imminent data loss that will result during Apple ID unlocking. To confirm that you agree with the procedure, you are required to type in “000000” as the PIN code. Finally, click “Unlock” to start the Apple ID unlocking procedure. On its completion, hit the “Done” button to conclude the process.

Conclusion
In conclusion, we’ve guided you through a thorough exploration of the steps involved in how to get an Apple Developer account. We’ve given clear, easy-to-follow instructions to facilitate the setup of your Apple Developer account. If your objective is to join the Apple Developer Program, we strongly advise adhering to the enrollment prerequisites outlined earlier in this article.
Additionally, for those who may encounter issues with their Apple ID due to forgotten passwords, we’ve introduced the Wondershare Dr.Fone tool. This efficient solution provides a seamless method for regaining access to your Apple ID without compromising your data. We highly recommend it for its user-friendliness and compatibility with all iOS devices.
How to Fix when Apple Account Locked On Apple iPhone 14?
You pick up your phone to perform a routine task, and your Apple iPhone 14 gives you a surprise that you have gotten your Apple account locked. It will remain this way, and you will not be able to use the phone unless you follow the proper steps.
Several Apple device users face this problem, and one of these messages might be on your screen:
- “This Apple ID has been disabled for security reasons.”
- “You can’t sign in because your account was disabled for security reasons.”
- “This Apple ID has been locked for security reasons.”
Getting your Apple account locked can be frustrating and might hinder the performance of your phone. In this article, we will discuss the various tips to solve the Apple account locked issue.

Part 1. Why is Apple Account Locked?
Although annoying, Apple locks your Apple Account for a good reason. There might be various reasons, but the most common one is that your account’s integrity was in danger. Apple locks your account when it sees an “unusual activity” surrounding your account or device. It generally happens when some unauthorized person attempts to access your account.
Your activity can also lock your account. If you fail to log in to your Apple ID several times, Apple might lock it. Moreover, your account can even get locked when you answer the security questions incorrectly more than once. Furthermore, Apple tries to keep your ID dedicated to a few devices. Besides, it could shut it down when you aimlessly try to open the account on multiple Apple devices.
Part 2. 3 Tips to Unlock Apple Account
Well, now you know the reasons behind the Apple Account getting locked. The next step is to learn the best tips to unlock it. Here, we will share various tricks that will open the Apple account in no time. So let’s dive in!
Tip 1. Use Dr.Fone to Unlock Apple Account (without Password)
Wondershare’s Dr.Fone comes with a complete set of tools to help with a range of different and challenging problems related to your Android or iPhone. The software has an intuitive interface, making unlocking Apple account a lot easier than its competitors. The application Dr. Fone - Screen Unlock (iOS) has robust versions for both Windows and macOS.
Some of the top and vital features of Dr.Fone are as follows:
- It can repair the system of both Android and iOS devices.
- It can backup data available on your device.
- You can transfer WhatsApp, Line, and Kik chat history from one phone to another.
Download the tool on your respective system, and follow the guidelines stated below to unlock Apple account without the password:
Step 1: Run the Application
Once the download is complete, get your USB cable and connect your Apple iPhone 14/iPad to your computer.
Select the “Screen Unlock” tool, and a new interface will greet you. Select the “Unlock Apple ID” option to begin the process to unlock your Apple Account.
Step 2: Reset your Apple iPhone 14 using Dr.Fone
Dr.Fone will present you with detailed on-screen instructions that show precisely how to reset your Apple iPhone 14 Settings. Dr.Fone must unlock your Apple iPhone 14/iPad.
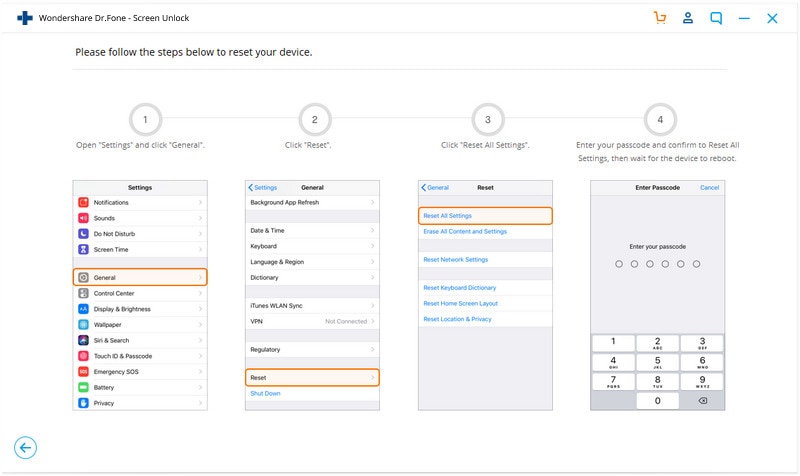
Step 3: Unlock the Phone
When your Apple device has been reset, Dr.Fone will get to work and will give you your unlocked iPhone/iPad in a matter of seconds.
When the process finishes, a pop-up message will notify you. It will point out that you can now unplug your Apple iPhone 14 from the PC and check if the operation was successful.
Tip 2. Use iTunes to Unlock Apple Account
Apple also offers the services of its built-in utilities such as iTunes to unlock Apple account. Here before doing anything else, you will need to get your Apple iPhone 14 into recovery mode. For added convenience, we have listed how to get into recovery mode with iPhone so you can smoothly proceed with the process.
Step 1. Power off your device.
Step 2. Once it’s powered off, press the side button and keep holding it while connecting your Apple iPhone 14 to your computer.
Step 3. Once the recovery mode logo appears, leave the button.
Now that you have entered into recovery mode, the next step is to restore the iPhone. The process is simple. You can learn it quickly by going through the steps listed below:
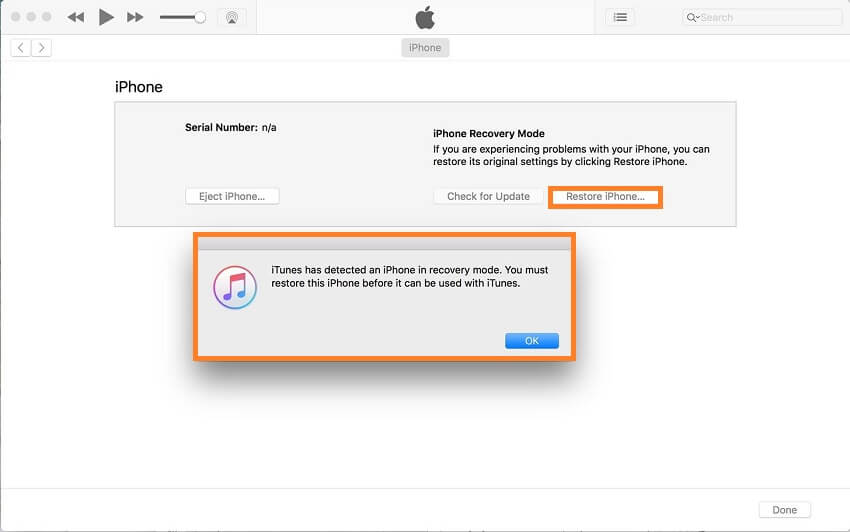
Step 1. After successfully getting your Apple iPhone 14 into recovery mode, select the Restore or Update option from iTunes.
Step 2. iTunes will download the necessary files to restore your phone, which can take some time.
Step 3. After the download, you can press shift while clicking restore, which will let you select the firmware file.
Step 4. Wait for the firmware update to finish, and then you are done!
Step 5. Access your Apple iPhone 14, and you will find that the Apple account will be disabled.
Tip 3. Recover Your Apple ID via Apple (Reset Password)
If you have forgotten your Apple device’s password, it’s recommended not to input your password more than one time. It would lead to a 24-hour shutdown. It cannot be lifted even if you know your password, so proceed wisely. The recommended solution instead is to reset your password.
Here are the steps to reset the password for any of your Apple devices, provided they are in your trusted devices’ list.
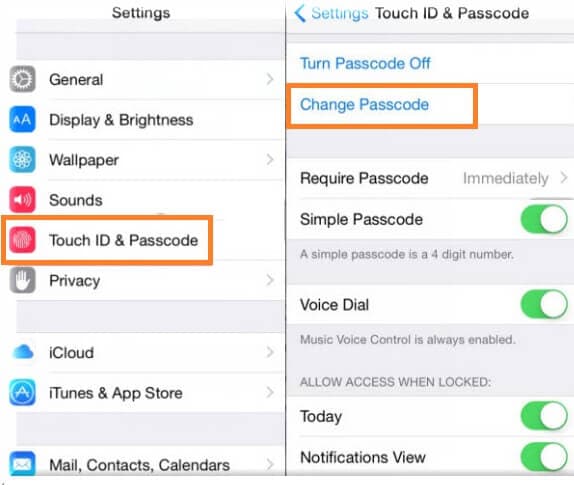
Step 1. Go to Settings on your Apple device and tap your name.
Step 2. Now, go to Password & Security and then Change passcode.
Step 3. If your Apple device is signed in to iCloud, you will be required to enter a password.
Step 4. Enter the iCloud password and then set a new code for your device.
Part 3. How to Change Apple ID on an iPhone?
If you have purchased a refurbished iPhone and the previous owner’s Apple ID added to it, it is wise to change the Apple ID. You can add your own or add the ID of someone you know. Apple provides simple steps for you to change your account on iPhone.
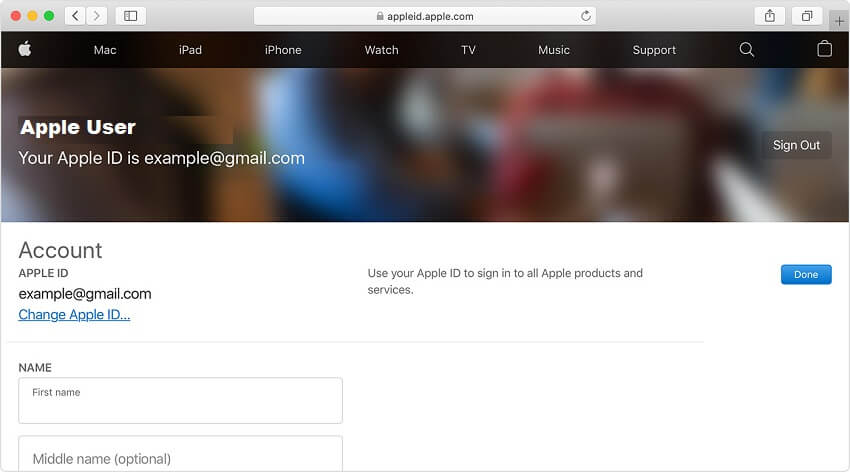
Step 1. Visit the relevant site of Apple to remove the ID and sign in with your account.
Step 2. Navigate to the Account section and choose Edit. From there, you will see a new list of options.
Step 3. Select Change Apple ID.
Step 4. Update your email address and click continue.
Step 5. That’s it!
Conclusion
Getting your Apple account can ruin your day and hinder your work. Luckily, there are suitable methods to fix the Apple Account Locked issue quickly and without any damage. Here, we have discussed the top techniques to unlock the Apple account. Hopefully, these tips have helped you can access the contents of your Apple iPhone 14.
Also read:
- [Updated] In 2024, Fabricating Temporal Anomaly Illusions
- [Updated] Sleight of the Brain Navigating Top Room Riddles
- 2024 Approved Hidden Harmony Harvesters IOS & Android Secret Audio Apps
- Addressing System Gap: MSVCR71 Acquired
- Everything To Know About Apple ID Password Requirements For Apple iPhone 14 Pro
- Everything To Know About Apple ID Password Requirements For iPhone 6 Plus
- How to Make Computer Fast
- How To Remove Phone Number From Your Apple ID on Your iPhone 6s Plus?
- How To Reset the Security Questions of Your Apple ID From Your Apple iPhone XS Max
- In 2024, 9 Mind-Blowing Tricks to Hatch Eggs in Pokemon Go Without Walking On Oppo Reno 8T 5G | Dr.fone
- In 2024, Apple ID Locked for Security Reasons From Apple iPhone 15 Pro Max? Find the Best Solution Here
- In 2024, How To Fix Apple ID Verification Code Not Working From Apple iPhone 7 Plus
- In 2024, Your Account Has Been Disabled in the App Store and iTunes From iPhone 13 Pro?
- Tech Tolls: Facebook and Co.'s 6-Hour Disruption
- The Complete SRT File Maker's Handbook for 2024
- Top 8 Free iPhone Apps for Aspiring Musicians
- Title: Turning Off Two Factor Authentication On iPhone 14? 5 Tips You Must Know
- Author: Alma
- Created at : 2024-10-18 19:16:50
- Updated at : 2024-10-20 16:13:00
- Link: https://apple-account.techidaily.com/turning-off-two-factor-authentication-on-iphone-14-5-tips-you-must-know-by-drfone-ios/
- License: This work is licensed under CC BY-NC-SA 4.0.