
Why Apple Account Disabled On your iPhone 13 Pro Max? How to Fix
Why Apple Account Disabled On your Apple iPhone 13 Pro Max? How to Fix
Apple is one of the leading smartphone developing enterprises that has introduced the world to a contemporary set of features that are not common among other leading smartphone companies. One of the major distinguishing characteristics of Apple has been displayed in its present security protocols. Apple Account is regarded as one of the most significant credentials of the Apple iPhone 13 Pro Max and iPad that is responsible for connecting and holding the applications and the assorted data. Many users have generally reported unusual situations that got their Apple Account disabled. There are several reasons that can be associated with the Apple account getting disabled. The major repercussion that is associated with it is unnecessary data loss following the suspension of all products that have been bought with the account over time. This article provides you an impressive overview of the major reasons that lead to your Apple Account getting disabled, followed by the associated mechanisms that can be tested to secure the account.
Part 1. Why is the Apple account disabled?
Apple iPhone, iPad, and other devices operate over a single Operating System, with its own protocols and unique mechanisms that distinguish it from other smartphone models in the market. Apple believes in securing the data and identification of its users with its state-of-the-art security measures. Under such circumstances, it usually gets possible for the user to have his Apple account disabled unnecessarily. Whenever you encounter such a situation, there are several messages that might be displayed on your device to prompt you over the disabling of the account. These messages usually appear in situations where you intend to sign in to some platform with your associated Apple ID. The most common messages that appear on the screen are:
- “This Apple ID has been disabled for security reasons.”
- “You can’t sign in because your account was disabled for security reasons.”
- “This Apple ID has been locked for security reasons.”
The messages that have been stated above are usually depicting a security anomaly that led to the disabling of the associated Apple ID. However, there can be several reasons that would have led to such circumstances, which are described as follows.
- There might be incorrect forced logging in into your Apple ID for multiple tries.
- Any user would have entered incorrect security questions multiple times.
- The other information associated with the Apple ID would have been entered incorrectly numerous times.
Part 2. Is “Your account has been disabled in the App Store and iTunes” the same as “This Apple ID has been disabled for security reasons”?
There are several instances where you encounter such prompt messages where you are restricted in using the App Store and iTunes. These messages can come in the form of “Your account has been disabled in the App Store and iTunes.” Over observing this prompt message, it has been discovered that the assorted message is not related to the other common message of “This Apple ID has been disabled for security reasons.” The dynamics of getting restricted from using the App Store and iTunes are related to remaining balances that have stuck around for a while over your Apple account. Normally, you may have some billing issues that are prevailing over an unpaid iTunes or App Store order. This problem can be countered through simplistic methods under such conditions where you are having access to the account information and can check for the basic billing information or update the payment method following other settings that are associated with paying bills. Over failure in accessing your account, you are required to contact Apple Support and look for the billing and payment statements to clear up all the remaining dues. Apple has considered covering all the security protocols to perfection, where you have any prevailing Apple charges on your connected credit card that would lead to direct disabling of your Apple Account.
Even though Apple accounts can be generally disabled overpayment issues, there are several security reasons that might restrict you in discovering and buying different products across the App Store and iTunes. It is necessary for you, as an Apple user, to remain prompt of all the issues that are relating to your Apple Account.
Part 3. 2 tips to Unlock Disabled Apple Account
As this article provides you a detailed overview of the reasons that lead to your Apple Account getting disabled, this article also considers providing you a few tips and tricks that would guide you in efficiently unlocking your Apple Account and use it with ease.
Unlock disabled Apple account with Dr. Fone
The first remedy that can be effectively tested across such situations that involve disabled Apple accounts is relating a third-party platform. Dedicated third-party tools are quite common in the market and provide users with adequate services that allow them to unlock their devices with ease. Out of this uncountable list of platforms, this article introduces you to a specific platform that offers you unique features with a user-interface that can be easily apprehended. Dr. Fone – Screen Unlock (iOS) offers you the perfect environment that would lead you in reversing the disabling of your Apple Account easily. There are several reasons that make this platform the first choice of users all around the globe, which are declared as follows:
- You can easily unlock your Apple iPhone 13 Pro Max if you accidentally forget the password at any time.
- The platform protects the Apple iPhone 13 Pro Max or iPad from the disabled state.
- It can work for any iPhone, iPad, or iPod Touch model.
- The platform is compatible across the latest iOS versions.
- You are not required to have iTunes for unlocking your device.
- A very user-friendly platform with no requirements of technical expertise.
While you understand the basic reasons that lead you to the fact that Dr. Fone is the most appropriate choice to unlock your disabled Apple Account, the following steps explain the guide that would help you in unlocking your device with ease.
Step 1: Connect Devices and Launch
Initially, it is significant to download the platform and install it by following all the on-screen instructions effectively. Following this, you need to launch the platform and connect your Apple device via a USB connection.
Step 2: Select Screen Unlock
With the home window on your front, you are required to tap on the ‘Screen Unlock’ tool from the list of options to open a new screen. On the new screen, you are required to select the last option of “Unlock Apple ID” to initiate the process.

Step 3: Trust the Computer and Access Device Settings
Over the Apple Device, you need to select the option of “Trust” over the prompt that is received on the phone. Following this, you need to open the “Settings” of your device and initiate a reboot of your Apple device.

Step 4: Device Unlocks
The unlocking process immediately starts, and the platform executes the complete process automatically. A prompt message appears on the desktop showing the completion of the task. The device is now unlocked successfully.

Unlock disabled Apple account using Apple’s verification
The other method that can be effectively tested is Apple’s verification that would allow us to easily topple off all barriers that are involved in the process. To effectively unlock your disabled Apple Account using Apple’s verification process, you need to follow the steps described in detail.
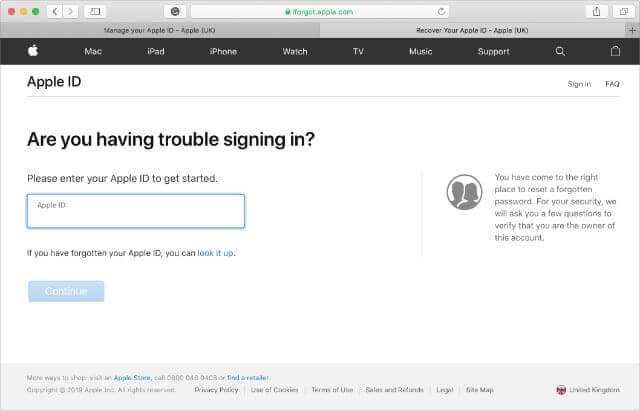
Step 1: Open iForgot Website
You need to open the iForgot website to test the verification process. As you open the platform, provide the appropriate credentials over which your Apple device is operating. This is referred to as your Apple ID that has been used for the Apple iPhone 13 Pro Max device.
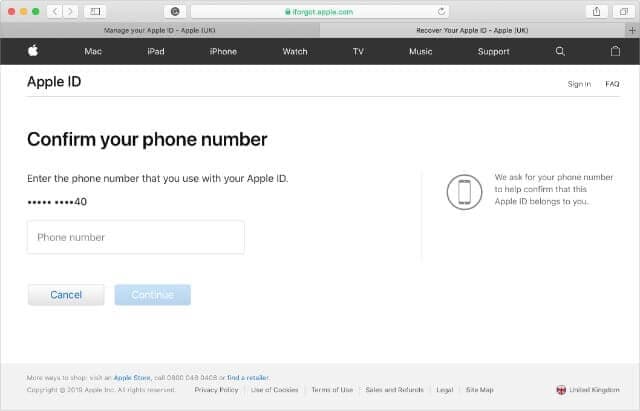
Step 2: Provide Personal Details
As you proceed with the verification, there are several personal details that are used to check the authenticity of the user. You are required to answer all security questions, provide all numbers if asked.
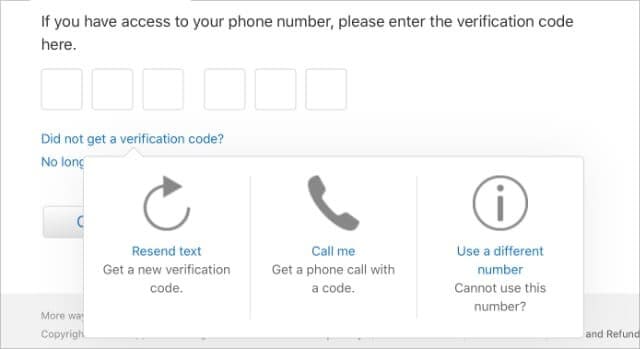
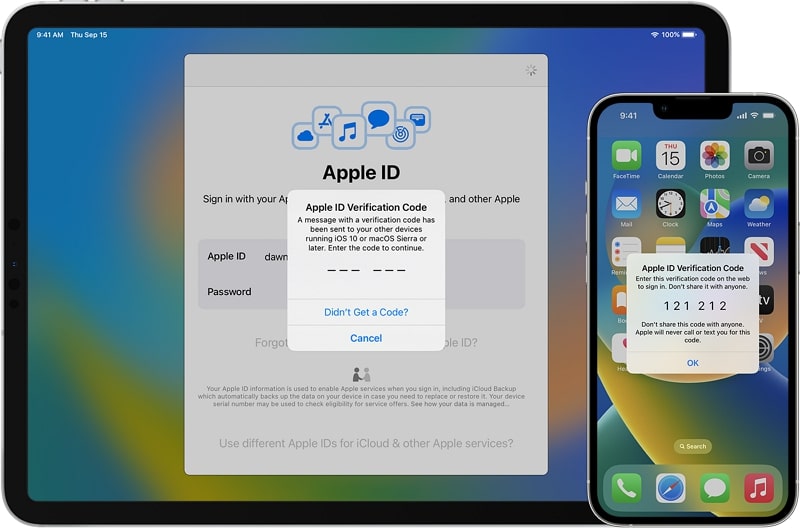
Step 3: Use the Verification Code
The platform will send a verification code that would allow you to unlock your device with the Recovery Key that is offered. Tap on “Unable to access your [device]“? to allow the platform to send a six-digit verification to the phone number that is attached to the Apple ID. You can simply use it along with the Apple ID password to unlock your account.
Conclusion
This article has provided you a detailed guide over the existing reasons that would have your Apple account disabled, followed by different tips that can be followed to cover your assorted problems efficiently.
Apple ID Locked for Security Reasons On Apple iPhone 13 Pro Max? Find the Best Solution Here
Apple ID is the main functional unit in the smooth and secure operation of Apple devices. This ID is the gateway towards many services, including iCloud, App Store, and more. In the context of these security concerns, Apple ID could get locked out for various reasons, like Apple ID locked for security reasons. This happens just because the security feature in the operating system detects some fictitious activity.
However, you don’t need to worry about your Apple ID locked for security reasons because solutions to these problems do exist. In this article, we will also provide one significant and effective solution to tackle such issues effortlessly.
Part 1. Exploring the Causes of Apple ID Locked Out for Security Purposes
Has your Apple ID been locked for security reasons, and is this problem creating some tension for you? Before we move further towards its solutions, it’s essential to know the reasons that lead to these problems. Some of them are explained below in a comprehensive manner:
1. Incorrect Attempts
Apple locks your Apple ID mainly when you or someone else has entered the password incorrectly multiple times. This is one of the most common reasons, and mostly, this happens by the original users themselves unintentionally.
2. Preventing Fraudulence
If there are unauthorized purchases or suspicious transactions on your ID, Apple may consider locking it to prevent that activity. It happens to protect the user’s financial information and to avoid any fraudulent activity from being done on that Apple ID.
3. Using Third-Party Tools
Sometimes, when using third-party tools based on open-source iCloud sources, the Apple ID could get locked. Developers can integrate iCloud features into their applications to provide users with improved accessibility to their iCloud data.
4. Security Breach Reasons
The ID can also get locked when Apple senses a potential security breach, which could lead to the exposure of your credentials. It may occur when someone tries to hack your ID to get some information, especially when it is being used in multiple areas.
5. Incorrect Security Questions
It may be due to the security questions you or someone else has entered incorrectly too many times. This is another common reason because, most often, the security questions are forgotten by the user. Ultimately, this leads to your Apple ID being locked for security reasons.
Part 2. Resolving the Apple ID Locked Out For Security Reasons by Resetting The Password
The basic solution to the Apple ID locked for security reasons is to reset the ID’s password. Apple also recommends adopting this method if you feel any suspicious activity. The password for your Apple ID can be reset from the iOS device itself or the Mac. We are providing a simple guide to reset your password either way.
Resetting Password From iOS Device
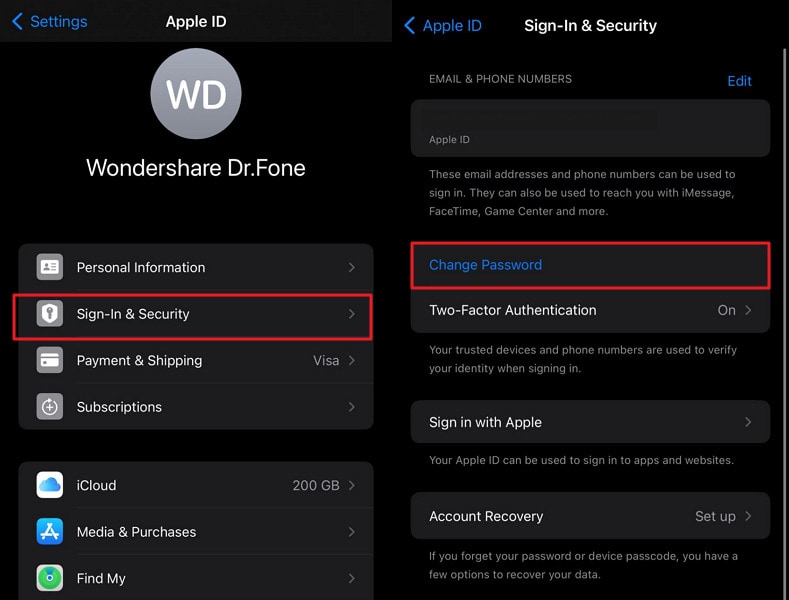
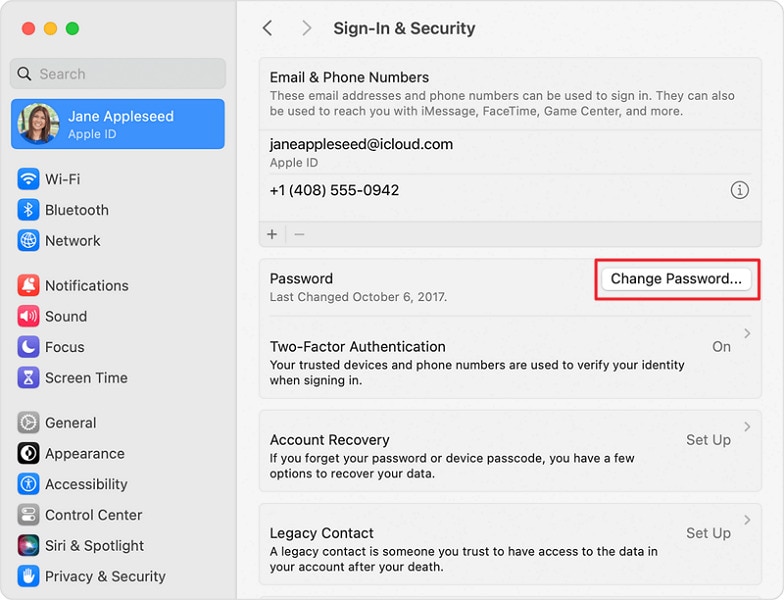
Instructions: To reset your Apple ID password using your iOS device, open the “Settings” app and move ahead by tapping on your name in front of you. Then, continue to select the “Sign-In & Security” option and select “Change Password.” Follow the prompts on the screen to complete the Apple ID password change process.
Resetting Password From Mac
Instructions: Start by tapping the Apple logo in the top left corner of your screen and choosing the option “System Settings.” Upon completion of this step, you have to access your Apple ID settings and proceed by selecting the “Sign-In & Security” option. Subsequently, opt for the “Change Password” feature to modify your Apple ID password.
Part 3. Resolving the Apple ID Locked Out for Security Reasons by iForgot Website
You have tried to resolve the problematic message indicating, “This Apple ID has been locked,” but resetting the password is not helping. Then, you need to try iforgot.apple.com, which will help you tackle this issue quickly. Here is how to resolve your Apple ID, which has been locked for security reasons, using the iforgot.apple.com website.
- Step 1: To begin with, you will have to browse the website iforgot.apple.com on your computer. Once the website has loaded, move ahead by pressing the “Reset Password” and selecting the “Continue” option after entering the Apple ID.

- Step 2: In the next stage, you need to reset your password, and for that, you need to go through a verification process sent to your trusted device. You can reset the Apple ID password by tapping the “Allow” button. Following this, you must provide the trusted device passcode to initiate the password reset process.

Part 4. Resolving the Apple ID Locked Out for Security Reasons by Apple Support App
If your Apple ID is still inaccessible after implementing the methods, you can try the Apple Support app. This technique can be applied by arranging another device for downloading the Apple Support app. Users can regain access to their Apple ID and restore full device functionality through this app. The simple guide to perform this action is explained below step-wise:
- Step 1: You need to download the Apple Support App on the borrowed device and proceed to open it. After that, navigate to the “Support Tools” section, find the “Reset Password” option, and tap on it.
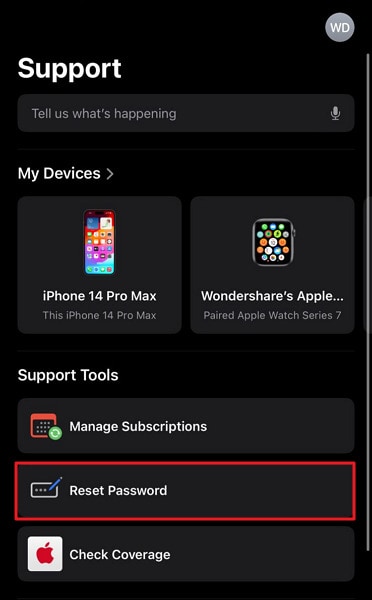
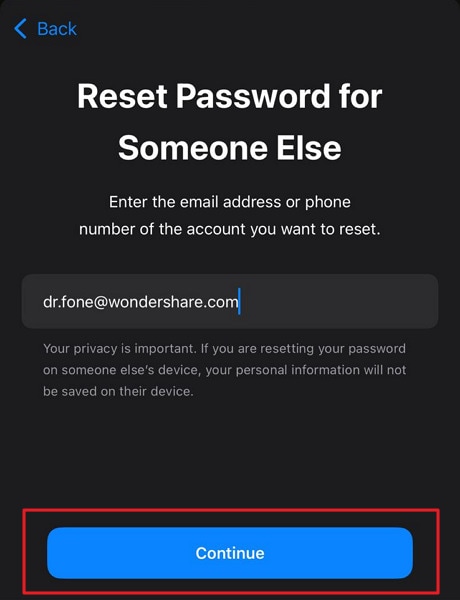
- Step 2: Choose the “Help Someone Else” option to continue. Then, give your Apple ID and hit the “Continue” button. There, you have to follow the on-screen instructions to reset your password and get access to it.
Part 5. No Solution Yet? Try Wondershare Dr.Fone – Screen Unlock (iOS) To Unlock Locked Apple ID for Security Reasons
When facing an Apple ID locked for security reasons, it becomes imperative to seek a reliable solution. All essential operations within iOS devices are intertwined with the functionality of the Apple ID. That’s why a viable resolution is crucial for seamless device usability. In such situations, Wondershare Dr.Fone emerges as a highly effective option.
It is specifically designed to tackle the intricacies of iOS device management. This tool offers a dedicated feature to unlock Apple IDs, making it the ultimate recourse. Additionally, it allows you to bypass the iCloud activation lock without requiring a password. This iOS screen unlock tool is fully compatible with the latest versions of iOS 17 and iPadOS 17.
Key Features of Wondershare Dr.Fone
- Using Wondershare Dr.Fone, you can also remove the Apple ID or screen lock from the latest iPhone 15 models.
- You can also manage your Apple iPhone 13 Pro Max data transfer or fix iDevice system issues with the help of Wondershare Dr.Fone.
- This tool can also help its users to remove the Screen Time Passcode and SIM lock.
How To Use Wondershare Dr.Fone To Unlock Locked Apple ID for Security Reasons
Summarized below is the detailed step-by-step process of using Wondershare Dr.Fone to unlock your Apple ID:
- Step 1: Navigate to the Remove Apple ID Feature
With Wondershare Dr.Fone launched, move to the “Toolbox” tab and access “Screen Unlock.” Then choose “iOS” as your device type, and on the following screen, press “Remove Apple ID.” Now is the time to connect your Apple iPhone 13 Pro Max to the computer and let Wondershare Dr.Fone detect it.
- Step 2: Enable 2FA on Your iOS Device
To proceed further, it is imperative to have screen lock and 2FA enabled on your iOS device. If it already isn’t, do it and move to put your device in Recovery Mode. Dr.Fone will guide you through the process of enabling Recovery Mode on your device. Once Wondershare Dr.Fone detects your device in Recovery Mode, it will display your device model.

- Step 3: Complete the Apple ID Unlocking Process
Now choose “System Version” and tap “Start” to let Dr.Fone download the firmware. Once it is downloaded and verified, tap “Unlock Now.” The last step involves putting the confirmation code in the confirmation prompt and pressing “Unlock.” In a few moments, Wondershare Dr.Fone will unlock your Apple ID.

Final Words
To conclude, there are scenarios that can lead to the Apple ID being locked for security reasons problem. Apple does this for your benefit. However, we have explained different methods to get you out of this situation. Although all of these methods possess the potential to resolve this problem, Wondershare Dr.Fone offers a powerful platform for more in-depth remedies.
This robust iOS toolkit feature performs this recovery in seconds, saving you time. Also, it has a simple interface for its users with various technical exposure. In short, it is the best solution if your Apple ID has been locked for security reasons.
How To Remove the Two Factor Authentication On Apple iPhone 13 Pro Max
Want To Remove the Two Factor Authentication? Check Out This Guide

Continuous technology innovation has introduced many advanced encryption and security methods to protect data from hackers. With these innovations, companies like Apple and Google have introduced the two-factor authentication process to protect user data.
But sometimes, this security method becomes a hassle to access your data daily, due to which many users try to remove it. That is why, in this article, we have discussed how you can remove iCloud two-factor authentication easily.
- Part 1: What Is Two-Factor Authentication and How Helpful It Is
- Part 2: Can You Remove the Two Factor Authentication iCloud at Anytime
- Part 3: How To Remove the Two-Factor Authentication Within 14 Days
- Part 4: iPhone Apple ID Got Locked? Here’s a Reliable Tool To Get It Unlocked Without Passcode

Part 1: What Is Two-Factor Authentication and How Helpful It Is
Protecting users’ devices and online accounts is one of the major responsibilities of tech companies like Apple. Due to this, they have added multiple security features, including two-factor authentication. Thus, if you create an Apple ID, you can see a two-factor authentication option that adds an extra layer of security.
2FA is activated when the user provides the password to log into the Apple ID or software through a new device, and it acts as a second layer for account security. Apple ID or any software containing sensitive data cannot be accessed without it. This method provides a higher security level than single-factor authentication. To understand more benefits of this security system in detail, check the following points:
- Protection From Password Theft: 2FA acts as an additional security level. It protects your accounts and devices in case your password is leaked.
- Migrations of Unauthorized Assets: Online banking applications use 2FA to protect users from unauthorized bank transfers. If someone accesses their app, this is a beneficial security measure.
- Protection on Multiple Services: Platforms, including social media, banks, and cloud storage, use 2FA. It means that 2FA can be used in various digital aspects.
Part 2: Can You Remove the Two Factor Authentication iCloud at Anytime
Many people use 2FA globally to protect their personal information and devices from hackers and unauthorized access. However, in some cases, users may want to remove two-factor authentication iCloud for multiple reasons. This includes scenarios in which their device is lost or damaged or if they have found a better security option than this one.
Moreover, there is one important key point to note: Apple has removed the feature of deactivating 2FA from the Apple ID. It means you need to think twice before activating this feature on your Apple ID because it cannot be reversed. For the following reasons, Apple has taken this initiative:
- Enhanced Security: By removing the deactivation option for 2FA, Apple is trying to strengthen its account security to ensure that no one can access its user’s data.
- Reducing Vulnerabilities: Allowing users to deactivate 2FA could cause vulnerabilities in the Apple ecosystem that can be a weak point for protecting users’ data. That is why Apple has removed the deactivation option to stop malicious actors from taking advantage of this vulnerability.
- Encouraging Security Awareness: To make Apple users more security conscious, Apple has made it difficult on purpose to remove 2FA. It helps users to be more confident in Apple services and products.
- Minimizing Mistakenly Steps: If users mistakenly remove the 2FA, their accounts and devices are at risk of being accessed without proper authentication. To avoid such an issue, the deactivation option of 2FA is removed.
Besides all these reasons, there is still some good news for those who want to remove the two-factor authentication iPhone to use other security options. The good news is that Apple allows users to remove 2FA for a limited time after activation.
Part 3: How To Remove the Two-Factor Authentication Within 14 Days
As explained in the last part, Apple has made removing the 2FA option from Apple ID challenging for several security reasons. Thus, if you want to remove 2FA from your Apple ID, you have only 14 days after activating this feature. To understand how to disable iCloud two-factor authentication within this given time, check the following steps:
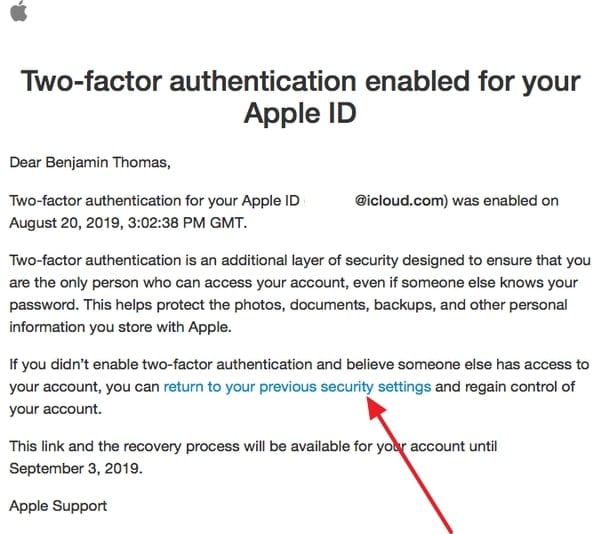
- Step 1. Once you have activated the 2FA feature, your 14-day grace period will start eventually. To deactivate this, open the enrollment email you received from Apple regarding 2FA on your Apple ID.
- Step 2. Scroll to the bottom of this email and select the link or button to return to your account security & settings section. There, follow the on-screen instructions to deactivate the 2FA of your Apple ID.
Part 4: iPhone Apple ID Got Locked? Here’s a Reliable Tool To Get It Unlocked Without Passcode
If you mistakenly got your Apple ID locked due to entering the wrong password multiple times, there is no need to stress it out. It is a common issue that many people forget their Apple ID password and cannot access it. Due to this, we have got you a perfect solution to unlock your Apple ID without a passcode.
This solution is the Wondershare Dr.Fone - Screen Unlock (iOS) tool specially designed to help users remove their iPhone and iPod lock screens. It is compatible with the latest iOS devices and assists in removing various types of lock screens, including Touch ID and Face ID.
Key Features
- This iOS screen unlock tool assists users in bypassing MDM without data loss and other technical errors.
- iCloud activation lock and iTunes backup encryption can be bypassed without a password in just a few steps.
- iPhone 15 and the latest versions of iOS 17/iPadOS 17 are supported by this tool to help users professionally.
Simplified Steps for Unlocking Apple ID With Wondershare Dr.Fone
To help you use this AI-powered screen unlock tool for unlocking the Apple ID without a password, follow the process we have mentioned below for your ease:
- Step 1. Access the Toolbox and Choose the Respective Option
Initiate the process by accessing Wondershare Dr.Fone’s latest version on your computer and tapping on the “Toolbox” option from its left side toolbar. Following this, choose “Screen Unlock” from the list of tools and tap “Remove Apple ID” in the next window.

- Step 2. Make Sure That the Apple iPhone 13 Pro Max Is Connected to the Computer
Then, connect your Apple iPhone 13 Pro Max to your computer using a USB cable so that you can see its connectivity status. Once the status is displayed on a new window, hit the “Unlock Now” button to proceed. Answer some questions that are asked by the platform, and with this, ensure that your device’s “Screen Lock” and “Two-Factor Authentication” are enabled or disabled.

- Step 3. Select the System Version and Proceed Ahead
In this step, enable Recovery Mode by following the on-screen instructions. It will help the platform detect the connected device model, with which you will need to select “System Version.” Afterward, you can hit the “Start” button to proceed ahead.

- Step 4. Start the Apple ID Unlocking Process
The respective iOS firmware will download according to the Apple iPhone 13 Pro Max device model and system version. After it is downloaded, the platform will verify it for you, based on which you can tap the “Unlock Now” option to get your Apple ID unlocked successfully.
Conclusion
With this, we hope you understand how to disable iCloud two-factor authentication. However, remember that doing this is only possible within 14 days of a grace period. If this period is over, you cannot remove 2FA from your Apple ID.
Moreover, if you have locked your Apple ID passcode, using Wondershare Dr.Fone to unlock it can be the perfect option. While using this tool, you also don’t have to worry about screen locks on different iOS devices. This is because the innovative algorithms integrated in this tool make it easier to use for unlocking the Apple ID or screen lock.
Also read:
- [New] 2024 Approved Navigating Full HD Display on Twitter Videos
- [New] Making the Most of Your Multi-Image Story Sessions on Insta for 2024
- [Updated] Spectacular Gaming Capture Options for 2024
- Apple ID Locked for Security Reasons On iPhone SE (2020)? Find the Best Solution Here
- Can I Remove the Apple Watch Activation Lock By iPhone SE (2020) without the Previous Owner?
- Creating an Automatic iTunes Addition Folder for Windows 11 and 10 Users: Top Tips and Tricks
- Effective Methods to Break Free From the Dell Continuous Reboot Cycle on Windows 10
- Gratuit Konverteren Van MPEG Tot WMV: Een Online Noodgevraag Met Movavi
- How to Fix Locked Apple ID from Apple iPhone 14
- How To Unlink Your Apple iPhone 11 Pro Max From Your Apple ID
- In 2024, How to Remove Apple iPhone SE (2022) Device from iCloud
- In 2024, The Best iSpoofer Alternative to Try On Infinix Hot 40i | Dr.fone
- In 2024, Troubleshooting Error Connecting to the Apple ID Server On Apple iPhone XS Max
- In 2024, Unlock Apple ID without Phone Number On Apple iPhone X
- Install Up-to-Date Quadro Driver Software on Your Windows 10 Machine | Official Downloads by NVIDIA
- Removing Device From Apple ID For your iPhone XS
- Upgrade Auf Ein Neues iPhone – Ersatz Ihres Alten Geräts Mit/Ohne Früheres Backup Nutzen
- Title: Why Apple Account Disabled On your iPhone 13 Pro Max? How to Fix
- Author: Alma
- Created at : 2024-11-10 03:37:01
- Updated at : 2024-11-16 23:58:27
- Link: https://apple-account.techidaily.com/why-apple-account-disabled-on-your-iphone-13-pro-max-how-to-fix-by-drfone-ios/
- License: This work is licensed under CC BY-NC-SA 4.0.